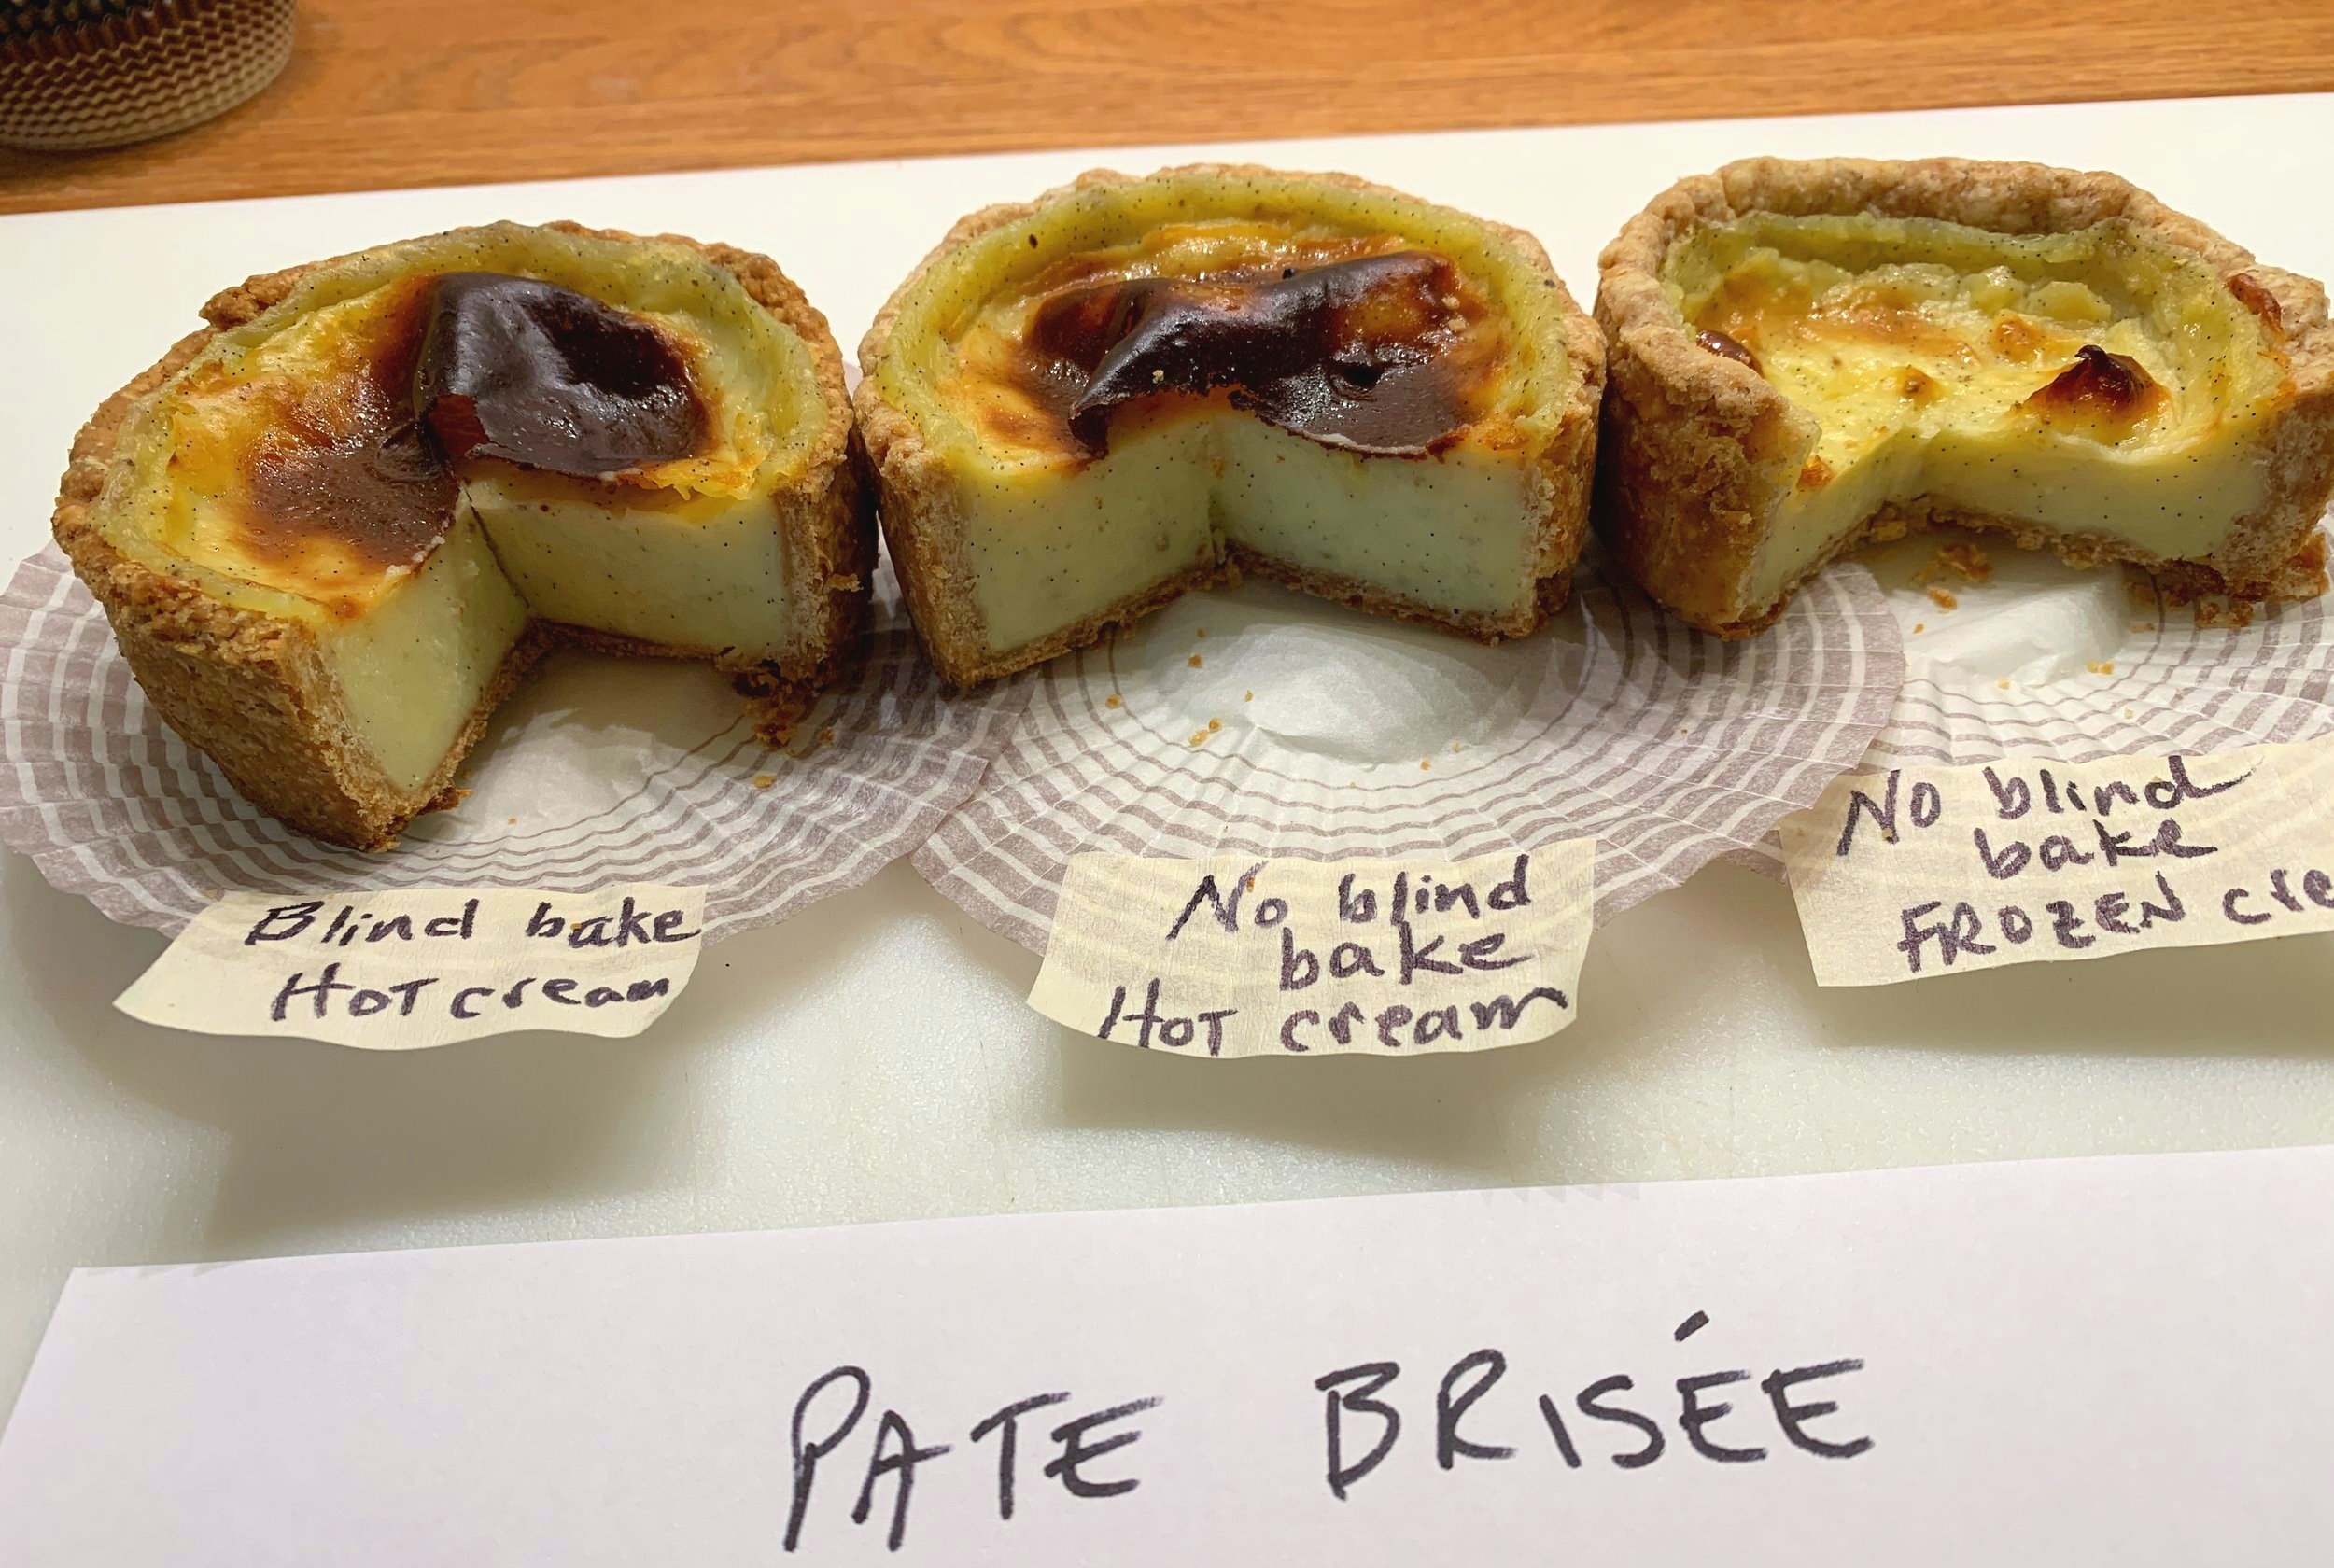
Pastel de Nata

Bom dia! Having recently returned from Portugal, I’m here to share my experience with pastel de Nata (pastel is the singular of pasteis), the classic custard tart seen everywhere in this small country.

This being our first visit to Spain’s petite neighbor, we enjoyed many experiences in spite of weather that was all over the place. We had coolish days with spurts of wind and rain and occasionally sunny breaks interspersed. So windy in fact that mid Portugal sustained damaging winds with many trees blown over or snapped off, metal road signs twisted into pretzels and debris strewn here and there. Our planned train trip from Lisbon to Porto was canceled (all trains going north were affected) but fortunately there were buses aplenty that got us to our destination in almost the same amount of time as the train. Gotta love it!

As many of you well know, I’m a huge fan of custard in most any form so I knew that when we were planning this trip to Lisbon and Porto, I should search for a class experience to learn the secrets of this delectable treat. And so I signed up for an afternoon session at Lisbon’s Nat’elier.

Turns out the shop was just a few blocks walk from our AirBnB so Steve and I decided to check it out a couple of days before my class.

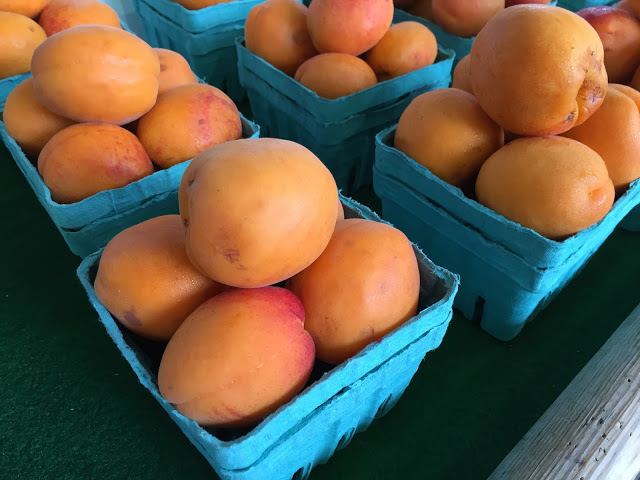
The case was chock full of pasteis (plural of pastel) in different flavors ranging from the traditional to a take on the currently popular Dubai chocolate bars; apple crumble, tiramisu, crème brulée and cherry were just a few of the many other options. The space is airy and open with seating on the main floor as well as on a wrap around sort of balcony offering a great view of the main space. There’s a robust coffee and drinks menu as well.

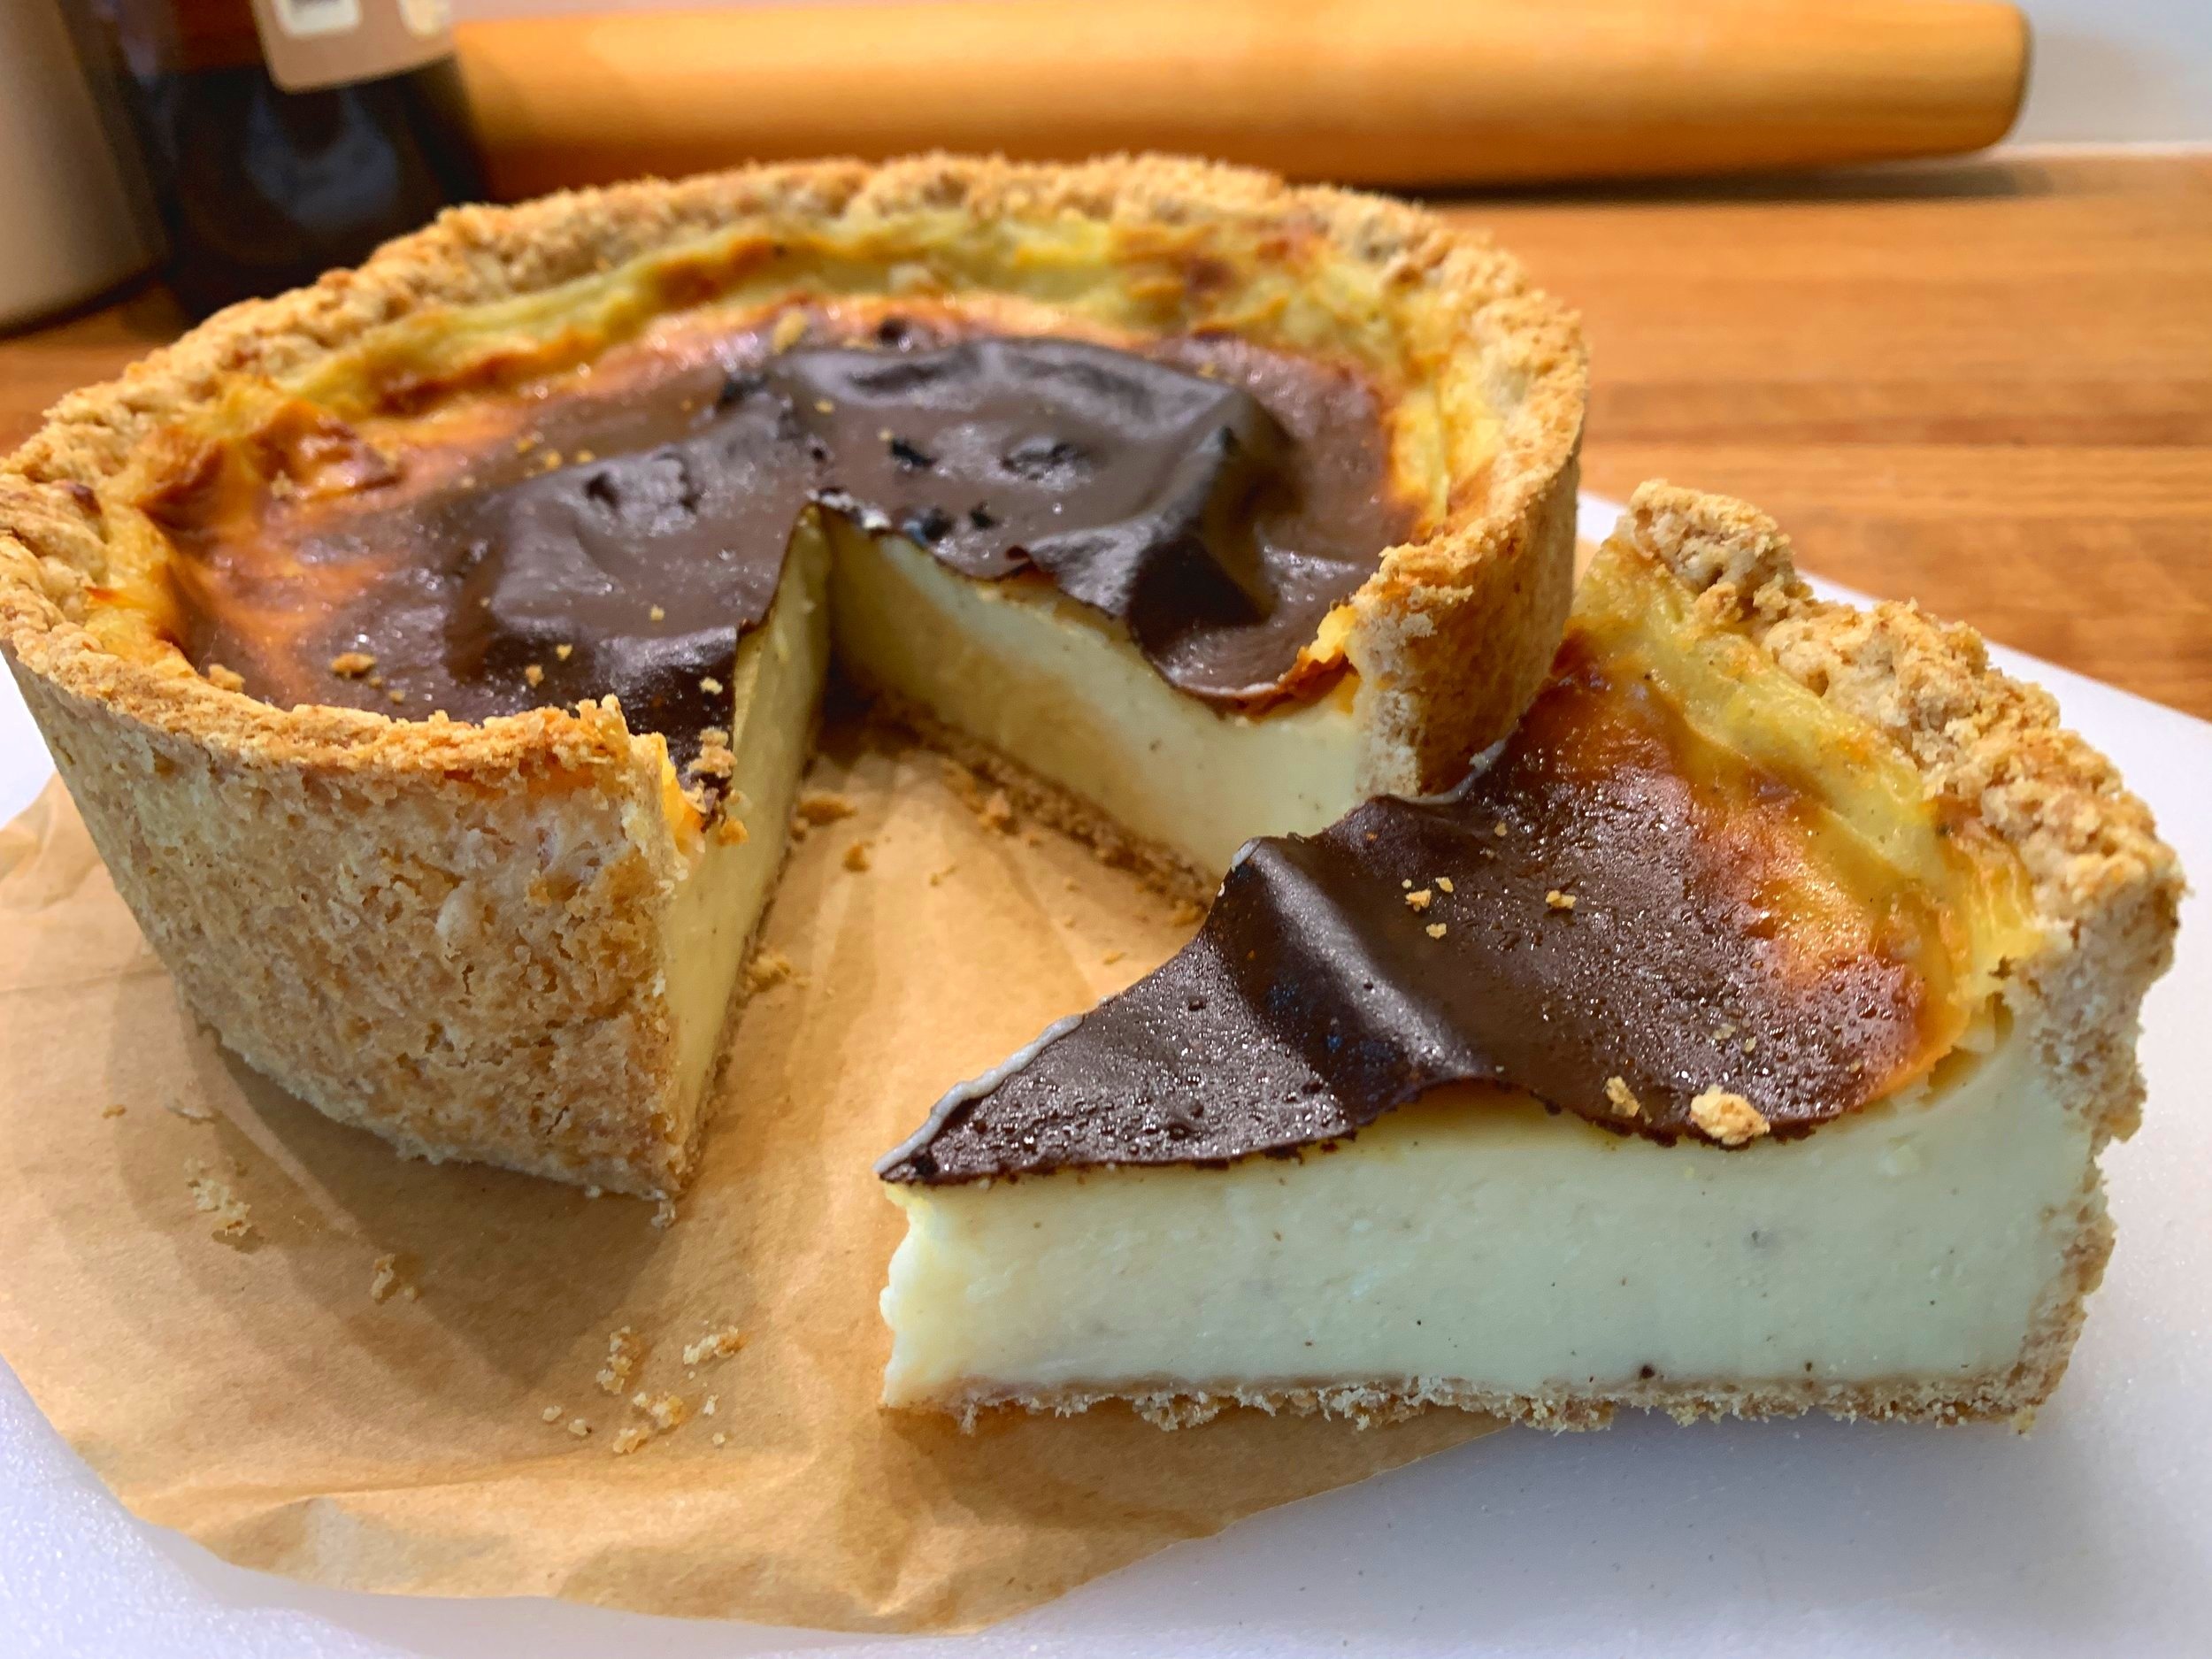
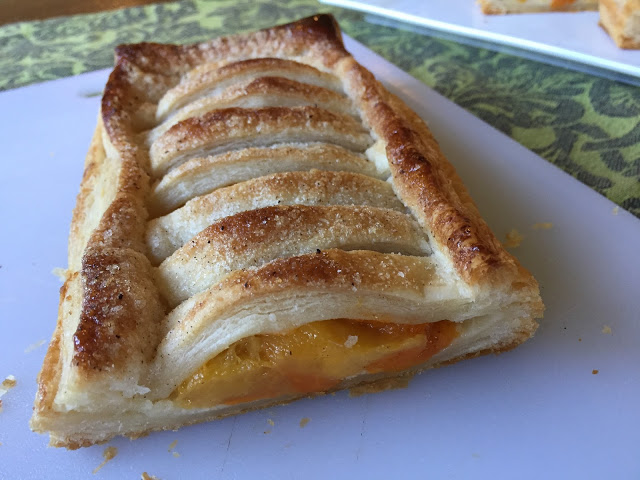
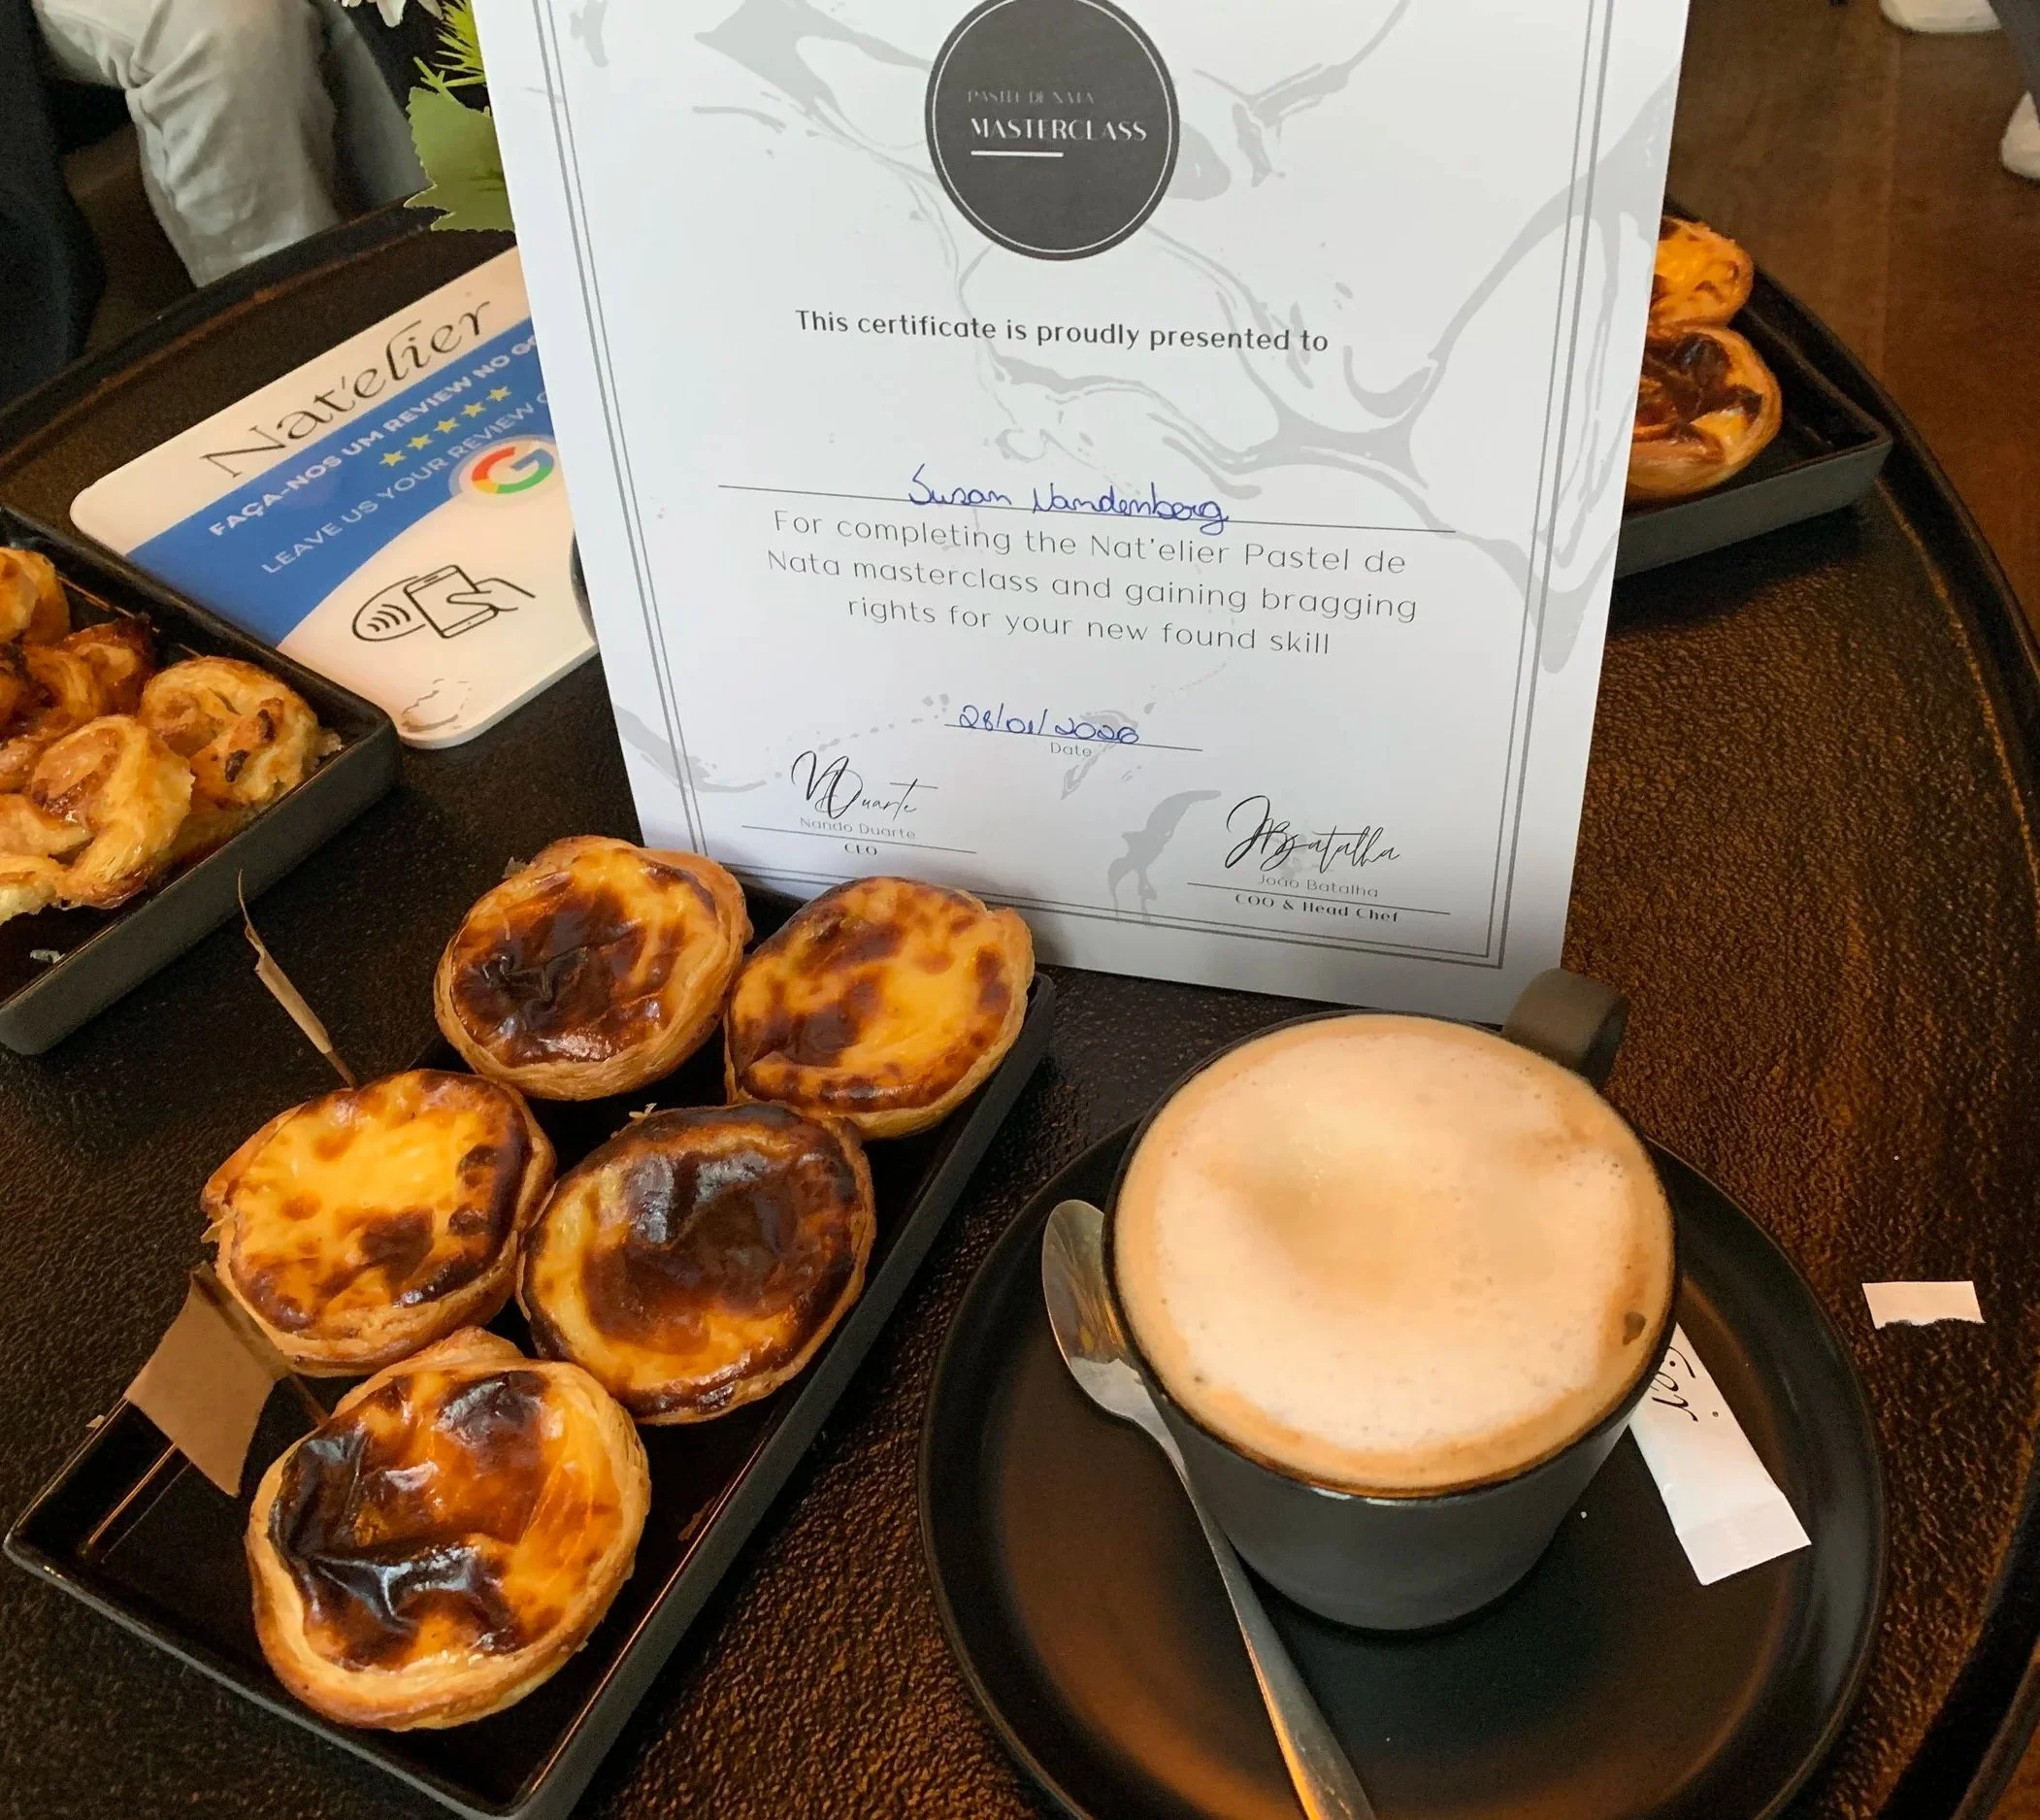
I chose the traditional pastel and Steve the Dubai version along with an espresso. I foolishly went with an over the top hot chocolate with whipped cream and caramel which made me wonder if I’d even want dinner ((I don’t indulge very often!)


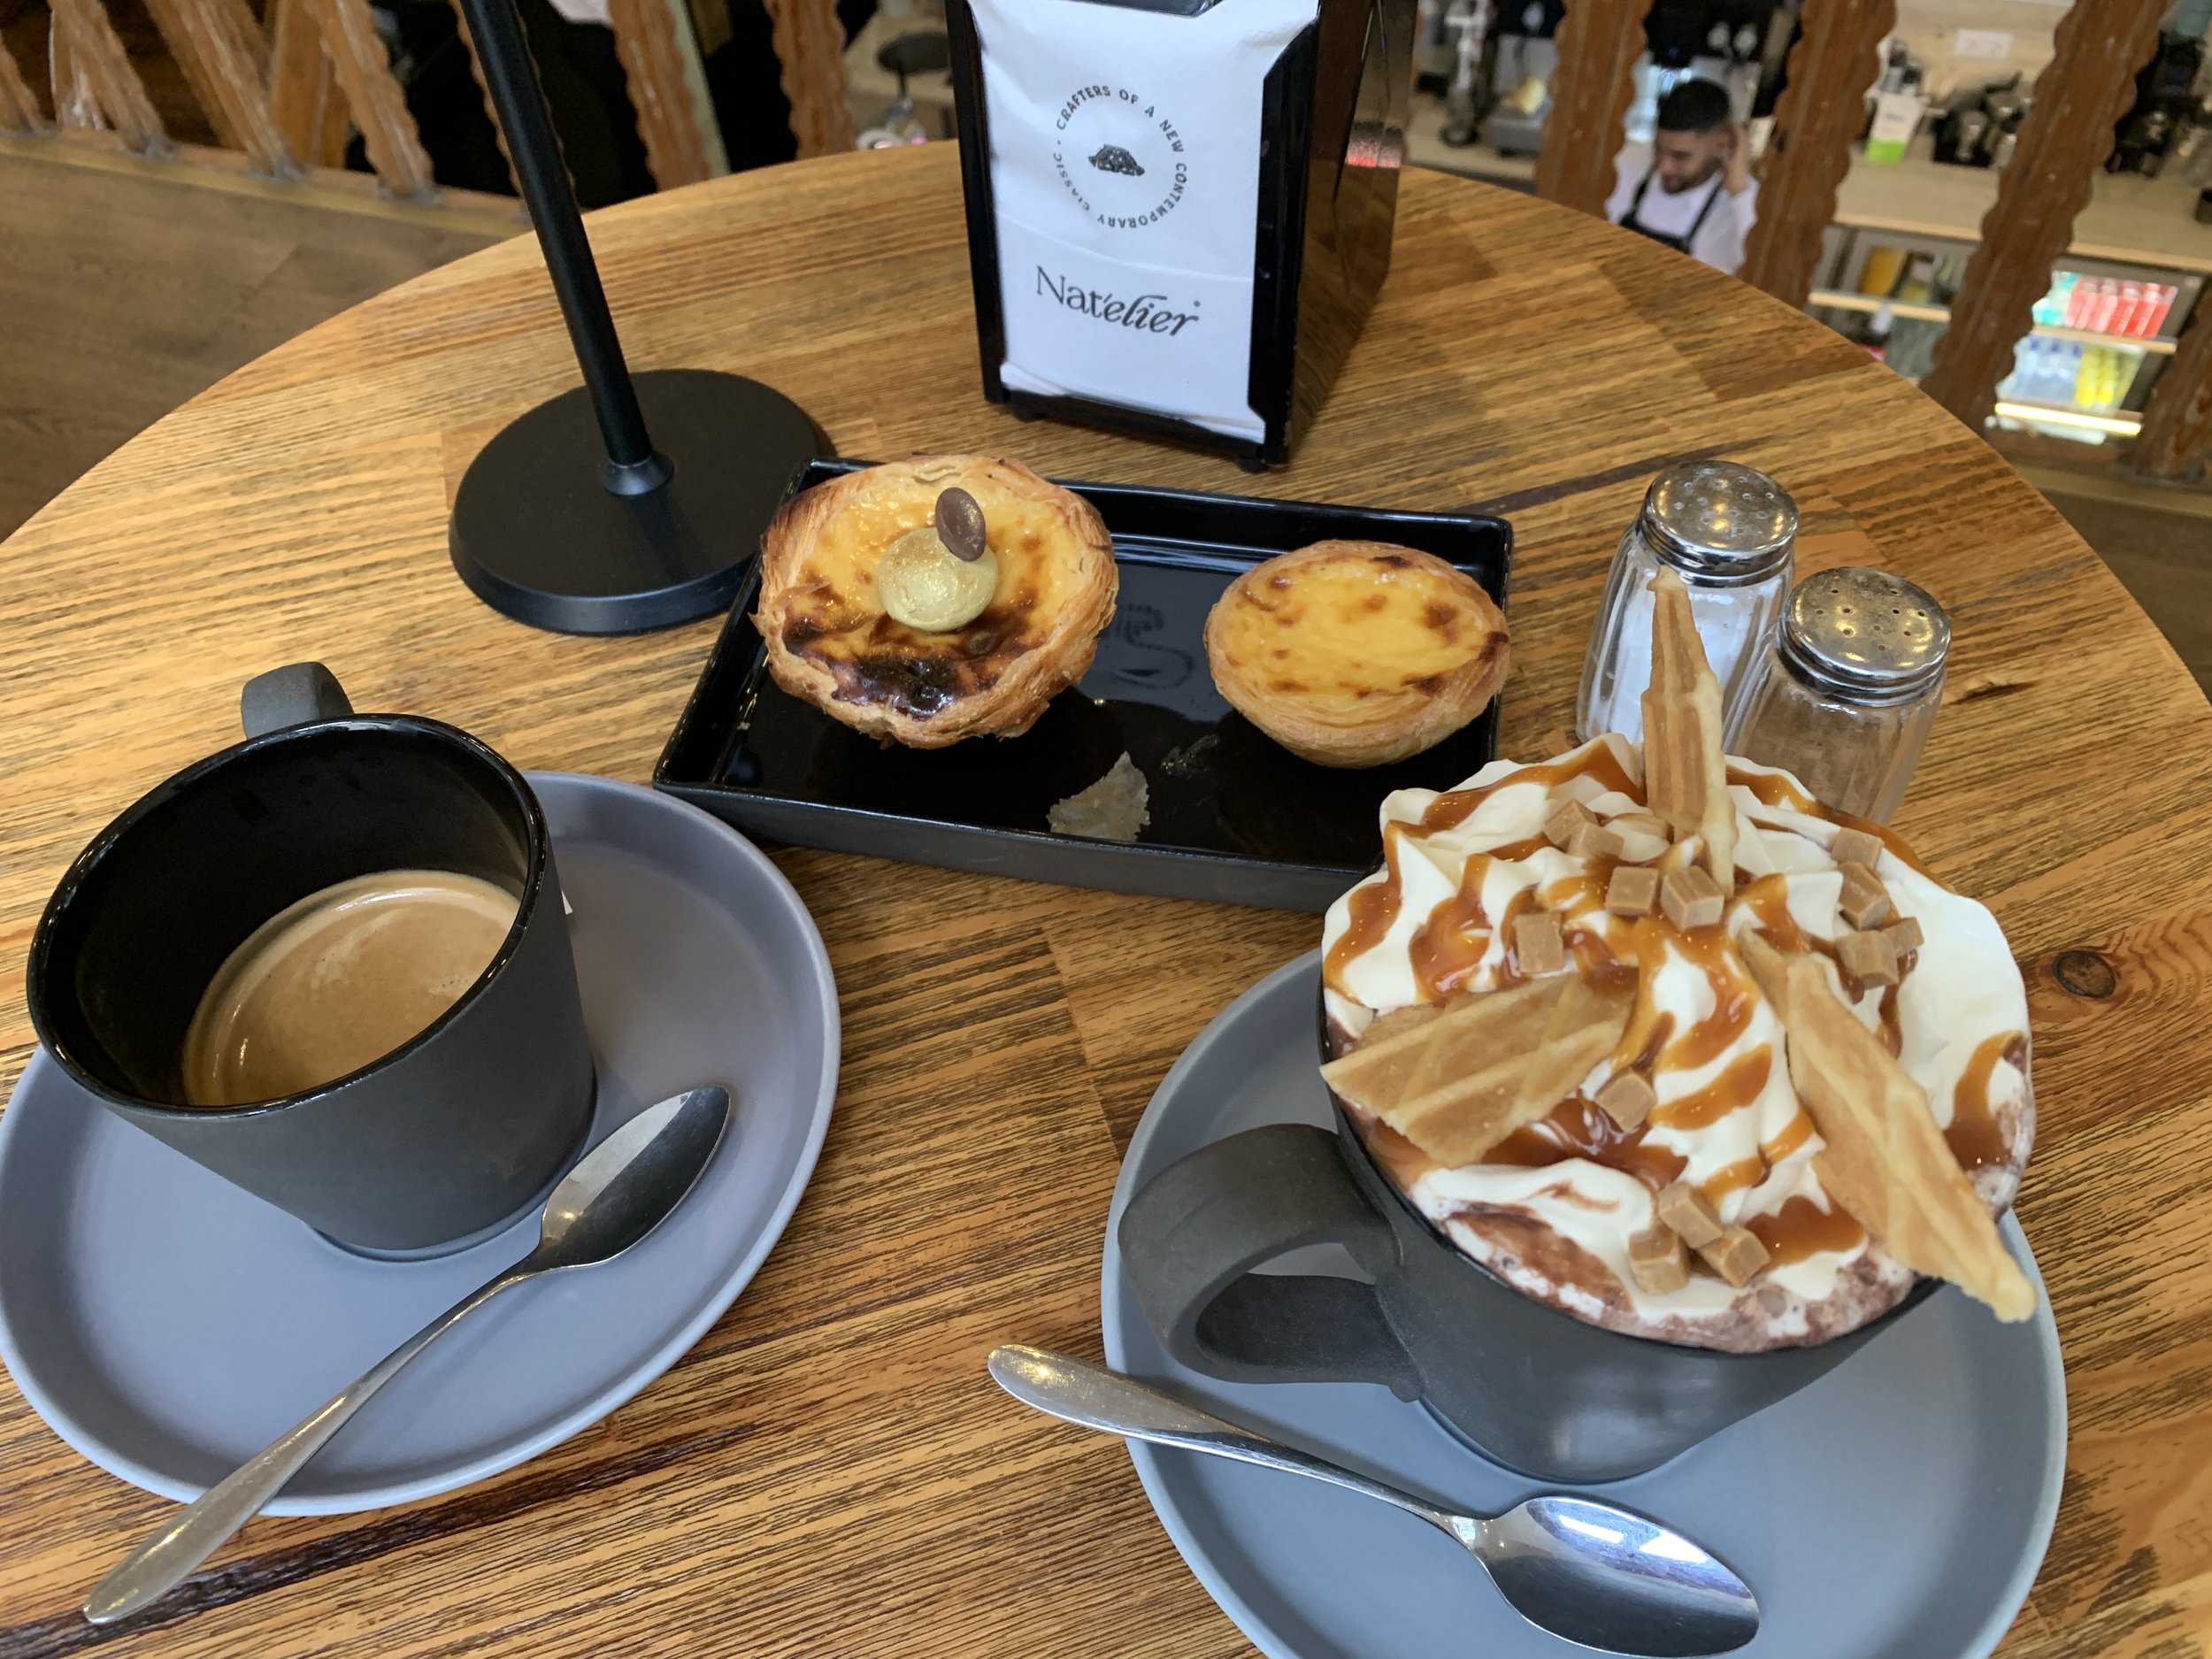
The pastry was crispy, flaky and delicious; the custard smooth with a hint of cinnamon. Steve’s Dubai tart had chocolate hidden under the custard and pistachio cream dolloped on top.

There happened to be a class going on that afternoon - we could see the activity through the windowed teaching kitchen at the back of the shop. My turn would come in a couple of days.

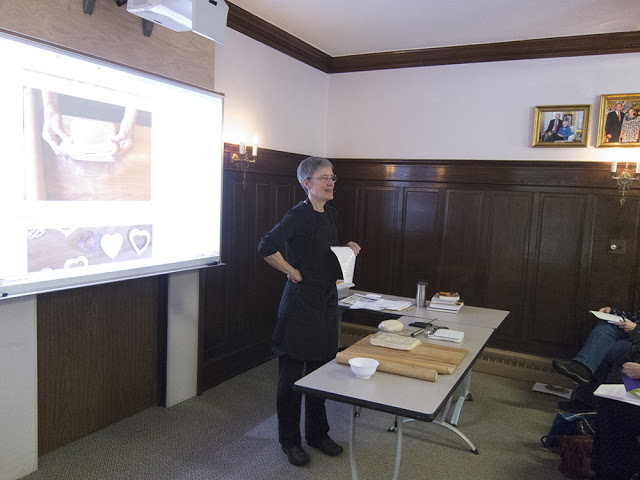
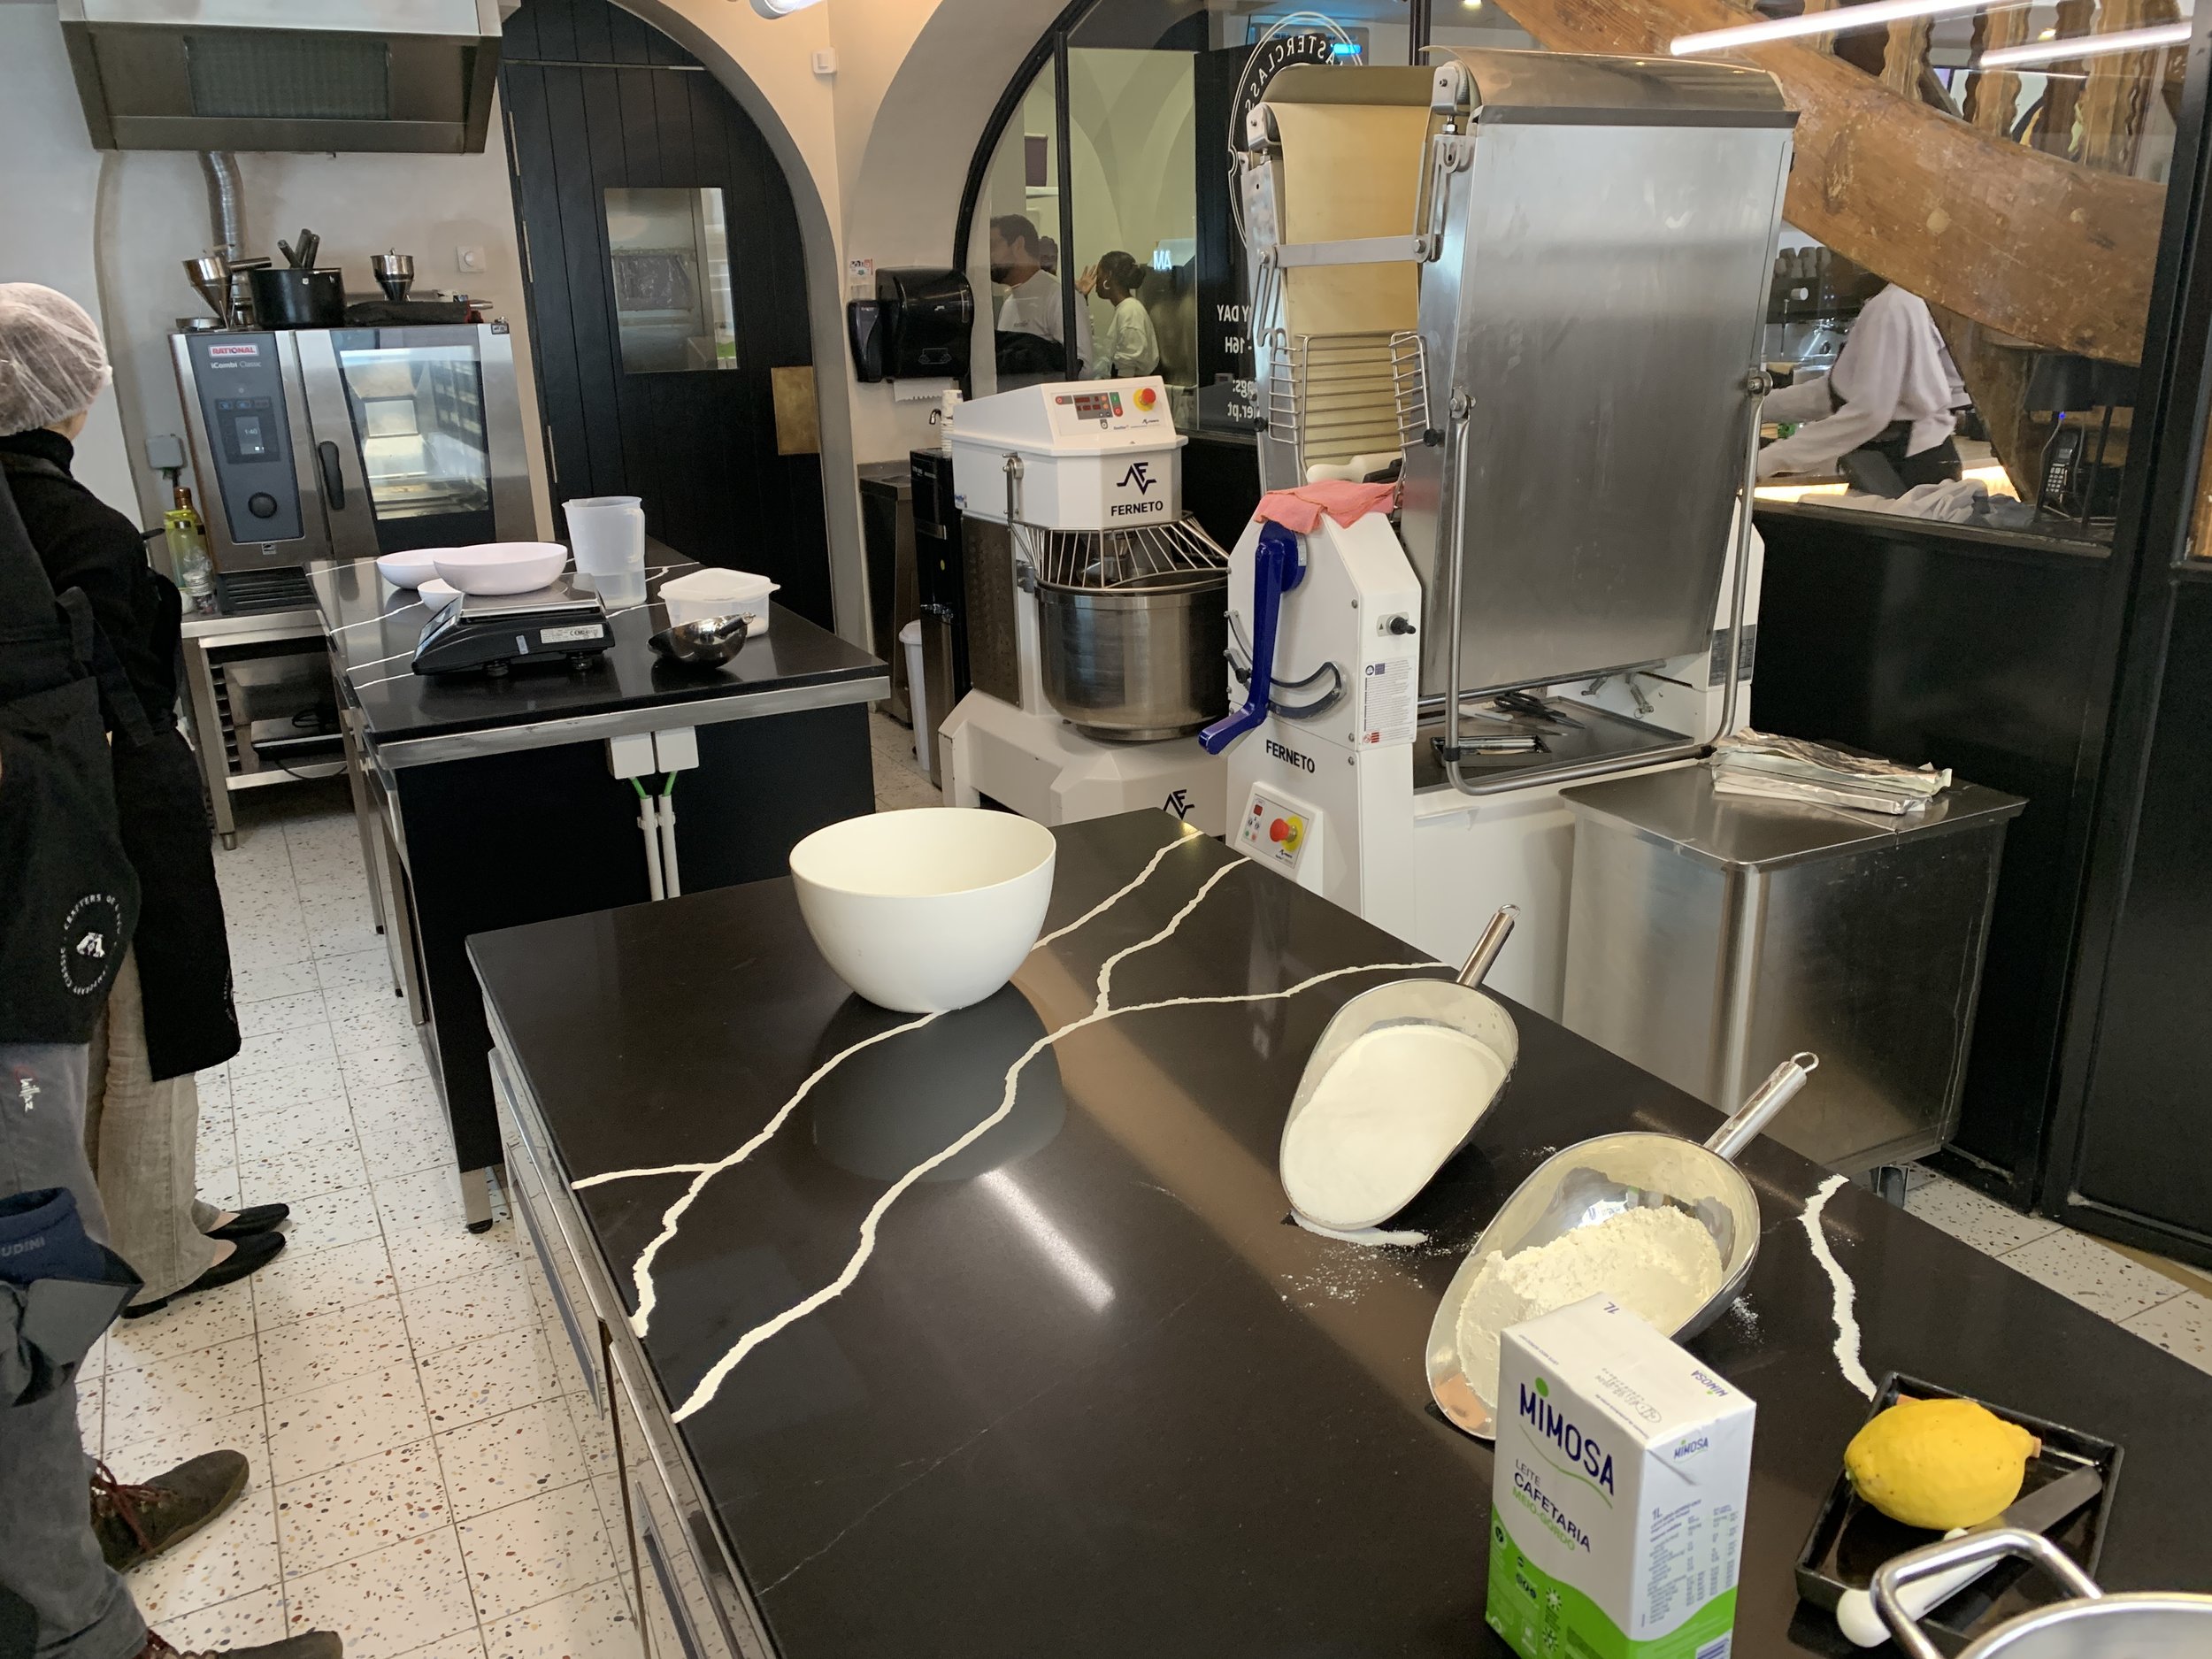
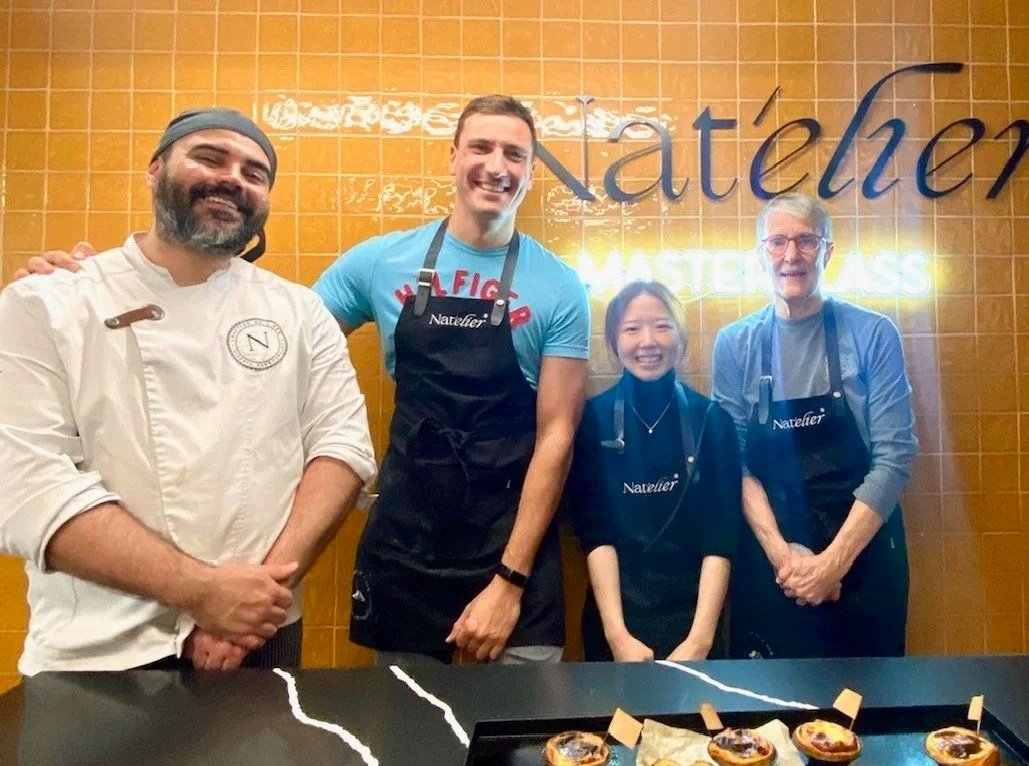
Whereas the class we had witnessed was chock full (I think they take a maximum of 12 in a class), my class had three attendees - Ulrich from Germany, Michi, a pastry chef from Japan and myself. The space is laid out simply with a couple of work tables, all essential tools, a sheeter, mixer, oven etc.


Our chef Adriano had come to Lisbon from Brazil and was able to speak English as well as some Japanese. Michi didn’t speak any English, while Ulrich spoke it fluently. Interesting how one can communicate even when not knowing a particular language. Somehow it just works.


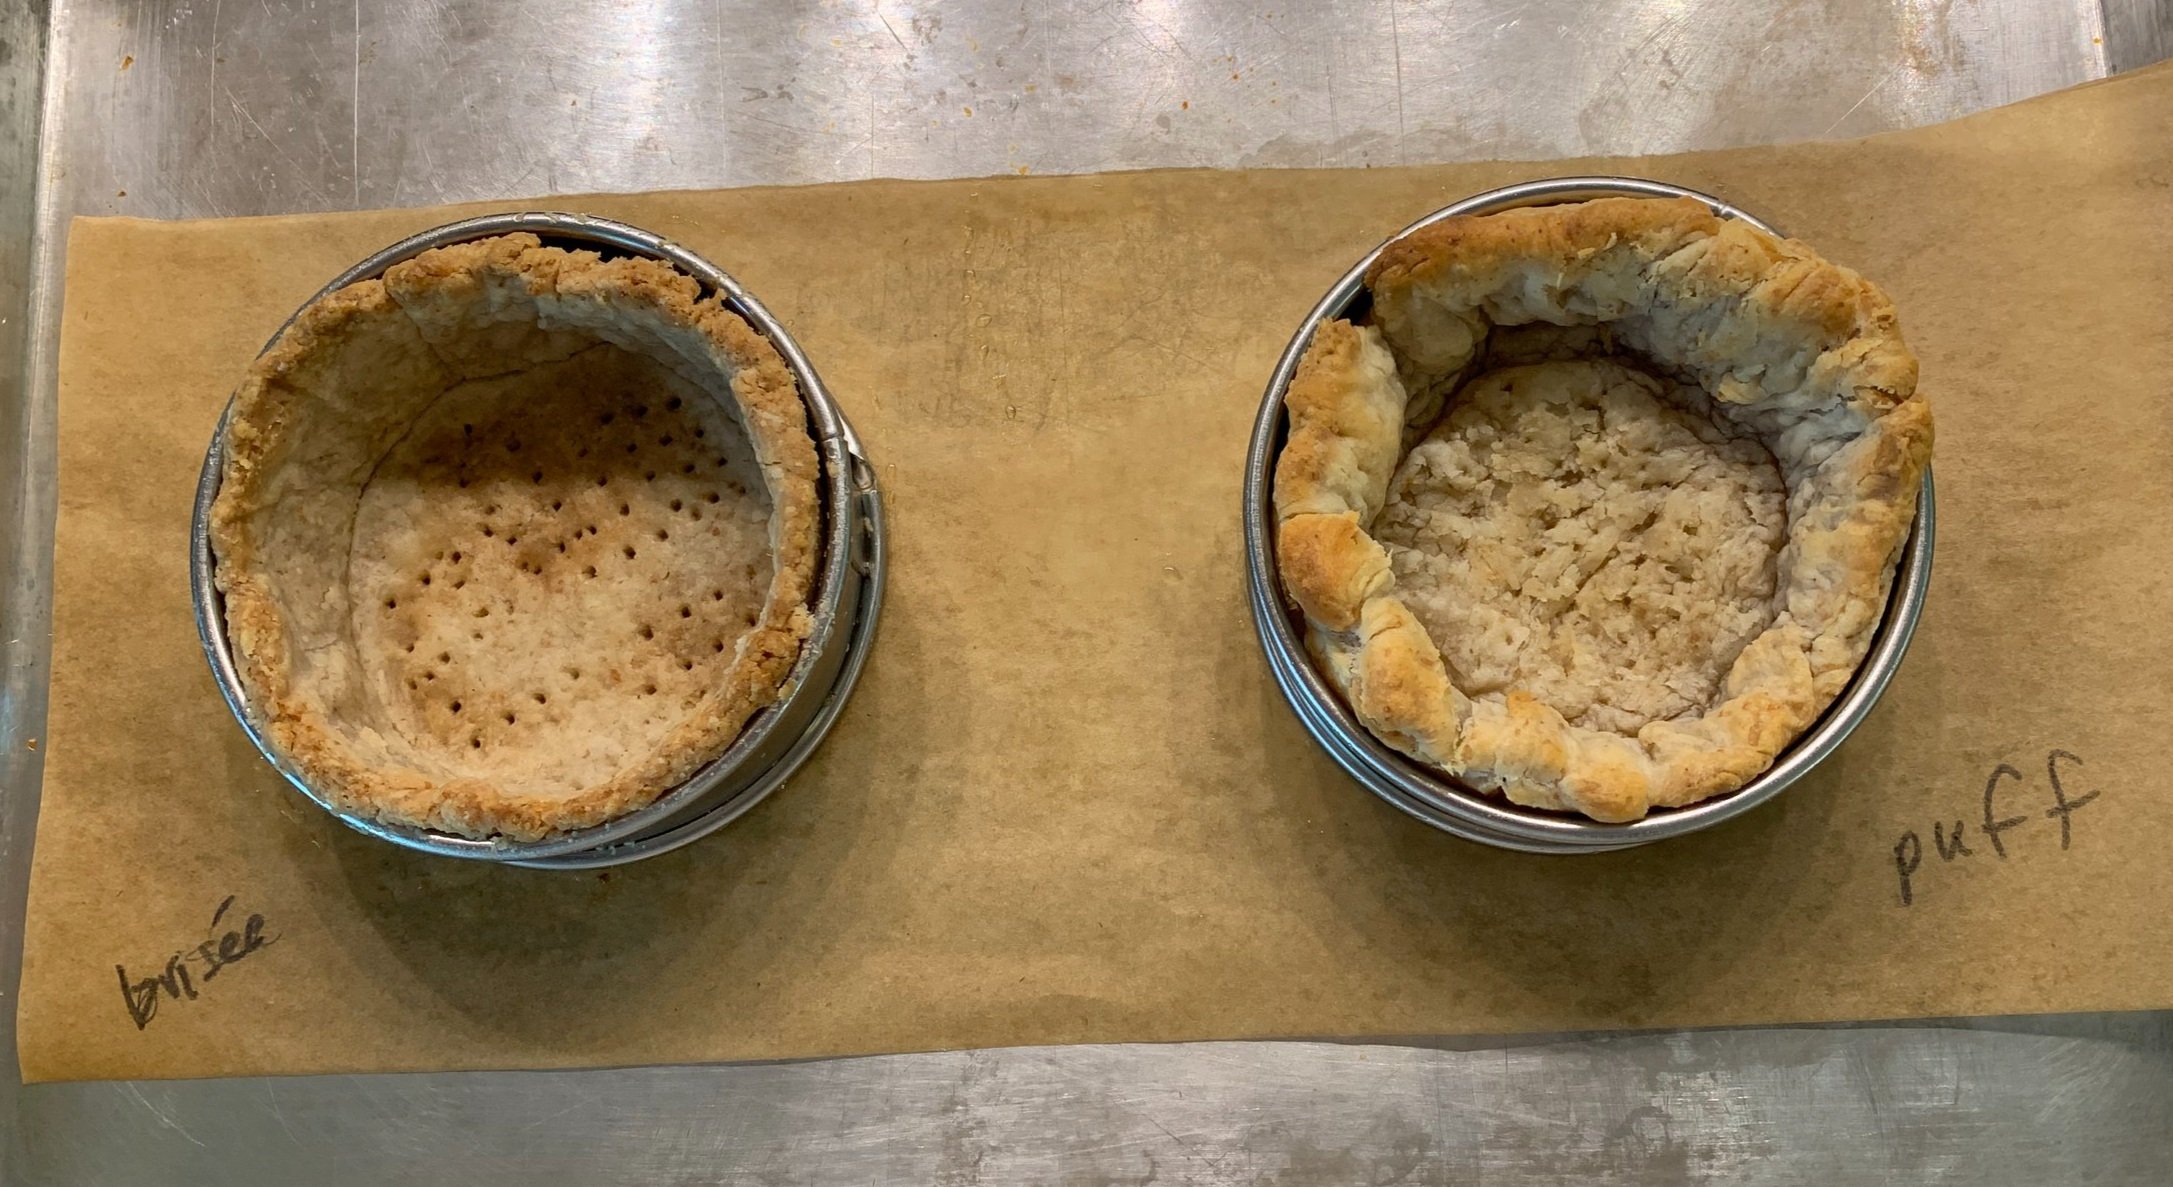
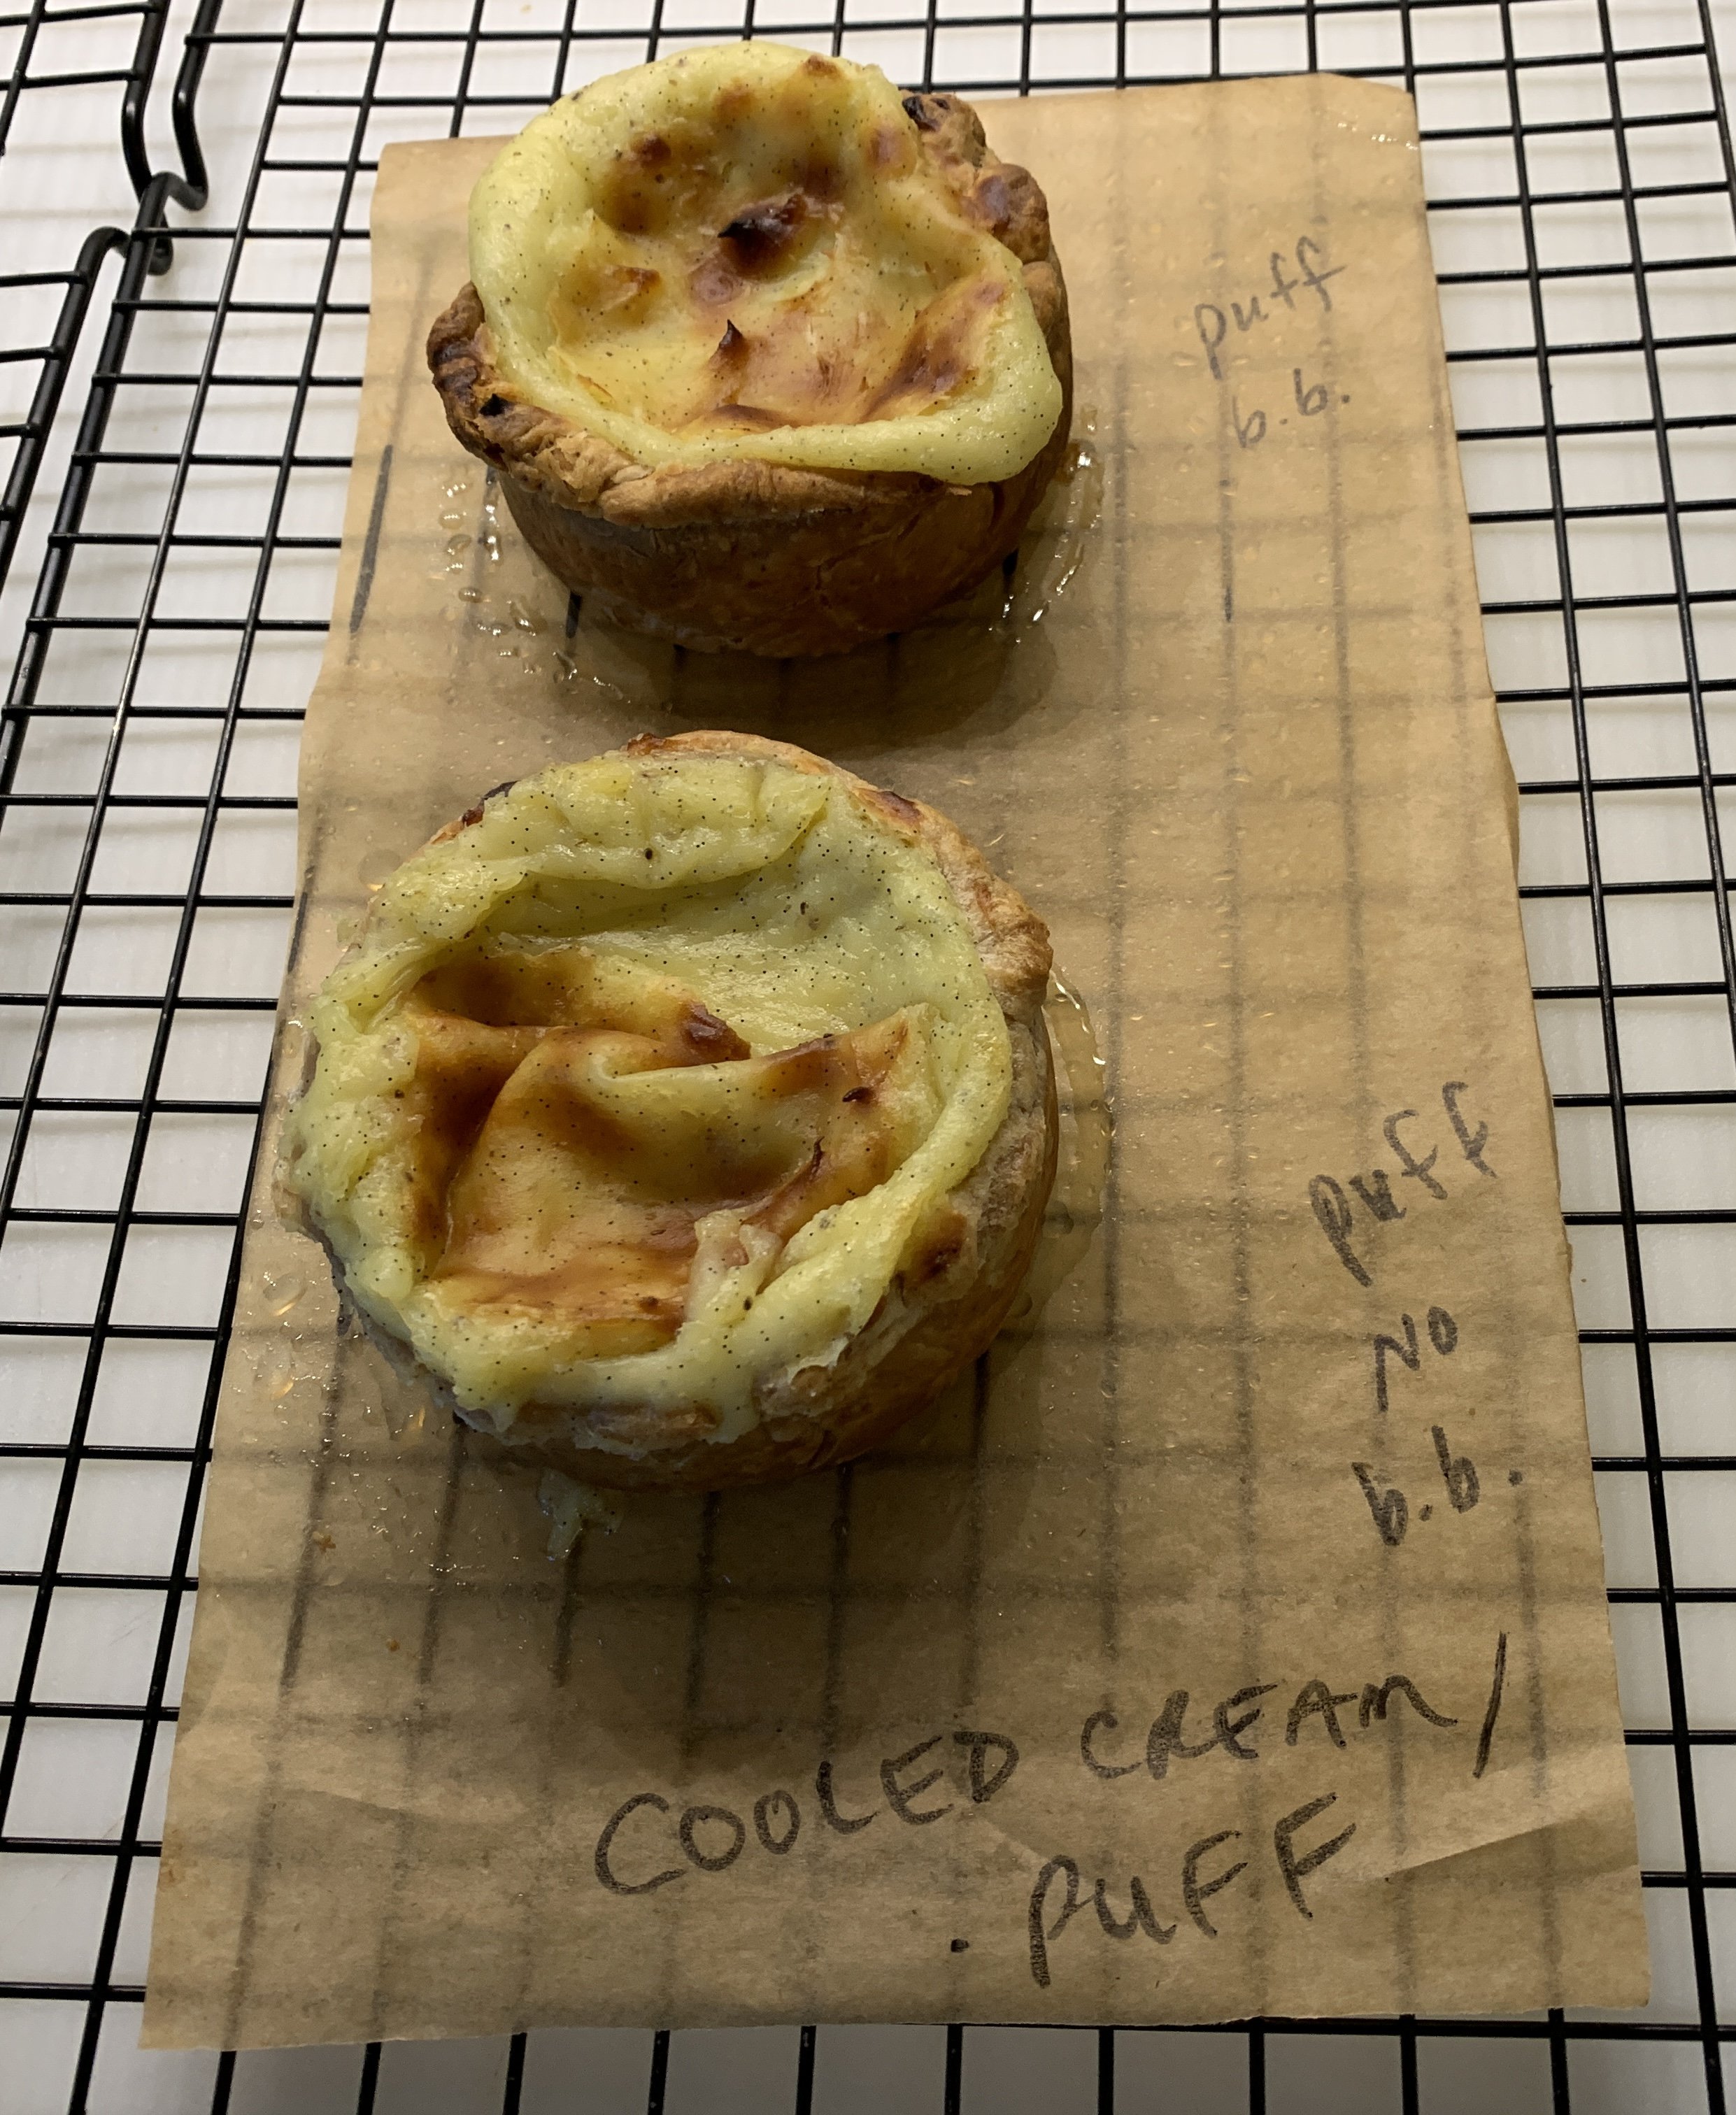
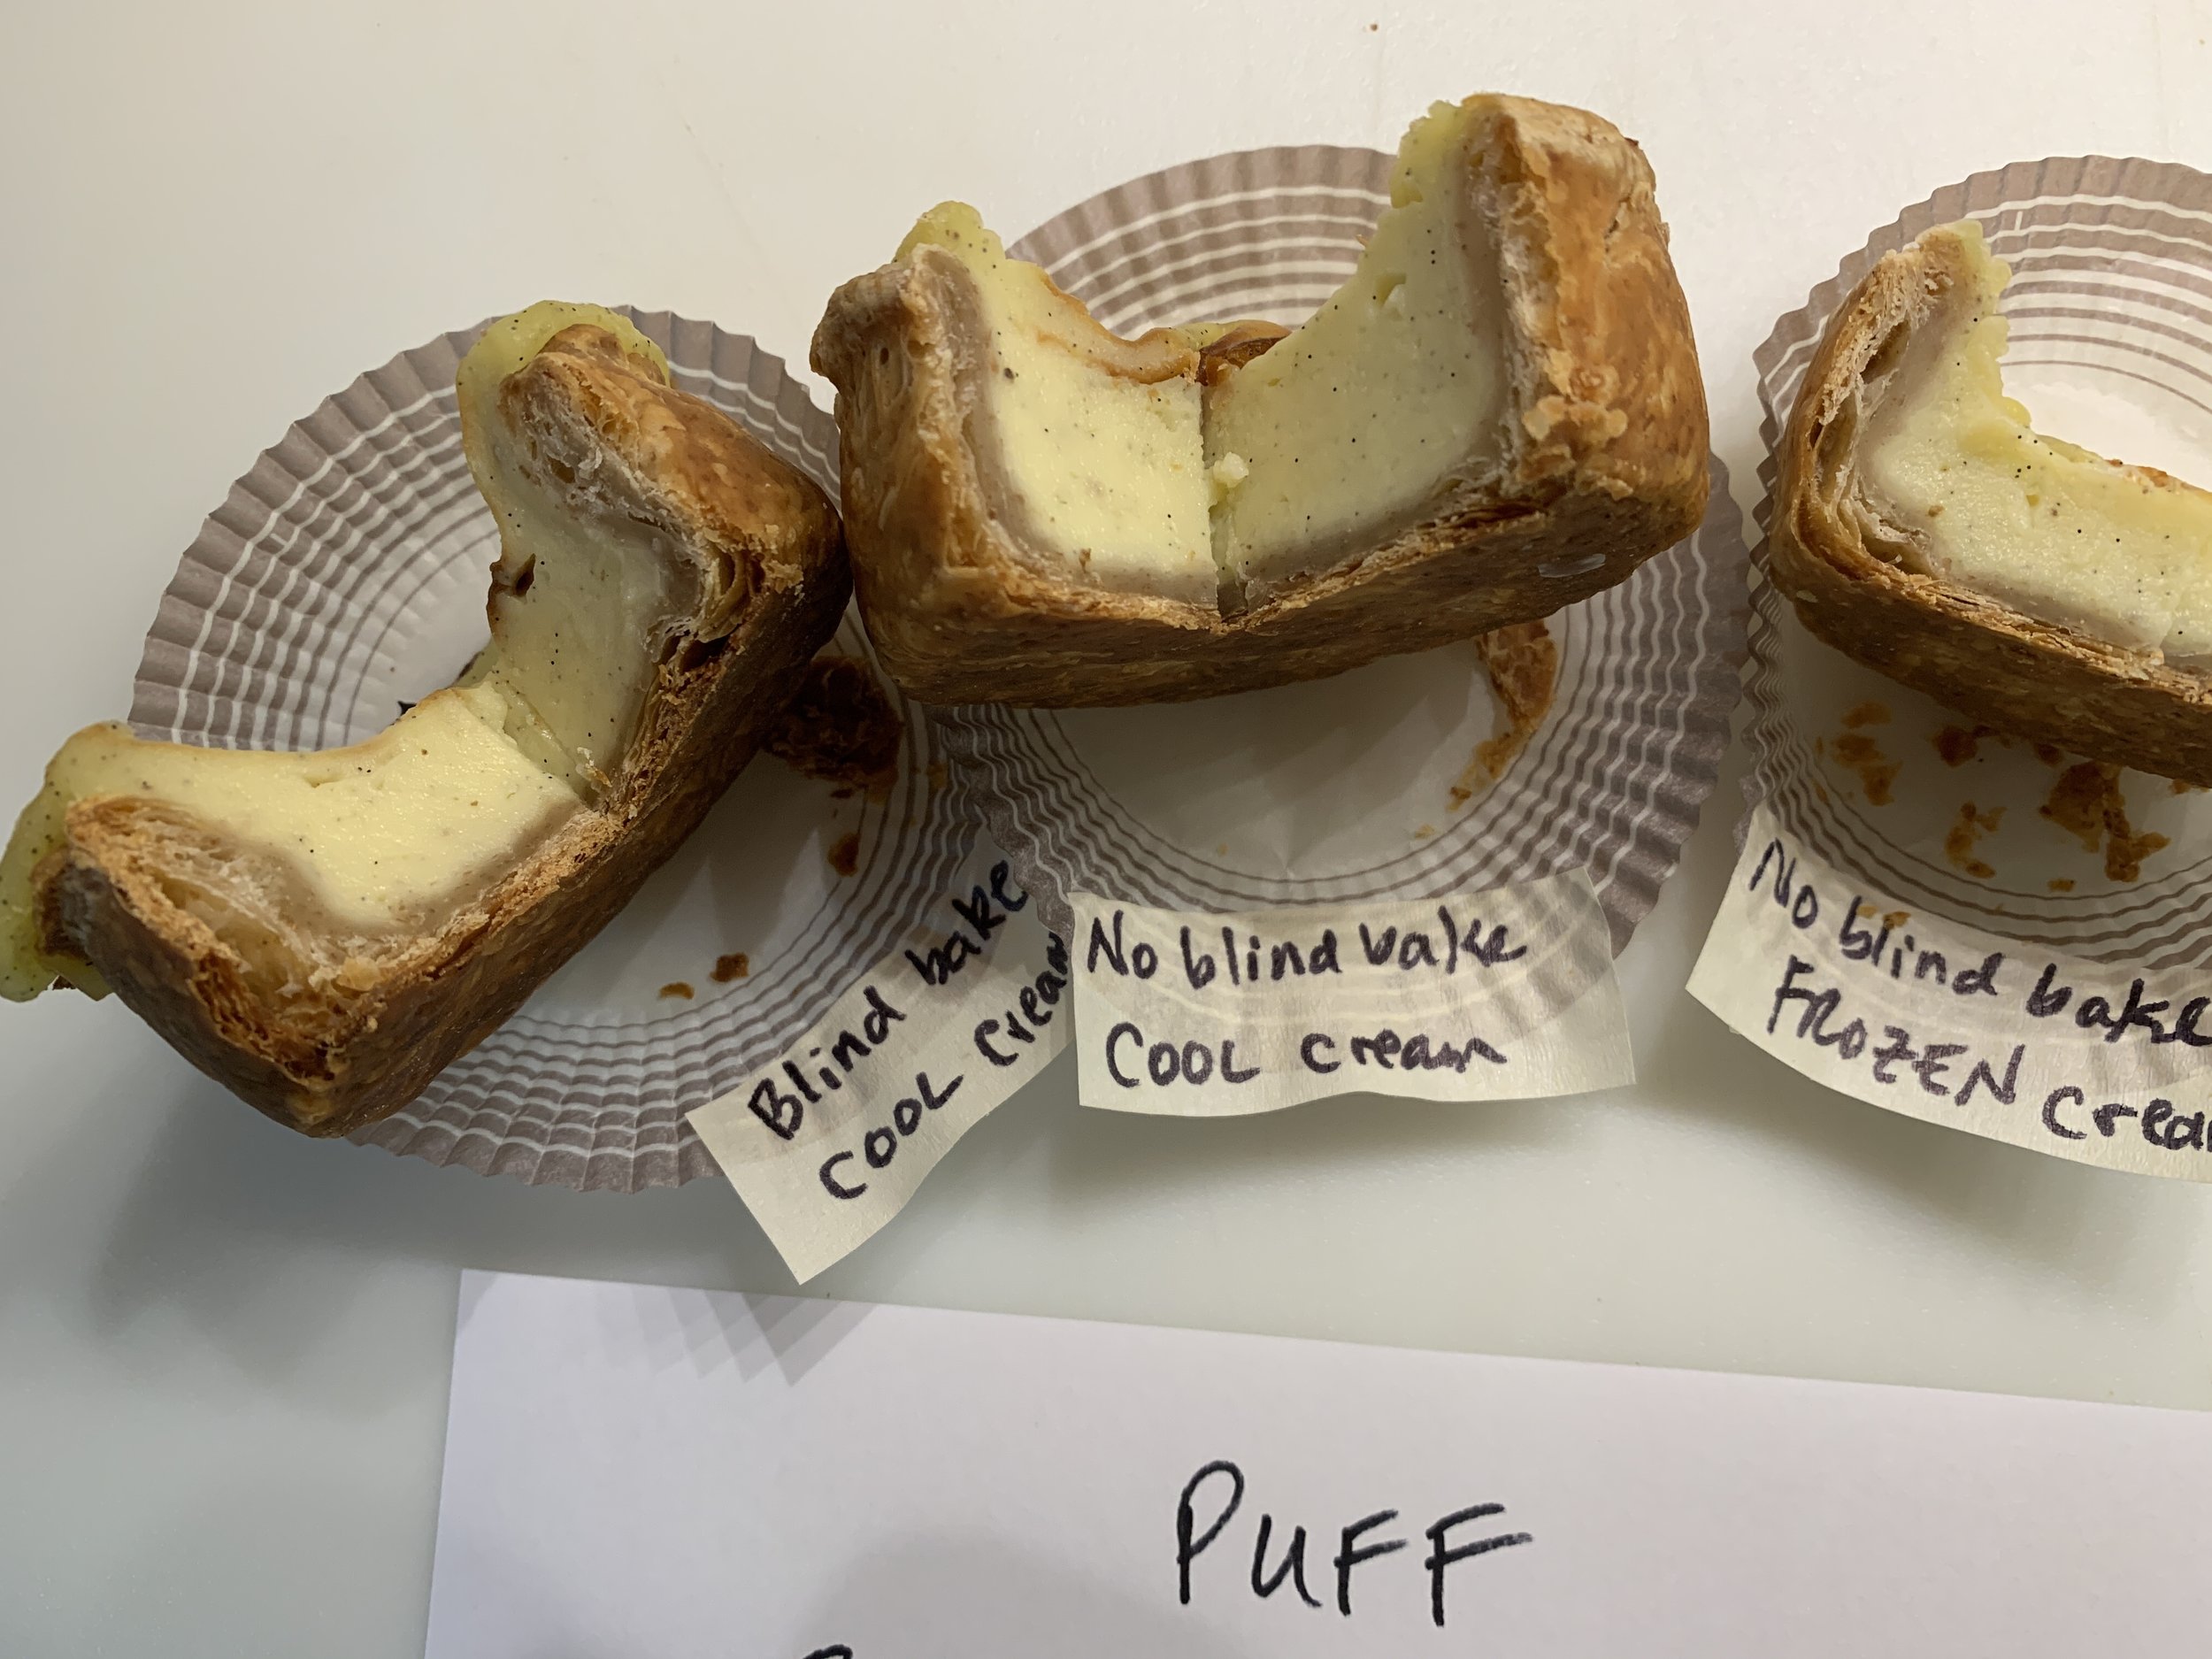
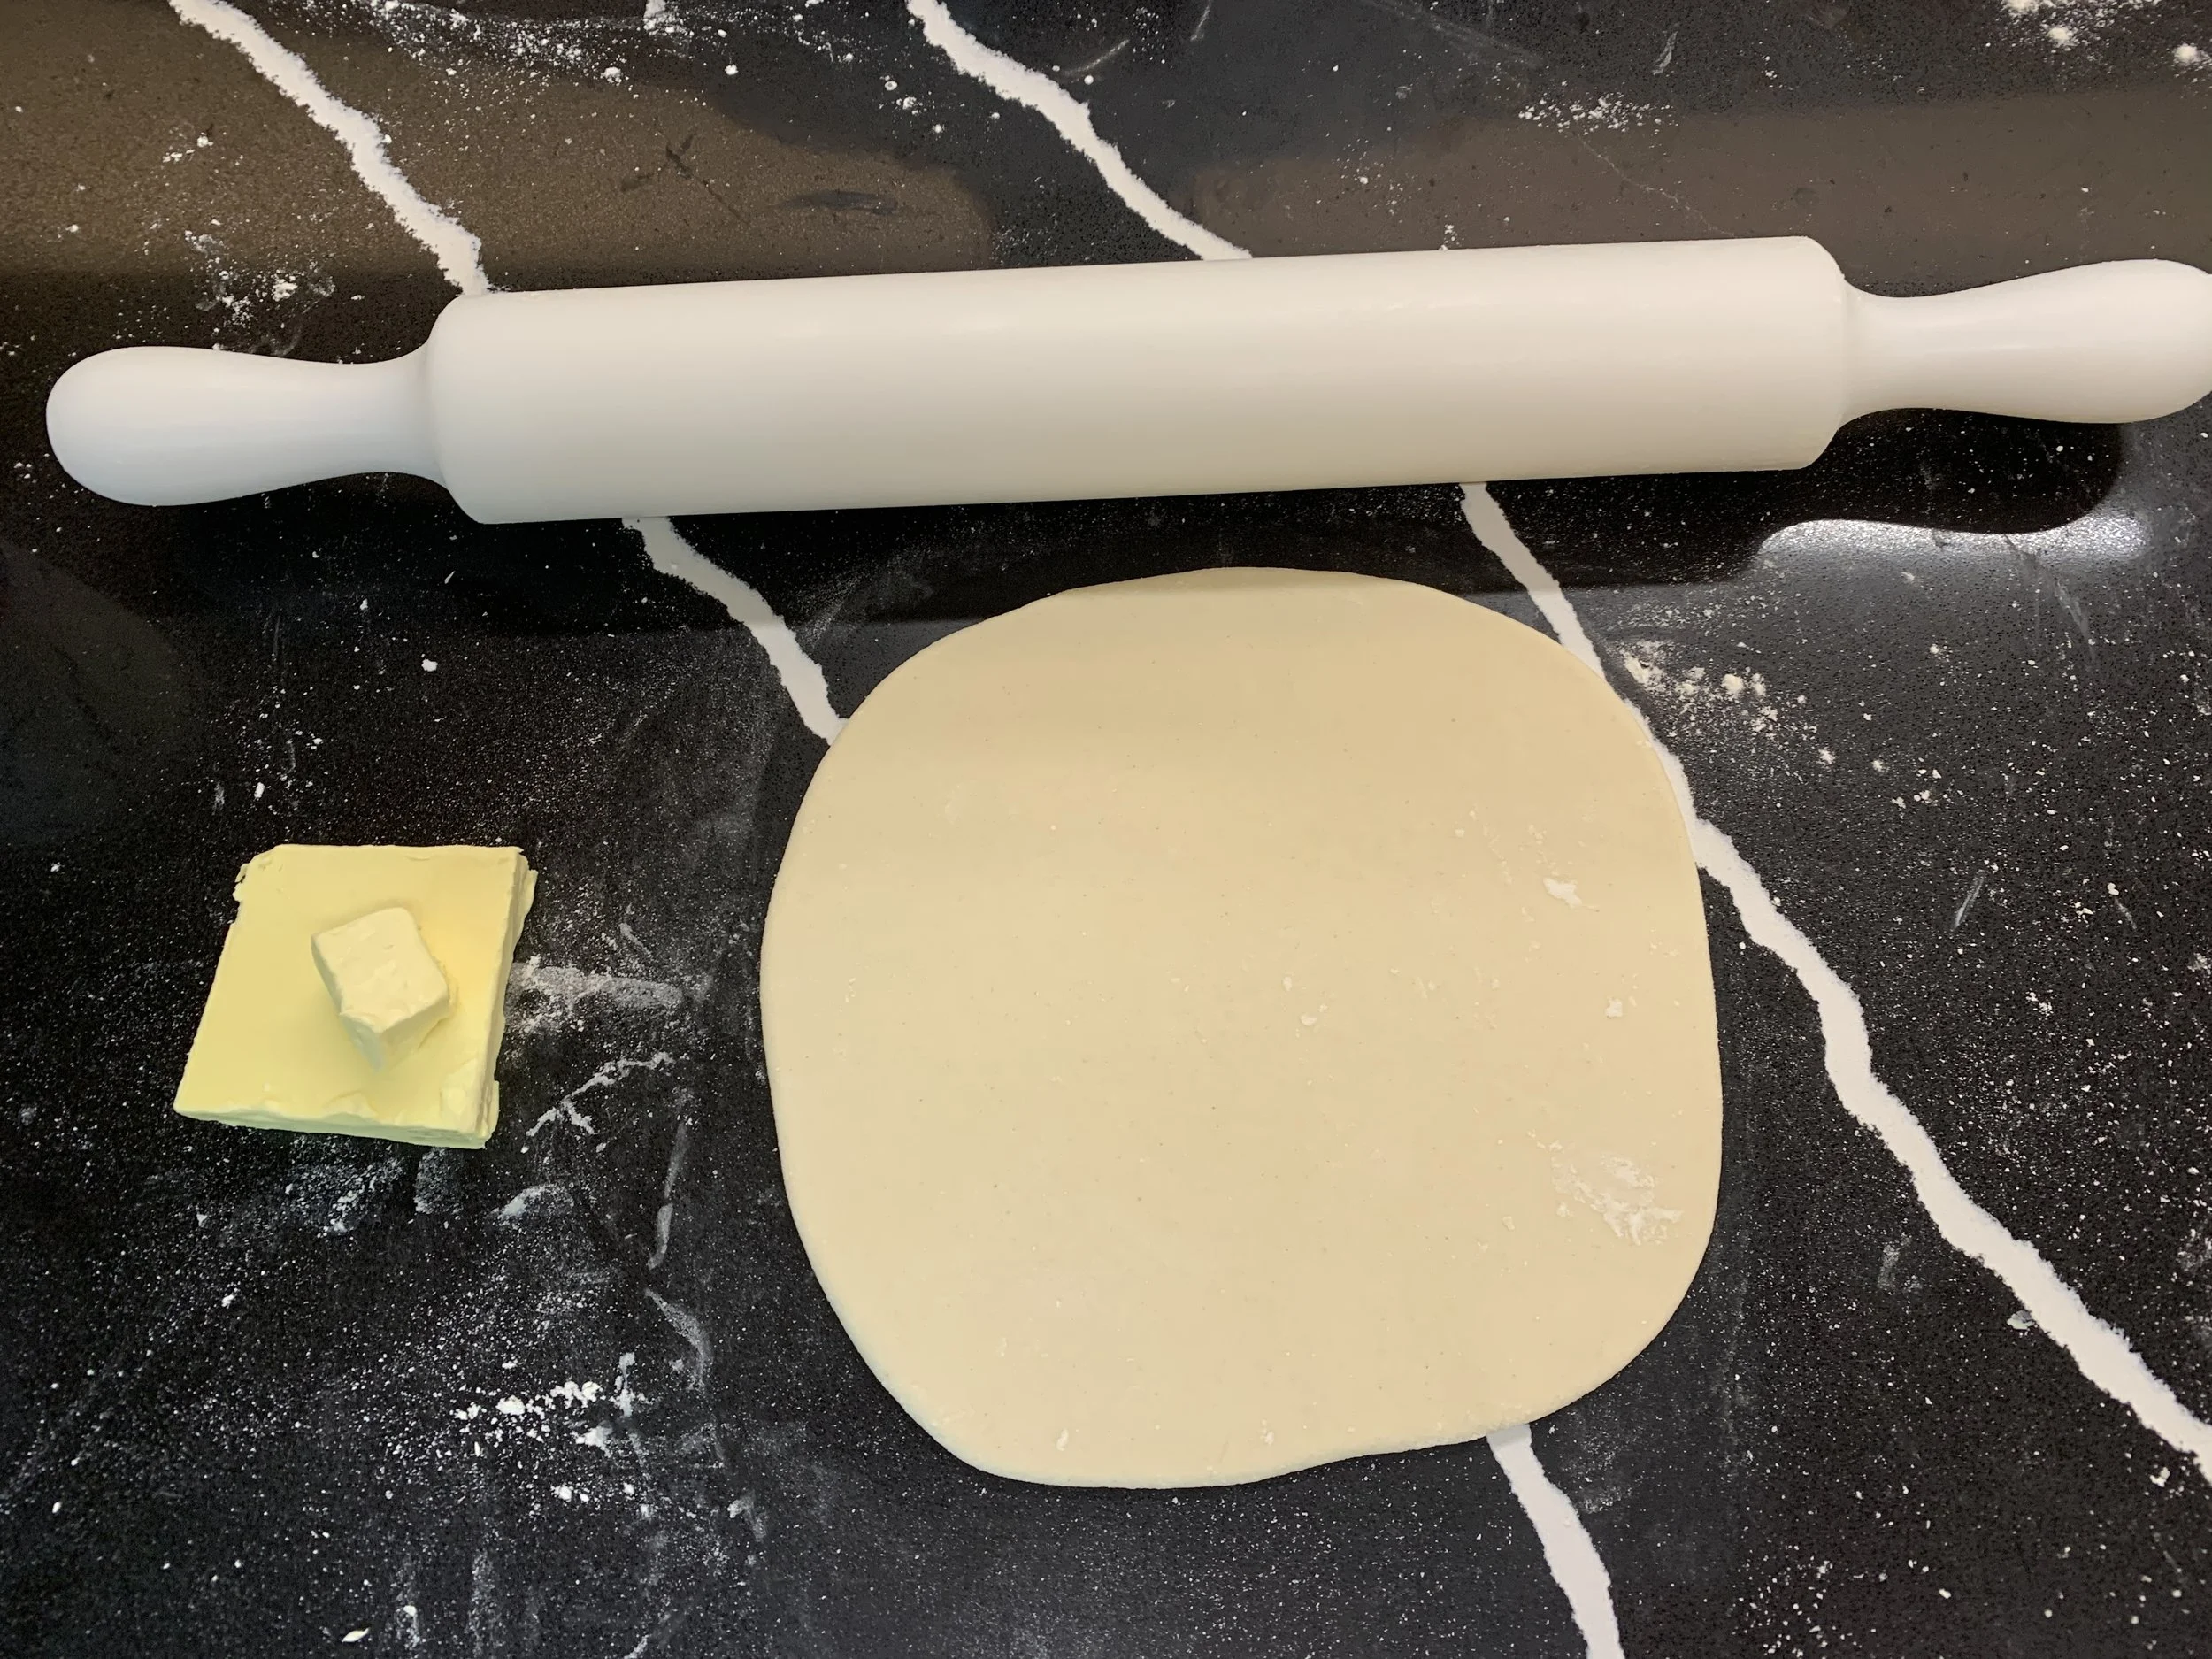
We all went through the steps of creating the laminated dough. One surprise for me was the fact that we used margarine instead of butter in the puff pastry. Our chef explained that because it’s more “plastic”, it’s easier to create the finished dough in a relatively short period of time without the usual rests in between the folds and turns. It also stands up well to high oven heat. With a bit of online reading I found that some pasteis are baked in as high as 800ºF/400ºC ovens!

SIDE NOTE: the recipe we were given at the end of class uses butter in the puff. Every other recipe I’ve looked at on line does as well. Also - one can use a high quality all butter puff from your local grocer if you prefer not to make your own.

Another eye opener was making the base dough by hand, kneading for a good ten minutes then starting the beurrage after only a short rest period for the dough. Certainly different than the way I’ve been making puff pastry for years! I guess you CAN teach an old dog new tricks!

I’ll give you more detail about ingredients and the process in the upcoming post when I share my “at home” adventures with making pasteis.

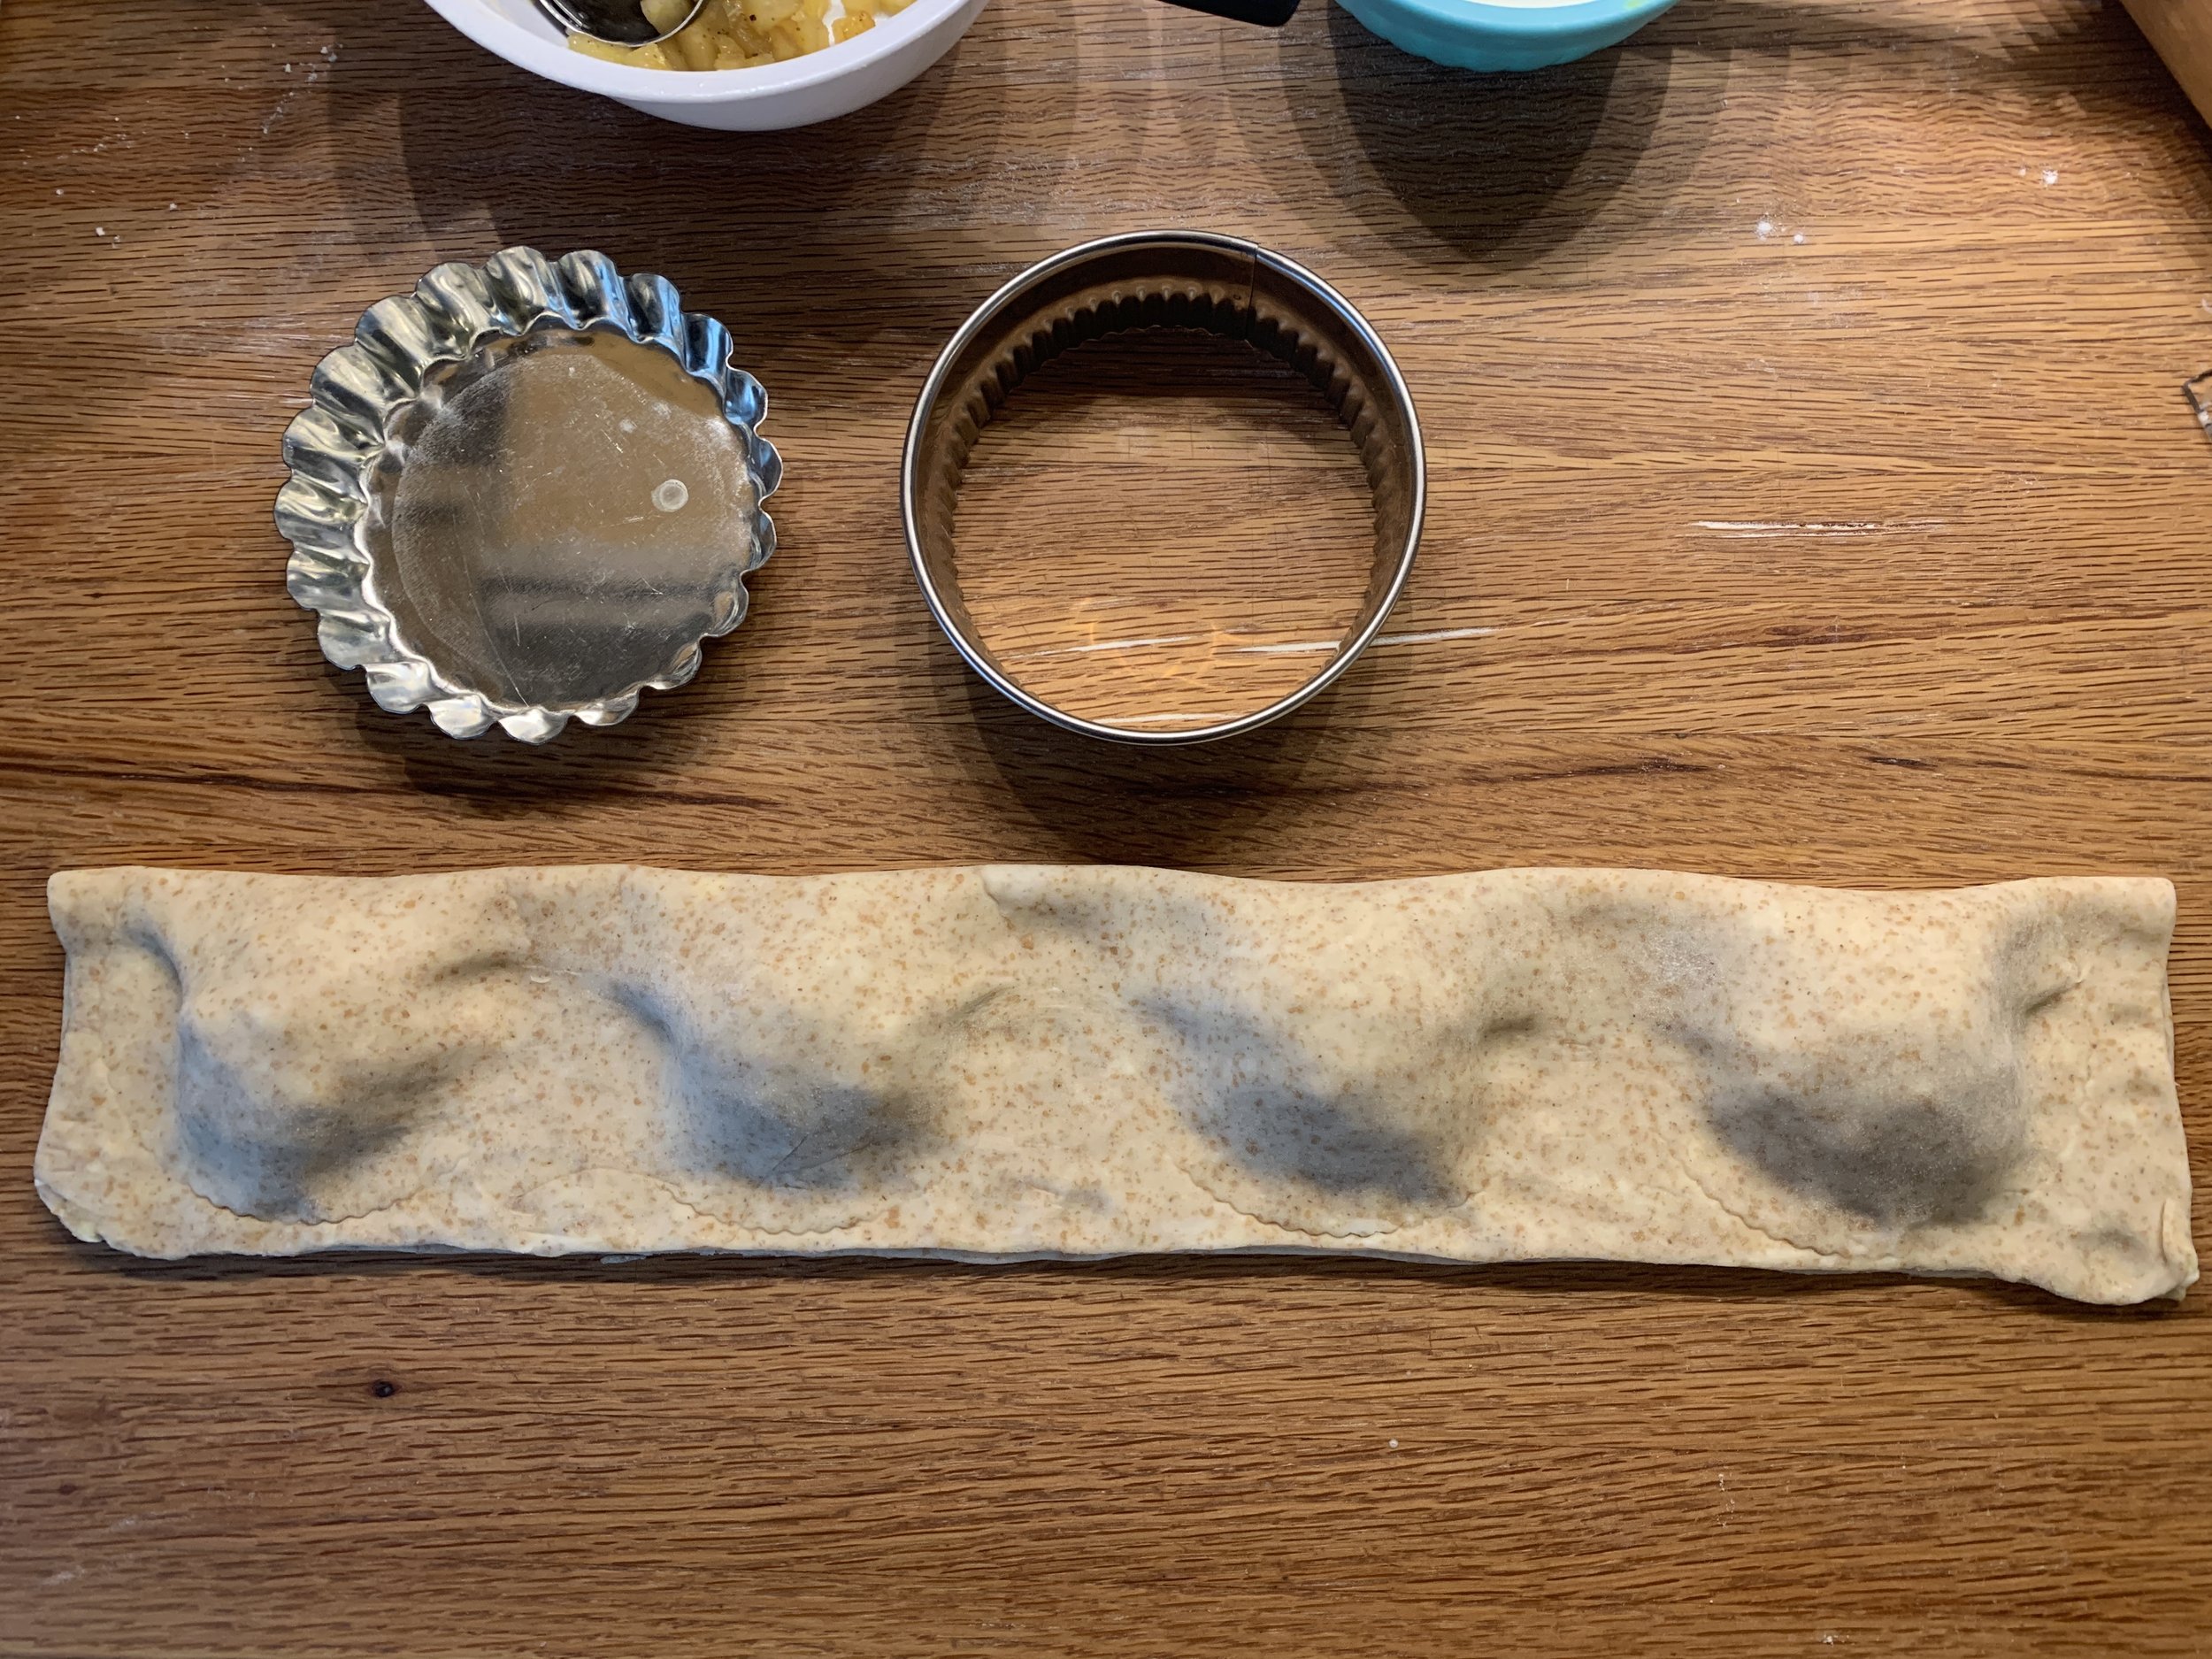
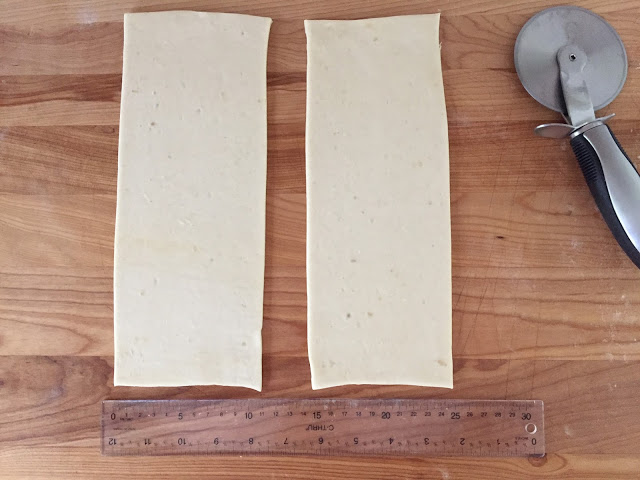
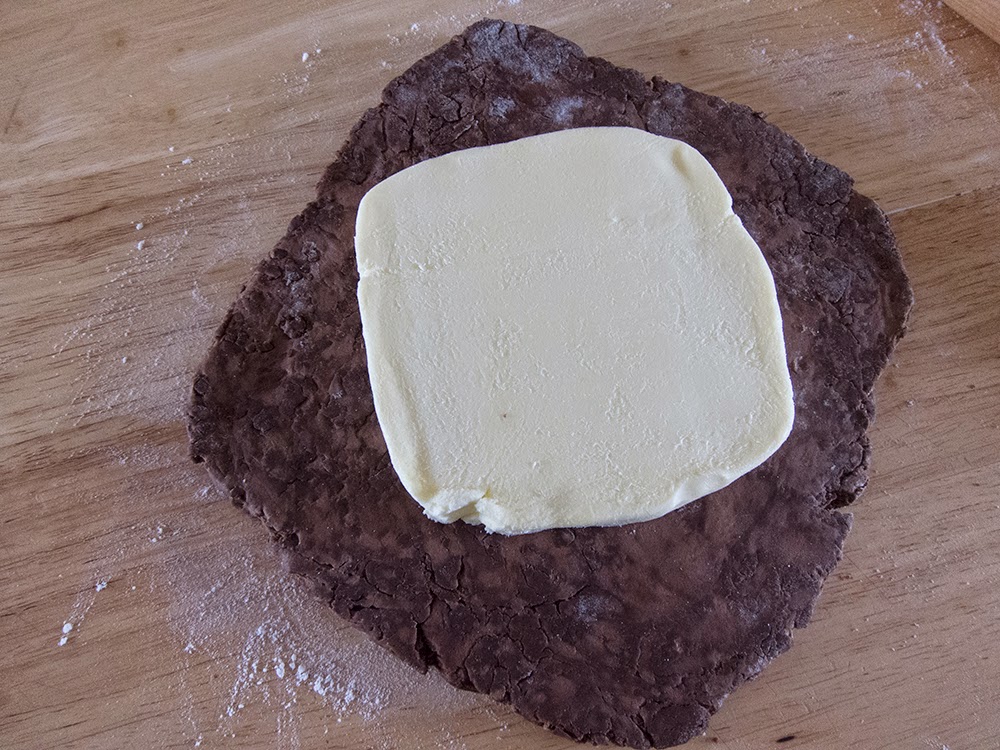
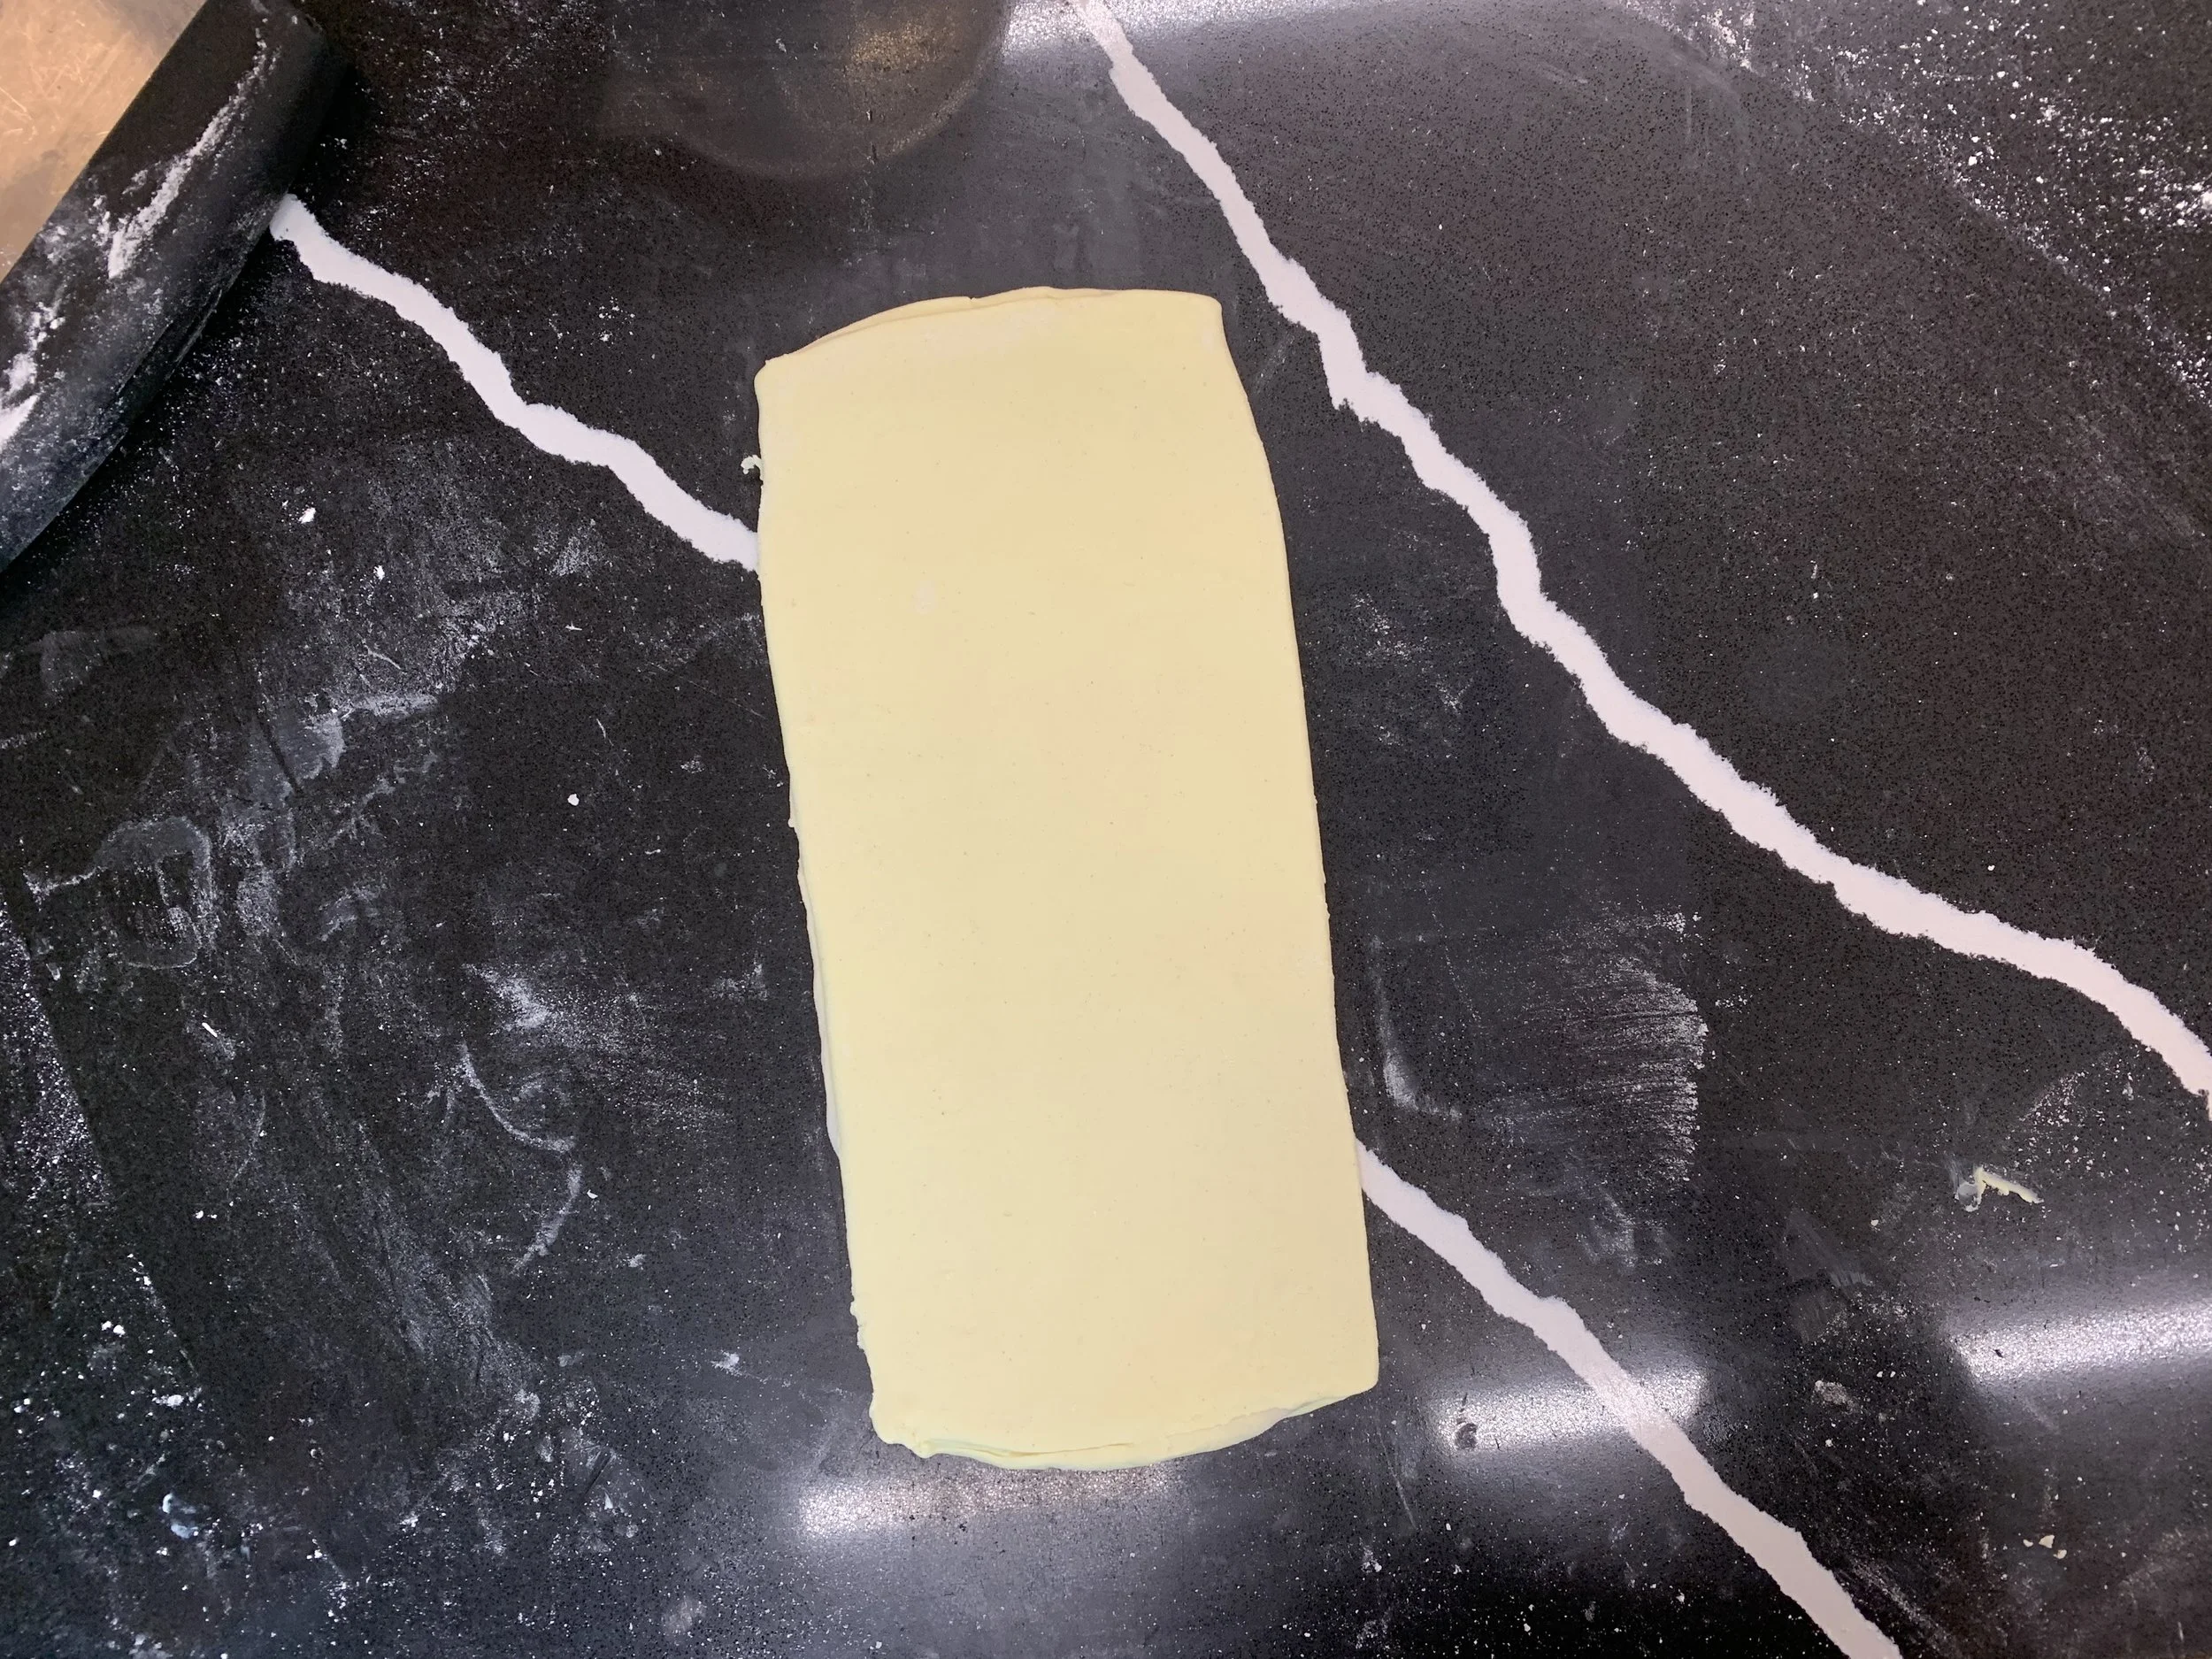
For this class, we enveloped our margarine in the dough . . . .


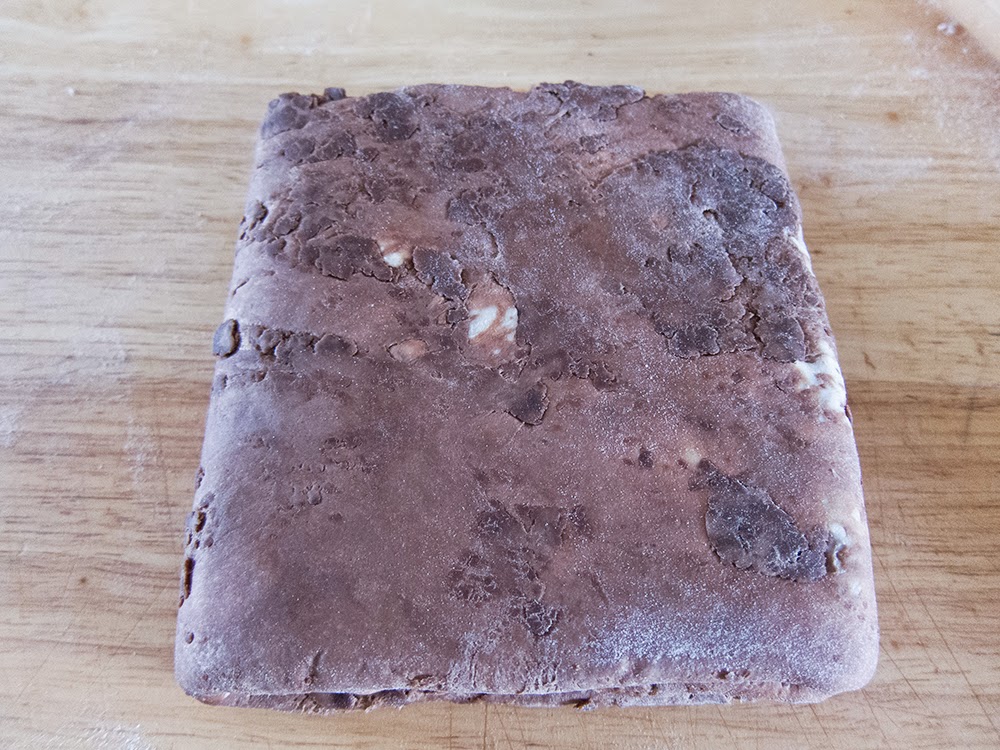
. . . . then rolled it out long, did a three fold, rotated 90º, rolled out again and did another three fold, all back to back without resting. I was amazed at how smoothly it rolled out without any resistance.


Then, placing the dough with the long edge facing us, we gave the surface of the dough a light brush with water (helps the layers stick) and starting by rolling the leading edge over tightly. Continuing on, we then rolled it into a snug log. We wrapped the logs and refrigerated them for 10-15 minutes as the oven heated to 500ºF.


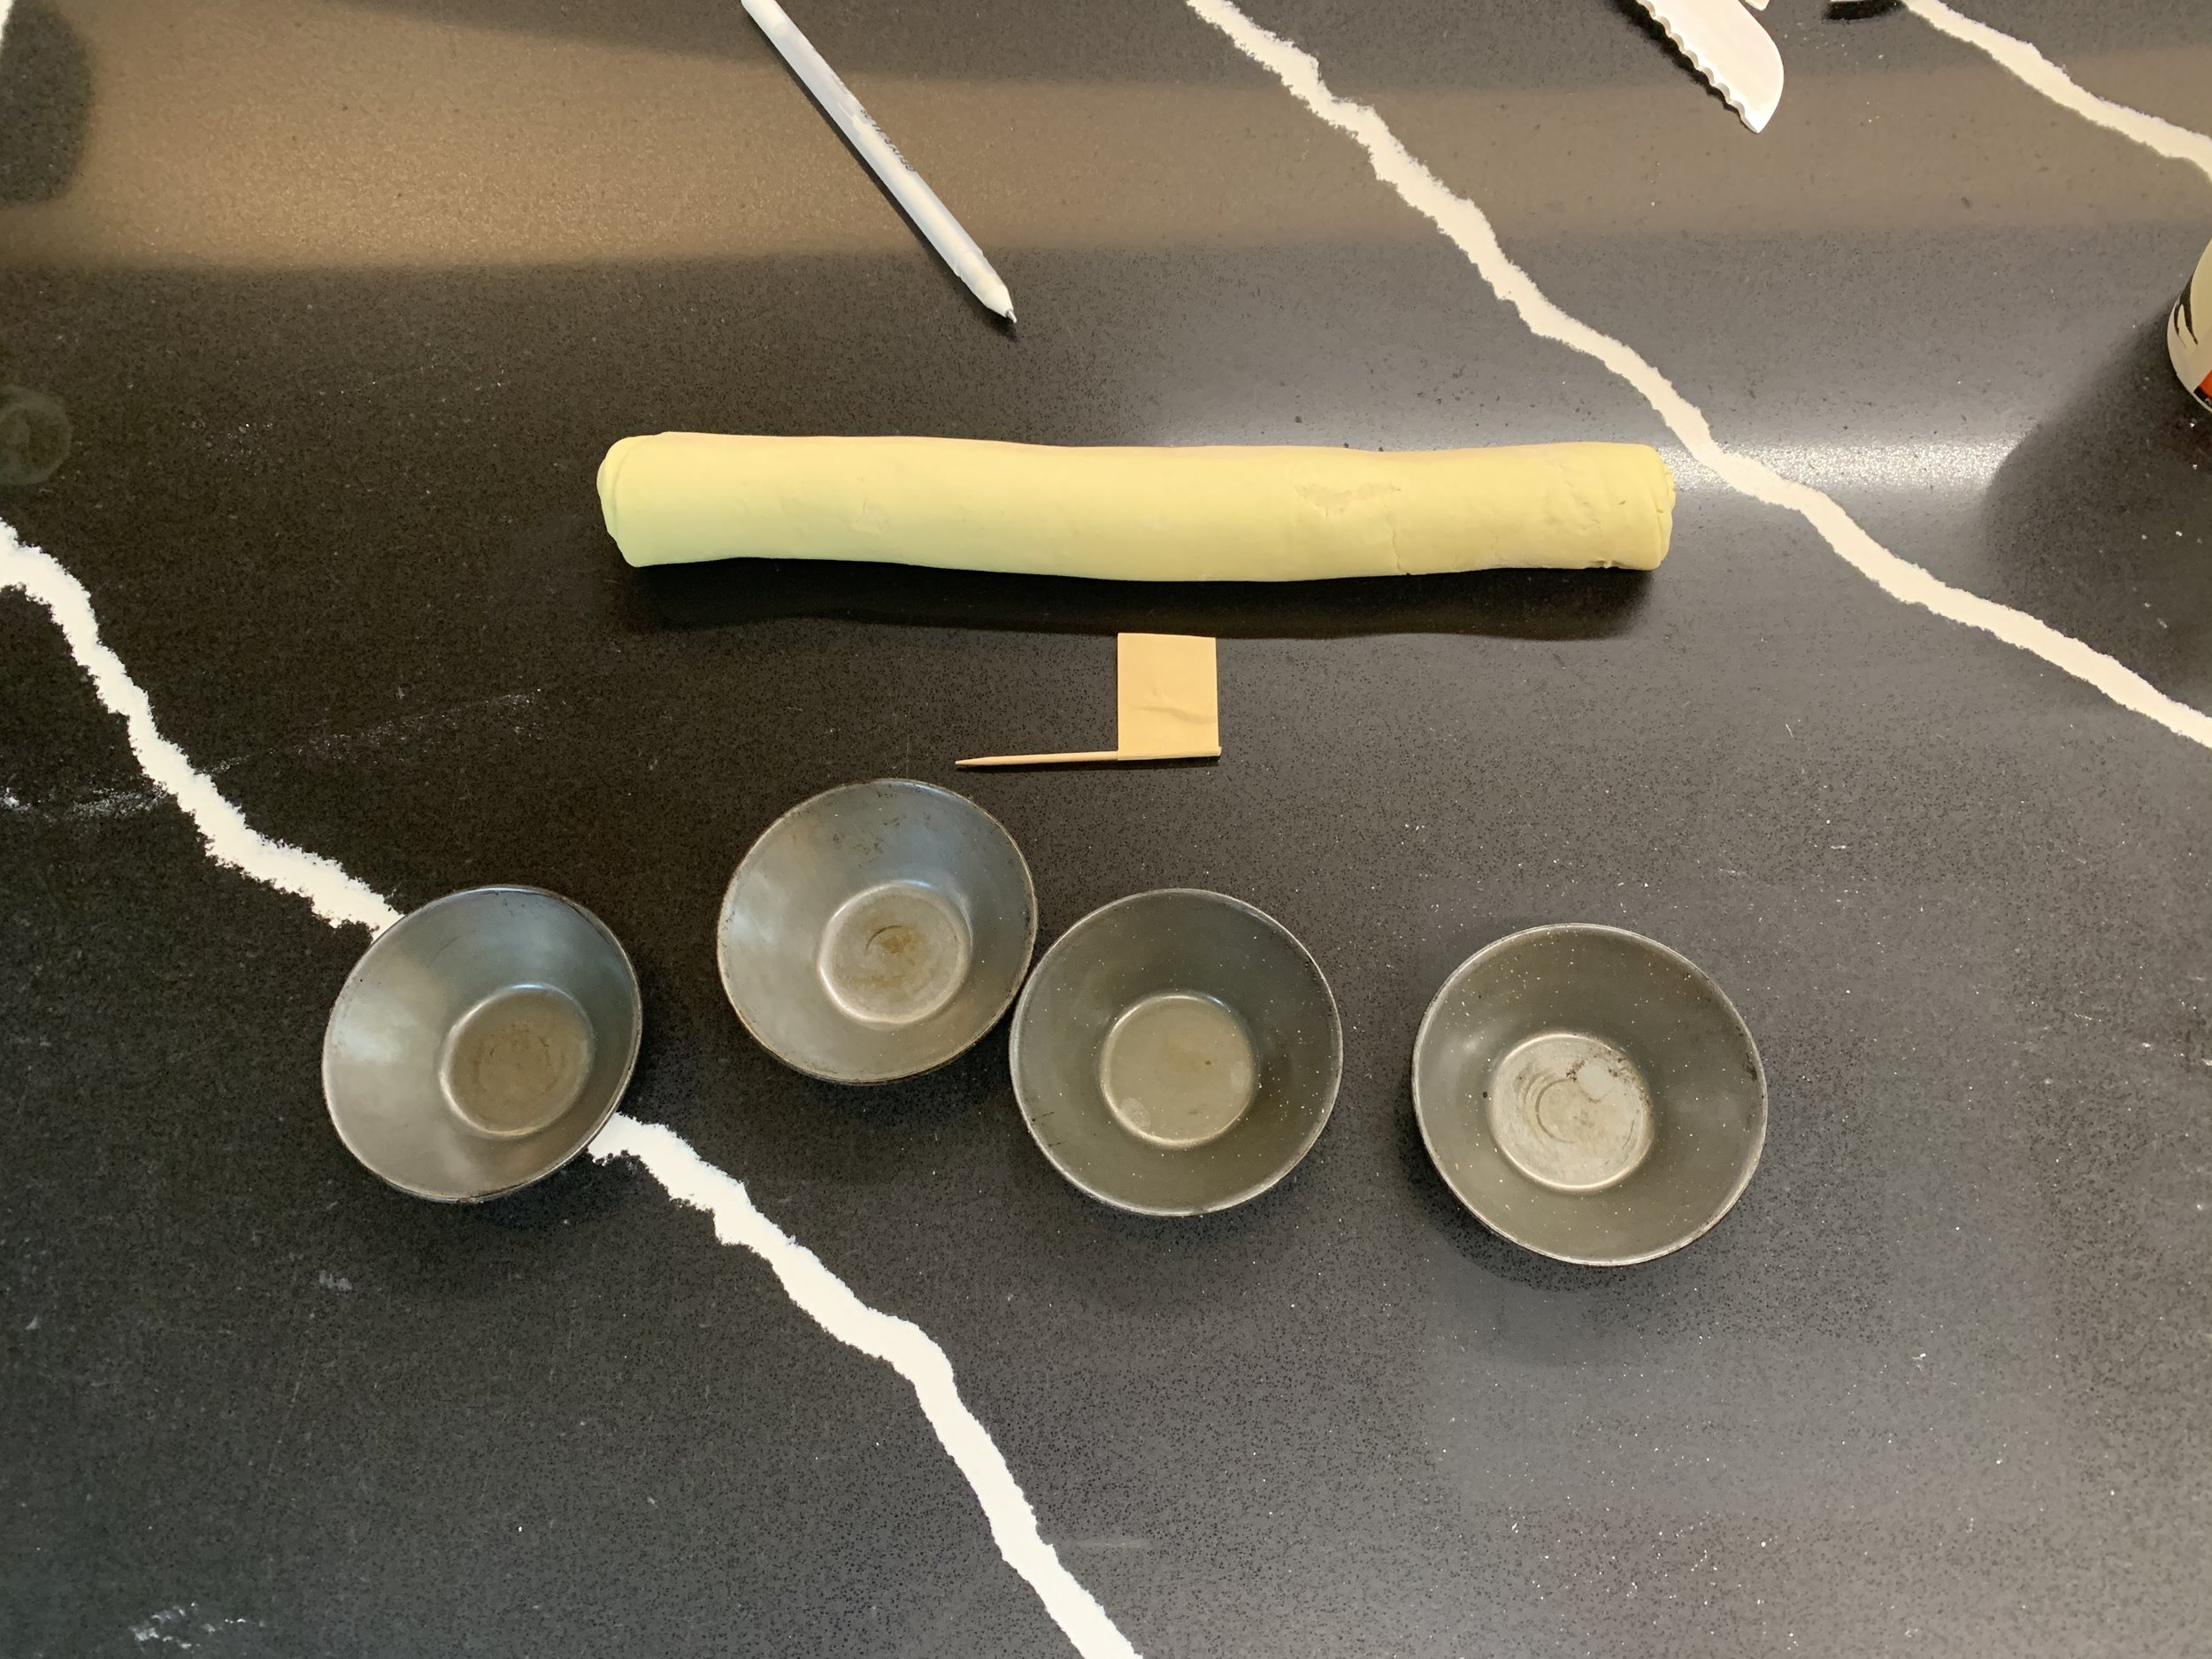
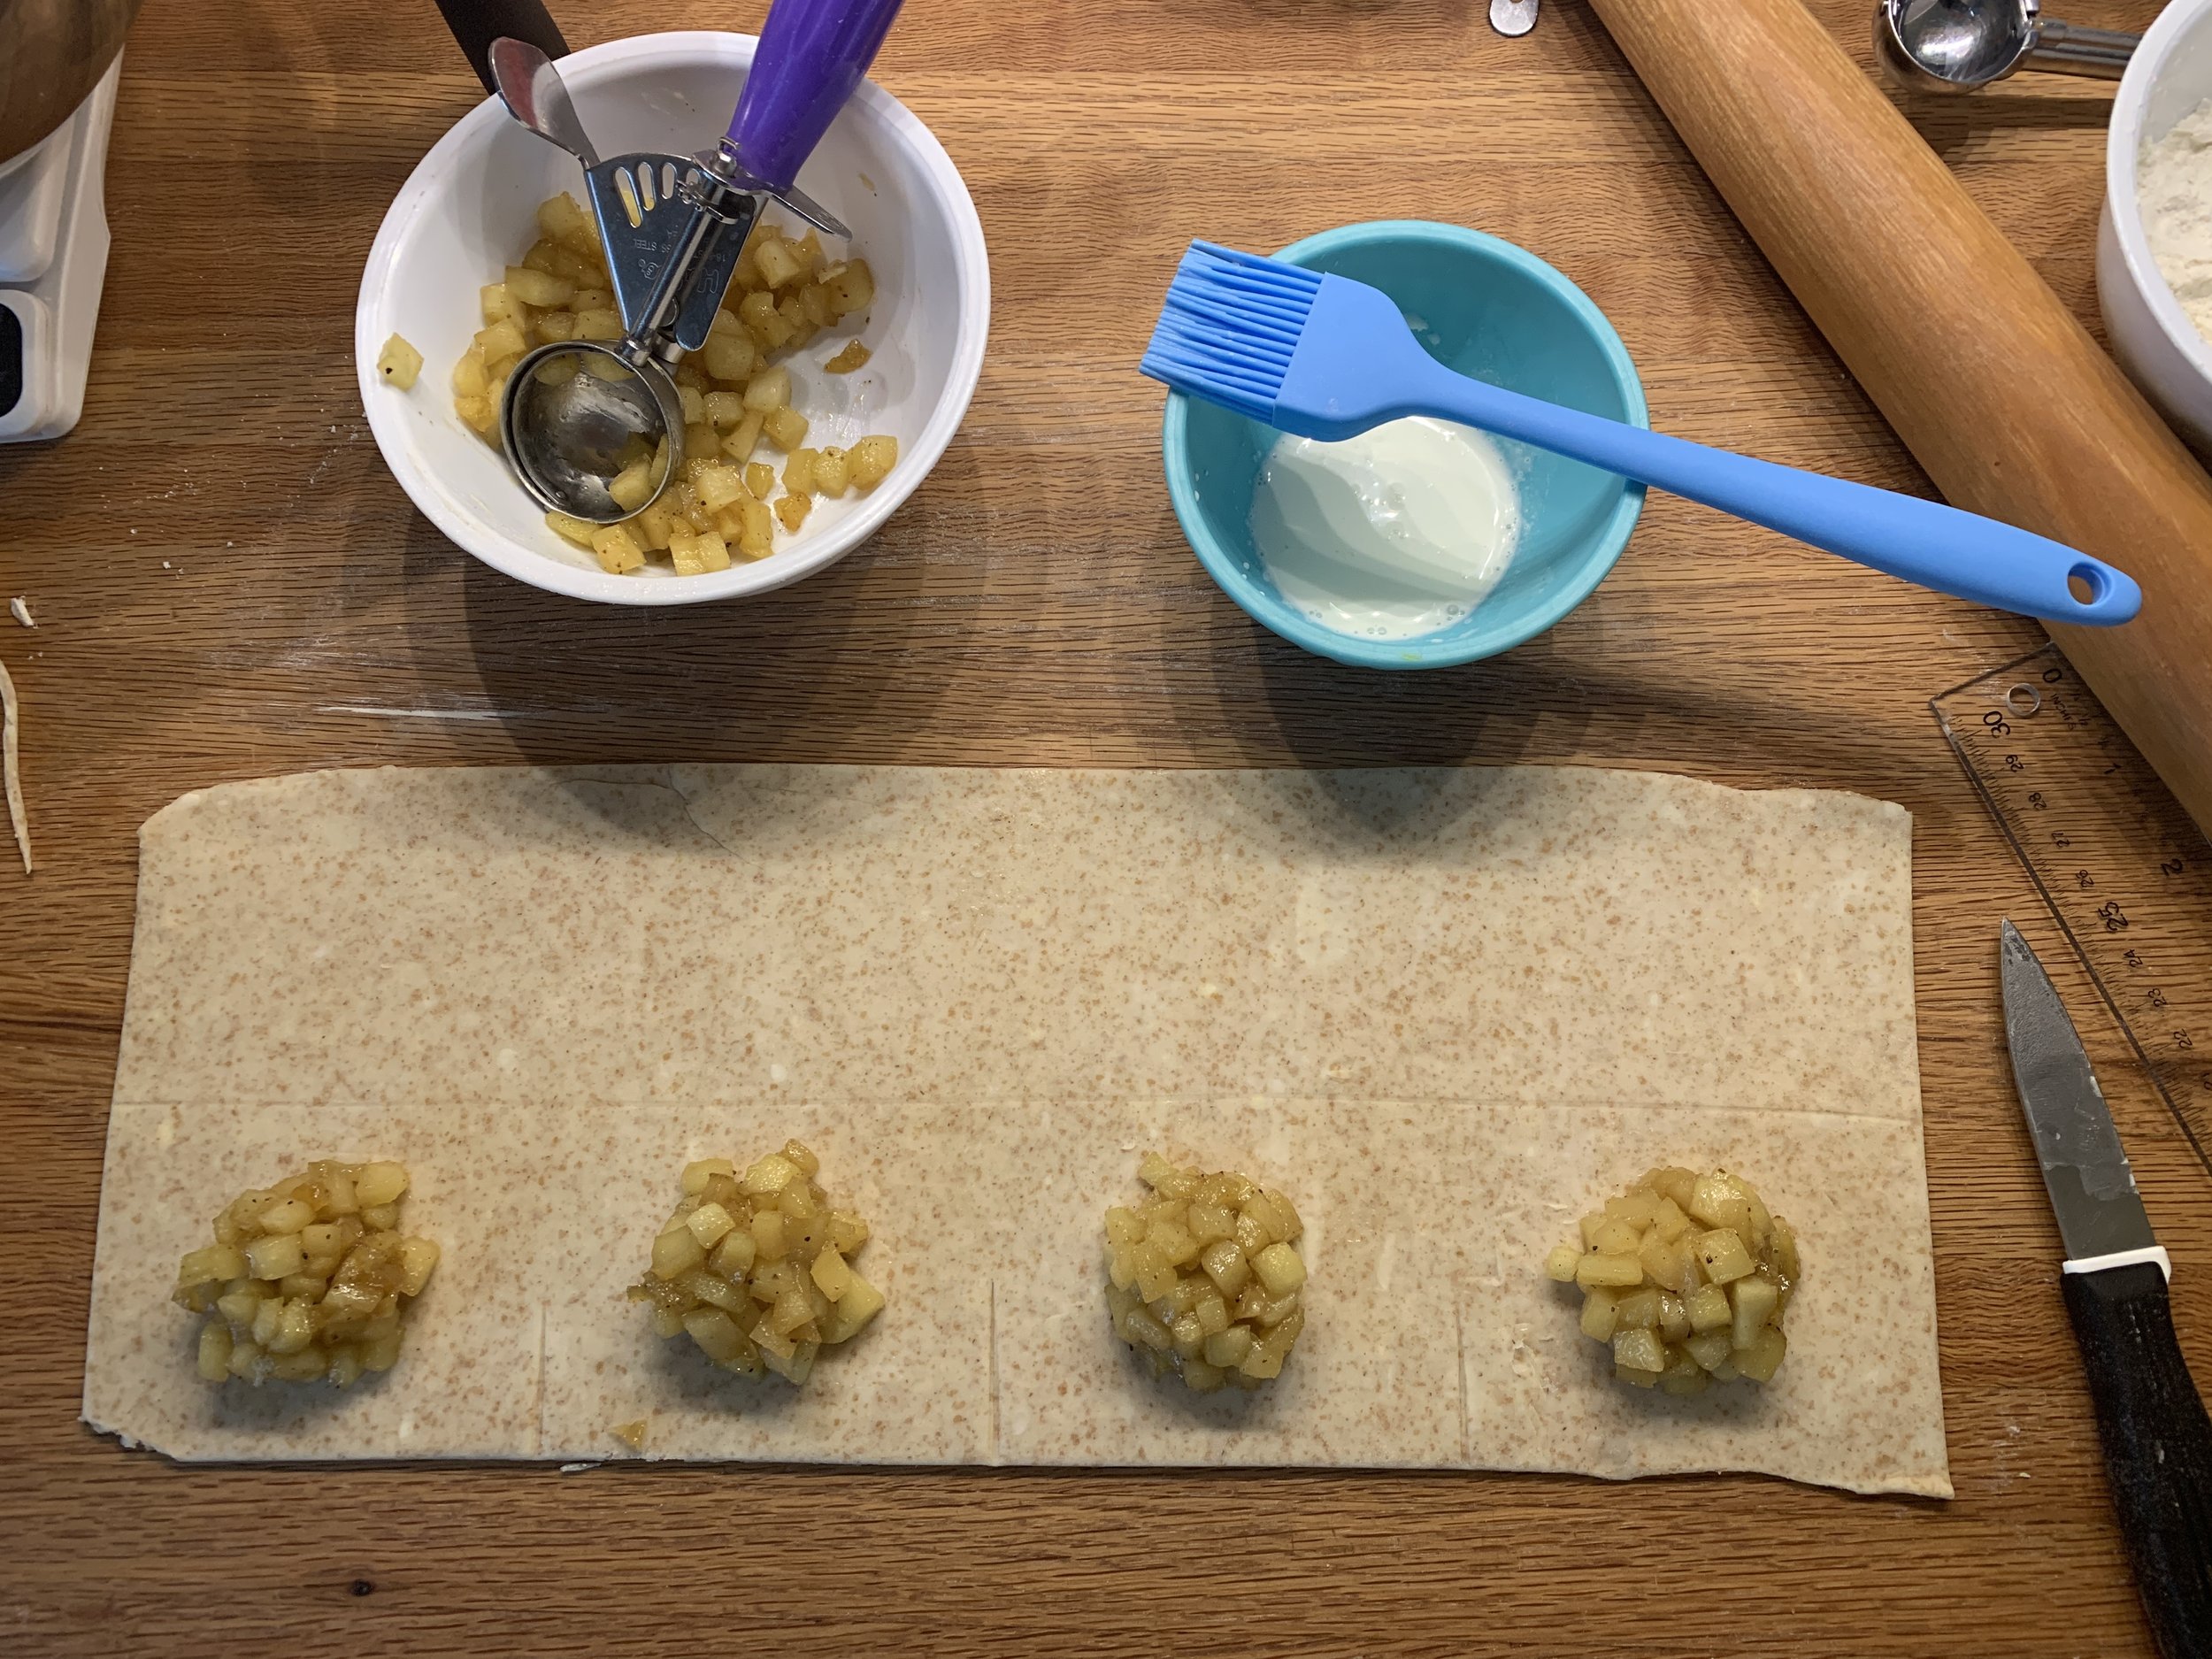
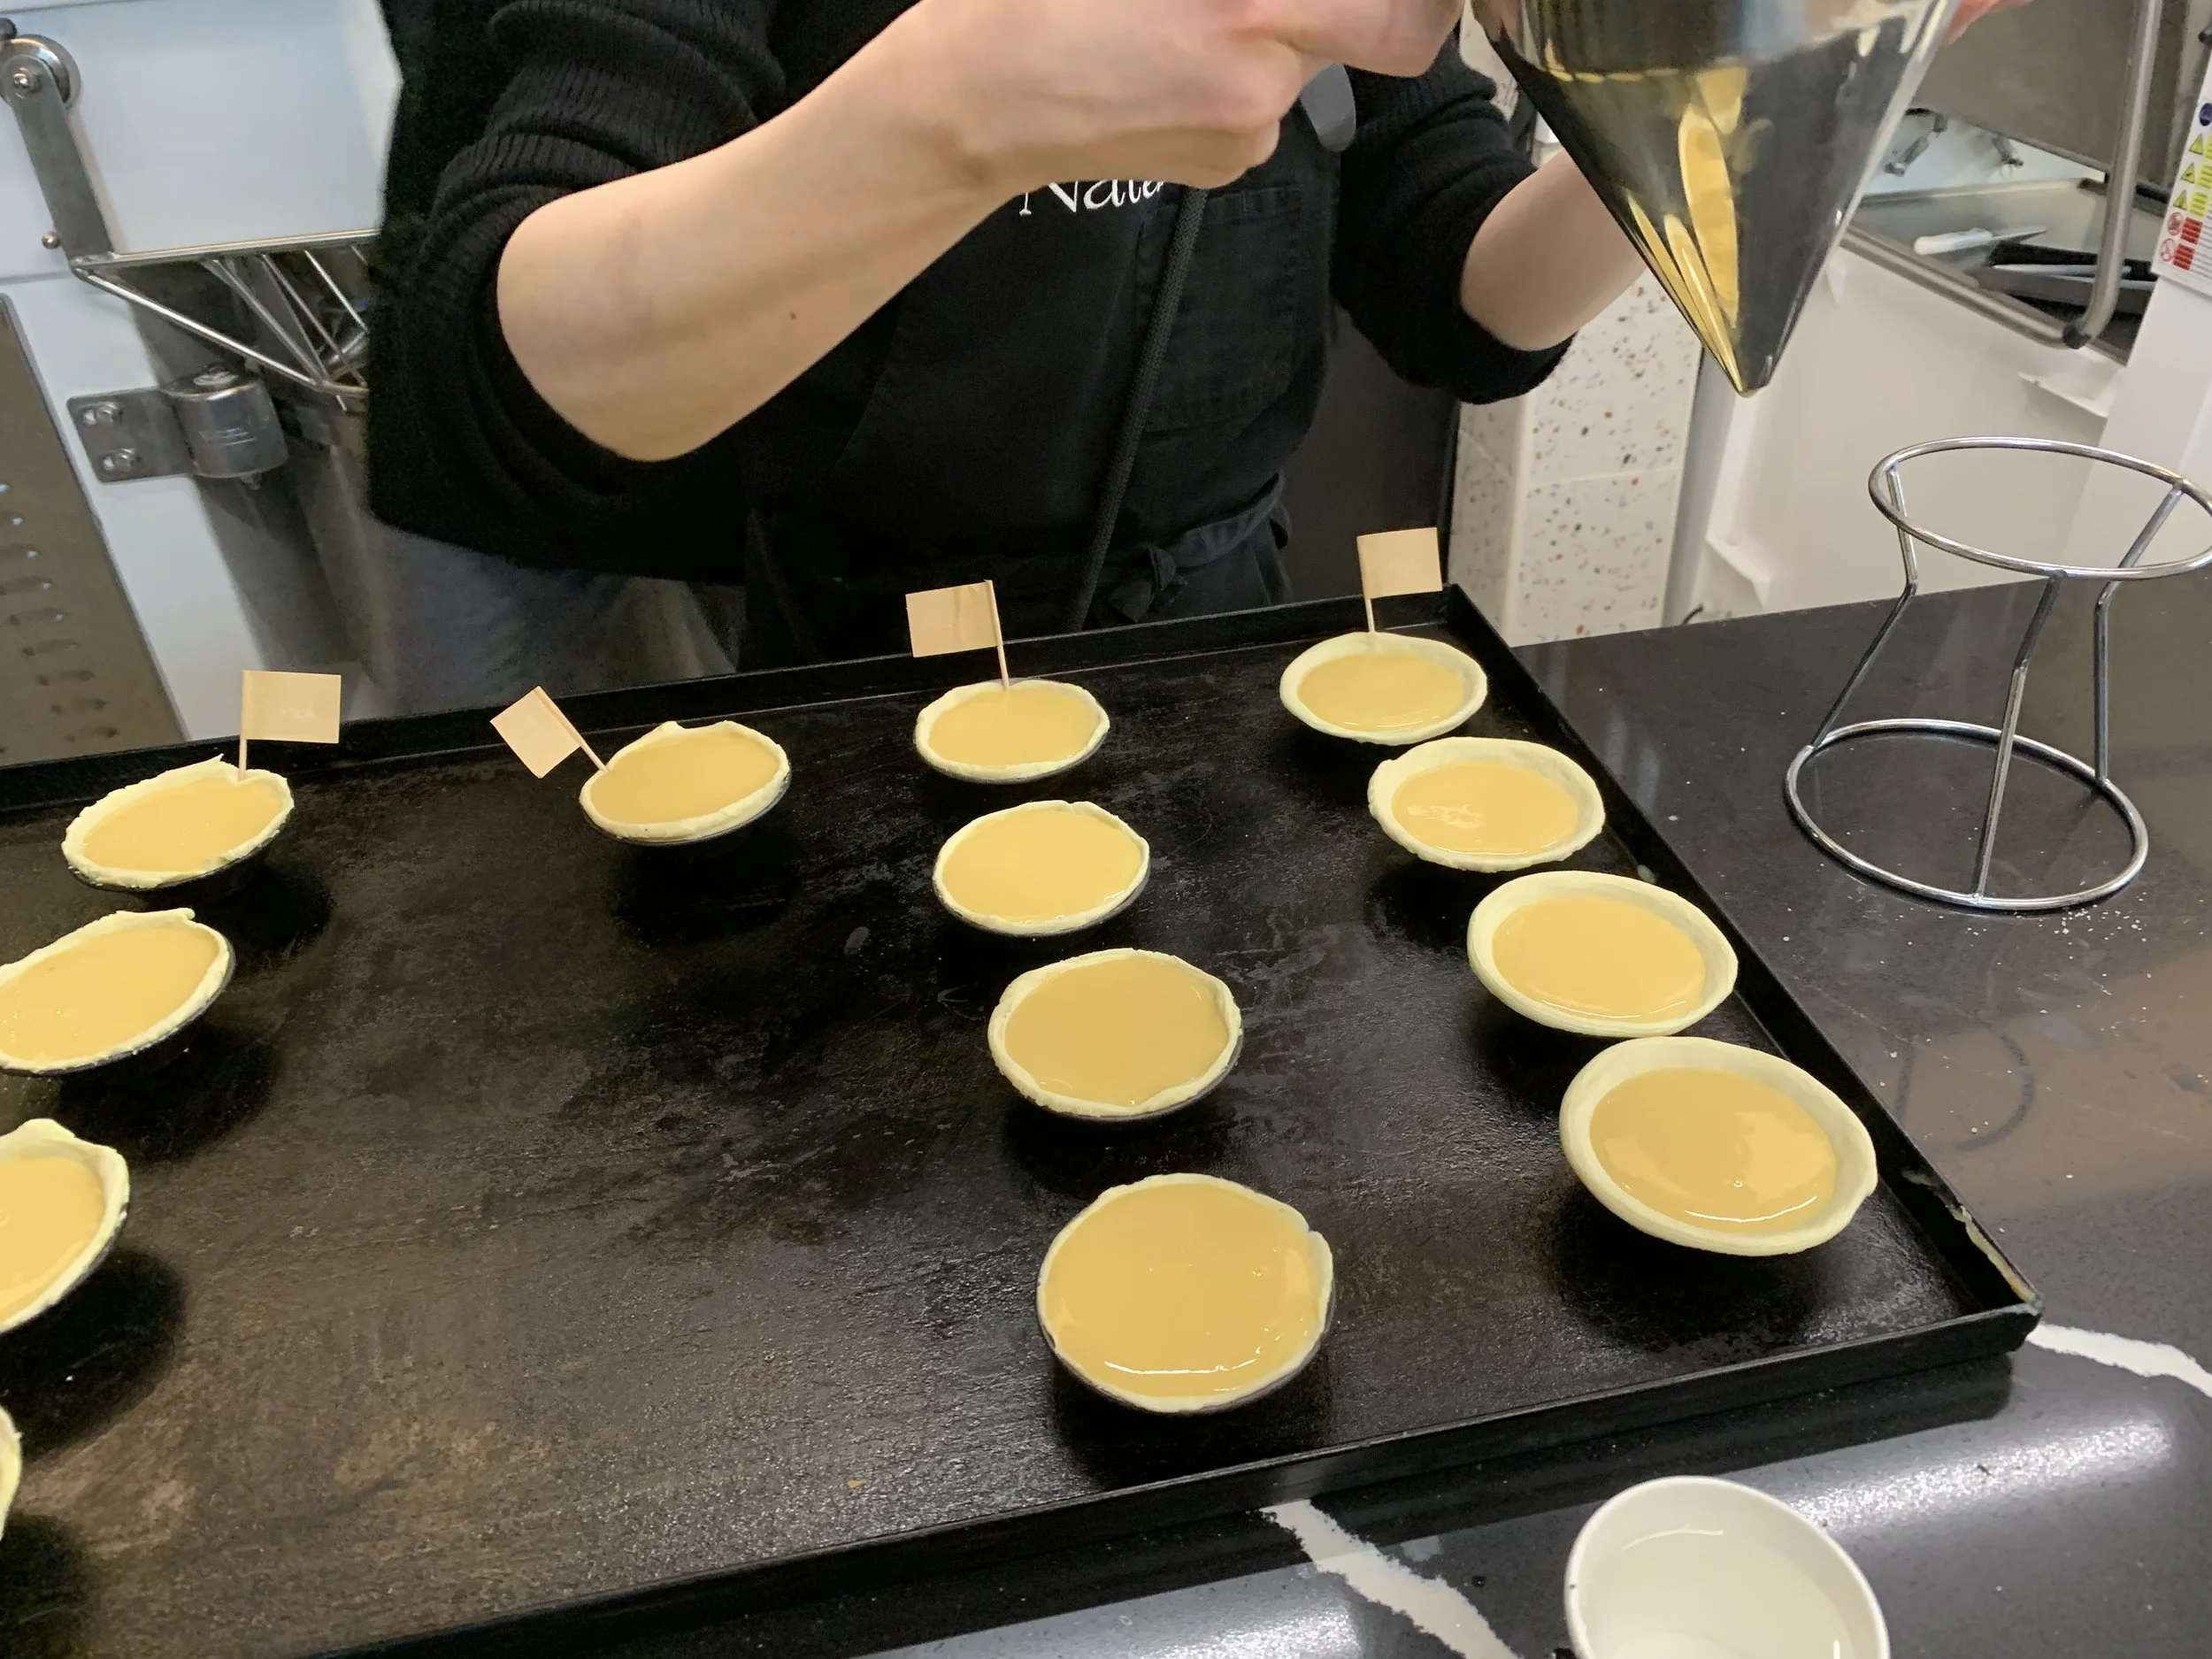
Lightly oil or butter the tins. Slice the log into pieces as wide as the height of the tins then place them cut side up in the tins.


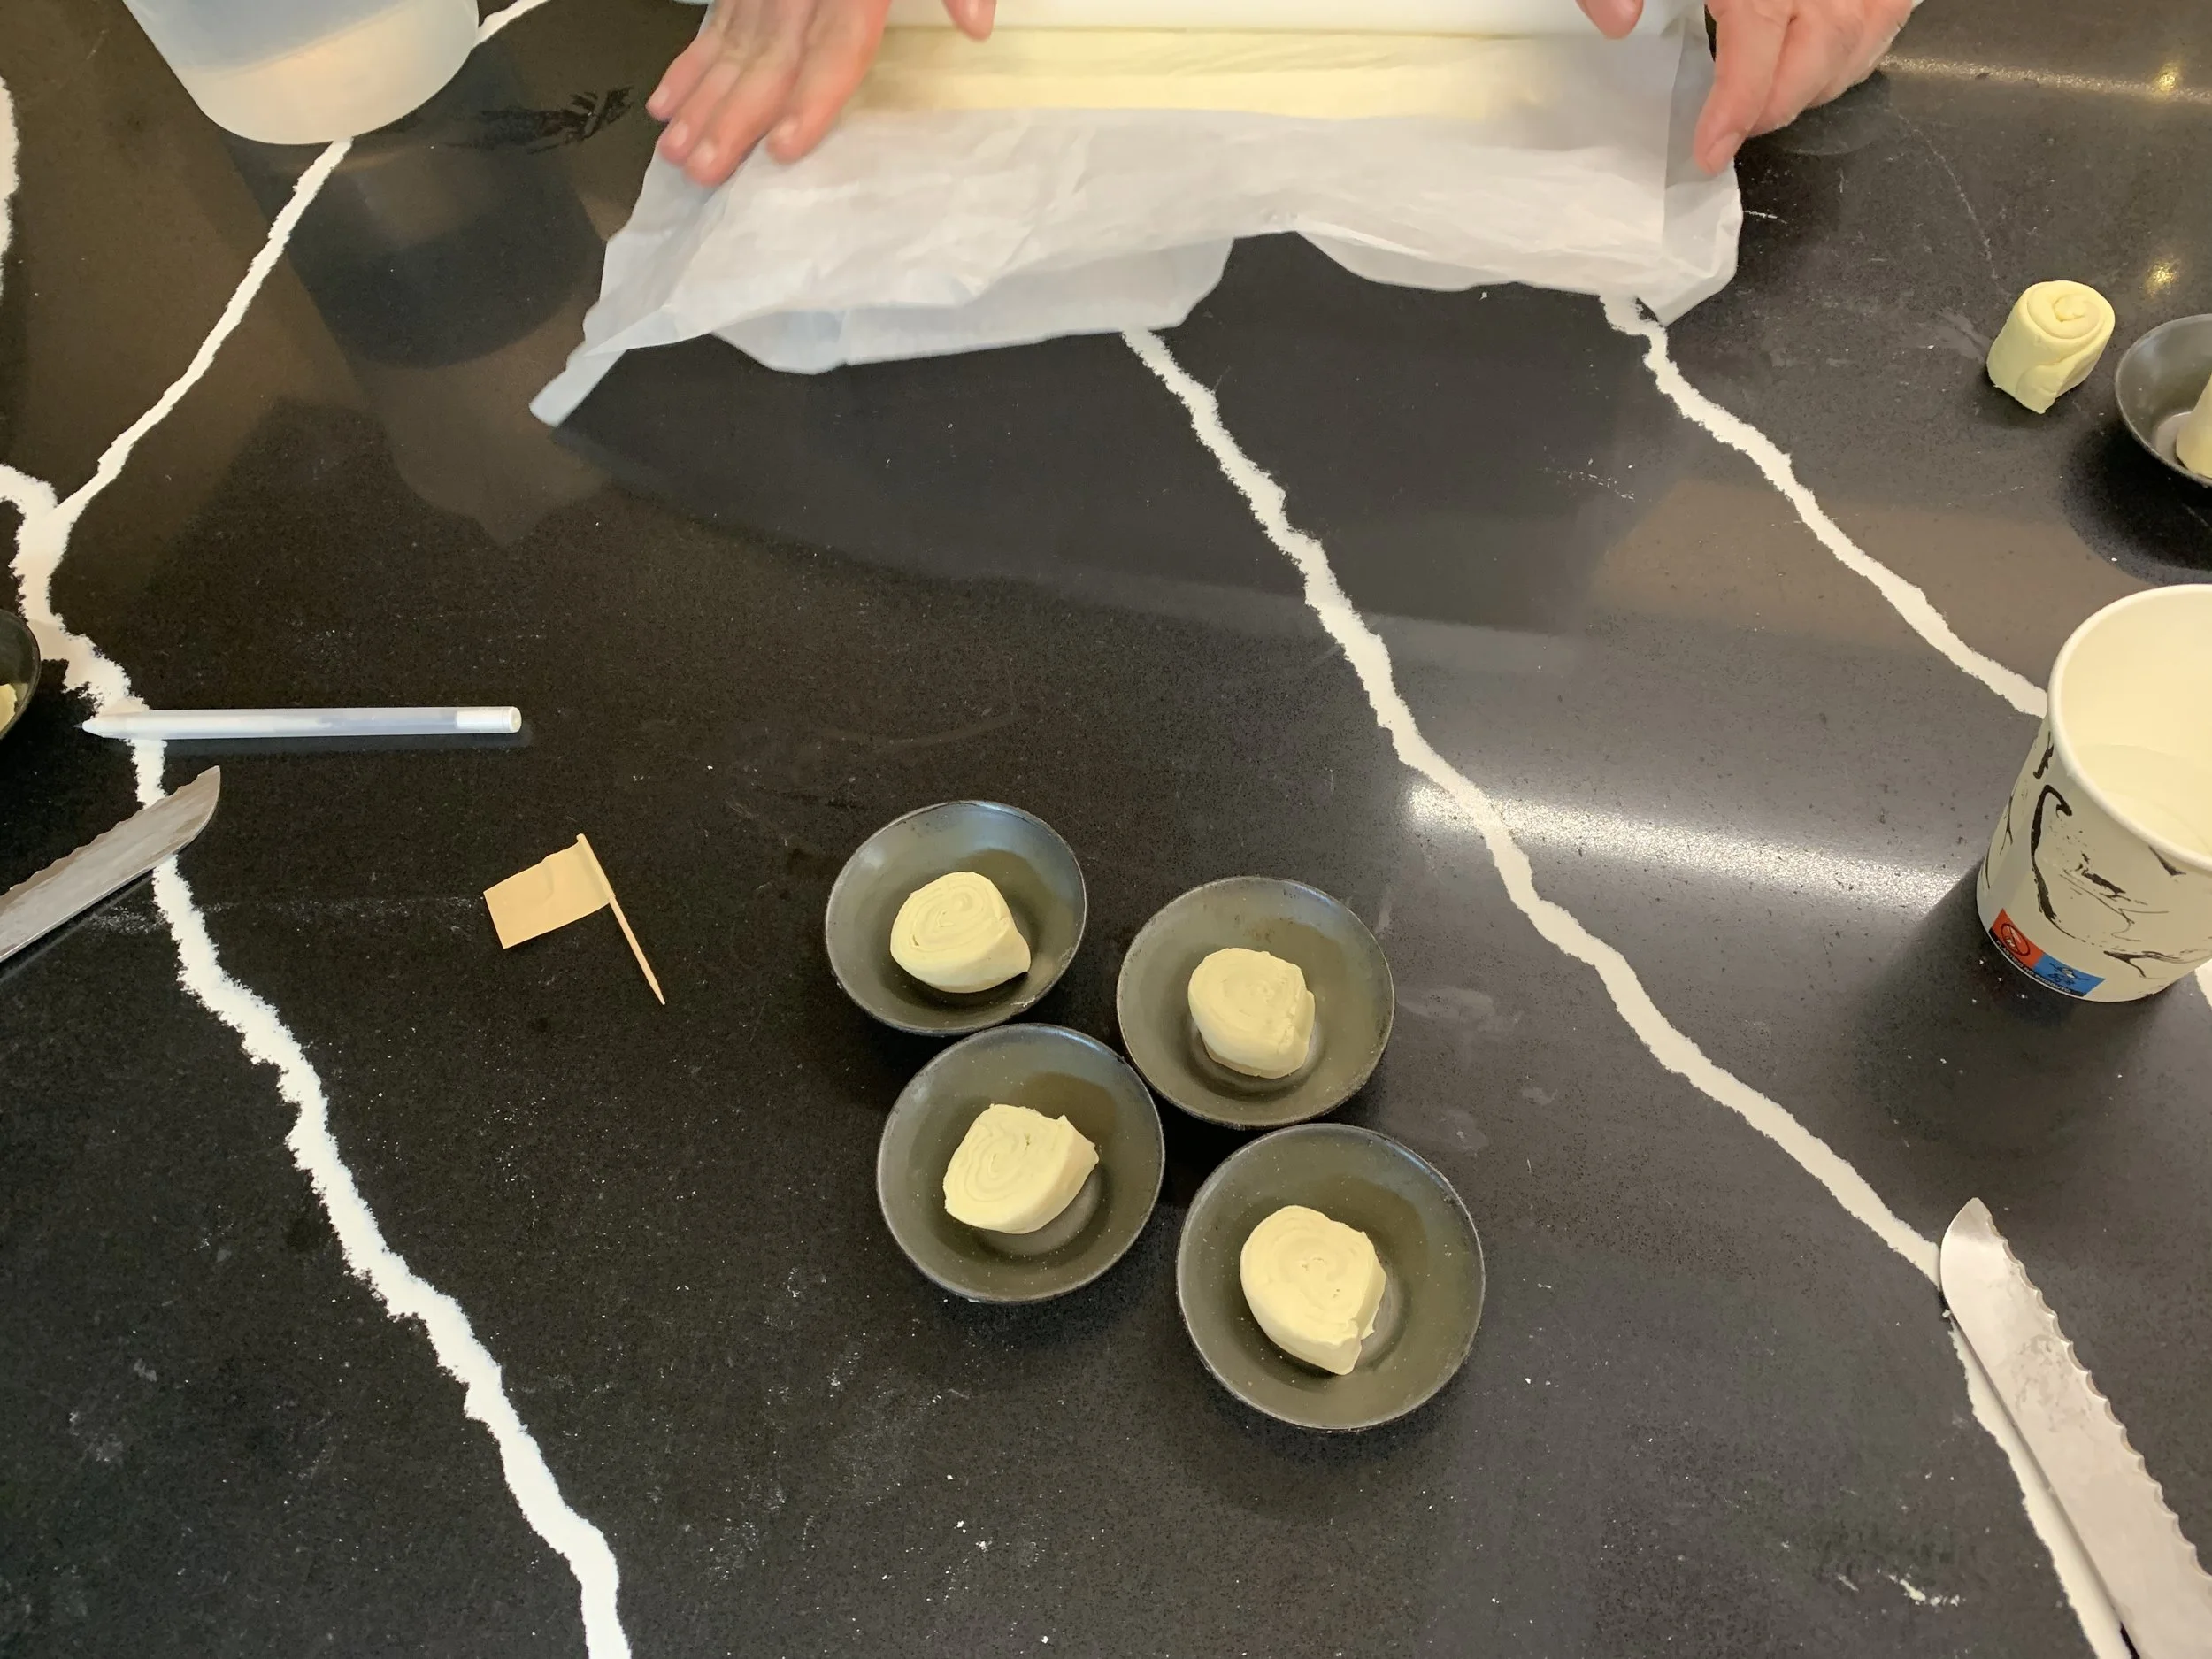
Next we dipped a thumb in water and pushed down directly into the center of the dough. Push firmly to flatten the bottom then work the dough evenly up the sides to create a rim just over the edge.

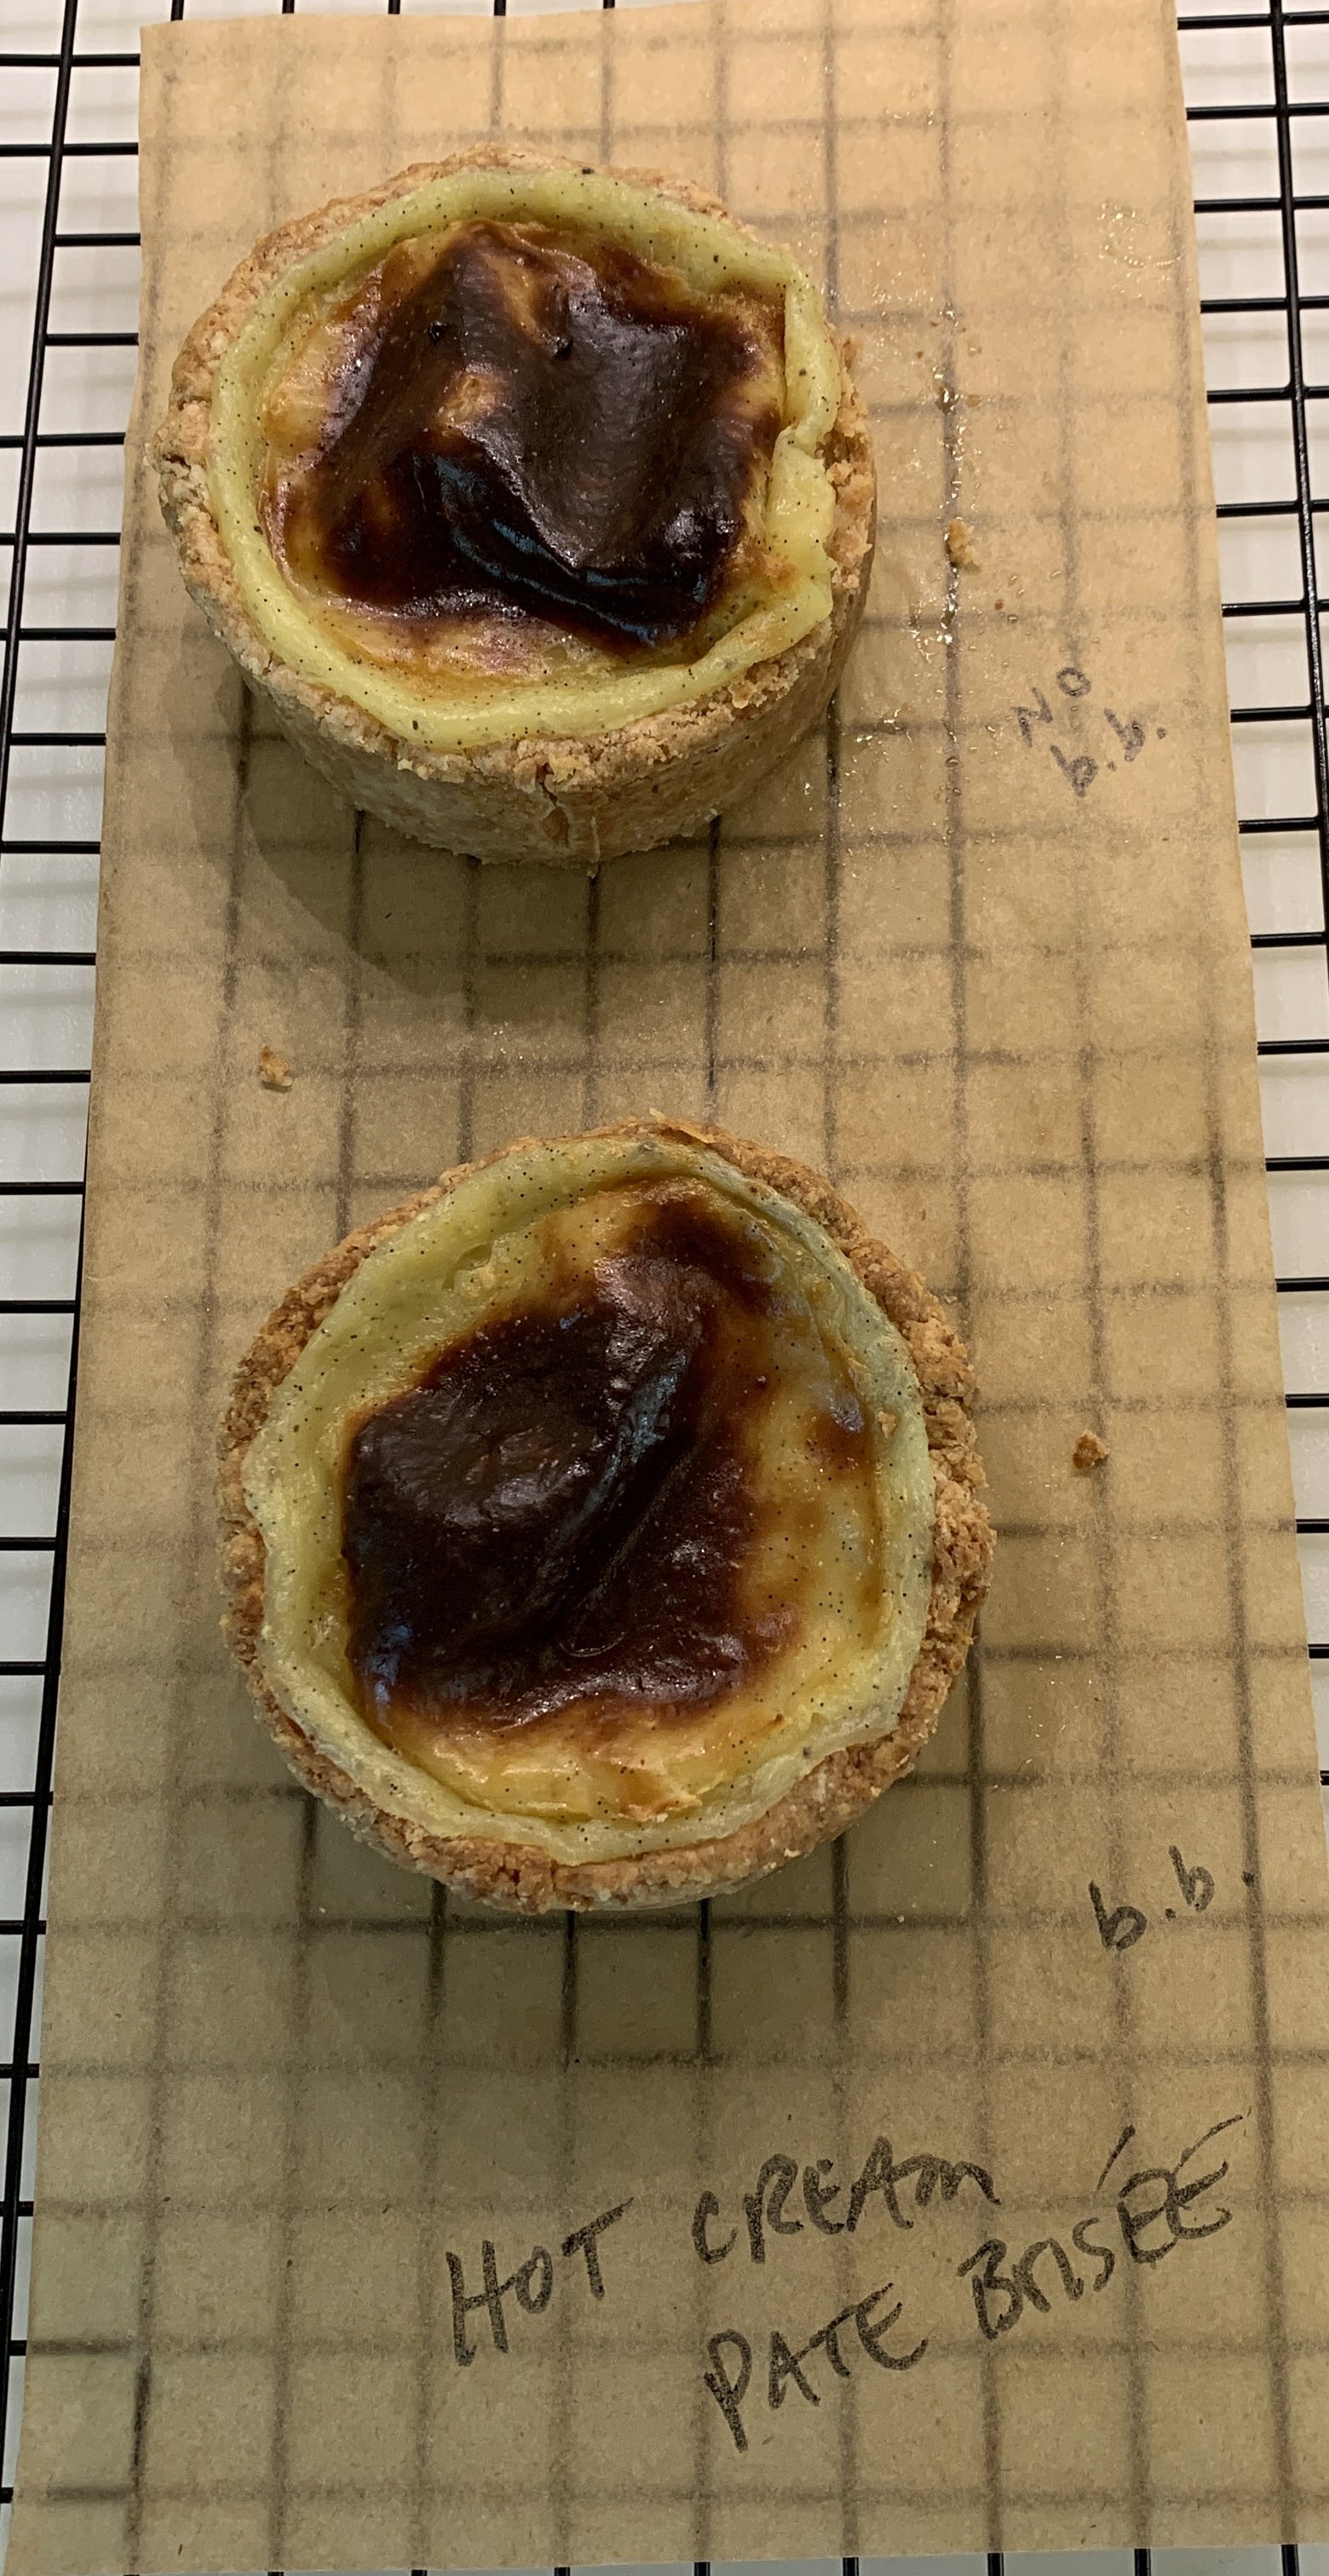
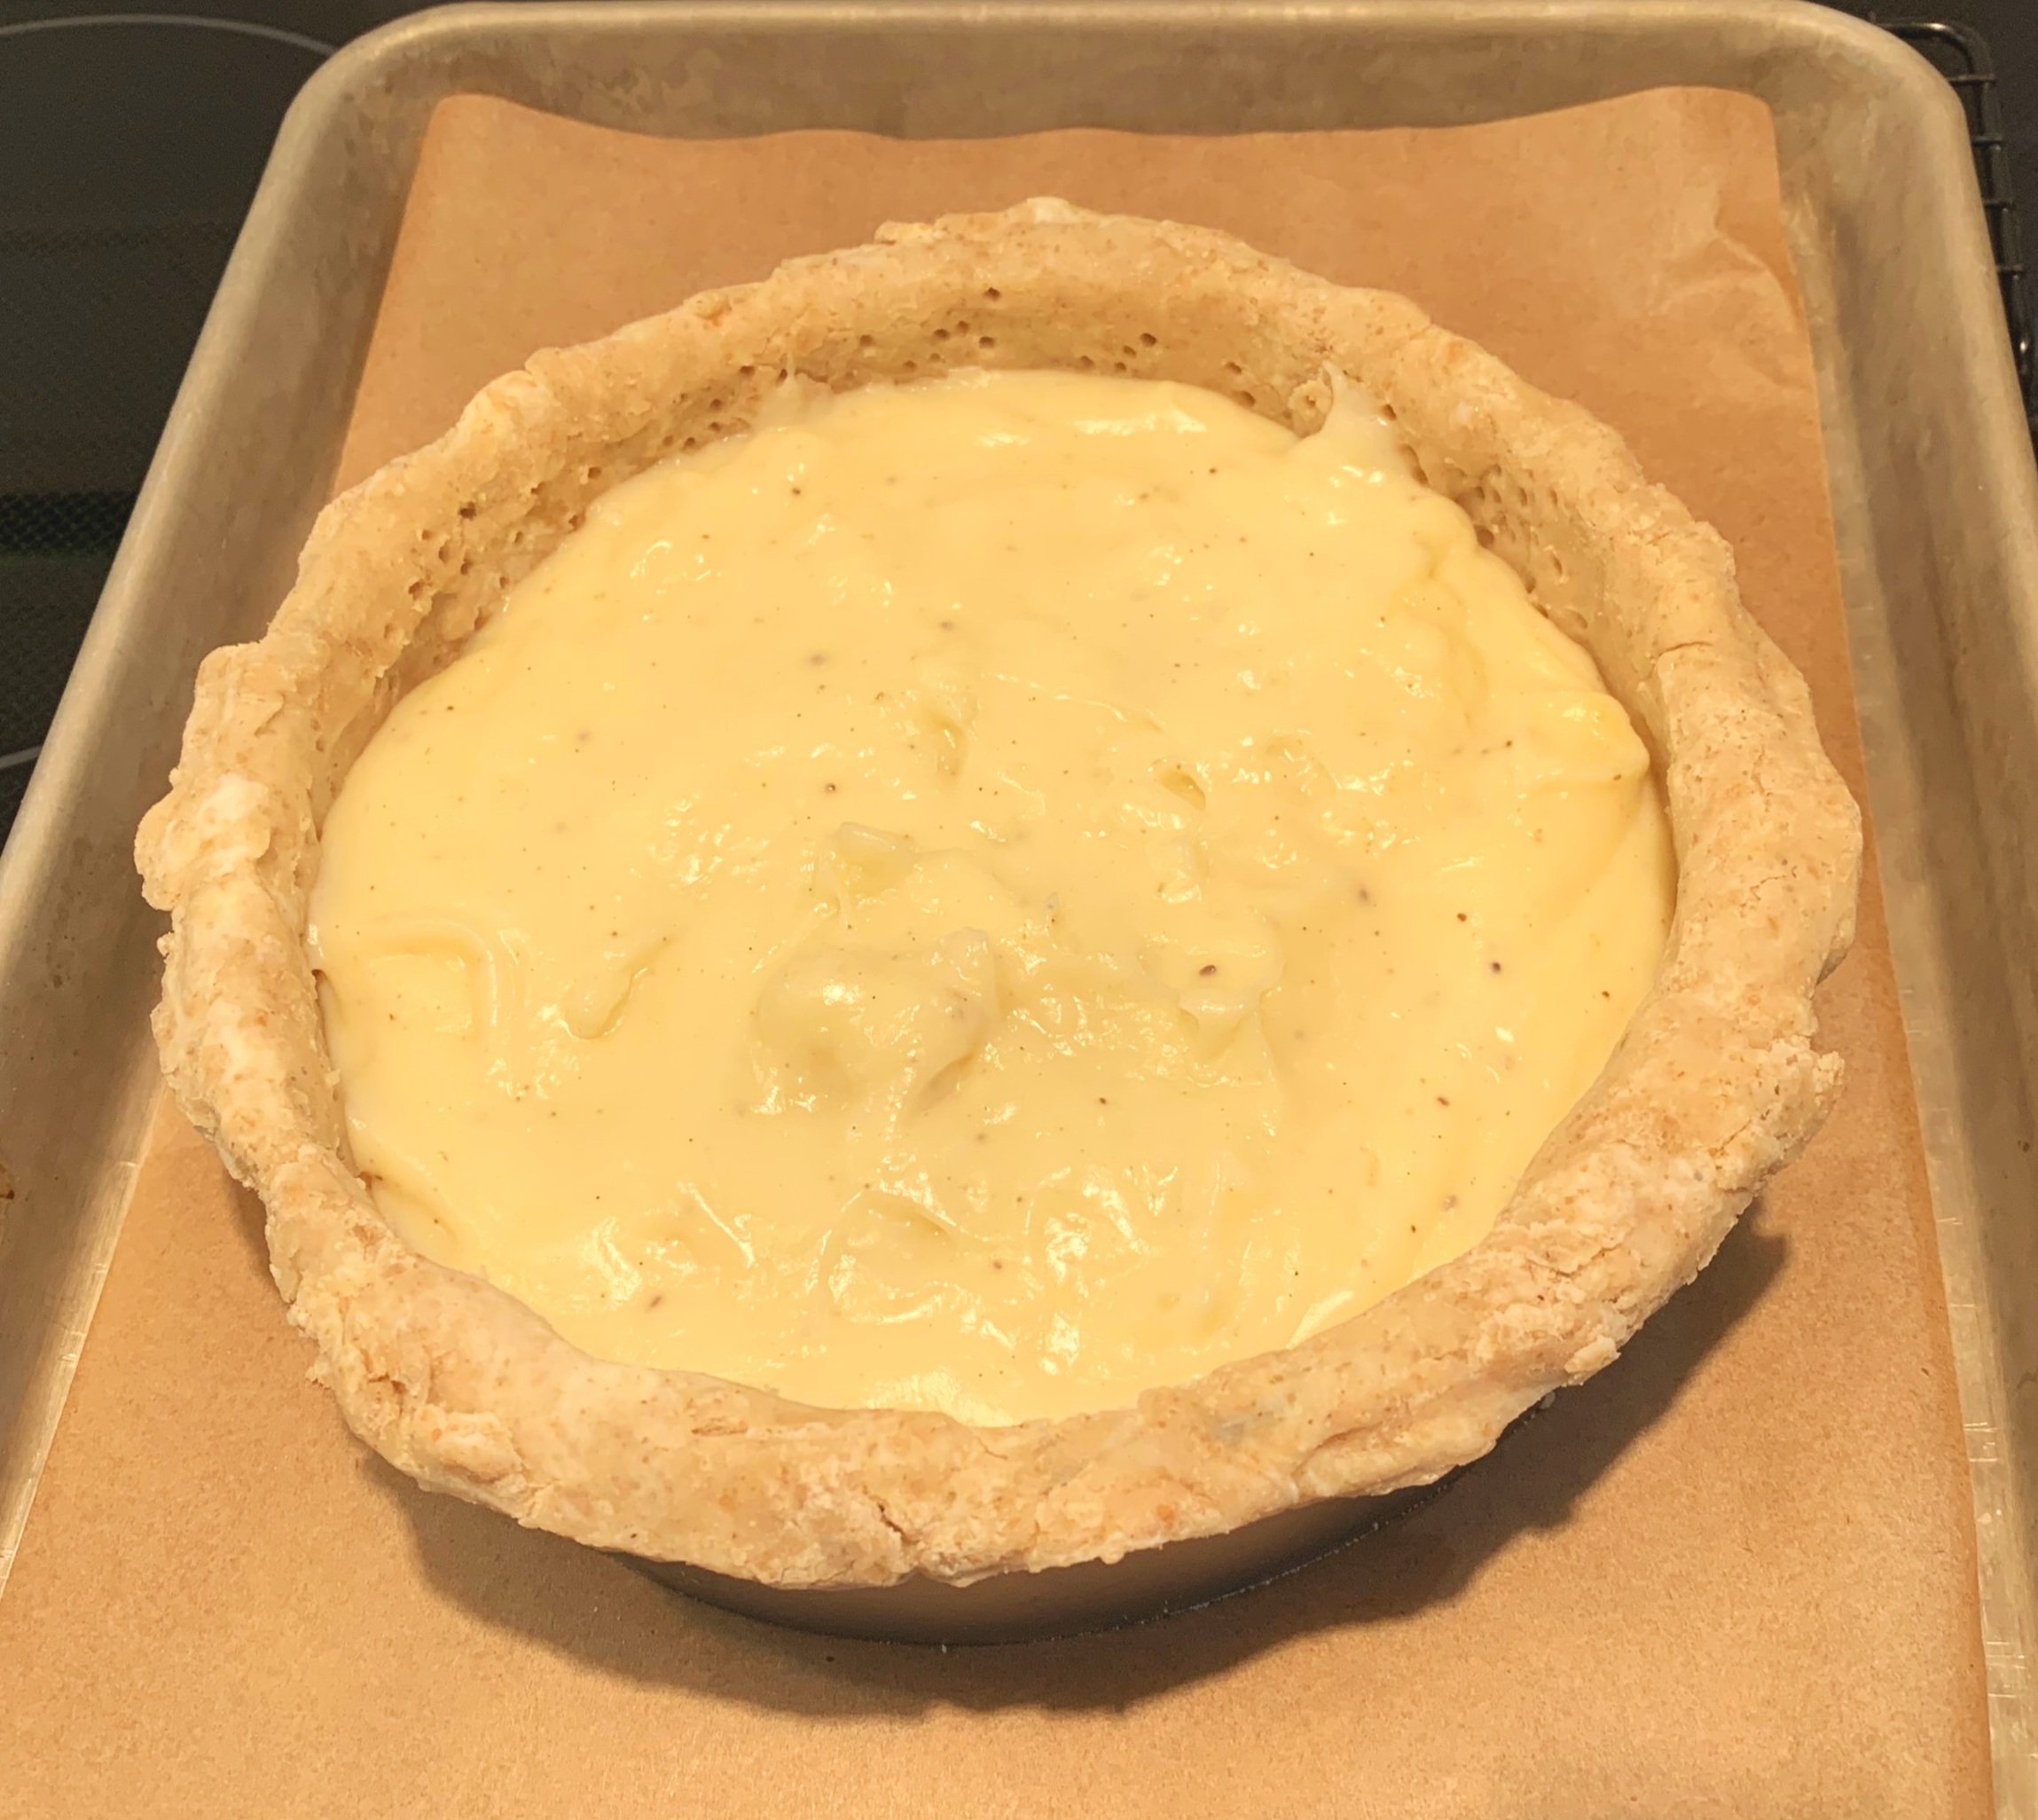
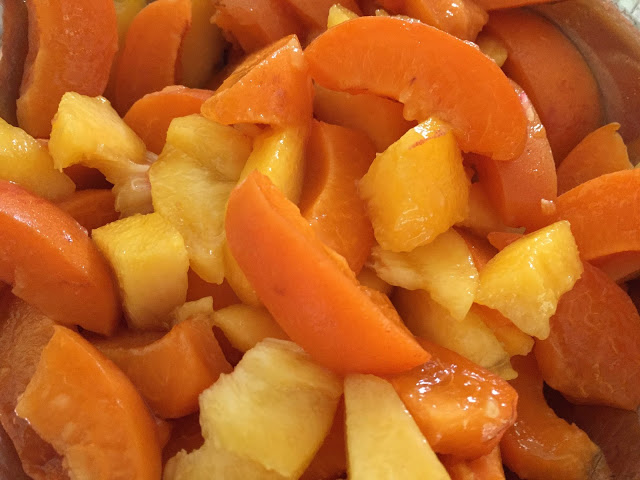
We had made a big batch of custard a little earlier in the class - made with 2% milk, cinnamon stick and some lemon peel first brought to a boil. Reduce heat to low as you add a flour/sugar mixture, stirring constantly to avoid lumps. Then cook over medium heat until thickened a bit (it should leave a trail when lifting the spoon) then set aside to cool to room temperature. Egg yolks shouldn’t go in when the mixture is boiling hot - add the yolks to the base custard mixture right before filling the shells. I’m told this lends itself to a nice silky custard that isn’t too firm or flan like.

Fill each shell with custard almost to the top.


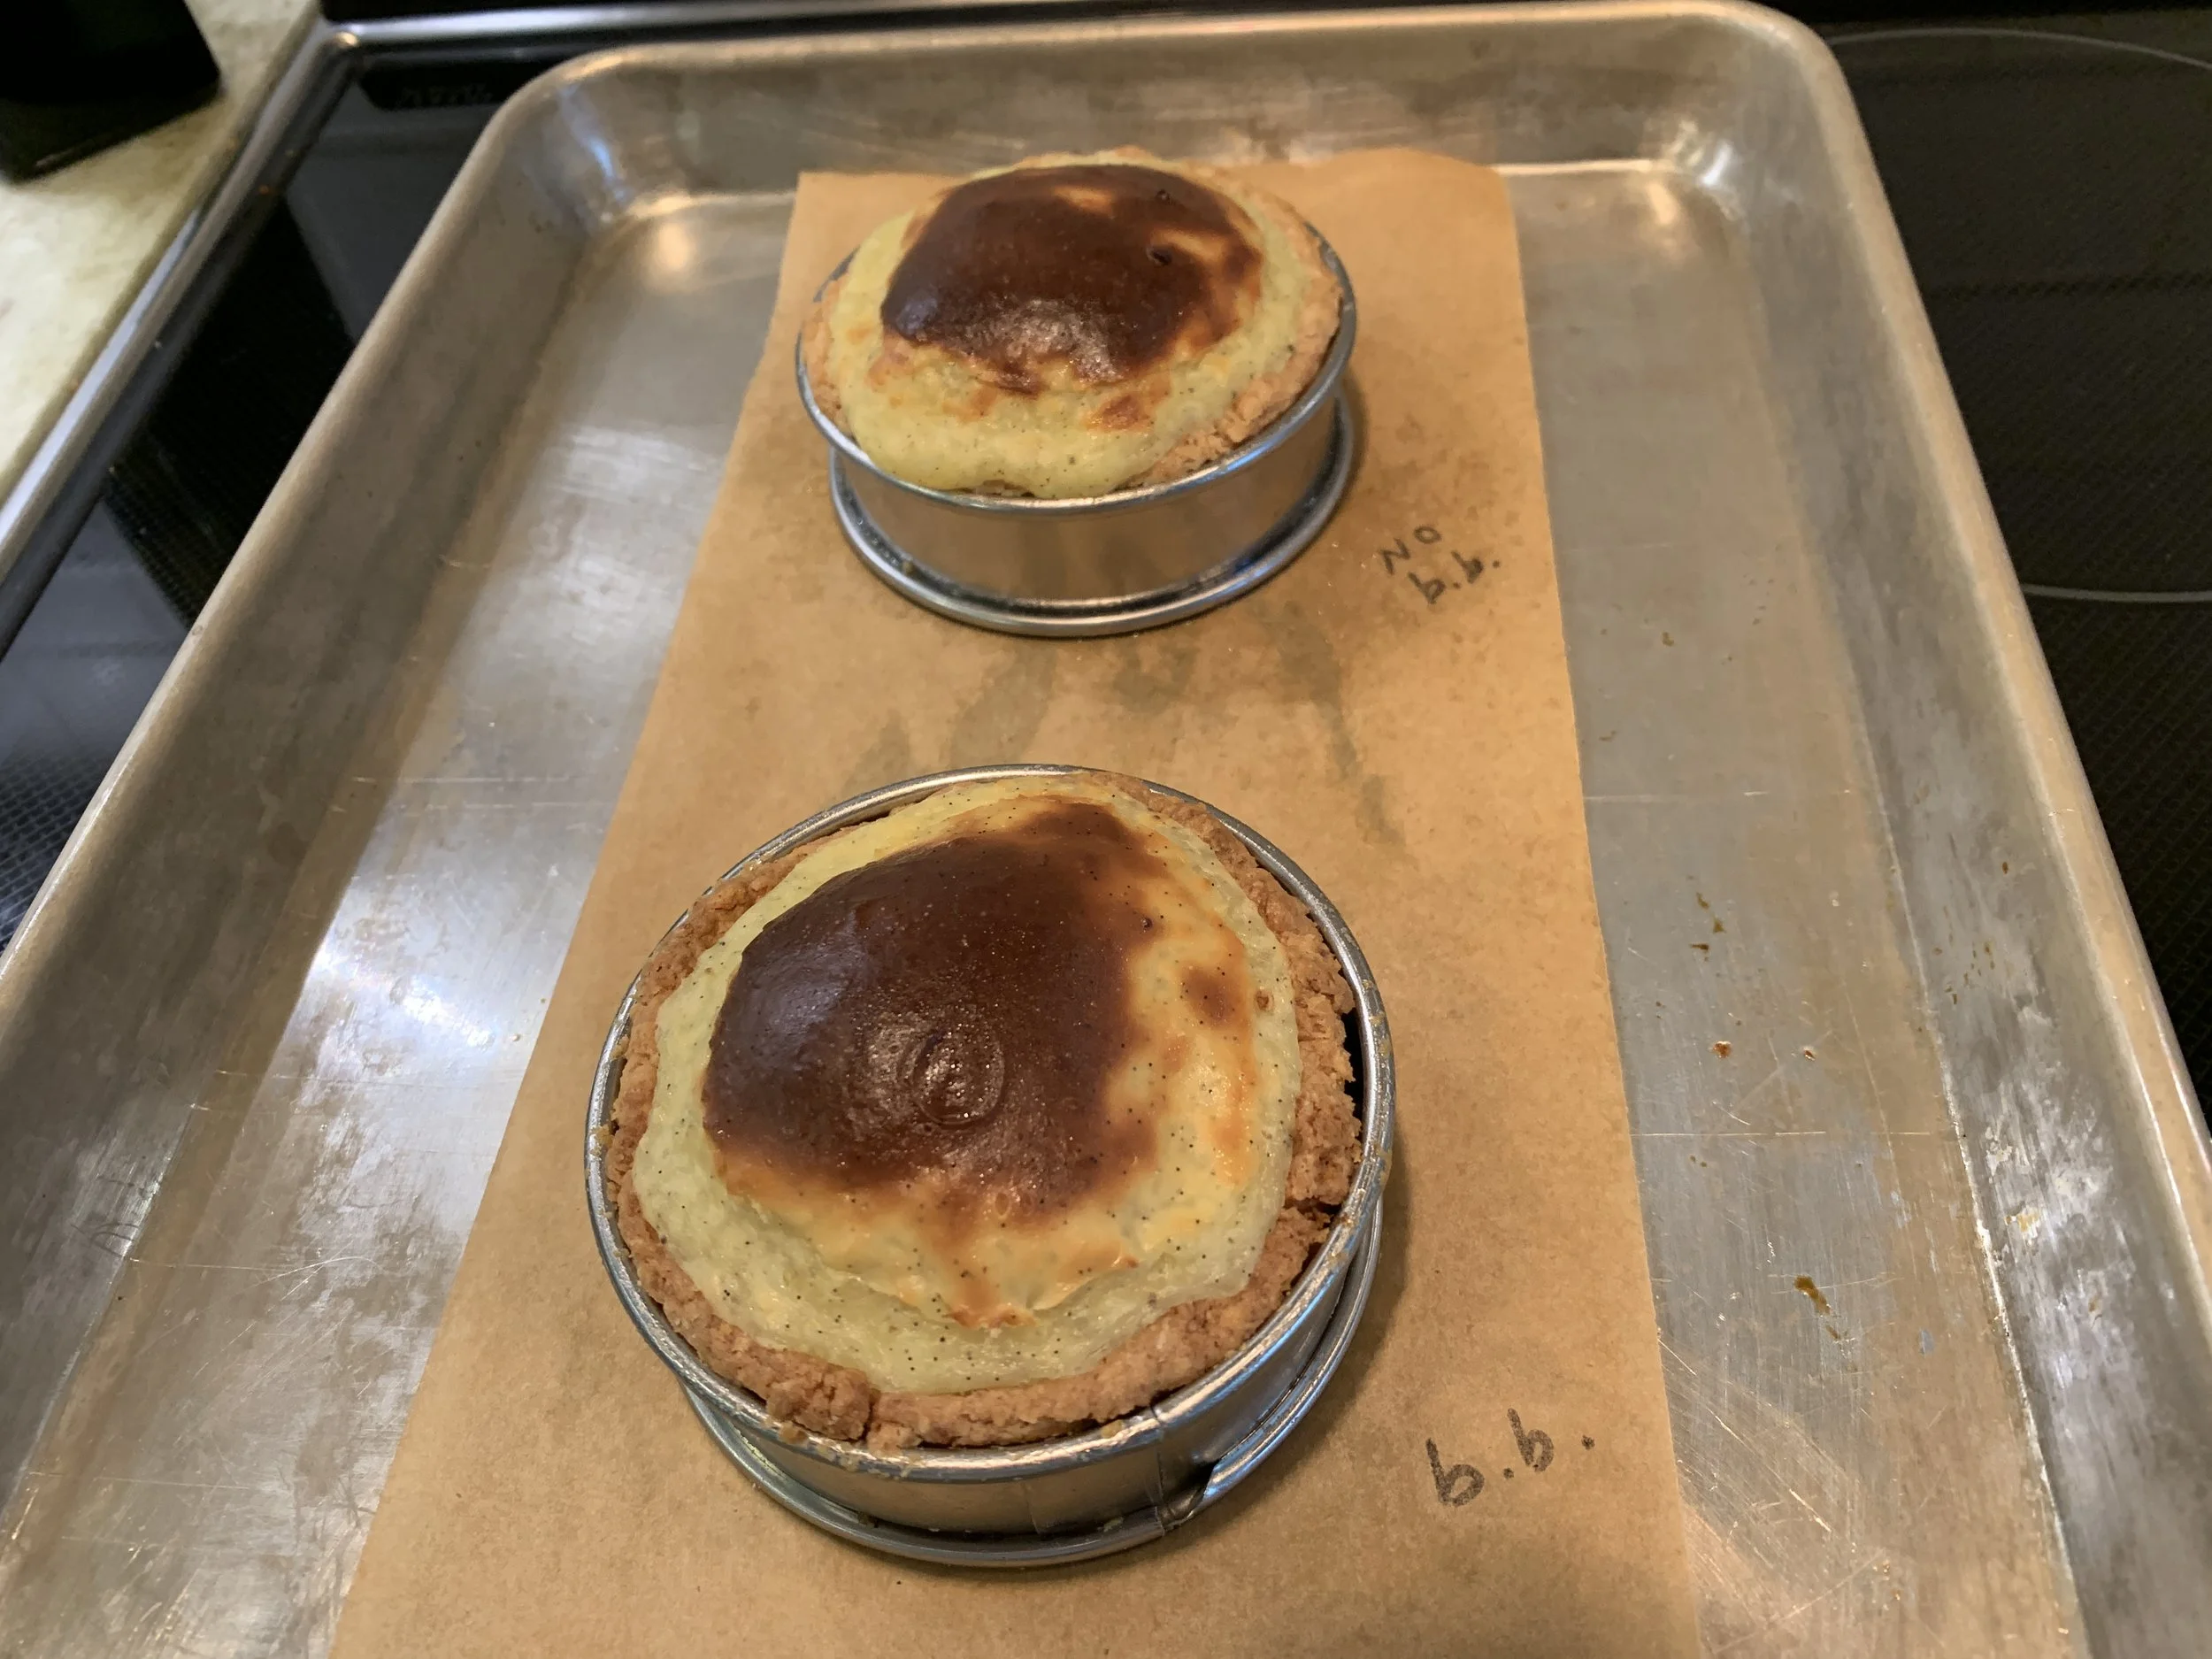
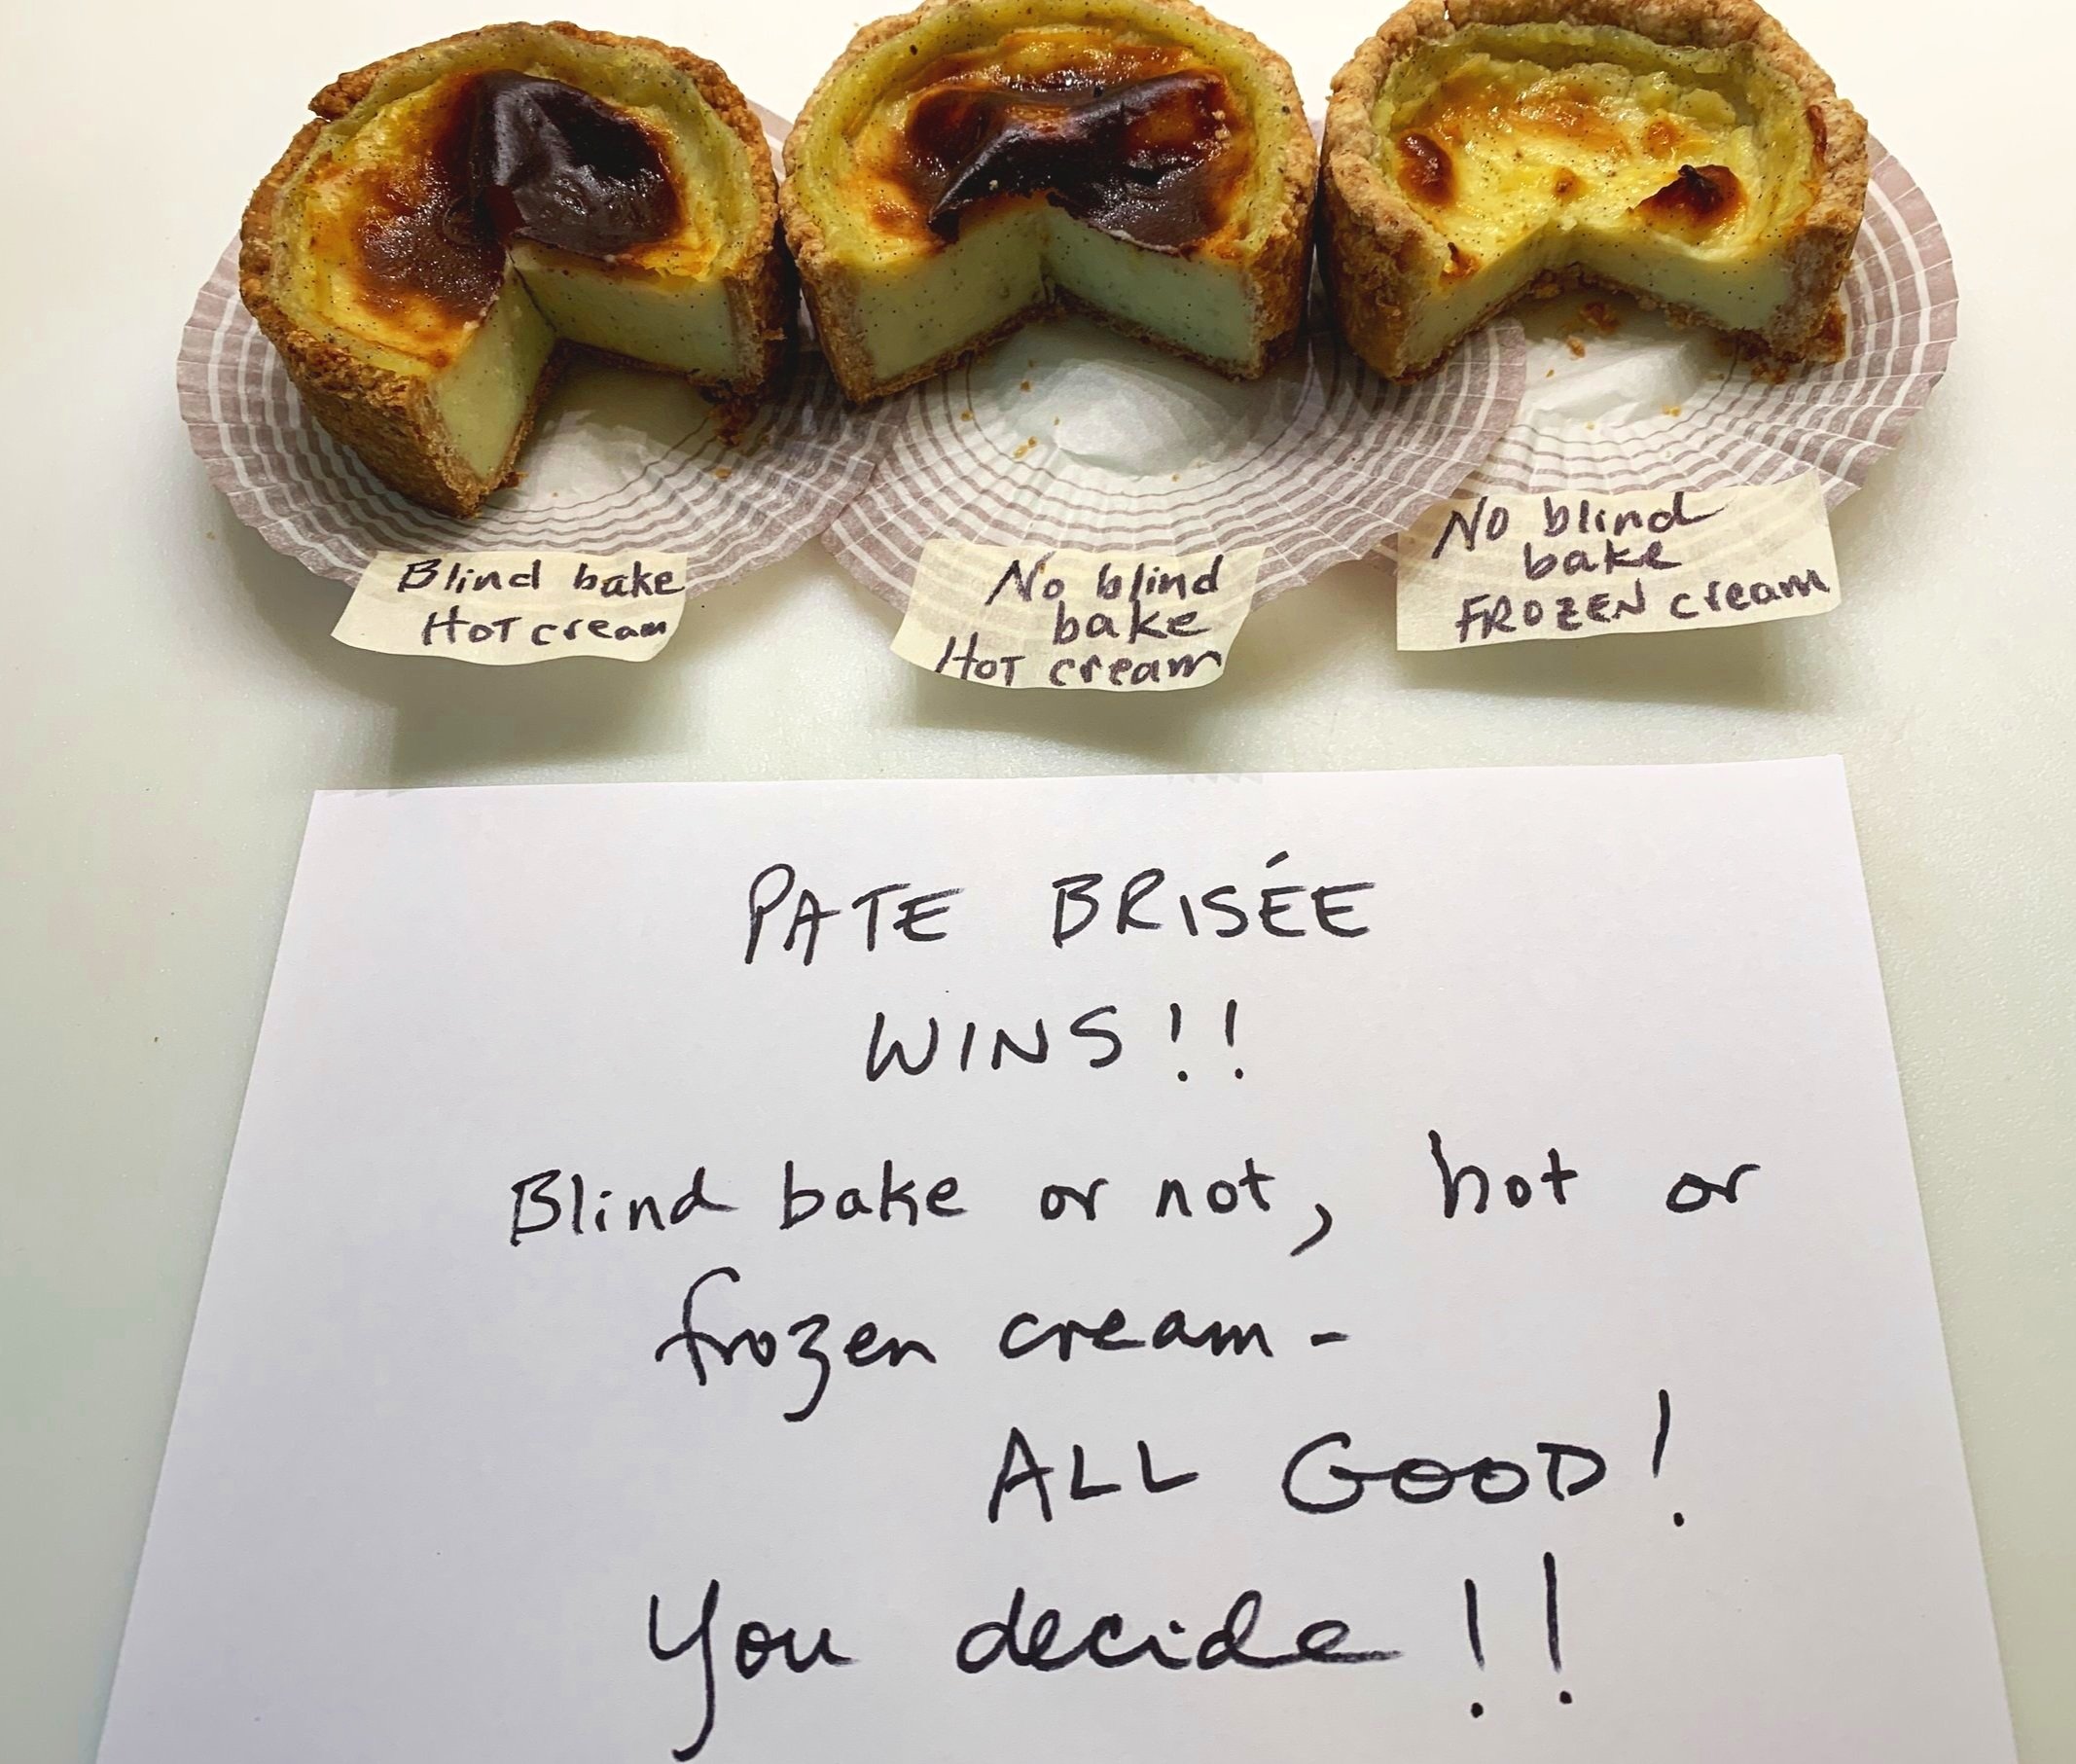
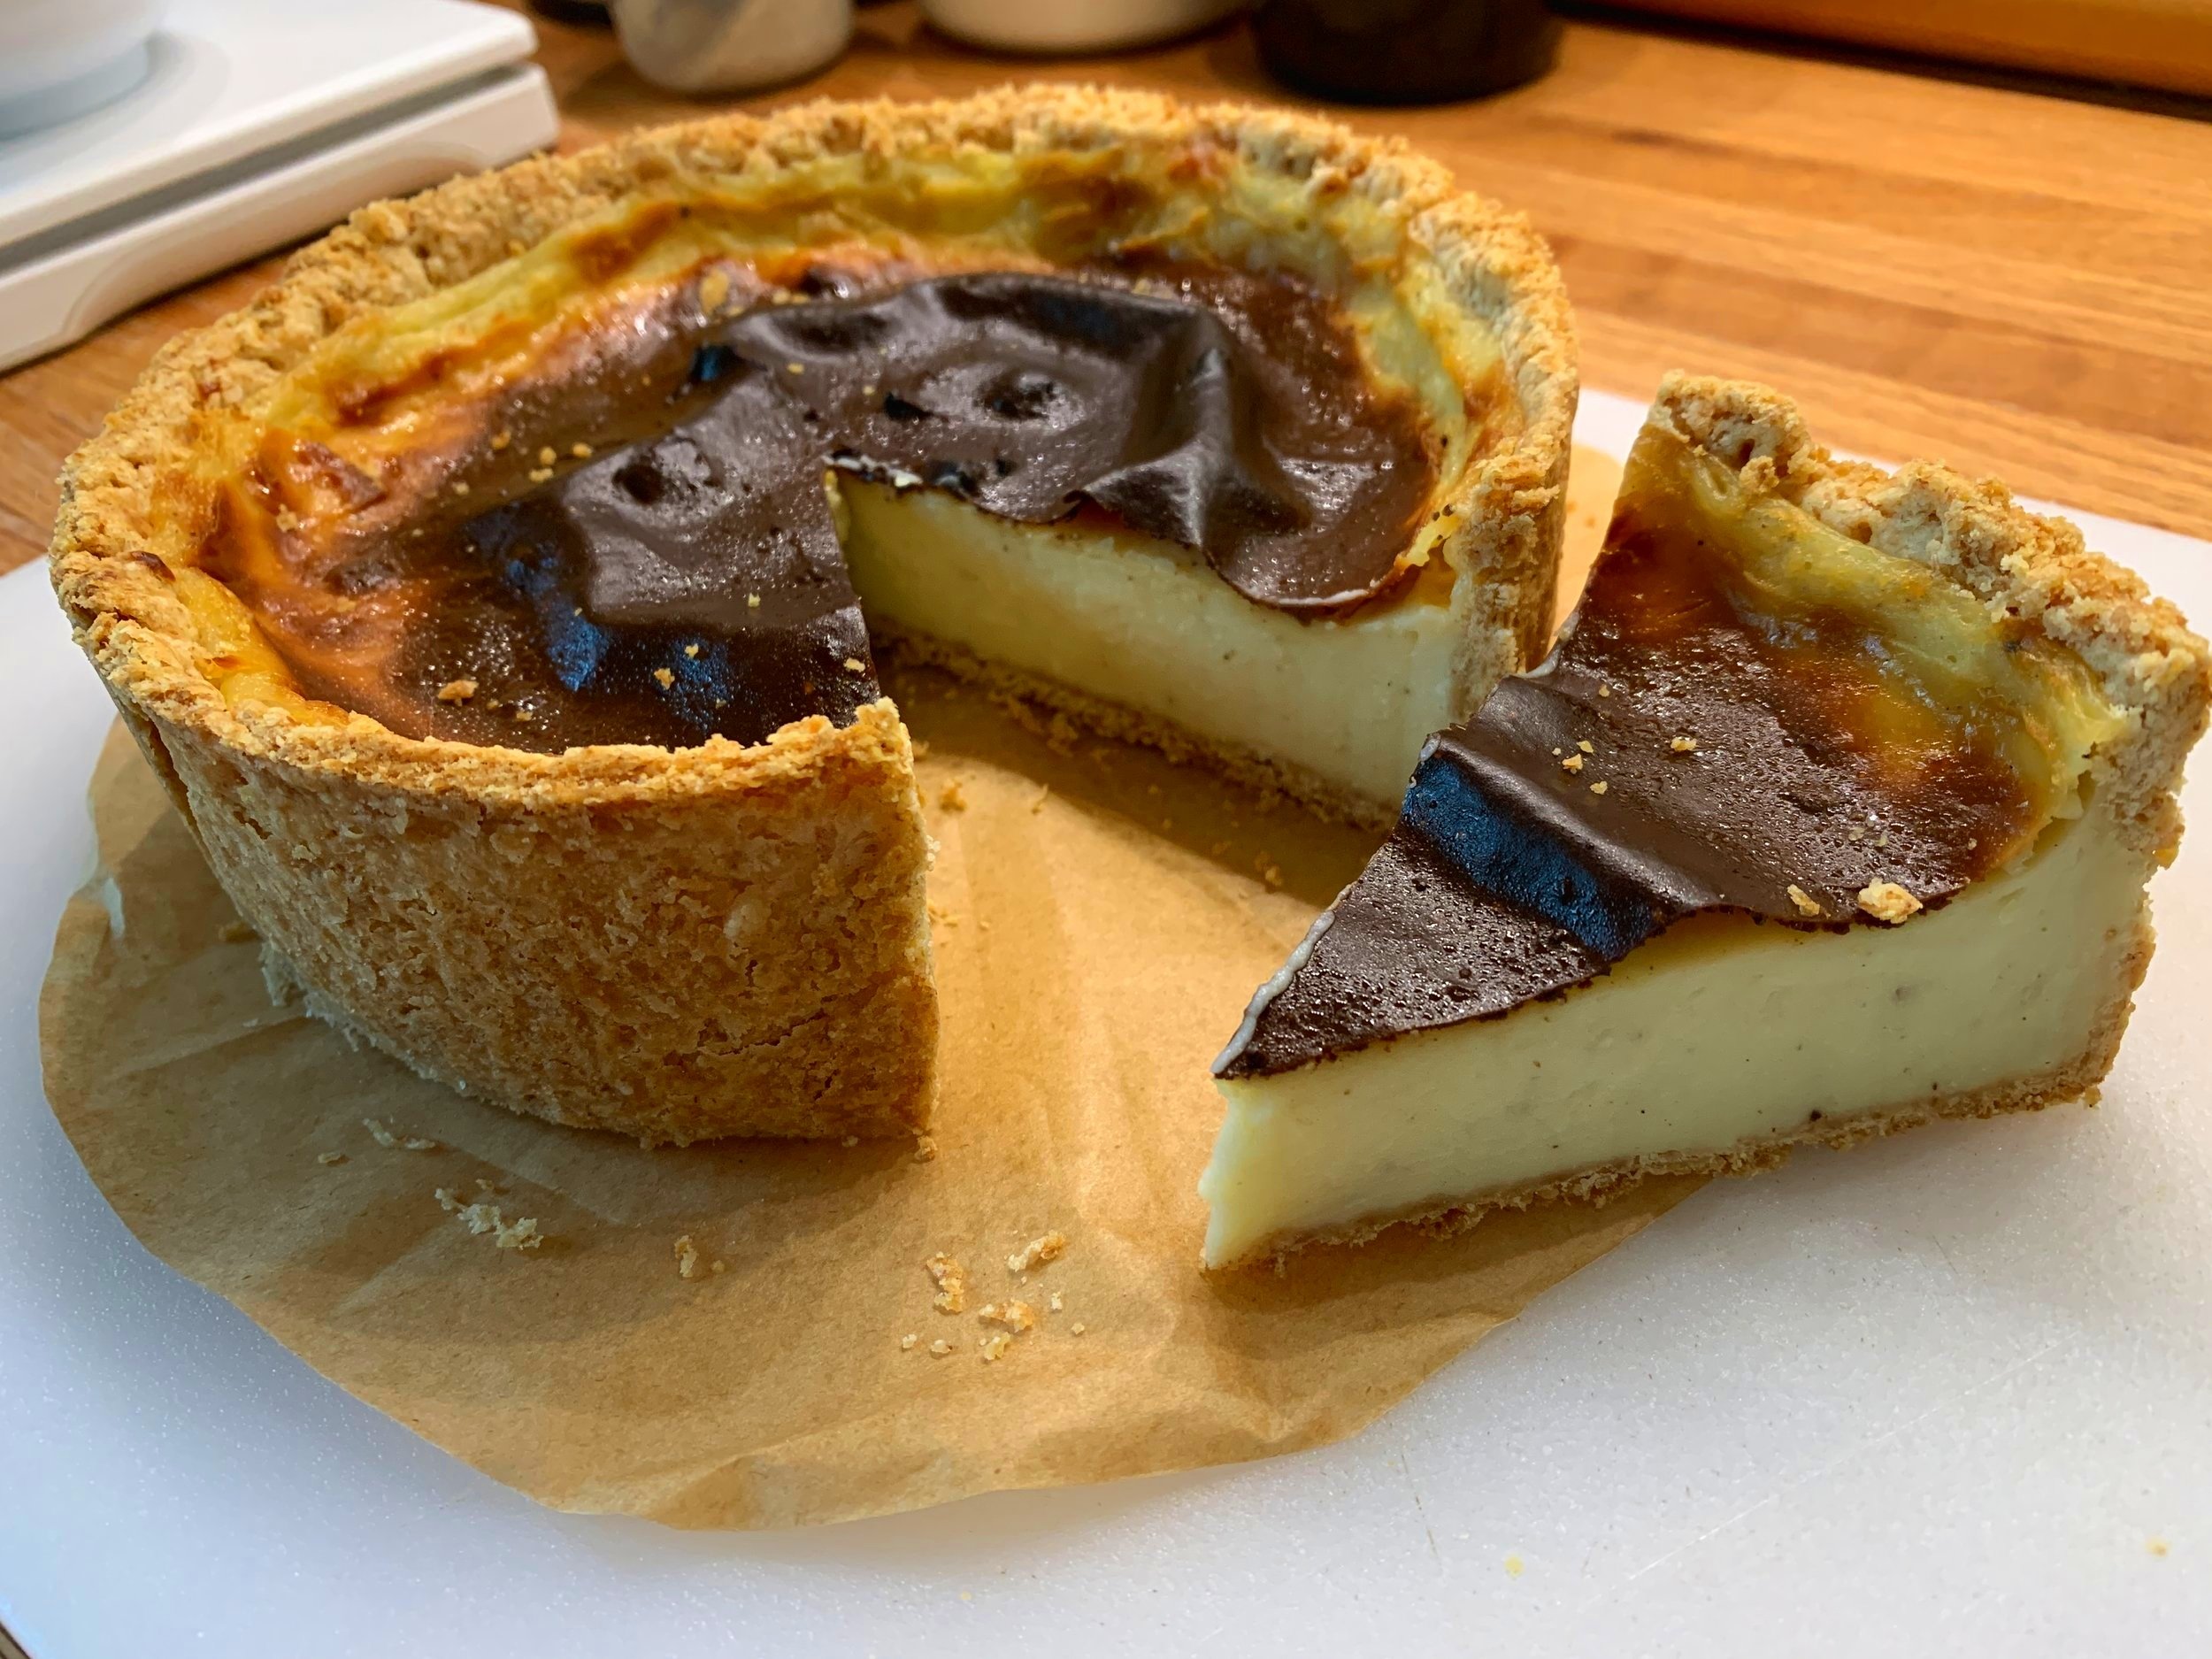
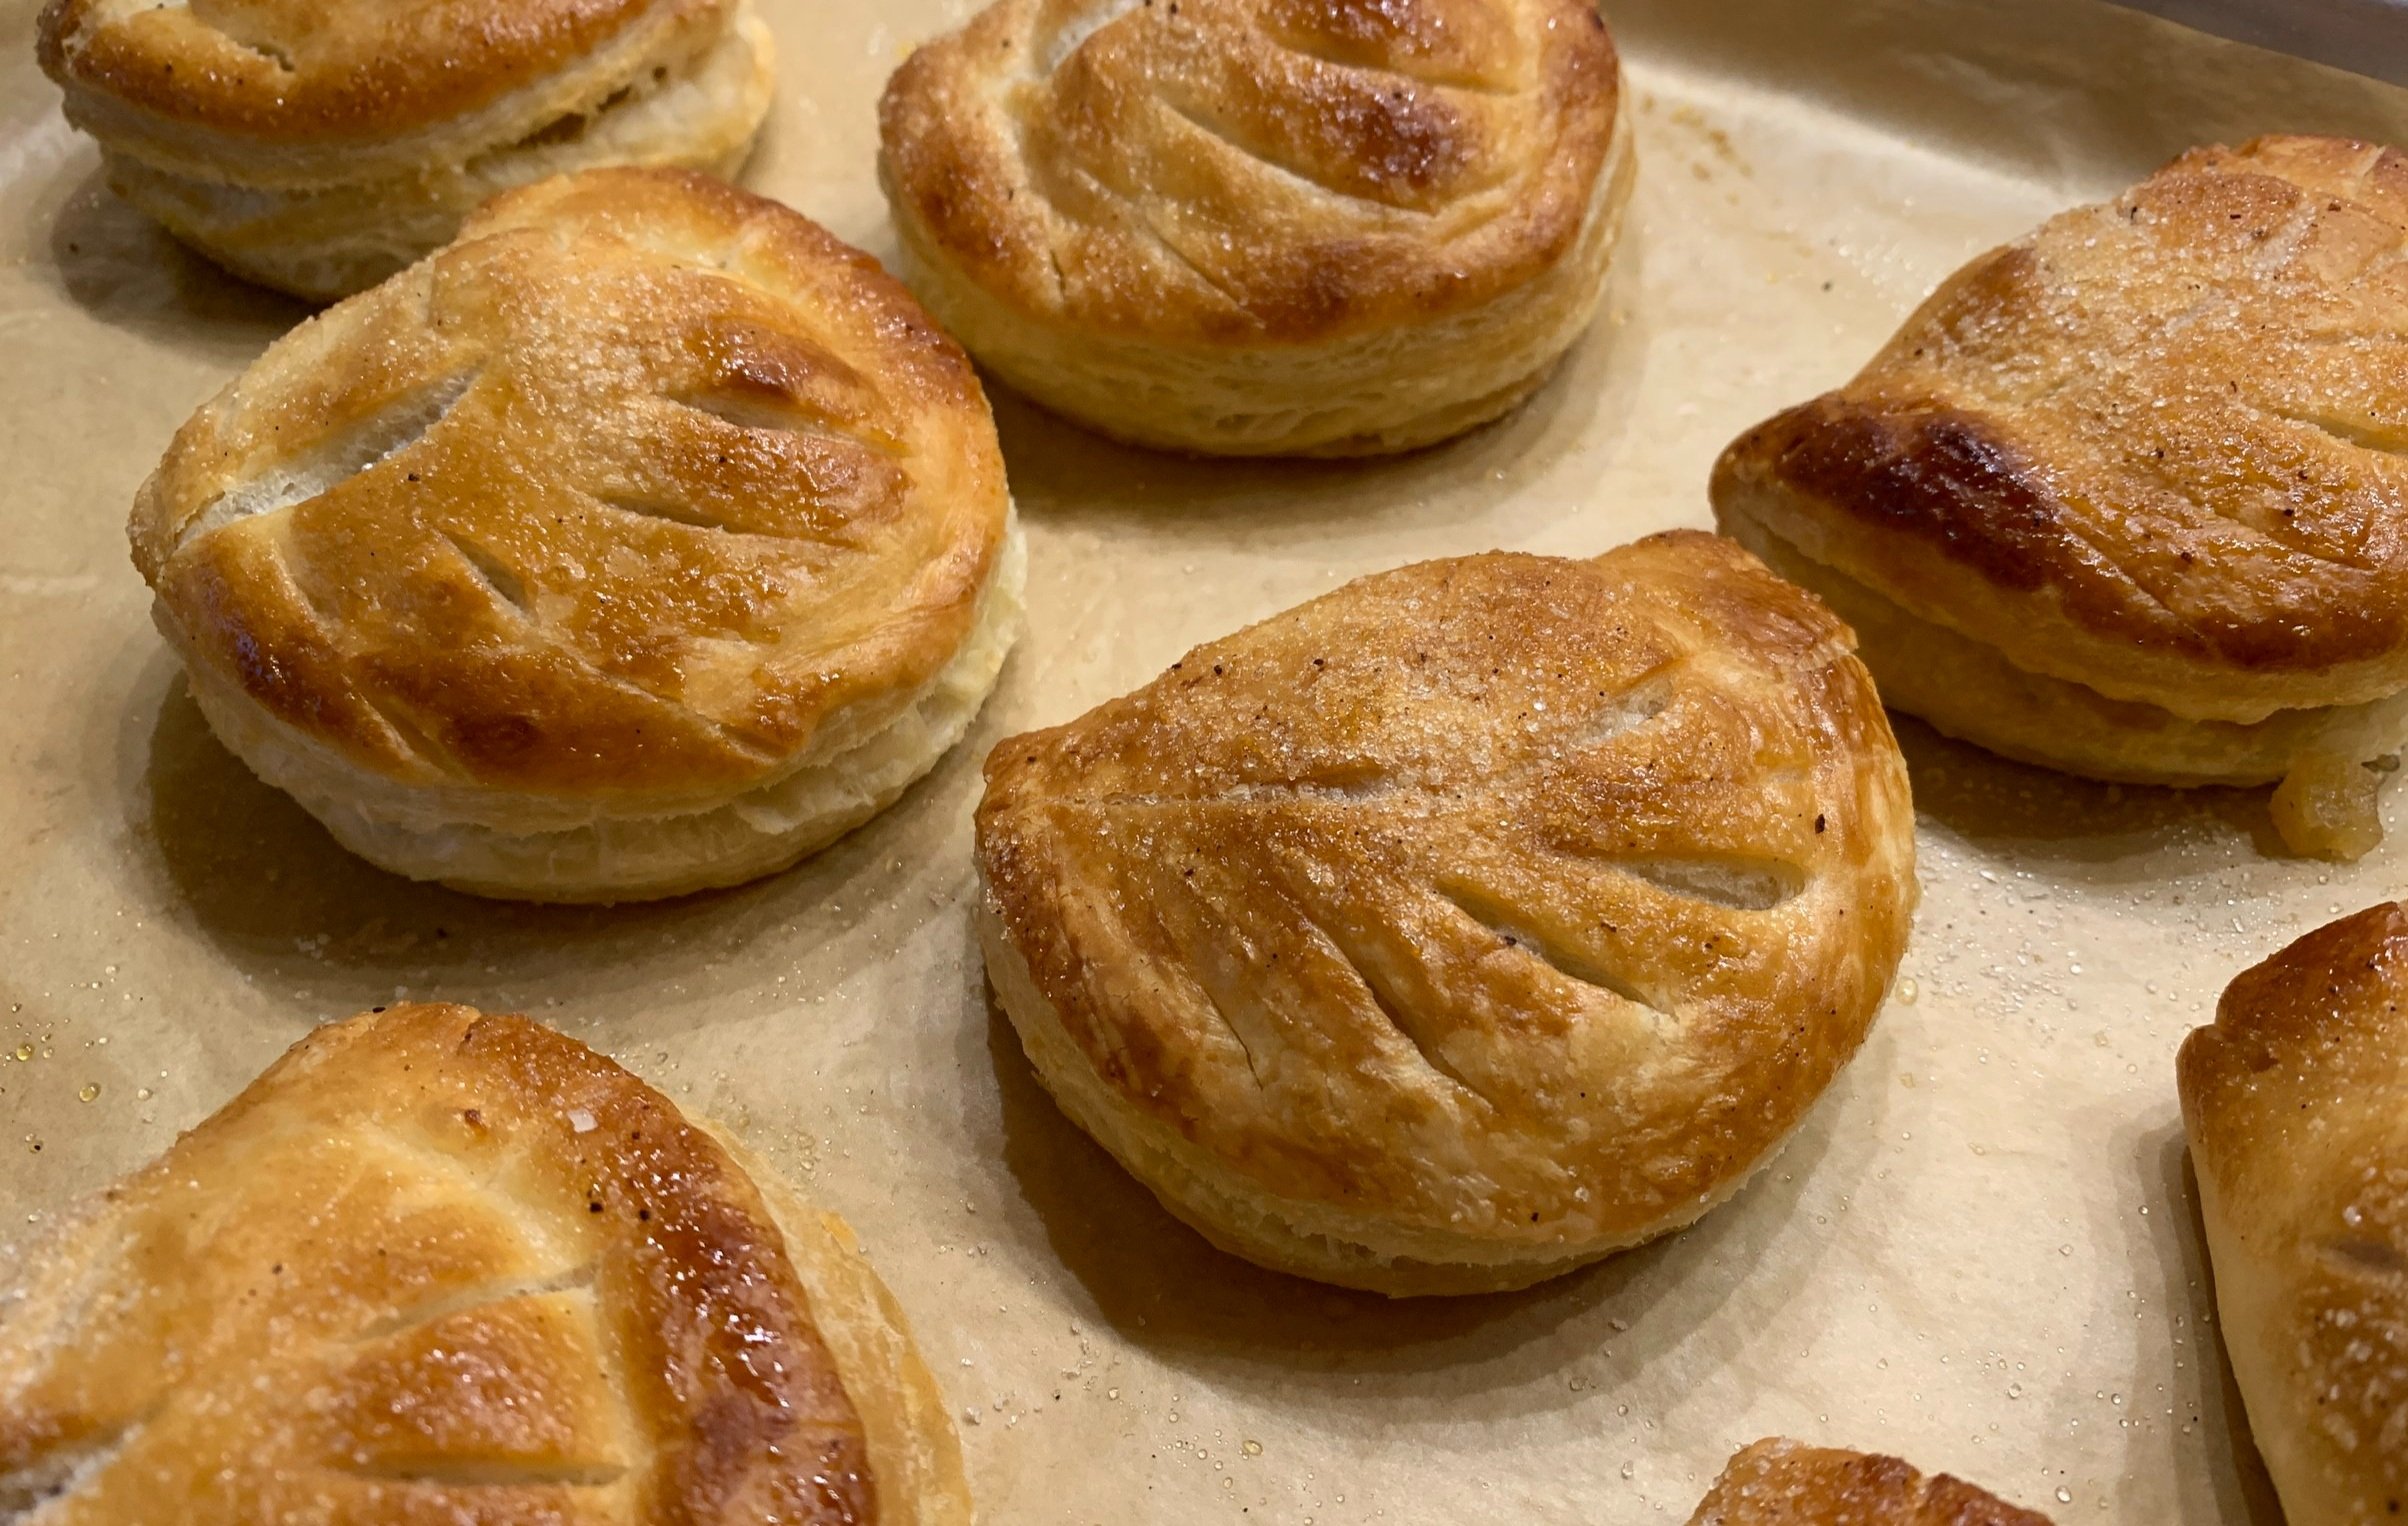
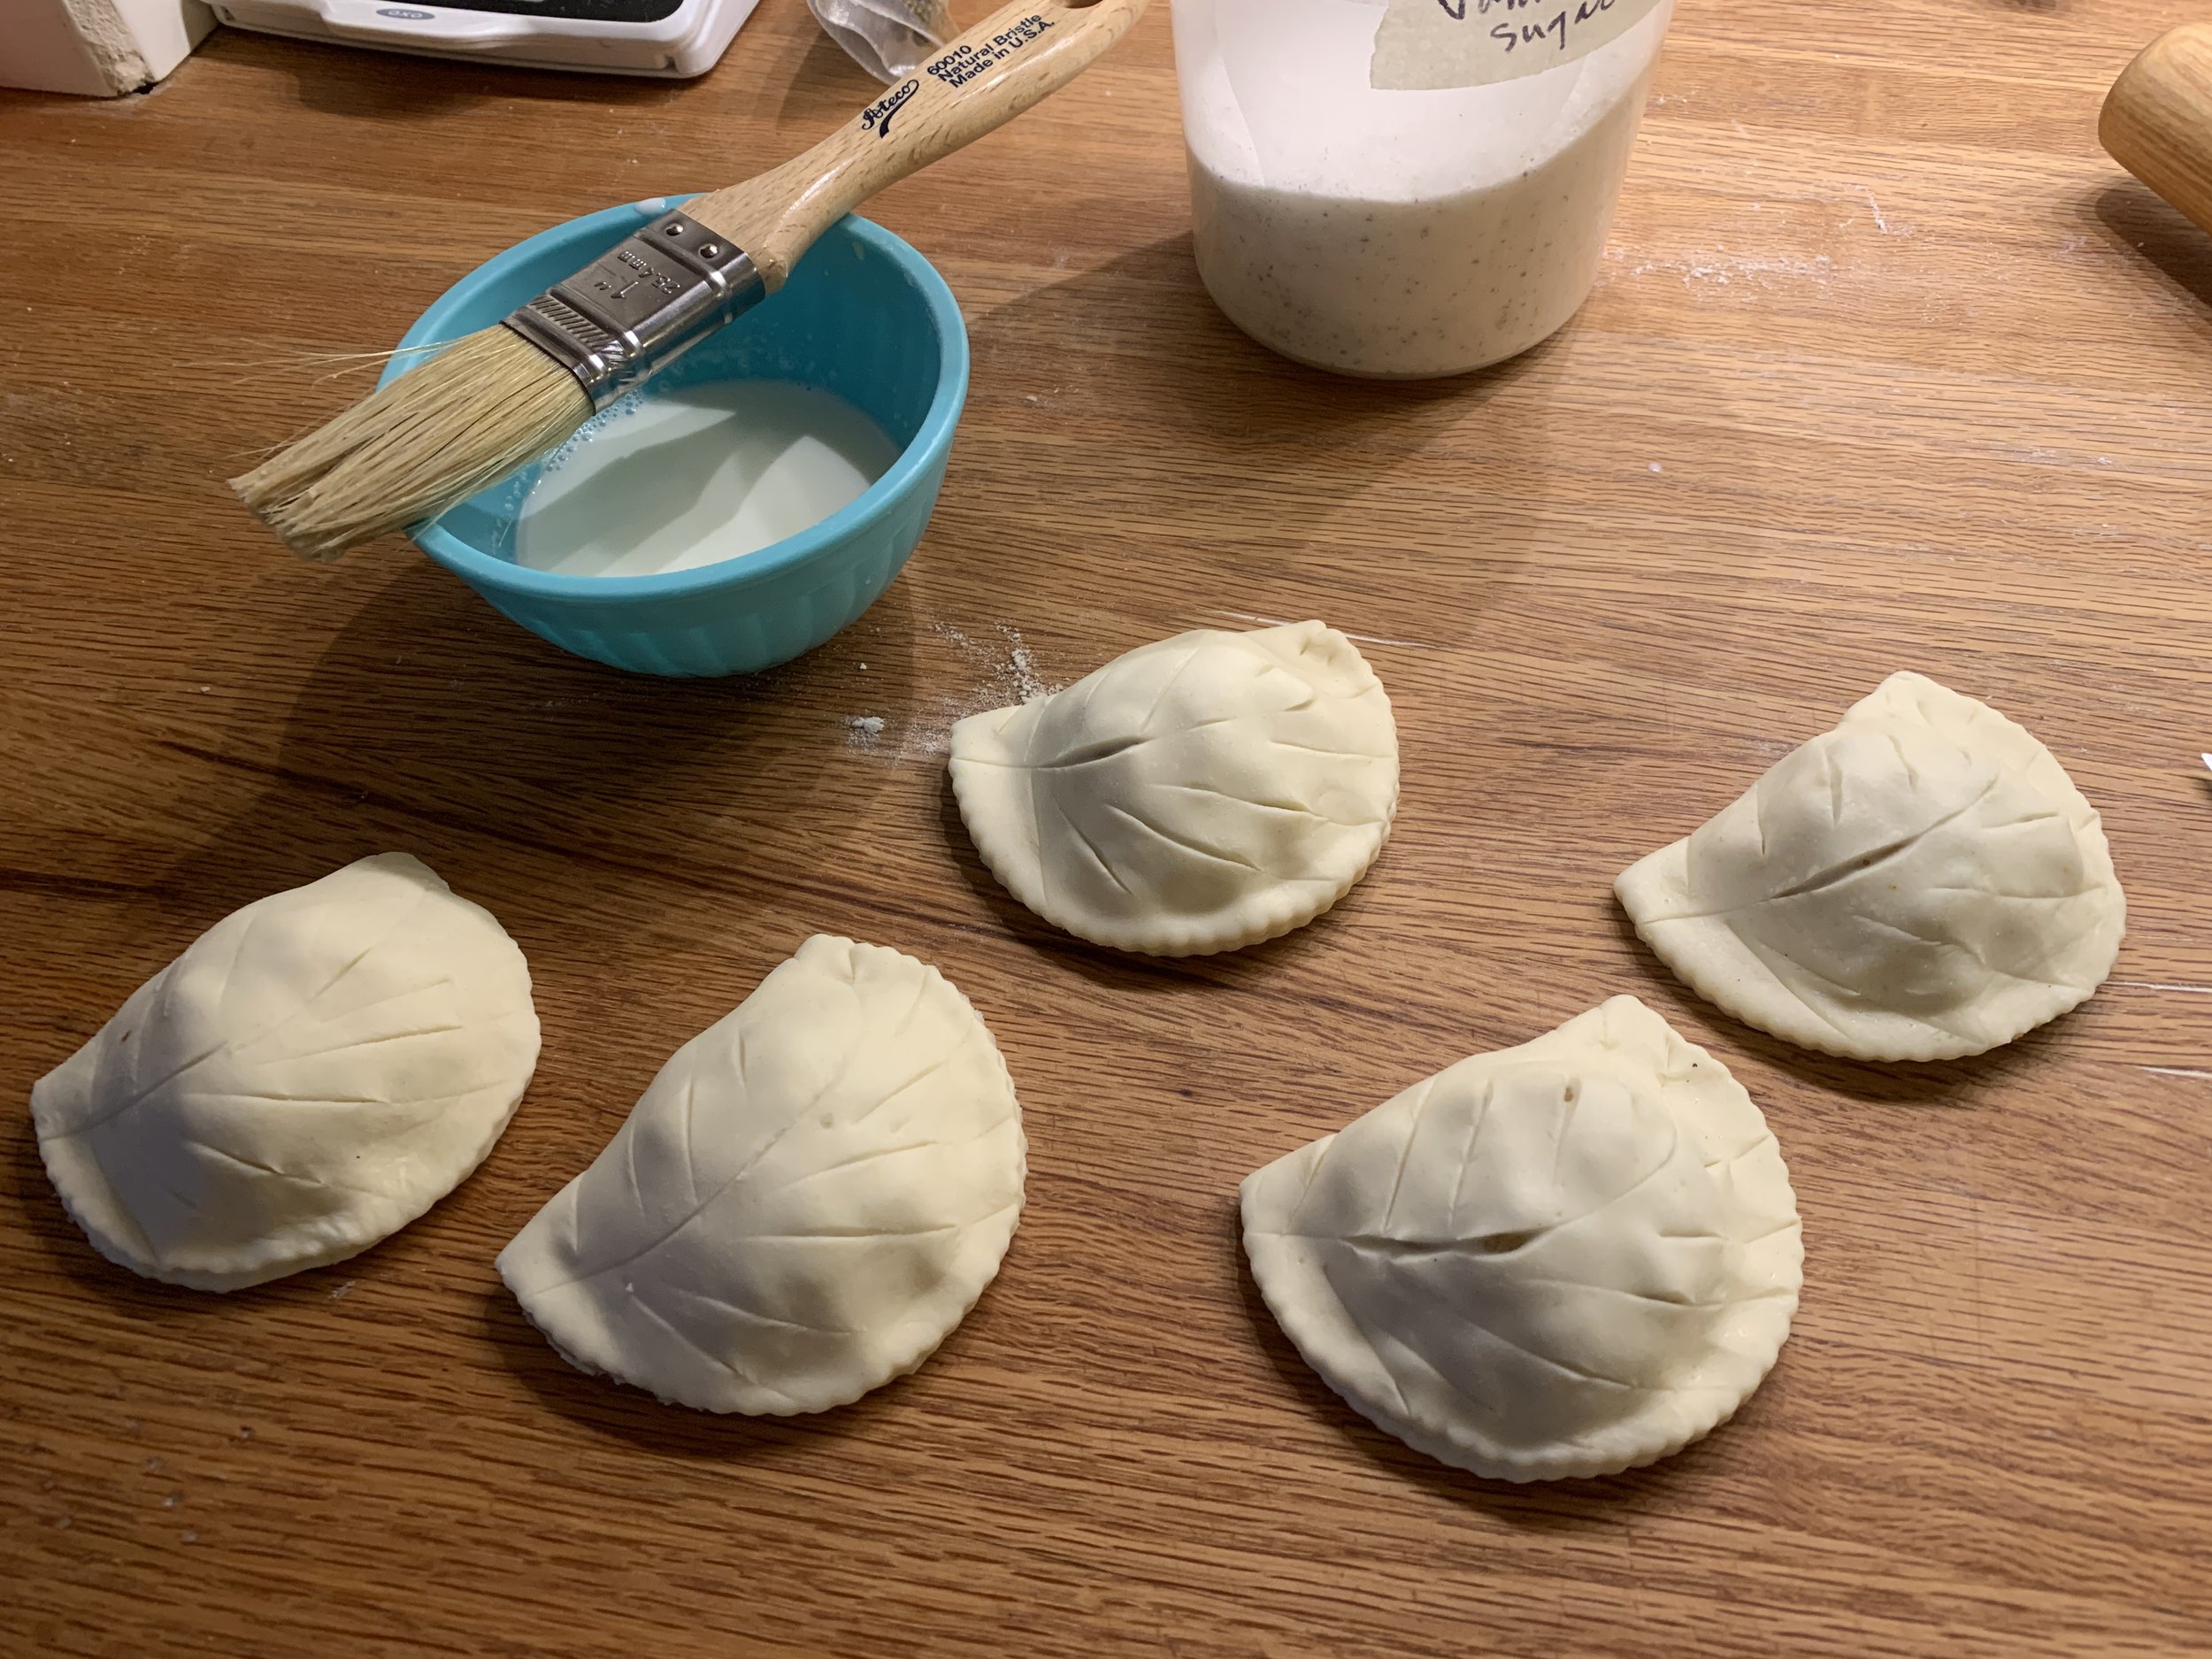
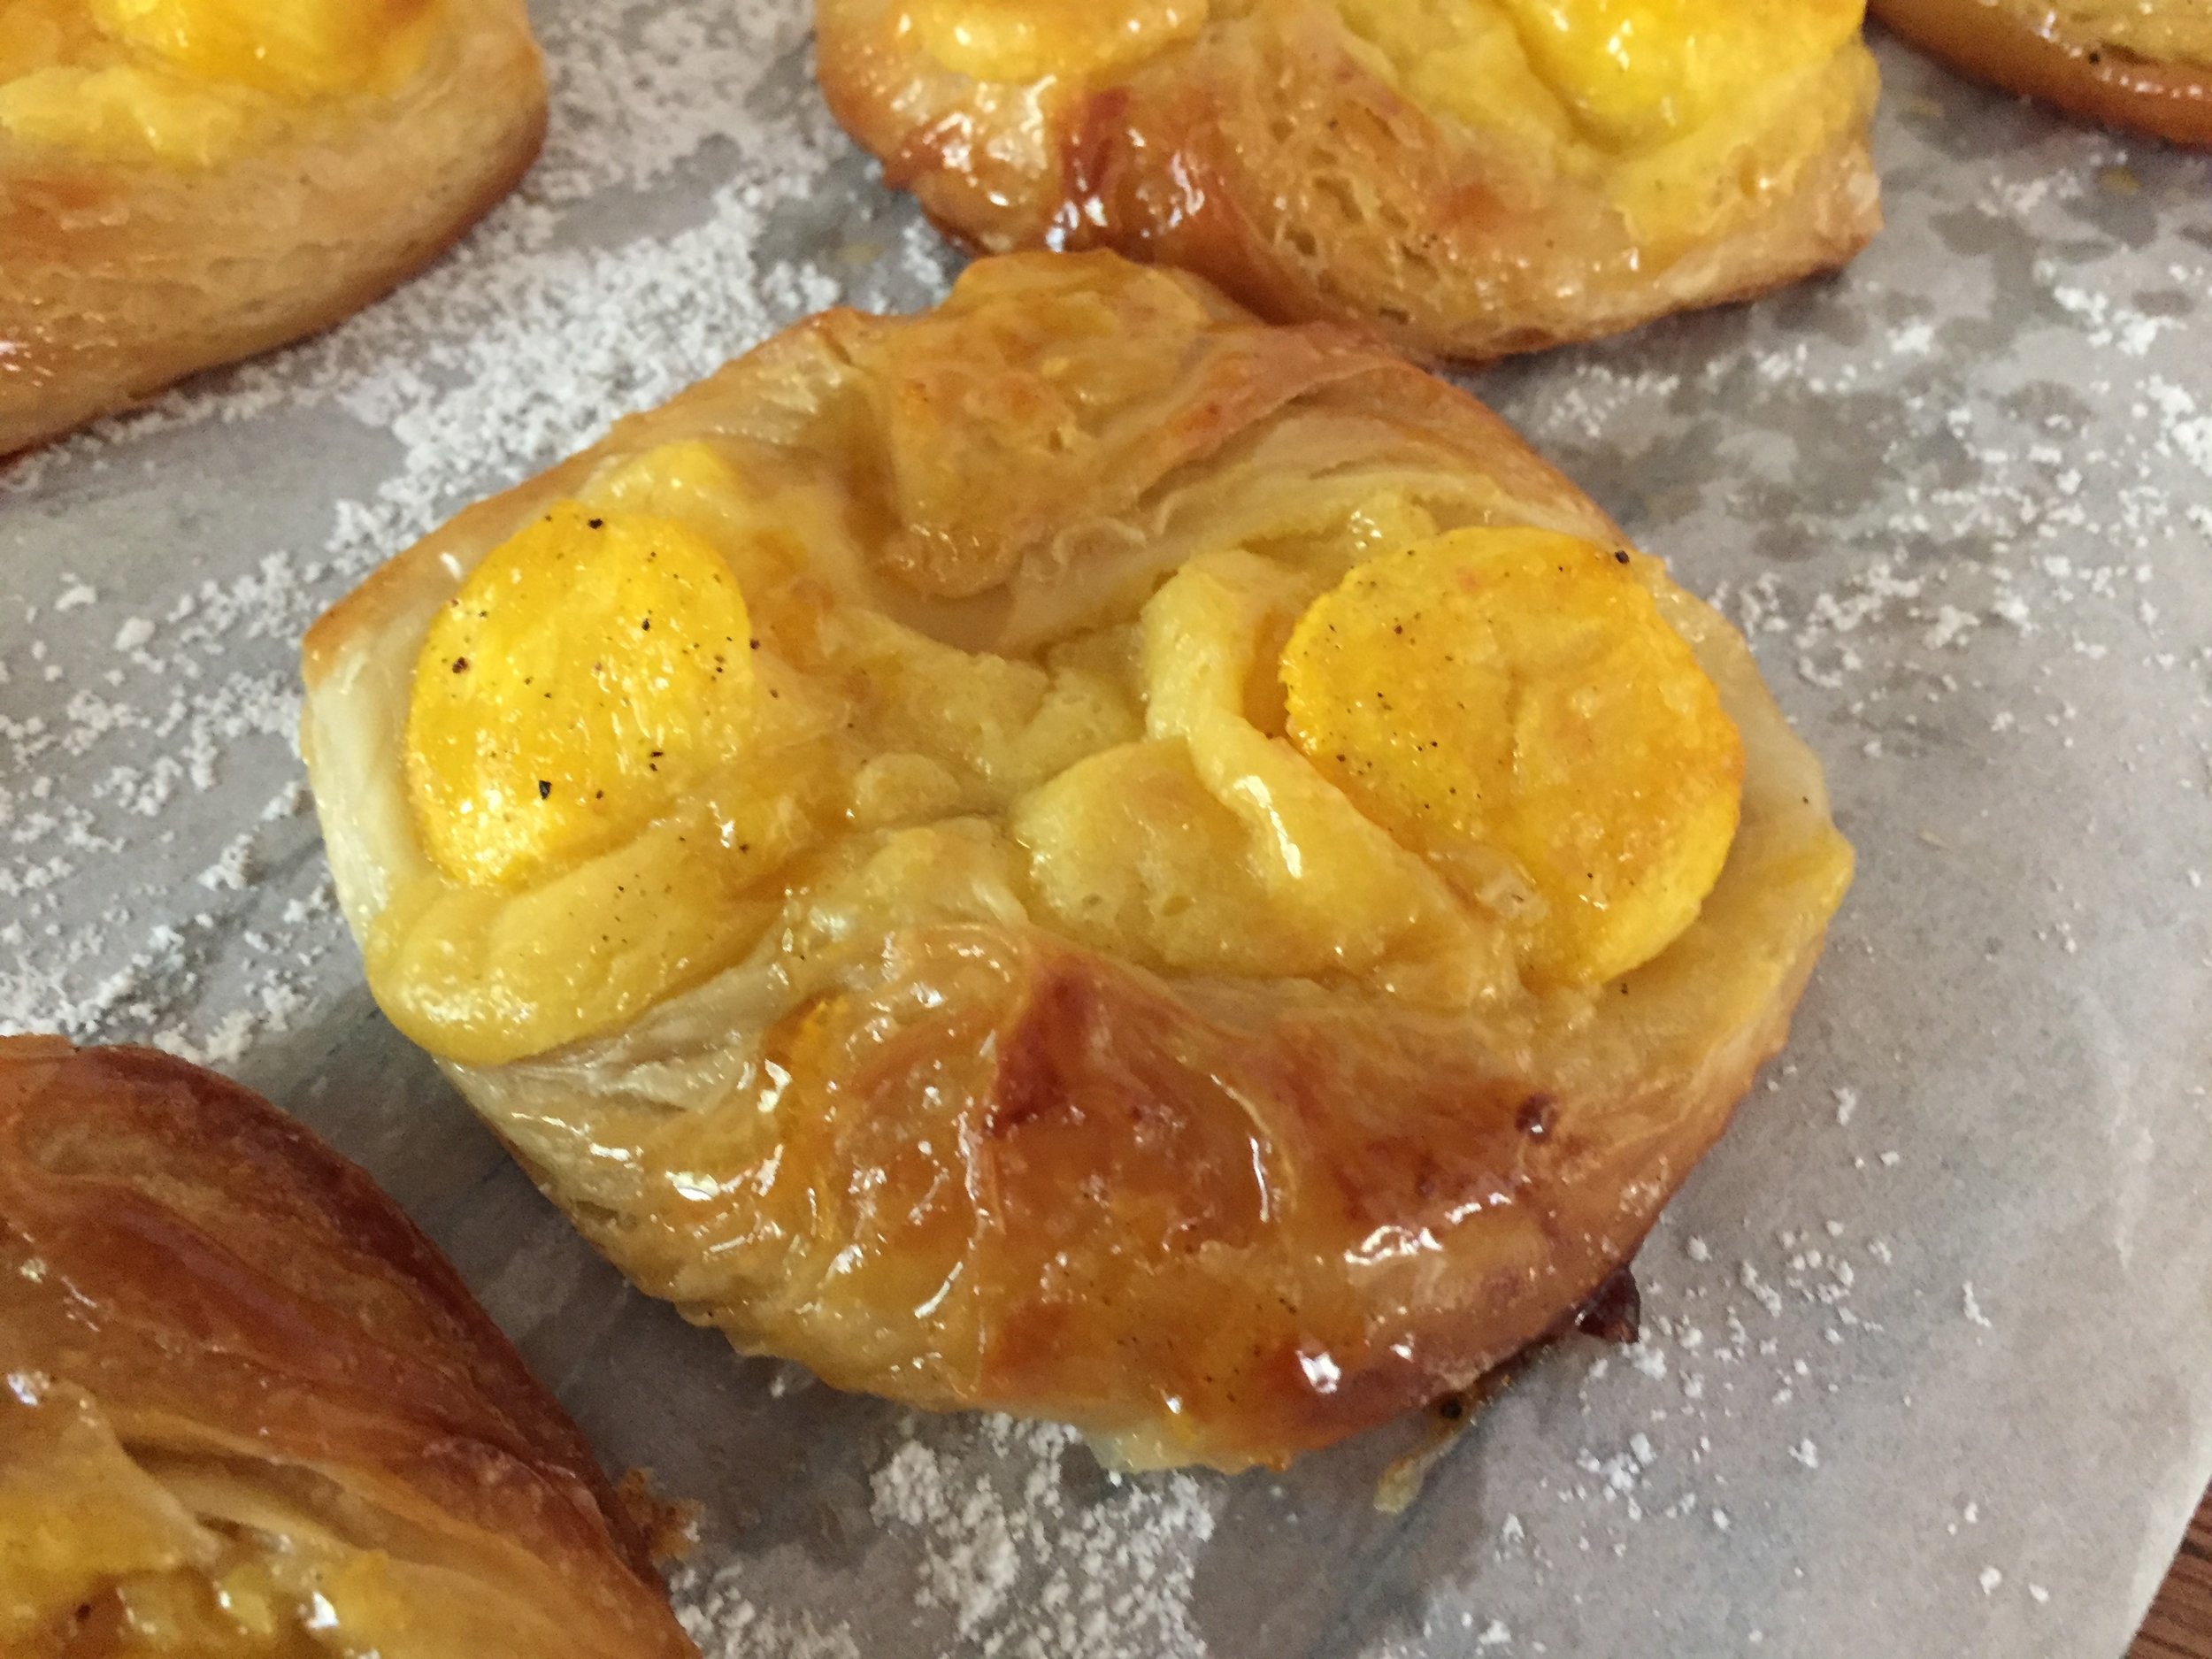
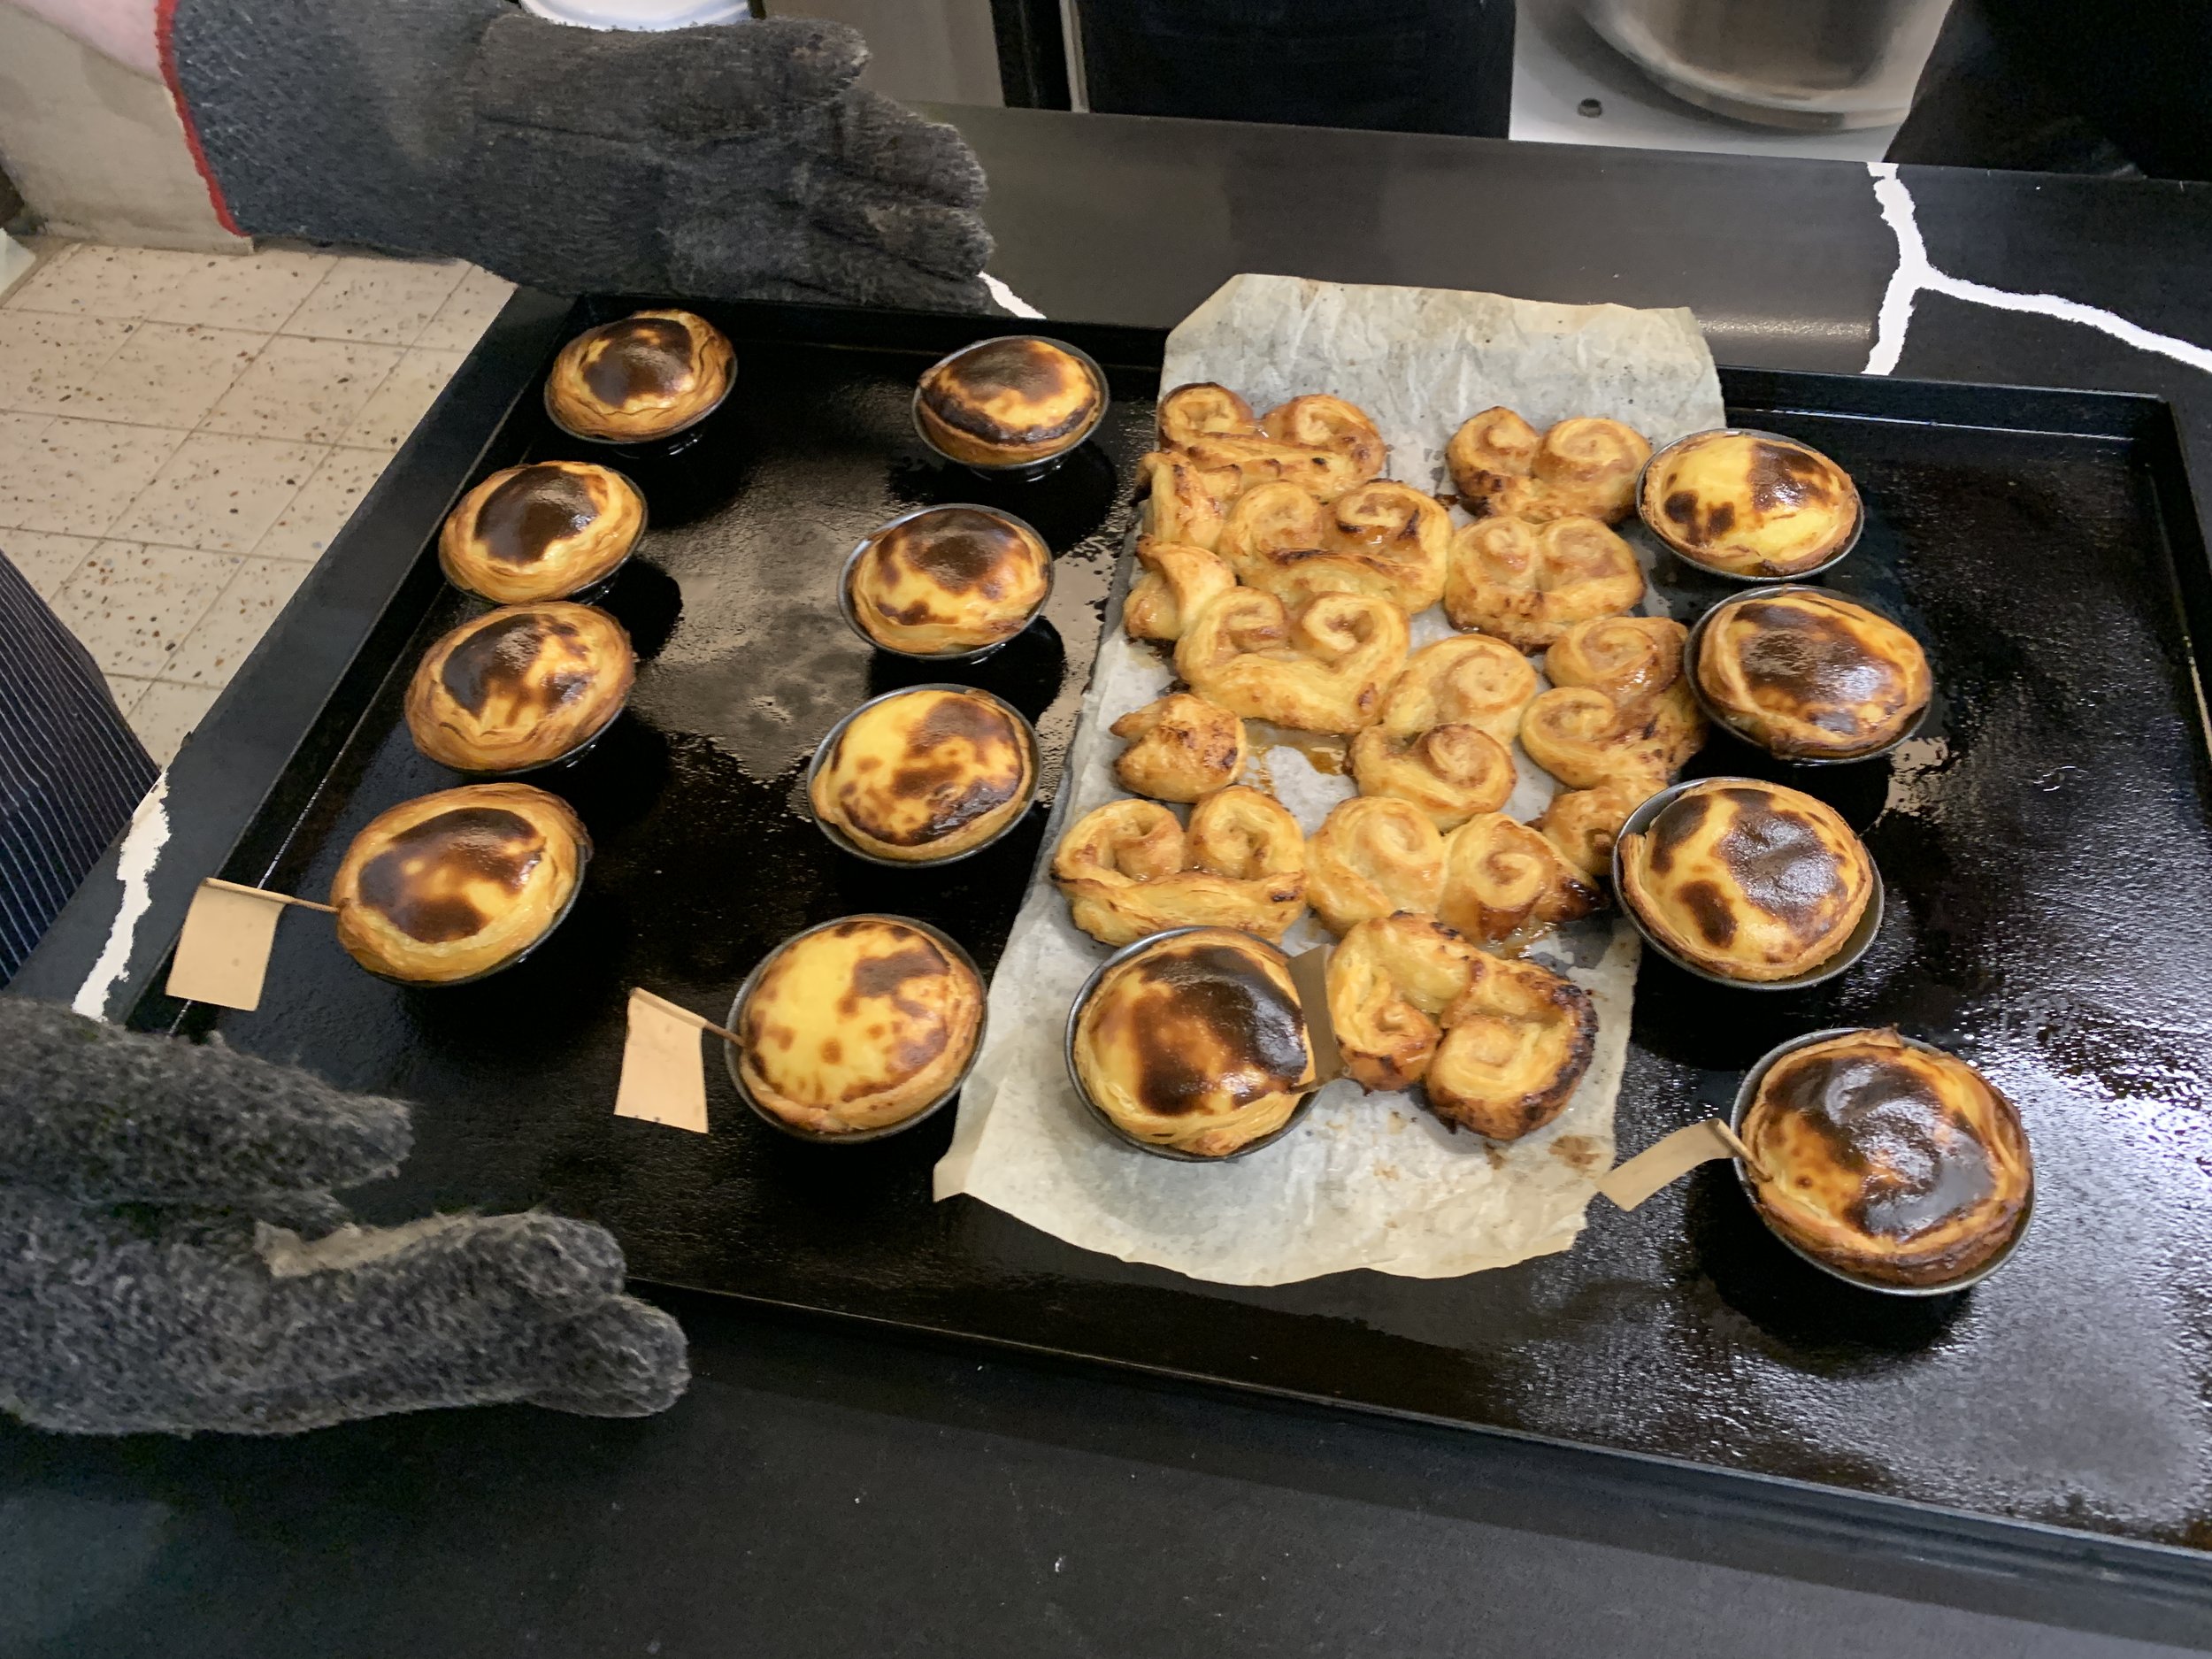
We each made four (there was plenty of dough left that our instructor used to created palmiers). Bake at 250ºC/480ºF for 5-6 minutes then rotate trays and bake another 10-12 minutes until set.

The well browned tops are a sign of a well baked pastel - if the center wobbles a bit, bake a couple minutes more. Let cool briefly then remove from the tins. HINT - more about my experience with this in the next post!


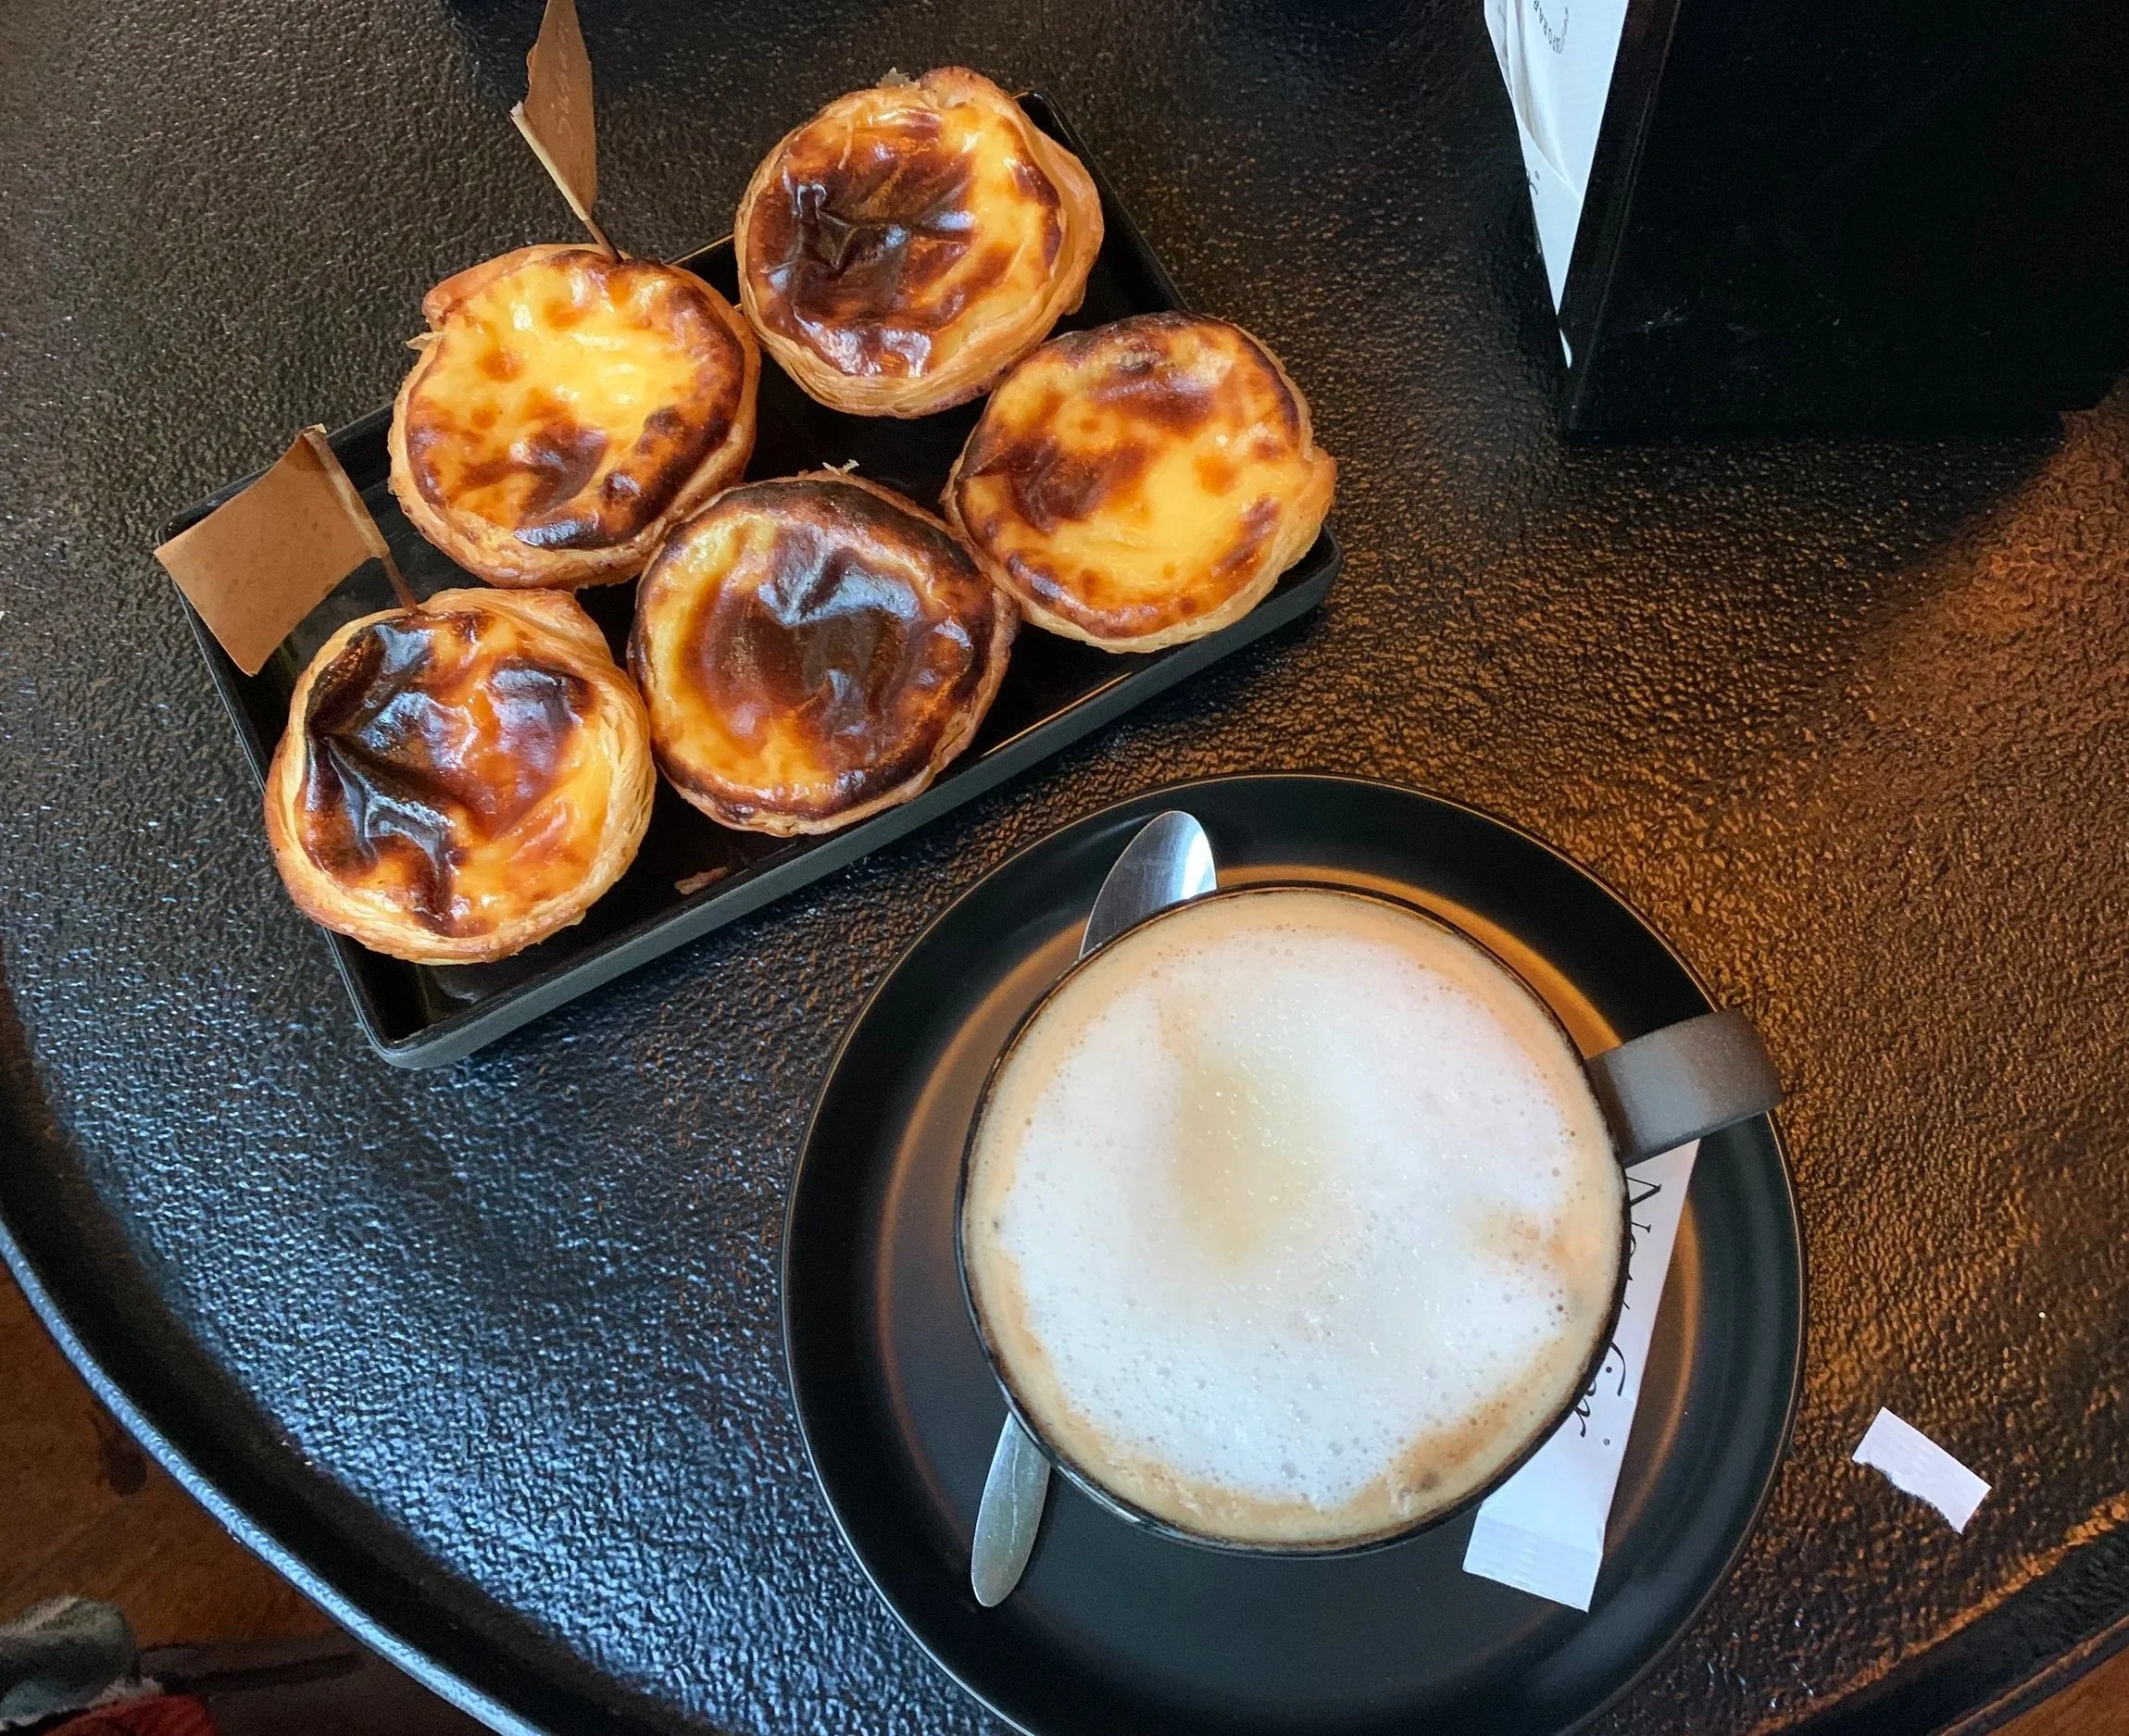
After class we were invited upstairs to a sitting area to enjoy our freshly baked pasteis along with a coffee beverage of our choice.

Next up we’ll see how my experience at home went! I didn’t want to overwhelm you all in one go so stay tuned . . . . adventures await.

Flan Parisien


OK! It’s time to get down to brass tacks. October is flying by, and I want to share one of my favorite baked goods ever. Being a huge lover of all things custard (think cooked vanilla pudding with melty chocolate chips as a child), my focus here is on le flan Parisien, essentially a custard baked in a crust. Yum.

Ever popular, flan has made its mark as a favorite le gouter after school snack for many French kiddos and is a staple in many pâtisseries across the country. There are many versions of flan across the globe - Mexico and Spain to name just two.

And let’s not forget the many classic custard based desserts that you’ll find world wide. Some of my favorites are crème brulée, pot de crème and my favorite ice cream base, crème anglaise, which I (and many!) consider the mother of custard sauces.

LIme coconut, raspberry/strawberry, chocolate almond, peach ice creams

I do digress. Sorry ice cream! I have to get back on track, but I couldn’t resist bringing you into the picture.

A custard is essentially a blend of dairy, egg and sugar with the occasional added thickener like cornstarch and/or flour, as is the case with crème pâtissière. You’ll see MANY variations in custard recipes using only milk, only cream, a blend of milk and cream, some yolks, some whole eggs - you get the idea. It would take me an entire post to try and explain the differences. Suffice it to say - all or mostly cream and all yolks in a custard make for a more unctuous mouth feel and richer taste. Switch in some whole milk for some of the cream and some whole eggs for yolks and you’ll experience a lighter, airier custard.

During my stage at Pâtisserie Pascal Pinaud in Paris’ 5th arrondisement, the house flan was made with puff pastry scraps for the crust and a simple crème pâtissière filling using whole eggs rather than yolks. Chef Pascal would line a 10-11 inch (25-28 cm) open ring with puff, hold it in the freezer and then I (oui moi!) would make the crème pâtissière that would be poured directly from the hot saucepan into the unbaked frozen shell. Into the oven it went. Always a hit.

At The French Tarte, my small shop in Pawtucket RI (2012-2014) , I occasionally made a version from Phillipe Conticini’s Pâtisserie des Rêves. His offered a unique approach whereby the custard filling was cooked, cooled then placed into unbaked puff lined rings and into the freezer for a couple of hours before baking. Right out of the freezer, directly into the oven! I looked back at my notes from July 25, 2013, having done a comparison between frozen and not - frozen won out for its creamier texture. Who knew.

I had already created my own flan custard base a few years back after doing a comparison of several recipes I had tried over the years. It incorporates whole milk, cream, eggs, yolks, sugar, cornstarch, vanilla bean. It was tasty back then so I went with it for this project. Plus, I hadn’t made a flan in forever!! Here’s a link to the full recipe with dough/custard/baking temps etc.

My goal here was not so much to revisit the custard portion BUT to compare using puff pastry scraps and my favorite pâte brisée for the shells. Blind baked or not and filling them with hot/cooled/frozen in the shell versions of the custard filling. While not a very scientific or well controlled experiment, it gave me the answers I sought. NOTE: once my rings are lined, I place them in the freezer for 20-30 minutes before proceeding. Remember - cold dough into hot oven, flakier result.

I used my 80 mm (3”) diameter, 2.5 cm (1”) high open tart rings, lining three with puff pastry scraps and three with pâte brisêe. I blind baked one each of brisée and puff and left the rest unbaked.

Ready for Baking

As I suspected it would, the puff puffed up in spite of the weights, resulting in a pudgy crust.


I then proceeded to make a batch of my flan custard, filling both a blind baked and an unbaked pâte brisée shell with HOT cream and then right into the oven.

Look for the nicely browned (in some cases almost black) top and just a hint of jiggle in the otherwise set custard. Both crusts baked up brown and crisp, blind baked or not. Good to know.

pâte brisée/hot cream just out of the oven

The flans do deflate while cooling as seen below.

I allowed the remaining flan cream to cool about 30 minutes and filled a blind baked puff and an unbaked puff with the cooled cream.

Ready for the oven

Not a pretty picture since the unbaked puff puffed, essentially pushed the filling out and over the edges. Yikes! The blind baked one didn’t fare too well either. Too much filling on my part, although it did settle down once cooled.

rather a mess

Last but not least I filled my remaining two unbaked shells (one brisée and one puff) with cooled custard and froze them for a couple of hours before baking. I was a bit short on filling, but they were still good for the testing phase.


Taste test time! The first image is of the three puff crusted flans. You can see the inner layer of puff isn’t fully baked, even in the blind baked one. The custard was a winner in all versions, whether hot, cooled or frozen.

Here’s a closer view of the puff versions. Can’t have that doughy layer, no sirree!

The brisée versions all baked up beautifully. The crust so nice and crisp, browned and buttery and the custard silky smooth with a lightness that seemed just right.


Here’s a closer look at the brisée crusts.


The final analysis? Pâte brisée, hot custard and no need to blind bake. Straight forward indeed.

I simply had to do one final version using a 16 cm open ring. Once more - here’s my recipe. As seen below, I did the let-the-raw-dough-hang-over-the-edge-of-the-ring approach, something I’ve seen in a couple of different pastry books. Once the whole thing is baked and cooled, you carefully cut away the excess dough to create a clean edge. It worked OK but I wouldn’t bother with it in the future.

Over hanging dough approach

Place lined ring/sheet pan in the freezer while preparing the custard. Fill shell with hot cream and bake.

Ready for the oven

All Baked up

Crust trimmed

Once cooled, trim off the excess crust (snack on it!), lift off the ring and cool the flan in the fridge overnight. This holds well refrigerated over 3-4 days, and I’ll admit that Steve and I each enjoyed a daily slice during that time. A keeper.


Have fun making your own flan Parisien!

Before I go, let me share this photo of a beautiful double rainbow seen out of our west windows this morning. The rising sun in the east was hitting the trees/oncoming rain clouds to the west to give us a vision of nature’s finest. Until next time - happy baking!

Chausson aux pommes - a classic

You know when you’ve made something so many times using the method you were taught because, well duh, that’s how we did it? That’s what chaussons aux pommes have been for me. Ever since my Paris pastry schooling and internships in 2006-2007 I’ve done the preparation/assembly the same way, the process unchanged throughout the years. Roll out the dough, cut circles of your desired size, let them rest a few minutes then roll out a bit more to an oval. Egg wash the lower edge, scoop prepped apples on the bottom half, fold the top over and seal the edges. ONE. BY. ONE.

Well low and behold, as I was planning to teach a recent puff pastry class here in Grand Rapids and reviewing one of my favorite books “Pastry, Savory and Sweet” by Michel Roux, I realized that through all these years I had NEVER noticed his method of creating chausson. Eureka!

Hint- think ravioli.

Let’s start at the beginning and work through the steps. I’ll assume you have your puff pastry already made or purchased. The next thing is to prep the apples. I love Granny Smith for this since the caramel-y tart apples go so well with the buttery, flaky puff. Yum.

If you’re wondering how many apples to prep, I find that a good sized Granny Smith will yield me three to four chaussons of medium-ish size (I tend to lean smaller in my pastries - just sayin’). I peel, core and small dice the apples and sauté them in butter and sugar until softened. My “rule” is to use about 10 g sugar and 10 g butter per medium apple soooooo . . . . . if I’m prepping 5 apples, I use 50 g (about 1/4 cup) sugar and 50 g (about 1/2 stick) unsalted butter. You can play around with the proportions to suit your taste.

Have some water on the side so when the apples start browning and sticking a bit and their liquid evaporates, you can splash a bit more water in to deglaze. Toward the end of sautéing I also add a big splash of boiled apple cider and a couple of big squirts of my home made caramel sauce, always at the ready in my fridge.

The apples should become golden brown and caramel-y and start sticking to the pan. Once they’re fork prick tender (but NOT mushy), I scrape them onto a paper towel lined sheet pan to cool and soak up any remaining moisture.

A side note: when sautéing the apples, I figure I might as well go for the “more is better” approach since they keep well in the fridge for several days. Plus you can assemble a bunch of chaussons and freeze them unbaked until you’re ready. Have some house guests coming soon? Pop a few onto a sheet pan and into the oven (no thawing needed) for some freshly baked morning treats.

Ready for assembly? Let’s go!

I usually get about 12 chaussons from a half batch (~600 g) of my puff. Save the scraps to roll out for palmiers or as the lining crust for quiche or flan Parisien or for blind baked mini tart shells that you can fill with lemon curd or ganache or coconut cream or . . . . . you decide.

On a lightly floured surface roll the dough out to a 16” across and 18” top to bottom rectangle, about 1/8” thick. Divide the dough into three strips of 6” by 16”. A pizza cutter works great here! You’ll create 4 chaussons from each strip.

In the image below I did a practice run using my spelt rough puff (had some in the freezer, don’t ya know). Without cutting the dough, mark it into four 4” sections.

Also mark (don’t cut!) the midline across the length of the piece. Now put a nice scoop of apples on each of the sections.

You can use water or milk or egg white or egg wash - just something wet to brush around the apples. Now fold the dough from top down, covering the apples, pushing out any air pockets and pressing down around the mounds to seal.

I tried two different forms to cut the dough - a 3.5” fluted tart pan and a 3.25” fluted cutter. The tart pan didn’t cut sharply enough but the fluted cutter did the trick.

Shoot! I didn’t get a pic of the cutter placement - set it so that a little over half of the cutter is over the dough and a little less than half is over the counter, straddling the folded edge.

Make slashes to create a leaf like pattern. Pssst . . . I’m using some regular puff below, having done my assembly in a couple of different sessions.

Brush them with egg wash or milk, sprinkle with vanilla sugar or coarse raw sugar and place them on a parchment lined sheet pan. Pop ‘em into the freezer to firm things up and stabilize the butter while you heat the oven to 425ºF.

Bake 10 minutes, rotate your pan and check on the browning. If browning too quickly, reduce temp to 400ºF and bake an additional 10-15 minutes until golden brown.


Mmmmmm . . . . these are tasty indeed!

Not only that, but spring is finally springing. Enjoy!

Oranais aux pêches

IMG_4229.JPG

Kinda looks like a double yolked fried egg, eh?

As we step ever so eagerly into prime baking season and autumn flavors like apples, pears, nuts, caramel, coffee, chocolate and pumpkin, here’s a farewell nod to the delicious summer fruits of west Michigan. Desirous of doing something a bit different, I opted for my own peach version of oranais.

So what is oranais you might ask? A traditional pastry made with either puff pastry or croissant dough, it’s created with a combination of pastry cream and apricot halves. It may go by a different name in various parts of France, e.g. lunette aux abricots, croissant aux abricots (en Bretagne) or abricotine (sud de la France).

My research revealed that it reportedly originated in Algeria in and around the port city of Oran - hence the name oranais. Did you know that Algeria is fourth in apricot production in the world? And let’s not forget that Algeria was once governed by France so there’s still a huge French influence there, both culturally and culinarily (is that even a word?). By the way, here’s a little historical tidbit for you - Algeria gained it’s independence from France on July 5, 1962.

During our various trips-to and stays-in Paris over the years, oranais is always on Steve’s radar - he loves those sunny beauties!! Frankly they’re not often found in the many pastry shops around town so one has to keep an eye out for a good one. At Le Cordon Bleu Paris we made them with croissant dough, and those that we’ve found in Parisian pâtisseries have been made that way as well. However my online research found that many recipes call for puff pastry.

I decided to give it a go with both. Oh boy!

Since puff is not yeasted it’s more straight forward in its handling - no worries about the dough bubbling and puffing up during the rolling, cutting and shaping. I rolled my puff to about 6-7 mm (~1/4”) thick and cut 80 mm (3 inch) squares.

IMG_4203.jpg

The rolling out, cutting and assembly process is the same for both puff and croissant dough. Using a classic pastry cream, pipe a line diagonally across the square, place two rounds of fresh peach near opposite corners and bring the other two opposite corners up and over, sealing with egg wash. Sort of like a chubby bowtie.

IMG_4220.jpg
IMG_4221.jpg

Remember - puff doesn’t have to rise before baking, whereas with the croissant dough version, give it a 45-50 minute (give or take) rise. I topped the shaped/risen croissant version of oranais with an additional blob of pastry cream and some peach jam in the hopes of keeping the corners together during their time in the oven.

IMG_4225.JPG

Bake at 400ºF for about 20-25 minutes until the pastry is golden brown.

Puff result

Puff result

Croissant dough version result

Croissant dough version result

Once out of the oven brush with a vanilla simple syrup or some apricot glaze and let cool.

During the bake there was definitely more slipping and sliding of the pastry cream and peach in the croissant dough version. I had to keep pushing the peach rounds back onto the dough in my attempts at keeping things together.

As for the taste test (the best part, especially for Mr. Steve), we actually preferred the puff version. The flaky pastry and creamy, peachy combo was oh so delicious.

Of course, the croissant version was pretty good as well. After all, anything made with croissant dough is usually a winner.

Bottom line - going forward I’ll be making my oranais with puff. Yes indeed!

Jalousie aux abricots et pêches

Hints of fall are in the air here in West Michigan - perfect baking weather. Yes sirree.

But even though we've turned the corner into September, there are still plenty of delicious Michigan summer fruits just calling out to be baked into something wonderfully luscious. Apricots and peaches to name just two.

Jalousie is literally translated as jealousy, but, in spite of my attempts at finding out why this particular pastry carries that label, the answer eluded me. I did see one reference to it being of Provençal origin, although when I went back to review that reference, I couldn't find it again. My oh my.

There's another version known as dartois that is usually filled with crème d'amande  along with fruit, although dartois appears to be used interchangeably with jalousie. Call it what you will, it's tasty.

In a nutshell it's a puff pastry case with slatted top, filled with fruit that is usually macerated or caramelized on the stove top with a bit of butter and sugar. Apricot is a classic and that's what I went for.

I reviewed a number of recipes and came up with quantities of puff pastry and fruit that suited my vision of the final product. The fact of the matter is that you decide how large or small you'd like to make your jalousie so there isn't really a specific recipe one has to follow.

I planned to use about 800 g of fruit and, since I didn't have quite that amount in apricots, I supplemented with a couple of peaches that were just waiting in my fridge.

I pitted and sliced the apricots and peaches . . . . 

. . . then sautéed the sliced fruit in 70 g butter and 70 g vanilla sugar to caramelize it. The apricots were so ripe that they broke down and produced a lot of juice, so I ended up straining the fruit-butter-sugar liquid off and cooling the fruit on paper towel to absorb any remaining liquid. I didn't want my jalousie to be soggy.

Oh my! Now what could I do with this bowl of deliciousness? I think I'll blend some into my homemade caramel sauce and see what THAT's like. Why not, eh?

While the fruit cooled I rolled out my favorite from scratch puff pastry and cut 2 rectangles approximately 28x11 cm each. Each piece weighed about 150 g, rolled out to about 3 mm thick. 

Start with slightly more than you need so you can trim up the edges as necessary. And be sure to save any scraps - they're great for making palmiers or rolled out as a crust for quiche or flan.

This should give you some guideline to determine how much dough you might use for a larger or smaller end result. Sometimes it simply a matter of experimenting and figuring it out. 

Fold one of the pieces in half lengthwise and cut slits about an inch or so apart, leaving the edges uncut.

Unfold it and set aside.

Place the other piece of puff on a parchment lined sheet pan, sprinkle with some almond flour (to help absorb any juice and protect the bottom crust) and top with the cooled fruit, leaving about 2 cm clear around the edges.

Brush the dough edges with a little water, place the slatted top over the fruit, press the edges together to seal and crimp with a fork.

I like to brush mine with a bit of milk and top it off with a sprinkle of vanilla sugar.

Freeze it for 20 minutes or so while heating the oven to 425ºF.

Bake about 25 minutes until puffed, golden brown and the fruit is bubbly.

Serve slightly warm or at room temperature.

Steve and I enjoyed a piece with some of my homemade peach ice cream - buttery, flaky, a hint of tartness to the apricot yet married so nicely with the sweetness of the peach - SO GOOD.

I kept the rest covered lightly with parchment paper at room temperature over the next couple of days. It was still good with morning coffee, especially warmed for a few minutes in the oven.

This one's a keeper.

A free form savory tart


As I anticipated the end-of-the-fall-session gathering of my weekly French class, I considered what I should bring as a contribution to the fête. I was in the mood for something savory - it just seemed right for this time of year.

I had puff pastry in my freezer so out it came to thaw.  I then embarked on the course of creating a free form puff pastry base.


The beauty of this approach is that you can create any shape or size to fit your mood as well as the number of people you plan to serve.

In my case I planned to cut the finished product into appetizer size portions, so I made a simple rectangle of about 4" x 8" and had plenty of dough to cut narrow strips, braid them and create a lovely border look.

I had autumn veggies on the brain and recalled the vol-au-vent filled with a mix of roasted butternut squash, caramelized onion and goat cheese from a puff pastry class I taught at the Grand Rapids downtown market last fall.  Yes, that's it!

First I baked the puff base solo (425º for about 20 minutes) and set it aside while preparing the filling.  The center puffs up quite a bit, but I simply push it down gently to allow some space for the filling.

NOTE:  this approach is best when using a filling that will already be cooked through since the whole thing will just require warming up once assembled.


I tossed a couple of cups of chunked butternut squash with some olive oil, rosemary, herbes de provence, salt and pepper and roasted them at 450º for about 25 minutes.


I mixed the caramelized onion I had prepared earlier with the squash, piled it onto the baked puff, topped it with crumbled goat cheese and popped it into a 350º oven for about 15 minutes just to warm the whole thing up.


As a final garnish, some roasted pepitas and toasted walnut pieces went on top.


The end result was a delicious combo of buttery, flaky puff and herbed veggie filling with the added crunch of pumpkin seeds and nuts.

Yes - a lovely fall treat.

So put your thinking cap on and imagine of all the wonderful combos you can create!


Happy Valentine's Day and some puff pastry hearts


 Happy Valentines Day to one and all!


I recently gave a puff pastry presentation at OLLI (Osher Lifelong Learning Institute) at Aquinas College here in Grand Rapids MI.

talking the puff talk

As a prelude to Valentine's Day I simply had to include some puff pastry heart treats for the attendees.

I cut out some heart shaped vol au vent . . . 


and baked them up after egg washing and sprinkling them with vanilla sugar.


I filled them with swirls of whipped chocolate ganache . . . .


Et voila! A tasty treat!

Mille-feuille chocolat - chocolate puff and other stuff

Before I start on the topic at hand, here are some pics of the delectable chocolate bread pudding I made using the left over chocolate croissant spirals from my last post.  I diced up the spirals, poured a basic chocolate custard over the pieces in my favorite square C&B ramekins, sprinkled on some vanilla sugar and baked 'em in a water bath.


just out of the oven

Just imagine one served warm with a scoop of vanilla ice cream.  Yes, indeed.

Now on to the task at hand.  What most of us know as napoleon, mille-feuille (literally "a thousand leaves") is that classic combination of puff pastry layered with vanilla pastry cream.  Of course, as is true of pretty much any classic you can think of, there are a multitude of ways to create variations on the theme.

Years ago, before pastry school was even a gleam in my eye, I made versions of this dessert using good old Pepperidge Farm puff pastry sheets, cut into squares and baked, then simply layered with a cream or custard and fresh fruit and/or a fruit coulis.  Always good.

Once pastry school was under my belt and I experienced what Paris had to offer, mille-feuille was often on my tasting hit list.  During my stage at Pascal Pinaud's shop on rue Monge in the 5th, raspberry-lemon mille-feuille was offered as a special treat only on Sundays.

When done well, the combination of crisp, flaky, buttery puff and smooth and creamy custard can't be beat.

Flash forward to the spring of 2013 when I took a class at Christophe Felder's school in Paris on mille-feuille chocolat.  I purchased his pastry tome Patisserie! and have been drawn into it lately to refresh myself on the classics as well as get inspiration for some new ideas (new tart coming up soon!).  My eyes lit up at the recipe for mille-feuille chocolat and off I went on a trip down feuilletage chocolat lane.


This recipe calls for cocoa powder added to the détrempe, just as in my recent chocolate croissant experiment.

les ingredients

I made half a recipe:  250 gm flour, 30 gm cocoa powder, 130 ml cold water, 43 gm melted butter and 5 gm salt mixed together just until everything is incorporated.


the creature from the Black Lagoon!

The détrempe felt dry, and it looked a lot more blotchy than when I make regular puff pastry.  I gave it a couple hour rest in the fridge and prepared the 168 gm butter block.


ready for the beurrage

Once I completed the beurrage and started the folds/turns the dough in general started to look a little better, but still blotchy.


after the first two turns - yikes!

But once all the turns were complete the dough looked and felt better - there was hope after all.


after six turns

I held the dough in the fridge overnight for use the following day.  Otherwise I would typically pop it into the freezer for another time.

When rolling out the puff for mille-feuille, it's important to roll it about 2-3 mm thick.  I divided the dough in two and rolled each piece to fit a quarter sheet pan.

It's important to let the dough rest - otherwise it shrinks when baking (as you'll see in the upcoming pictures).  It's also a good rule to freeze the rolled out puff for 10 minutes or so before baking to help stabilize the dough.


ready to bake

For comparison I baked one quarter sheet with a cooling grid over the pan (seen above) to help limit the puff's rise and the second one topped with a piece of parchment and a second sheet pan to weigh it down (the generally recommended method to keep puff under control).

I did NOT prick either one with a fork, having found instructions on line with and without (Felder's approach) fork pricking.

What really happened in the oven?  The weighted down version puffed anyway, and I actually pushed it down a couple of times during baking to try and keep it flat.

The one with the grid over it puffed up to the limits of the grid, but it ended up more irregular with undulating waves across the surface.

And both of them shrank.


Having chosen the weighted down piece for my assembly, I trimmed the edges and cut it into thirds,


and then a dust of powdered sugar and under the broiler for a couple of minutes to caramelize.


On to the assembly!

I made a simple whipped ganache filling using 250 gm heavy cream and 70 gm chocolate.  While I was piping the first layer I was reminded of the radiatore pasta Steve and I had just eaten a couple of nights before - ruffles!


first whipped ganache layer


second puff layer


second whipped ganache layer


completed layers

Once all the layers were assembled I popped the whole thing into the fridge for 30 minutes before topping with a basic 1:1 ganache.


getting ready to spread the ganache

used a decorative comb for design

The result looked pretty cool, but the flavor of the puff was disappointing - rather boring and not terribly chocolatey.  I also felt the puff layers were too thick and should have been more crisp and flakey.

What would I do differently next time?  Use standard puff pastry (not chocolate), roll it more thinly, let it rest longer so as to reduce shrinkage, and prick the dough with a fork before weighing it down and baking it.

Steve's reaction?  "What's so special about mille-feuille?"

OK, OK - back to the drawing board!