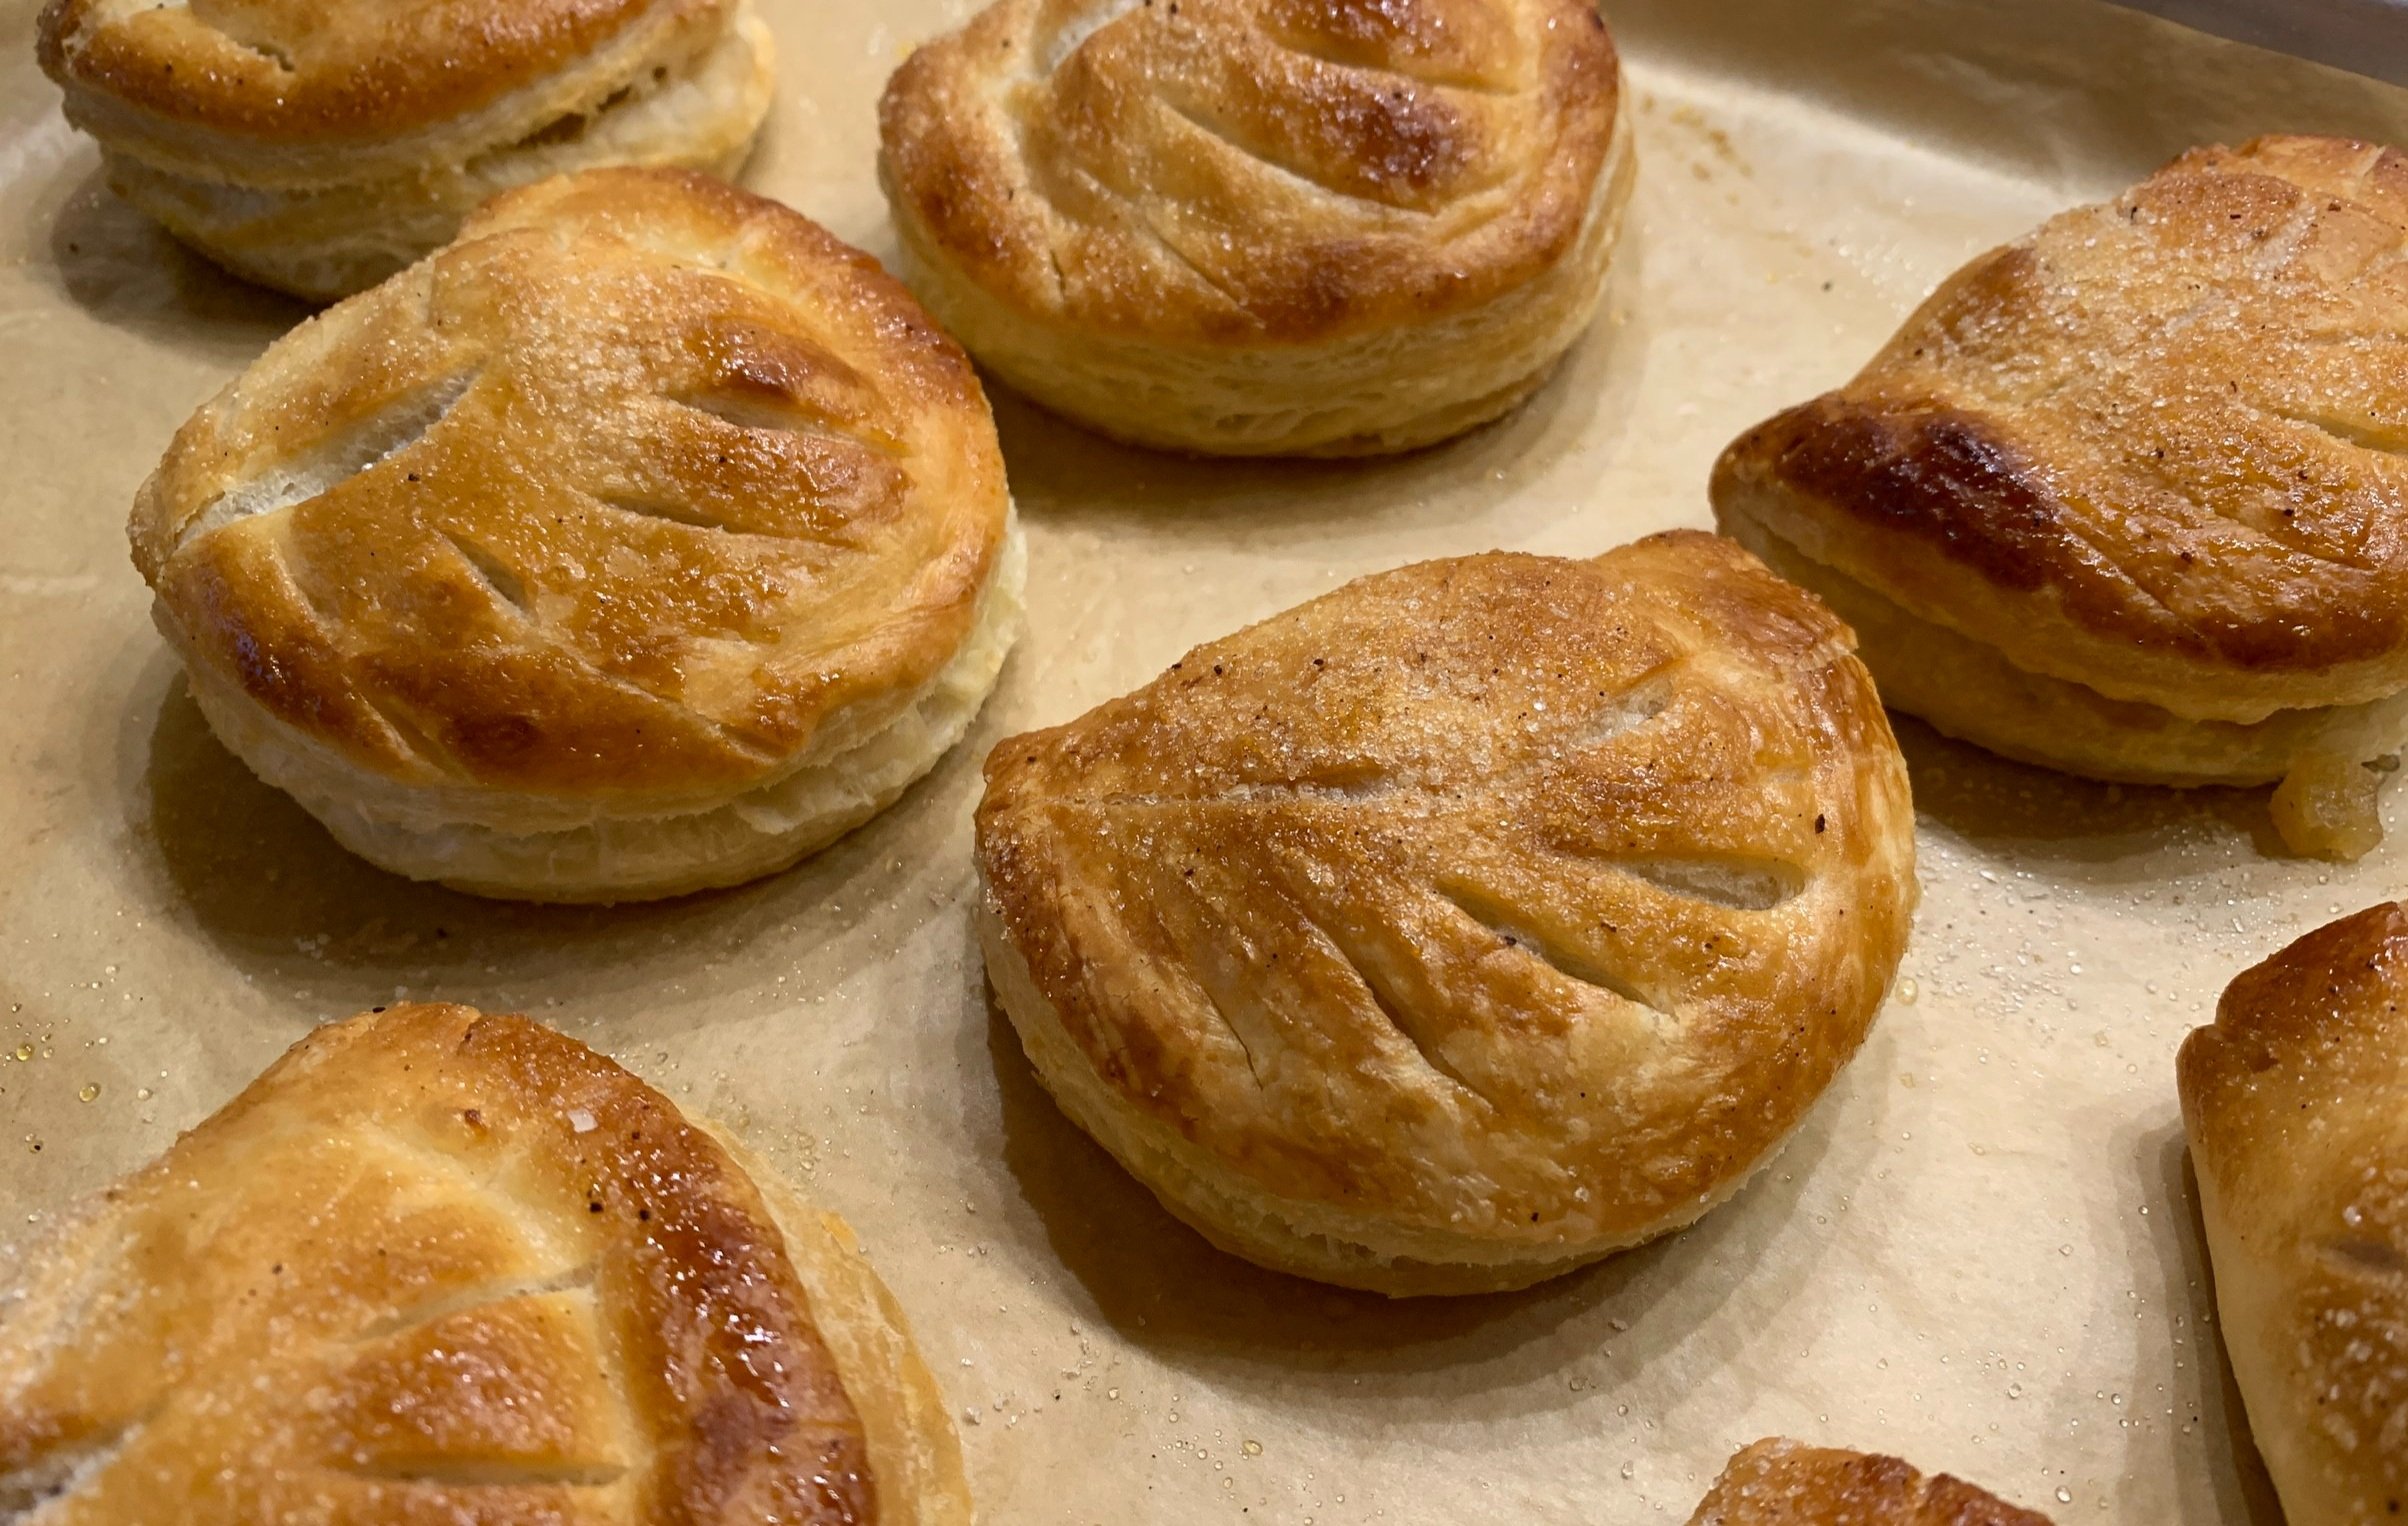
Chausson aux pommes - a classic

You know when you’ve made something so many times using the method you were taught because, well duh, that’s how we did it? That’s what chaussons aux pommes have been for me. Ever since my Paris pastry schooling and internships in 2006-2007 I’ve done the preparation/assembly the same way, the process unchanged throughout the years. Roll out the dough, cut circles of your desired size, let them rest a few minutes then roll out a bit more to an oval. Egg wash the lower edge, scoop prepped apples on the bottom half, fold the top over and seal the edges. ONE. BY. ONE.

Well low and behold, as I was planning to teach a recent puff pastry class here in Grand Rapids and reviewing one of my favorite books “Pastry, Savory and Sweet” by Michel Roux, I realized that through all these years I had NEVER noticed his method of creating chausson. Eureka!

Hint- think ravioli.

Let’s start at the beginning and work through the steps. I’ll assume you have your puff pastry already made or purchased. The next thing is to prep the apples. I love Granny Smith for this since the caramel-y tart apples go so well with the buttery, flaky puff. Yum.

If you’re wondering how many apples to prep, I find that a good sized Granny Smith will yield me three to four chaussons of medium-ish size (I tend to lean smaller in my pastries - just sayin’). I peel, core and small dice the apples and sauté them in butter and sugar until softened. My “rule” is to use about 10 g sugar and 10 g butter per medium apple soooooo . . . . . if I’m prepping 5 apples, I use 50 g (about 1/4 cup) sugar and 50 g (about 1/2 stick) unsalted butter. You can play around with the proportions to suit your taste.

Have some water on the side so when the apples start browning and sticking a bit and their liquid evaporates, you can splash a bit more water in to deglaze. Toward the end of sautéing I also add a big splash of boiled apple cider and a couple of big squirts of my home made caramel sauce, always at the ready in my fridge.

The apples should become golden brown and caramel-y and start sticking to the pan. Once they’re fork prick tender (but NOT mushy), I scrape them onto a paper towel lined sheet pan to cool and soak up any remaining moisture.

A side note: when sautéing the apples, I figure I might as well go for the “more is better” approach since they keep well in the fridge for several days. Plus you can assemble a bunch of chaussons and freeze them unbaked until you’re ready. Have some house guests coming soon? Pop a few onto a sheet pan and into the oven (no thawing needed) for some freshly baked morning treats.

Ready for assembly? Let’s go!

I usually get about 12 chaussons from a half batch (~600 g) of my puff. Save the scraps to roll out for palmiers or as the lining crust for quiche or flan Parisien or for blind baked mini tart shells that you can fill with lemon curd or ganache or coconut cream or . . . . . you decide.

On a lightly floured surface roll the dough out to a 16” across and 18” top to bottom rectangle, about 1/8” thick. Divide the dough into three strips of 6” by 16”. A pizza cutter works great here! You’ll create 4 chaussons from each strip.

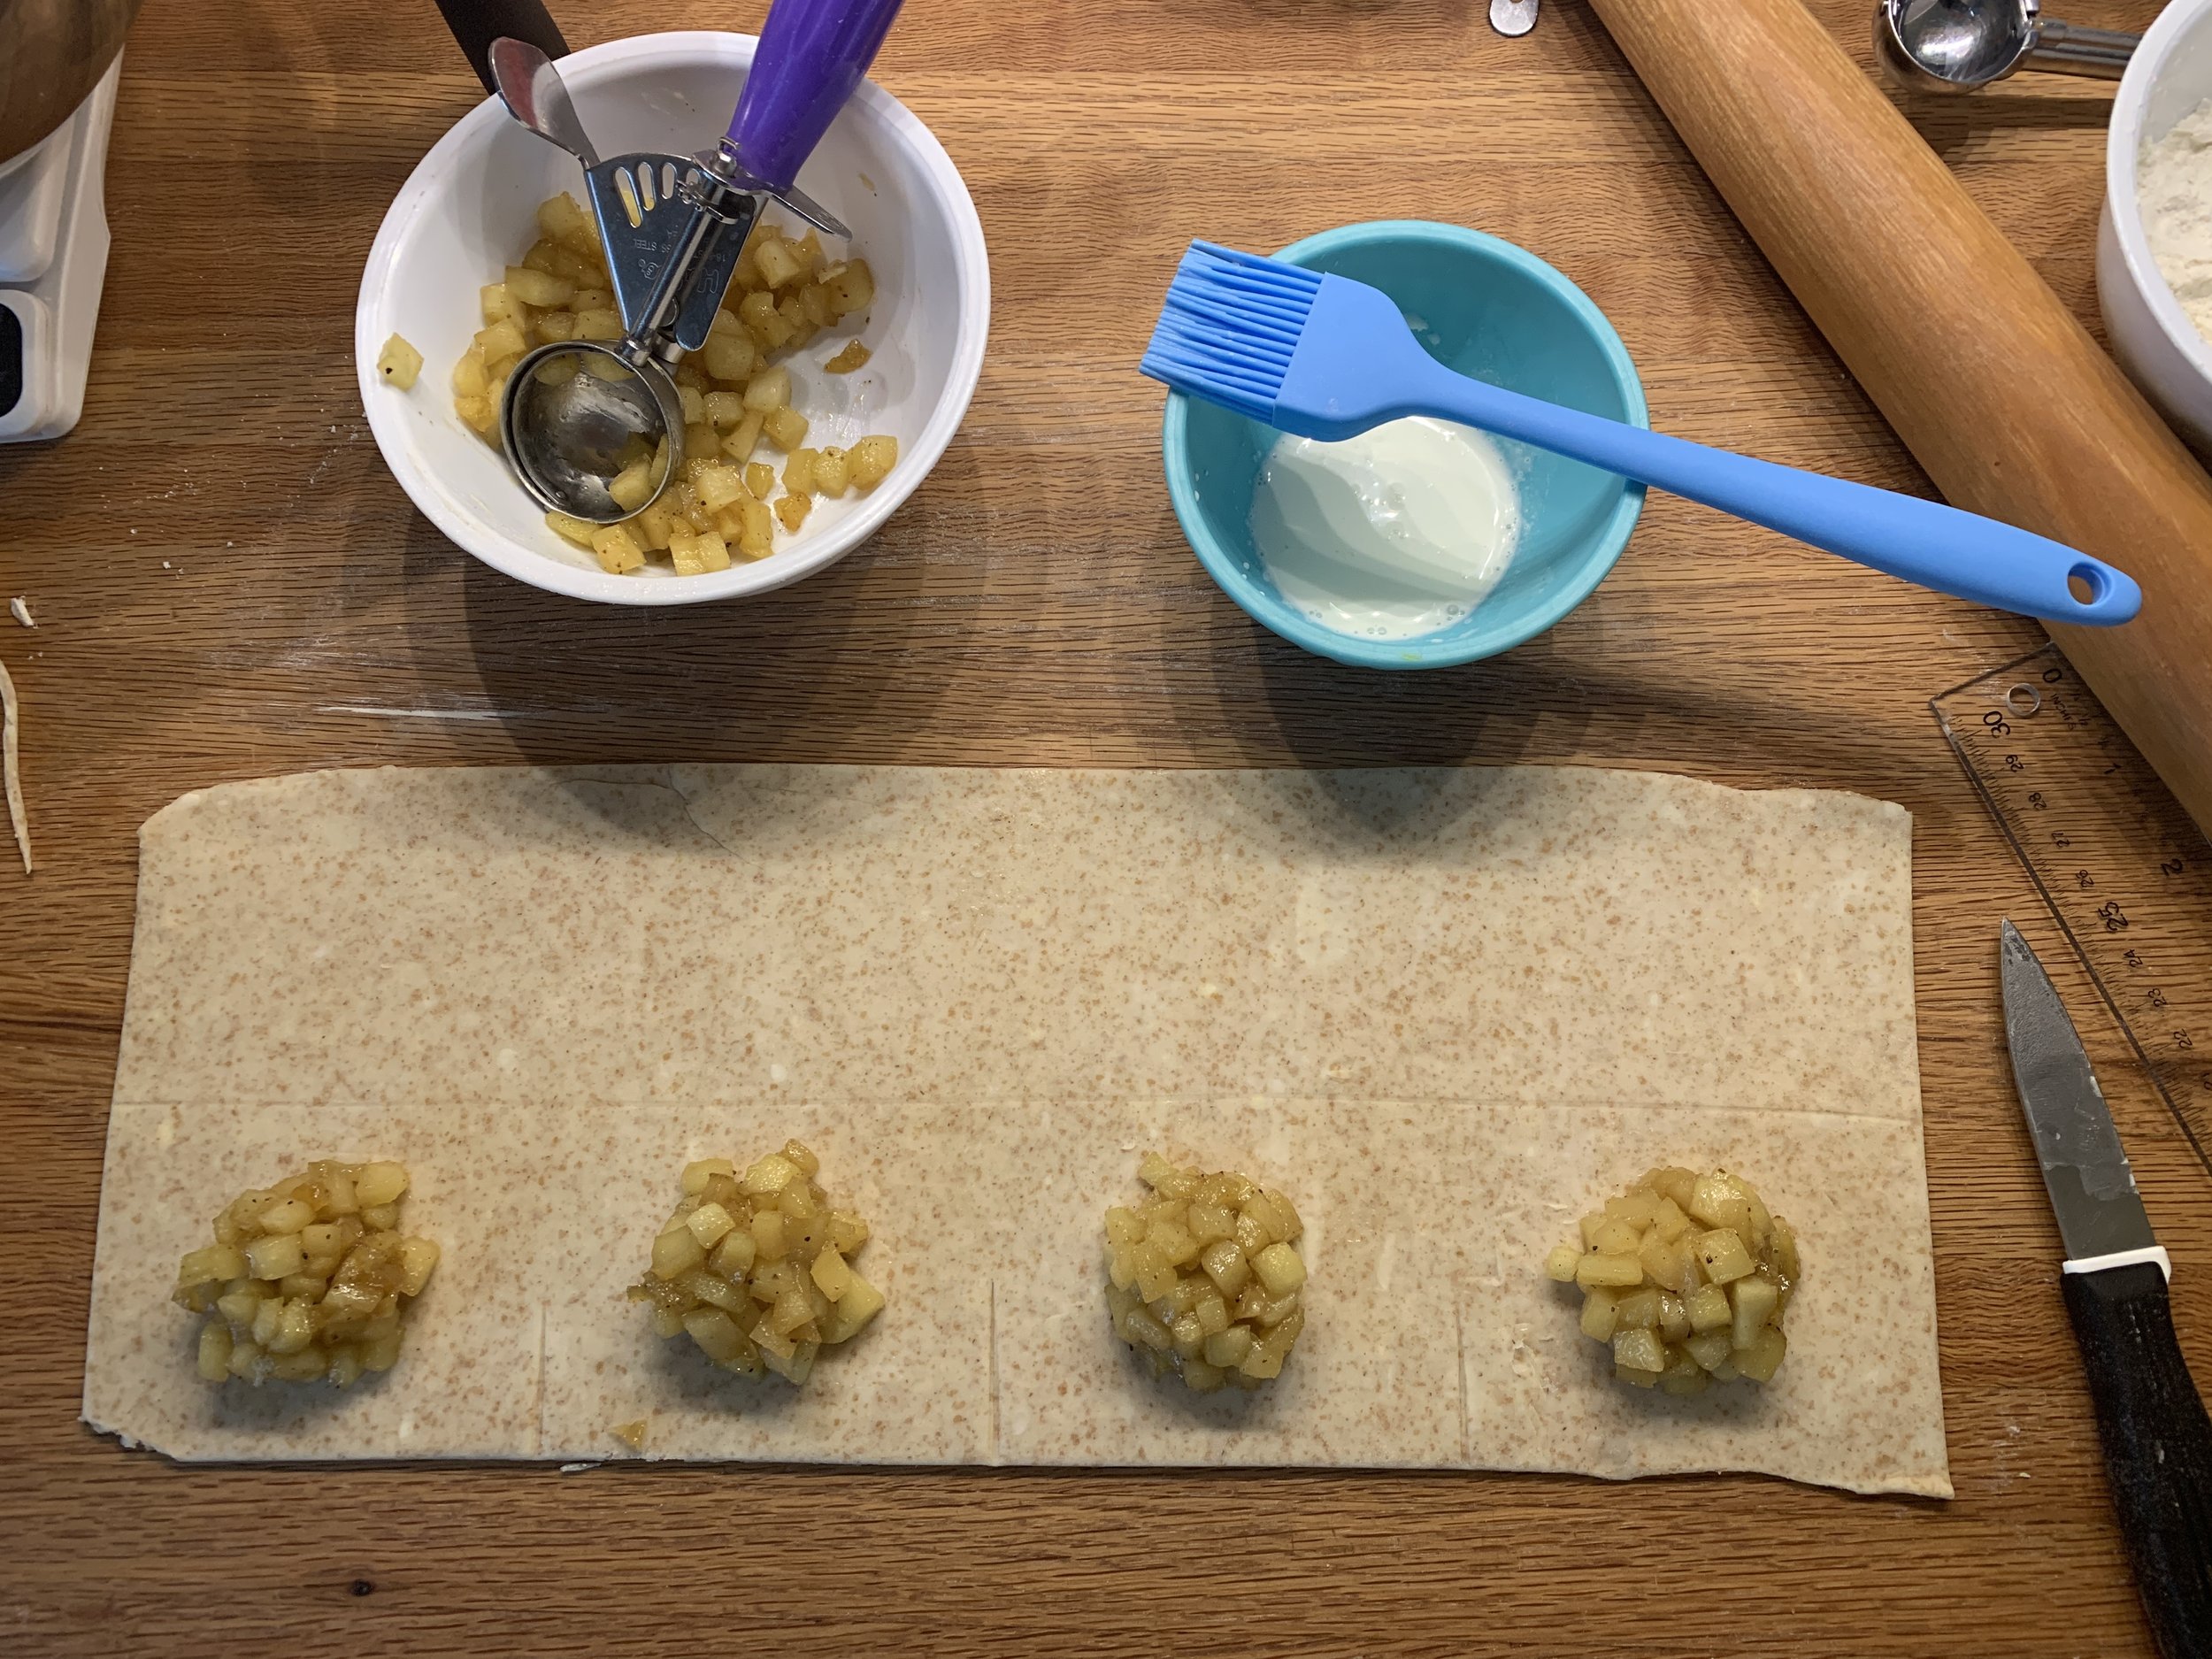
In the image below I did a practice run using my spelt rough puff (had some in the freezer, don’t ya know). Without cutting the dough, mark it into four 4” sections.

Also mark (don’t cut!) the midline across the length of the piece. Now put a nice scoop of apples on each of the sections.

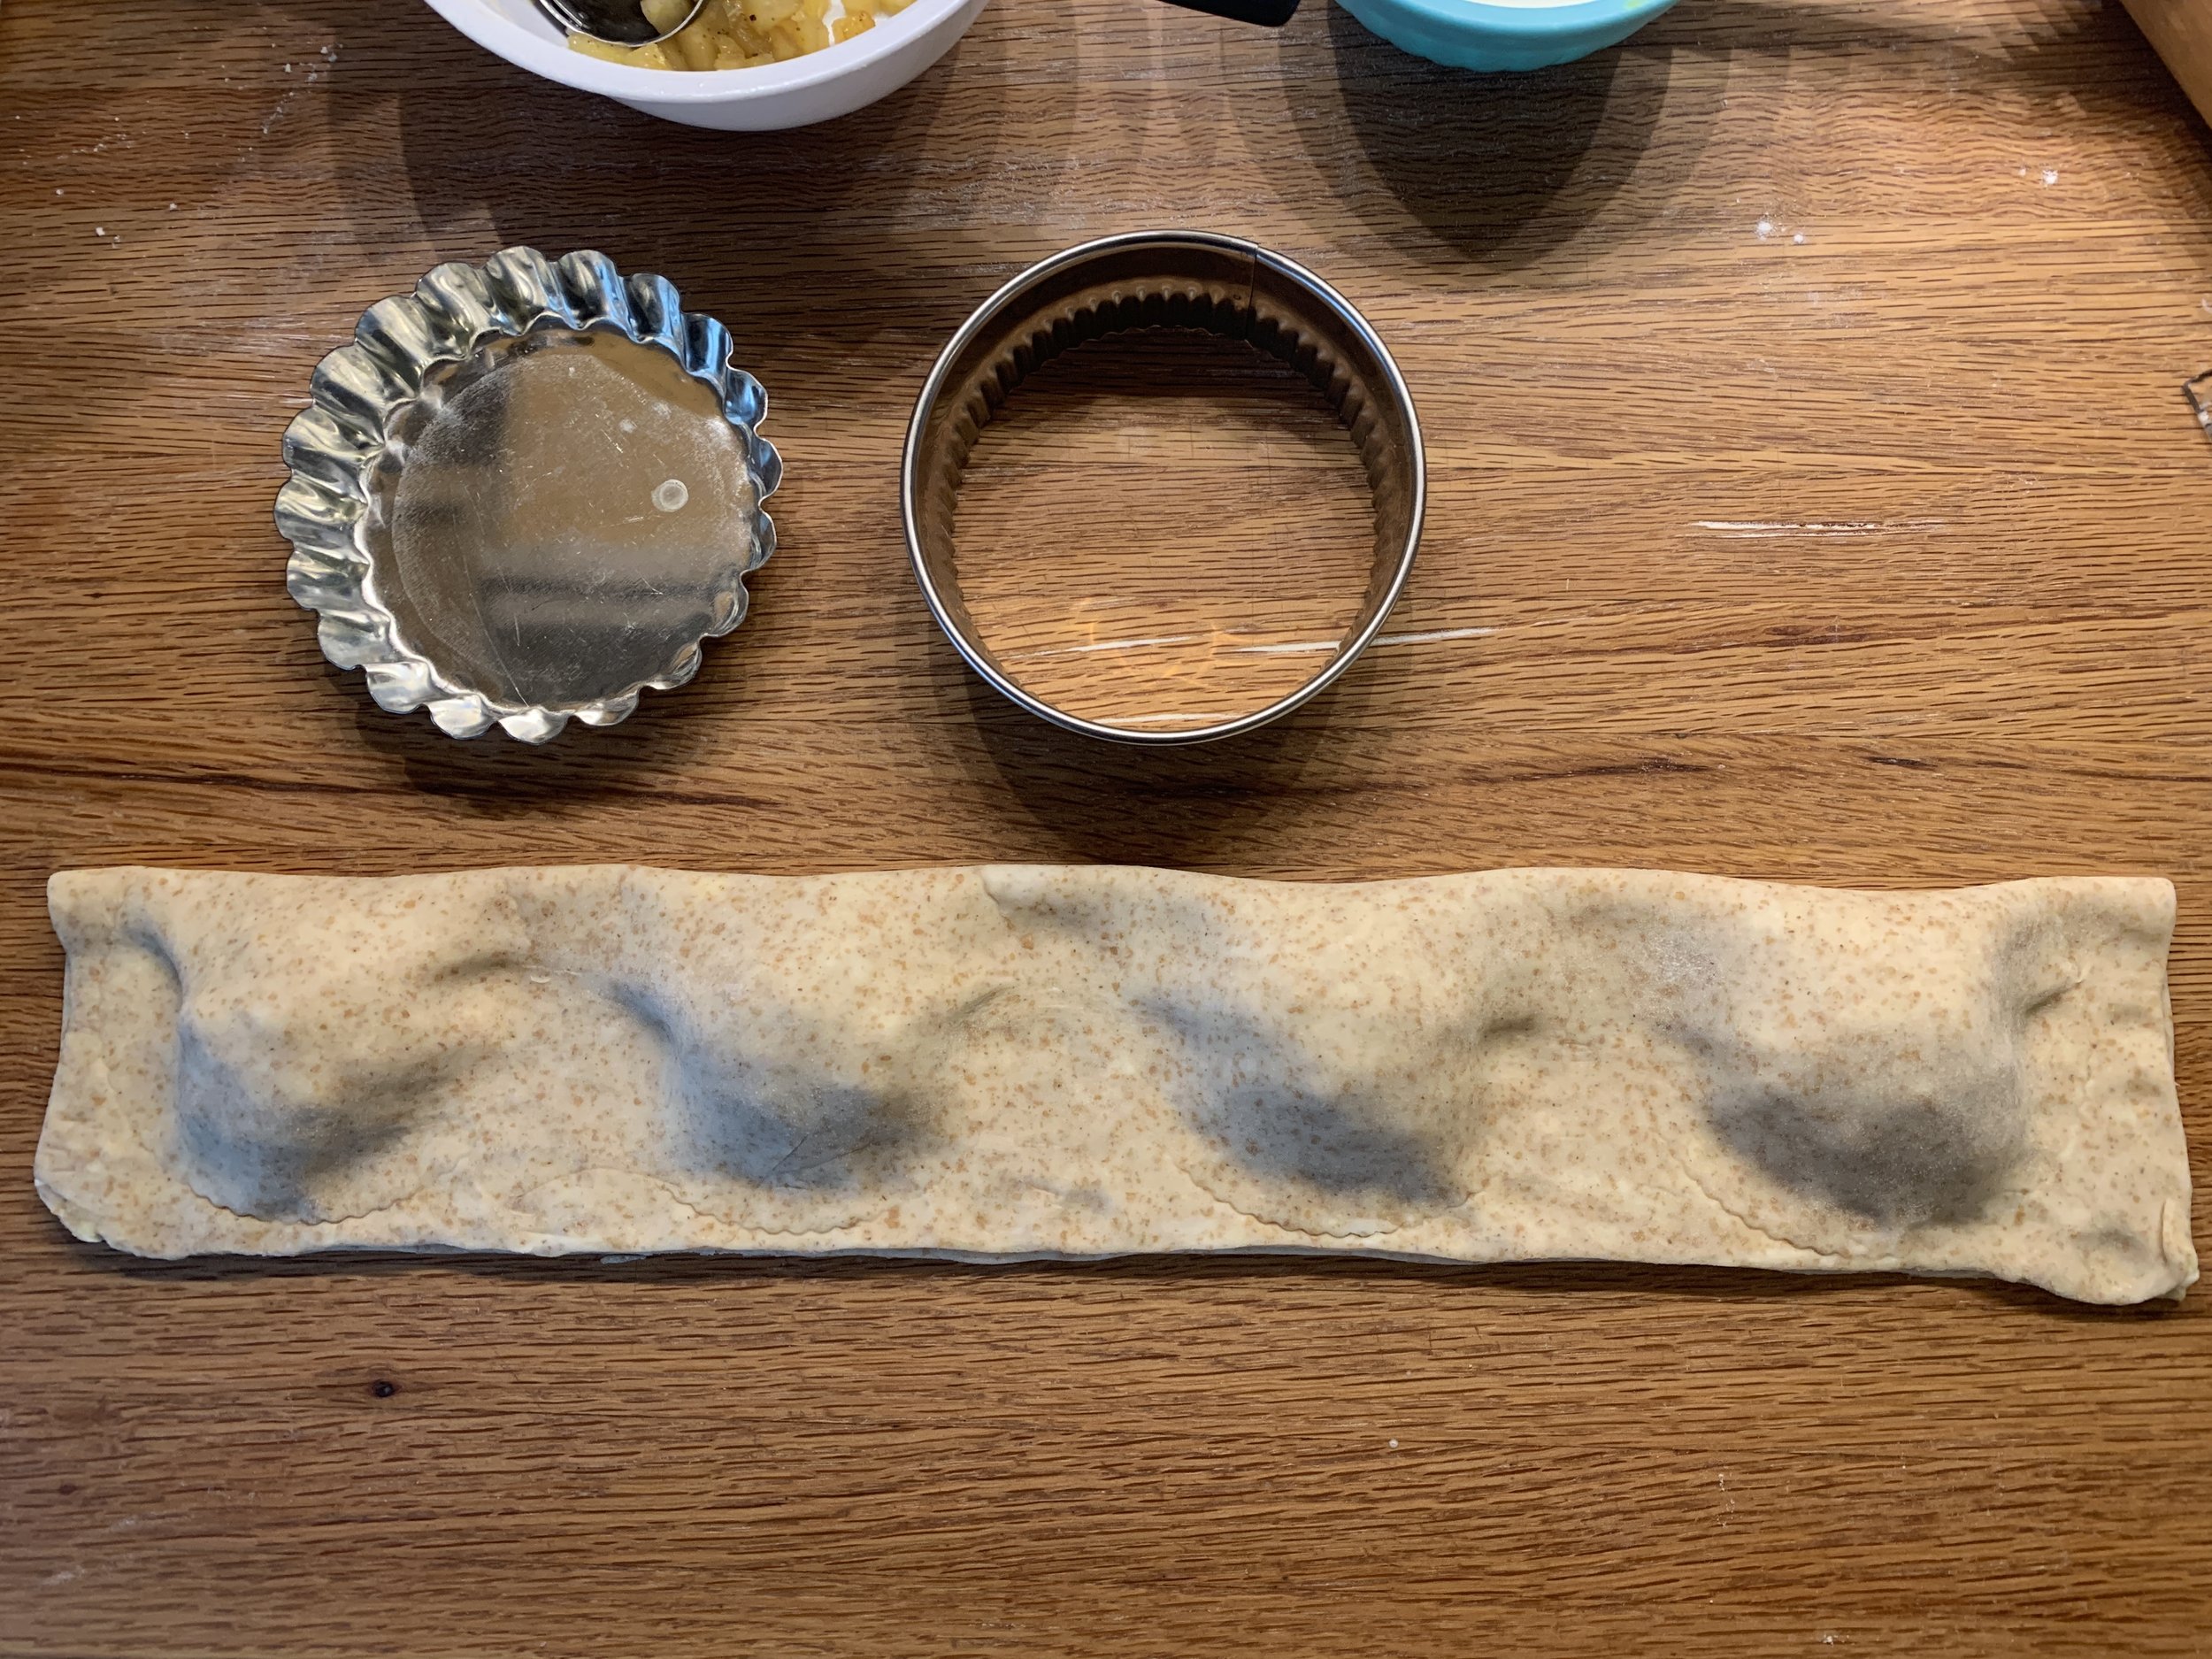
You can use water or milk or egg white or egg wash - just something wet to brush around the apples. Now fold the dough from top down, covering the apples, pushing out any air pockets and pressing down around the mounds to seal.

I tried two different forms to cut the dough - a 3.5” fluted tart pan and a 3.25” fluted cutter. The tart pan didn’t cut sharply enough but the fluted cutter did the trick.

Shoot! I didn’t get a pic of the cutter placement - set it so that a little over half of the cutter is over the dough and a little less than half is over the counter, straddling the folded edge.

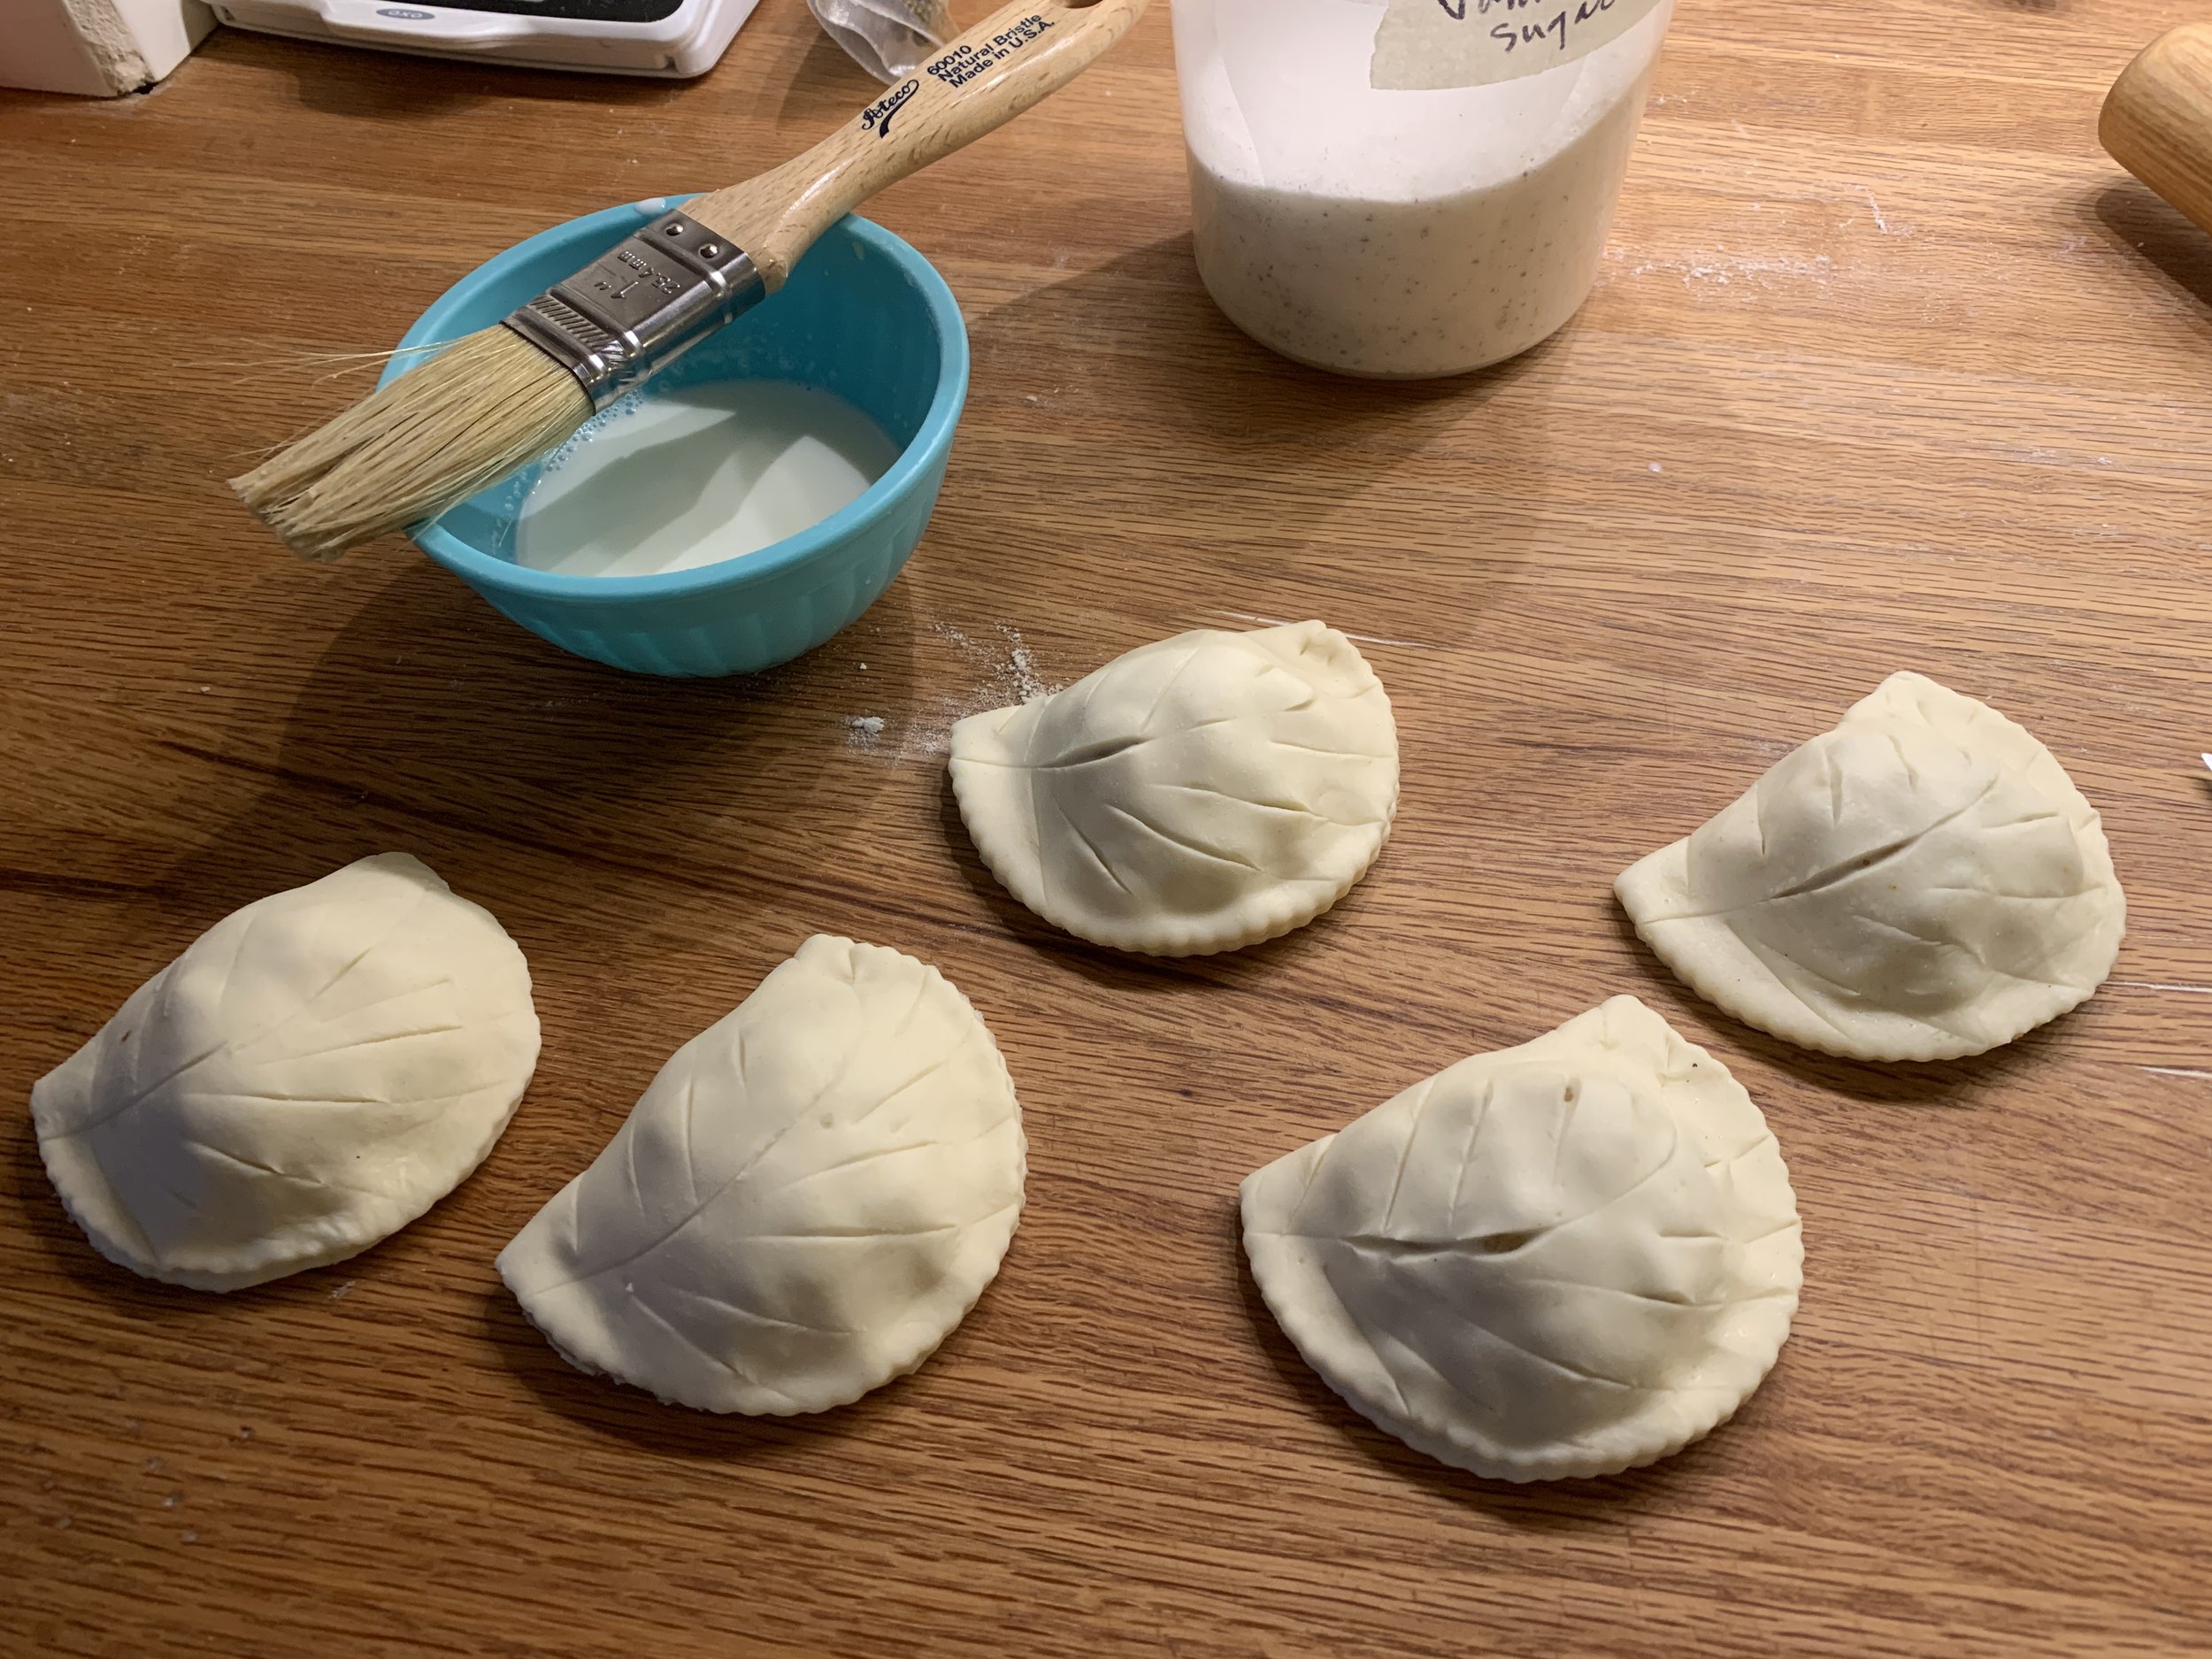
Make slashes to create a leaf like pattern. Pssst . . . I’m using some regular puff below, having done my assembly in a couple of different sessions.

Brush them with egg wash or milk, sprinkle with vanilla sugar or coarse raw sugar and place them on a parchment lined sheet pan. Pop ‘em into the freezer to firm things up and stabilize the butter while you heat the oven to 425ºF.

Bake 10 minutes, rotate your pan and check on the browning. If browning too quickly, reduce temp to 400ºF and bake an additional 10-15 minutes until golden brown.


Mmmmmm . . . . these are tasty indeed!

Not only that, but spring is finally springing. Enjoy!

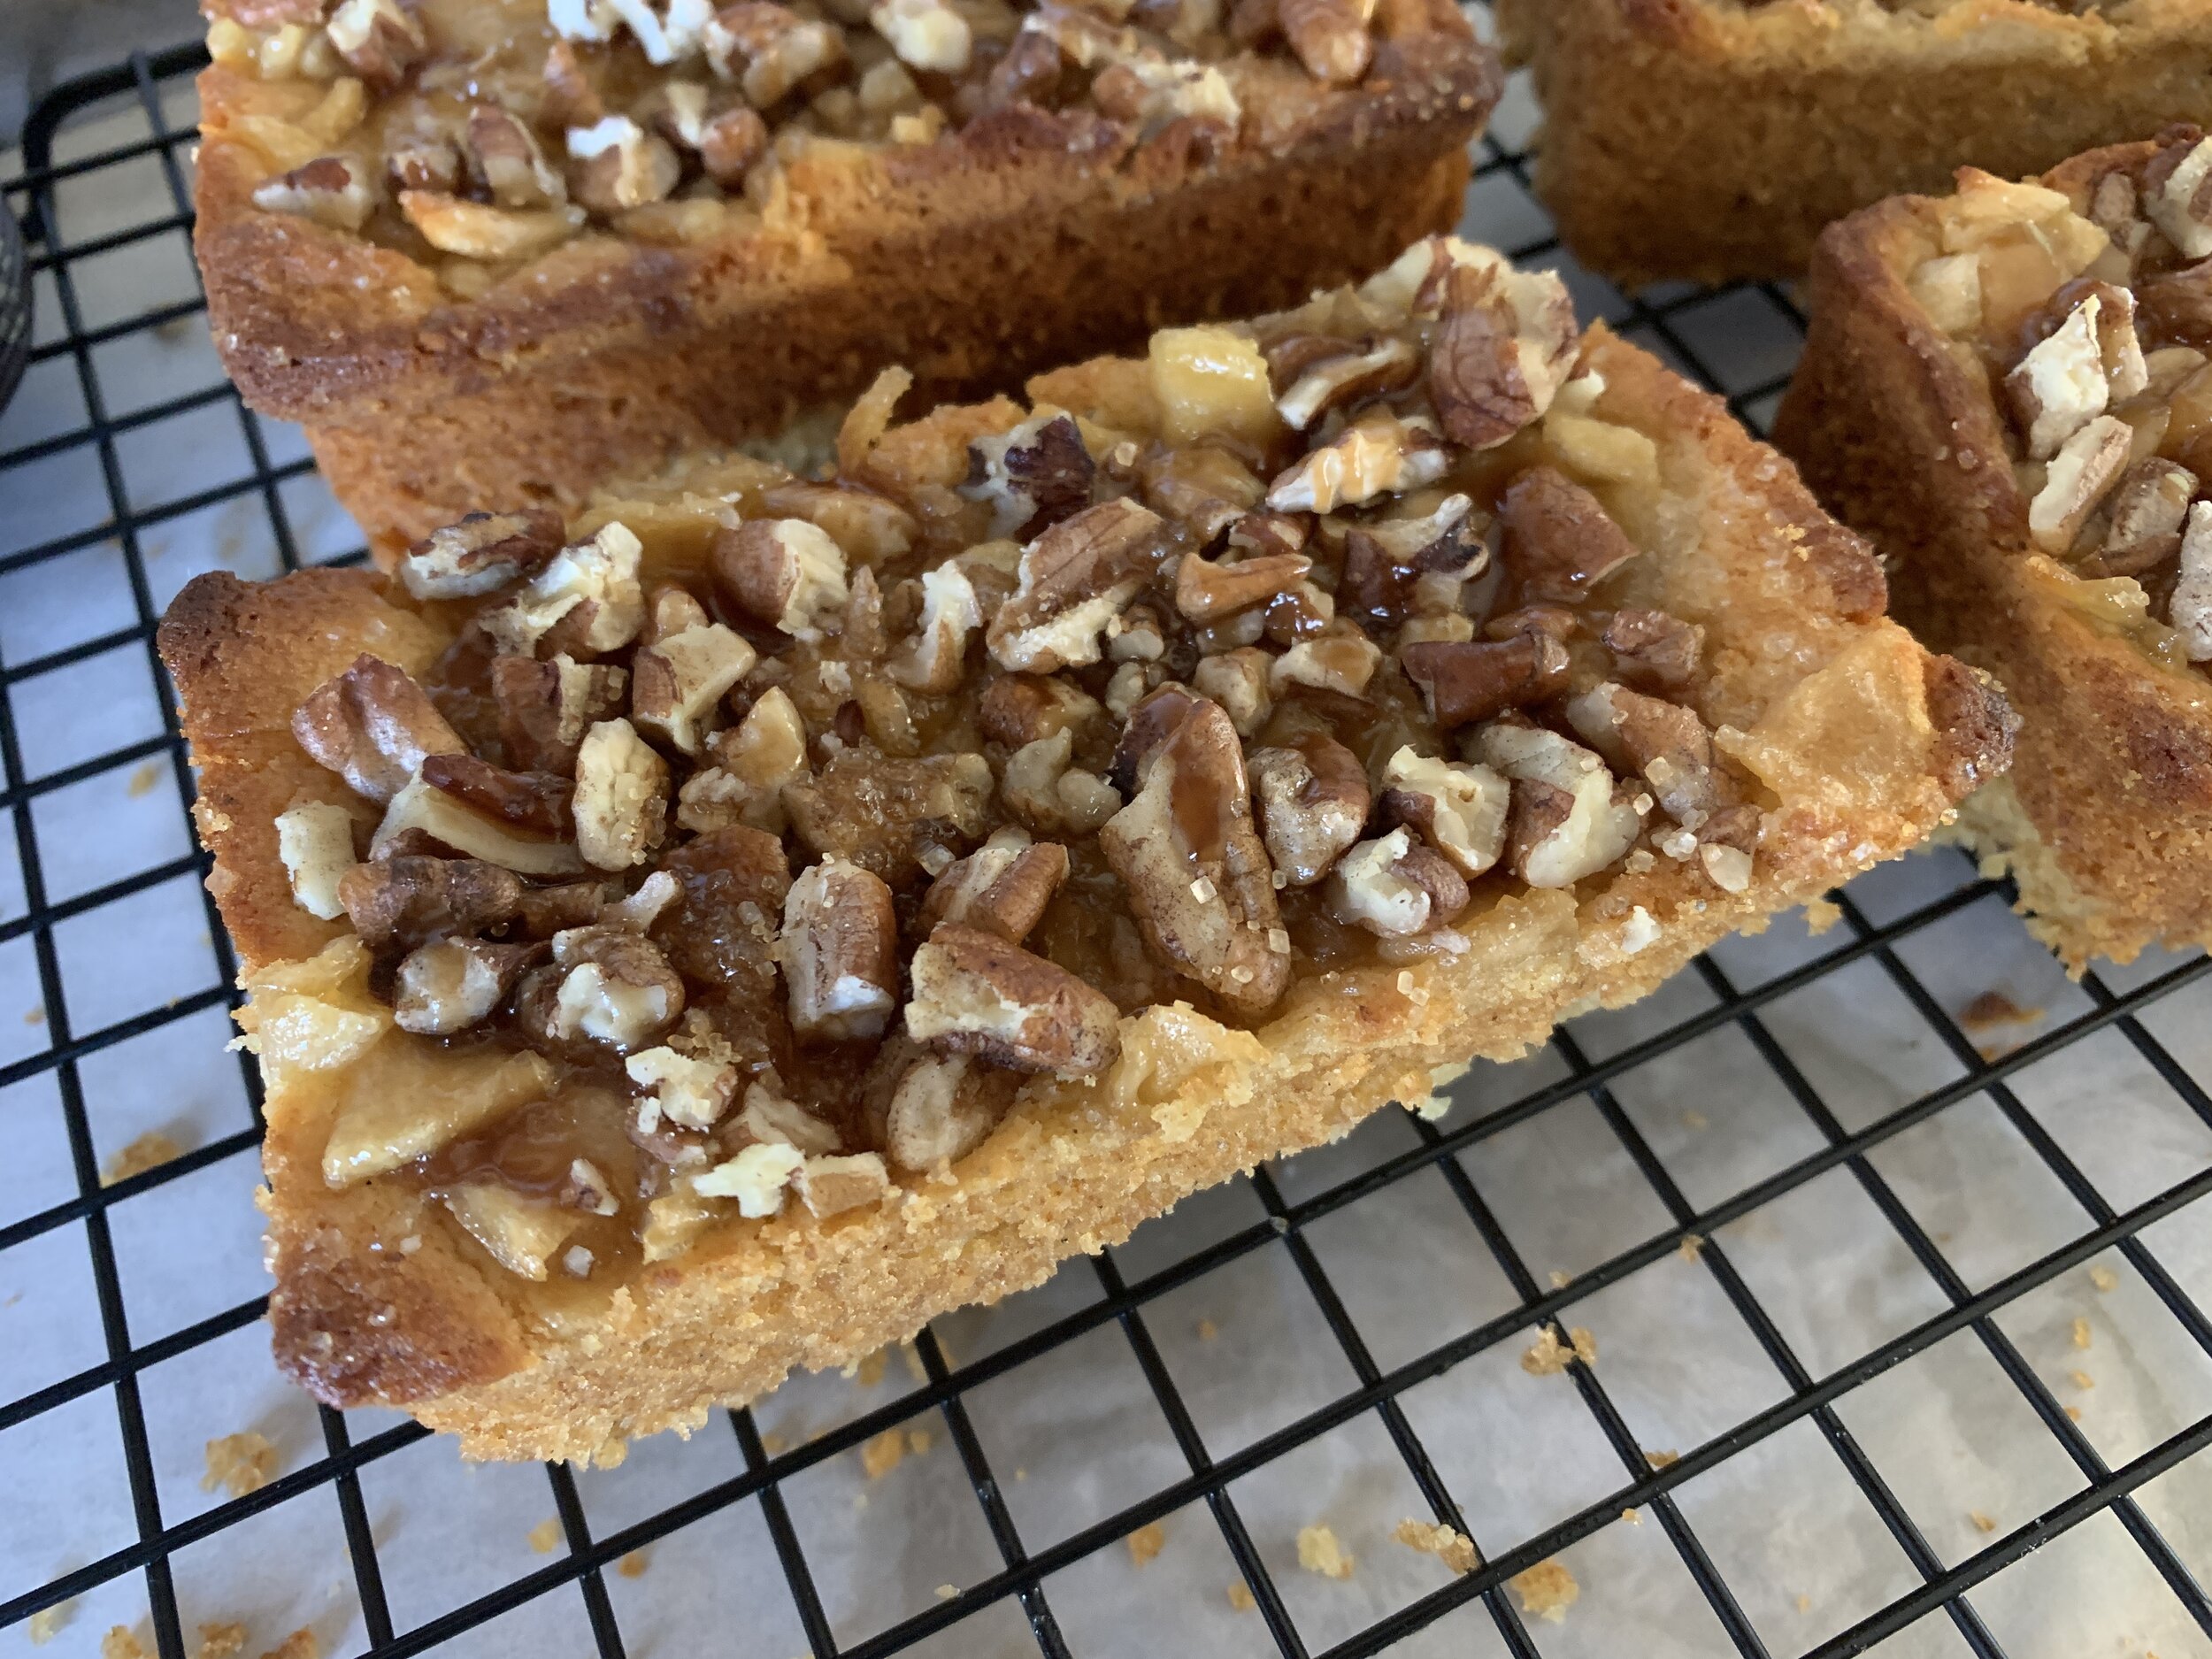
Swedish sand cake (sandkaka) - apple pecan version

IMG_0506.JPG

This one’s an eye opener folks. As I continue to work toward using up some less frequently needed ingredients I have on hand, potato flour is one that prompted further investigation. I originally bought it with an eye to making potato dinner rolls (which I did!), but of course I had some left. Sooooo . . . . . now what?

I did some online research and found this Swedish sandkaka recipe compliments of Jennifer Rao and Around the World in 80 Cakes. It also happens to be gluten free for those who are interested in that sort of thing.

I realize my flavor profile speaks more of autumn than the bursting out of spring but wouldn’t you know I had some sliced apples in the freezer left over from a mid-winter apple tart project? Vermont boiled cider and rum also remain at the ready, a combo I’m becoming very fond of.

Typically baked in a standard loaf pan, I opted to use my 4-well mini loaf pan (buttered) for a more petite cake offering. After a bit of calculation I figured the batter would fill 4 minis with some left for a 4” round panettone paper mold (no buttering needed here!).

Planning ahead: as you prep for this one, you want your eggs and butter at room temperature. I’m adding a mix of warming spices too so I shelled about 15 green cardamom pods then lightly toasted and finely ground the cardamom seed. It’s all about being ready, right?

IMG_0485.JPG

I also diced my thawed apple slices ( I had the equivalent of about a medium apple’s worth) and sautéed them in a bit of butter and sugar then added a tablespoon each of rum and boiled cider until reduced and the apples were golden and caramel-y; set aside until ready. I toasted up ~80 g pecans, then cooled and coarsely chopped them.

Heat your oven to 350ºF.

For the batter: sift 173 g / 1 cup potato flour and 2 teaspoons baking powder into a medium bowl. Add 3/4 teaspoon ground coriander, scant 1/2 teaspoon ground cardamom, 1/4 teaspoon cinnamon, 1/4 tsp salt, and 1/8 teaspoon allspice. I also threw in a large pinch of vanilla powder just because I could.

In the bowl of a stand mixer fitted with the paddle cream 227 g / 8 ounces unsalted butter with 150 g / 3/4 cup granulated sugar, 50 g / 1/2 cup confectioner’s sugar and 1 teaspoon vanilla extract. Beat on medium high for 3 minutes until light and fluffy. Scrape down the sides of the bowl.

Add eggs one at a time on low, blending about 30 seconds after each and scraping down. Then add the potato flour/spice mixture in thirds alternating with a mix of 2 tablespoons rum/2 tablespoons boiled cider. Scrape sides and blend well as you go.

Have the pecans and sautéed apples at the ready.

IMG_0486.JPG

For my purposes I divided the batter amongst the 4 mini-loaf pans and the panettone mold but feel free to use a standard loaf pan if that’s what you have available.

IMG_0488.jpg

Top with apples . . . . . .

IMG_0490.jpg

and finish off with chopped pecans and a sprinkling of raw sugar.

IMG_0492.jpg

I put the pans and paper mold together on a sheet pan - easier to grab when rotating or pulling them out of the oven. Bake about 20-25 minutes until the edges are nicely browned and a tester in the center comes out clean. (Note: if you are using a standard loaf pan, baking time is 40-45 minutes).

IMG_0503.JPG

Let cool 10-15 minutes then gently nudge out of the pans with a small offset spatula and finish cooling on a wire rack. Although a bit crumbly around the edges, they came out pretty well after all.

IMG_0504.JPG

This is good cake! It’s really hard to describe but it IS like sand believe it or not. I’m not saying that I eat sand but the texture of this brings that very thing to mind. Weirdly so, it’s dry yet moist and the flavor, along with the apples, nuts, spices and boiled cider tang, is delectable in my book. How about serving it up with your favorite vanilla or butter pecan ice cream? Yeah baby, why not!

Actually I enjoyed a small slice with my morning coffee for several mornings in a row (gotta have a little treat every now and then) and found that the cake held up well in a covered container for a few days.

Now you know - don’t hesitate to go for this gluten free Swedish treat (no apples and pecans necessary) when you have potato flour at the ready. Mmmm good.

Keep up the good work on the home front and stay safe!

IMG_0507.JPG

Apple pie tart

IMG_0032.JPG

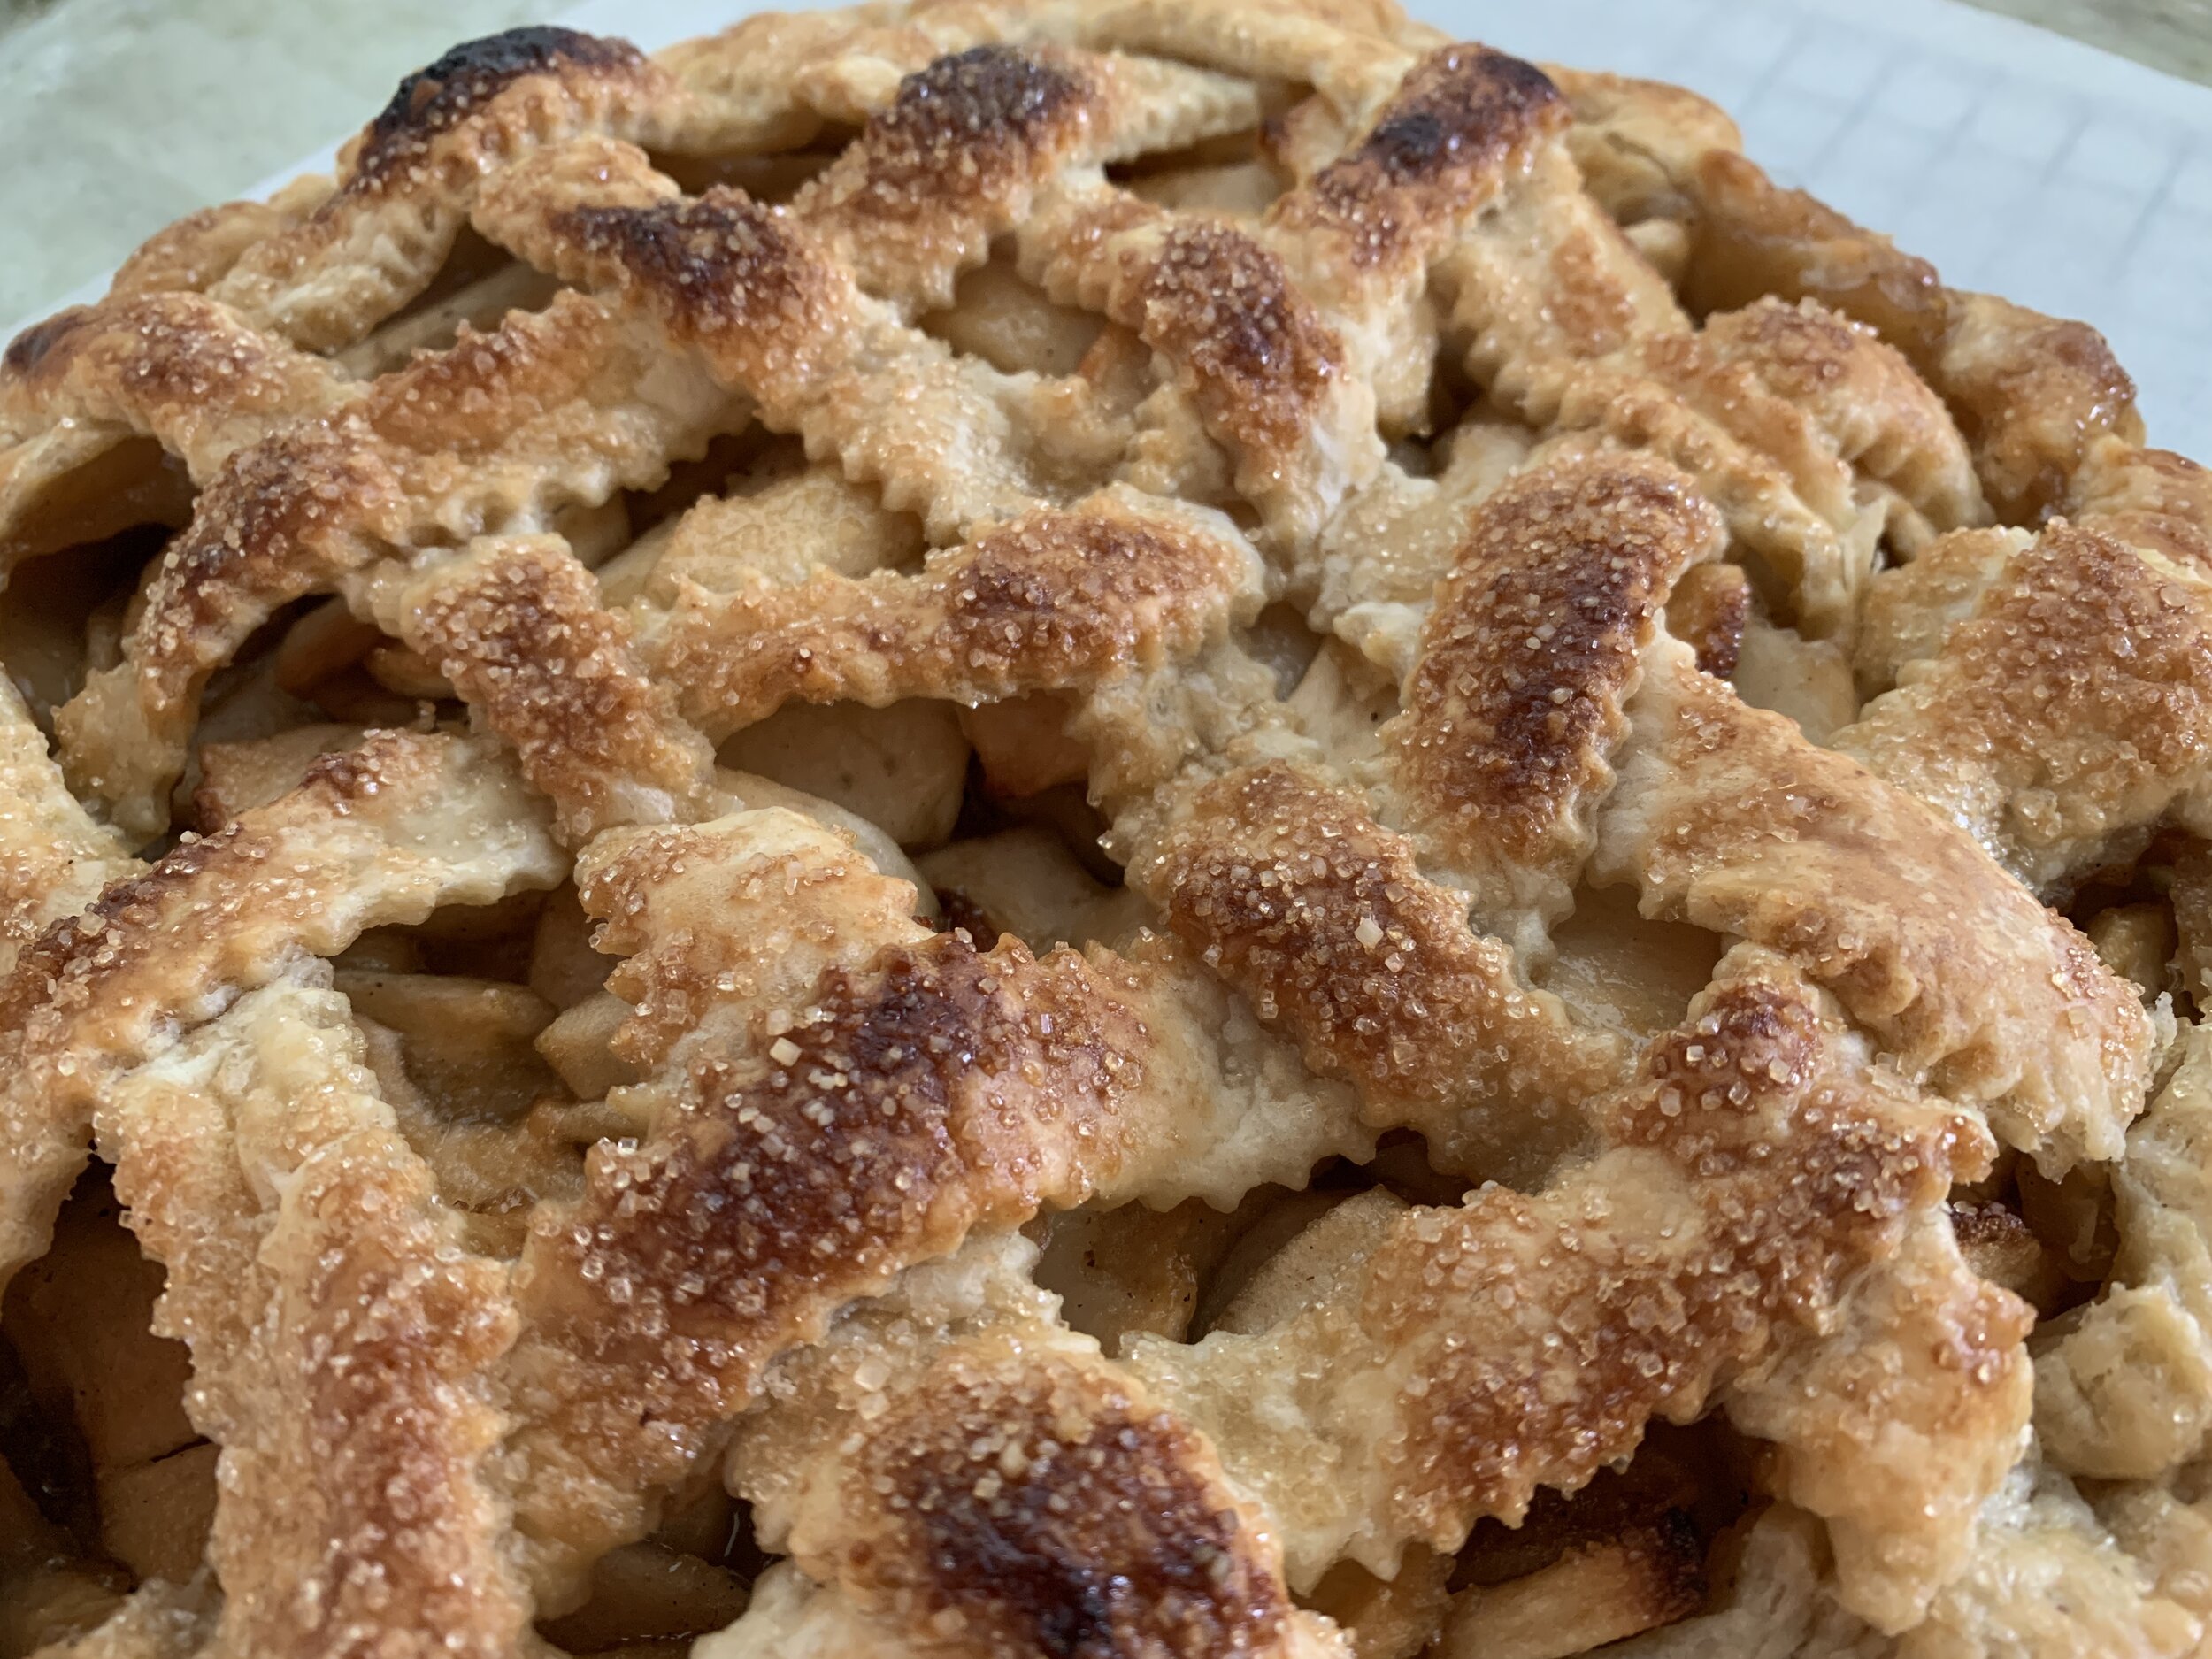
It’s a pie! No wait, it’s a tart! What?? Frankly, it kinda looks like some kind of coral reef creature.

For a recent supper at cousin Jen’s, I was in the mood to make something apple. Besides that, I had sprung for a bottle of boiled cider from King Arthur Flour and was so ready to try it out. It’s made in Springfield VT, a state which Steve and I called home for nearly 12 very enjoyable years.

IMG_0022.JPG

If you’re a regular reader of this blog, you’ve most likely realized by now that I LOVE reading baking and pastry books, comparing recipes and techniques and continuing to gain knowledge about this craft. They give me much pleasure and inspiration to boot! Some of my faves are FOOD 52’s “Genius Desserts” and anything by Rose Levy Beranbaum. They are chock full to overflowing with cool stuff.

As I approached this apple project I reviewed apple pie recipes (again!) from “Tartine”, “Art of the Pie”, “The Baking Bible” as well as “Genuis Desserts”. GD’s is essentially a review of RLB’s recipe for fruit pies, creating a filling with concentrated flavor by cooking down the juices. I’m IN!

In my fall 2018 post on a couple of apple/pear/berry tarts, I followed Tartine’s method of cooking the apples in butter and sugar first then draining off the liquid and cooking that down. They were deelish! The Genius Desserts/Rose LB approach is a bit different - macerating but not cooking the fruit, then reducing down the drained off liquid to a lovely caramel.

Here goes! This go-around I used a combo of Granny Smith and Jonagolds. Years ago I used to think peeling and coring apples was such a chore, but it’s amazing how one can get into a rhythm and actually make a bit of sport out of it, racing against the clock to see how fast you might finish. It’s so satisfying!

IMG_4383.jpg

Once the 2.5 pounds of apples for a 9-inch tart are peeled and cored, slice them up into ~1/4 inch slices and toss them in a large bowl with 50 g light brown sugar (or dark if you prefer), 50 g granulated sugar, a tablespoon freshly squeezed lemon juice, 1/4 teaspoon fine sea salt, some freshly grated nutmeg and 1/2 teaspoon cinnamon. Cover and allow to sit a room temperature for at least 30 minutes and up to three hours to juice ‘em up.

In the meantime take your favorite pâte brisée, roll it out about 1/8” thick and line your chosen tart pan or pie plate. I chose an open 220 mm tart ring this time, and since I planned a lattice top I made sure I had a 2-crust quantity of dough on hand. Cover the dough with plastic wrap and hold in the fridge until ready to fill.

IMG_0018.JPG

I rolled out the dough for my lattice as well, cut my strips and held them in the fridge until ready for final assembly. I thought I’d be creative and cut curvy pieces, but, when it came time to create my lattice, the strips didn’t really feel like staying very curvy until I coaxed them into submission. I made the best of it and it worked out just fine and dandy.

IMG_0024.jpg

Ready to finish the filling! Transfer the apple mixture to a colander set over a bowl and let drain to release anywhere from 1/2 - 1 cup liquid. Sounding good already.

Pour the juice into a small saucepan along with 2 tablespoons unsalted butter and bring to a boil. Cook until caramelized and reduced to about 1/3 cup. Then I added a tablespoon or so of boiled cider to intensify the apple flavor.

Transfer the drained apples back into the large bowl and mix them with 1 tablespoon plus 1 teaspoon of cornstarch.

IMG_0026.jpg

Place a baking stone or empty sheet pan on the bottom rack of your oven and heat to to 425ºF.

In the meantime blend the reduced apple caramel liquid into the apples and transfer it all into the lined tart ring. Create the lattice, trim, tuck and crimp or flute the edges. Brush with milk and sprinkle with raw sugar. Hold in the freezer while the oven heats.

IMG_0029.jpg

Bake approximately 50-55 minutes. If your crust edges are browning too quickly, place an aluminum foil ring over them. Watch for bubbling juices and tender fruit when poked with a small, sharp knife. My pie-tart baked about an hour before I was happy with the bubbles and texture. Looking pretty tasty!

IMG_0031.JPG

One problem with this baby is that a small section of the crust bottom and edge seemed to collect a lot of juice and didn’t bake through. It was also an interesting challenge to get it out of the tart ring. I ended up cutting a cardboard round slightly smaller in diameter, slid it under the pie/tart and lifted it up and out of the ring. Whew. Maybe a solid pie plate or lovely fluted ceramic pie dish next time, eh?

No matter - it was delicious, the boiled cider adding just the right tang and deep apple flavor. A classic, particularly topped with a scoop of vanilla ice cream.

IMG_0033.JPG

Always remember - there’s more than one way to skin a cat!

Now can’t you just imagine the hint of spring just around the corner? It won’t be long folks. Happy baking!