Back to basics - pâte brisée

now THAT's flaky

In the wake of a tart class that I taught a few months back, when my apple tarts baked with pâte brisée came out soggy and under baked, I was determined to revisit the techniques involved in making this classic dough. (SIDE NOTE: in my defense the apple filling prepped by an eager culinary student was way too soupy, and the oven I used was not familiar to me, but I still felt the need for a refresher!)

Known to pie and tart bakers as flaky pie dough, pâte brisée can cause the most confident baker to question why, why, why doesn't this dough come out perfectly EVERY time?! Some years ago I compared a number of recipes and methods for pâte brisée and came away with a version that was delicious and seemed to be just the thing. But since then, even though I've used the same recipe and technique every time, I've had my share of less than stellar results. Maybe it's just me, eh?

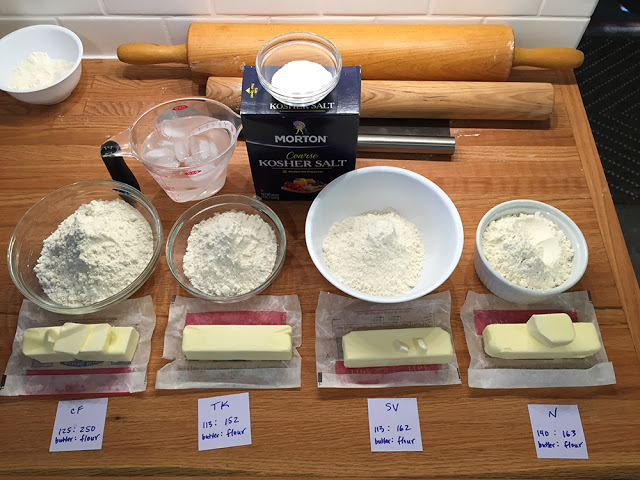
I proceeded to look at recipes from Christophe Felder (one of my favorite tart makers) and Thomas Keller of French Laundry/Bouchon Bakery fame. In addition I obtained the recipe that the bakers at Nonna Cafe in Ada use (I've had their quiche many times and the crust is always deeelish!). The last addition to my test quartet was the recipe I've been using for years.

Truth be told, many pâte brisée recipes are very similar, but what intrigued me about these four was the difference in ratios of butter to flour, how much water is added and how the ingredients are brought together.

Here we go!

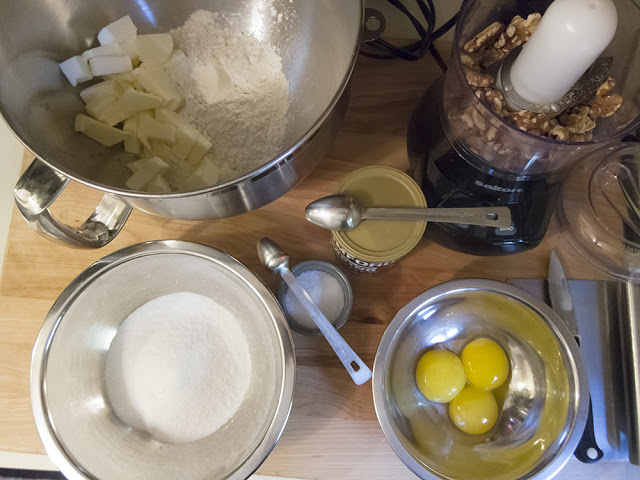
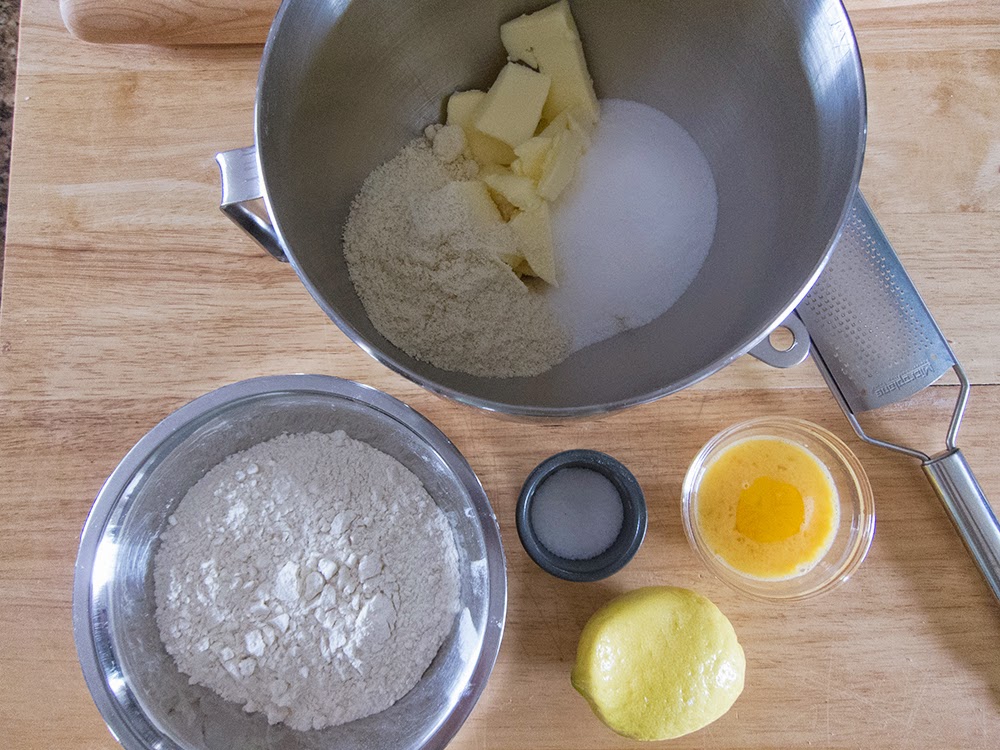
Pâte brisée is simply flour, cold butter, salt and ice water (some recipes add a bit of sugar too). In the photo below I've provided the amounts of butter and flour for each of the four recipes. From left to right you see the following ratios plus baker’s percentages for the butter: Felder (CF): butter:flour at 1:2 (50%); Keller (TK) 1:1.35 (74%); me (SV): 1:1.44 (69%); Nonna (N): 1:1.18 (85%) (getting much closer to 1:1!).

In this test I'm using Challenge unsalted butter made in California with the claim that it is from cows not treated with growth hormone rbST. I've been using it for some months now and it's good.

I've discovered over the years, working with various tart and shortbread doughs, that the closer the weight of butter gets to the weight of flour in the dough (butter weight is typically about 2/3 flour weight), the more tender and delectable the end result.

At any rate, this promised to be interesting.

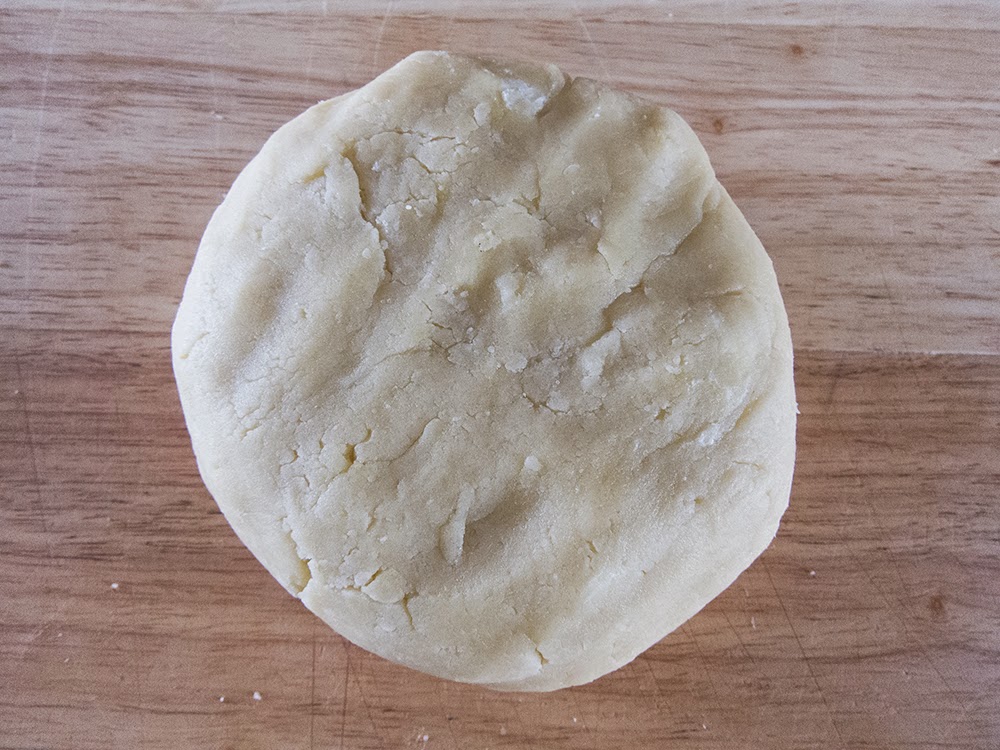
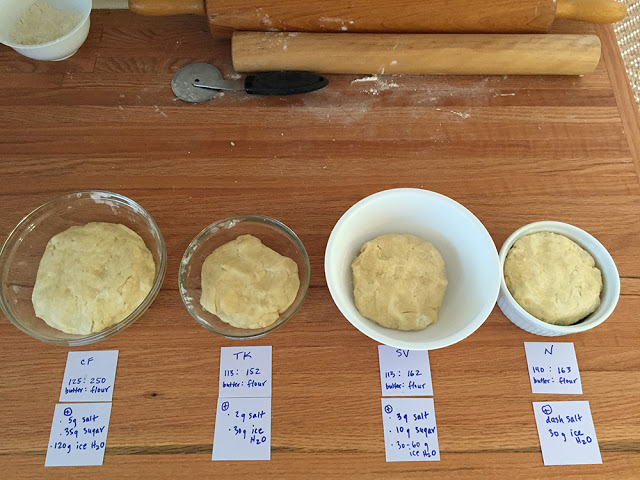
Below are the four finished doughs with all ingredient amounts listed. The Felder recipe makes a larger quantity than the other three, but you can still appreciate the ingredient ratios.

Just a note - the TK, SV and N recipes are typically double (enough for two 9" tarts or pies) what I note below.  I made smaller recipes for testing purposes.

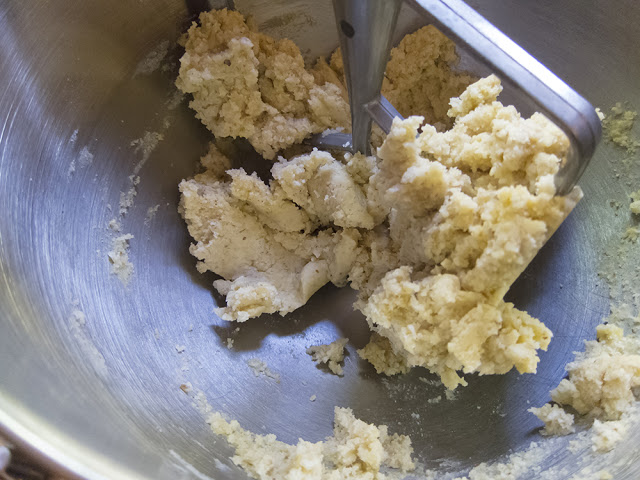
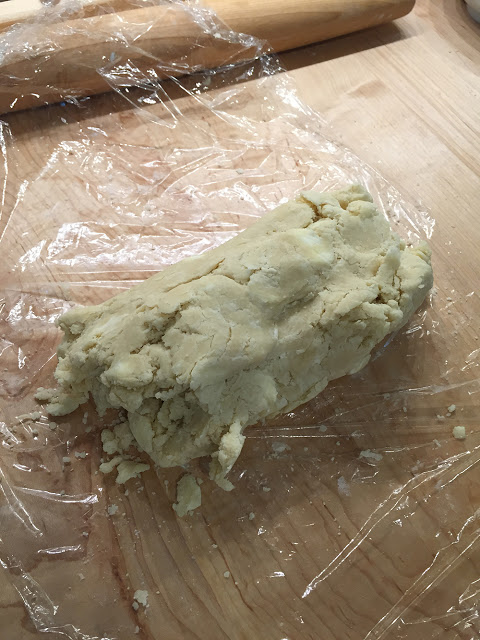
So how are these all put together, you might ask? I've always followed the "flaking" method when making pâte brisée by hand.This involves working pieces of cold butter into the flour and salt, purposely leaving large "flakes" or flat pieces of butter in the mixture. Cold water is then added in increments and mixed lightly and quickly until the dough holds together. The dough is then wrapped and chilled before rolling it out for use.

Here are the differences in technique for the other three doughs.

Felder calls for soft butter to which is added the salt, sugar and flour. The mixture is sanded by hand to coarse crumbs, then 120 gm ice water is added and mixed gently until the dough comes together. The amount of water to flour is much higher in his recipe. He claims that this dough holds very well after baking, doesn't soften and is great for juicy fruit fillings.

Keller's method involves mixing half the flour with the salt, adding butter pieces on low speed in a mixer until NO butter is visible. Then on med-low speed the remaining flour is added, followed by the water. Mix until just combined, wrap and chill.

Nonna's dough is made with a food processor, although I chose to sand the butter in by hand. Place the flour and salt in the bowl, pulse in the cold, diced butter to achieve coarse crumbs, then add the ice water and pulse just until it comes together. Wrap and chill.

All just a little bit different!

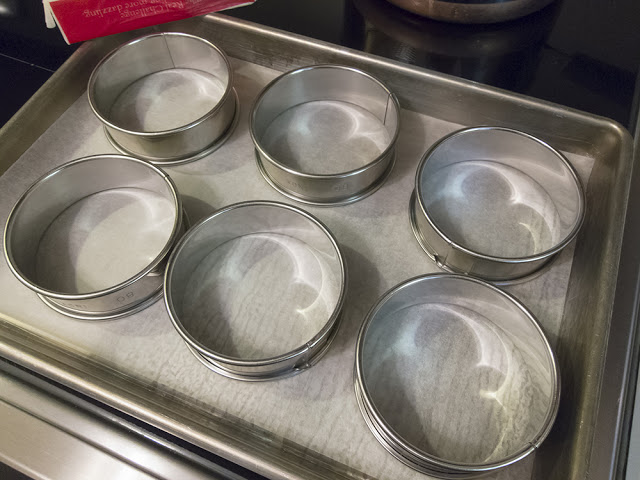
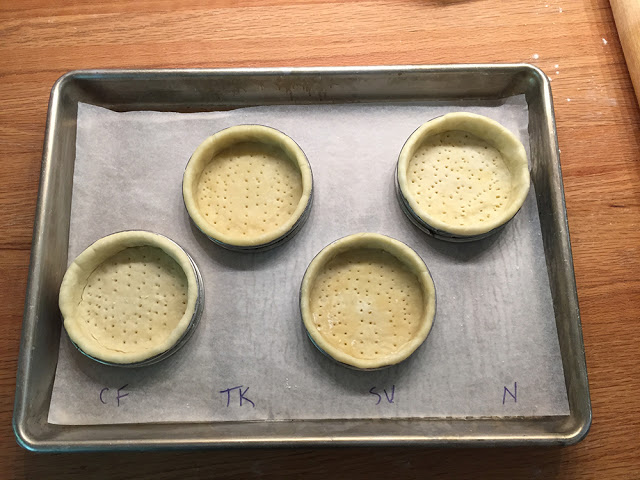
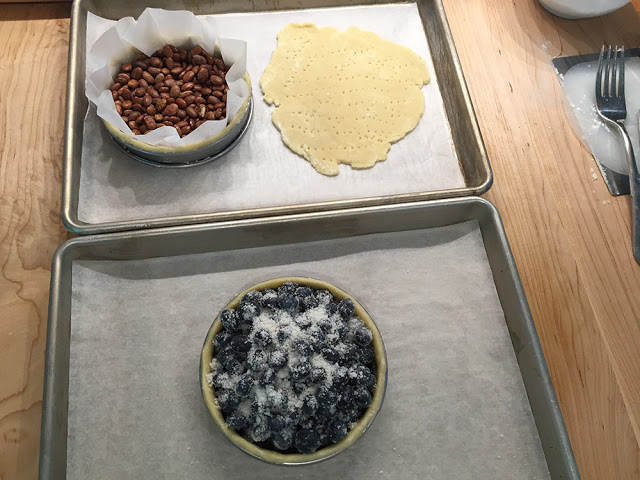
Once the four doughs were chilled I rolled them out to make 80 mm filled and baked blueberry tarts and blind baked then filled lemon tarts.

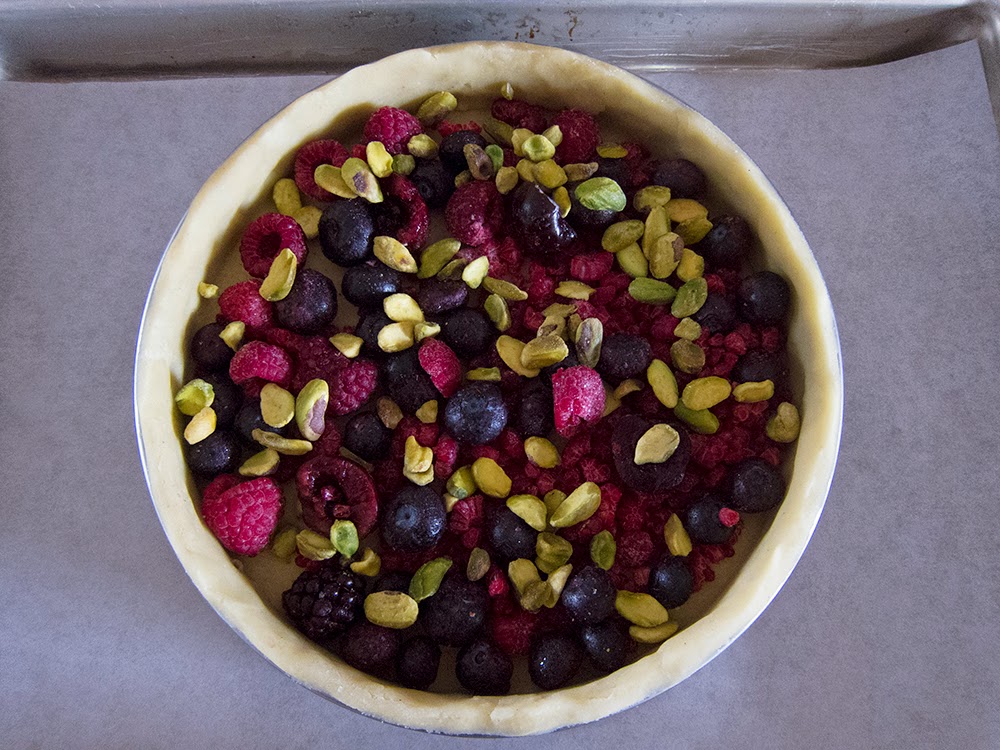
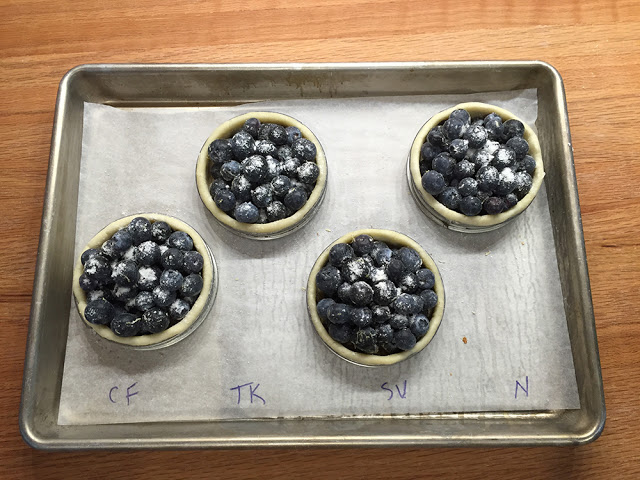
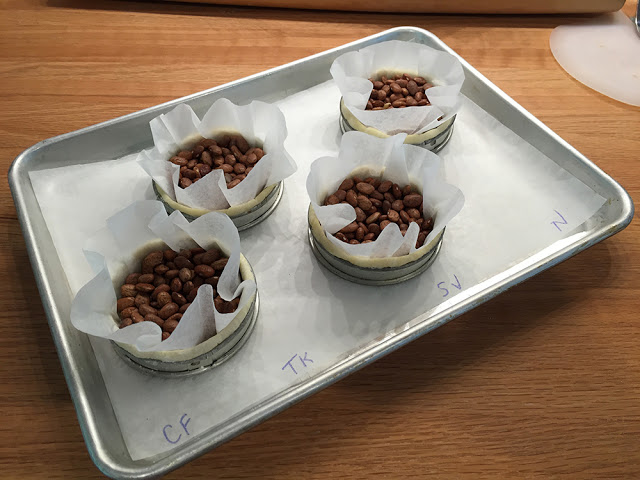
Here are the rings lined for the blueberry tarts.

Here's what I observed when rolling these doughs.

The Felder dough, even after a good chill, felt weirdly spongy and soft (NOT in a good way). It was sticky and didn't hold its shape well when lining the ring.

The Keller dough was smooth, firm and tight, rolled beautifully and held very nicely when lining the ring.

My SV dough felt a bit rougher and drier than the others, although rolled well and held when lining the ring.

The Nonna dough felt soft (in a good way) - not too wet, not too dry - rolled nicely and held well when lining the ring.

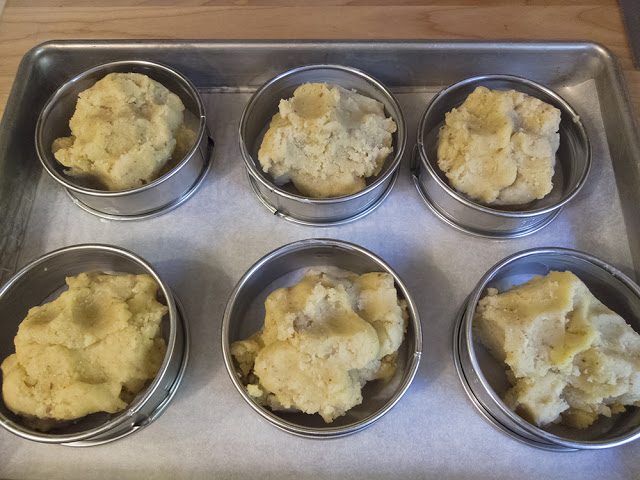
I popped the lined rings into the freezer to firm up before baking.

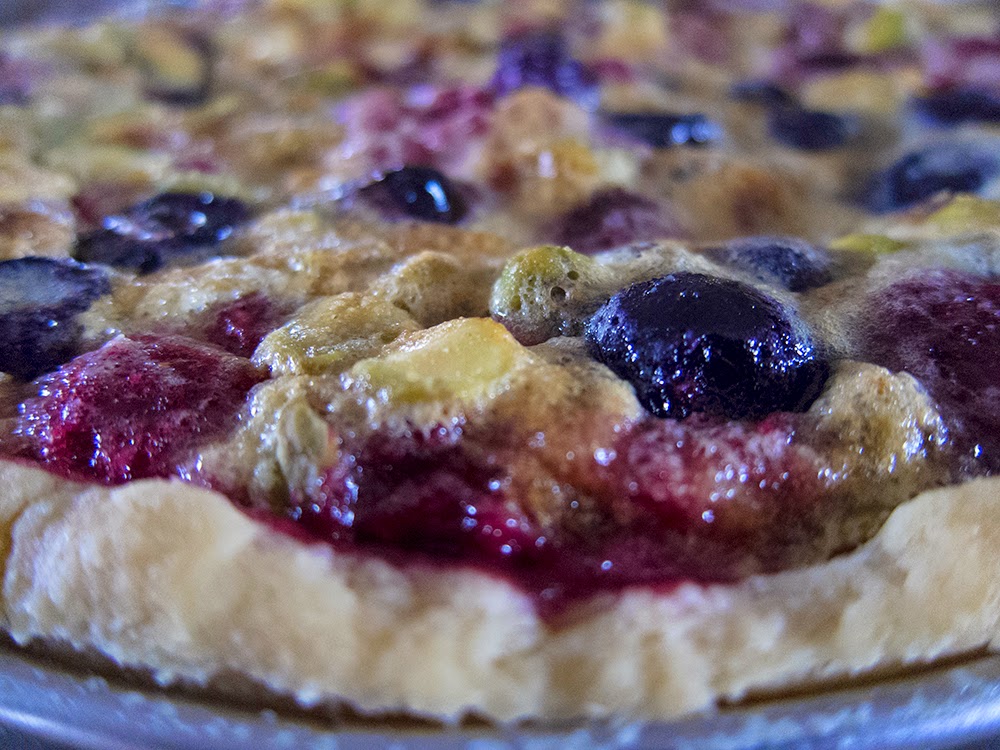
First the blueberry tarts. I sprinkled some fine, dry bread crumbs in the bottom of the tart shells - this is meant to create a barrier between the filling and the crust to help reduce the chance for sogginess. Then I filled each with fresh blueberries that were tossed in a little lemon juice, sugar and flour ( for four 80 mm tarts I used a generous 3 cups of berries with 1-2 teaspoons lemon juice, 4 - 6 tablespoons sugar (or to taste) and 2 tablespoons of flour).

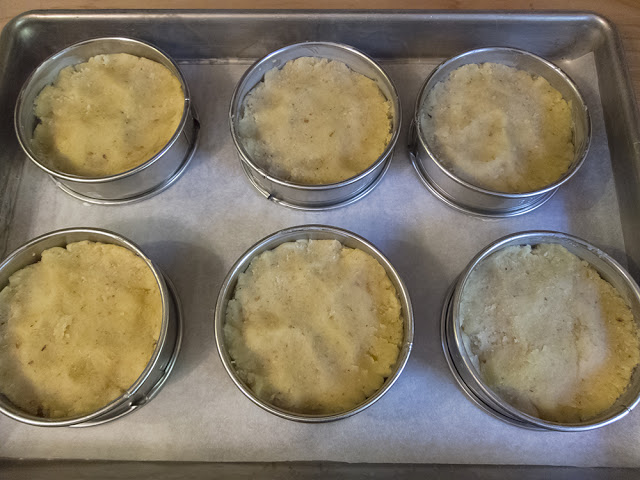
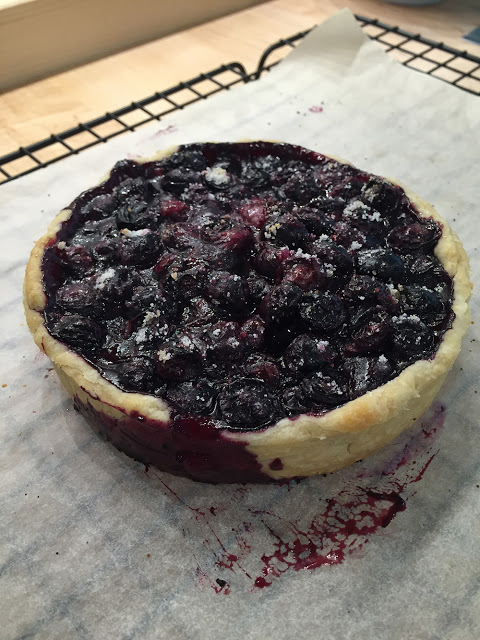
Heat the oven to 425 F. Here they are ready to go in.

I gave these 5 minutes then decreased the oven temp to 400 F. Continue baking another 20-25 minutes or so until the berries are bubbly and the crust is nicely browned.

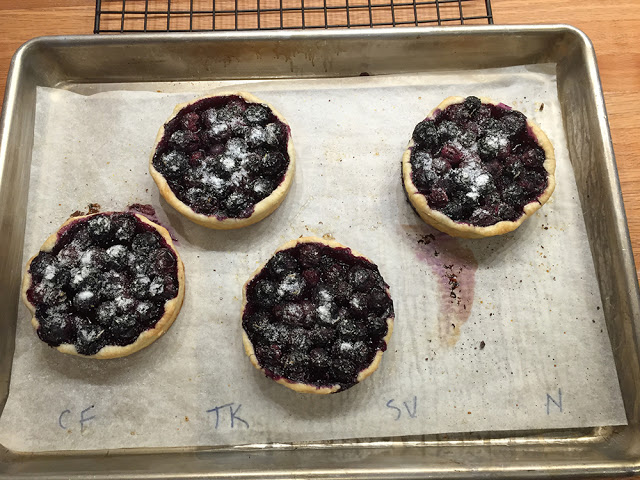
I sprinkled vanilla sugar atop the blueberry tarts once out of the oven.

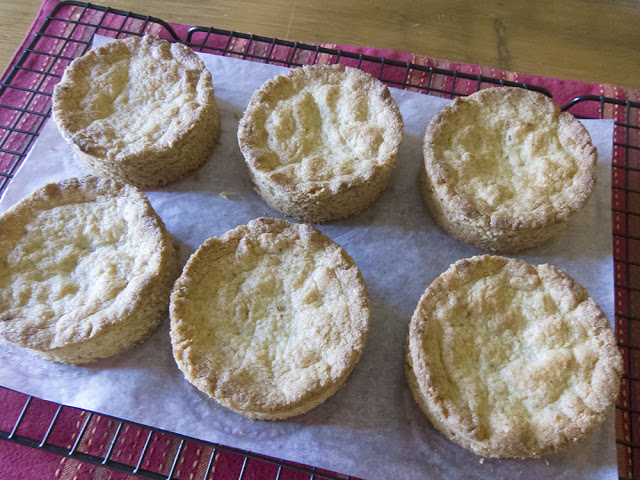
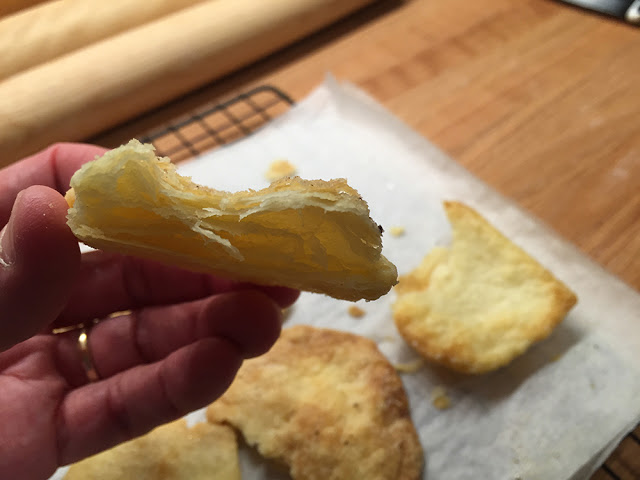
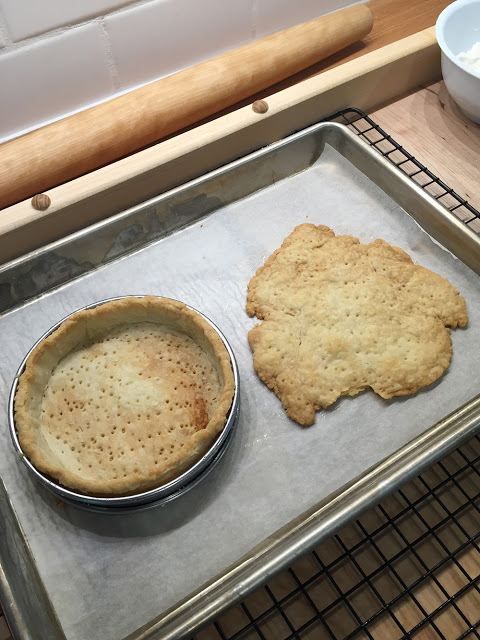
I also rolled out some scraps of each dough to bake all by themselves. I wanted to see how they puffed and tasted sans filling. A sprinkle of vanilla sugar gave them just the right something.


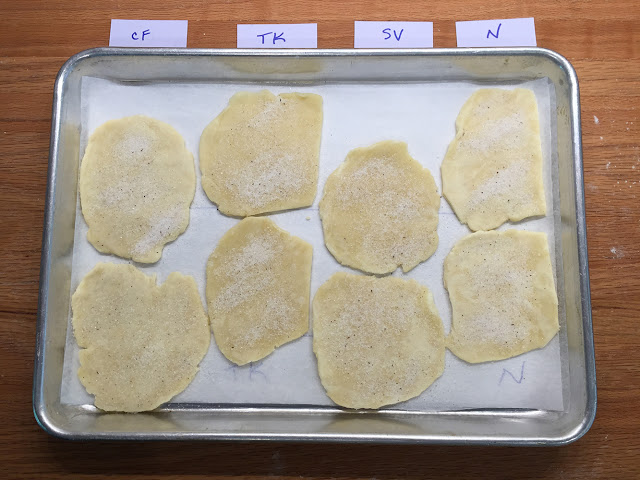
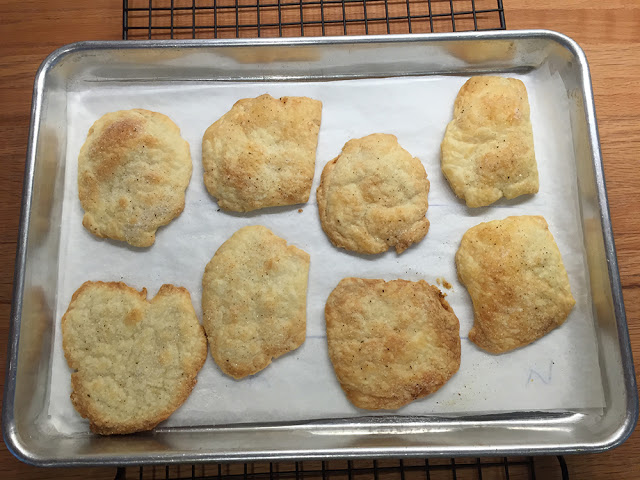
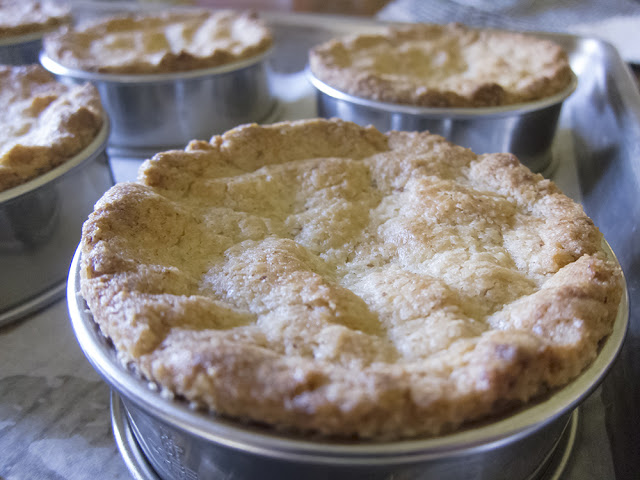
It's a bit difficult to see from the photo above, but all of the scrap pieces puffed up nicely, except the Felder dough. Here’s the Nonna dough, beautifully flaky.

Now for the blind baked tarts with oven temp at 400ºF.

Freeze the lined rings for 10-15 minutes then fill with parchment rounds and dry beans.

Bake with weights for 15 minutes, remove weights and bake an additional 5-8 minutes until nicely browned. Always pay attention to what's going on inside your oven!!

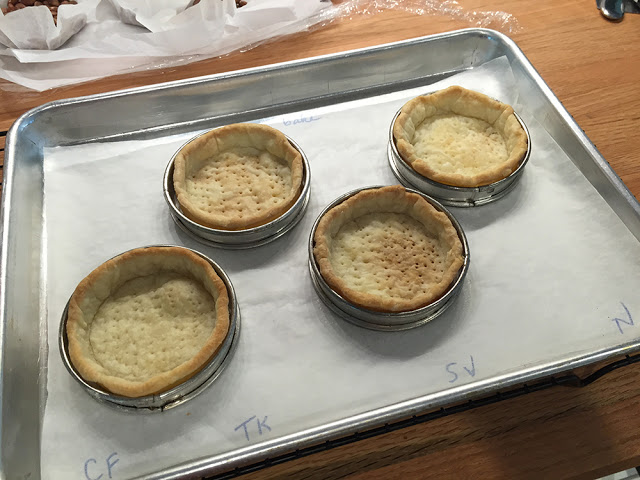
All four doughs held their shape pretty well during baking with the usual amount of shrinkage away from the rings.

After reducing the oven temp to 300ºF I filled them with my current favorite lemon filling and baked them until the filling was set, about 10-15 minutes. Check out my post from 2/16/16 on lemon-lime tart and here’s a link to two of my favorite tarte au citron recipes.

Now for the tasting. Steve was on hand for the event, my ever present tasting guru. First the blueberry.

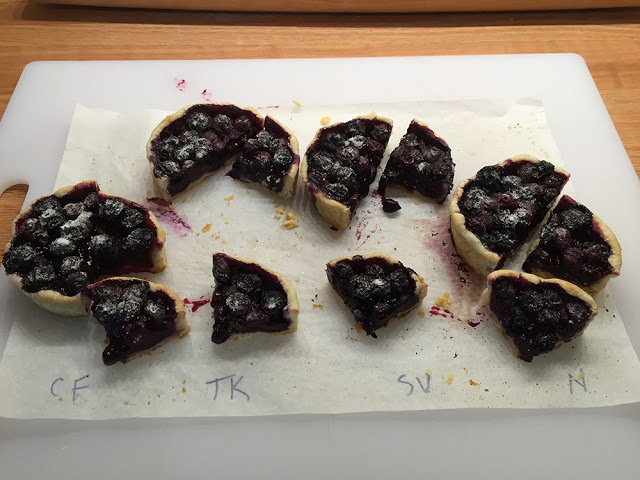
I realize you can't appreciate the difference in the doughs visually, but the first thing I checked was how they all felt when portioning them with a serrated knife, followed by how easily they cut with a fork.

Felder's crust was tough, both when slicing with a knife and when cutting with a fork. It was chewy in the mouth, not flaky or tender and the flavor was dull. No thanks.

Keller's cut very easily with both knife and fork, was tender and crisp with a pleasant and agreeable flavor.

Mine was just a tad resistant to cutting compared to Keller's, slightly less tender but crisp in the mouth with good flavor.

Nonna's cut easily with great flavor and texture.

All of the above observations held when tasting the plain baked scraps of dough. Felder's was chewy and tough, broke apart with a bend rather than a crisp snap without any flakiness. The other three were flaky, crisply tender and delicious.

When cutting and tasting the lemon tarts, the same observations held true. (Love that lemon filling!)

Felder was the obvious loser. However the other three were all good, leaving me with the question - now what?!

As if you haven't already had enough, I decided to do just a bit more reading and research and came upon one more technique that sounded promising. I'll credit this one to Kristen Rosenau who writes the blog "Pastry Affair" (http://www.pastryaffair.com).

First I tweaked my recipe (it's coming at the end, I promise!) by increasing the butter to bring the butter:flour ratio to 1:1.25 (80%), in between TK and N.

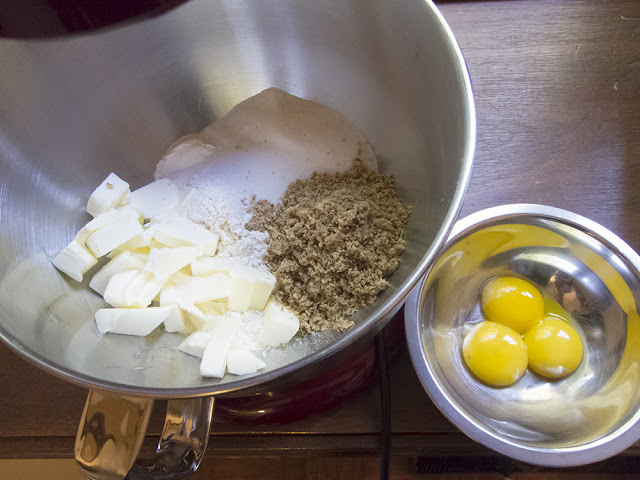
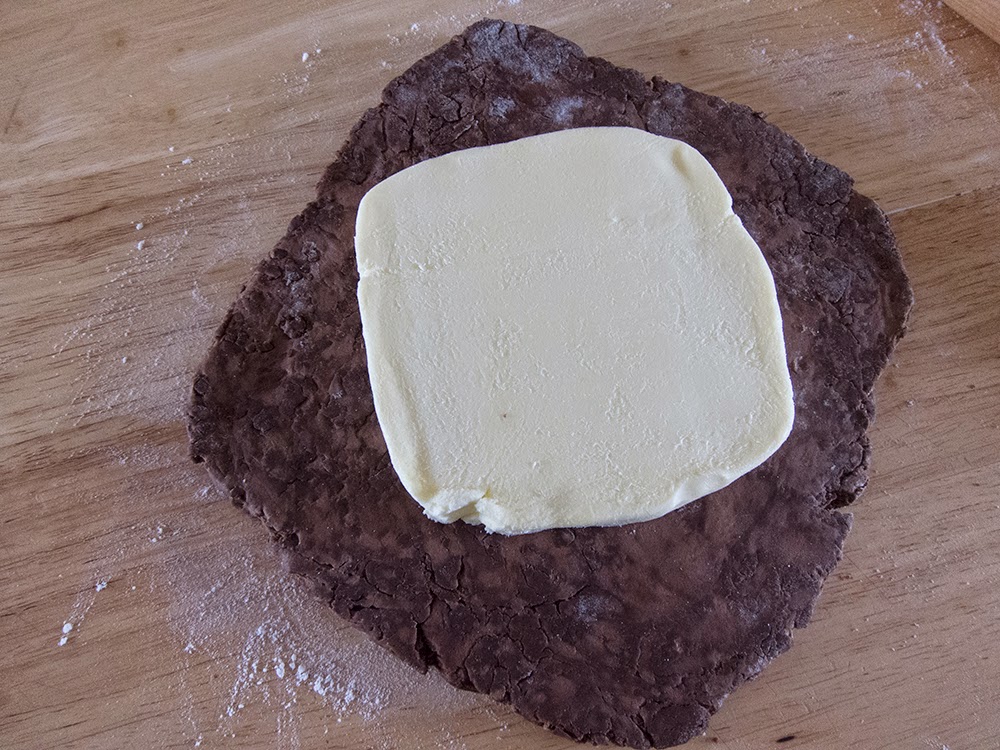
In Kristen's by-hand method she takes half of the diced cold butter and sands it into the flour and salt. Then she adds the other half of the butter in larger diced pieces and "flakes" them, leaving flat pieces of butter visible. Add the ice water incrementally and once the dough holds together, turn it out onto a piece of parchment or plastic wrap. There may very well be some crumbly pieces at the edges. Don't worry.

Using the plastic wrap as an aid, fold the dough in three.

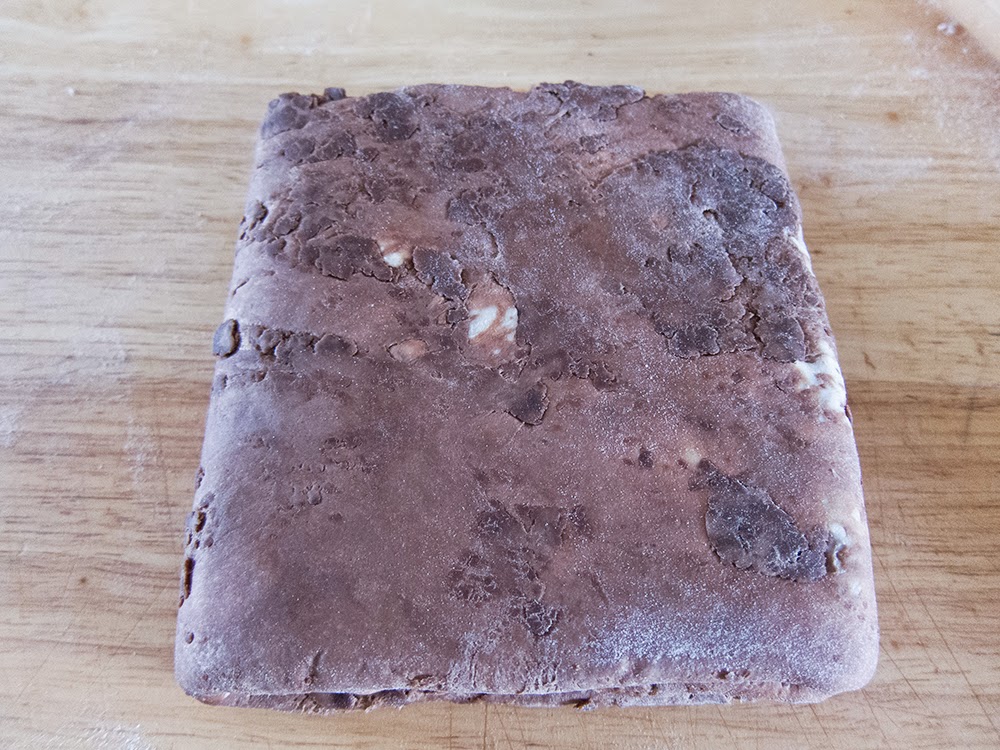
Flatten and turn it 90 degrees then fold in three again (basically a rustic version of puff pastry).

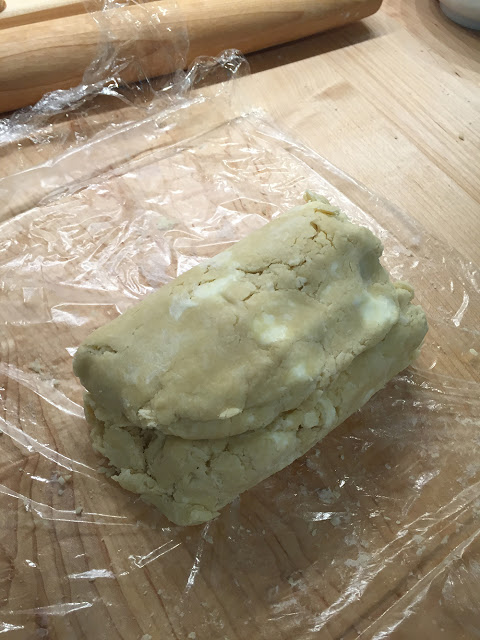
Flatten, wrap and chill for a good hour or more.

I then performed the same steps as with the quartet of doughs already described, making a filled and baked blueberry tart, a blind baked and filled lemon tart and baking a piece of the dough all by itself.

Ready for the oven above and all baked below.

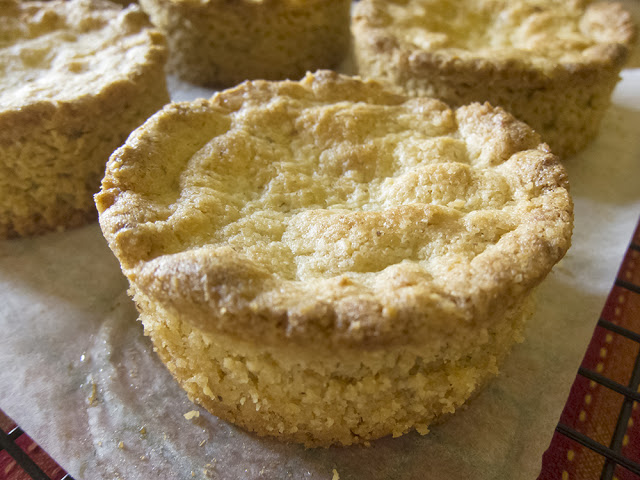
Here’s the au naturel dough all baked up.

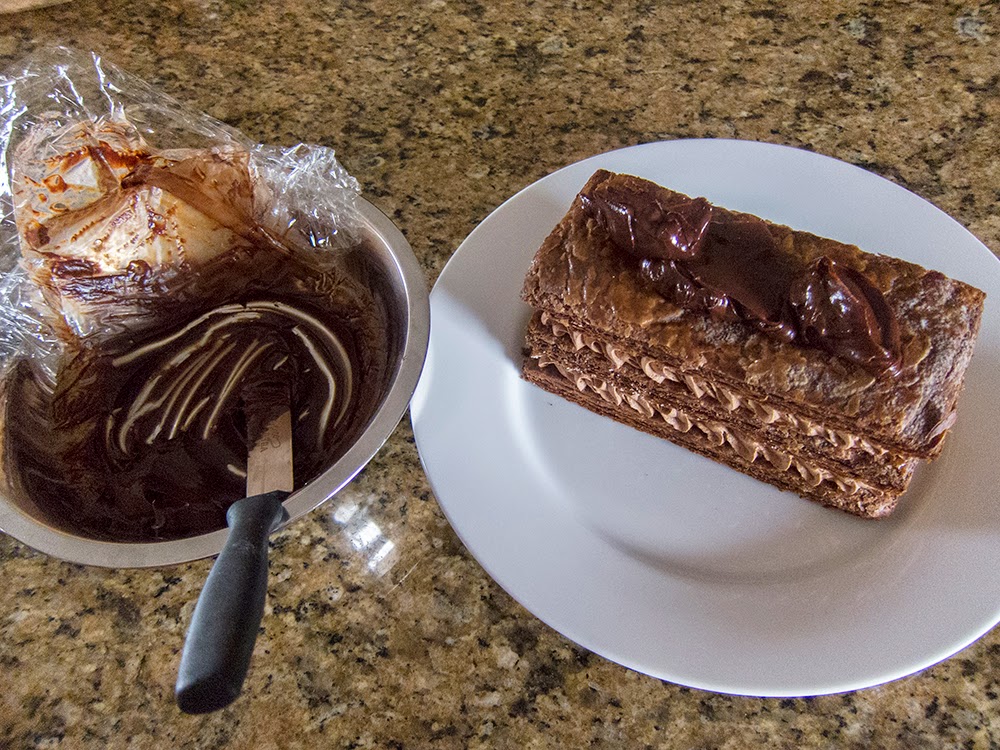
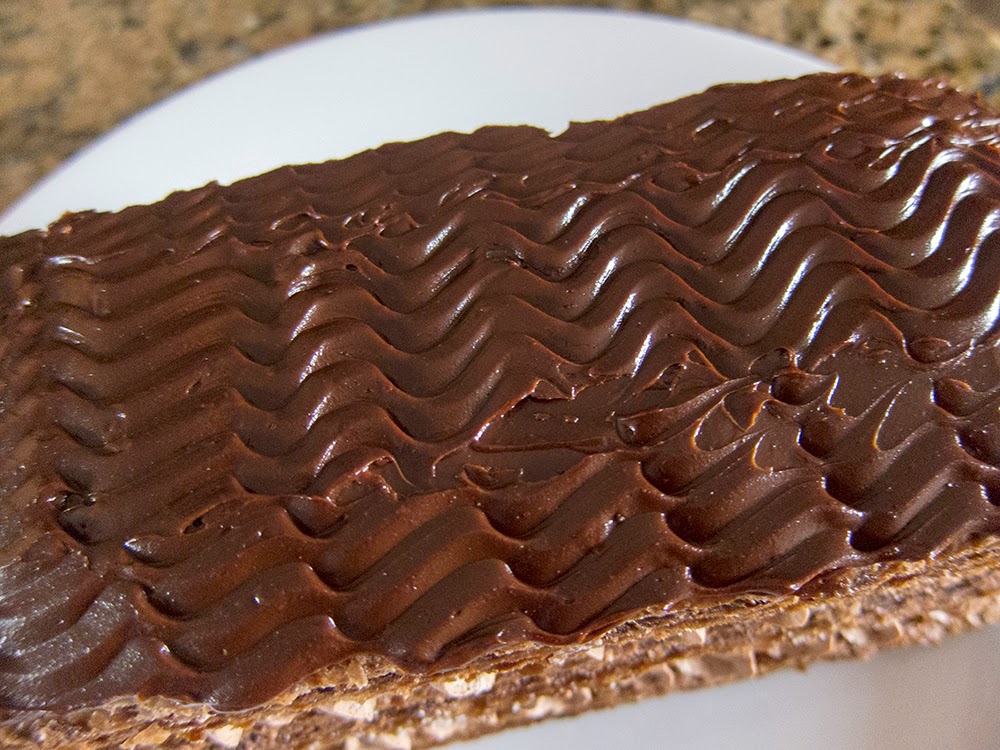
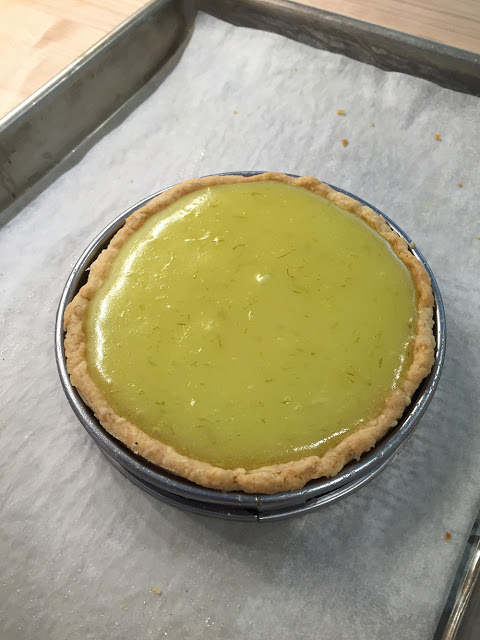
And the finished lemon tart.

Of course while the blueberry and lemon tarts were cooling, I just had to snitch a taste of the plain crust - YUM!  Tender, flaky and all around delicious.

Once they were cooled, Steve and I tasted the blueberry and lemon versions and found the crust to be wonderfully tender, flaky and buttery. And, to top it off, they were still delicious the next day!  I like that.

So here's my version that I intend to use from this day forward.

Pâte brisée (makes approximately 645 gms of dough, MORE than enough for two 9" tarts; just freeze what you don't need). Click here for a printable PDF version.

325 grams all purpose flour
3/4 teaspoon salt
OPT: one tablespoon granulated sugar
260 grams cold, unsalted butter (1/2 small-dice, 1/2 large-dice)
60 ml (4 tablespoons) ice cold water

Mix the flour, salt and sugar (if using) in a large bowl.
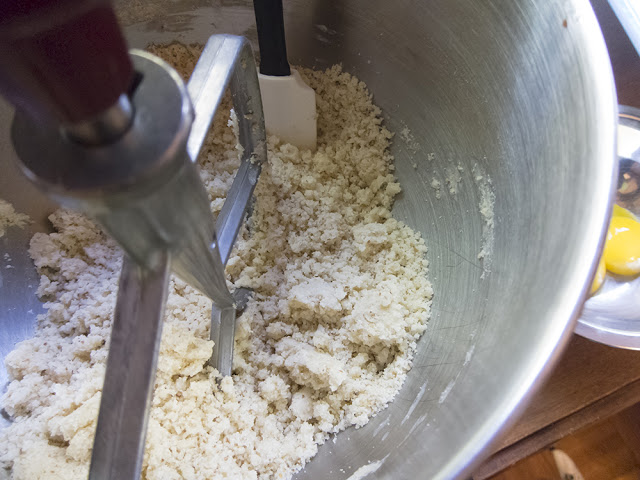
Sand in the small-dice butter with your finger tips to achieve coarse crumbs.
Flake in the large-dice butter leaving flat, largish pieces in the mixture.
Add 1/2 the water, toss with a fork then toss and gently squeeze with your hands. Add additional water by tablespoon until the dough holds together.
NOTE:  if the dough still seems dry and too crumbly to hold together (as it might on a cold, dry winter's day), continue to add additional tablespoons as needed but don't exceed 120 ml (8 tablespoons).
Place the dough onto a piece of parchment or plastic wrap; using the wrap as an aid, flatten the dough and fold into thirds. Turn 90 degrees, flatten and fold in thirds again. Flatten, wrap and chill for at least an hour or overnight.

If you don't intend to use the dough for a couple of days, freeze it well wrapped for up to 3 months. A day before you wish to use it remove it from the freezer and place in the fridge to thaw overnight.

While this may not have been the most scientific of studies, it was indeed illuminating. I love experimenting and learning, especially when I get to work with dough. Yeah.

Have lots of fun folks!!

Gateau Breton

Perhaps I've mentioned this wonderful goodie in previous posts, if only to speak of its ease of preparation and its delightful taste and texture.  In the wake of making a walnut version recently, I thought it time to focus on Breton dough a bit more.  

Absolument!

Gateau Breton au noix

In Brittany a simple gateau Breton is a common offering for petit déjeuner.  It's hard to describe its texture - kind of a cross between cake and shortbread.  When you first take a bite, there is a crispiness to the exterior, but then you reach a dense, almost cake-like interior full of buttery goodness. So deelish.

Breton dough is in the sablé category of dough, but differs from some pâte sablés by changing up the sugar, butter and flour ratios, adding more egg yolks plus baking powder, not a typical ingredient in shortbread and tart doughs.

There are many Breton dough recipes out there.  Most of them utilize equal weights (or close) of sugar and butter in addition to a number of egg yolks, and an amount of flour that is usually about 2 times by weight of that of the sugar or butter.  You can replace some of the flour with a ground nut flour of choice, e.g. almond, pistachio or walnut. Tons of variations exist!

The beauty of Breton dough is its ease of mixing and shaping.  Plus, depending on how thick you bake it, you'll end up with a crispy shortbread (baked thin) or a classic gateau Breton (baked thick).  How can you go wrong with those choices?!

For my walnut version I used Christophe Felder's sablé Breton recipe from his book Les Folles Tartes, replacing the almond flour with toasted, then ground walnuts (toasting nuts before using brings out their flavor!).

I'm a pastry chef who takes lots of notes.  In Felder's book the dough is described thus:  "sablé aéré et léger", and my notation of 2/11/11 was "c'est vrai!" On that date I baked this Breton dough in 60 mm rings and served it with ricotta custard, almond nougatine and a blackberry/raspberry sorbet.  Wow! 

How can something be dense yet airy and light at the same time?  You just have to taste it to understand.

I've since created versions of Breton tarts by topping the dough with almond or pistachio cream and berries or cherries before baking.  You can also add a layer of raspberry or apricot jam (or any flavor you want!) between two layers of dough before baking.  Or bake it plain and top with citrus curd and fresh fruit or coconut cream, candied lime zest and chopped crystallized ginger.  Just use your imagination!

On to the recipe.

les ingredients

There are different methods of mixing the dough - I use the one I learned at LCB in Paris in which one puts all the ingredients except the yolks in the mixing bowl, brings it to the crumbly stage, then adds the yolks and mixes just until the dough comes together.  So easy.

Here goes.  Place 140 g sugar, 150 g diced/cool butter, 200 g all purpose flour, 70 g ground toasted walnuts (almonds if you're following Felder's recipe), 1 teaspoon baking powder and 1/2 teaspoon salt in the mixing bowl.

NOTE:  Felder calls for 20 g baking powder which is about 2 tablespoons.  I opted to cut it back so as to avoid too heavy of a baking powder taste.

Mix with the paddle on low until coarse crumbs.  Have 3 egg yolks standing by.

ready to start mixing

coarse crumbs

Now add the 3 yolks and blend just until the dough comes together.

c'est fini!

I baked my gateaux Bretons in 80 mm (~3") wide, 2.5 cm (1") tall open rings.  Butter them first and place them on a parchment lined sheet pan.  Heat the oven to 325ºF (I use convection).

Here's the beauty of Breton dough.  When baking it this way, you don't have to chill it or let it rest first.  You can simply press it into place.  I divided the dough up among 6 rings ( ~105 g per ring) and pressed it down evenly.

all divided up

all pressed down evenly

On a side note, if you're baking this dough as a thin cookie, you should wrap and chill it for a couple of hours first.  Then you can roll it out on a lightly floured surface and cut shapes of choice.

Bake these gateaux for about 20-25 minutes and REMEMBER - always watch what's going on in your oven. You're looking for golden brown deliciousness, and the dough should have risen up along the edges of the rings.

golden brown

looks yummy

Let cool for about 10-15 minutes before gently removing from the rings.

I served the gateaux with warm, sautéed plums prepared as follows.

Thinly slice 4 plums, toss them with a bit of lemon zest,  about 1/4 cup of vanilla sugar and  a couple of teaspoons of cornstarch . . . .

all mixed up

then sauté them over med-low heat until the juices are released and start to thicken, 5-10 minutes.

thickened up and ready to go

And the piéce de resistance . . . .

Gateau Breton with sautéed plums, chantilly cream and nut crumble

Très, très délicieux!

Happy autumn tout le monde!!

Gateau Basque from Christophe Felder

Hmmmm - Gateau Basque - now just what is that all about?  Well let me tell you.  It's a traditional Basque butter cake baked with a pastry cream filling and/or cherry jam (for those of you who like fruit in your desserts).  It's kind of a cross between a cake and a tart and leans toward either of those depending on which recipe you use.  More about that later.

Gateau Basque (let's call it GB) was one of the first cakes we made in the basic pastry curriculum at LCB in Paris.  We were told then that one can make it with pastry cream and cherries or can substitute prunes or dried apricots.  As I researched it online I found pictures of many variations for this cake - some with only pastry cream, some with only cherries (black cherry jam to be precise) - including a couple of chocolate versions and one with a pink tinged (cherry? strawberry? raspberry?) pastry cream filling.  Let's hear it for artistic license, eh?

Below are the individual versions of GB that I made in my pastry studio at Hope Artiste Village a couple of years ago.  I used the LCB recipe from my schooling days and baked them with pastry cream and dried tart cherries that had been plumped up first in hot water ( you could use cherry juice or liqueur if you wanted).


When I was reading up on the topic back then, I remember one source (can't for the life of me tell you where I found it!) advising that a good GB should be one in which the interior pastry cream layer becomes one with the dough during baking, sort of melding into it without being identifiable as a distinct layer.  That's how the above LCB versions came out, and they were tasty!  Buttery, crumbly, yet cake-like, not too sweet and oh-so-good with a cup of coffee or tea.

Now, as I review the topic again, I see many photos of the sliced cake showing very distinct pastry cream/fruit layers.  That seems to be the way of it.

On to the task at hand.

This time I opted to try Christophe Felder's GB recipe from his book Patisserie!.  His leçons focus on a particular component e.g. a type of dough or pâte and carry that through to a finished product.  I like that. 


As I compare his recipe with LCB's there are several variations - his has a bit less butter, less sugar, fewer eggs and calls for almond flour along with all purpose flour.


He treats this dough like a tart dough, whereas the LCB recipe uses it more as a batter (and a very thick one at that). 


les ingredients

For the pâte à gateau basque place 175 gm soft butter, 125 gm sugar, 85 gm almond flour and the zest of one lemon in a mixing bowl.  Blend it by hand with a spatula or in the mixer with the paddle attachment on low speed.  Then blend in one egg yolk plus 25 gm of beaten egg (1/2 an egg) followed by 225 gm all purpose flour and a pinch of salt.

I mixed it until it looked like large curds (as seen below),


then brought it together by hand.


Wrap it up and into the fridge it goes for a couple of hours.

In the meantime I made a batch of basic pastry cream in the usual fashion using 250 ml whole milk, 3 egg yolks, 45 gm sugar, 20 gm cornstarch and a tablespoon of hazelnut liqueur (in place of the recommended rum) whisked in after the cooking process.


crème pâtissière

I like to cool the pastry cream on a plastic lined quarter sheet pan, folding the plastic over it to eliminate air and pop it in the fridge.  It doesn't take long.

Next up - the cherries.  Since I preferred not having a jar of leftover cherry jam (Christophe calls for 150 gm confiture de griottes) on my hands, I roasted 150 gm of frozen cherries with a couple of tablespoons of raw sugar and a pinch of salt at 450º for about 8 minutes (watch carefully so they don't burn!).  Then I added a couple tablespoons of hazelnut liqueur and gave them another 5 minutes in the oven.


before roasting

after roasting

I poured the cherries onto a clean flat pan and let them cool to room temp which allowed the syrup to thicken up a bit.

Now for the assembly.

Remove the chilled pâte from the fridge and divide it in two.  Butter an 8-9" round pan, line the bottom with parchment and butter and flour that.

my nod to Mickey Mouse

Roll out each of the pieces of dough slightly larger than the diameter of your pan.


Trim off the excess and place one round into the prepared pan.  Roll the scraps into a long snake and place it around the periphery of the pan, gently pressing it in to adhere it to the sides of the pan and the bottom dough layer.


I piped a layer of pastry cream over the bottom, topped it with the cherries and finished off the cream over the cherries.


Note - you can put the cherries in first and pipe the cream over them, or pipe all the cream in and top with the cherries - it doesn't really matter.

Take the second round of dough and place it over the filling.  Tuck it in nicely around the edges and remove the excess.


I used most of the dough to create a nice rim all the way around, leaving very few scraps.


almost ready for the oven

Give the surface a brush with egg wash, pop it in the fridge for a few minutes, give a second coat of egg wash and create cross-hatch marks with a fork.


At LCB we were told that there are a variety of patterns one can use.  As I understand it, in true Basque fashion, certain surface markings indicate what type of filling is inside i.e. cream only or jam only.  I basically winged it with mine.

Bake in a 350º oven for approximately 40 minutes until golden.


Once cooled a bit, turn it out of the pan and let cool on a wire rack.

Whew!

I served this for dessert after a traditional Indonesian nasi goreng feast prepared by sister-in-law Dorothy's long time friend Jeanette from Toronto.  And what a feast it was!

What you see below are all of the cold portions of the meal which accompanied warm dishes of Indonesian fried rice, pork satay, coconut shrimp, beef with onions, chicken and various sauces.

My apologies Jeanette - I can't do the descriptions justice, but it was one delicious repast!


I felt almost too full for dessert, but the group was ready and willing so away we went.


Topped with crème chantilly and toasted almonds this was a delightful surprise.  While being in no way related to Indonesian food, it still seemed to fit the bill (more like a tart than a cake, not too sweet, buttery and cookie like) as a perfect ending to a meal full of flavorful contrasts.

The pastry cream/cherry layers remained distinct and certainly didn't detract from the overall experience, but in the future I think I'll go back to the LCB recipe.  In a nutshell its texture and overall flavor win out in my book.

And there you have it.


Cannelés Bordelais

cannelés Bordelais

I first made a Christophe Felder recipe for cannelés back in late winter/early spring of 2013 in my pastry studio at Hope Artiste Village in Pawtucket RI.  While the batter is trés simple I soon learned these delectable treats required baking in a hot oven (450-500º) for a good hour (or more!)   Since I couldn't justify dedicating the oven to one thing for that long, I didn't bake them on a regular basis.  But man are they good!

We're talking one tasty little tidbit.  With a custard like interior and darkly caramelized exterior they are a true taste and mouth-feel experience.


Also known as canelé de Bordeaux these babies are well known and very popular, not only in and around Bordeaux, but in many parts of France.  For years they have been baked traditionally in copper molds coated with beeswax, but, now that silicone molds are so prevalent, there's much less muss and fuss involved, especially for the home baker.

One of the big producers in France is Baillardran.  They have a shop in Paris, and when Steve and I were there in May, 2013 (soon after I had first made cannelés) we felt we HAD to try them.


yup - nicely caramelized

custardy pockets are de rigueur as I understand

Sad to say, we found them rather dry and unappealing, not like the delicious, custardy treats we had sampled at The French Tarte.

At any rate, fast forward 2 years to now.  Inspired by Dorie Greenspan's "Baking Chez Moi" it seemed only natural to try out her recipe for cannelés.


The batter preparation is straightforward and includes milk, sugar, butter, egg, flour, vanilla and usually rum.  Not being a rum fan, I substituted hazelnut liqueur.  Part of the planning involves making the batter at least a day before baking since it requires a good 12 hour (or more) rest in the fridge.


les ingredients

Here we go.  Bring 480 ml (2 cups milk), 150 gm (3/4 cup) sugar and 28 gm (2 TBSP) butter to a boil, stirring occasionally to make sure the sugar is dissolved.  Let it cool 10-15 minutes.

In a separate bowl sift 136 gm (1 cup) flour plus 100 gm (1/2 cup) sugar together.

Whisk 2 large eggs and 1 yolk in another bowl, then slowly add the warm milk mixture while whisking.  Then whisk in the flour/sugar mixture, beating vigorously as needed to blend everything.


ready to strain

Strain it into a clean bowl or pouring container and whisk in 2.5 TBSP rum (or liqueur of choice) and 2 teaspoons vanilla extract.


ready to cover and pop into the fridge

Cover and refrigerate for at least 12 hours (FYI - you can keep it in the fridge for several days).

On baking day brush the cannelé molds with melted butter and put them in the freezer for 30 minutes while heating the oven to 450º.


getting ready to butter the molds

When ready, take the batter out of the fridge and whisk it up, since the ingredients have a tendency to separate during their chilling time.  Fill each mold about 3/4 full.


ready for the oven

Bake at 450º for 30 minutes then lower the temp to 400º and bake another 30 minutes.  In my case I took Dorie's advice and removed one of the cannelé from the mold with a bamboo skewer so I could check the progress at about 40 minutes.


after a 40 minute bake

custardy pockets

I kept the remainder of the batch in the oven for another 10 minutes (total 50 minutes) and felt the browning was just right.


just out of the oven (the empty spot is the for the one I removed early)

Once out of the oven let them cool on a rack for 10 minutes before turning them out of the molds.


whoa baby!

not bad, eh?

Upon cutting one open the interior had the same custardy pockets as the one I had taken out of the oven ten minutes earlier.


So could I reduce the oven time in the future?  With these petite molds I say "yes"!  However, based on my previous experience a couple of years ago when I used a slightly larger mold, the cannelés required a full hour (if not more) in the oven.  Just remember that baking times vary depending on the size of the goods.

The moral of the story?  Pay attention to what's going on in your oven.

A quick note about the taste - firm and chewy on the outside yet with a moist and custardy interior.  In a word - delicious!

Steve took a bunch of these to work, later reporting that they were gone in 5 minutes and were enjoyed by all!

Yes, I would make these again (and again and again and again)!!


Tarte aux fruits rouge pistache from Christophe Felder

Lately I've been delving into Christophe Felder's book Patisserie! in search of new recipes to try. Tarts being one of my favorite things, I settled on the first section of the book (Les Pates et Les Tartes)  and chose this one primarily because it uses a tart dough that I've never made.


Mmmmmm!

Even though I arrived at my list of favorite and regularly used tart doughs long ago, I can't resist trying a new one every now and then.  Just gotta' do it.

The array of tart dough recipes one can find is overwhelming, with so many variations on the theme, whether it's pâte brisée, pâte sablée, pâte sucrée or sablé Breton!  More butter? Granulated or confectioners sugar?  Greater butter to flour ratio?  Eggs, yolks?  Nut flour? A splash of cream?  The possibilities go on and on.

Felder's book has a great table at the beginning of the tart section giving an overall look at certain doughs' characteristics, how easy they are to make, what types of fillings work well with them, what oven temperature at which to bake them, etc.  Check it out if you get the chance.

Now on to the recipe for pâte brisée fondante and tarte aux fruits rouges pistache.  Let's go!  

The word fondante means "melting" which certainly gave me a clue as to how this might come out.  I compared the ingredients with a standard pâte brisée (flour, butter, water, salt and sometimes a little sugar) and found a higher ratio of butter to flour, plus a bit of egg yolk and milk in the fondante version.  And more butter definitely means "melt in your mouth".

Here's the dough:  mix 185 gm soft butter with 25 gm warm milk and 10 gm egg yolk; add a teaspoon fleur de sel and a teaspoon sugar; add 250 gm flour and mix just until it comes together.  Wrap the dough and chill it for a couple of hours.  (Note:  this dough amount was plenty for two 180 mm/7" tarts, plus probably one more).

When I took the dough out of the fridge and tapped it with my rolling pin to render it more malleable, I could appreciate the firmness of the buttery dough.  It rolled out pretty easily, although it was more stiff and breakable than other standard pâte sablée or pâte sucrée doughs I've used.

I lined the tart ring carefully (I made a 180 mm tart this time), pricked it with a fork and popped it into the freezer while I prepared the filling.

Now's the time to heat the oven to 350º.


I made 2/3 of the filling amount which turned out to be perfect for my 180 mm ring.


les ingredients

This is VERY easy!  For  2/3 recipe mix together 2 eggs, 16 gm almond flour, 66 gm sugar, 100 gm heavy cream, 16 gm melted butter, a splash of vanilla (the recipe actually calls for kirsch, but I don't keep that around) and a scant teaspoon flour.  In addition have 20 gm pistachios and 166 gm fruits rouges assortis ready to go.  I used a mixture of IQF raspberries, blackberries, blueberries and cherries.  Yum.


filling all mixed up

Sprinkle the pistachios and fruit into the shell (note - UNbaked shell!) . . .


love the colors

and pour the filling over.


ready for the oven

This baked about 40 minutes, pretty much on target with the recipe instructions.  You can tell it's ready when it nicely browned on top and the filling doesn't jiggle any more.


Once it's cool dust with some powdered sugar and serve it up!


Imagine my disappointment upon finding an unbaked center with a big dimple on the bottom - yuck!  That is one of my biggest pet peeves when baking tarts.


eeeuw!

When I read this recipe over the first time, I had a niggling sense in my brain that blind baking the crust was in order with this very liquid filling.  But Christophe Felder is a seasoned professional with an impressive resumé, so I decided to follow his lead.  Not.

The good news is that, in spite of the unbaked center, the tart was deeelicious and the crust definitely a "melt in your mouth" experience.

Not to be thwarted, I decided to take one more go at this one but with a blind baking approach.  Particularly with the lining step, one has to be very gentle and careful with this dough.

I started the bake with weights, but when I removed them there was a crack in the bottom crust.  I took a small piece of raw dough to patch it and finished off the blind bake.  Whew!  Is this really worth it??


Then, just to be sure, before putting the filling in, I brushed the bottom with egg white to seal it.  No leaks allowed here, folks.


c'est fini!

The crust developed a nice light golden color, although you can appreciate some cracking in parts of the periphery.

The good news is a well done, non-dimpled center bottom crust.  Now we're talking.


And it's still "melt in your mouth" delicious.

Moral of the story - blind bake first if you have a really loose, liquid filling!

Yes, I would make this again.


Mille-feuille chocolat - chocolate puff and other stuff

Before I start on the topic at hand, here are some pics of the delectable chocolate bread pudding I made using the left over chocolate croissant spirals from my last post.  I diced up the spirals, poured a basic chocolate custard over the pieces in my favorite square C&B ramekins, sprinkled on some vanilla sugar and baked 'em in a water bath.


just out of the oven

Just imagine one served warm with a scoop of vanilla ice cream.  Yes, indeed.

Now on to the task at hand.  What most of us know as napoleon, mille-feuille (literally "a thousand leaves") is that classic combination of puff pastry layered with vanilla pastry cream.  Of course, as is true of pretty much any classic you can think of, there are a multitude of ways to create variations on the theme.

Years ago, before pastry school was even a gleam in my eye, I made versions of this dessert using good old Pepperidge Farm puff pastry sheets, cut into squares and baked, then simply layered with a cream or custard and fresh fruit and/or a fruit coulis.  Always good.

Once pastry school was under my belt and I experienced what Paris had to offer, mille-feuille was often on my tasting hit list.  During my stage at Pascal Pinaud's shop on rue Monge in the 5th, raspberry-lemon mille-feuille was offered as a special treat only on Sundays.

When done well, the combination of crisp, flaky, buttery puff and smooth and creamy custard can't be beat.

Flash forward to the spring of 2013 when I took a class at Christophe Felder's school in Paris on mille-feuille chocolat.  I purchased his pastry tome Patisserie! and have been drawn into it lately to refresh myself on the classics as well as get inspiration for some new ideas (new tart coming up soon!).  My eyes lit up at the recipe for mille-feuille chocolat and off I went on a trip down feuilletage chocolat lane.


This recipe calls for cocoa powder added to the détrempe, just as in my recent chocolate croissant experiment.

les ingredients

I made half a recipe:  250 gm flour, 30 gm cocoa powder, 130 ml cold water, 43 gm melted butter and 5 gm salt mixed together just until everything is incorporated.


the creature from the Black Lagoon!

The détrempe felt dry, and it looked a lot more blotchy than when I make regular puff pastry.  I gave it a couple hour rest in the fridge and prepared the 168 gm butter block.


ready for the beurrage

Once I completed the beurrage and started the folds/turns the dough in general started to look a little better, but still blotchy.


after the first two turns - yikes!

But once all the turns were complete the dough looked and felt better - there was hope after all.


after six turns

I held the dough in the fridge overnight for use the following day.  Otherwise I would typically pop it into the freezer for another time.

When rolling out the puff for mille-feuille, it's important to roll it about 2-3 mm thick.  I divided the dough in two and rolled each piece to fit a quarter sheet pan.

It's important to let the dough rest - otherwise it shrinks when baking (as you'll see in the upcoming pictures).  It's also a good rule to freeze the rolled out puff for 10 minutes or so before baking to help stabilize the dough.


ready to bake

For comparison I baked one quarter sheet with a cooling grid over the pan (seen above) to help limit the puff's rise and the second one topped with a piece of parchment and a second sheet pan to weigh it down (the generally recommended method to keep puff under control).

I did NOT prick either one with a fork, having found instructions on line with and without (Felder's approach) fork pricking.

What really happened in the oven?  The weighted down version puffed anyway, and I actually pushed it down a couple of times during baking to try and keep it flat.

The one with the grid over it puffed up to the limits of the grid, but it ended up more irregular with undulating waves across the surface.

And both of them shrank.


Having chosen the weighted down piece for my assembly, I trimmed the edges and cut it into thirds,


and then a dust of powdered sugar and under the broiler for a couple of minutes to caramelize.


On to the assembly!

I made a simple whipped ganache filling using 250 gm heavy cream and 70 gm chocolate.  While I was piping the first layer I was reminded of the radiatore pasta Steve and I had just eaten a couple of nights before - ruffles!


first whipped ganache layer


second puff layer


second whipped ganache layer


completed layers

Once all the layers were assembled I popped the whole thing into the fridge for 30 minutes before topping with a basic 1:1 ganache.


getting ready to spread the ganache

used a decorative comb for design

The result looked pretty cool, but the flavor of the puff was disappointing - rather boring and not terribly chocolatey.  I also felt the puff layers were too thick and should have been more crisp and flakey.

What would I do differently next time?  Use standard puff pastry (not chocolate), roll it more thinly, let it rest longer so as to reduce shrinkage, and prick the dough with a fork before weighing it down and baking it.

Steve's reaction?  "What's so special about mille-feuille?"

OK, OK - back to the drawing board!