
Baguette
/
NOTE: I did a quick update of this post on 06/14/24 to include a link to the recipe PDF for King Arthur baguettes. You can also find the link on the recipe page under BREADS AND BUNS.
This is a long one folks - sometimes it’s just how I roll!!
Well it’s about time. Do you know I’ve never made baguette at home just for the two of us? The closest I’ve come was ficelle which is essentially a skinny baguette, and that was tasty indeed! Even though I’ve made many versions while attending various bread classes over the years and have also taught my own bread class to folks, I don’t know what took me so long to make this classic French bread for our own larder. Perhaps it’s the fact that I finally bought a baking stone some months back and felt it was time to put it to the baguette test.
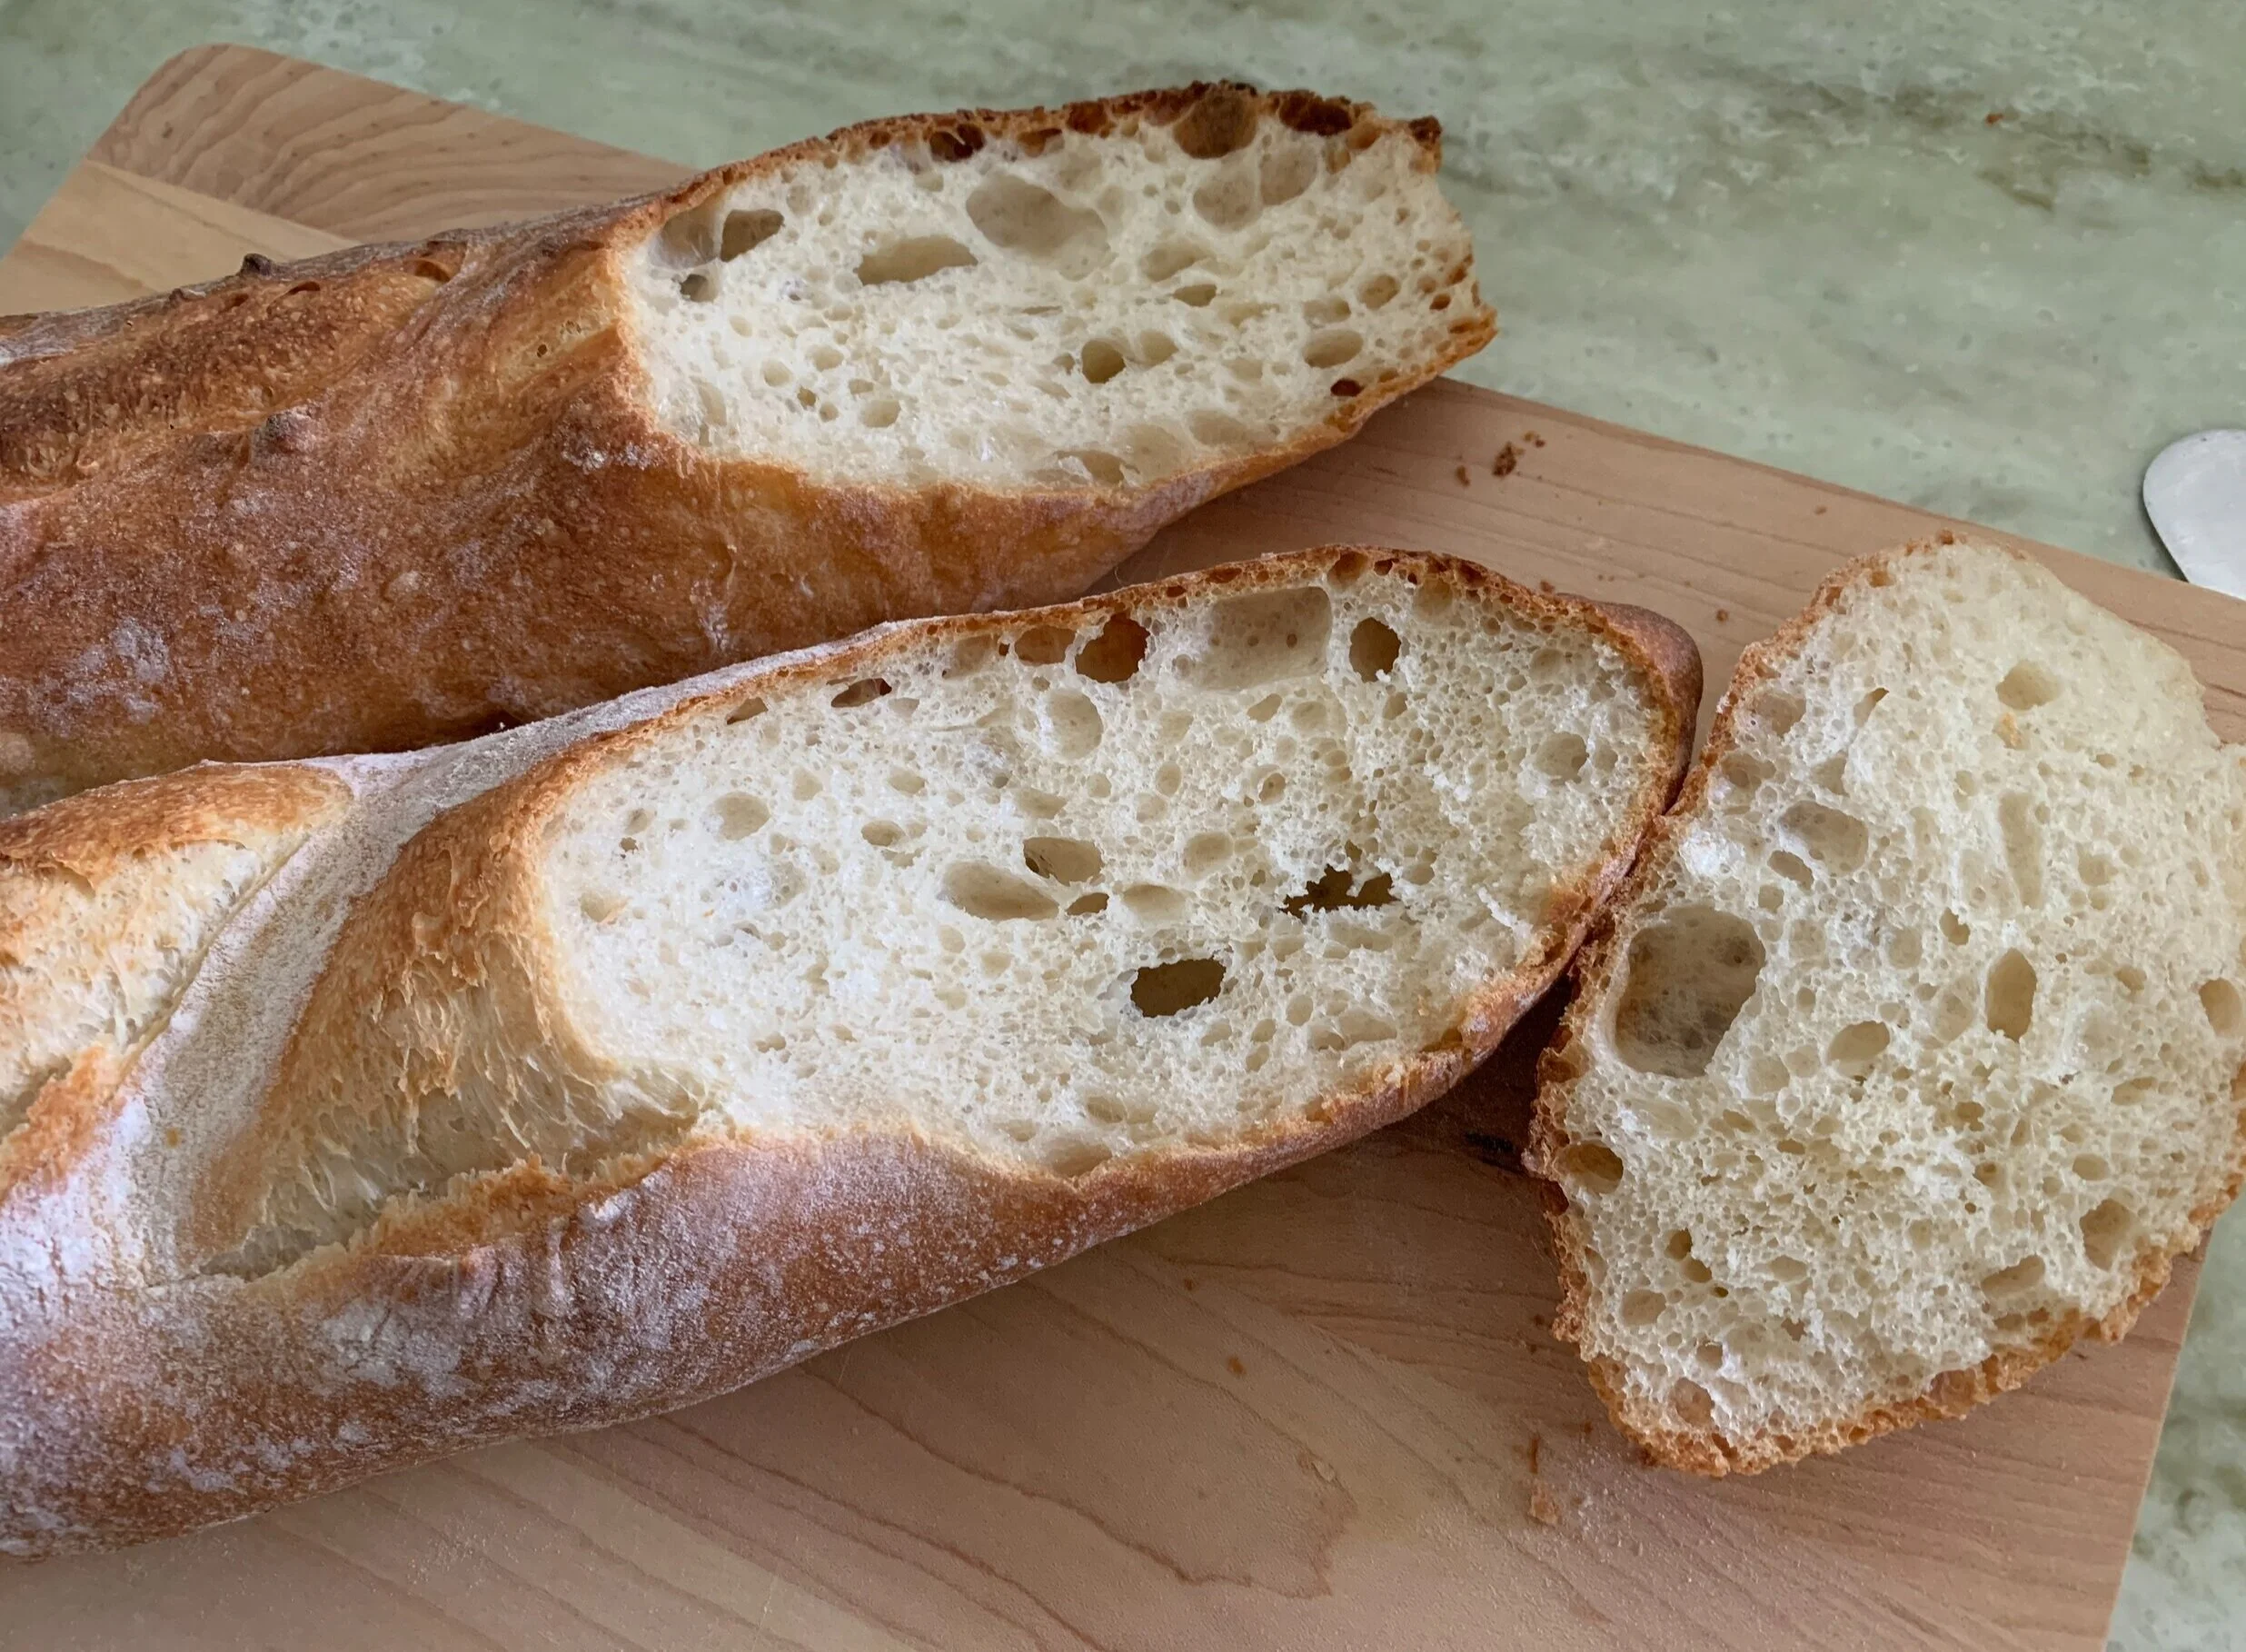
What makes a good baguette you might ask? They say it should have a creamy, open crumb with a crust that crackles as it comes out of the oven. Yes indeed!

It’s taken me awhile to get this post together. I started the project back in April early in the pandemic with nothin’ but time on my hands. I chose three different recipes: King Arthur Flour, Le Cordon Bleu Paris and another from Paris boulanger/chef Benjamin Turquier of 134 RDT on rue de Turenne in the 3rd arr.
I had made both the KAF (now King Arthur Baking Company) and LCB versions in classes I attended at those establishments in recent years and since then to classes I’ve taught to others. The RDT recipe came from a France Magazine article that I saved from several years ago and has been sitting on my to-do pile ever since.
During my stage at Pâtisserie Pascal Pinaud in Paris, I can’t help but remember the early attempts at shaping baguette - not a pretty picture. It takes a while to develop a feel for the dough, rolling with just the right amount of pressure to elongate and keep it even with tapered ends.

And the scoring? Oh my - that’s something I’m still learning! Just the right touch and don’t over think it - efficient, purposeful, a light hand, don’t drag and NO hesitation - those are the keys in my book. (Psssst . . . the texture of the dough makes a big difference - softer means more difficult to score, firmer means easier.) You may be able to tell the difference in the next two photos - the first shows a softer, more wrinkly dough and in the second the dough looks more firm and smooth.

KAF dough: hmmmm . . . not so good with too much drag and hesitation on the top loaf

LCB dough: much better - less drag, more purpose!
On to the process!
This isn’t intended to be an in depth bread primer, but I hope it gives you a decent look at how baguettes are created. We’ll look at the steps and I’ll make a few comparisons amongst the three recipes. Spoiler alert - they’re ALL delicious!
When comparing recipes, especially for breads, it helps to sketch out the timelines for proper planning. Don’t get hung up on the nitty gritty details below, but you can see that the process can vary anywhere from 1 to 3 days. That made it much easier for me to accomplish the baking in a staggered fashion. Nice. I like that.

Here’s a quick summary of the typical basic steps of bread making: Weigh ingredients. Mix. Knead. First proof. Pre-shape. Rest. Shape. Second proof. Score (sometimes). Bake. Cool. Enjoy!
Bear with me here - technical stuff coming up.
Now remember, a basic lean bread dough consists of flour, water, yeast and salt. I’m sure a number of you are familiar with baker’s percentages which uses the weight of flour in a recipe as the 100% ingredient. A typical straight bread dough made by the direct method (no preferments or long fermentations) will contain about 60% of the flour weight as water, 3% as fresh yeast (~1.5% dry yeast) and 1.5-2% as salt. Example: 500 g flour/300g water/7-8 g instant yeast/8-10 g salt.
So basically you can take any weight of flour you’d like and figure out the quantities of the other ingredients - pretty cool, eh?
Adjust the hydration factor upward and you’ll experience the different feel and ways of handling a wetter dough. The KAF recipe uses 72% hydration and thus is the wettest and stickiest of all three. It can be a challenge the first time you work with it so it bears repeating a few times to get the feel. With higher hydration dough you’ll often see the “stretch and fold” technique used to develop the dough’s structure. A tip: when working with wet dough, rather than dusting with flour, oil or wet your hands to reduce sticking. I’ve played around with hydrations of 68% and 70% too.
The LCB dough hydration is 64% and the one I found the easiest to handle while the RDT comes in at 70% and is less sticky than KAF.
Both KAF and LCB involve making a poolish which combines equal weights water and flour with a small amount of yeast and allowed to ferment at room temperature (or fridge) for a period of time. The amount of yeast added depends on how long you wish your poolish to ferment - shorter time/more yeast, longer ferment/less yeast.
The RDT recipe doesn’t use the poolish approach but utilizes a step referred to as autolyse - flour and water are mixed then allowed to sit for 30 minutes or so to hydrate the flour. Then add yeast, knead, add salt, knead and rest 20-30 minutes before refrigeration of 10-48 hours. Longer fridge, more flavor development.
As is usual in the culinary and pastry worlds, there are so many sources out there explaining the nuances that it can become overwhelming. If you’re starting to deep dive into bread making, I highly recommend a couple of good bread tomes like Jeffrey Hamelman’s “Bread”, Rose Levy Beranbaum’s “The Bread Bible” and any of Peter Reinhart’s books. The list goes on and on and on . . . . . So much to learn.
Let’s focus more in depth on the recipe from Le Cordon Bleu which is a 3 day process and we’ll look at the basic steps too. Sound good?

When starting with a poolish and planning a long fermentation, as with this LCB recipe, you’ll see the very small percentage of yeast used. The total flour in the full recipe is 1500 g yet the total instant yeast used is only about 5 g total which comes in at a paltry 0.3%. Buuuuuutttt . . . . . it’s the longer time that this dough ferments that makes all the difference. Give the yeast enough time to work and it WILL perform.
For this project I made half of the above LCB recipe since many home mixers are too small for the full quantity (the flour alone is about 11 cups total and the water almost a liter!). Note: my Kitchenaid 6 quart mixer managed the half recipe just fine.
In addition my oven (and home ovens in general) isn’t structured to bake 7 or 8 baguettes at one time on a stone. My baking stone is about 14” x 16” with 20” on the diagonal, and I use a piece of parchment on an overturned half sheet pan (12”x18”) as my peel. That limits the length I can make my baguette - best not to go longer than 16” - as well as the number of loaves I can fit on the peel and stone.
Even though this is a three day deal, the hands-on time is minimal compared to the resting and fermentation that occurs, so it’s easy to carve out a small niche in your schedule to get the process started.
For the half recipe: on day one make the poolish by mixing 250 g bread flour with 250 g cold water and a pinch of instant yeast. Whisk it 1-2 minutes, cover and refrigerate for 24 hours. Below is a good example of a developed poolish - poofy, bubbly and fragrant.

On day 2 mise out 500 g bread flour, 232 g water, 14 g salt and 2 g (just a tad over 1/2 teaspoon) instant yeast then, in the bowl of a stand mixer fitted with the dough hook, combine these ingredients with the poolish. Knead on low speed for 10 minutes. Cover and rest 30 minutes then do a complete fold set (stretch and pull the dough up over itself from top, then bottom, then left, then right) then turn over, ball up, cover and refrigerate for 24 hours.
Day 3 - here’s the dough ready to divide and shape.

I opted for 3 baguettes, each weighing about 408 g, knowing that I could make them an appropriate length for my oven/baking stone. In French boulangeries a baguette may be anywhere from 26 to 39 inches long - whoa - and the diameter is typically about 2.5 inches/6 cm. My baguettes turned out pretty chubby so next time I’ll do four loaves instead of three to achieve a slimmer result.
First shape the divided dough into rough boules and let them rest , covered, for 20 minutes.

Then one by one, flatten into a rectangle and shape a preliminary torpedo (lots of online resources on how to do that!). Give them a 10 minute rest then, starting with the first one you pre-shaped, place your palms in the center and gently but with steady pressure, roll as you move your hands outward to elongate and taper the ends. One down, two to go.

Place the shaped baguettes on a floured tea towel or linen couche with a few inches between each, then pull the fabric up between the loaves to support them and avoid them sticking to each other.

Cover with another tea towel and let them proof 30-45 minutes. Meanwhile, heat your oven/baking stone to 480ºF (250ºC).
Now for a little bit of a tricky part. You have to gently roll your proofed baguettes onto a narrow wooden board (one by one) and then roll them back onto a floured or cornmeal dusted peel (I use a parchment topped overturned half sheet pan as my peel). Then score them and from there you slide them onto the baking stone (parchment and all if using my method). Whew! A bit unnerving at first but, just like scoring, be purposeful and without hesitation in your movements.
I happen to have a handcrafted wooden cheese board made by an acquaintance of ours - it’s about 15 inches long and was just the ticket for helping me perform this maneuver. I’ve also heard of folks cutting a piece of sturdy cardboard and covering it with some cheese cloth in lieu of a board. Sounds like a great idea!
Snug the board up along side a baguette, lift the towel gently from underneath and roll the baguette onto the board. (NOTE: the next two images are actually the KAF version - I use them here simply to show the board steps.)

Once on the board, simply roll it off onto your peel or sheet pan. Be mindful of the space available to you!
Man oh man - maybe one day I’ll get into the whole video aspect of this stuff!!

Ready to roll off the board
Now score . . . . . . . . .

and slide the baguettes with parchment off the sheet pan and onto the stone with a decisive move. Bake with steam about 25 minutes.
NOTE: If you don’t have a baking stone, transferring board or peel, simply heat your oven with an empty half sheet pan on the lower rack to serve as your “stone”. Place your shaped baguette on a separate parchment lined sheet pan (no couche needed) to proof, covered lightly with a flour sack type towel (be sure there’s enough room between the loaves), then score and pop the sheet pan directly onto the heated pan in the oven. Voilà - no transferring necessary.
NOTE #2: I have a tray that slides onto the lower rack of my oven into which I can pour or squirt water as soon as I’ve placed the loaves onto the stone. That gives me my burst of steam which helps to create a crackling crust. You can also put an oven safe metal tray of some sort on the floor of your oven and pour a cup or so of hot water in it just as you place your baguettes in the oven. Close the door immediately to give that burst of steam.
Pull the loaves out onto a cooling grid and listen for the signature crackle - yes, it’s there. Hooray!!
As you can easily see my loaves baked a bit differently with the top one looking like a humpback whale. A sign of the need to be more purposeful with shaping to tighten the dough up.
My scoring was certainly variable, the middle loaf looking the best.

Once cooled, either tear off a piece or slice it up and enjoy with your favorite cheese or jam or whatever floats your boat.
I jotted notes on each recipe. LCB: “great crackle; dough easiest to work with and most springy and elastic of all; nice crust and chew although perhaps a bit more doughy than the other two; wonderful flavor; next time shape more narrow and longer - would do four 312 g loaves rather than three 408 g.

Here’s the KAF final result. Check out the difference in scoring between the top and bottom loaves.

My notes on KAF: highest hydration and stickiest dough thus hardest to work with (this one takes practice folks!); wonderful crackle and crust; deliciously creamy with open spaces.

Here’s RDT’s result. Pretty good scoring, eh? You can see the top one is shorter - another instance of not putting the proper pressure on when elongating. Still tasted great!

My notes on RDT: 70% hydration; less sticky; scored easily; less crust crackle and not as crusty; delicious flavor, good chew and nicely creamy.

My overall favorite is the LCB recipe primarily for its ease of preparation/handling, plenty of fermentation and flavor development time in the fridge and its wonderful crust and flavor. The half recipe makes about 1250 g of dough from which I made three 408 g baguettes. OPT: four 312 g for a slimmer end result.
In second place is KAF’s recipe which mixes a poolish of 150 g all purpose flour, 150 g cool water and a pinch of instant yeast, then is covered and ferments for 15 hours at room temperature. When ready, the poolish is combined with 311 g all purpose flour, 180 g cool water, 5 g instant yeast and 7 g salt and mixed into a shaggy mass. This is the one that takes some practice working with a sticky dough. The base recipe makes about 803 g of dough from which I made two 400 g baguettes. OPT: three 268 g for a slimmer result.
The RDT half recipe makes about 862 g of dough from which I made three 284 g loaves. Since I’ve come to prefer the poolish approach for this kind of bread, I won’t go any further with this one. Now it’s off the to-do pile.
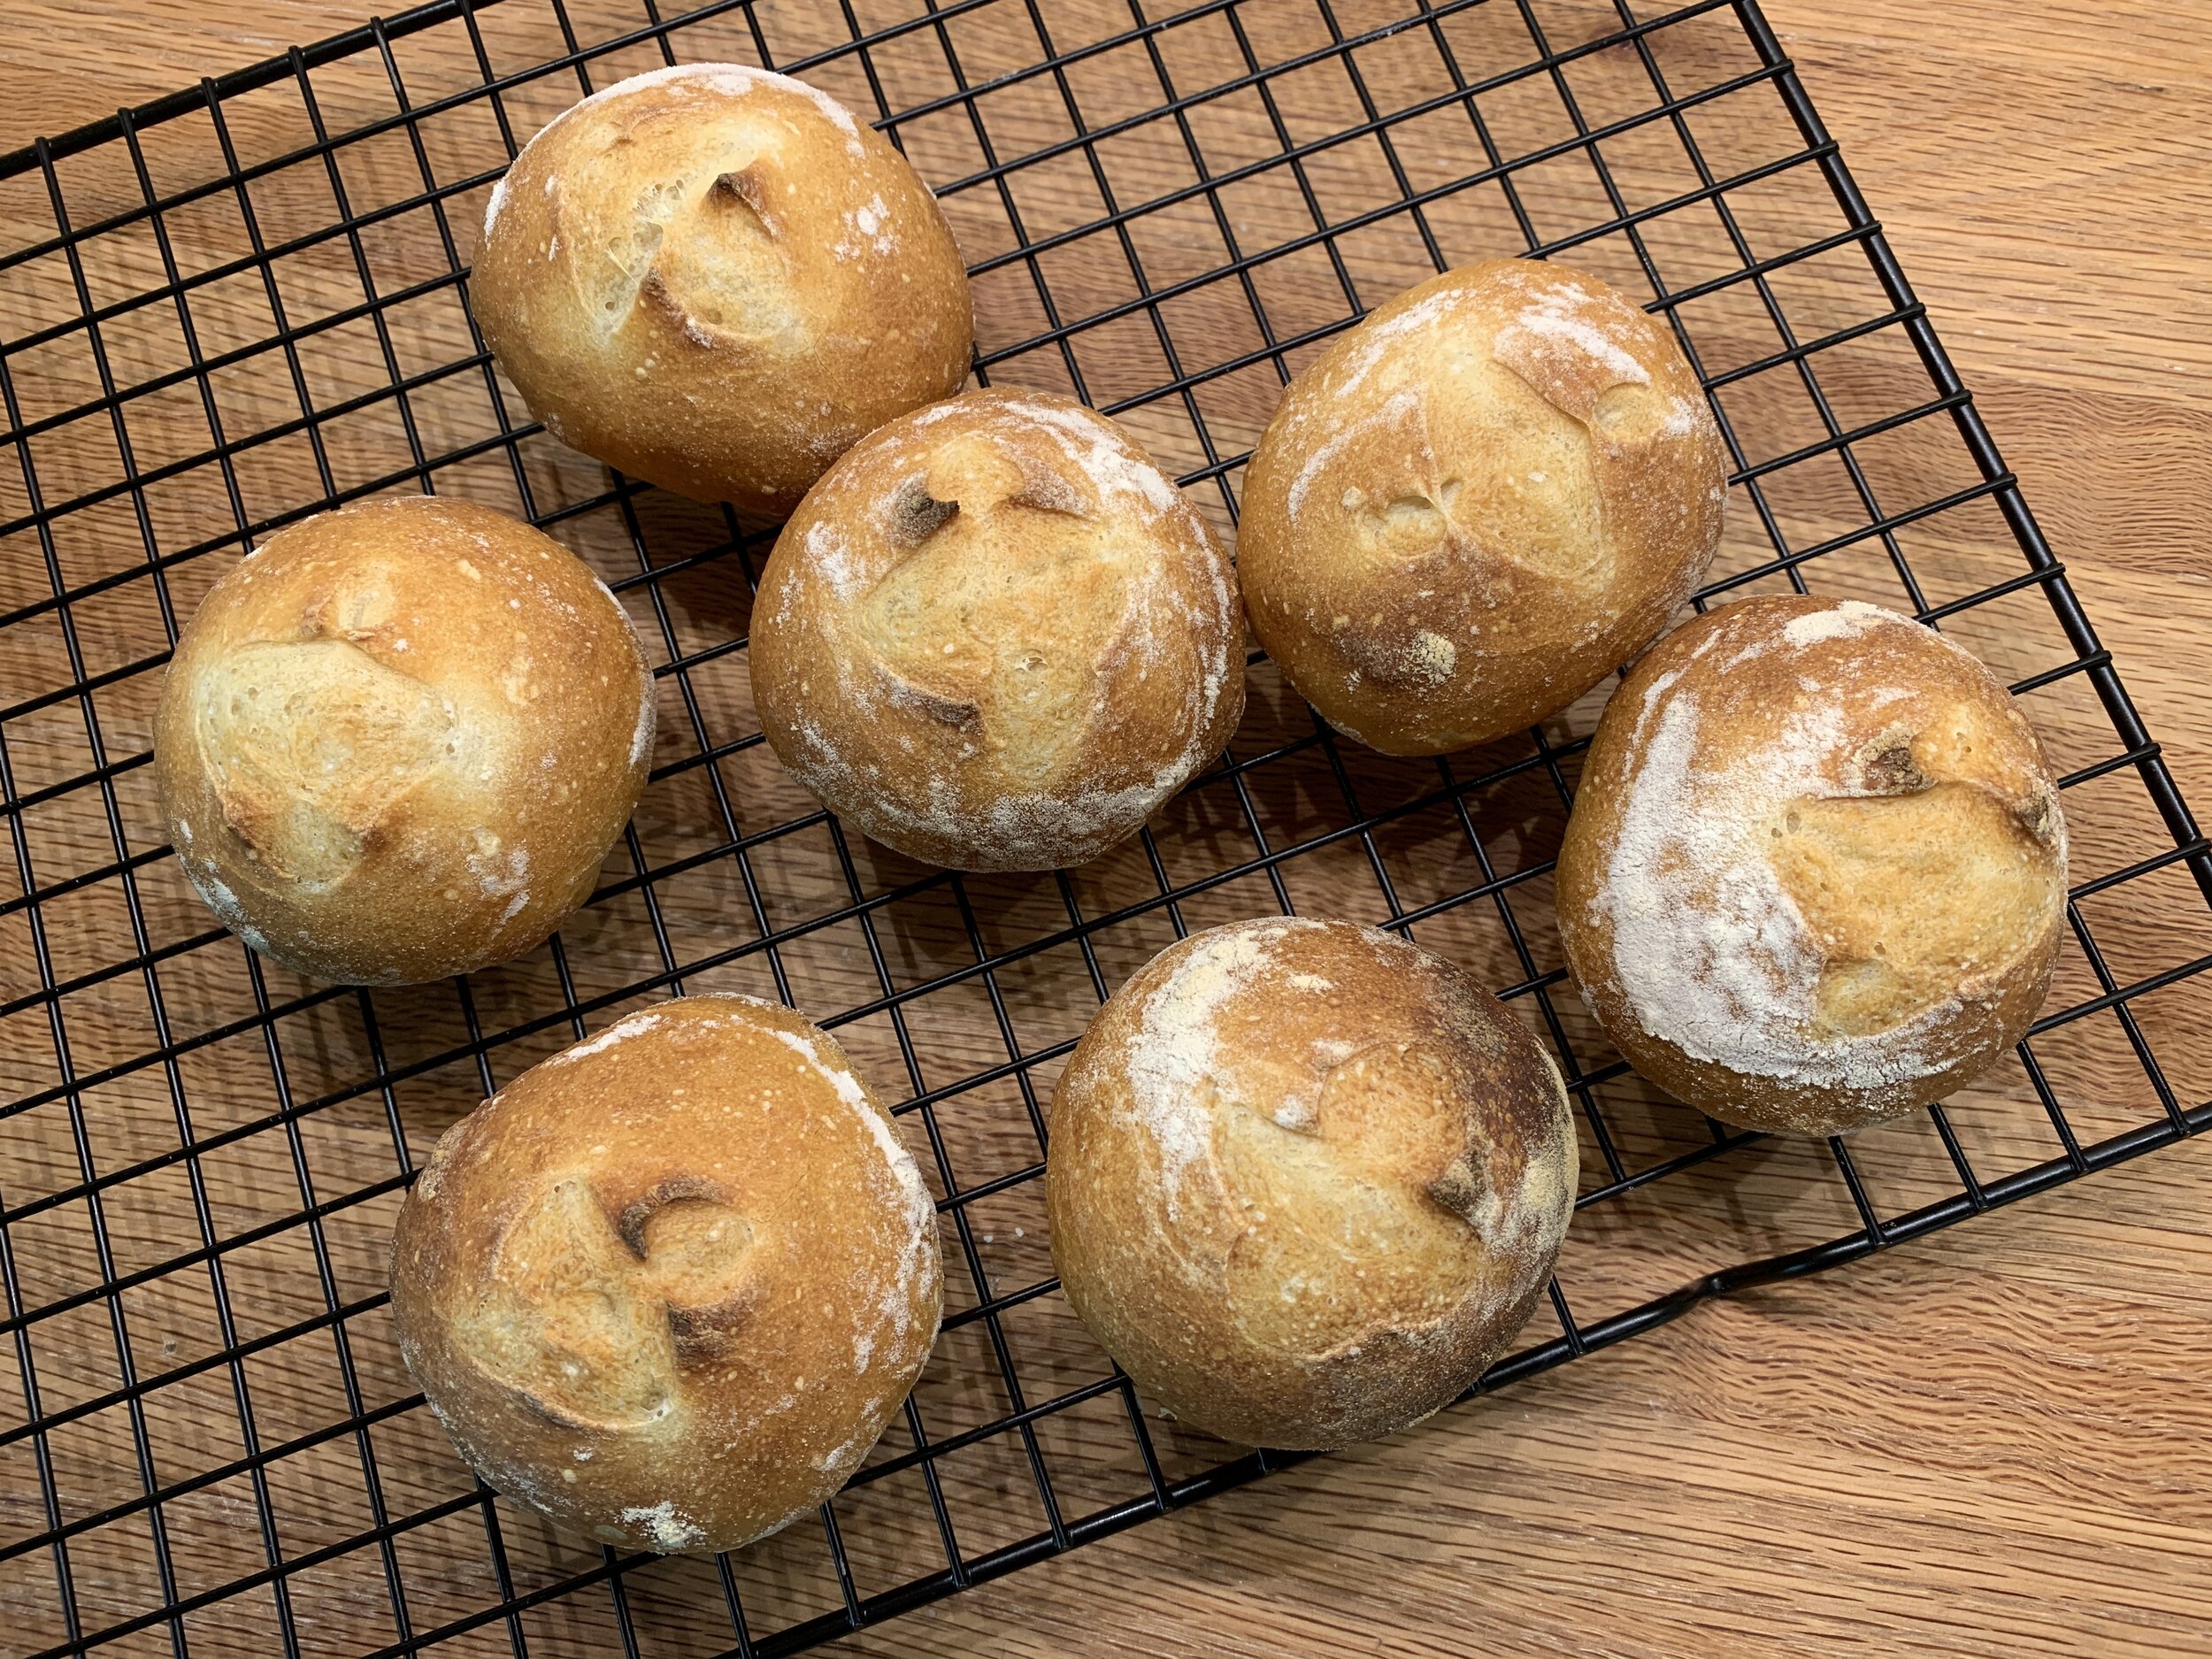
On one final note, I did another batch of the KAF recipe a month or so ago - upped it to 1.5x the recipe (which, BTW, brings it very close to the LCB half recipe aside from the hydration difference), made two 400 g baguettes and eight 50 g crusty rolls. Boy oh boy they were good! I’m still fine tuning the handling of the sticky dough, but next time may drop the hydration down a couple of percentage points just to see how it goes. Why not, eh?
Bottom line on size - going forward I’ll aim for 280-310 g per baguette. That just seems right to me. Why not play around with dough weights for minis or rolls too. Sure thing.
Thanks for reading and slogging through all of this. It barely even begins to scratch the surface of the world of baguette. I’m sure I’ve forgotten to include some important tidbits and please don’t hesitate to raise any questions or make any comments about your own experiences with this classic French bread.
Meanwhile stay safe, bake some bread and enjoy the last colors of autumn.

