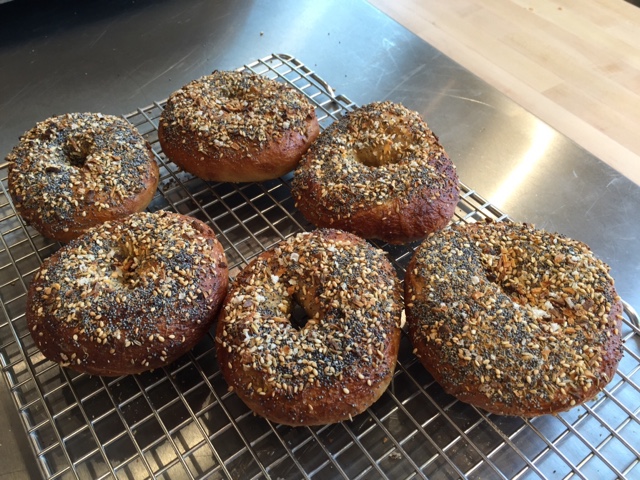
Seeded knot rolls


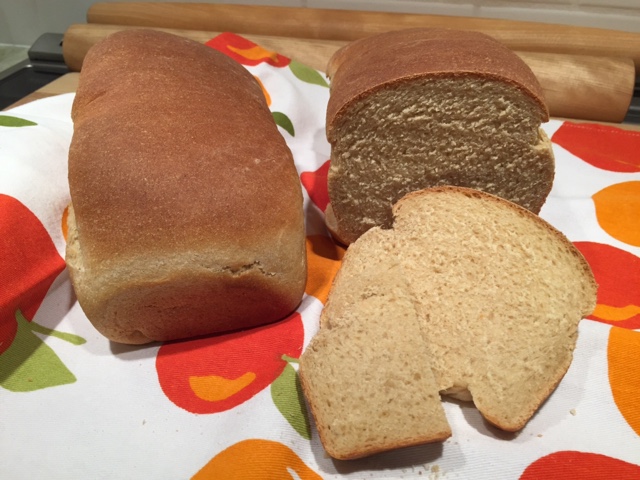
I try to keep homemade bread on hand in our freezer.  There's nothing like it for morning toast, a tasty egg salad sandwich or a nice grilled cheese.

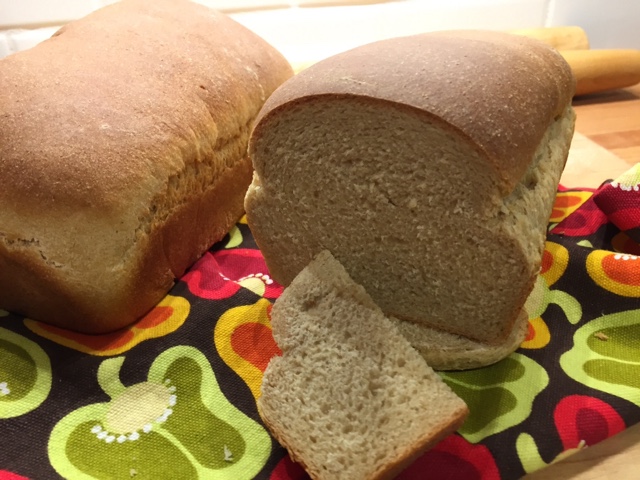
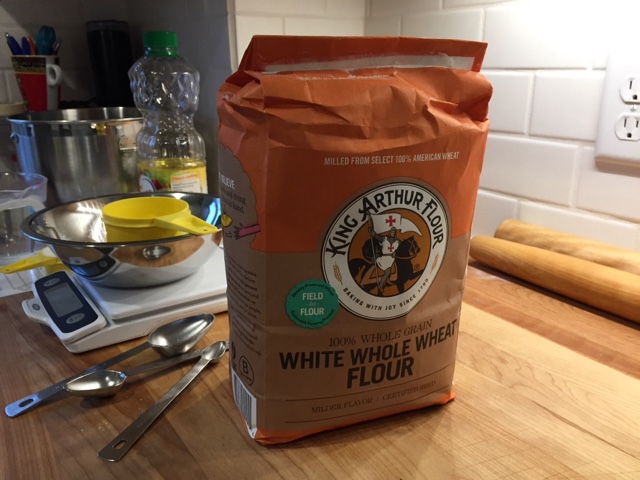
This time I used a basic sandwich bread recipe from the folks at King Arthur Flour and decided to double it - one half for a loaf and one half for some rolls.

The recipe uses a basic straight dough made with all purpose flour, although there's a suggested option for replacing half of that with white whole wheat flour (which is what I did).

Here's the base recipe (remember - you can double it as I did).

390 g/3 cups flour (half all purpose, half white whole wheat for me)
120 ml/1/2 cup milk (any fat content you choose)
120-180 ml/1/2 to 2/3 cup hot water to make a smooth dough
56 g/4 tablespoons melted butter or vegetable oil (I used butter)
45g/3 tablespoons sugar
7g/1.25 teaspoons salt
7g/2 teaspoons instant yeast

Combine all the ingredients in the bowl of a stand mixer fitted with the dough hook.  Mix on low to moisten all the ingredients until the dough starts to pull together.  Then knead on low for about 5-6 minutes to achieve a smooth and supple dough.

Place the dough into a lightly oiled bowl, cover it and let rise for about an hour at room temperature.

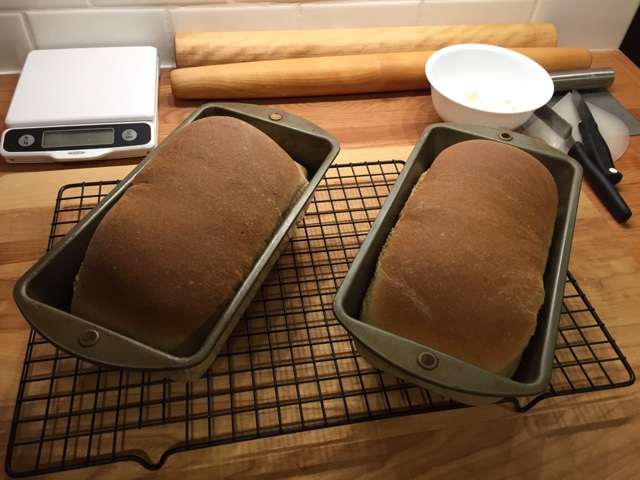
Place the dough on a lightly oiled surface.  In my case I divided my double batch of dough in half and shaped one half into an 8 inch log which I then placed in a lightly oiled 8 1/2" x 4 1/2" loaf pan.  Cover with lightly oiled plastic wrap and allow it to rise about 60 minutes (or longer if you're working in a cool kitchen).  The dough should crown about 1 inch above the pan rim.

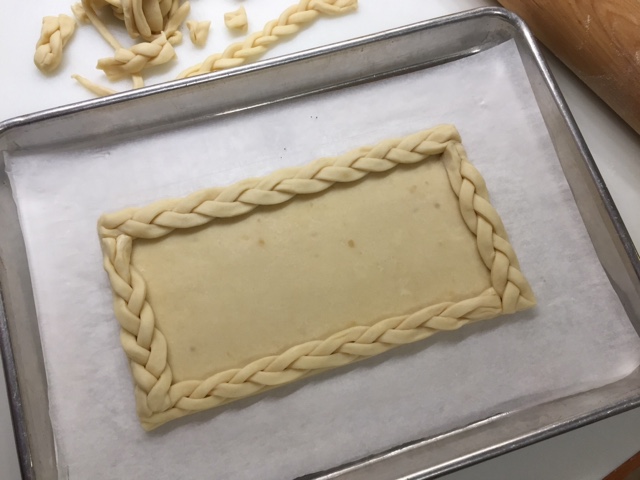
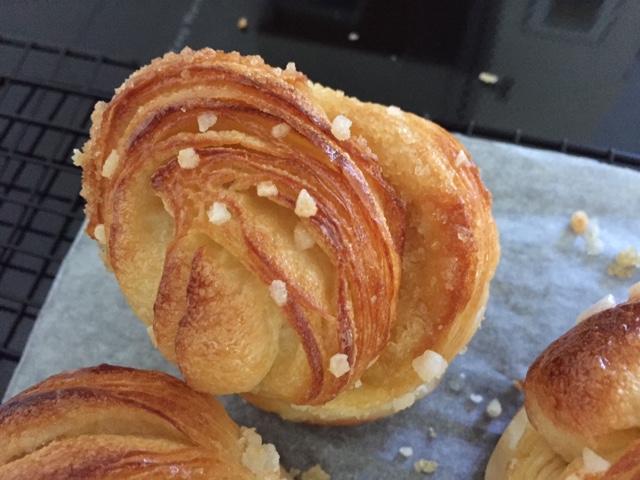
The second half of dough was destined to become knot rolls.  Oh boy!

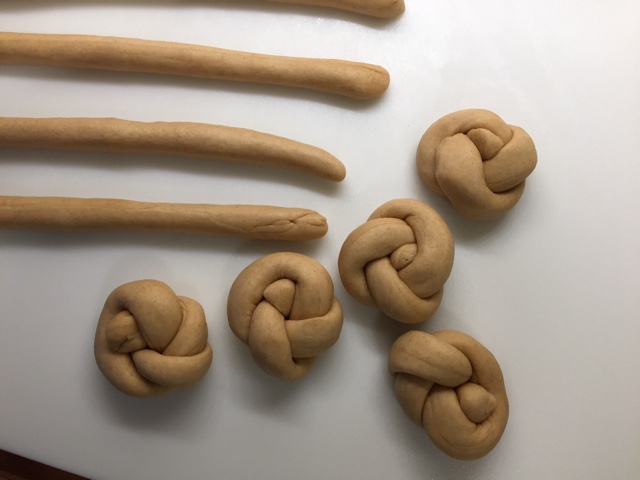
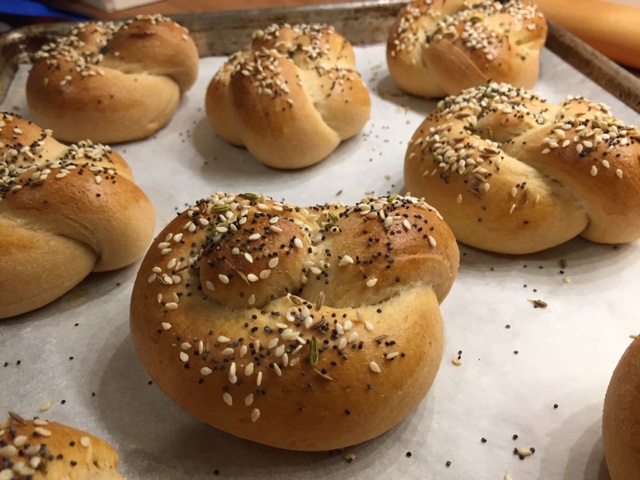
Working on a lightly oiled surface, I divided the dough into nine 85 g/3 oz pieces.  I rolled each piece into a snake-like ~12" length and formed each into a knot. Cool! It's all about tucking the ends just so.


I placed the rolls on a parchment paper lined sheet pan, covered them loosely with lightly oiled plastic wrap and gave them a good 1 to 1.5 hour rise.

I heated the oven to 350ºF.

I made a mix of fennel, cumin, sesame and poppy seeds . . . .


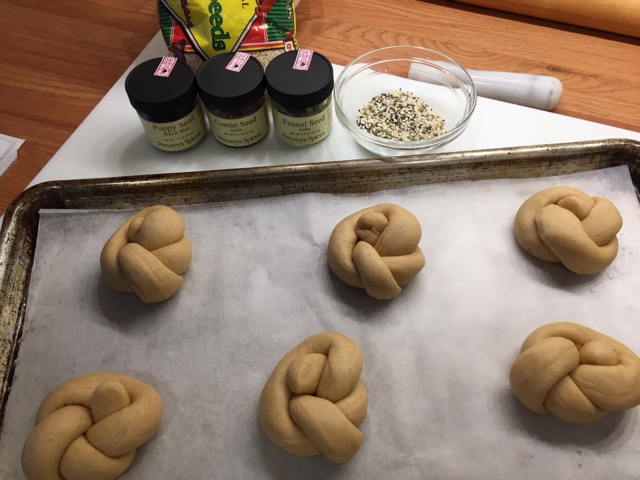
then lightly brushed the knots with egg wash and sprinkled them with the seed mixture.


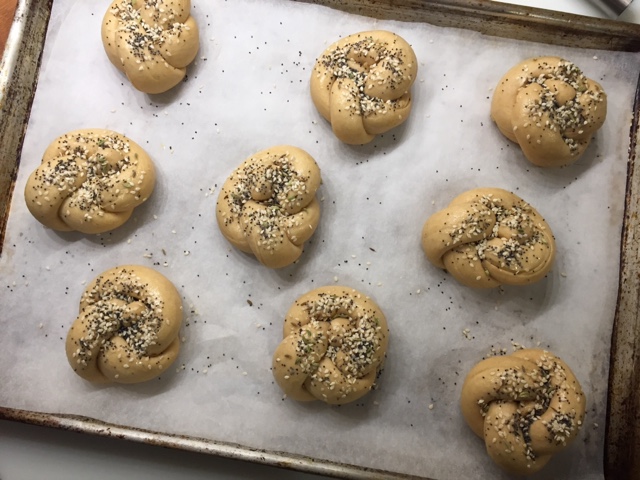
Into the oven they go!

After about 20 minutes of baking time, they emerged nicely browned and smelling heavenly.


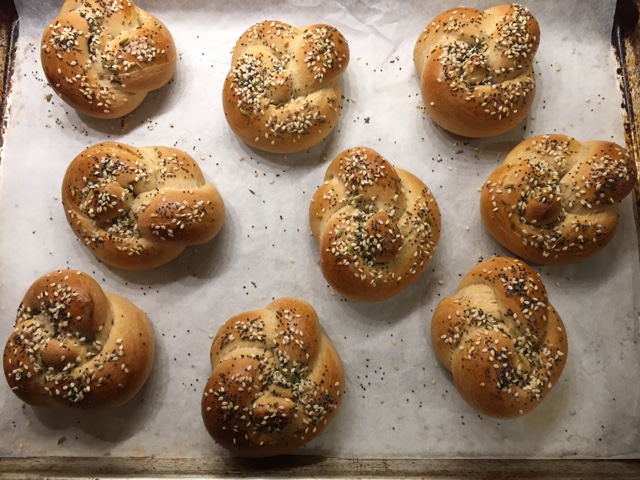
They had a bit of cooling time before we took some over to Mom's for supper.


There's nothing like a freshly baked warm roll with a bit of thinly spread butter.  You can't beat it.

Thanks King Arthur!


Chocolate madeleines and more than you'll ever want to know about making them


A good madeleine can be hard to find.  It's best to eat them fresh from the oven since they have a tendency to be on the dry side once they cool.  In the past I've taken to brushing the classic version of madeleines with lemon syrup while still warm, which goes a long way to holding in moisture and prolonging their shelf life.

I've tried a variety of madeleine recipes over the years, most of which have somewhat similar ratios of flour, sugar, butter and eggs, often with some honey and lemon zest added in.

This chocolate version is from Clotilde Dusoulier's "Chocolate and Zucchini" blog, and is her chocolate version of the "perfect madeleine" from Fabrice Le Bourdat's shop Blé Sucré in Paris.  The base recipe has a larger quantity of butter than many I've reviewed, and Clotilde's chocolate version adds melted bittersweet chocolate and cocoa powder to Le Bourdat's base.

Madeleine batter should be made ahead and allowed to sit in the fridge for several hours and up to a couple of days.  Think planning ahead!

Here's the process.  

Melt 150 g good quality chocolate (I used 56%) over a bain marie. Remove from the heat but keep the chocolate bowl over the warm water to hold it until it's added to the batter.

Melt 350 g unsalted butter (stove top or microwave - you decide).  NOTE - the butter is the final ingredient to be blended in and should be hot when added to the batter.  It's all about planning.

In the bowl of a stand mixer beat 6 large eggs with 260 g sugar until thick and pale yellow, 4-5 minutes.  Blend in 120 ml milk (I used whole) and the warm, melted chocolate.

In a separate bowl combine 375 g all purpose flour, 3 tablespoons unsweetened cocoa powder, 1 tablespoon baking powder and 1/2 teaspoon sea salt. Fold these dry ingredients into the batter.

Finally blend in the hot melted butter until incorporated. 

Cover and refrigerate up to 2-3 days.

On baking day heat the oven to 450ºF with half sheet pans placed separately on two different racks (I have three oven racks but prefer to use only two at a time - it's just easier).

Placing cold batter into cold molds and then onto heated sheet pans in a hot oven are some of the reasons that madeleines develop that classic hump.

Mold preparation is key.  I prefer using the standard silver tin molds rather than the darker finish brown non-stick molds (which, by the way, still have to be buttered and can cause the petite cakes to brown too quickly - trust me, I know.)

I apply a decent coating of butter on each well and give them a dusting of flour - you can never be too careful in terms of making sure your madeleines don't stick!

As you can see below, I opted to bake some minis as well as the standard size.


Once my molds are ready I pop them into the fridge until I'm ready to fill them.

The chilled batter is quite thick.  You can pipe it or simply scoop it into the molds. Filling the wells with just the right amount of batter carries a bit of a learning curve and comes with experience but a general rule is to full 1/2-3/4 full.  I wasn't sure how these babies would rise so I chose about 1/2 full.


Place the molds into the hot oven directly onto the heated sheet pans.  Immediately turn the oven temp down to 360º F and bake for 12-14 minutes for standard size and about 6-7 minutes for the minis.  If you're doing multiple batches, turn the oven back up to 450ºF before baking your next batch.

Nice humps!


Once pulled from the oven turn them out onto parchment paper - they should fall out freely if your molds have been well prepared.  You can tap the corner of the overturned mold onto the nearby surface as needed if they're being a bit stubborn.  It works.


One thing I noticed about the minis is a blurring of the shell pattern - most likely due to the butter and flour coating of the mold that melded into the batter and didn't allow the pattern to remain distinct. No biggie.


I reacted to my first taste of a mini with the feeling that the chocolate flavor wasn't as forward as I would have liked.  However, the texture was sooooo light and ethereal - I've never had a madeleine like it!  As I continued to sample a few more, they grew on me.  Steve too.

I wanted to punch up the chocolate experience and decided to make a glaze by melting 130 g bittersweet chocolate with 3 tablespoons butter and 1 tablespoon corn syrup (gives it a bit of sheen) over a bain marie and then adding in 1/4 teaspoon vanilla extract.  

I dipped the "hump side" of some of the madeleines in the warm chocolate, and, after a few minutes of setting, created a ridge like pattern with my zig-zag cake decorating tool.  They look kind of like walnuts, don't you think?


The added layer of chocolate was just the right touch.  Mmmmm good.

Once the chocolate had cooled and set, I turned them over to give them the quintessential dusting of powdered sugar.


With another bunch of the finished cakes, at Steve's suggestion, I did what I used to do with the little coriander buttermilk cakes I used to make in Rhode Island.  I re-warmed the madeleines briefly in the oven then dipped them in melted butter and rolled them in coriander sugar.


I thought the sugar a bit too much so brushed some of it off.  Delicious indeed.

Both versions remained moist in a covered container over a couple of days, plus I froze some of each as well. Once thawed they still tasted great. The texture is fantastic!

What a treat.

Thanks Clotilde!


Dried apricot purée and something new with croissant dough


Always on the path of using up ingredients I have on hand, I decided to make apricot purée with a bunch of dried apricots standing by in the fridge.  Of course, what I might do with said purée was also on my mind.  Ahhh - something with croissant dough might be nice!

First the purée. After some recipe research I came up with a pretty straight forward approach involving poaching the dried apricots in a light sugar syrup with added orange zest.  Apricots go soooo nicely with orange, n'est pas?

Place 300 ml (1 1/4 cup) water, 50 g (1/4 cup) sugar, 84 g (1/4 cup) honey and the zest of two oranges in a saucepan, bring to a simmer and cook on medium low until the sugar is dissolved. Add 250 g (1 1/4 cup) dried apricots, cover and cook about 30 minutes until the fruit is soft and supple.


Purée in a blender until smooth then strain.  This stuff looks like baby food!


I decided to freeze the end result by portioning it out into an ice cube tray. That allowed me to remove small amounts on an as needed basis. Interestingly the purée didn't freeze solid due to the sugar content but it was a good way to store it nonetheless.


The day before I wanted to create my little croissant bites, I pulled some croissant dough from the freezer, thawed it overnight and then rolled it out and cut small squares that would fit nicely into buttered and sugar-dusted mini-muffin tins.


I decided on a cream cheese type filling, making my own version based on a recipe in my CIA Baking and Pastry book.


Mix 270 g cream cheese with 33 g sugar (I reduced the amount of sugar in the original recipe since I would be adding my sweetened apricot purée), 33 g corn starch, pinches of lemon and orange zest and a splash of vanilla. Blend in 45 g egg and a couple of tablespoons of apricot purée (or more to taste).

I let the croissant squares rise for about 1.5 hours then topped them with a dollop of apricot cream cheese filling, followed by a smaller dollop of purée and a few pieces of diced dried apricot.


Then I topped 'em all off with some pistachio crumble . . . . 


and popped them into a preheated 400ºF oven to bake.  After about 8 minutes I reduced the temp to 375ºF and continued to bake until nicely browned, another 15- 20 minutes or so.  REMEMBER - watch what's going on in that oven of yours!

.  
After a few minutes I gently lifted them out onto a wire rack to cool, and then, of course, it was time for a taste test.  Yeah baby.


Lovely layered, delectable, buttery goodness with the creamy apricot filling and crunchy pistachio crumble adding the always hoped for differences in textures and tastes.


And Steve liked them too. Yippee!

Praliné et sablés

Some of you know how much I love shortbread cookies (les sablés, en français) and am often playing around with new flavors and ingredients to create something unique and tasty.


There is an ingredient in the pastry world called praliné which consists of toasted nuts coated in caramel that are then cooled and ground into a paste. It is often made with hazelnuts or a 50/50 mix of almonds and hazelnuts, although any nut (nuts in general are referred to as fruits sec, en français) or combination thereof can work.


One of the first sets of recipes we were given in the basic pastry course at Le Cordon Bleu contained a recipe for do-it-yourself praliné or praline paste.  One can buy this particular delight ready made in fairly pricey tubs from companies like Valrhona, but I thought it was high time I made it myself.  Why not?!

What inspired me to take on this project was a recipe for sablés au praliné from Thierry Mulhaupt (a well known patissier chocolatier in the Alsace region) recently published on the French blog La Cuisine de Mercotte.  The recipe for les sablés contains a link for DIY le praliné and I went for it!

Toast 125 g almonds and 125 g hazelnuts in a 325º oven for about 10 minutes. Make a sugar syrup with 165 g of sugar and 45 g of water and cook it to 121ºC (250ºF).  Off the heat stir the warm toasted nuts into the sugar syrup until the sugar crystallizes.  


Then put the pan back on medium heat and stir continuously until the crystallized sugar melts and caramelizes to a golden amber.

I must admit that I should have cooked mine a little longer to bring ALL the sugar to a beautiful caramel stage, but sometimes impatience takes over.  Still - the nuts were looking pretty good.


Turn them out of the pan onto a Silpat, spreading them into a single layer and separating the nuts as much as possible.

Once cooled place them in the bowl of a food processor and whiz away!  


Still a bit grainy above, but I gave it a few more minutes of processing and was pretty happy with the result. All in all it takes a good 8-10 minutes to arrive at the end result.


This stuff will keep in a covered container at room temperature for several weeks.

Next comes the cookie dough.


Dice 300 g cold butter and sand it into a mixture of 300 g all purpose flour, 65 g almond flour and 65 g powdered sugar. Add 175 g praliné and a large pinch of fleur de sel and blend to create a smooth dough.


Divide the dough into five 180 g pieces and form logs about 25 cm long. I made mine into triangle logs for something a little different. Wrap and chill.

When it's time to bake, heat the oven to 325ºF.  Brush the logs with a bit of water, roll in raw sugar and slice into 7-8 mm slices. NOTE: the recipe actually suggests 15 mm slices, however I was going for a thinner cookie.


Place cookies on parchment lined sheet pans and bake about 16 minutes until nicely browned.


I must say these are tasty little morsels. Although the nuttiness is subtle, the butteriness is superb and the texture is melt in your mouth.  And the raw sugar crunch adds just the right touch.


Of course, making the praline paste is a time commitment which I suspect many would choose not to take on, and going the "store-bought" route is fairly prohibitive cost-wise. 

For me it was worth the effort to make my own, especially since so much of this stuff is about tackling something new, experiencing the process and enjoying the tastes that come along with it.

The good news is that once you make it you can use it for other things like ganache or as an addition to mousses or creams.  And remember - it keeps!  Only you can decide.

Chocolate hazelnut torte

Get ready folks!  This one is a four bowl-er!!

A family supper at Mom's had me in the dessert planning mode again.  I recalled with fond memories this chocolate hazelnut number that I had made a couple of times at my shop in Pawtucket RI for the Saturday morning farmers market.  Definitely delicious and worth the extra effort to make.


It's very important to plan ahead and do your mise en place for this recipe - pan preparation, butter at room temperature, chopping and melting chocolate, dividing the sugar (pay attention to the recipe!) separating eggs and understanding all the steps of beating and mixing before the whole shebang goes into the pan and the oven.  

The ingredients:

227 g/8 oz unsalted butter, room temperature
215 g/1 cup sugar, divided, plus more for pan prep
227 g/8 oz bittersweet chocolate, chopped
175 g/1.25 cup hazelnut flour
35 g/0.25 cup all purpose flour
16 g/2 tablespoons unsweetened cocoa powder
1 teaspoon kosher salt
6 large eggs, separated
1 teaspoon vanilla extract
1/4 teaspoon cream of tartar

The process:

Heat the oven to 375ºF.  Butter a 9" springform pan, place a parchment round on the bottom, butter the parchment and sprinkle with sugar.

Melt the chopped bittersweet chocolate in a bowl over a bain marie, stirring periodically until smooth; remove from the bain marie and let cool slightly.

In a medium bowl whisk together the hazelnut flour, all purpose flour, cocoa powder, salt and 1/4 cup sugar.

In a mixer with the paddle attachment beat butter with 3/4 cup sugar until light and fluffy, about 3-4 minutes. 

Add egg yolks, one by one, blending in each addition before adding the next. Beat in vanilla.

Here are the four bowls at this point:


Blend in melted chocolate then gradually add in dry ingredients, mixing just until combined.

In a clean bowl with clean beaters or whisk attachment beat egg whites and cream of tartar to stiff peaks.

Now down to two bowls!


With a rubber spatula fold 1/3 of the whites into the chocolate batter to loosen it (NOTE: it can get pretty dense as the chocolate cools so don't dilly-dally!). Fold in the remaining whites just until combined.  Scrape the batter into the prepared pan.


Bake for 20 minutes then reduce the oven temp to 350ºF and bake an additional 30-40 minutes.  The top should look dry and may crack a bit and a skewer inserted in the center should come out clean.


Let cool about 20 minutes then unmold and cool completely.

Once cooled I decided to glaze it with some leftover ganache I had in the fridge.  I gently warmed the ganache until spreadable and gave the top some cover.

Time for dessert!


My vanilla ice cream fait à la maison, a narrow slice of heaven and a sprinkle of crisp chocolate pearls:


Smooth ganache, dense moist crumb, lovely chocolate-hazelnut balance, cool-creamy ice cream and just a little crunch thrown in.  Yes. 

Give it a try!

Pistachio berry dacquoise

I'm a bit behind the curve on this one but welcome to 2017!

During the Christmas-New Year's week we had a lovely dinner at friend Margaret's cozy and festively decorated home. She rustled up a Viennese beef stew with noodles, as a reminder of her recent trip to Austria in early December. Her friend Kate brought a delicious and full-of-good-stuff green salad, and I, of course, brought dessert.

Creamy custard, lightly sweetened berry compote, candied pistachios - all nestled on a dacquoise base.  Sounds pretty good!

Dacquoise is one of my favorite things to make (and to eat, yes sir!). It's basically a soft nut meringue with the same ingredients as the popular and trendy French macaron, but it is WAY less fussy and tastes great too.

Having egg whites in the fridge is often the impetus I need to make dacquoise, and so it was that I began to imagine a pistachio version for my dessert creation.

The recipe (this is half my typical base recipe): in a separate bowl whisk together 50 g almond flour, 50 g ground unsalted raw pistachios and 75 g confectioners sugar. In a mixer with the whisk attachment whip 3 egg whites with 25 g granulated sugar to stiff peaks.  Gently fold in the nut/confectioners sugar mixture just until blended.

NOTE:  you can use any ground nut, either by itself or as a mix - almond, pistachio, hazelnut, walnut or pecan - you decide.

Once the dacquoise is mixed you can pipe any shape you choose, depending on your dessert vision. You can see what I did below. I think of these as dacquoise rafts just waiting to float down a dessert river, and, in this case, destined to carry a creamy ricotta custard ingot.

ready for the oven

all baked up!

Dacquoise is one of the few things for which I use silicone baking mats. The softly baked meringue lifts off the Silpat so easily. It's a beautiful thing. And another plus is you can make these ahead and freeze them until ready to go.

Candied pistachios are next. Adjust the recipe depending on the quantities you need, but a typical base recipe calls for 2 cups raw nuts, about 1/2 an egg white, some sugar as well as spices of choice if that's what you're after - cinnamon, nutmeg, ginger, coriander, even a little cayenne pepper - it's up to you.

Just whisk up the egg white until foamy, whisk in about 1/4 cup sugar (and the optional spices) then stir in the nuts until coated. Spread out onto a parchment or Silpat lined pan and bake at 325ºF, stirring every 10 minutes or so, until the egg whites have dried and things look toasty. It usually takes about 20-25 minutes for me.

Good news - the nuts are another do-ahead component that will keep at room temperature in a covered container for many days.

crunchy goodness

The beauty of these is they aren't really very sweet, even though coated in sugar - just deliciously enjoyable!

The ricotta custard is a combo of 177 g ricotta, 354 g cream cheese, 112 g sugar, 2 eggs, 1 egg white, seeds from 1/2 scraped vanilla bean and 177 g heavy cream. Beat the cheeses, sugar, vanilla bean in the mixer until smooth, beat in the egg and white, then add the cream and blend.

Pour the custard into flexible silicone molds of choice. I used Silikomart's SF026 12-well ingot shaped mold. 

Place the molds on a sheet pan, pour some hot water in to bathe the lower half of the molds and bake at 275ºF until the custard is set. The time will vary depending on the size of your molds (for these it took 20-25 minutes). This recipe made about 20 custard ingots.

Once baked, let the custards cool to room temperature then put them, mold and all, into the freezer until firm. Then you can pop them out of the molds and store them frozen. Yay! Another do-ahead.

In the afternoon on your designated dessert day, just place the frozen shapes onto your chosen bases and refrigerate to thaw before serving. The custards hold their shape and are ready to garnish and enjoy!

I made a berry compote with a mixture of raspberries and blackberries (total 300 g) in a saucepan with 40 g of sugar and some lime zest. Heat 'em up until the berries break down a bit then stir in a cornstarch slurry (2 teaspoons cornstarch whisked in 1 tablespoon warm water) and simmer a few minutes until the mixture thickens.

Serve it a bit on the warm side or refrigerate it until ready to use. By now you know - do-ahead!!

What a luscious combination enjoyed by all! And a simple vanilla shortbread on the side added that extra special something.

Happy New Year from The French Tarte. Here's to all the baking and dessert creations to come!

Beer bread


For our Christmas Eve dinner Steve made carbonnade flamande, a Belgian/Flemish specialty of beef braised in beer and onion.  We experienced this very dish, much to our delight, during our trip to Bruges this past fall with my niece Christina and her family.  Needless to say, Steve was eager to try his hand at it.

For the dish he searched out the availability of Belgian beer here in Grand Rapids and came up with a dark Belgian style Canadian beer from Martha's Vineyard, a fantastic local purveyor of all things culinary, including a vast selection of wine and beer from far and wide.


Don't worry - the name "Terrible" certainly did NOT indicate the flavor of this hearty brew!

Since Steve didn't use the entire 750 ml bottle of beer for the carbonnade, I decided to finish it off by making beer bread.  So, of course, I turned to Rose Levy Beranbaum's The Bread Bible.

What a straight forward recipe!  Easy to mix up, whether by hand or in the mixer, soft and supple and carrying the aroma of yeasty beer.

This recipe utilizes the straight dough method, which simply means mixing the ingredients together, kneading the mélange to achieve a smooth, elastic dough, giving it a first rise, shaping a boule and then giving it a second rise.  I know I've mentioned this in previous posts but it never hurts to go over it again - that's one of the ways we learn!

Even though I do love kneading dough by hand, this time I decided to use the Kitchenaid. The process went like this:  in the mixer bowl whisk together 4 g instant yeast, 12.5 g sugar, 380 g bread flour (leaving 2 tablespoons aside) and 30 g whole wheat flour;  mix with the dough hook on low speed, add 255 g beer and mix on low for another minute.

Let the mixture rest, covered, for 20 minutes then sprinkle on 8 g salt and knead on medium speed for 7 minutes.  If the dough feels a little sticky, add in some of the 2 tablespoons of flour that were set aside for that very purpose.

Place the dough in a lightly oiled bowl, cover and let the dough rise until doubled, about 1.5-2 hours.  Alternatively, you can place the dough in the fridge overnight, which is what I did.  It helps develop the flavor even more.

On baking day I let the dough rise for a good 2-2.5 hours since it was cold coming right out of the fridge.  Then I shaped a chubby boule, placed it on a parchment lined sheet pan, covered it with lightly oiled plastic wrap and gave it another 1.5-2 hours rise.

The baking process here involves creating as close to a hearth environment as possible.  Place a baking stone or 1/2 sheet pan on the lower oven rack and heat the oven to 450ºF, giving it a good 45-60 minutes of heating time.

In addition place a baking steel or cast iron pan on the oven floor which will be the receptacle for ice cubes that are thrown in when the bread goes into the oven.  This creates a burst of steam, leading to a beautiful crust.

NOTE: in my case I have a tray that slides right onto the under surface of the oven rack that serves as a receptacle for water or ice when doing steam baking.  Pretty nice!

Slash the dough in a pattern of choice and place it on it's sheet pan directly onto the hot sheet pan already in the oven. Toss 1/2 cup ice cubes onto the hot steel/cast iron and close the door!

Bake for 15 minutes, reduce the oven temp to 400 and bake an additional 30-40 minutes until golden brown. Cool on a wire rack.


The aroma was heavenly, making it very difficult to wait until cooled to taste this baby. But wait we did and it was well worth it.


Yay!  A crusty crust along with a tight, yet soft and oh-so-delectable crumb with a flavor reminiscent of molasses. So delicious! 

This one's a keeper.


Apricot orange cake with pistachio crumble

How often do you buy an ingredient with a specific project in mind, only to have that ingredient languish on the shelf or in the fridge waiting to be used? Fortunately, that doesn't happen too frequently, but, every now and then it's a good idea to see what's on hand, both in the fridge and the freezer, and figure out ways to use up things that are either nearing the end of their shelf life or are begging to be baked into something delicious.

This time - dried apricots and yogurt with unbaked pistachio crumble on the side.

Here I opted for a loaf cake variation on a recipe for orange currant muffins with pistachio crumb which I've had in my files for some time now. I’m not even sure where I found it. I used yogurt instead of sour cream and diced dried apricots for currants. Here goes! It's a straight forward batter.

Get the printable PDF recipe here!

  1. Heat the oven to 325ºF.  Butter a medium loaf pan, line it with parchment and butter the parchment as well.

  2. In a separate bowl whisk together 195 g / 1.5 cups all purpose flour, 1.5 teaspoons baking powder, 1/4 teaspoon baking soda and 1/4 teaspoon salt. OPT: replace 1/3 of the flour with white whole wheat or spelt.

  3. In the bowl of a stand mixer fitted with the paddle, cream 70 g / 5 TBSP unsalted butter with 1/2 cup / 100 g sugar (white or brown) until light and fluffy; blend in 1 large egg; blend in 3/4 cup full fat plain yogurt and orange zest from one medium orange.

  4. Add the dry ingredients and mix just until incorporated; fold in 1/2 cup diced dried apricots. The batter will be thick.

  5. Spread the batter in the prepared pan.

  6. Top with a healthy layer of pistachio crumble made by combining 65 g / 1/2 cup flour, 50 g / 1/4 cup sugar (white or brown) in a medium bowl, then sanding in 56 g / 2 ounces cold, diced unsalted butter to coarse crumbs; add 30 g chopped pistachios. Easily double or triple the quantities and make plenty for freezer extras.

Bake for approximately 45 minutes until the top is browned and a skewer inserted in the center comes out clean.

After about 10 minutes lift the cake out and let cool. 

Slice and enjoy!

I simply couldn't wait until this had completely cooled.  The still warm, fruit studded, moist, pistachio crumbly and oh-so-delicious slice was just the thing for a middle-of-a-winter-afternoon snack.

And guess what - Steve liked it too!!

Shortbread gift boxes for the holidays


Here it is - only 8 days left until Christmas!  It's definitely winter here in Michigan with a number of inches of snow on the ground and more in the offing.  Brrrrr cold too!


I've been busy baking and packaging my assorted shortbread cookies at Patricia's Chocolate shop in Grand Haven.

There's a miniature version of the shortbread bar, reminiscent of my days at Hope Artiste Village in Pawtucket RI, from which customers can choose their favorite flavors for simple packaging in small bags.


And then there's a small display table for the gift boxes with signage compliments of Paul Christopher, Patricia's husband and graphics guru.  What a talent!


It's a whirlwind of activity at the shop this time of year, and Patty keeps everything under control with her ever steady presence and attention to detail.

You should check it out!  Patricia's Chocolate at 126 Washington Ave, Grand Haven MI. You'll be happy you did.

Cheers!


Daily bread and giving thanks


Thanksgiving Day has passed yet we must remember that everyday is a day to give thanks.  I have much for which to be thankful. My husband and best friend Steve has weathered another assault on his body, undergoing a successful cardiac catheterization and stenting procedure two days before the Thanksgiving holiday.  He was discharged to home on the day itself, allowing us to spend a very relaxing and quiet day together without the hustle and bustle of large gatherings, lots of food (probably too much) and perhaps feeling rather drained at the end of it all.

Please don't misunderstand me - being with family and friends is ever so important, but this year it was good to simply be at home.  After all - home is where the heart is, eh?

For me the day begged for bread baking.  What better way to spend a dreary, chilly and rainy Thanksgiving afternoon than baking one of the staples of life.  Let us break bread together.

This one was compliments of King Arthur Flour's monthly bake along recipe for October - "everyday whole-grain bread" - and was also my first foray into using their white whole wheat flour.  I've been a huge King Arthur fan for some years now and have used their flours for all my baking.  I love their "field to flour" approach which focuses on identifying the source of the grains used in their flours.  Good stuff.


My intention here is not to spell out the recipe for you, but to relish in the process of bread making.  The mixing and kneading of the dough, the feel of the dough after the first rise, the tactile experience of shaping the dough and placing it in the pan for the second rise.  It's all so satisfying!

This one is a straight forward direct dough - mix and knead, bulk rise, shape, pan up for the second rise then bake.  Yay!


The end result was a dense crumbed, tasty slice of white whole wheat bread that is delicious toasted and topped with PB and J or a perfect slice of cheese -whatever one might imagine.  


Happy Thanksgiving weekend everyone.  And don't forget to break bread with those you love.


A free form savory tart


As I anticipated the end-of-the-fall-session gathering of my weekly French class, I considered what I should bring as a contribution to the fête. I was in the mood for something savory - it just seemed right for this time of year.

I had puff pastry in my freezer so out it came to thaw.  I then embarked on the course of creating a free form puff pastry base.


The beauty of this approach is that you can create any shape or size to fit your mood as well as the number of people you plan to serve.

In my case I planned to cut the finished product into appetizer size portions, so I made a simple rectangle of about 4" x 8" and had plenty of dough to cut narrow strips, braid them and create a lovely border look.

I had autumn veggies on the brain and recalled the vol-au-vent filled with a mix of roasted butternut squash, caramelized onion and goat cheese from a puff pastry class I taught at the Grand Rapids downtown market last fall.  Yes, that's it!

First I baked the puff base solo (425º for about 20 minutes) and set it aside while preparing the filling.  The center puffs up quite a bit, but I simply push it down gently to allow some space for the filling.

NOTE:  this approach is best when using a filling that will already be cooked through since the whole thing will just require warming up once assembled.


I tossed a couple of cups of chunked butternut squash with some olive oil, rosemary, herbes de provence, salt and pepper and roasted them at 450º for about 25 minutes.


I mixed the caramelized onion I had prepared earlier with the squash, piled it onto the baked puff, topped it with crumbled goat cheese and popped it into a 350º oven for about 15 minutes just to warm the whole thing up.


As a final garnish, some roasted pepitas and toasted walnut pieces went on top.


The end result was a delicious combo of buttery, flaky puff and herbed veggie filling with the added crunch of pumpkin seeds and nuts.

Yes - a lovely fall treat.

So put your thinking cap on and imagine of all the wonderful combos you can create!


Brioche feuilletée


I've been wanting to make this delectable version of brioche for some time now, and so it was that a recent online reference to Guy Savoy's new venture in Paris, Gout de Brioche, finally got me going. The shop offers individual as well as "grand" brioche feuilletée in a variety of flavors both savory and sweet. 

This particular dough is another in the family of laminated dough - puff pastry, croissant and Danish being the standards.  Here we have an egg enriched brioche dough which is put through similar laminating steps to create buttery, flaky layers of goodness.


It seems that every time I make brioche I look back at various recipes and compare ingredient amounts and ratios.  This time I reviewed the recipe from the Le Nôtre class that I attended in Paris during our recent September trip. Using it, as well as an online recipe attributed to Philippe Conticini of Pâtisserie des Rêves fame, I came up with my own version to launch my attempt at brioche feuilletée.


Brioche dough can be lean to rich and may contain amounts of butter that are anywhere from 20-80% of the quantity of flour in the recipe.  With the laminated approach one reduces the amount of butter in the basic dough but then uses a larger amount of butter for the butter block that becomes incorporated into the dough.

Here's the dough: 500 g flour (450 g all purpose and 50 g bread); 10 g salt; 50 g sugar; 8 g instant yeast; 90 ml whole milk; 250 g egg (about 5 large); 50 g unsalted butter, cut into small cubes.  

Place the flour, salt, sugar, yeast and milk in the bowl of a stand mixer fitted with the dough hook and mix on low for a couple of minutes.  Add the eggs 1-2 at a time until each addition is incorporated.

Increase speed to medium and mix for 12-15 minutes until the dough is coming away from the sides of the bowl.  

Add the butter piece by piece until incorporated. The dough should be shiny, smooth and silky.

Turn the dough out into a lightly greased bowl, cover and let it rise for an hour.


Deflate the dough gently then cover snugly and put into the fridge for 4-5 hours or overnight.

Form a butter block with 340 g unsalted butter and hold it in the fridge overnight as well.

The following morning take the butter out to take the firm chill off and allow it to become more malleable for the beurrage et tourage.

At this point the process is the same as for croissant - envelope the butter and then put it through three single, or business letter, folds with 30 minute rests in between. Here's the first fold.


After the three folds give it a good hour rest in the fridge before rolling it out for its final use.

Take a look at my finished dough below - it felt great even though the butter isn't uniformly distributed in the dough. I pushed on nonetheless!  


Roll the dough out into an approximately 16"x13' rectangle.  At this point you can do any filling your little heart desires.  I opted for a simple mix of crushed raw sugar cubes with lemon zest which I sprinkled over the dough, leaving the upper edge clear.


Brush the upper edge with a little water, milk or egg wash to help seal the seam once you've rolled it up.


Now slice into twelve 1 1/4" slices.


You can tuck these, cut side up, into buttered standard muffin tins, but I decided to use lightly buttered panettone papers.


Let these rise in a warm place for 1-2 hours, depending on your ambient temperature.  They should look poufy with increased prominence of the laminations.


Heat the oven to 400ºF.  

Brush the tops with a bit of egg wash or milk and sprinkle with pearl sugar.


Bake for 10 minutes then decrease the temp to 350 for another 10-15 minutes until nicely browned.


Once cooled a bit I pulled them out of the baking papers and brushed the surface with lemon syrup.  I find that brioche often look a bit dry coming out of the oven and the syrup gives them a nice sheen.

They look a bit like a conch shell!  Or some kind of snail.  Some of them tried to rise up and escape from their houses, looking like a slinky going down the stairs.


Once a bit cooled it was definitely time for a taste test. In the photo below the smaller pieces in the background are a couple of end scraps that I baked separately, and the sliced brioche in the front is one that slink-ied out of its paper.


The thing that always strikes me about a good brioche is how LIGHT it is!  The eggs and the butter don't seem to weigh it down at all.  Although remember that an important part is making sure you give these babies a decent rise - if they don't rise long enough they'll end up heavy and dense.


The flavor and texture were just right and the lemon syrup gave these a nice little zing.  But next time I'd punch the lemon zest up even more.

I can't wait to try some other versions!  Yessiree!!

It's all about the journey.

Exciting news!

This past week The French Tarte became licensed to work out of the kitchen at Patricia's Chocolate in Grand Haven, Michigan.  Hooray!

What does this mean you might ask?  Well to start out I'll be baking and offering my tasty all butter shortbread in Patty's shop, accepting orders for shortbread gift boxes and developing a schedule of travel from GR to GH to dovetail with my teaching schedule at Sur La Table here in GR.

Shortbread bar

Taking it step by step. In the meantime I wanted to share with you some of things I've been making in recent months.  

In early August, as I birthday present to myself, I baked an assortment of goodies (from left to right): pavé aux amandes, cocoa hazelnut financiers, bubble eclairs with raspberry currant cream (Yum!) and chocolate milkshake tarts.

By now many of you know my attraction to financiers and tarts. What can I say? I just can't help it!

Once we returned from our trip to France in early October, I've been back in the kitchen doing this and that as well as trying some new shortbread flavors (how about coffee cardamom, oatmeal ginger or coconut lime?!).

My baking activities often seem to revolve around what I happen to have in the fridge - some of my lightly spiced poached pears being just one example. What better than a batch of financier batter to create pear-caramel and raspberry-pistachio crumble versions for our freezer.

The pears also encouraged me to make some individual versions of tarte bourdaloue using the recipe that I had brought back from Le Notre in Paris.

Of course I simply can't forget the household favorite (hint, hint - guess what Steve loves?), the quintessential caramel nut tart. This go around I used some chocolate tart dough that had been waiting in the freezer for that very thing.

Chock full-o-nuts, oh-so-delicious and always a hit.

And for something just a little different - bagels!  These were from a class I taught at Sur La Table where the results were stupendous.  Chewy, not tough, great depth of flavor and definitely a make-again recipe. These are the "everything" version, the deeply browned exterior being due to molasses in the dough as well as some molasses in the bagel boiling water.  Yup!

And so the adventures continue.  Stay tuned.

Coconut sugar and maple cream - new ingredients on my shelf

It's hard to believe that it's already been two whole weeks since our return from Paris.  It took a bit of time to get back on schedule and catch up with the odds and ends of daily living, but catch up we have and we're movin' forward!

We're seeing some beautiful fall colors and are currently enjoying sunny skies, balmy breezes and temps in the 70s.  We'll take it, since we know what's coming just around the corner.  It is Michigan after all.

Now let's get back into the kitchen OK?


Before we left on our France adventure I had purchased some coconut sugar as a result of perusing the various sugar choices on the grocery store shelf. The package info tells me that the coconut blossom is the source for this unrefined, sustainably grown and harvested sugar which tastes nothing of coconuts but has its own subtle taste.  It's touted as being great for baking as a 1:1 replacement for white sugar.  

In addition, my sister Mary had sent me a jar of Tonewood maple cream as a birthday gift, and it was just waiting to be used.  This stuff is made in Vermont by cooking and whipping pure maple syrup to a state of creamy goodness.  What's not to like.

First the coconut sugar.  I'm tweaking my shortbread flavor list for the upcoming holidays and decided to do a lime coconut version, so I substituted half of the sugar in the recipe with coconut sugar.  It looks like brown sugar and actually tastes like it too - toasty, caramel-y and very pleasant.  


It did give the dough a slightly darker hue than usual . . . 


and the cookies baked up more browned and toasty looking.


There was really no difference in the flavor - still tasty - so for me it's simply a matter of using an unrefined sugar in place of a refined one.  I've been doing this for some time with unrefined raw cane sugar which gives a pleasing crunch to shortbread cookies or as a topping for things like financiers.  

In a nutshell - coconut sugar seems well suited for general baking uses - you decide!

Next up - maple cream.  Maple walnut shortbread is one of my faves.  I typically reduce the amount of cane sugar in my recipe, add maple syrup and then brush the warm, just-out-of-the-oven cookies with more maple syrup. Hey! I'll use maple cream instead.


This stuff is delicious - wonderful maple flavor and a texture that can't be beat. I used it in the shortbread dough just as I would maple syrup.

Once the cookies were baked I brushed the tops with maple cream . . . 


and popped them back in the oven for a couple of minutes.


Bubbling, glistening and divine.

Tonewood's web site describes the maple cream as "the perfect spread over toast or pancakes or used as a dessert frosting".  Cost is $16.99 for a 9 ounce jar.  There are pages of recipes available on the site as well, many of which call for maple sugar and maple syrup as opposed to maple cream.

Suffice it to say, one could slather this stuff on pretty much anything - how about a day old croissant, nicely toasted? Or add some to your hot morning oatmeal? Or drizzle some over toasted nuts and enjoy with a nice sharp cheddar cheese?

Don't be afraid to use your imagination - come up with your own ideas!

Saying goodbye to Paris


We had a wonderful adventure this go around, starting with our visit with the MacDs in Lille, our WWI sites tour with Richard and Pauline and finally 10 days in Paris focusing on cemeteries for Steve and pastries for me.  And of course we were able to do a fair amount of flaneur-ing as we strolled around some of our favorite spots.

Our last day in Paris was a beauty - 60s, sunny, breezy and oh so lovely.

That morning Steve had a cemetery visit to make and I visited the new LCB Paris. We then connected at metro Sèvres-Babylon and strolled to rue du Cherche-Midi for lunch at Cuisine de Bar.  For years I've been enamored of this spot for dejeuner, right next to the Poilâne boulangerie, but this time we were unimpressed.  The  main server didn't seem able to get his act together, even though this is a small place and it wasn't very busy.  Finally we were served our tartines (open face sandwiches) made with Poilâne bread and, in our case, topped with a curry chicken.  It was tasty I must admit, but the place has lost it's appeal, and I suspect we won't go back again.

We meandered over to Saint-Sulpice with its impressive statue and fountain . . . .


and then wandered over to the nearby Jardin du Luxembourg, one of the best places to hang out in Paris if you ask me.  Since it was such a beautiful day many people were sitting in shorts and shirtsleeves soaking up the autumn sun in an attempt to extend their summer tans.


So many beautiful flowers!


We headed back to our apartment so I could start tackling the packing before going back out early in the evening for an aperitif and then dinner on rue Saint Anne, the Asian restaurant hot spot in Paris.

And finally we just had to finish up on the Trocadero to see the Eiffel Tower in all its twinkling glory!


So long Paris. Until next time.


A visit to the new Le Cordon Bleu in Paris

It was our last day in Paris before heading back to the US of A - what to do, what to do.  Steve had a cemetery investigation project on his hit list, and I had been wanting to visit Le Cordon Bleu, so off I went to do just that.

I had learned not too many months ago that LCB Paris had built a brand new facility on the Quai André Citroën in the 15th arrondisement, right down the street from the Eiffel Tower and in sight of the Statue of Liberty (the French have the original you know) sitting in the middle of the Seine.


Lady Liberty

I found the school without difficulty, although it is a bit of a metro ride on the 10.  A quick walk down Quai André Citroën and I was there.


Somewhat spaceship like in appearance, it's a far cry from the old LCB with its unassuming facade and entryway.  My, those were the days.

One enters via the stairway next to the orange structure you see above.  The space inside is light, spacious and airy with a friendly woman at the reception desk asking how she could help.  When I explained that I'm an alum and would love to see the new school, she promptly called to see if someone was available to give me a tour.


Philippe Rocheron is the school's public relations man and served as my guide.  He and I had actually communicated by email some months ago when I was expressing some interest in their new Diplôme de Boulangerie.  It was nice to put a face with the name.  

There weren't any classes actively in progress for us to visit, but there were a lot of students sitting out in the open areas having their lunch before going into the practical kitchens a bit later.

I was particularly interested in the boulangerie kitchen and was impressed by the wooden topped work tables (my favorite surface on which to work with dough!) and the well equipped space.  Ahhhh - maybe someday.


On the main level there is a small cafe that sells goods made by the chefs at LCB.  As the students become more savvy about production and become more accomplished at things like laminated dough, their end results also go into the case.


My how things have changed - and for the better I might add.

Thanks for the tour Philippe!

A walking tour of Montmartre with Clotilde Dusoulier

For those of you who aren't familiar with Clotilde Dusoulier, she is a Parisian food blogger and author extraordinaire who has been writing the blog "Chocolate and Zucchini" for 13 years now (not to mention her other numerous contributions to the food world).

Back in 2009 on a 2 week trip to Paris Steve and I used Clotilde's book "Edible Adventures in Paris" as our sole guide for all things food related - restaurants, bistros, boulangeries, pâtisseries, épiceries, chocolateries etc.  Each spot we either visited or dined in was absolutely up to par, and nary a disappointment in the bunch.

I've also emailed Clotilde a couple of times over the years with various questions, and she has always replied promptly and cheerfully.  Whenever we see her picture, we think of a pixie - smiling and friendly.

Sooooooo . . . . . When we decided to make this trip to Paris, we thought what better time than to meet Clotilde in person.  We booked a two hour food related walking tour of Montmartre with her, and here's the story.

We met her at the Abbesses metro stop and set out from there down rue des Abesses.  At various stops Clotilde purchased goodies for us to sample.  Nice.


Our first stop was a fruit and veggie vendor where everything was set out artistically, full of color and variety.  We tasted fresh green and purple figs - perfectly ripe, as sweet as honey and oh so good.


Our next stop just a little way down the street was a boulangerie/pâtisserie that has won the "best baguette" or meilleure Baguette de Tradition de Paris competition not only once, but twice!  It turns out each year's winners can't compete again for four years, so after a win in 2010, the chef entered again in 2015 and won a second time!  Pretty unheard of according to Clotilde.


We sampled one of the baguettes and experienced a just-right crisp crust, an open almost buttery interior with a certain softness (NOT doughiness) to the crumb (you had to be there!) and a delicious, natural flavor.


From there we wended our way over to rue Caulaincourt and the pastry shop of Gontran Cherrier.


M. Cherrier holds the prestigious honor of winning the meilleur croissant de Paris award and so, of course, we had to sample one of his croissants absolument!


I'm not quite sure how to describe this.  Perhaps because I've spent so much time researching croissant recipes, trying different butters, tweaking my folding techniques and resting times and sampling different finished products, my mind has become cluttered with the characteristics of a really, really good croissant.

For me, there has to be that cascade of crispy shards from the exterior as you pull it apart or bite into it.  The interior should be buttery, but not too, with a texture that's a cross between bread and flaky pastry, with perhaps a hint of chew but not too dense or heavy.

This croissant had beautiful, well defined laminations and a delicious flavor, but the exterior didn't have that shattering shard quality and the texture seemed just a tad dough-y to me.  But who am I to say?

Nonetheless, Steve and I finished it off with aplomb.

We meandered back to rue Lepic where we visited  L'Épicerie du Terroir, a shop full of all sorts of food goodies - oils, herbs, spices, specialty salts, peppers, nougats, mustards, jams and on and on and on. 

Clotilde suggested that this is a great place to pick up food gifts to take back home, however we weren't in the market for anything in particular so we simply looked and savored the possibilities.


Right next door was a fascinating tart shop, Les Petits Mitrons, full of rustic, simple tarts.  Unfortunately they didn't allow photos to be taken inside the shop, and the glare of the sun on the front window made it impossible to get a decent photo from outside. Bummer with a capital B!!


We did have a slice of the apricot-plum tart - basically fresh fruit baked on a sablé crust which is somehow coated in sugar and caramelized.  Clotilde is working on figuring out just how they accomplish this feat.  I'd certainly like to know!

Alas we'd already taken a few bites before Steve snapped this photo.  Delicious!


Throughout our strolling and tasting we chatted about various things, including my love of shortbread and tarts.  We were getting close to the end of our tour so Clotilde gave us the option of visiting a fromagerie vs. a biscuiterie (cookie shop for you English speakers).  Of course I was all for the second option, so off we went to the relatively new shop of Gilles Marchal known as Compagnie Générale de Biscuiterie Montmarte.  Now that's a mouth full!


We chose an assortment of delightful sablés, financiers and palets Bretons which were displayed simply in cookie tins.  One can buy mix and match flavors starting at a minimum of 100 grams (about 14-15 petite cookies) in a cellophane bag or choose a larger assortment lined up nicely in a tin.

The shop also has other types of biscuit already packaged up for sale - arlettes (caramelized puff pastry crisps), dacquoise, macarons rustique to name just a few.

This place is right up my alley.


After sampling just a few of our biscuit it was time to say goodbye.  We gave Clotilde our hearty thanks, strolled down rue Lepic to the Blanche metro stop and headed back to our apartment. 

We thoroughly enjoyed our time with the Parisian pixie from Montmartre.  Thanks so much Clotilde!

Succès class at Le Nôtre

Succès au praliné, a classic French dessert, was the subject of my third and final class at Le Nôtre Paris.  It requires some planning and make-ahead preparation, which stands one in good stead when it comes time to assemble this particular delight.

There were again three of us in the class. In addition to myself, a young 20-something Parisian woman (no English) who does a bit of baking at home and attended the class thanks to a gift certificate, plus a Japanese woman (no French) who makes pastries in Japan.  This was another interesting dynamic with the chef at times speaking English to the French woman and French to the Japanese woman - a bit confusing to say the least.

Nonetheless there were lots of smiles and head nodding going around as we worked our way through the recipe.


I recall making succès during pastry school at Le Cordon Bleu and having my crème mousseline improperly set and oozing out of the sides - not a pretty picture.

However this time the whole process felt pretty straight forward, something that 10 years of professional experience under my belt aided tremendously.

The base of this dessert is essentially a meringue made with egg whites, sugar, almond flour, powdered sugar and a bit of milk.  It's piped in two rounds and baked low and slow, resulting in a light, airy and crisp meringue.


It is filled with crème mousseline (blend of crème au beurre and crème pâtissiére) mixed with nougatine (chopped caramelized almonds).  Separate preparation is required for the various components, and it all comes together in the end.

A note on crème au beurre:  typically made with Italian meringue to which butter is added, Le Notre's recipe involves making a crème anglaise which is whipped until cool, then butter is blended in and finally the Italian meringue is added.  It makes for quite a light (believe it or not) and delicious mixture.

Below is the large bowl full of crème mousseline and the chef working on his assembly.


After the crème is sandwiched between the two rounds of meringue, the edges are coated with more crème and then covered with pralinettes (more caramelized chopped almonds - yum!).

Crème coating underway . . .   


and pralinettes going on!  Just pick up handfuls and press lightly.


We all assembled and coated our respective succès, dusted them with powdered sugar and that was that!


The amazing thing about this cream filled meringue, so full of butter, is how light in taste and texture it actually is. Incroyable!

And guess what?  Surprise, surprise, surprise - Steve loved it!


Les Tartes class at Le Nôtre


My second class at Le Nôtre's Pavillon Elysée was, of course, one of my favorite topics - tartes!

Same place, same kitchen, same chef, different group.  My classmates were two women of similar vintage to myself, one Parisian and one American married to a Frenchman.  They had both previously attended classes with the same chef instructor so there was some chitchat about how they spent their summer etc. 

The class was pretty much all in French and, while I understood most, there were times when my head was in a fog and was putting up roadblocks to my comprehension.  But, all in all, it went well.

On the docket:  tarte tatin, tarte bourdaloue, tarte au chocolat.

Our first task was to peel and cut up apples and tuck them into a round pan that would ultimately go into the oven.  We could choose apple halves standing on end or, as the chef demonstrated, apple quarters in two layers.


Next the chef prepared a large batch of caramel which included a bit of pectin. This was a new twist for me, and the chef explained that it helps the caramel set once the tarte comes out of the oven. Interesting.

The caramel was poured over the apples and the mélange was baked for about an hour until the apples were nicely baked through.


Then a round of puff pastry was placed over the cooked apples and the whole she-bang went back into the oven for another 20 minutes or so until the puff was nicely browned.


We didn't turn these out of the pans until the end of class to avoid the puff from getting soggy whilst having caramel-y apple goo sitting on top of it.

Below are the final results. The top right one is the chef's - he did two layers of apple quarters, and I really prefer the look of that one.  Note to self!

Mine is the bottom left and should have had the apples packed in more tightly - too many gaps methinks, at least on the left side.


The tarte bourdaloue is a variant of the classic pear almond tart, the big difference with this recipe being that the almond cream filling also contains a hefty dose of heavy cream. This made for a much more liquid mixture so when we tried to artistically place our thinly sliced pear halves on the filling, they swam around a bit.


Once baked however, everything seemed to be in good position, so it all worked out in the end.  A bit of glaze and some toasted sliced almonds et voilà!


The tarte au chocolat was made with the same pâte sablée as the bourdaloue, first blind-baked then filled with a mixture of chocolate ganache, eggs and vanilla and baked until set. 


Once cooled we gave it a finishing chocolate glaze.

At the end of class we tasted the tarte bourdaloue which I found delightfully light with good pear flavor and a crisp crust. We boxed up our three 7" tarts for tasting at our leisure i.e plenty of dessert for several nights to come (Steve is in heaven).

The main thing I took away from this class was the chef's method for lining the open tart rings (which we did for both the bourdaloue and chocolat).  While hard to describe it here, it differed slightly from the way I've been doing it since the days at Pascal's, and I found it quite rewarding.  So three cheers for learning new techniques!  

That's why I continue to take classes when I come to Paris - even though the topic/recipes may be something I've made before, there's always a tip or technique I come away with that makes my baking life a bit more enchanting. And so it goes.