Chocolate hazelnut torte

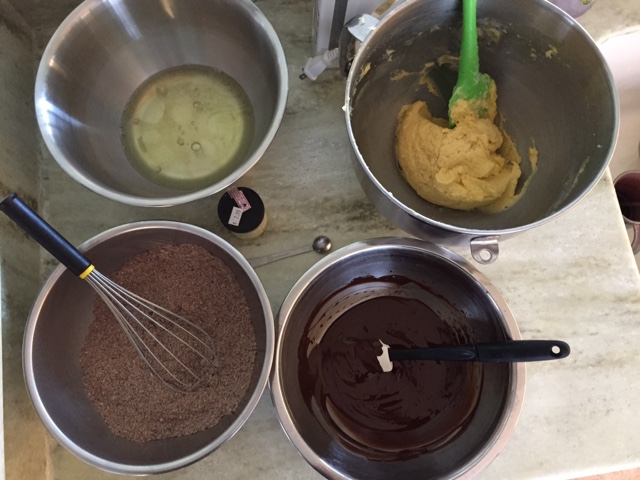
Get ready folks!  This one is a four bowl-er!!

A family supper at Mom's had me in the dessert planning mode again.  I recalled with fond memories this chocolate hazelnut number that I had made a couple of times at my shop in Pawtucket RI for the Saturday morning farmers market.  Definitely delicious and worth the extra effort to make.


It's very important to plan ahead and do your mise en place for this recipe - pan preparation, butter at room temperature, chopping and melting chocolate, dividing the sugar (pay attention to the recipe!) separating eggs and understanding all the steps of beating and mixing before the whole shebang goes into the pan and the oven.  

The ingredients:

227 g/8 oz unsalted butter, room temperature
215 g/1 cup sugar, divided, plus more for pan prep
227 g/8 oz bittersweet chocolate, chopped
175 g/1.25 cup hazelnut flour
35 g/0.25 cup all purpose flour
16 g/2 tablespoons unsweetened cocoa powder
1 teaspoon kosher salt
6 large eggs, separated
1 teaspoon vanilla extract
1/4 teaspoon cream of tartar

The process:

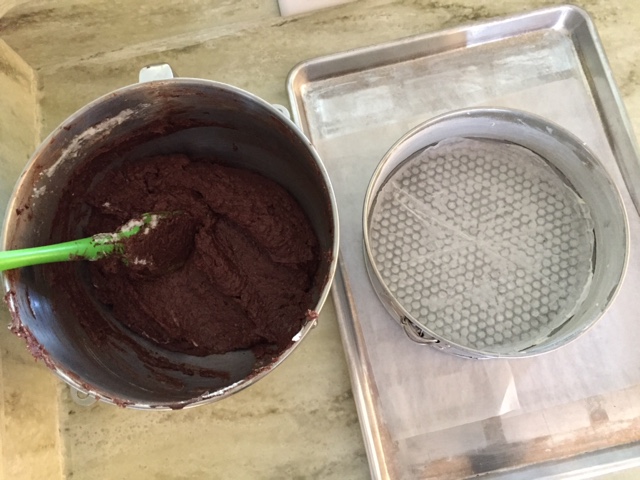
Heat the oven to 375ºF.  Butter a 9" springform pan, place a parchment round on the bottom, butter the parchment and sprinkle with sugar.

Melt the chopped bittersweet chocolate in a bowl over a bain marie, stirring periodically until smooth; remove from the bain marie and let cool slightly.

In a medium bowl whisk together the hazelnut flour, all purpose flour, cocoa powder, salt and 1/4 cup sugar.

In a mixer with the paddle attachment beat butter with 3/4 cup sugar until light and fluffy, about 3-4 minutes. 

Add egg yolks, one by one, blending in each addition before adding the next. Beat in vanilla.

Here are the four bowls at this point:


Blend in melted chocolate then gradually add in dry ingredients, mixing just until combined.

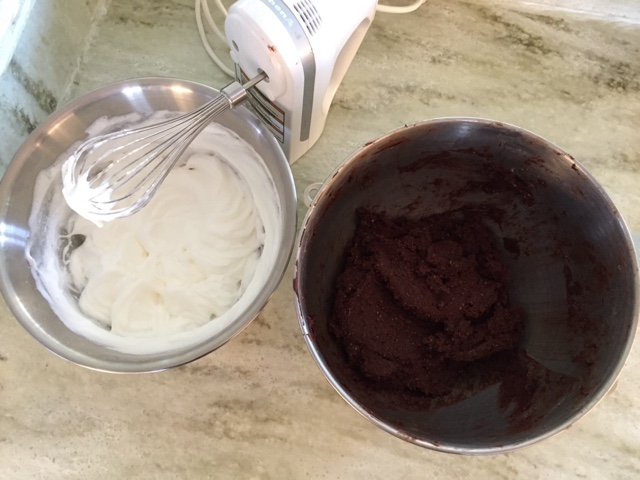
In a clean bowl with clean beaters or whisk attachment beat egg whites and cream of tartar to stiff peaks.

Now down to two bowls!


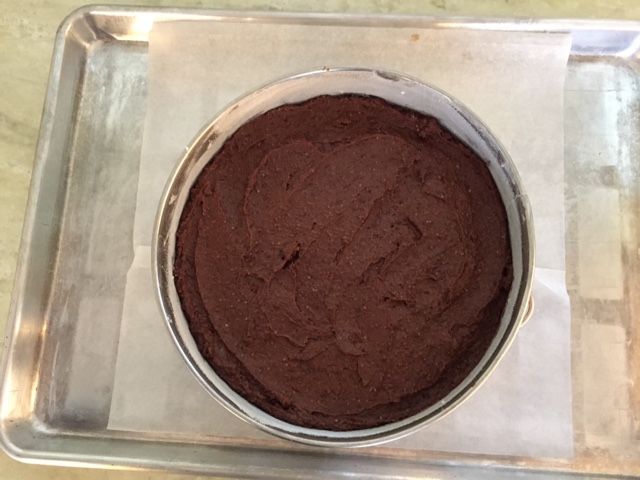
With a rubber spatula fold 1/3 of the whites into the chocolate batter to loosen it (NOTE: it can get pretty dense as the chocolate cools so don't dilly-dally!). Fold in the remaining whites just until combined.  Scrape the batter into the prepared pan.


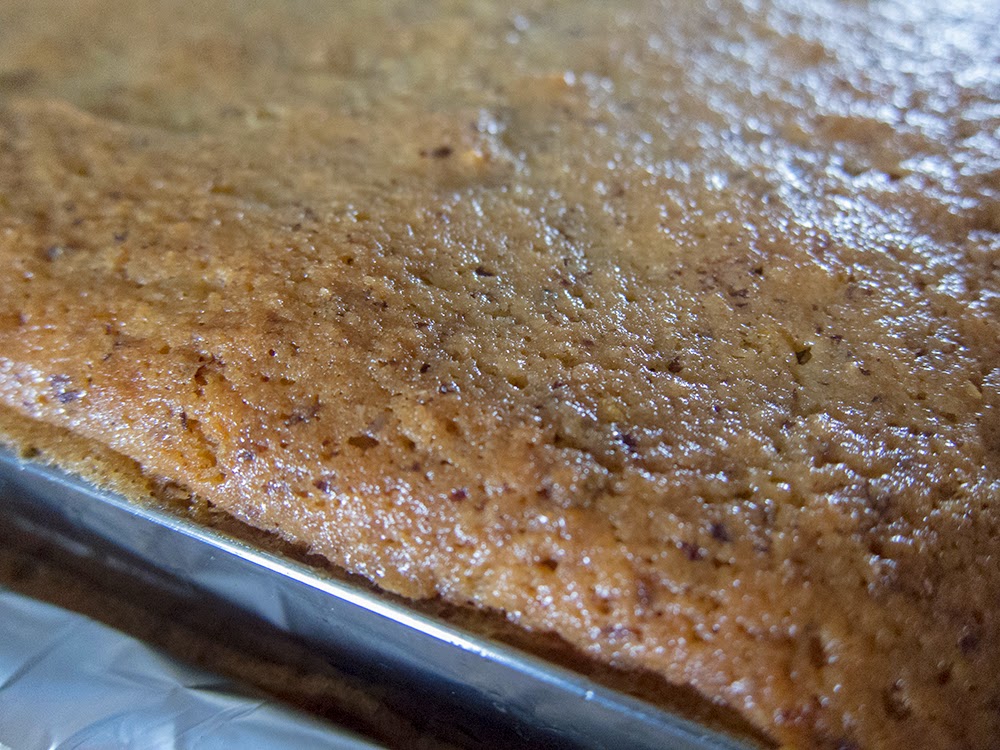
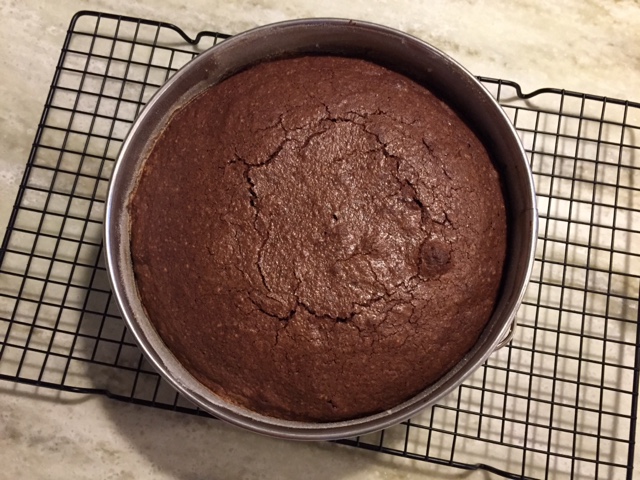
Bake for 20 minutes then reduce the oven temp to 350ºF and bake an additional 30-40 minutes.  The top should look dry and may crack a bit and a skewer inserted in the center should come out clean.


Let cool about 20 minutes then unmold and cool completely.

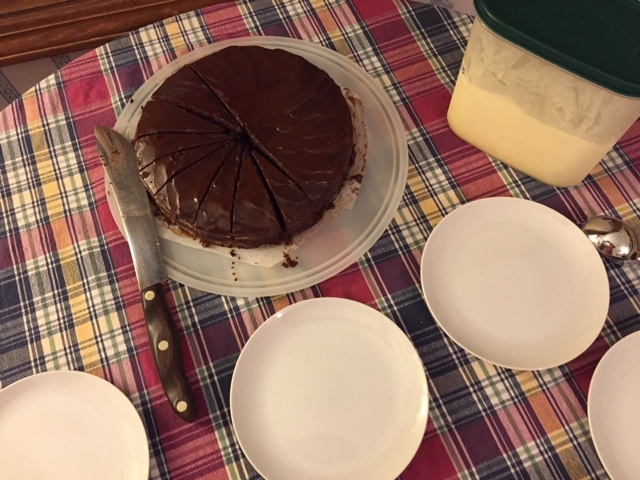
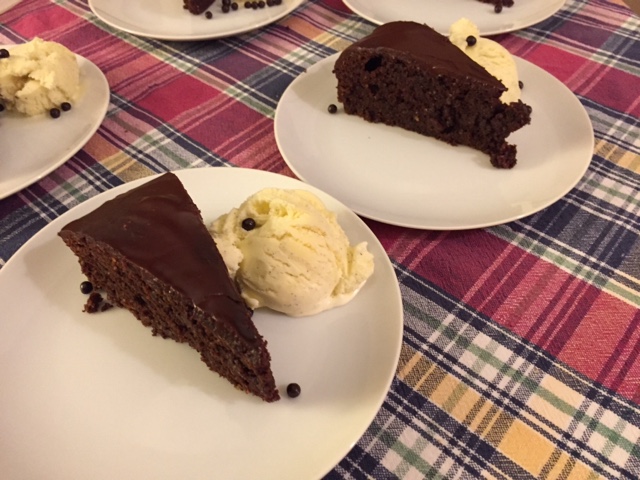
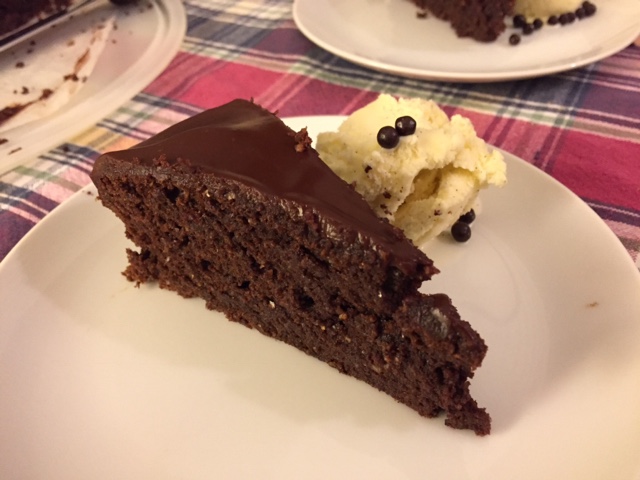
Once cooled I decided to glaze it with some leftover ganache I had in the fridge.  I gently warmed the ganache until spreadable and gave the top some cover.

Time for dessert!


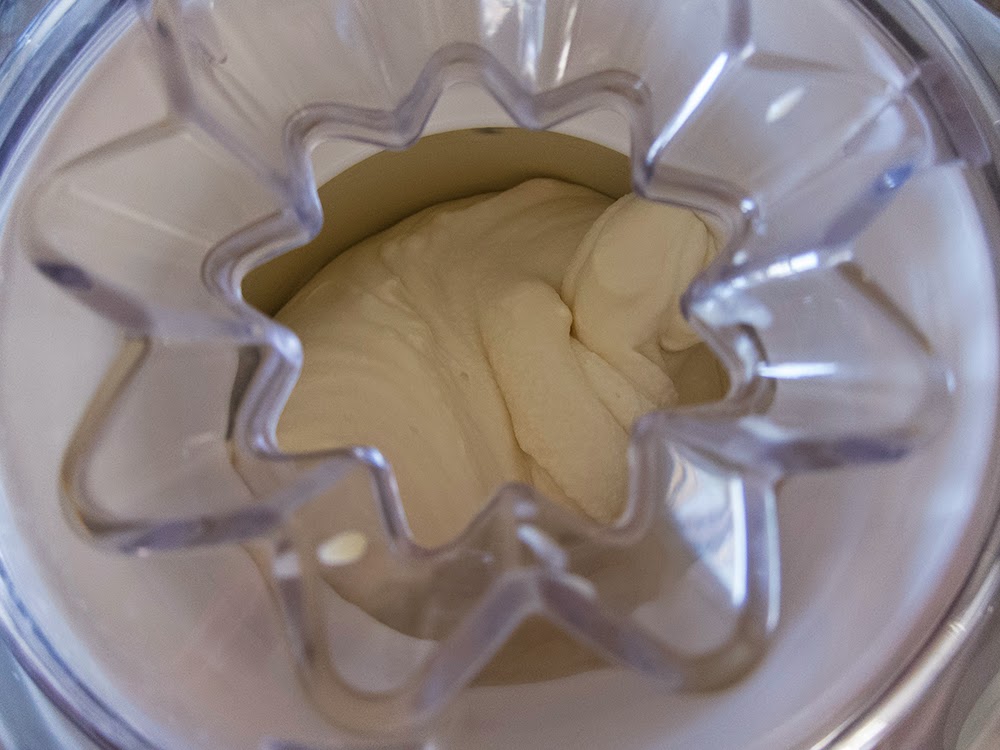
My vanilla ice cream fait à la maison, a narrow slice of heaven and a sprinkle of crisp chocolate pearls:


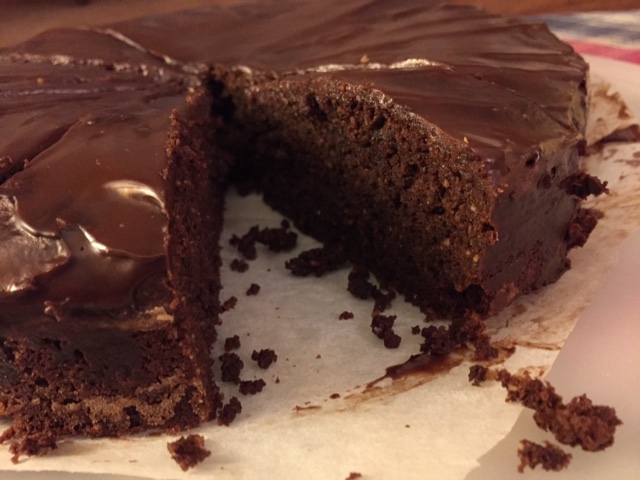
Smooth ganache, dense moist crumb, lovely chocolate-hazelnut balance, cool-creamy ice cream and just a little crunch thrown in.  Yes. 

Give it a try!

Moving, moving, moving and more hazelnut flour!

Wow - it seems like a long time since I've written about baking and delectable goodies!  I miss it but soon I'll be back in the saddle, as the old cowpokes say.

Steve and I are in the midst of our transition from Providence, RI to Grand Rapids, MI so my time spent in the kitchen has dropped pretty dramatically in recent weeks.  Yet . . .  I still have a few ingredients to use up, particularly the seemingly never ending supply of hazelnut flour in my freezer.

Soooooo - since we were planning on Memorial Day weekend supper at Dick and Dorothy's I developed a plan for dessert - the always popular pavé aux noisette, but this time with lime ice cream, blackberry sauce, fresh berries and toasted almonds.  YUM!

And, in addition, since making ice cream gives me egg whites to use up, I made a chocolate chunk hazelnut version of financier.  Delicious.


chocolate chunk hazelnut financier

hazelnut, lime, blackberry dessert

As the school year comes to a close and summer creeps up on us I suspect many of you will be spending more time out of doors and less time dealing with a hot oven.  It's only natural.

But for me, once we're settled in our new home (as yet to be determined), you can bet I'll be sharing my baking adventures with you.  Stay tuned!

Glace à la ricotta et macarons craquelé aux noisettes

Making ice cream at home is a special treat, and now that spring weather has finally appeared here in Providence, it seemed right to make a batch of creamy goodness.


Hurray!!

For those of you who aren't familiar with them, many basic home ice cream makers (lets call them ICMs) come with a special insulated canister that has to be frozen before use.  I like to pop it into the freezer at least 24 hours ahead of when I intend to use it - it has to be brrrrrr cold.

My first ICM (many moons ago) was a Donvier brand, hand-crank version that had a simple handle that fit into the top and required turning every few minutes over the 20-25 minutes it took for the ice cream base to firm up.  It was a work horse and delivered some delicious stuff, but, of course, I couldn't wander off when I was supposed to be turning the crank.  Then I moved up to (and continue to use) a Cuisinart electric version that plugs in, turns on and churns the mixture for you.  It's been great.

But enough about that.

I had a container of ricotta in my fridge that was just begging to be used.  After considering a ricotta cake of some sort, a little light bulb went on . . . .  how about ice cream?!

For some years now I've been using a basic ice cream base recipe from David Lebovitz - it's delicious and can be "doctored" to create whatever flavor you might want.  He describes a ricotta version of it in a 2014 post, and I decided to run with it.

The base calls for 5 egg yolks, which means there are egg whites to be used later!!  Time for some rustic macarons to go with that ricotta ice cream.  Yes indeed.

First the ice cream.

les ingredients

David's standard base calls for 2 cups of cream and 1 cup of whole milk, whereas this ricotta version calls for 1 cup of cream and 2 cups of whole milk ricotta.

Start by making a basic crème anglaise.  Have 5 egg yolks ready in a separate bowl.  Warm 1 cup heavy cream with 1/2 cup sugar and a pinch of salt just until you see small bubbles forming around the edges.  Temper the warm mixture into the egg yolks then return it all to medium heat.  Cook while whisking until little bubbles form around the edges and the mixture just begins to thicken.  Don't boil!

Strain into a clean bowl placed in an ice bath and let cool, whisking periodically.


Once the mixture has cooled blend in 2 cups ricotta (see note below), 1/4 cup honey and a teaspoon of vanilla.


A note about ricotta - store bought varieties tend to be grainy, so to smooth it out I whizz it in my small Salton processor for a few minutes.


before whizzing
after whizzing
Still a bit grainy but definitely smoother.

Pour the finished mixture into a covered container and refrigerate.  I like to make my base a day ahead of the actual processing step - it thickens and matures in the fridge.


cover and pop into the fridge

When ready to "spin" the ice cream (as they say in the biz), just pull the canister from the freezer, set up the ICM, stir a teaspoon of fresh lemon juice into the base mixture . . .


pour it in and turn 'er on!


and away we go!

In about 20 minutes it becomes a lovely, thickened, creamy ice cream.  Yes.


et voila!

Planning for the use of my 5 egg whites and continuing to pare down my supply of hazelnut flour, I decided to make a rustic version of macarons.  I have always found the classic French macaron process to be fussy and often frustrating, so I definitely prefer a more "rough and tumble" end product that doesn't have to be so pristine and perfect.

Some years ago, while I was in the thick of macaron making at Gracie's, I purchased Stéphane Glacier's book un amour de macaron.  


After paging through the options I chose to make a noisette version of macaron craquelé aux amandes to accompany the ricotta ice cream.


Let's go.


les ingredients

Egg whites mount better when warm so I weighed out my 150 gm and let them sit a while in the mixing bowl at room temp while preparing the other ingredients.

Weigh out 125 gm powdered sugar and 125 gm hazelnut flour and whisk them up, breaking up any lumps with your fingers (alternatively you can sift the two together to achieve the same goal).

Weigh out 42 gm sugar in a small bowl, have a pinch of salt and 3/4 teaspoon lemon juice ready (for the egg whites).

Whisk the whites with the salt and lemon juice on low-med speed until they start to get foamy.  Then add the sugar and whisk on high to softly firm peaks.


love those peaks

Blend the dry ingredients into the whites in two steps, gently folding until just incorporated.


ready to pipe

Since I wanted a finished base on which to scoop the ricotta ice cream I piped out approximately 3 inch rounds on one sheet pan . . .


and smaller rounds (that would later be sandwiched with chocolate) on a second pan.


Into the oven they go (350º for about 15 minutes) until lightly browned and set.


little cuties
The beauty of these goodies is they hold extremely well in the freezer.  I made them a couple of days ahead of serving, so into the freezer they went.

On the day that I planned to serve this dessert, I sandwiched the little ones with a chocolate glaze (113 gm chocolate and 42 gm butter melted together over a bain marie).


I wanted some additional crunch so I baked up some honeyed hazelnuts for garnish.


It's time for dessert!

The ice cream was pretty firm, so I had to soften it up a bit for scooping.  Into the bottom of the bowl went a macaron round, followed by the glace à la ricotta (which got a little softer than I intended) and then a mixed berry and crunchy honeyed hazelnut garnish.  A couple of dainty chocolate sandwiched macarons along side and the deed was done.


et voila!
Now I'll admit that I snuck a taste of the ice cream right after processing it and, while the flavor was good, the texture was a tad grainy.  But somehow it smoothed out after a rest in the freezer for a day or two.

The final verdict - deeeeelicious!  The combination of fruity, nutty, crunchy and creamy was superb.  Just goes to show ya that it never hurts to try something new.


Hazelnut flour and Easter dessert Part 1: planning and components

As Steve and I get closer to our move back to Grand Rapids, Michigan in a handful of weeks I'm working on using up some of the ingredients in my larder.  My current focus is hazelnut flour.

I'm able to buy nut flours (primarily almond and hazelnut) here in Providence from the Virginia and Spanish Peanut Company, but they sell them in minimum 5 pound portions.  I go through almond flour fast, but I end up freezing the bulk of the hazelnut flour for periodic use.  I still have 3 lbs or so on hand, so I've been working on recipes that will help me reduce my stash before the move.

The other day I held a tart class during which we baked a hazelnut version of sablé Breton, garnished with an orange-zested, white chocolate pastry cream and some nut crumble.  Boy, was that tasty!

Being on tap for dessert for Easter dinner at Dick and Dorothy's, I turned to the recipes from my spring 2009 professional entremets course at LCB Paris.


I opted for my version of an almond-lemon-raspberry number, focusing on hazelnut-orange-fruits rouge as my flavor profile.  There's still a hint of winter in this combo, but, since Easter is on the early side this year, I figured this would be a last nod to late winter's tastes.  And besides, the weather hasn't figured out that it's spring yet!

Many chefs, whether savory or sweet, will sketch out a dish/dessert for assembly or plating.  I certainly don't claim to be an artist, but it's kinda' fun to draw out what one has in mind for a layered dessert (takes me back to those grade school coloring days).  It's all part of the mise en place.
    
In this case I was looking for a cake/custard/fruity/nutty ensemble.  Gotta have those contrasts!  And the good news is the components can be made several days ahead and frozen before final assembly.


First I created two 16 cm square cake "pans" by wrapping these bottomless forms in foil.  My intention was to make my components in the same square shape in which I would assemble them.


On to the prep!


les ingredients pour le pavé

For the pavé aux noisette blend 95 gm soft butter, 150 gm sugar, 2 gm salt and the zest of an orange.  Add half of 200 gm egg, then half of 190 gm ground hazelnuts; finish with remaining egg and ground hazelnuts, blending to smooth.


before the egg white addition

Whisk 100 gm egg white with 30 gm sugar to medium firm peaks . . .


and fold them into the butter/sugar/egg/nut mixture. 


finished batter

Butter the foil, divide the batter between the two forms . . .


ready for the oven

and bake at 375º for about 25 minutes (should look nicely browned and feel firmly spongy in the center).


nice!

Once the cakes cool, remove them from the molds, wrap and hold 1-2 days at room temp or up to 2 weeks in the freezer (the day before assembly place them in the fridge to thaw).

For the vanilla bean ricotta custard . . . .


les ingredients

blend 354 gm cream cheese, 177 gm ricotta, 112 gm sugar and the seeds scraped from one vanilla bean until smooth; blend in 2 eggs and 1 white, followed by 177 gm heavy cream until incorporated.  Pour into your chosen pan or ramekins.

I baked these in the same foil wrapped 16 cm square forms, placed in a water bath.  Steve was tickled that I had leftover custard to fill a handful of small ramekins to boot!


Bake at 300º for about 30 minutes until set.


Once the custard had cooled I put it in the freezer for 30 minutes or so, during which I made a mixed fruit coulis using IQF berries and cherries.


Thaw, puree and strain 227 gm/8 oz frozen fruit (yield 150 gm).  Warm the puree, add 20 gm sugar to dissolve, and whisk in 3 gm of bloomed sheet gelatin (softened in ice water and squeezed out).  Let the mixture cool a bit.

I poured it over one of the chilled custard squares, spreading evenly . . . .


and topped it with hazelnut/almond crumble, pressing it in gently.


Putting the crumble on the still liquid coulis and then into the freezer helps set the layers and keep them together for the final assembly.  The crumble will ultimately become the center layer of my creation (let's hope!)

Next up - final assembly and tasting!

Stay tuned.