Chocolate babka buns

3B564E9B-75EC-46B6-BE88-1E49DA77C0B2_1_201_a.jpeg

These are NOT the prettiest pastry in the case BUT! They are dee-licious. Mmmmmm!!

I was on a mental chocolate bun kick, trying to decide what chocolate-y goodness I might create for “Pastry Friday” at a nearby assisted/independent living facility. Thinking of something twisty or swirled, babka came to mind as the basic idea but this time in individual bun form.

I wrote a series of babka posts during the spring of 2017 but haven’t returned to that particular pastry for awhile now. It’s time.

I had a chocolate babka recipe in my files from Sur La Table teaching days - it was one we never ended up making in class, but I saved it nonetheless. The filling looked very intriguing but different from other filling iterations I’ve seen. The ingredient portions had me wondering so I went to the “trusty” internet to google “best chocolate babka filling”. And what to my wondering eyes did appear? A NYT article/recipe on chocolate babka by Melissa Clark that was EXACTLY the same as this particular SLT version. My oh my, how intriguing is that?

At any rate, I decided to go for it and go for it I did.

The dough is a brioche like number that gets a first rise and then an overnight in the fridge - gotta develop that flavor! Compared to my usual brioche recipe in which I keep ingredients cold, Melissa’s is less enriched with half the milk (slightly warmed), one less egg and about half the butter (egg and butter at room temperature.) Vanilla and nutmeg add some wonderful flavor too.

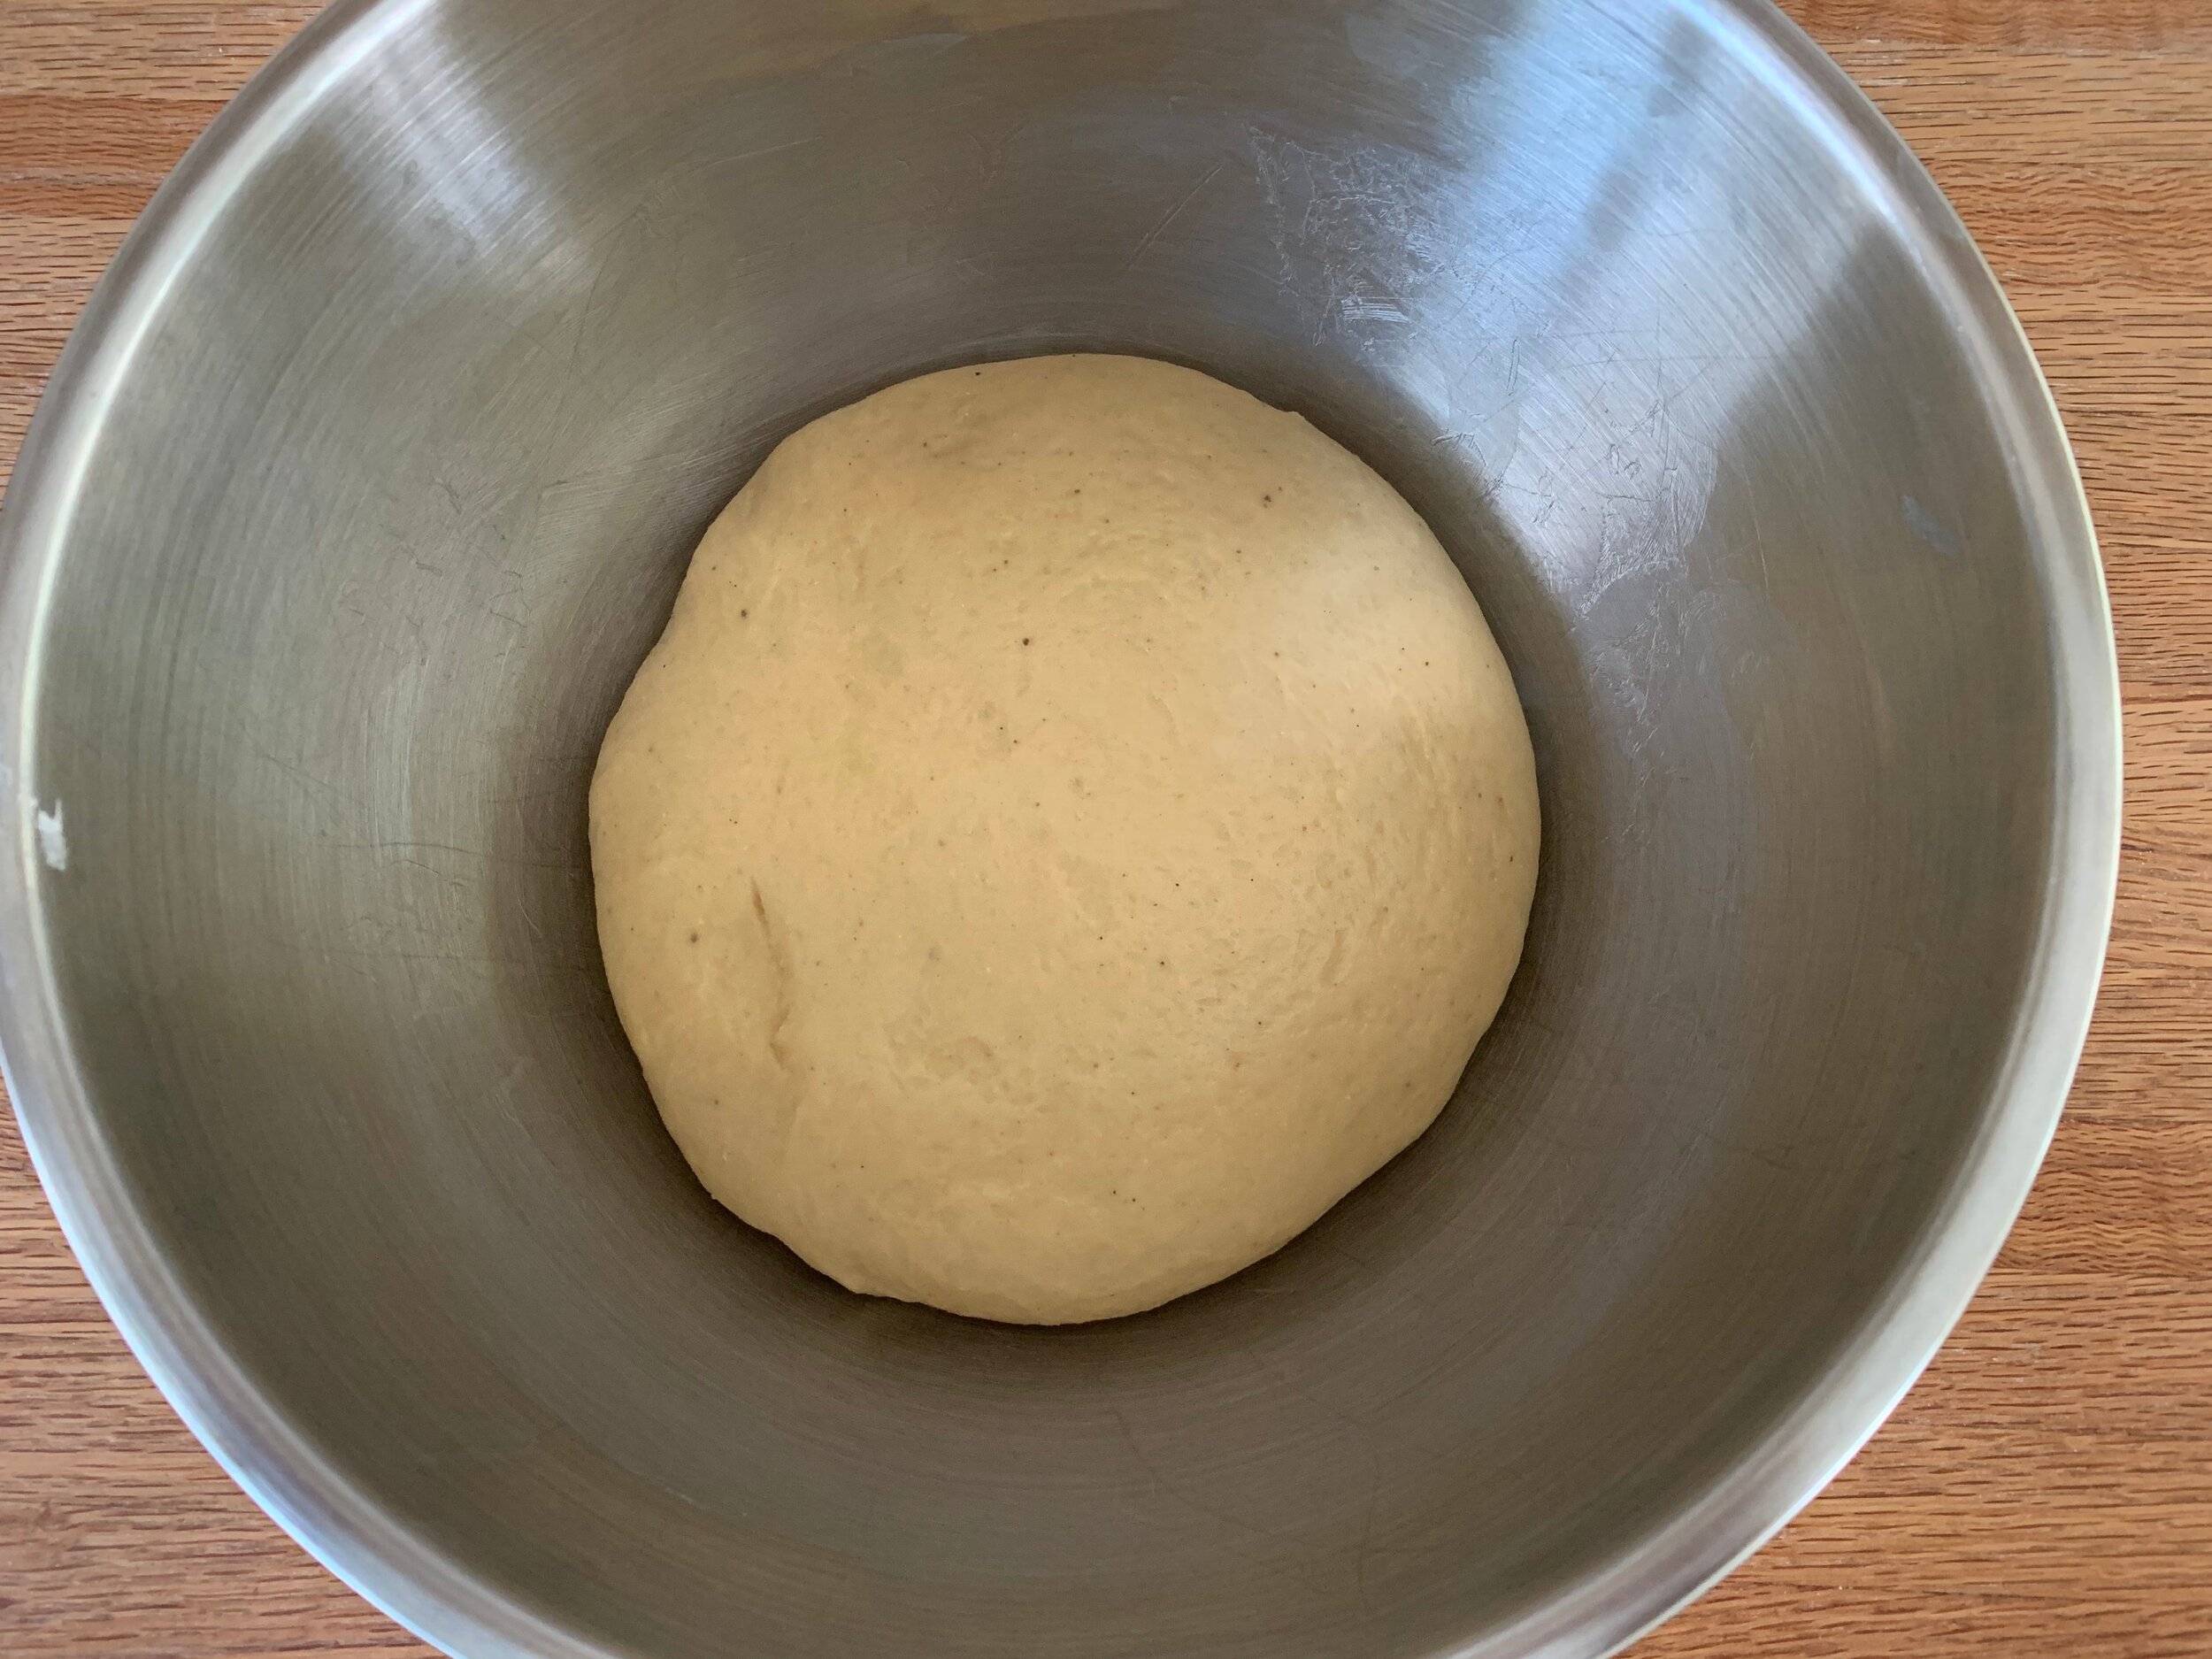
Here’s the dough after initial mixing;

A513BC37-F037-4D25-9B93-C37CF3F182F5_1_201_a.jpeg

and after a 2 hour rise.

43BEF7DB-6207-48A4-A33C-DBCC08485C79_1_201_a.jpeg

Gently deflate, form a ball then wrap and refrigerate overnight.

3F21B2CB-C431-4C9C-9ABE-16A2E407B833_1_201_a.jpeg

There are three more things that have to be prepared for assembly and final garnishing. They can all be prepared the day before and refrigerated, but I found it easiest to do it the day of baking.

The filling is fudge-y and oh so tasty. Make it 30 or 40 minutes ahead of taking the dough out of the fridge, since it has to set up a bit to make it perfectly spreadable. I reduced the sugar in Melissa’s recipe from 100 g to 50 g. Here’s how it goes: medium saucepan; 50 g sugar, 180 ml heavy cream, pinch kosher salt; simmer, stirring on and off for 5 minutes to dissolve sugar; scrape into a bowl and blend in 170 g chopped dark chocolate (66% is nice), 113 g unsalted butter (cubed and at room temp) and 2 teaspoons vanilla extract until smooth; cool to room temp.

The chocolate streusel is for final garnishing just before the bake so you can put that together easily during the proof. Here’s how it goes: stir 60 g all purpose flour (or whole wheat pastry if you have some), 45 g granulated sugar, 11 g cocoa powder (Dutch processed is my go to) and 1/2 teaspoon kosher salt together in a bowl; stir in 64 g melted butter with a fork to form large moist clumps. Melissa adds 50 g mini chocolate chips too but I left those out. Set aside.

Next is a simple syrup that will be brushed on after the bake. Here’s how it goes: combine 2/3 cup granulated sugar with 2/3 cup water in a small saucepan; bring to a simmer and simmer a few minutes to dissolve the sugar. Set aside.

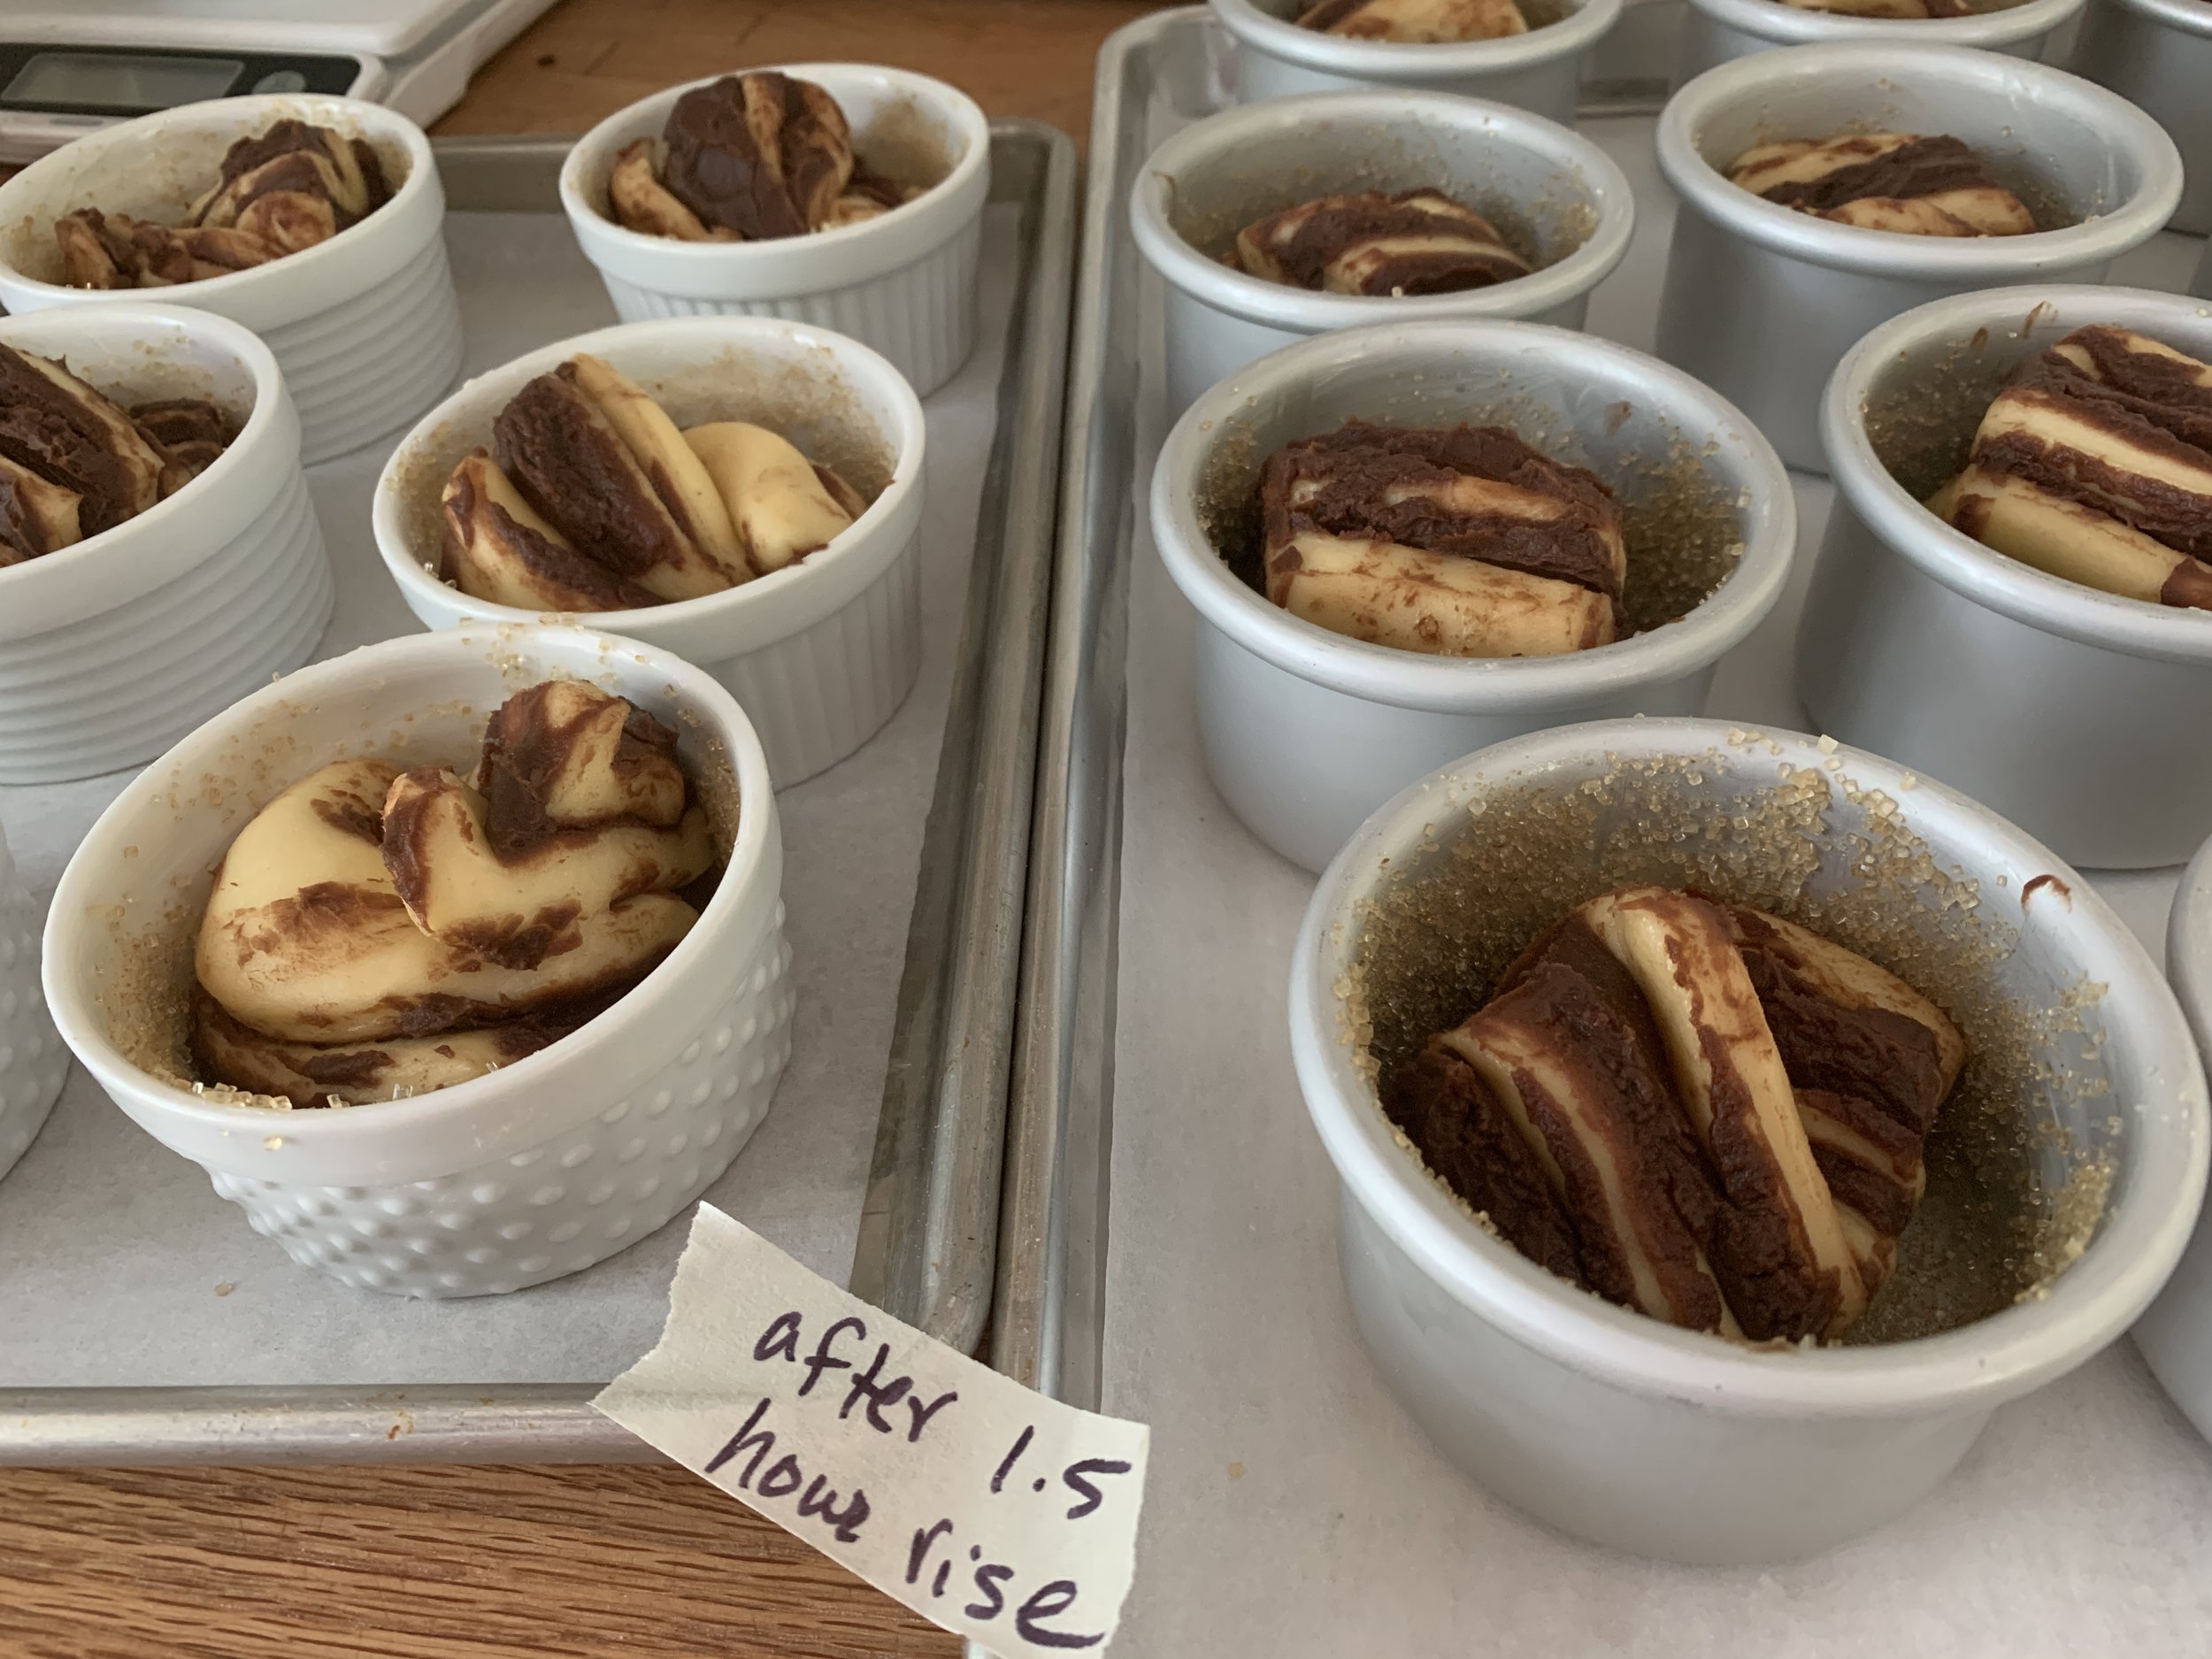
When ready to proceed with roll out and assembly, remove the dough from the fridge and divide it in half (it won’t have risen much). Going for a yield of 18 portions, I had my 3” Fat Daddio cake pans buttered and coated with raw sugar standing by. P.S. I have only 12 Fat Daddio pans and used 6 ramekins in addition.

4EAB6249-6954-4053-AA40-E50A18694B61.jpeg

The next few steps are the same as if you were making classic babka in loaf pans. Work with one half at a time, keeping the other half in the fridge until ready.

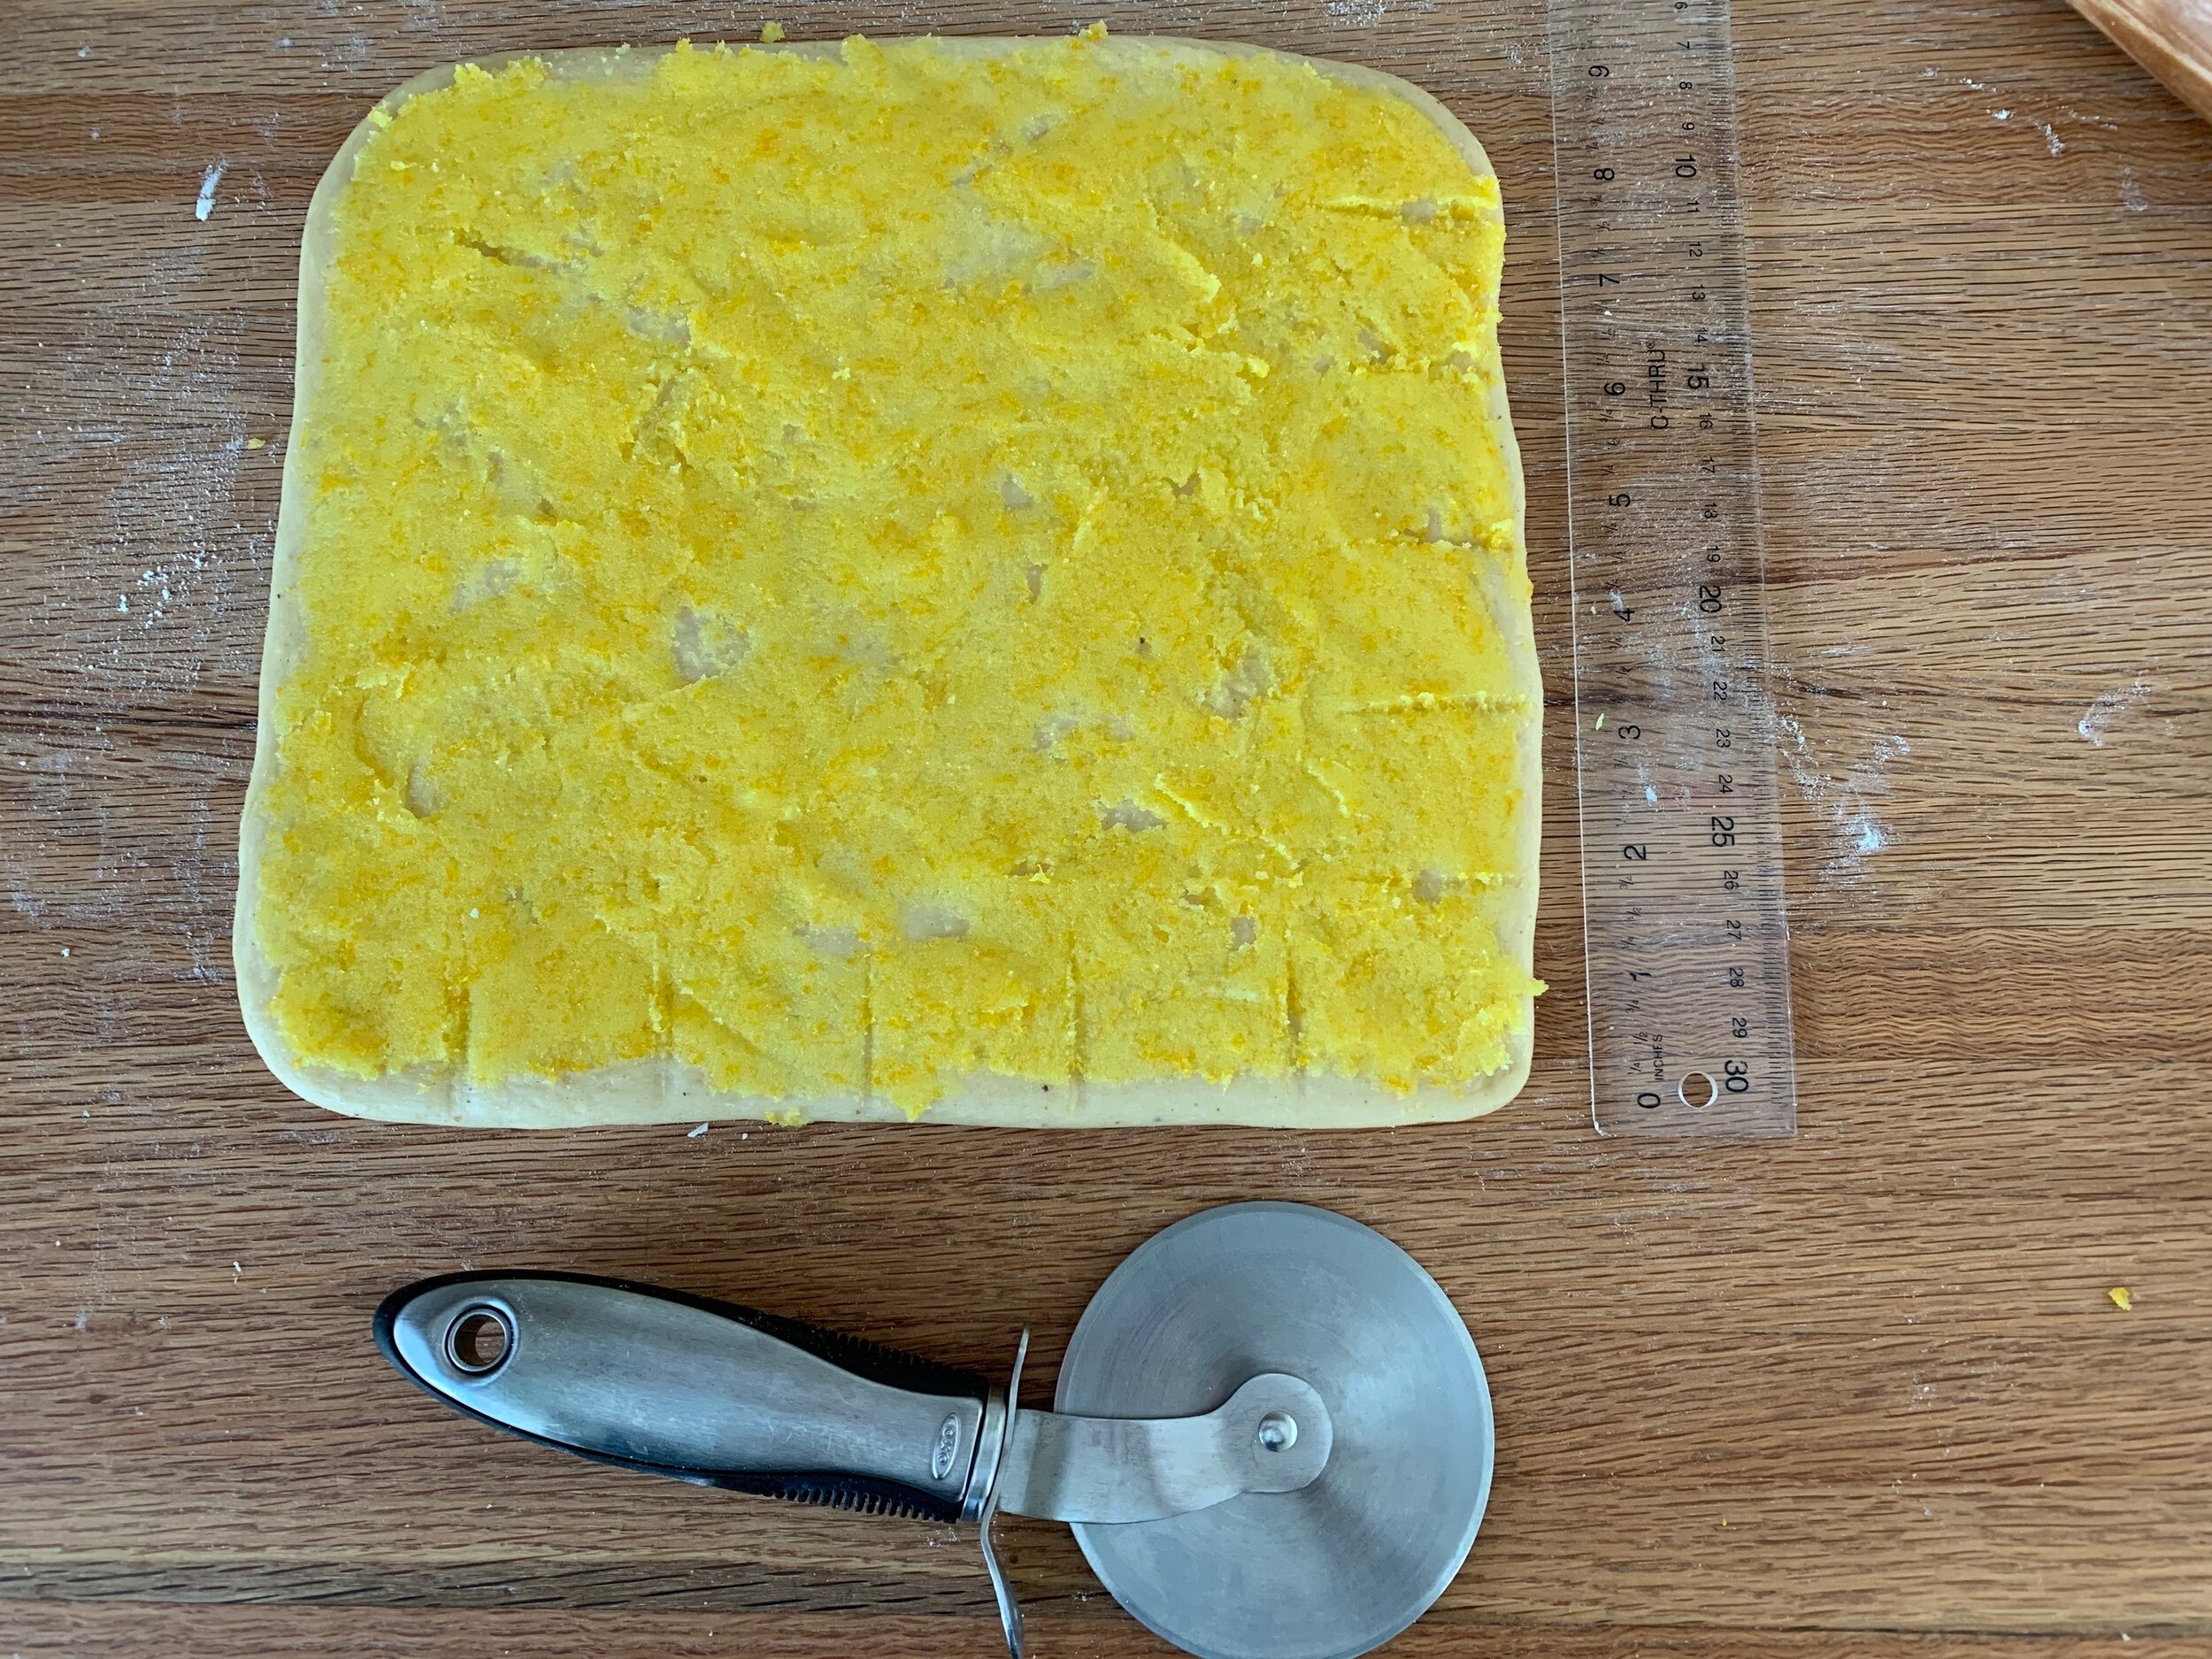
Roll each half into a 9”x18” rectangle.

2D5509E8-3C5A-41A2-BF50-7B12EEA493C3_1_201_a.jpeg

Spread half the chocolate fudge mixture on each. Heaven.

15A3A31A-1E42-4C95-9CF4-E241AECC8A94_1_201_a.jpeg

Roll into a tight coil then place on parchment and into the freezer for 15 minutes or so.

Rolling, rolling, rolling . . .

Rolling, rolling, rolling . . .

Place the chilled log on your work surface, seam side down, and slit it right down the middle, turning the pieces outward to expose the filling. I used my trusty bench scraper.

6C393F37-46FB-4700-A98C-01C3211816D2_1_201_a.jpeg

Now twist the 2 pieces around each other, keeping the filling facing up.

I gave the twist a good final snugging up before dividing.

Here’s where I veer away from the classic loaf babka. I cut each twist into nine 2” lengths for a total yield of 18 portions. Tuck each piece into the prepared pans.

Cover with lightly buttered film wrap and let rise for 1 to 1.5 hours. At about an hour in, heat the oven to 350ºF.

They won’t achieve a significant doming and filling the pan type of rise but you should appreciate puffiness.

Just before going into the oven, divide the streusel over the tops of the buns using a fork and your fingers to separate clumps a bit.

Bake about 20-25 minutes, rotating the trays half way through. NOTE: if you’re making two full size loaf babkas, baking time is 40-50 minutes.

I look for browning of the dough edges and a tester coming out clean. It’s a bit messy with the chocolate and streusel so aim the tester into dough (rather than chocolate goo) as much as possible.

Just out of the oven, brush with simple syrup as best you can. The streusel and chocolate on top makes it a bit tricky, but I tried to focus the syrup on the obvious browned dough edges.

Let sit about 10 minutes then ease out of the pans/ramekins with a small offset spatula, running it around the edges to loosen the crunchy bits.

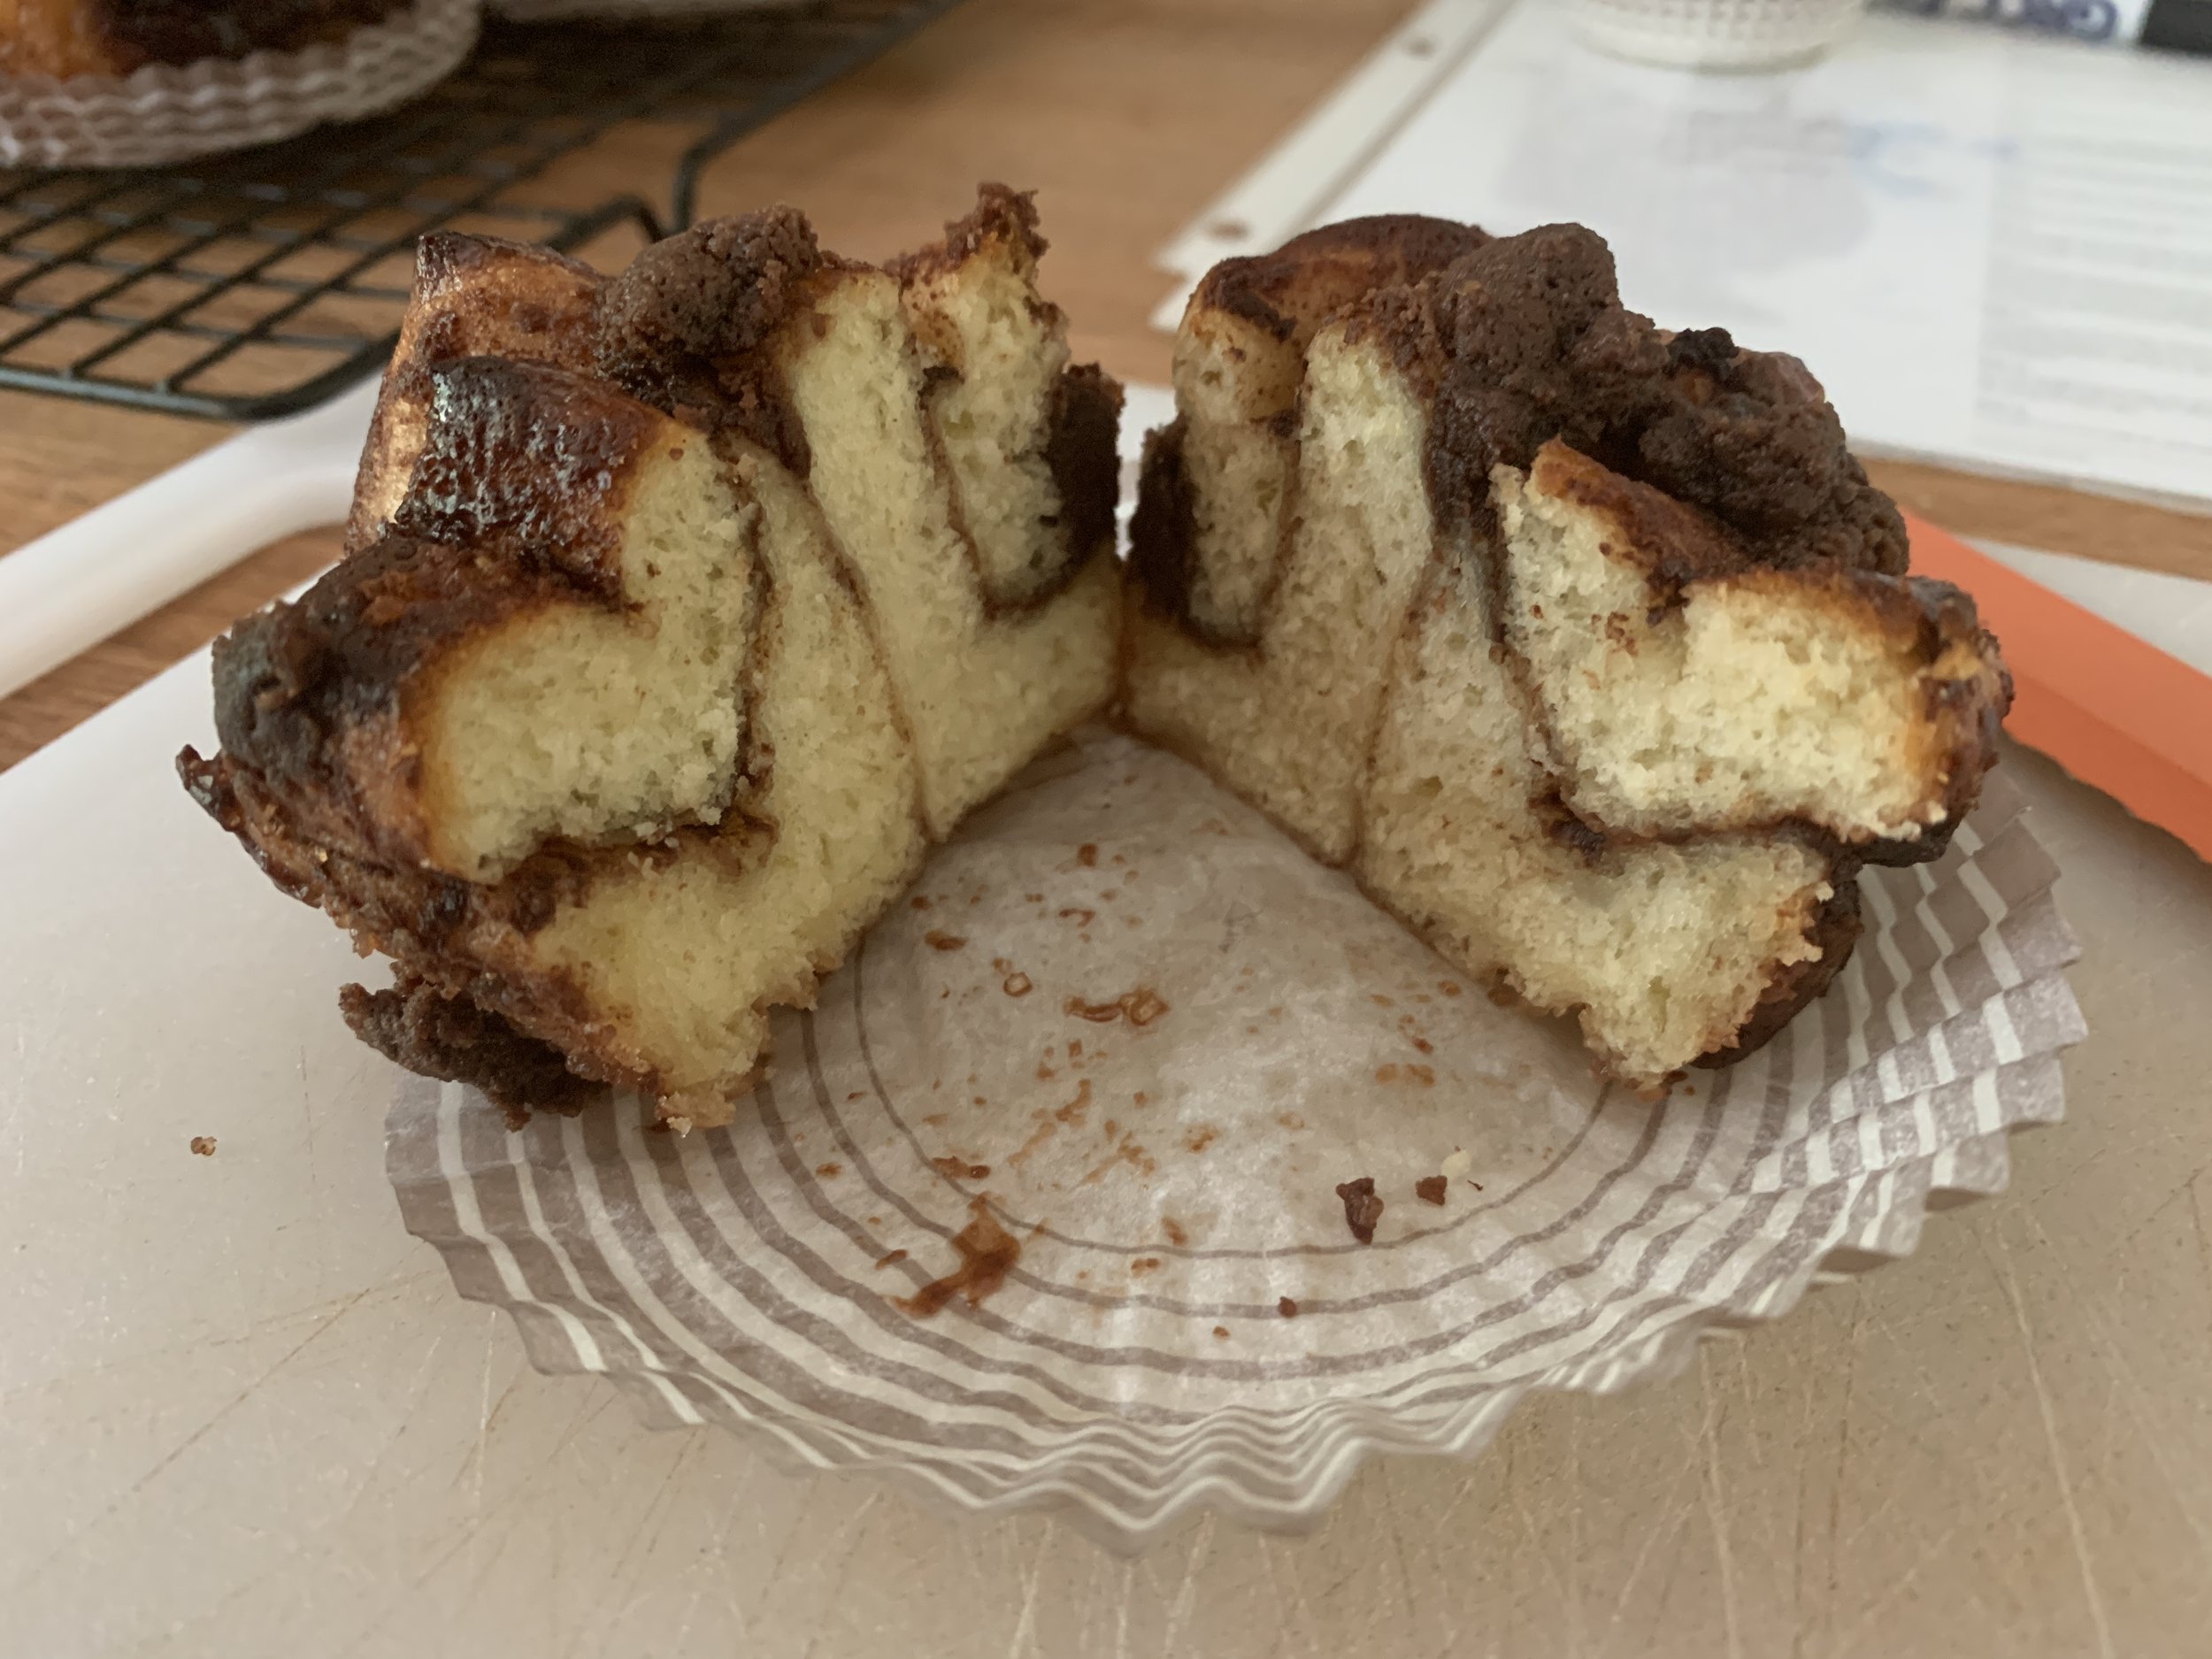
At first I was afraid these would fall apart like a pull-apart roll but as I gently released them and placed them on a cooling grid, they held their shape just fine.

Once fully cooled they maintained their integrity very nicely. Whew!

Taste test time!!

Based on the exterior appearance, I thought I’d find more chocolate inside. Not so, but the subtle swirls in the oh so tenderly textured dough, the hint of saltiness in the streusel and the all around delicious flavor of the whole are a winner in my book - and Steve agrees!!

You can use the same approach with your own favorite brioche or cinnamon roll type dough. Just go for it!

Meanwhile, autumn colors are finally appearing much later than usual. Here are a few images from some of the colorful inside displays at nearby Meijer Gardens.

Enjoy and I’ll “see” you next time around.

Orange pecan crumble pull apart rolls

IMG_0225.JPG

This one is great fun! Add some spices to your favorite sweet roll dough, let it rise, roll it out, spread with an orange zesty sugar/butter filling, cut it into squares and create your own pull-apart shapes. Top it off with a nutty pecan crumble and you’ll be happy you did!

The dough I used is easy to work with, soft and pillowy and quite delicious. The yield is either 7 or 9 rolls depending on how many squares of dough you use per roll to create your version (as you’ll see coming up). Note - the images below show ingredients and steps for my base recipe test batch with a 9 roll yield.

IMG_0158.jpg

Base recipe: put 120 ml / 1/2 cup whole milk in a microwaveable container (a 2 cup Pyrex measurer works well here), heat just to boiling then add 56 g / 2 ounces cubed, unsalted butter to the milk. Stir to melt the butter and let the mixture cool to tepid ( ~105ºF).

Now add 1 lightly beaten large egg and 1 tablespoon vanilla extract to the milk/butter mixture and keep it on standby.

In the bowl of a stand mixer combine 130 g / 1 cup all purpose flour, 130 g / 1 cup bread flour, 50 g / 1/4 cup packed light brown sugar, 5 g active dry or instant yeast, 1/2 teaspoon kosher salt, 1/2 teaspoon ground coriander, 1/4 teaspoon ground ginger, a pinch (or more to taste) of cinnamon and, in my case, I threw in some vanilla powder that I had made by grinding down and sifting some dried vanilla beans. Even though there’s vanilla extract in the dough, I figured a dash or two of the powder would only enhance the flavor.

Stir in the milk mixture and mix with either the paddle or a large spatula or wooden spoon until combined.

Fit the mixer with the dough hook and knead on low speed for about 6-7 minutes until smooth and elastic. Or knead by hand for about 12-14 minutes.

Place the dough in a lightly buttered bowl . . . .

IMG_0163.JPG

cover with plastic wrap and let rise for anywhere from 45 minutes to a couple of hours depending on the ambience of your room. You’re looking for about double in size.

IMG_0164.jpg

While the dough is rising make the filling by blending 66 g / 1/3 cup sugar, 2 tablespoons orange zest, 1/4 teaspoon kosher salt and 42 g / 3 tablespoons soft unsalted butter.

IMG_0165.jpg

For this test batch I wasn’t sure what pan/form would be best for what I had in mind, so I did some comparisons with standard muffin tin, individual cake pan and panettone paper.

Turn the dough out onto a lightly floured surface, gently de-gas then roll it out to a 9”x9” square. Spread the filling over it then cut into thirty-six 1.5” squares.

IMG_0167.JPG
IMG_0168.jpg
IMG_0169.JPG

Stack 4 squares together (for a yield of nine rolls) and tuck ‘em into buttered and sugared pans (FYI - no need to butter and sugar the panettone paper).

IMG_0170.jpg

Cover loosely with plastic wrap and let them rise for about an hour. About 30 minutes before you plan to bake, heat the oven to 375ºF.

Top with pecan crumble before baking.

Note: for the crumble combine 60 g all purpose flour, 60 g sugar and 60 g cold, diced butter. Sand the butter into the dry ingredients to achieve coarse crumbs and add in anywhere from 30 - 60 g toasted, then chopped pecans, depending on how nutty you like your topping. I usually double or triple any crumble I make so I can stash the rest in the freezer for another time. Nothing like planning ahead.

IMG_0176.jpg

Bake from 20-25 minutes until golden brown.

Each form yielded a slightly different end result. Not being rigid, the panettone paper roll skewed into an oblong pull apart, while the individual cake pan held the dough nicely in place.

IMG_0186.jpg

The standard muffin tin, being more shallow than the cake pan, allowed for more rising and flaring out of the dough, kind of like one of those wide curved balloon-y kind of kites that billow out into a big, rippled rectangle.

IMG_0191.jpg

Once out of the pan, they almost pulled themselves apart!

IMG_0190.JPG

The taste test received a big thumbs up from both Steve and myself, and I knew I wanted to make these again.

This time I doubled the dough batch (here’s the recipe PDF) and rolled out each HALF of the dough into the 9”x9” square, spread on the filling and cut the thirty-six 1.5” squares. NOTE: I found it easier to work with the 9” square portions then a full double batch of dough.

I had done a bit of calculating and decided to use 5 pieces for each pull apart (for a yield of 7 rolls per dough half or a total of 14), arranging them more as a flower than a rectangular stack. I buttered and sugared my individual cake pans and tucked the pieces in an overlapping, rough swirl fashion. Having a couple of extra squares of dough, I tucked those in where they seemed to be most needed.

Since I own only 12 of the aluminum Fat Daddio cake pans (which I LOVE!), I used 2 ramekins to fill the bill.

IMG_0207.JPG

After the rise they also received the pecan crumble top . . . .

IMG_0219.JPG

and baked up like a dream.

IMG_0221.jpg

After 5-10 minutes of cool time I gently loosened the edges with an offset spatula and popped them out onto a wire rack to finish cooling.

IMG_0225.JPG

Boy are these babies good! I made these as part of a pastry assortment for a neighbor’s Saturday morning gathering, and the followup reports were A+. Steve and I enjoyed some of the extras, plus a few went into the freezer for later. They kept well for a day or two in a covered container and were even better with a few minutes warm up in a 325º oven.

Love that pull-apart feature! I’m already planning another round soon.

In the meantime Steve and I are wishing everyone calm days and peaceful nights as we continue to try to understand what’s happening in our world day by day.

IMG_0227.JPG