Laminated pastries - what fun you can have!

I love both the process of making laminated dough as well as the variety of treats one can create with it. Through the summer months I don’t do much in that particular realm (just doesn’t seem quite right), but once autumn/early winter rolls around, it’s a new ball game folks!

Of course the standards are always on the table, my favorites being croissants, pain au chocolat, and croissant aux amandes. It’s often when I have a croissant class coming up (as I did in November), that I start making completed dough as well as portions of detrempe with which the students can work. They leave class with fresh croissants (and sometimes pain au chocolat) plus their own half batch of completed dough to play with at home.

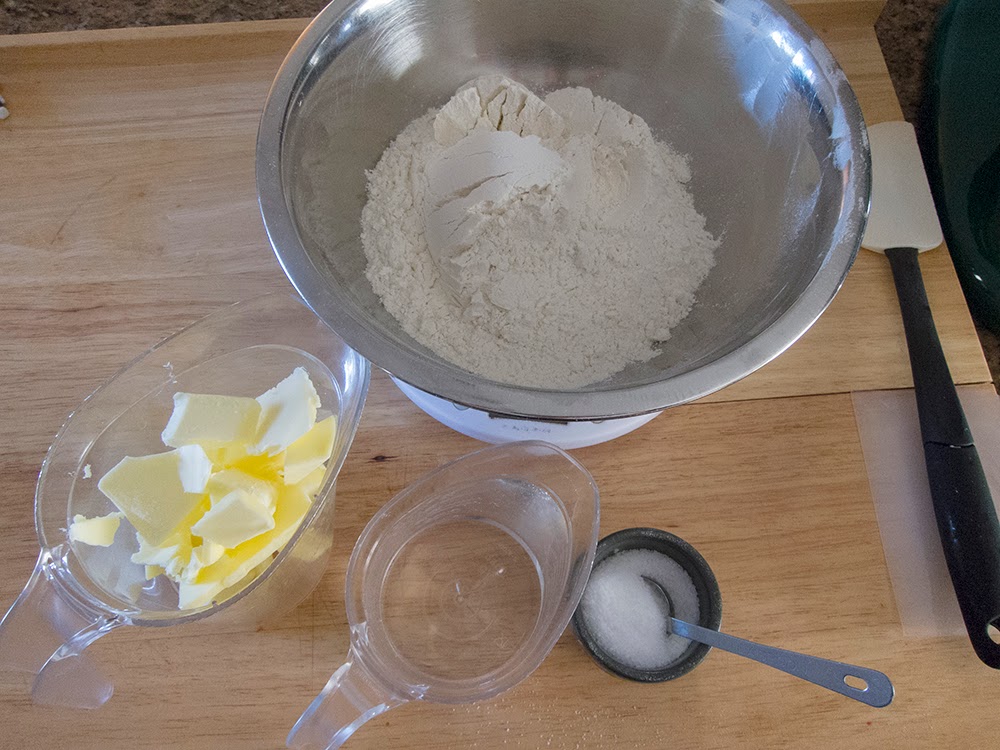
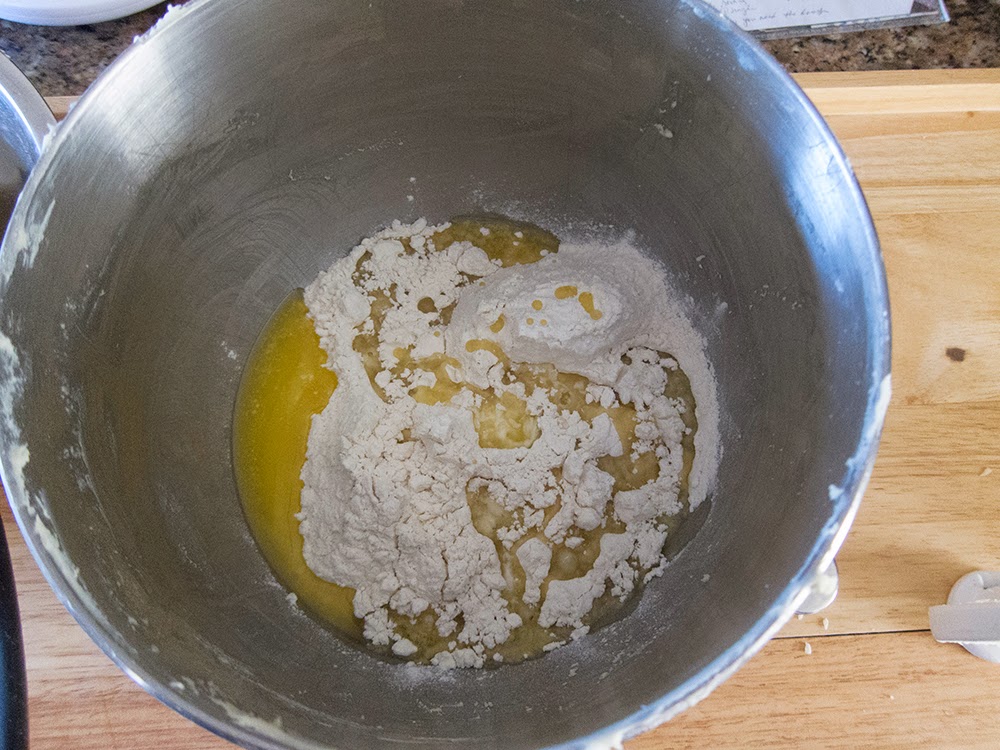
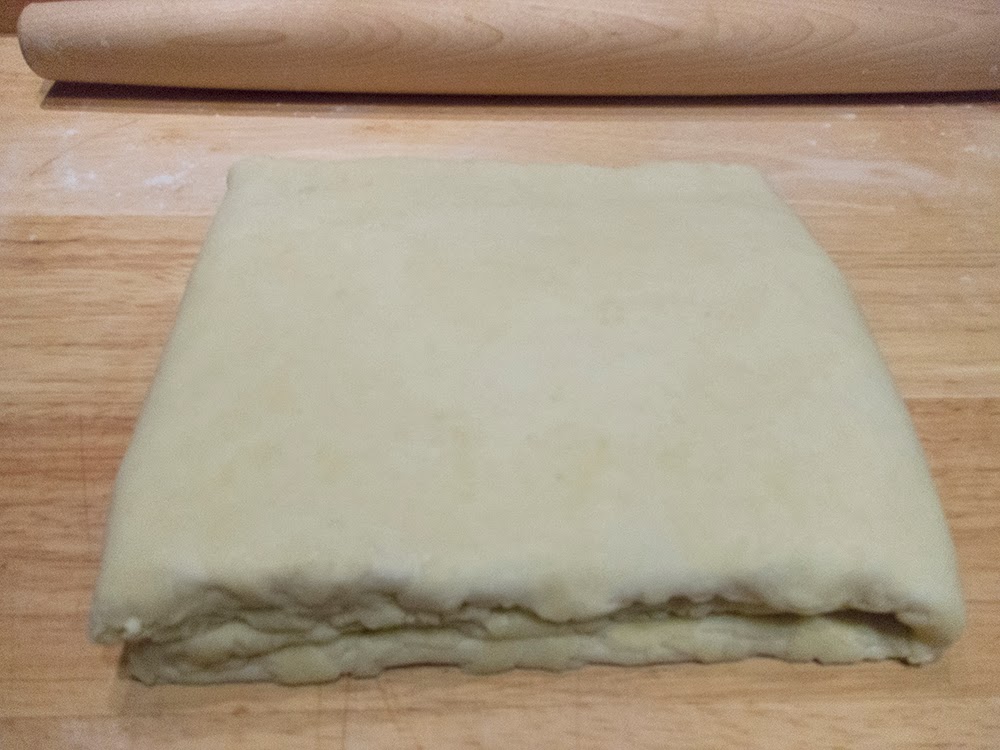
Here’s my standard croissant dough recipe. For those of you familiar with the process, I’ve been playing around with the folding steps. I was taught in pastry school (whoa - going on 20 years ago!) that croissant dough is put through three 3-folds (also referred to as business letter folds). For awhile now I’ve been doing a 4-fold (or book fold) and a 3-fold and calling it good. But lately I’ve added a 2-fold at the end of that process. I like the way the layers come out. Don’t be afraid to play around with it.

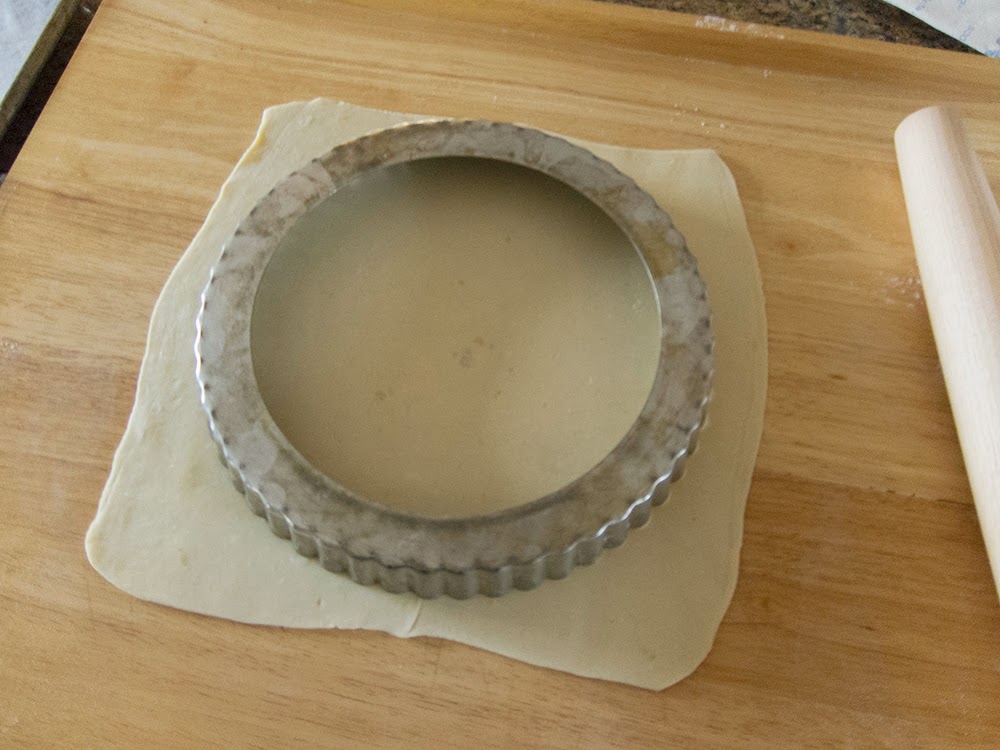
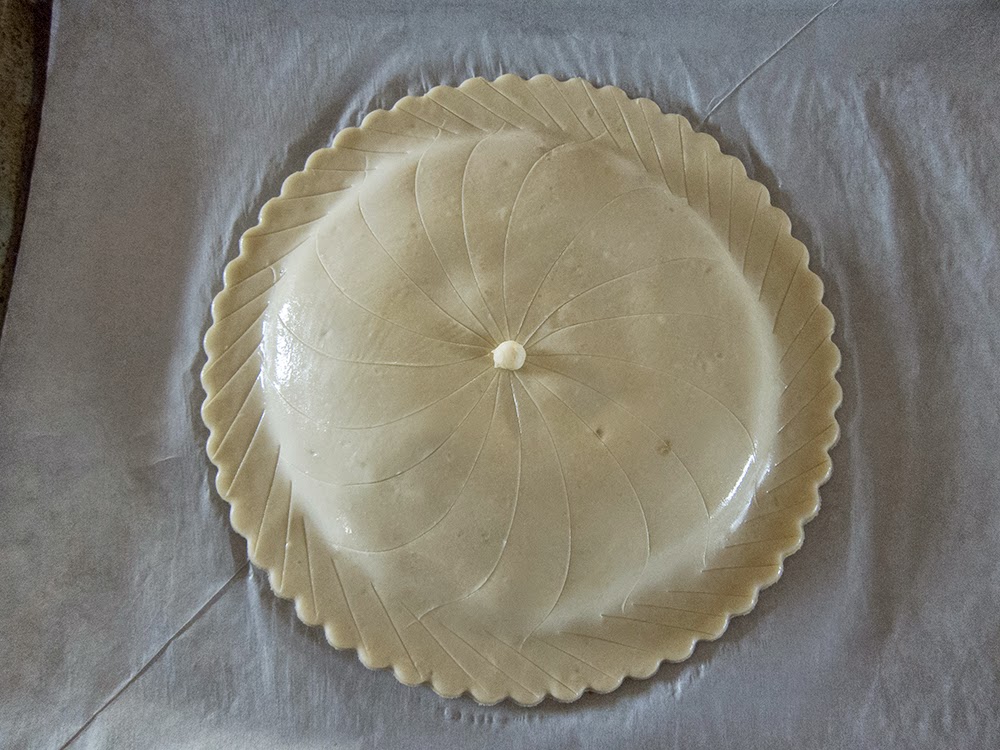
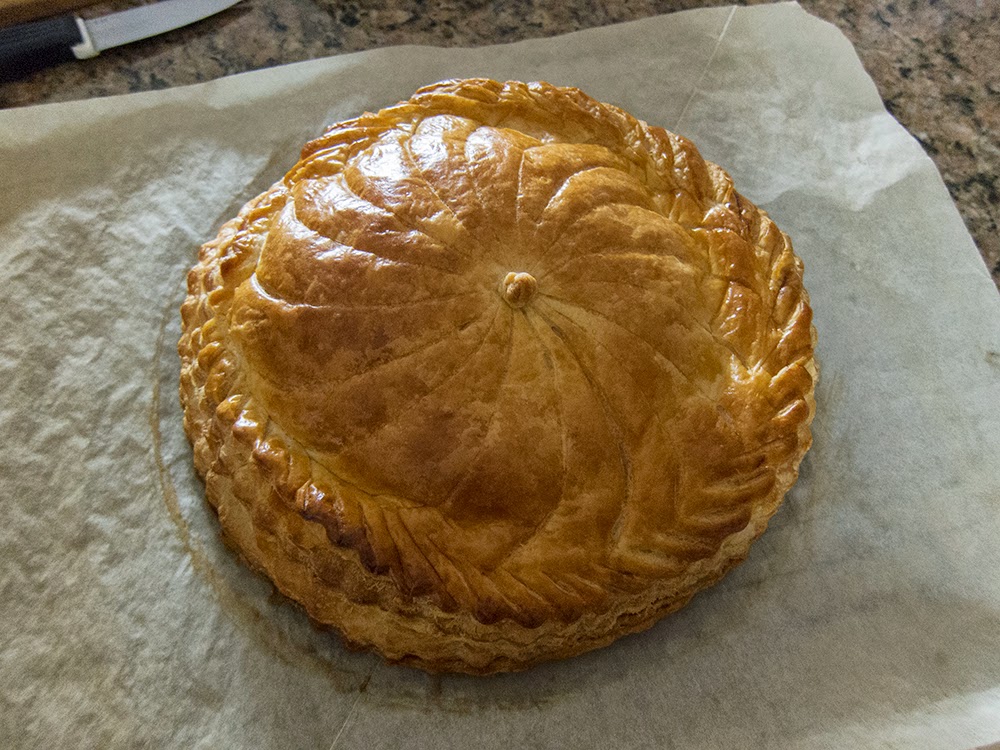
A past project - looking good!

As a result of preparing for the class, I was left with some 1/2 portions of dough in my freezer (never hurts to make extra!). It was definitely time to use those babies up. NOTE: yeasted dough can be frozen, but it’s best to use it within 4 weeks or so. Much longer and the yeast sort of dumbs down and the rise isn’t as good.

As some of you may realize by now, I prefer my treats in smaller portions - you know that “everything in moderation” mantra I swear by. I aimed for three different laminated pastries, each version made using a half portion of completed dough.

Technical steps coming up!

For this project I initially intended to veer away from the standards (like pain au chocolat) but since I have a stash of chocolate batons on hand, I thought it best to use some of those for one of the three versions. For the other two I chose classic “Danish” and some twisty spiral knots.

Let’s go through the steps of each (I’ll try to keep it succinct!)

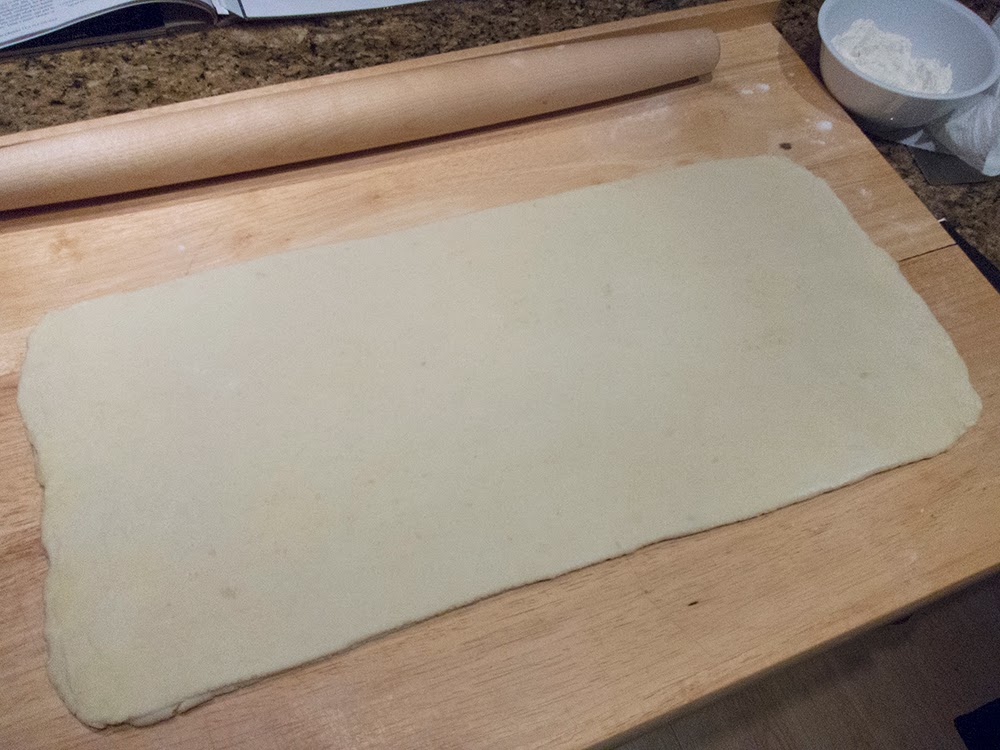
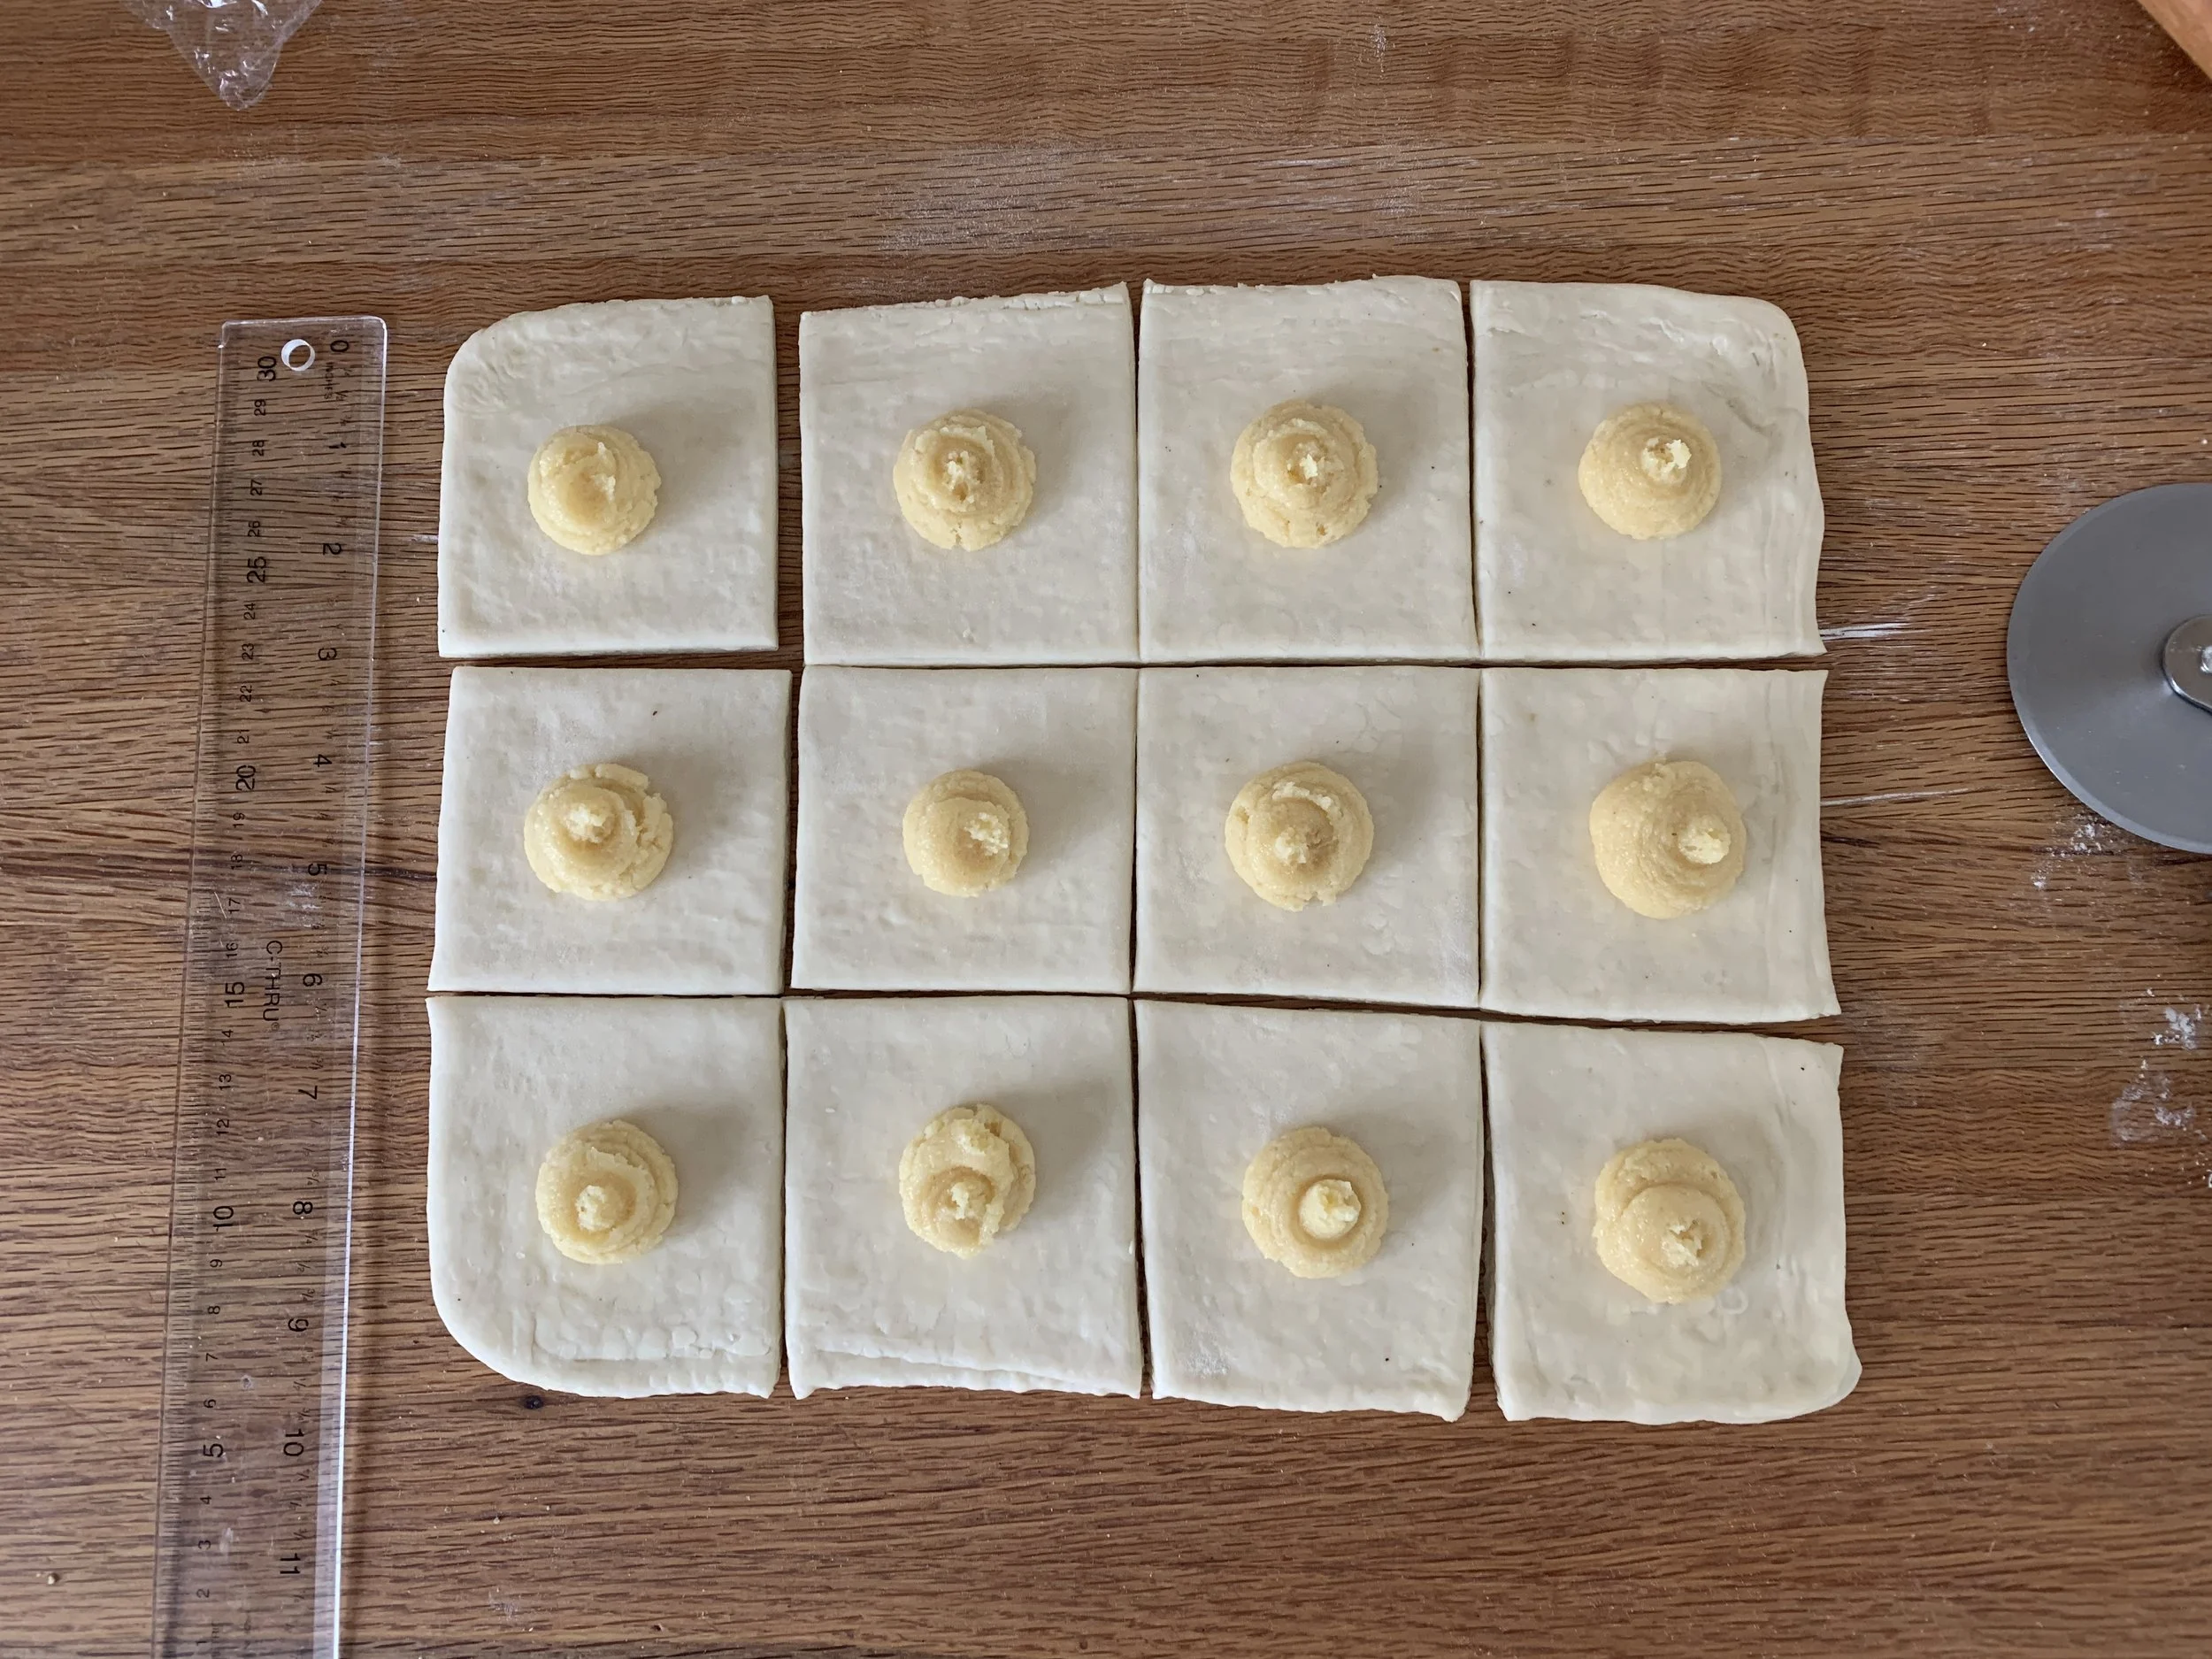
For standard Danish one would typically cut six ~4”x4” squares from a 1/2 portion (rolled out 8”x12”). To yield 12 smaller pastries I rolled the dough out to 9”x12”, cutting 3”x3” squares as seen below.

Pipe a round of crème d’amande in the center.

/

Fold the corners into the center and press them down to hold them in place.


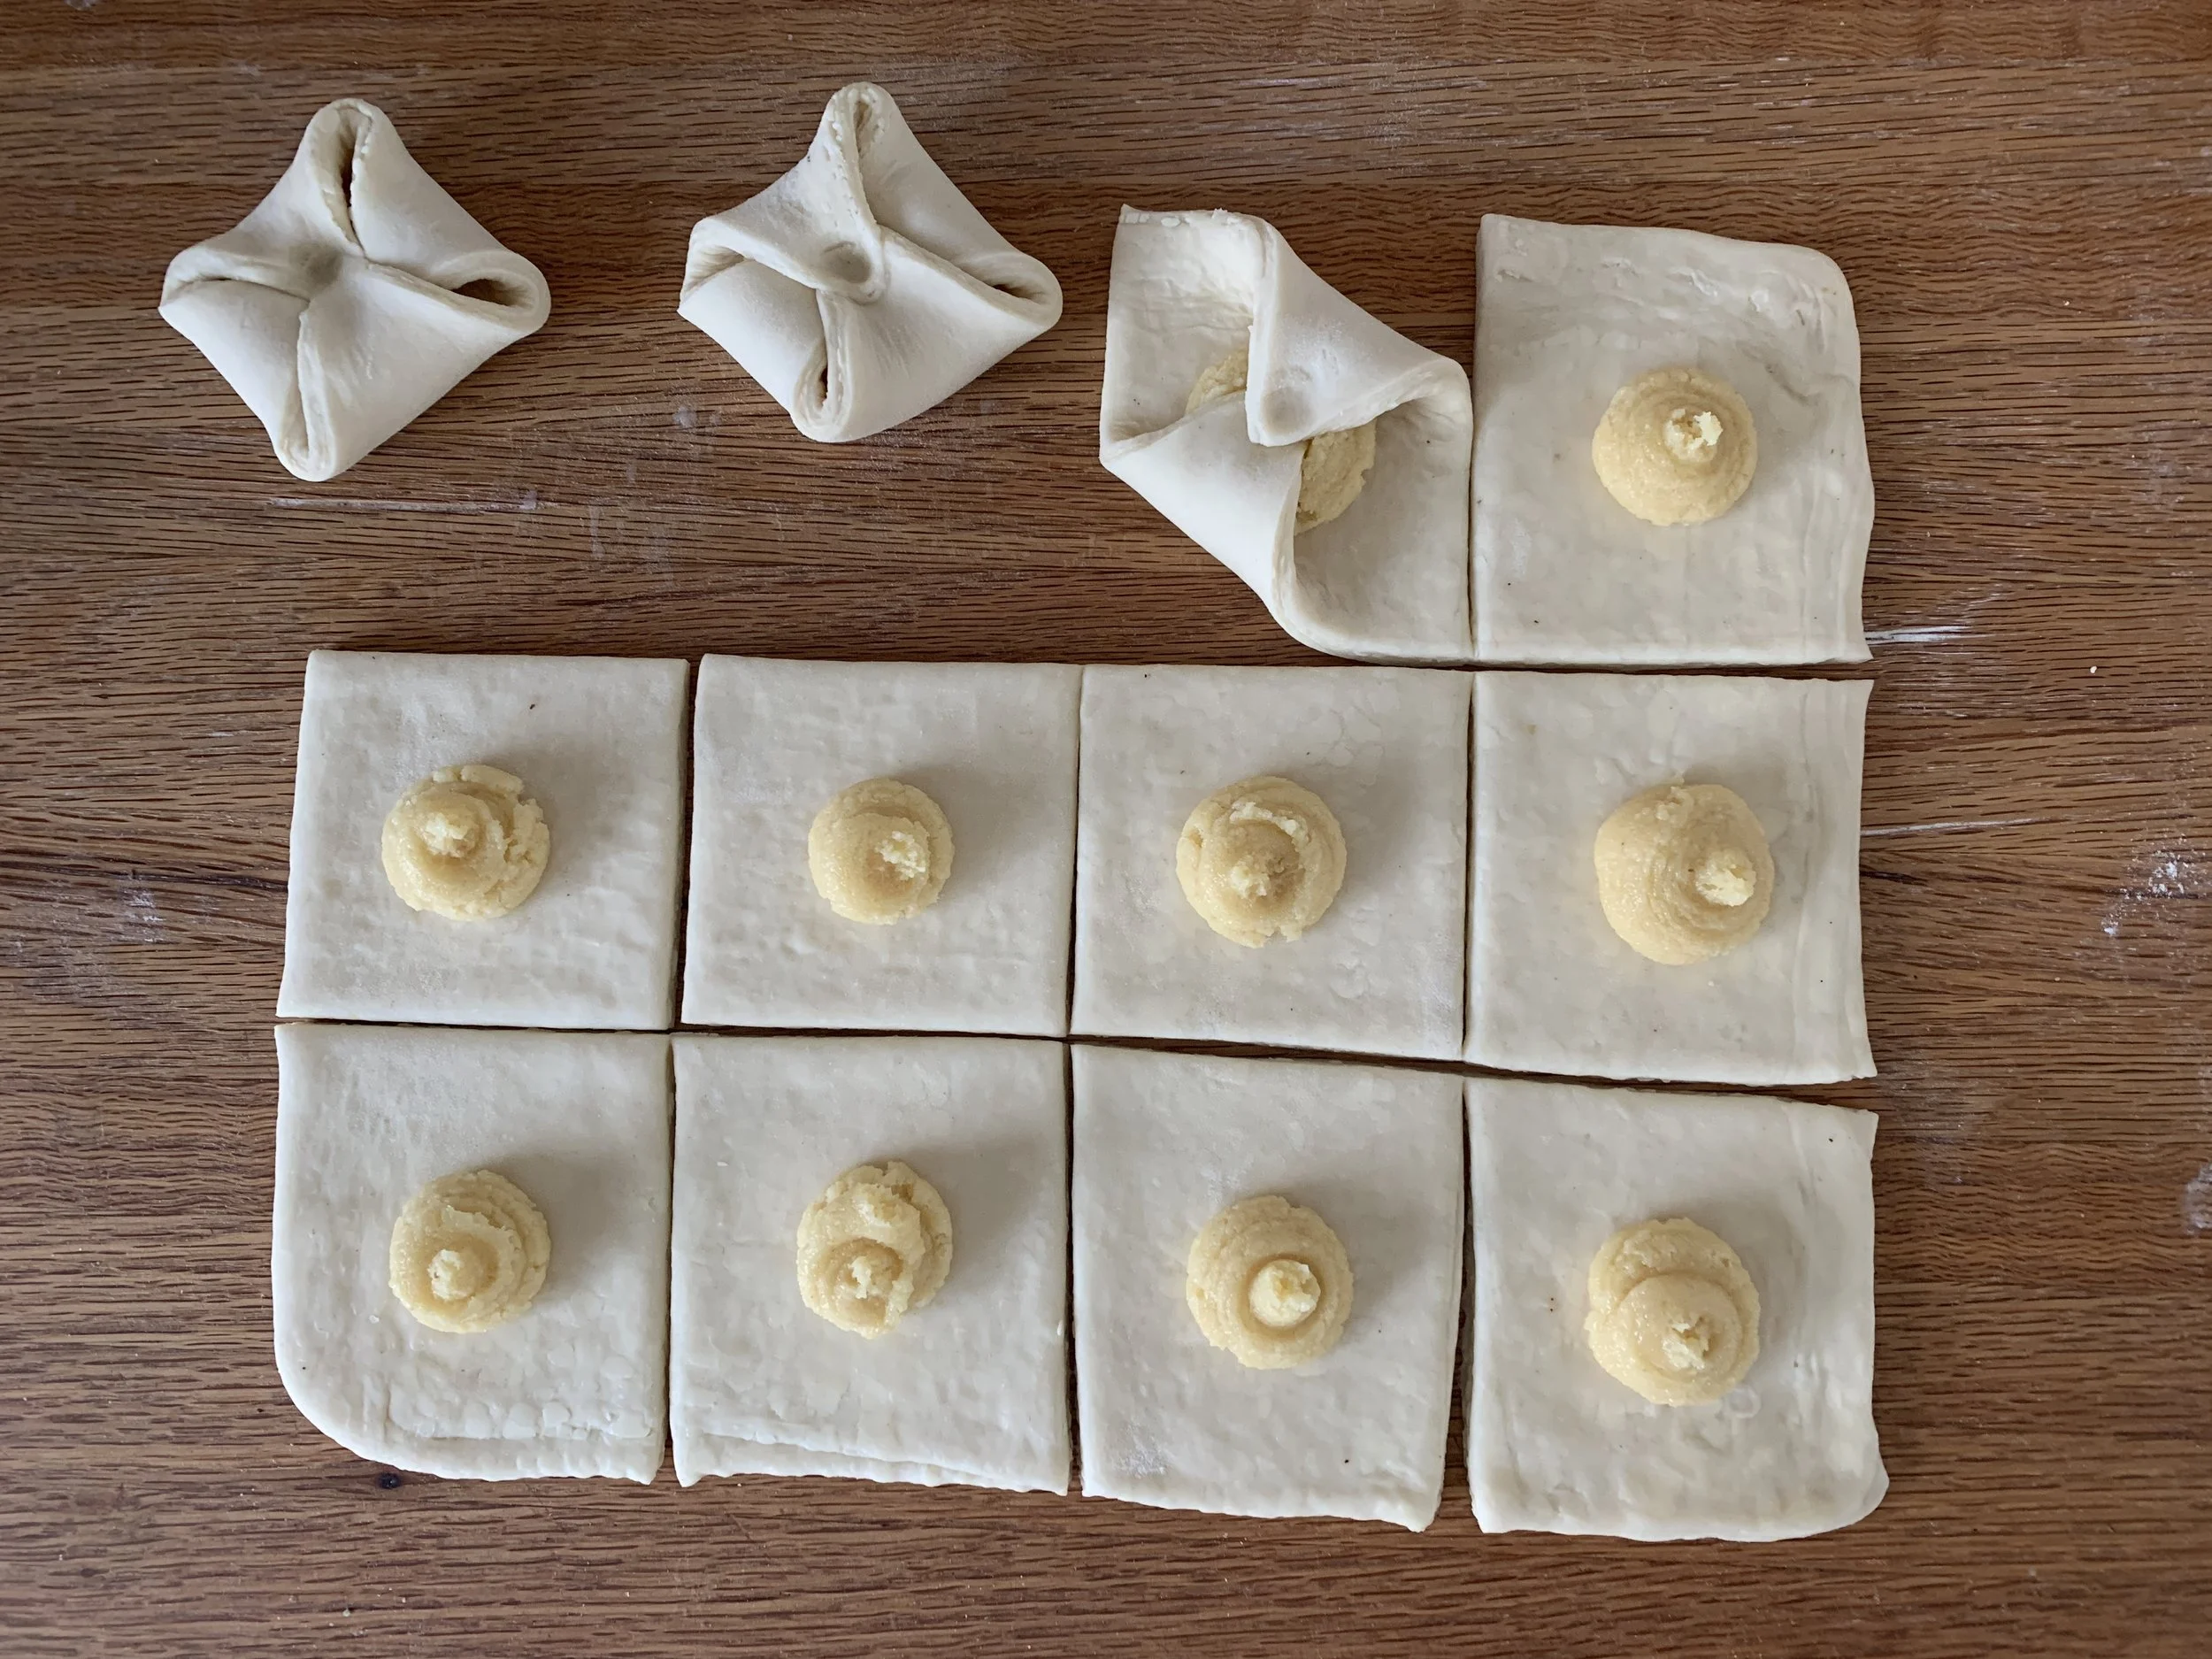
Don’t be afraid to push down in the center pretty firmly. Lightly brush with egg wash.


It’s important that laminated dough not rise at anything warmer than 78ºF. If too hot, the butter leaches out during the rise and the bake. I create a warm moist environment (yeast loves that!) either in my turned off oven with a pan of hot water in it or under an overturned clean tote bin with cups of hot water tucked next to the sheet pan(s).

Below is one example of my proof set up - my tote is large enough to stack 2 half sheet pans (using three wooden blocks) and have room on the side for a couple of cups of hot water to provide moisture. Here the bottom pan holds croissants and the top pain au chocolat - you can see the condensation inside the lid. Works great!!

Proof box set up

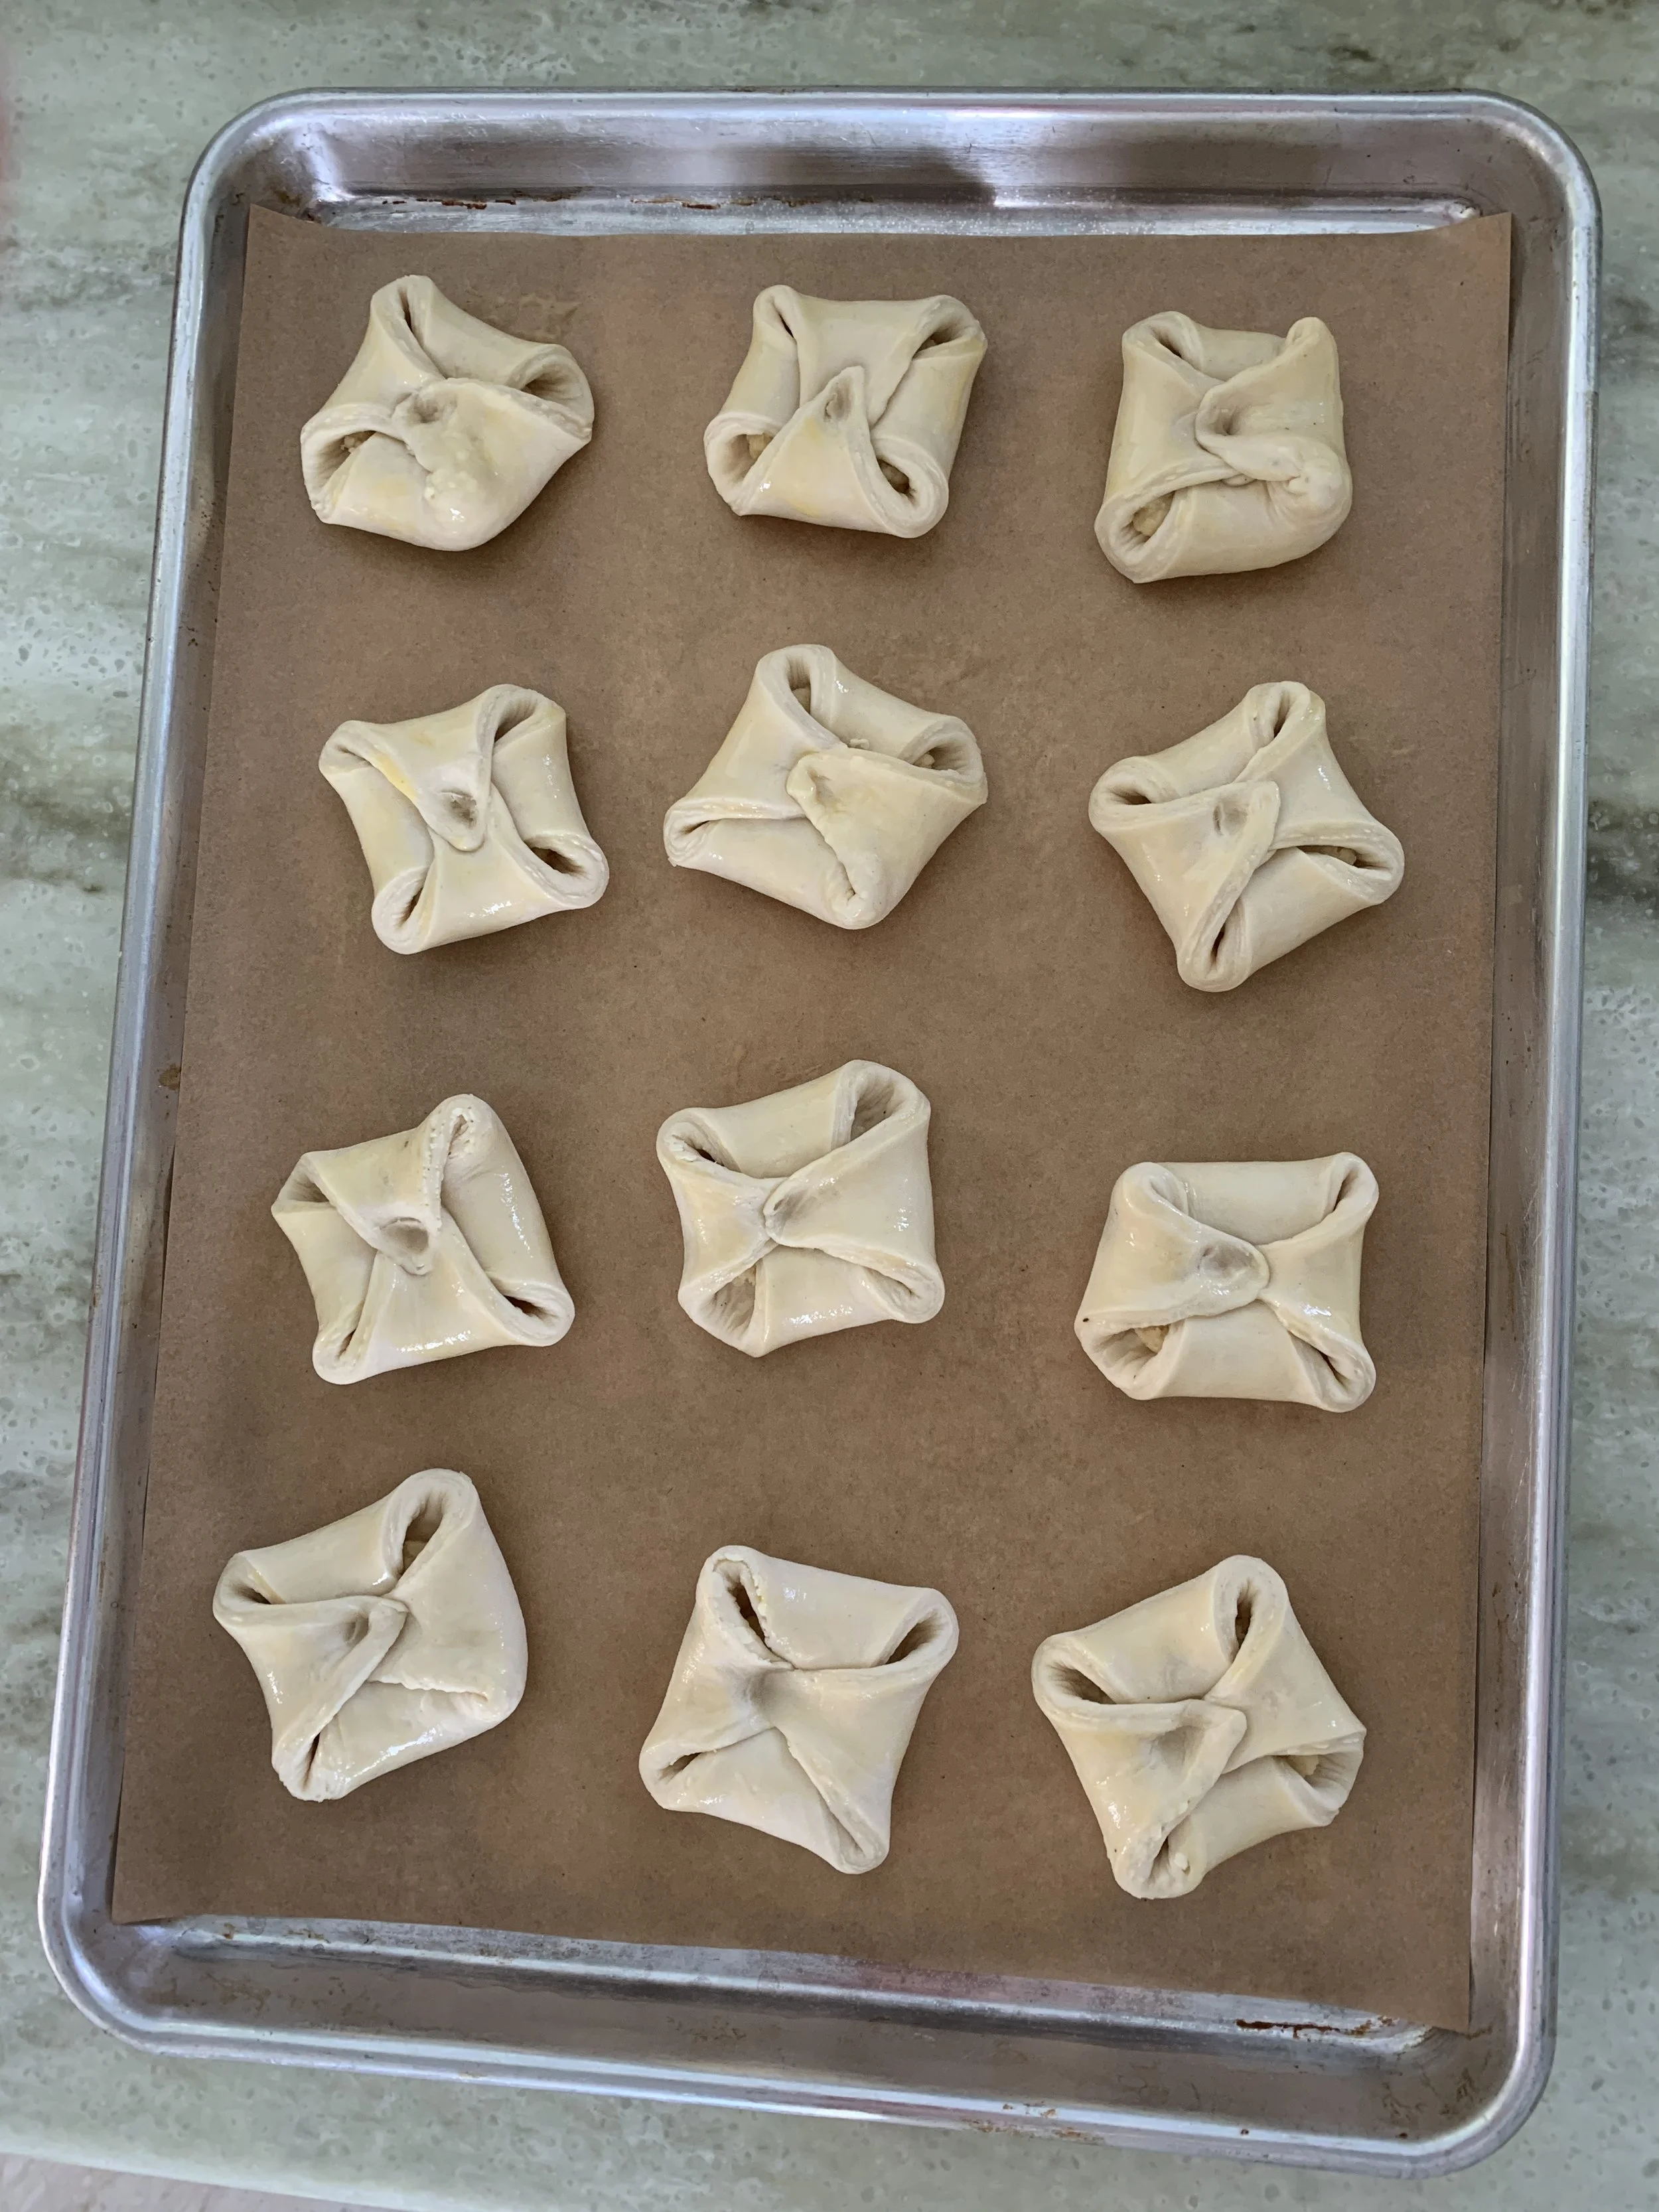
Let the pastries rise about 2-2.5 hours. Look for a more pudgy appearance and more visible layers.


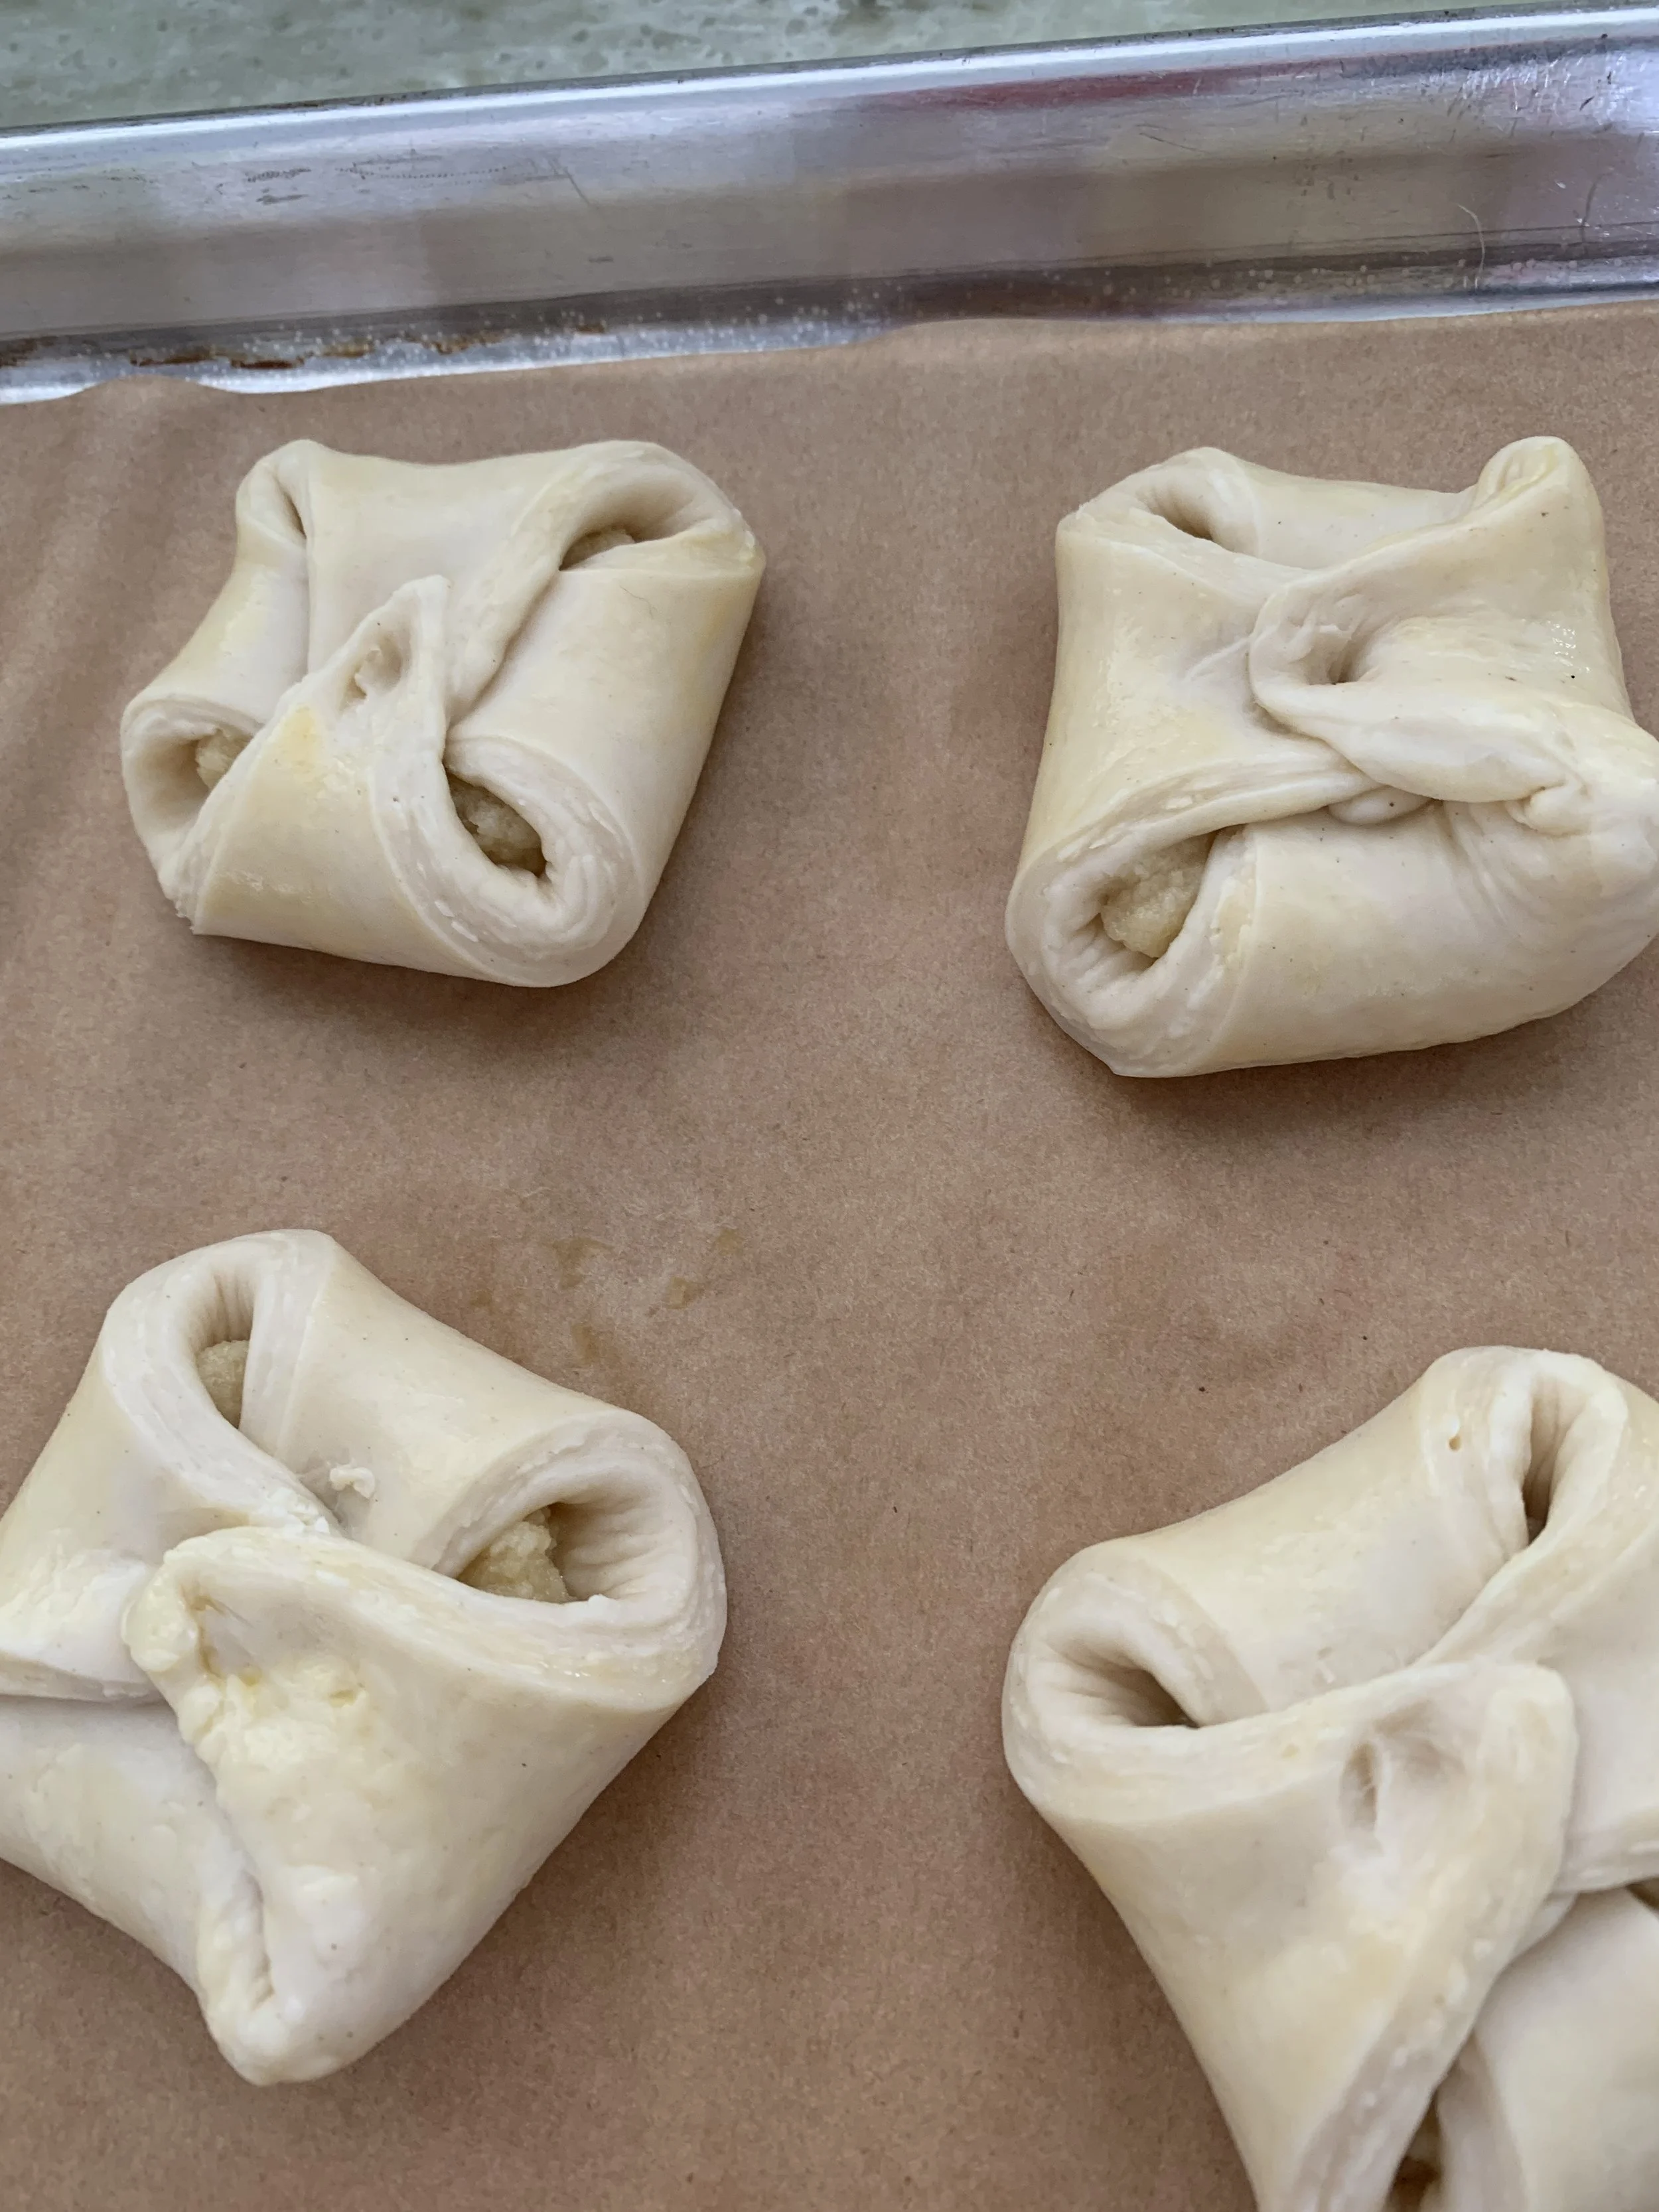
Top them with an additional dollop of crème d’amande, some apricot jam, crushed almond slices and a sprinkle of raw sugar. Give them a second egg wash.


Start the bake at 400º - I always check at 10 minutes in and will reduce temp to 375º if browning seems to be going too fast. Total bake time is typically 20-25 minutes. Here my jam sort of slid off - next time I’d mix the jam and crème d’amande together, both to protect the jam from burning (Susan - you should have known better) and keeping the filling more in the center. Invariably the corners do open up some but, believe me, the end result doesn’t suffer.
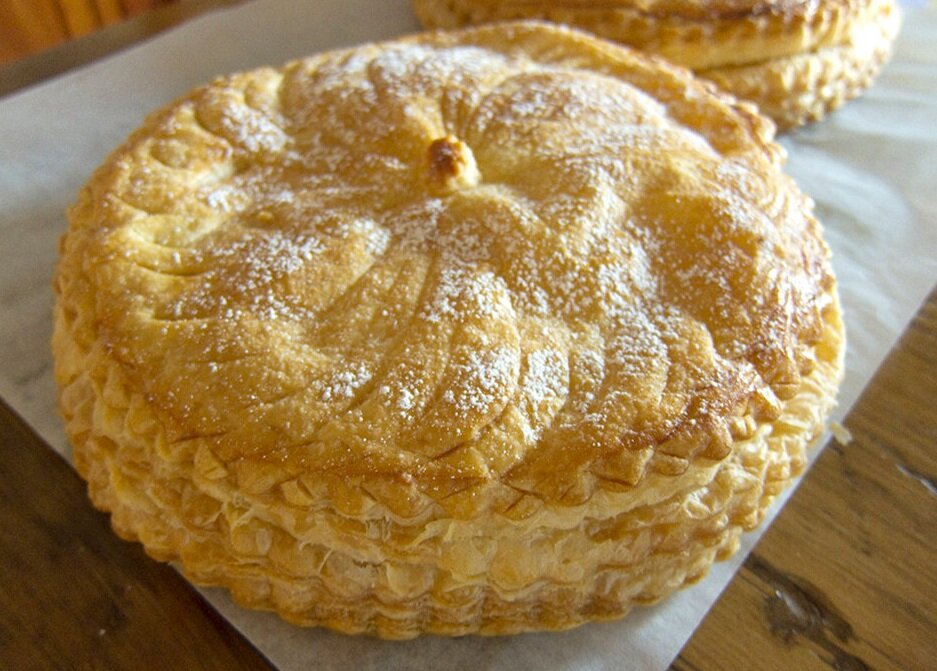
Oh yeah!

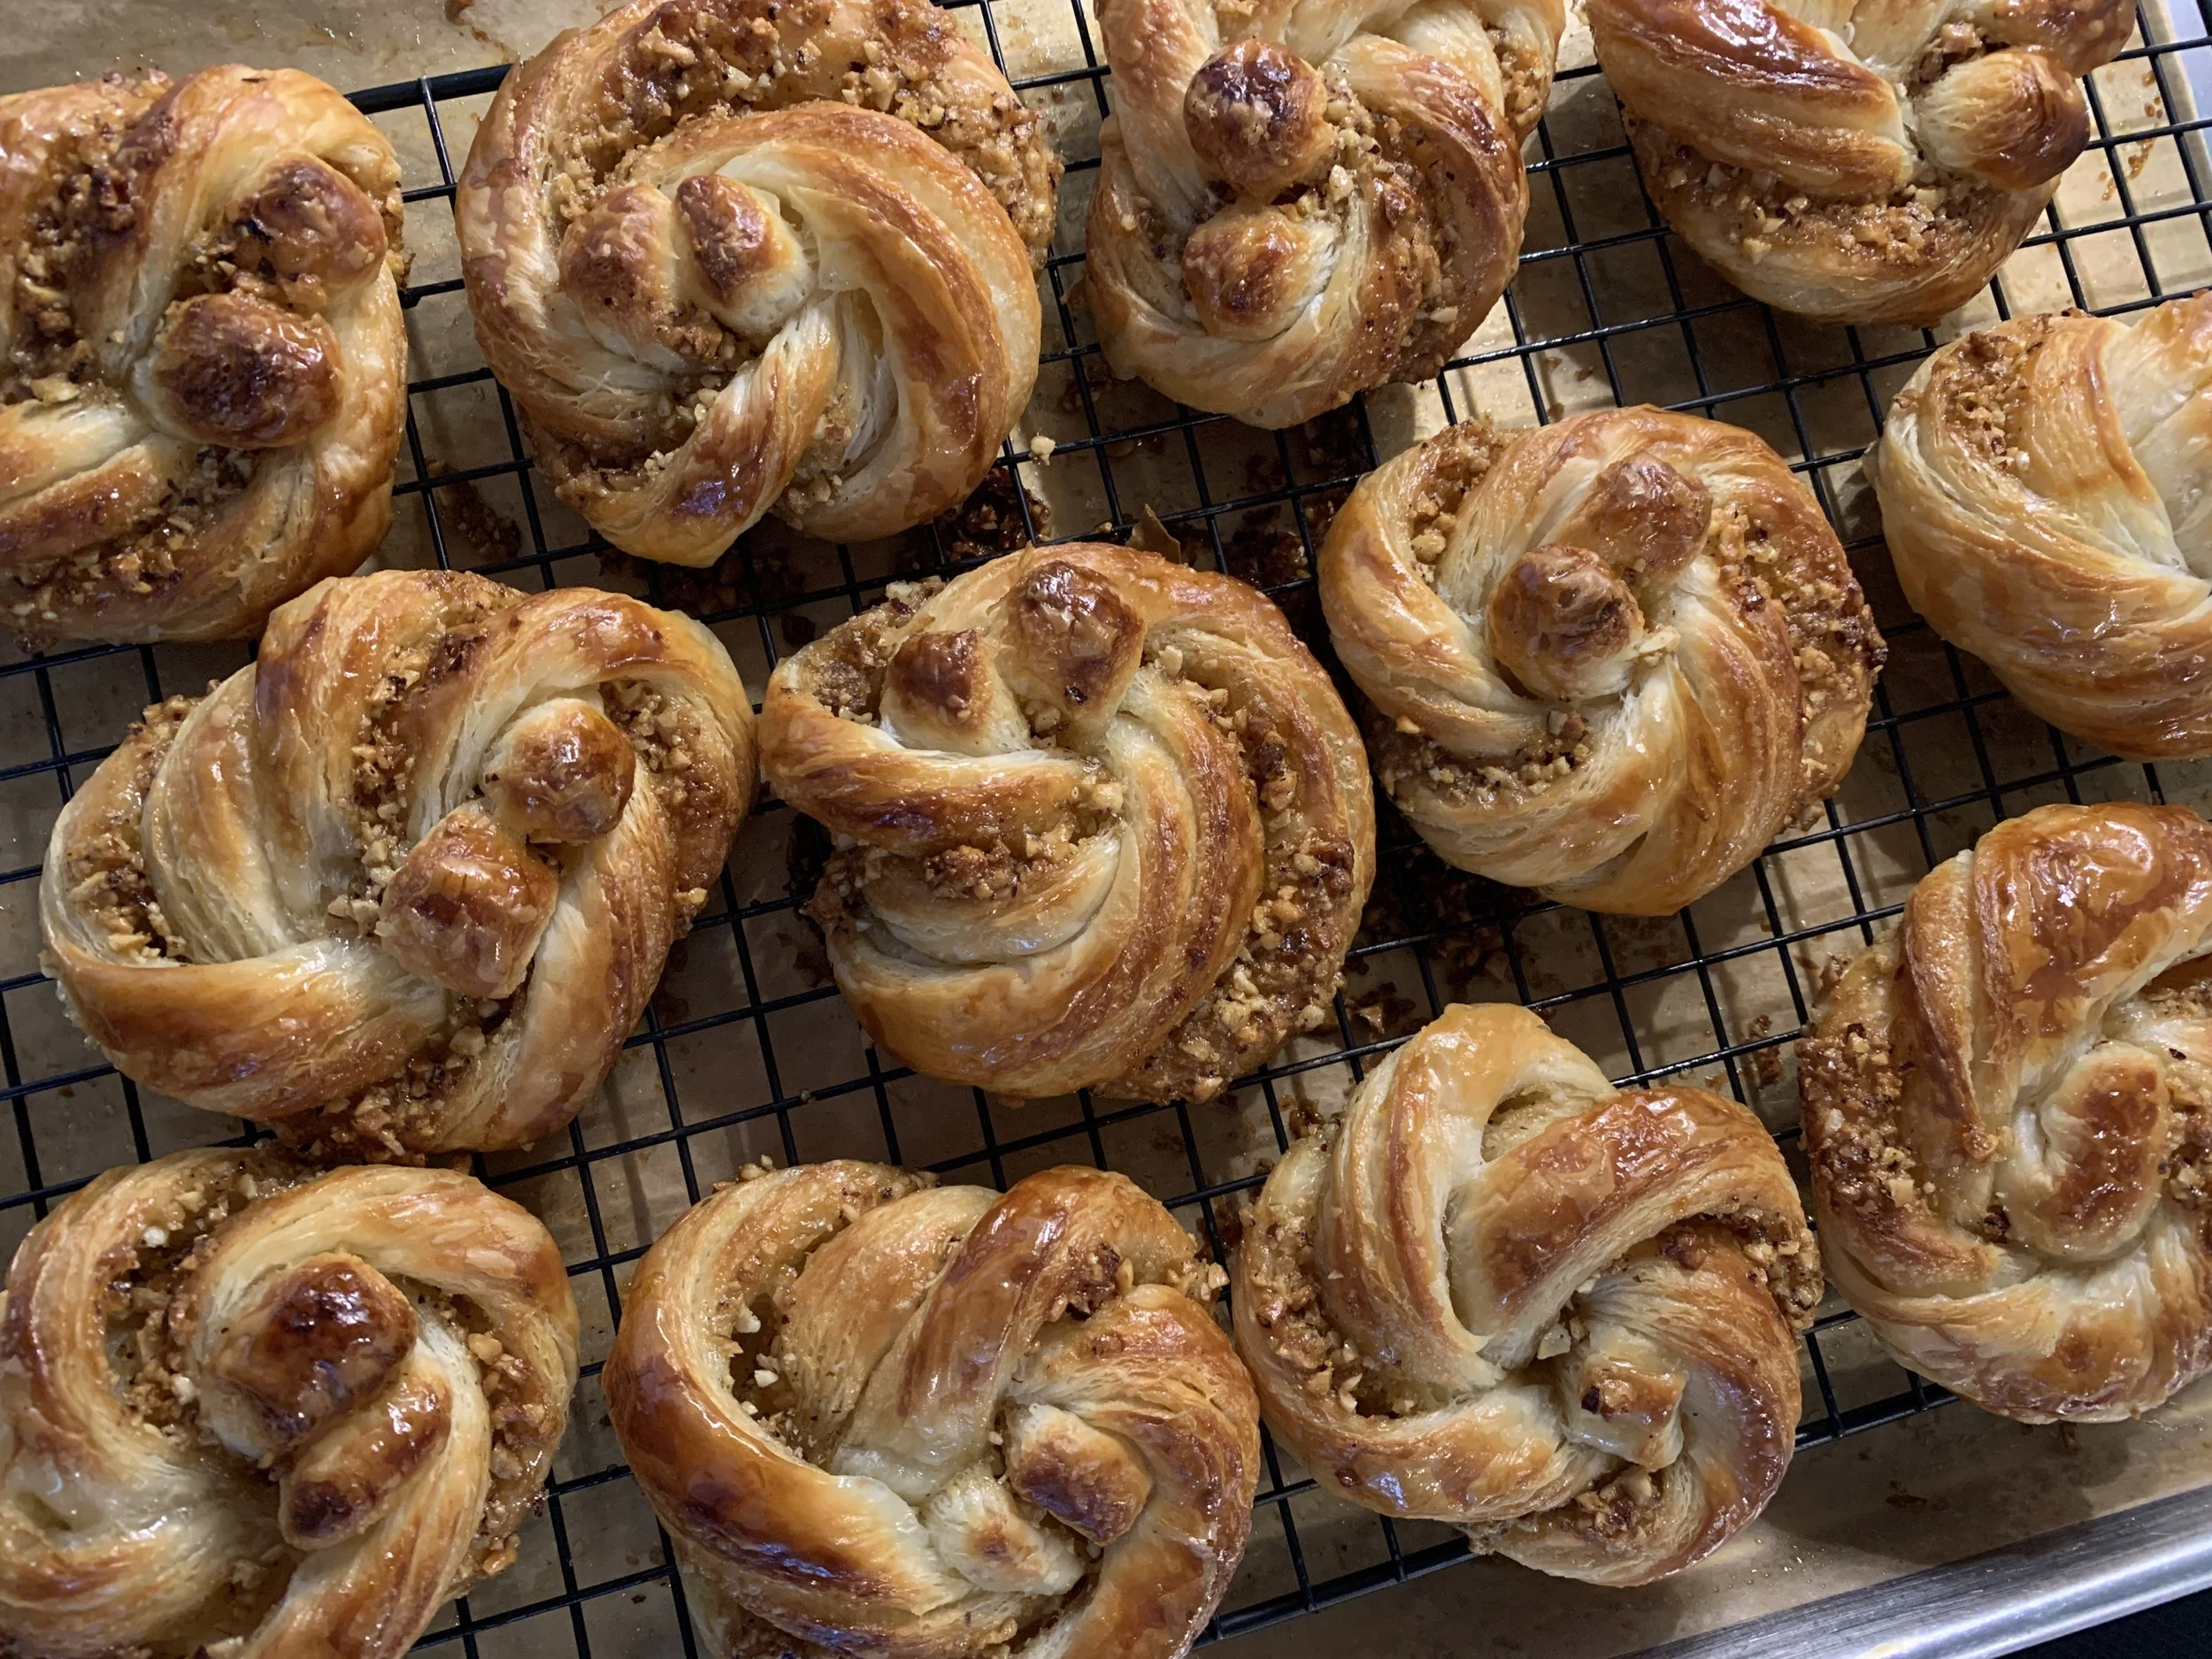
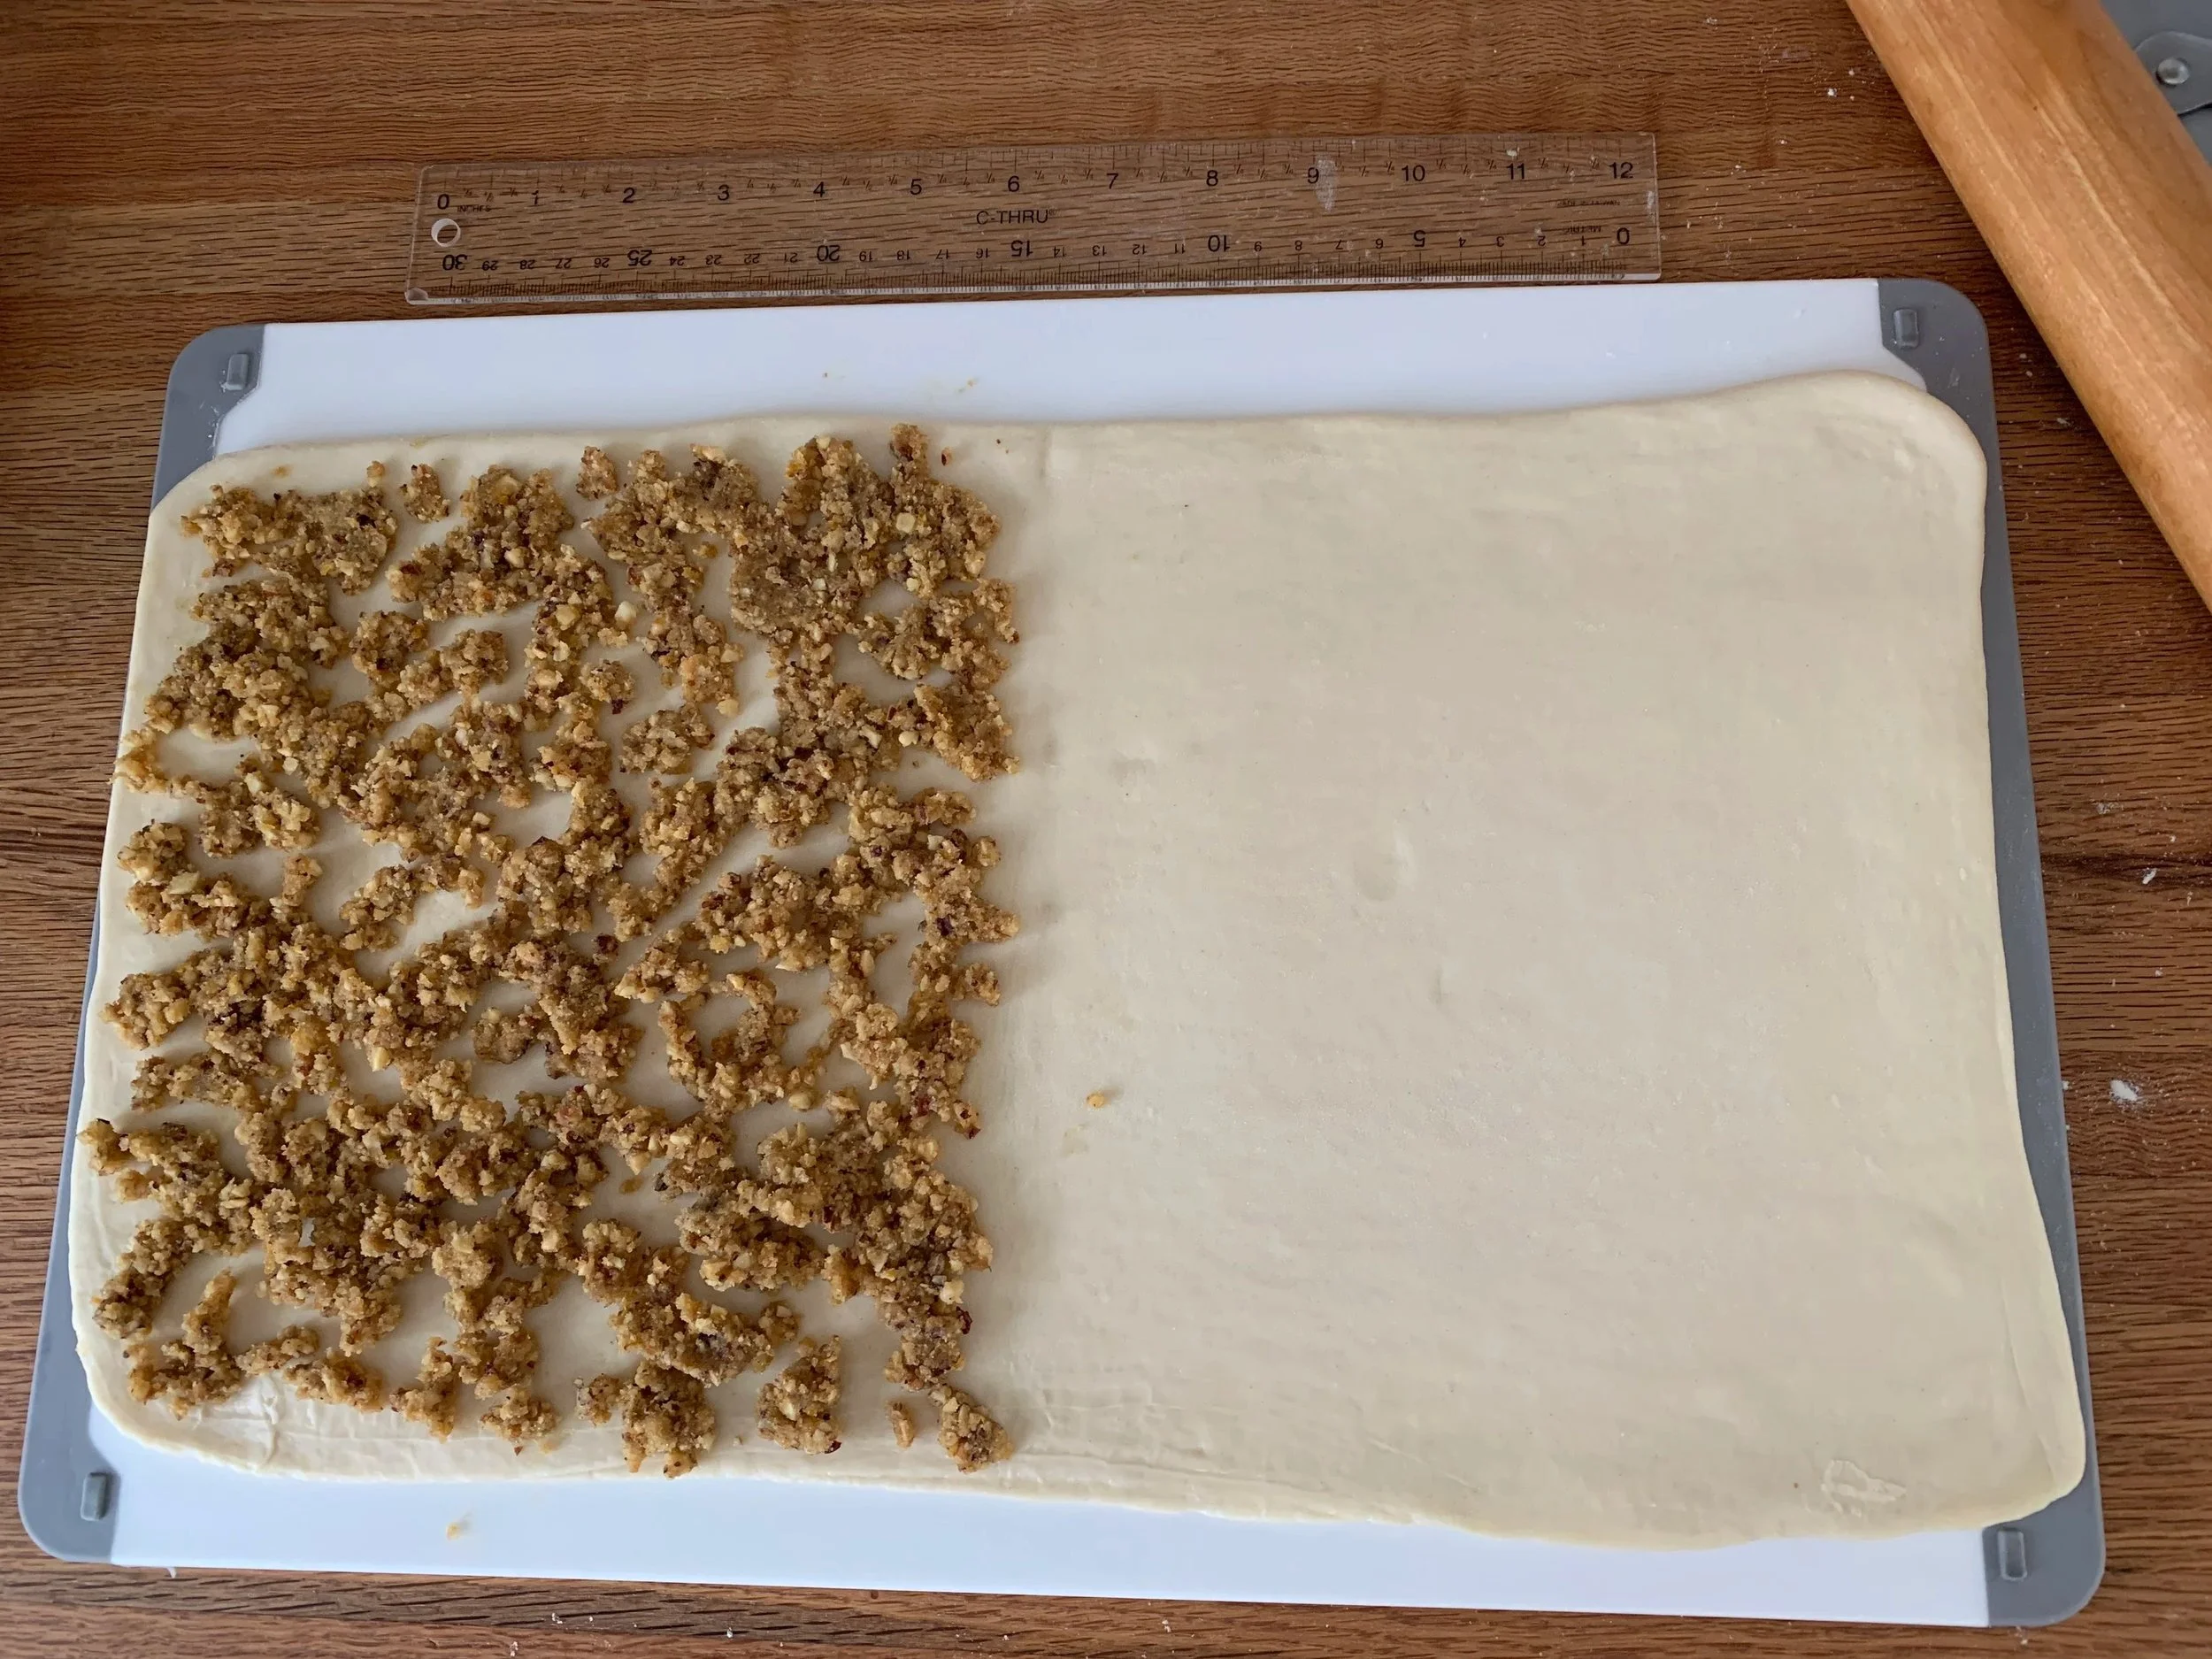
For my twisty spirals I decided on a hazelnut orange filling. For my 1/2 portion of dough I blended 42 g / 3 tablespoons soft unsalted butter with a large pinch salt, zest of an orange and 66 g / 1/3 cup brown sugar (light or dark - you decide).

I rolled the dough out to a 9”x18” rectangle and crumbled the filling mixture over one half. TIP: I didn’t do this here but, when you have a crumbly filling, it helps to blend in a bit of egg white to give it some cohesion.


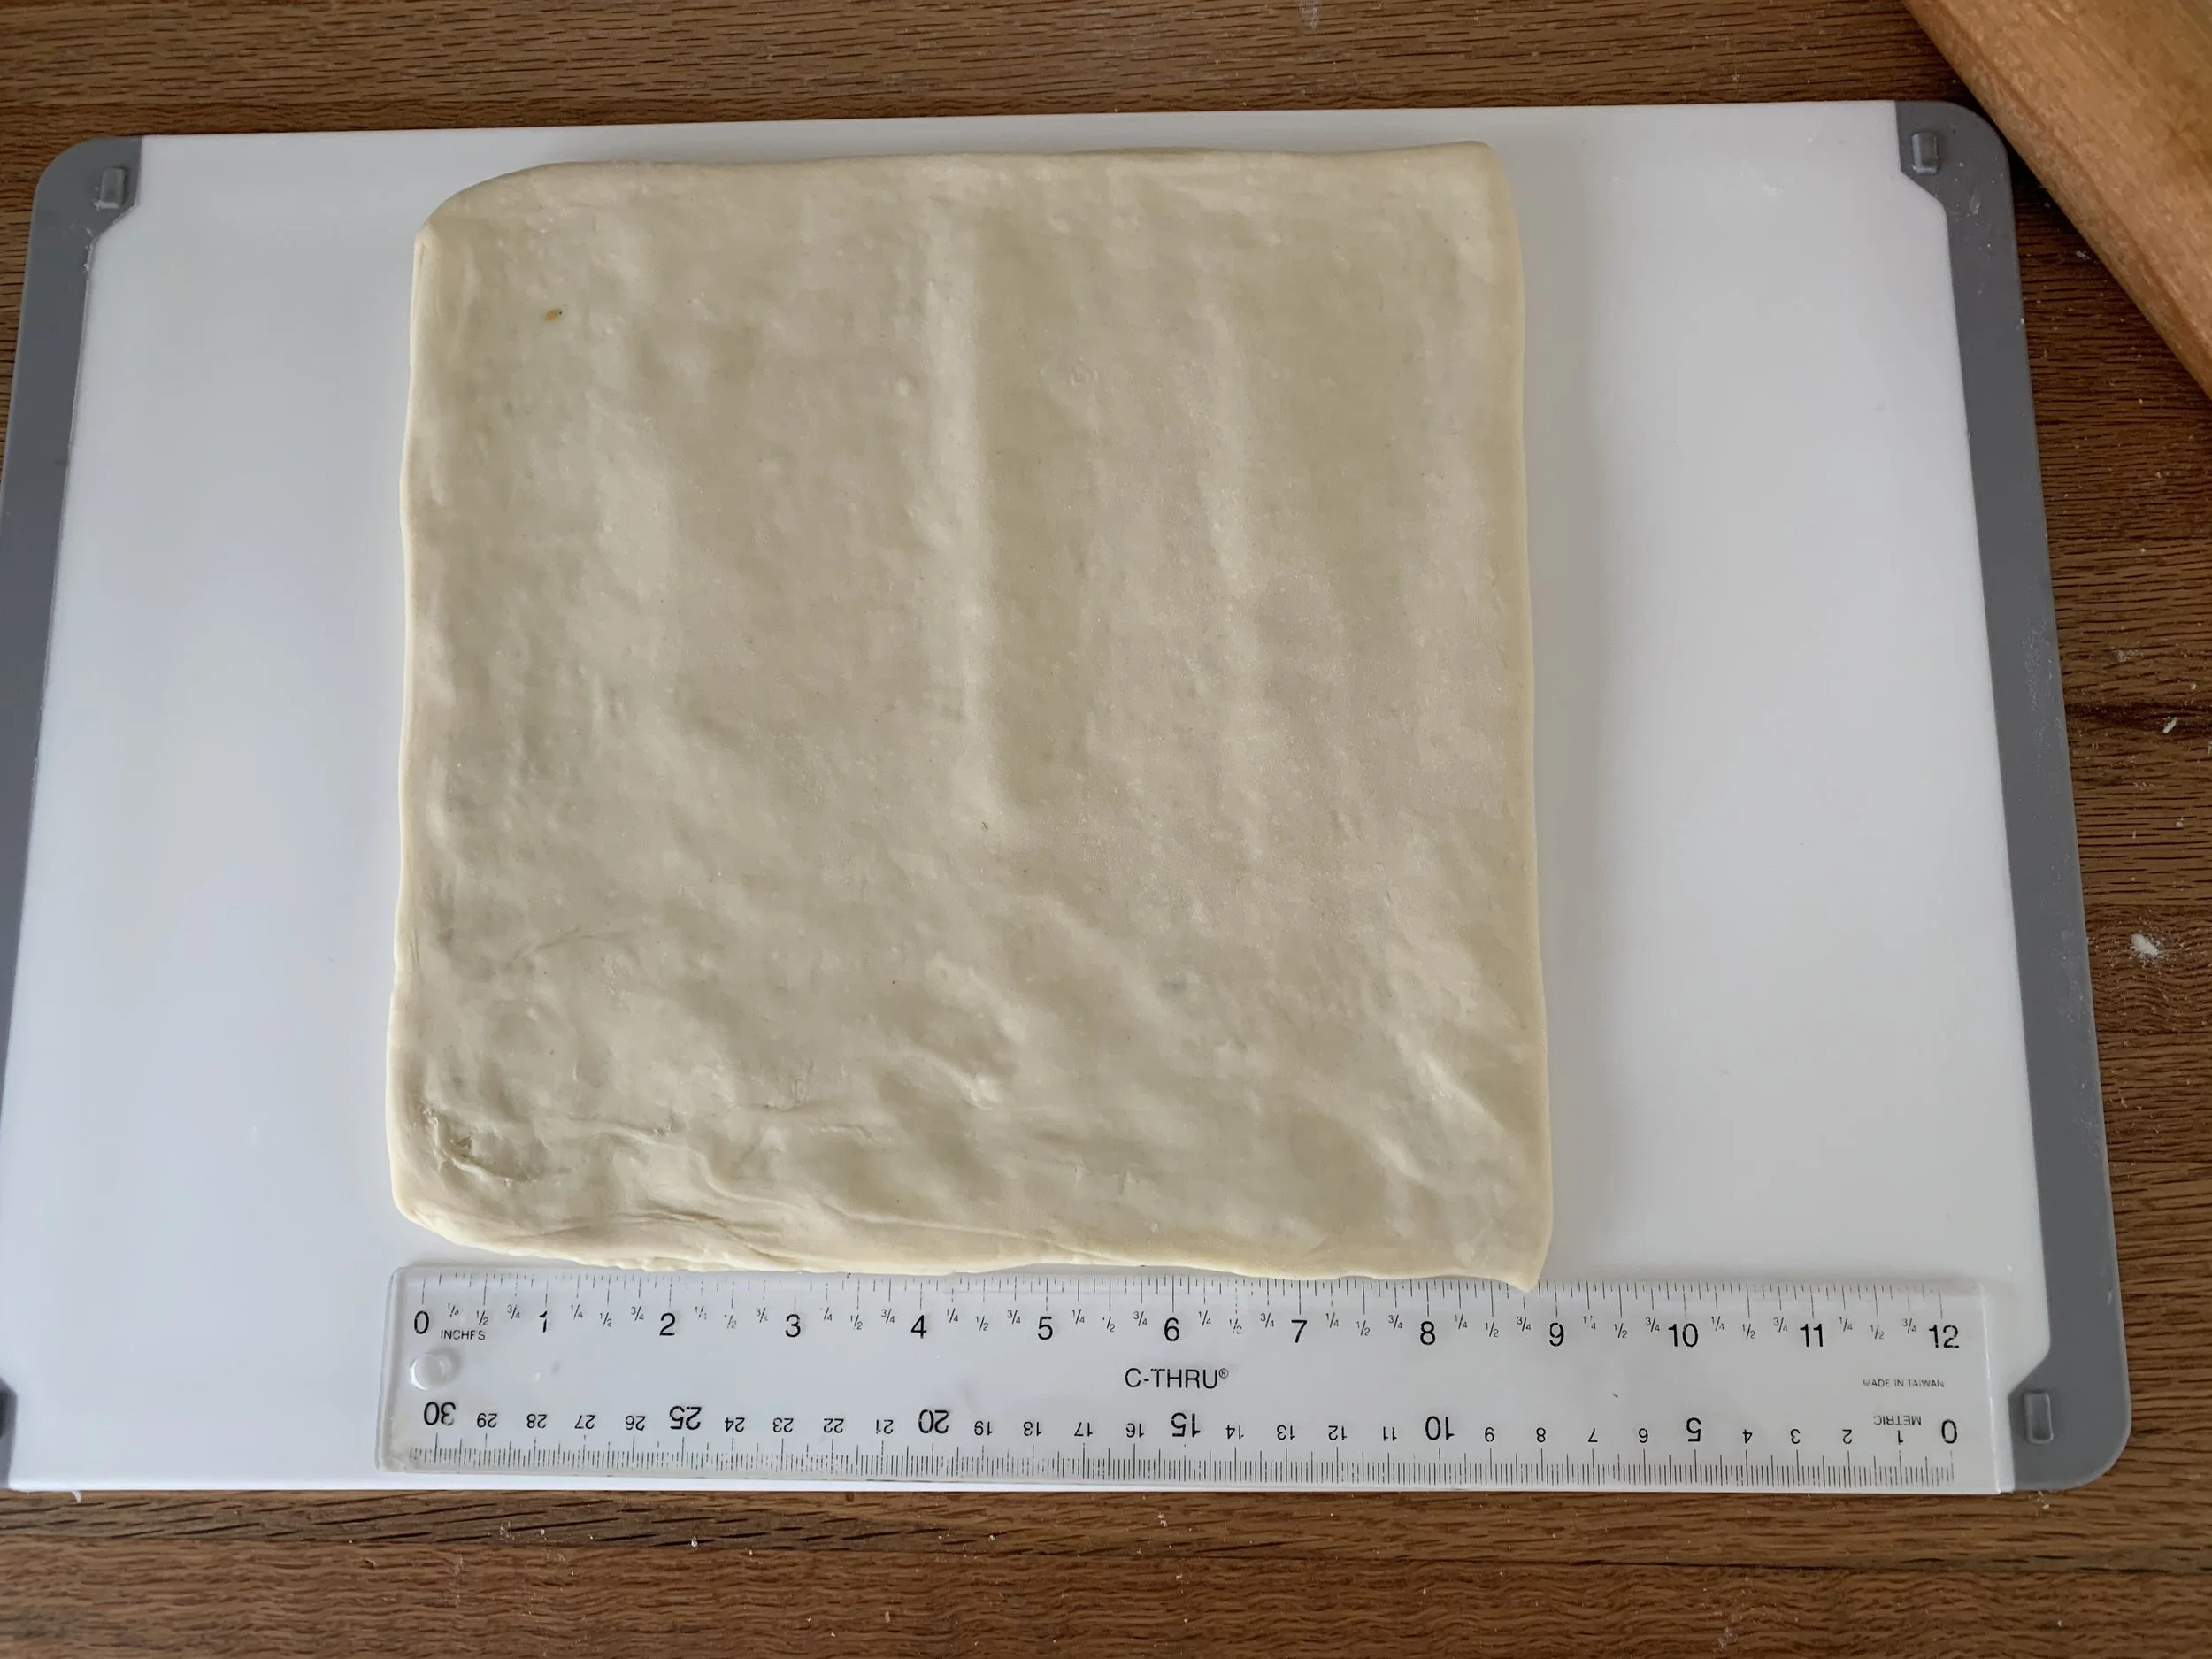
Fold the bare half of the dough over the filling covered half and lightly go over it with the rolling pin to press things together. I end up with a 9”x9” -ish square.


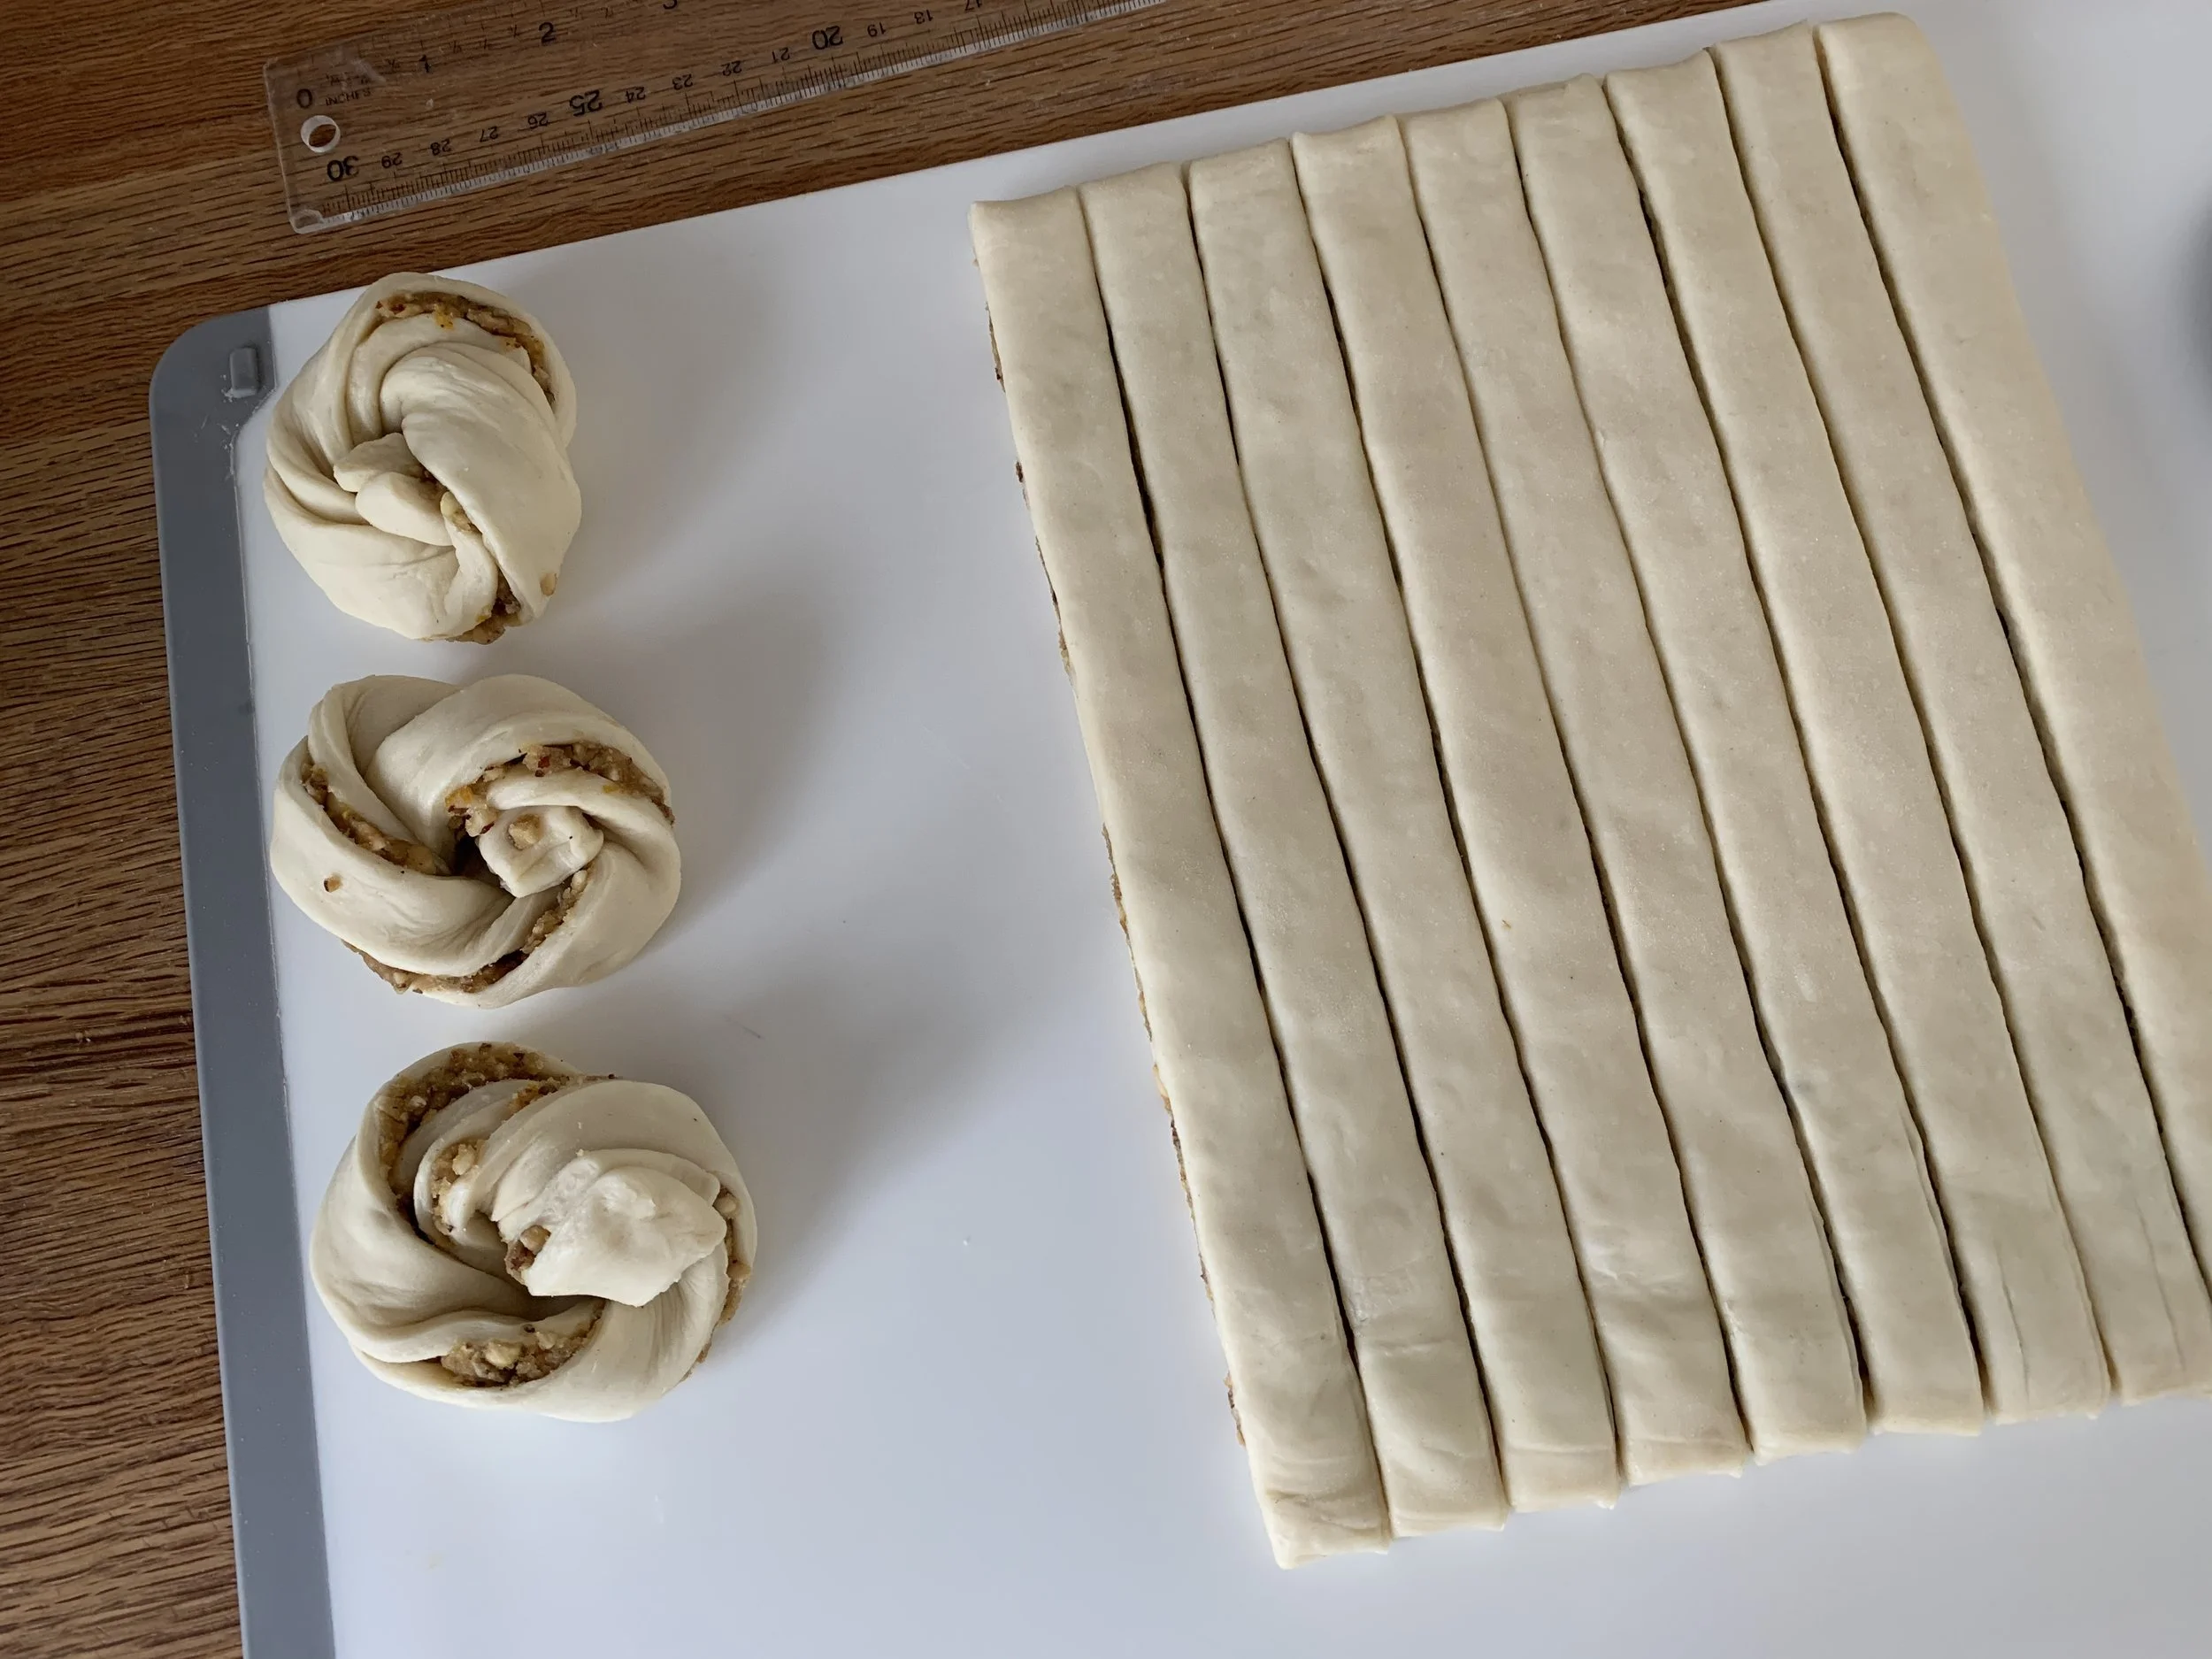
I wanted a yield of 12 pastries so I cut 3/4” strips and twisted and knotted each. Every time I do this it comes out a bit differently. Play around with it.


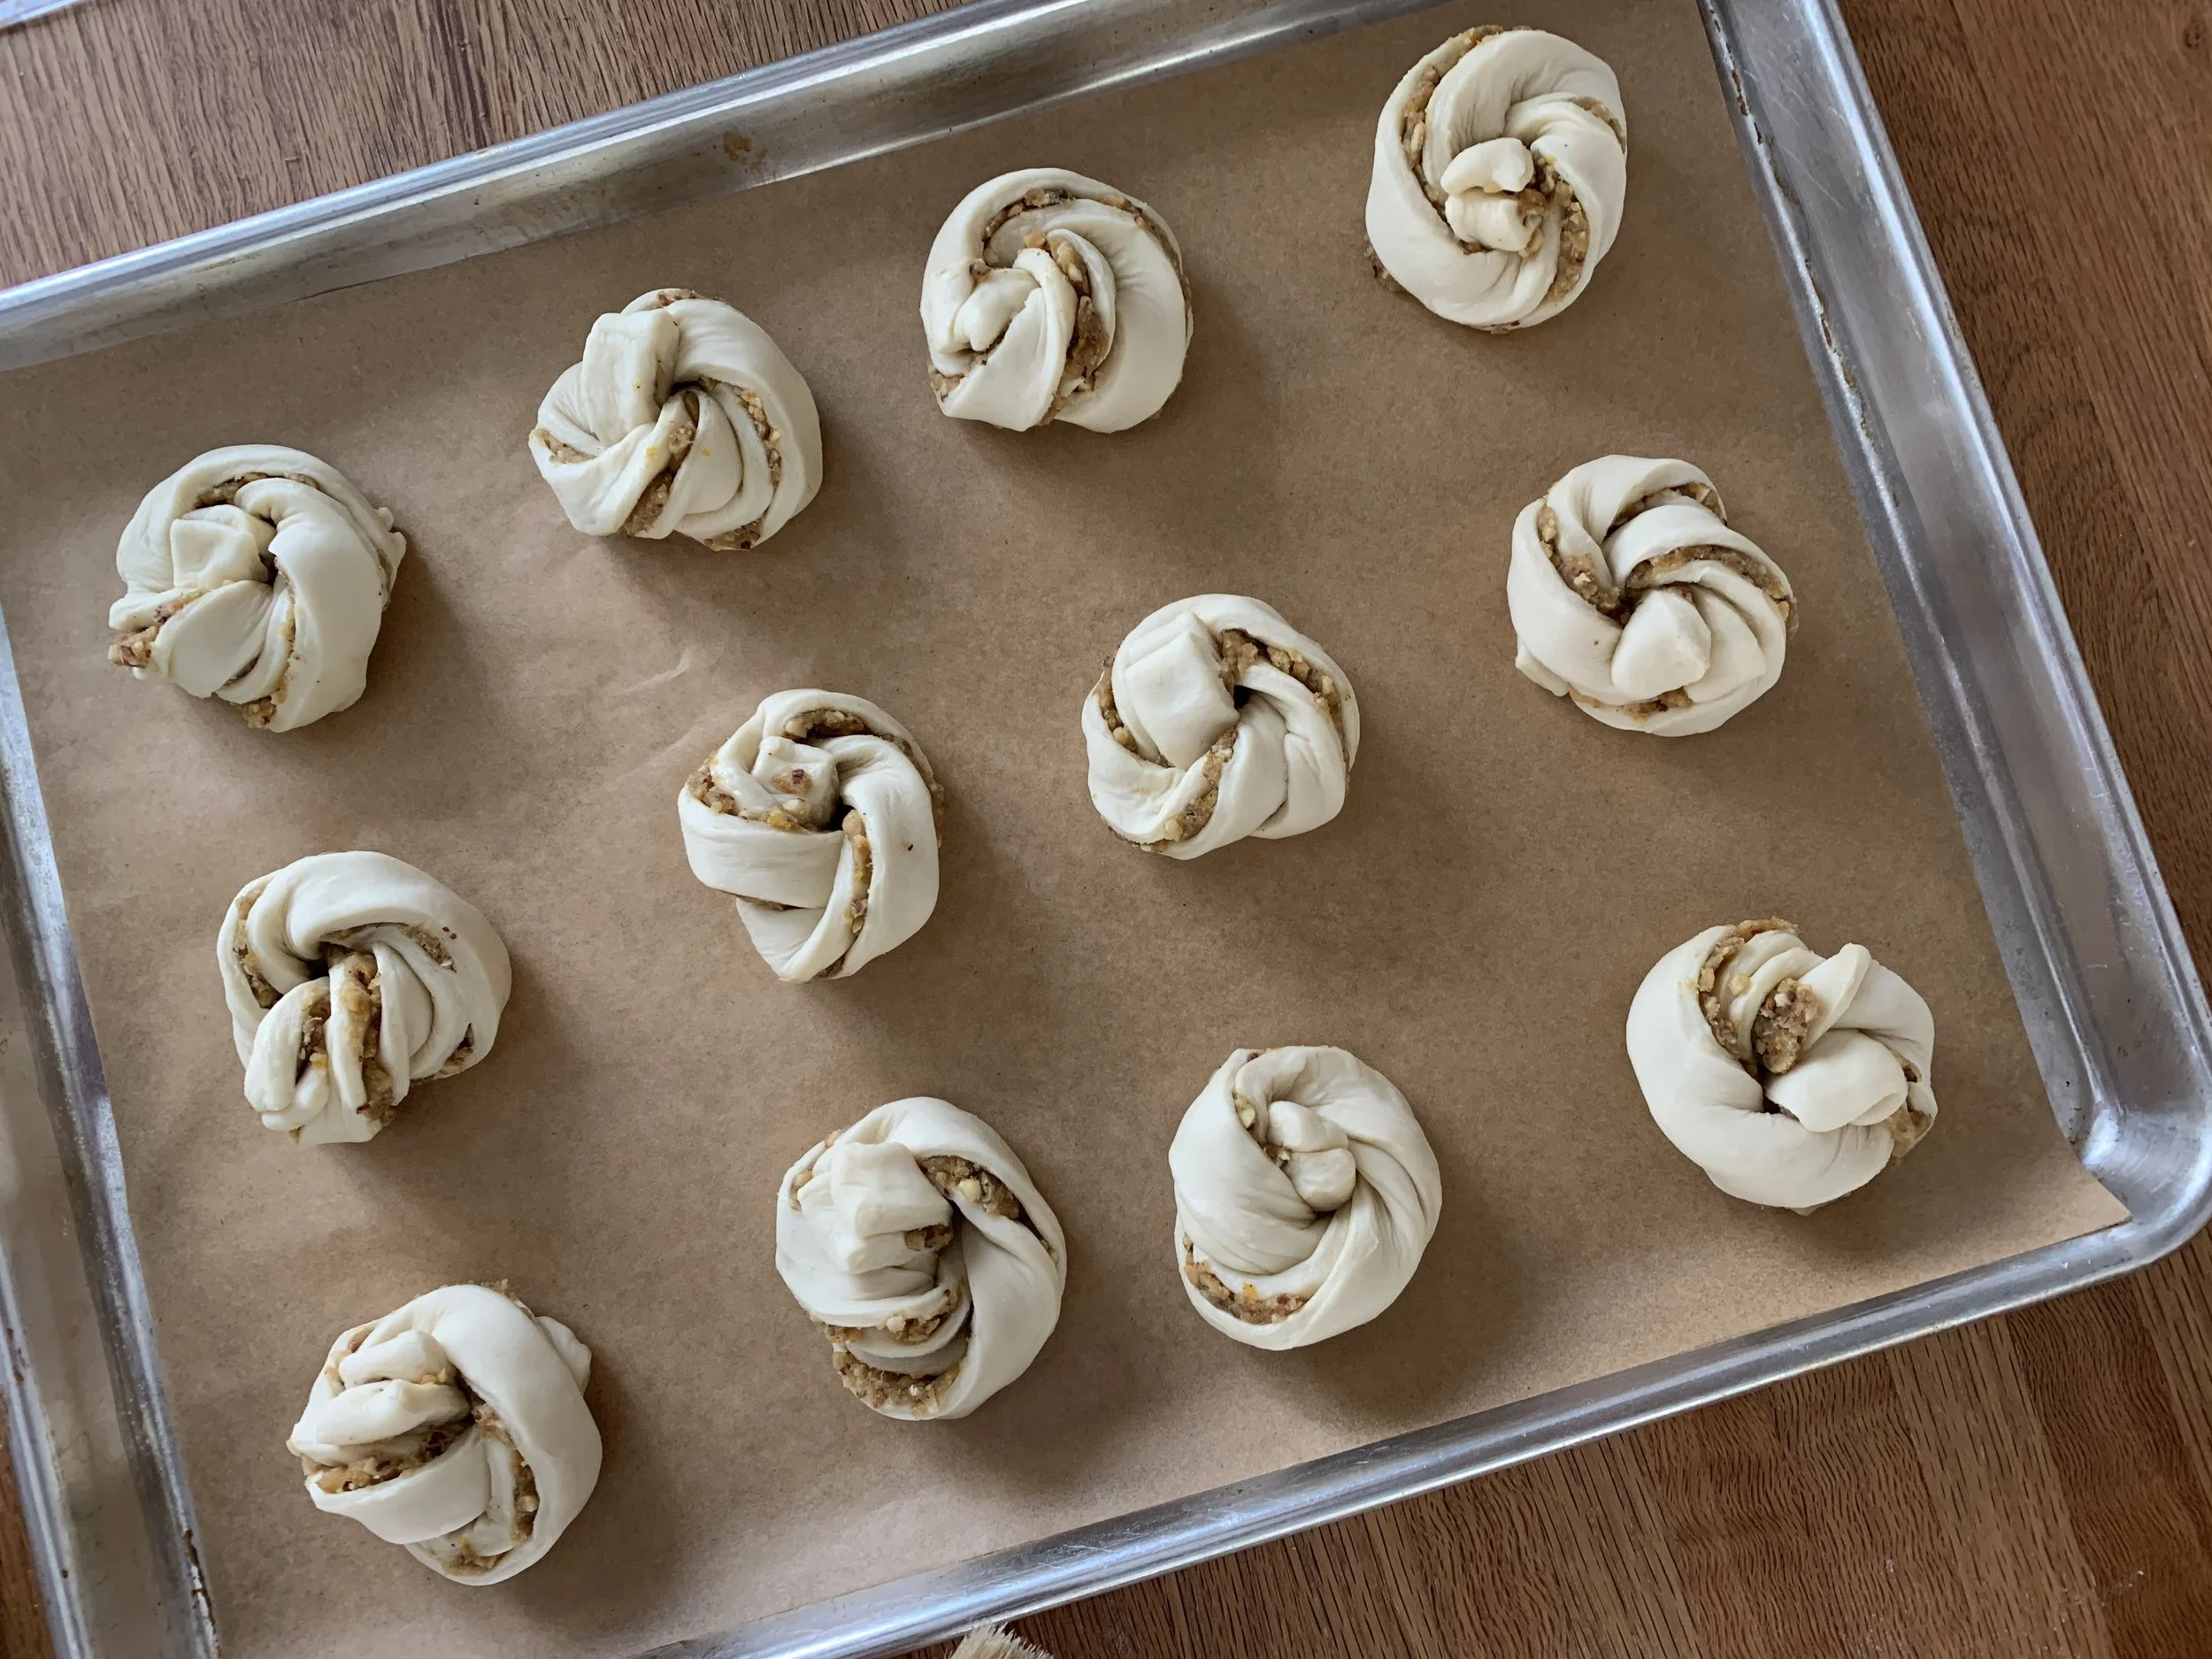
Egg wash, let rise a couple of hours. You should appreciate more fullness as they’ve risen. Lightly egg wash a second time.
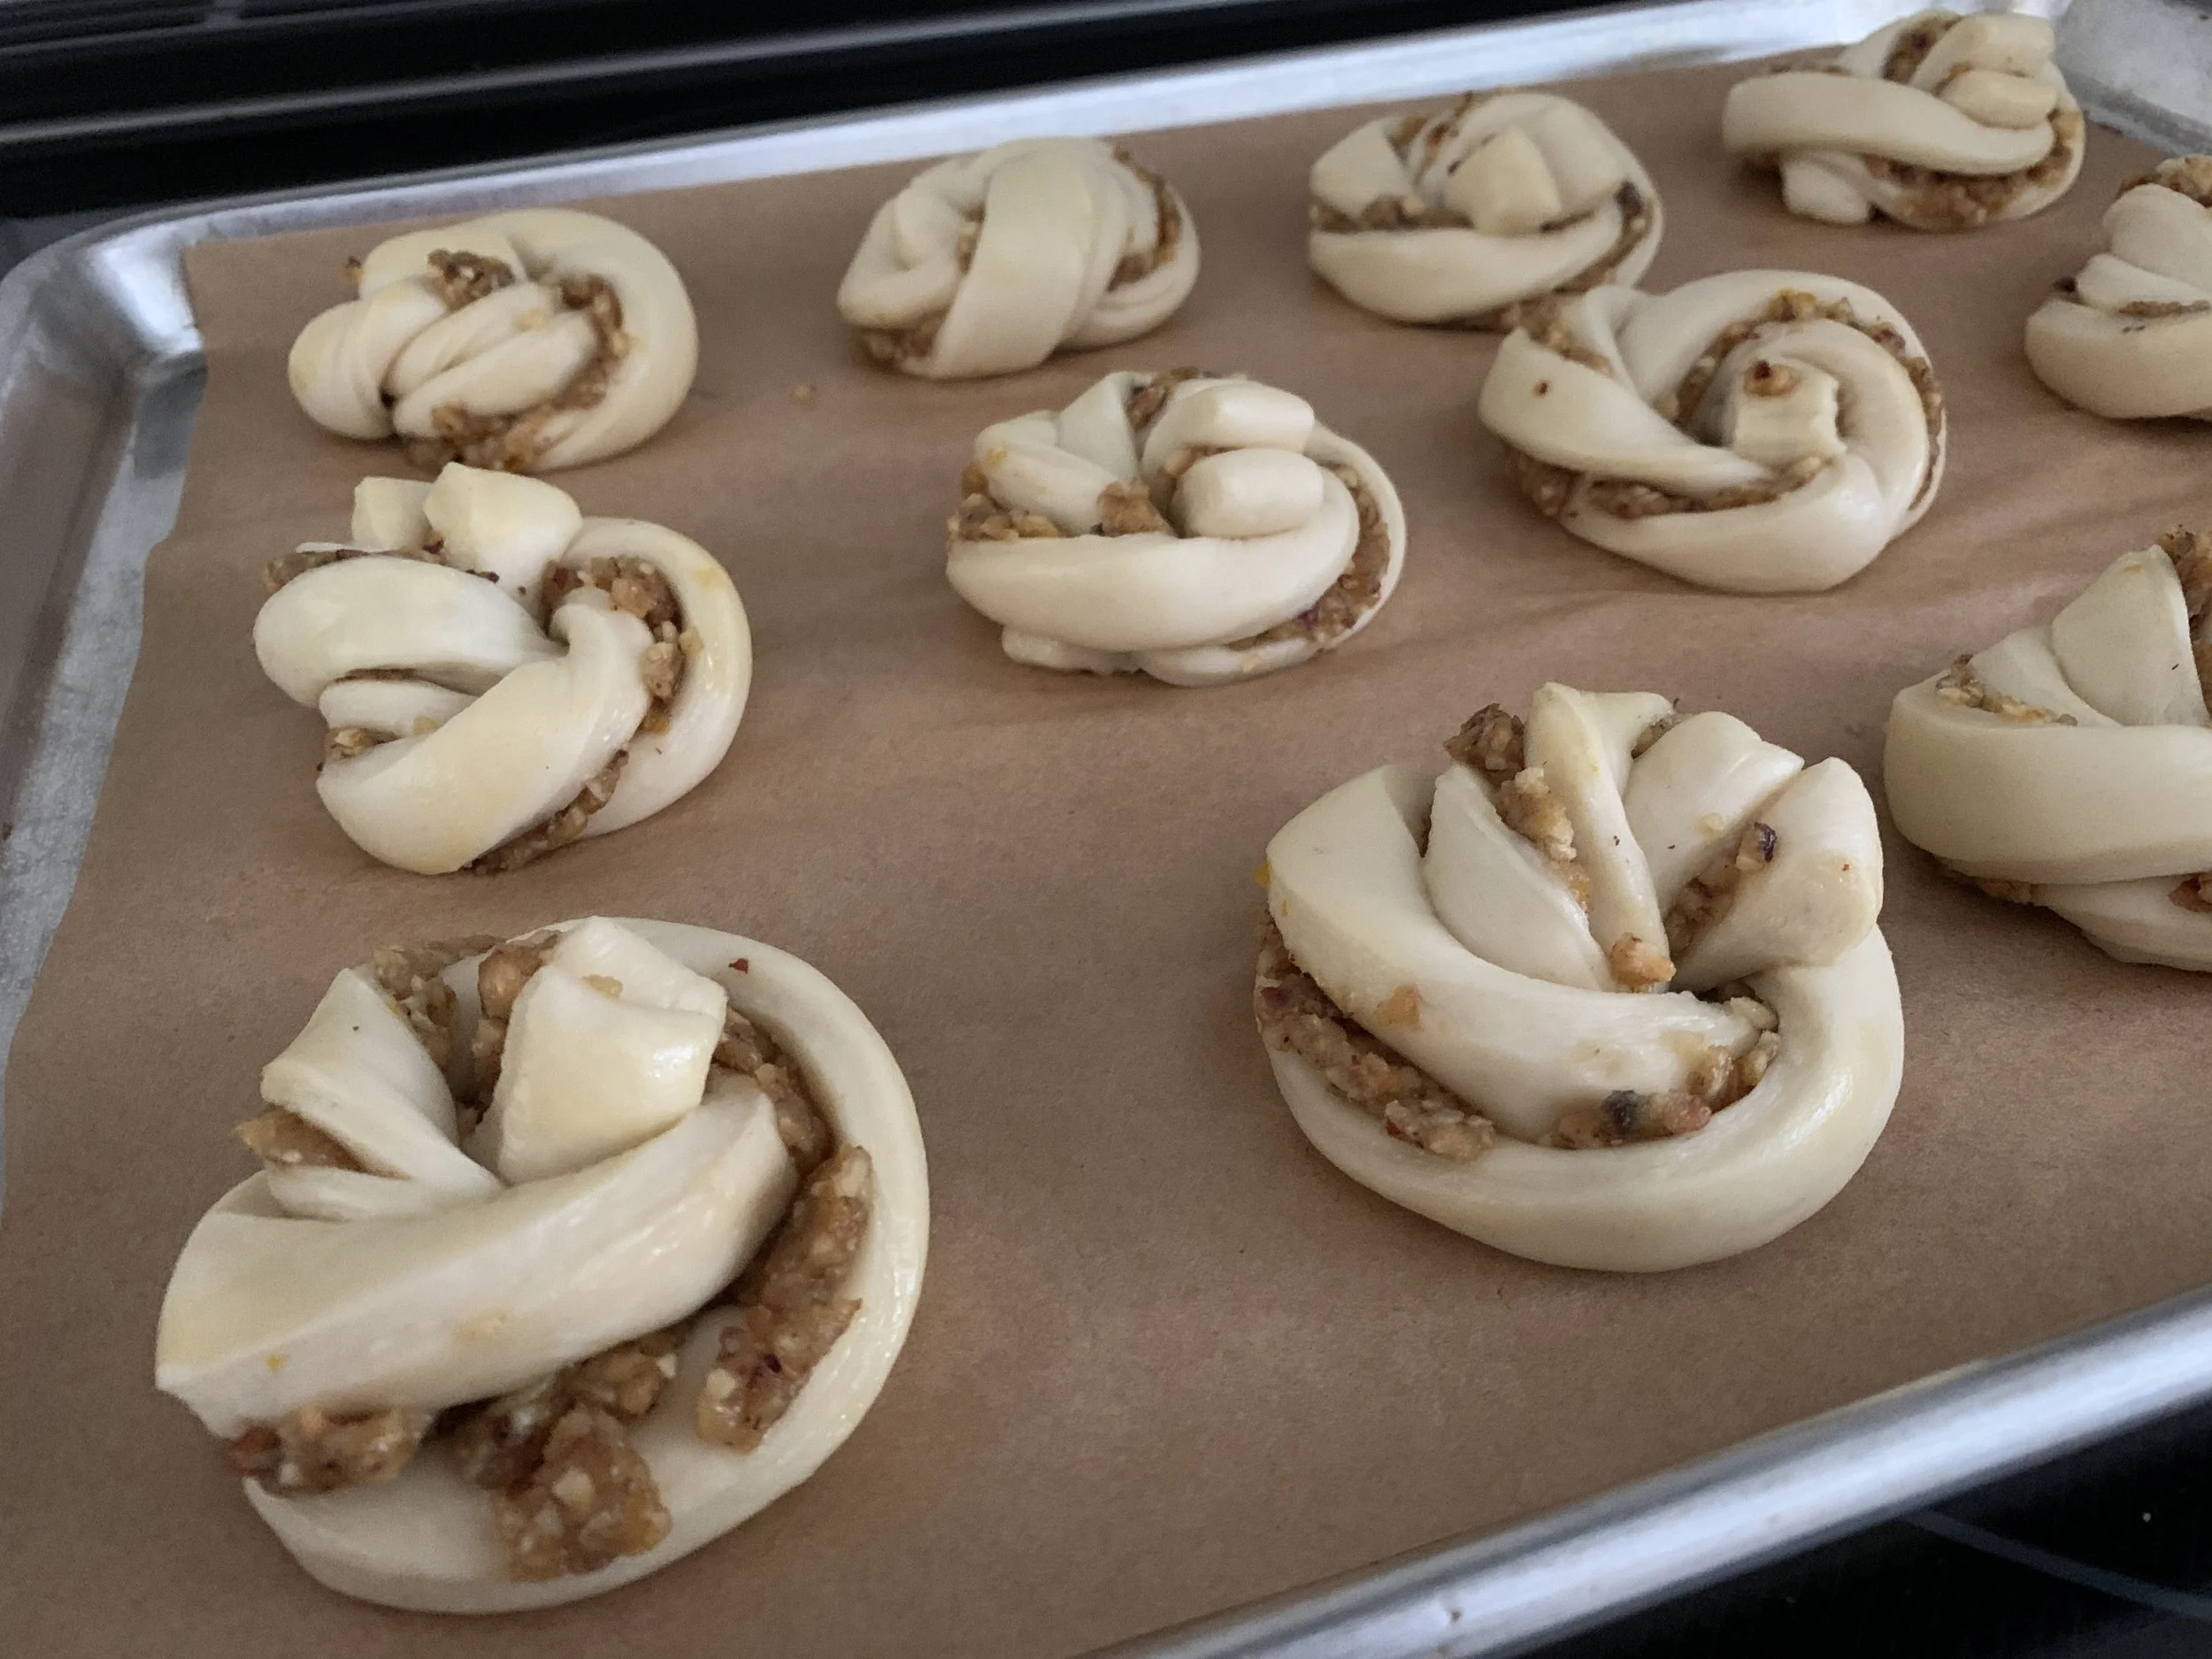
See that Pudginess?

Bake at 375º about 20-25 minutes. I brushed ‘em with some vanilla simple syrup just out of the oven.


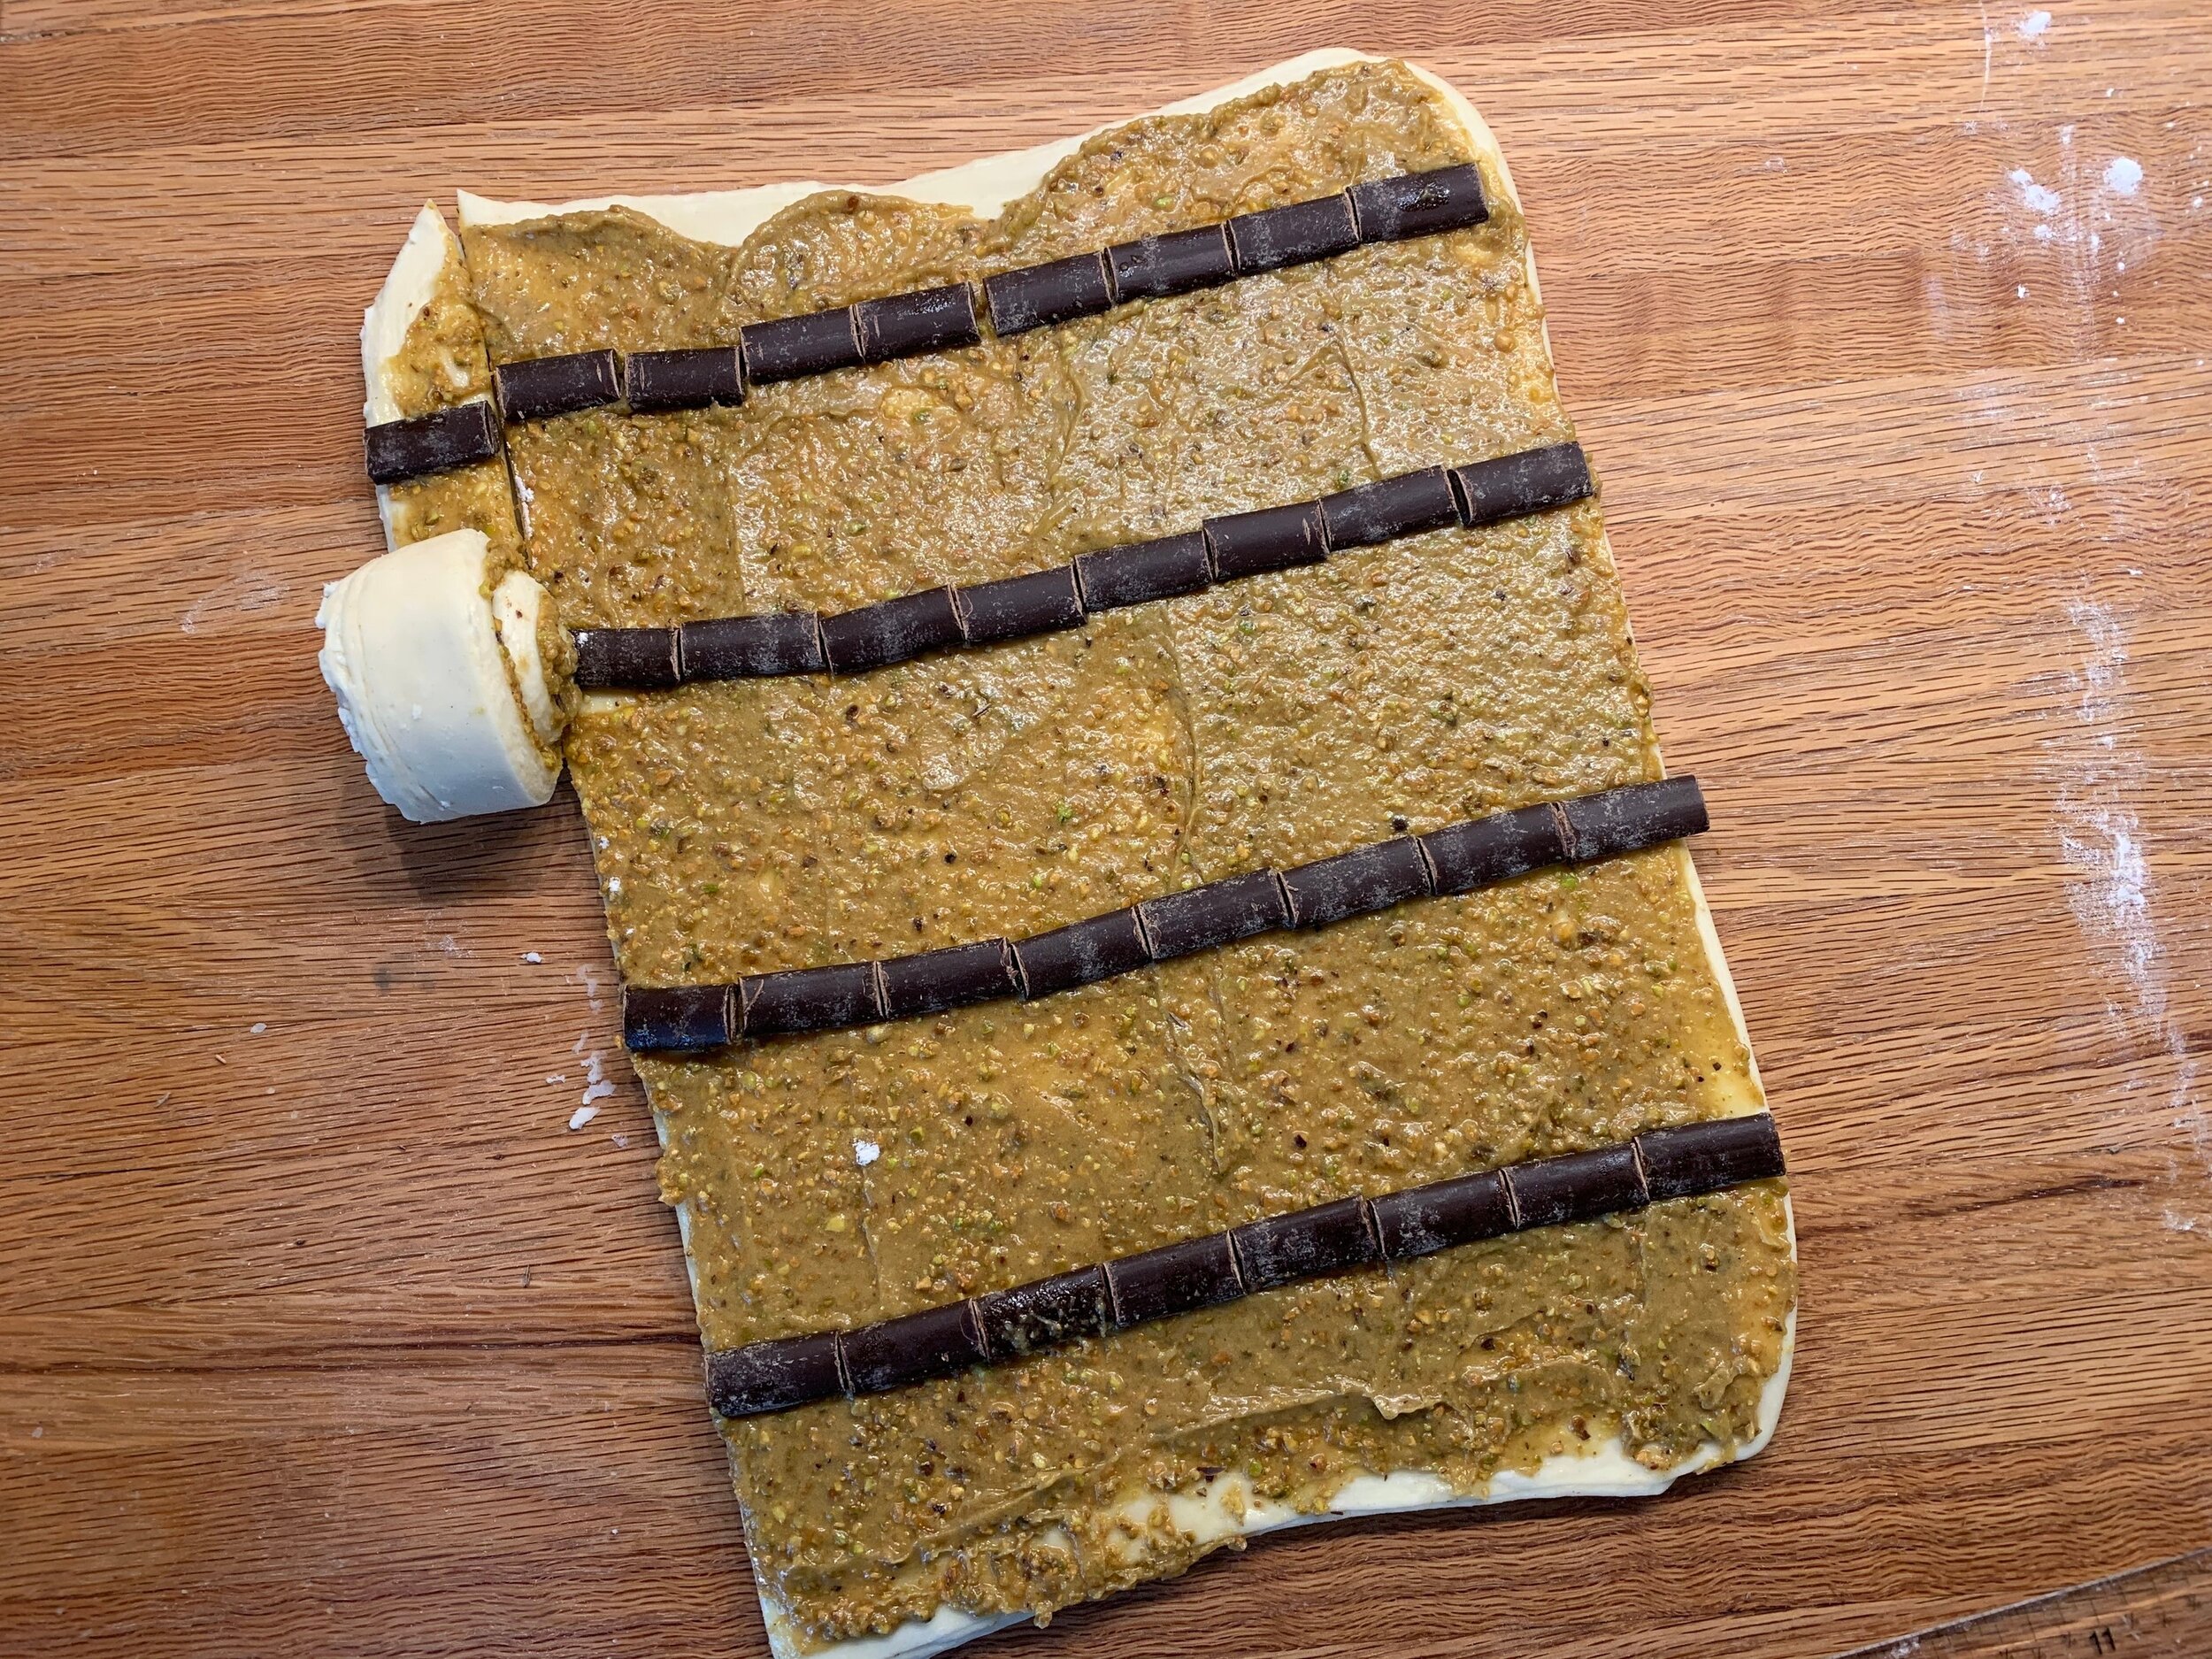
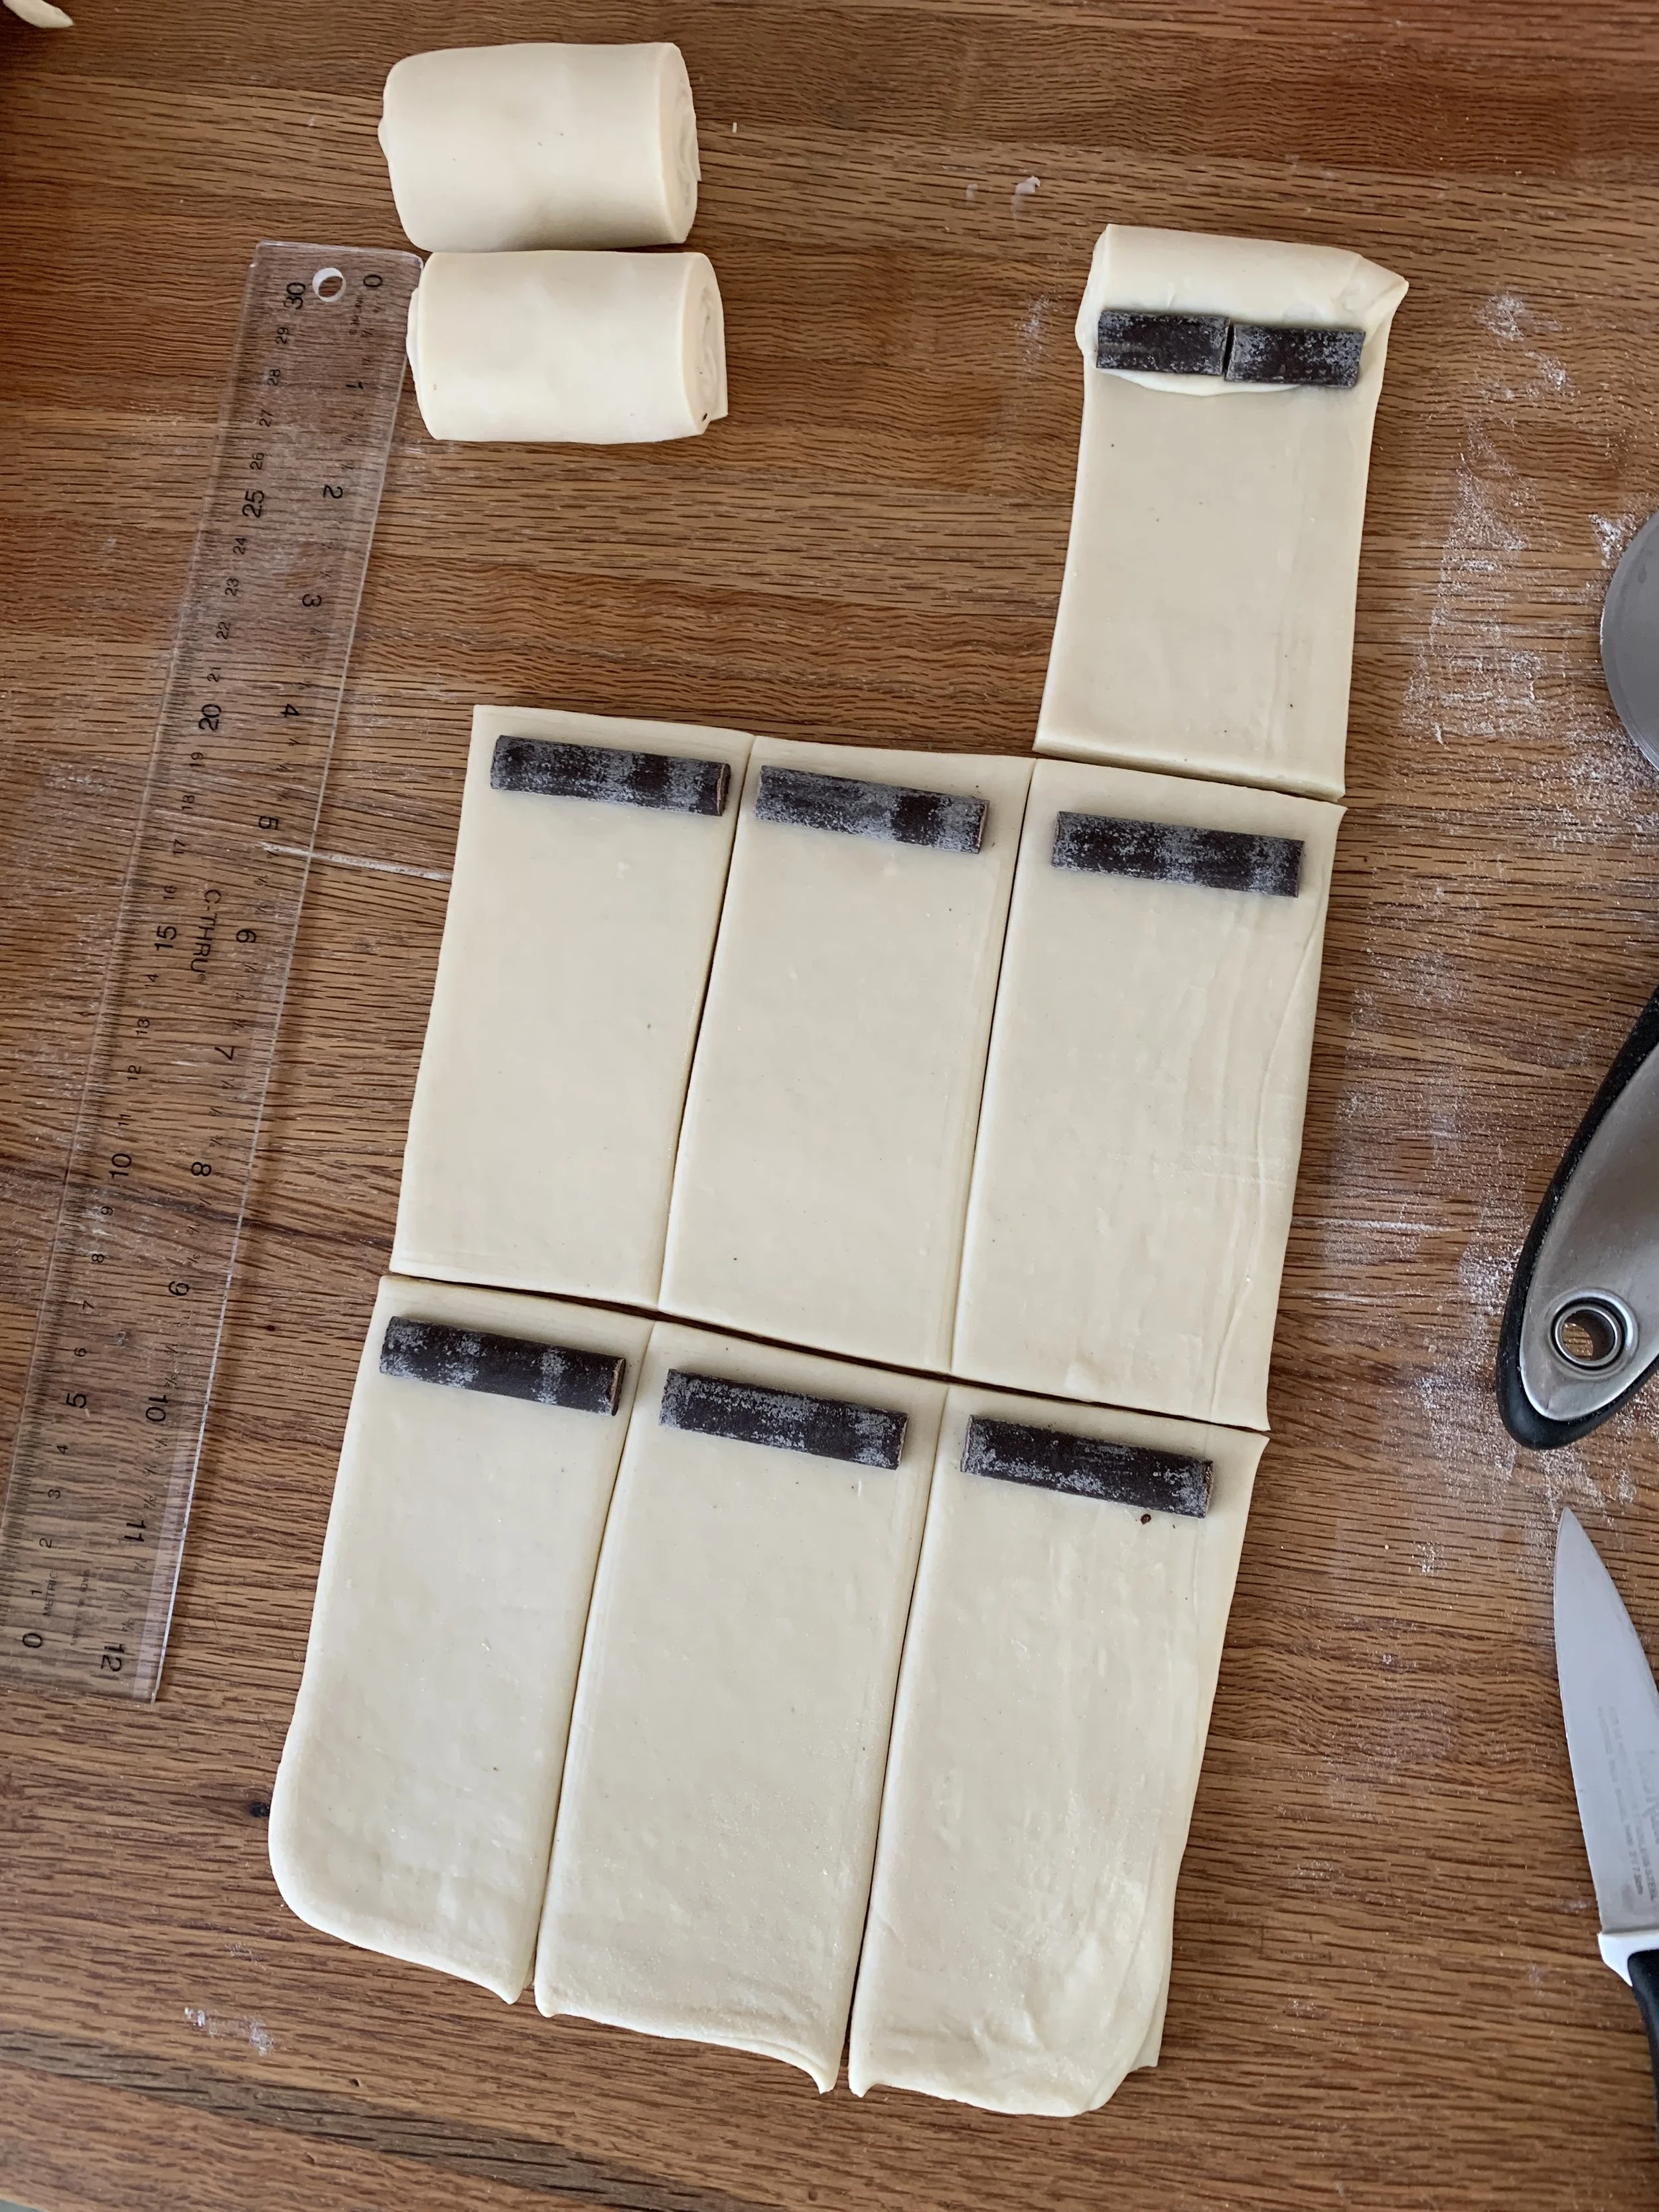
Last but not least - pain au chocolat. Normally a p.a.choc is about 3” wide (the width of the batons used) and a half batch of dough yields six standard sized pastries.

To go for a smaller, narrower version, I cut my batons down to 2”, allowing me to get 9 portions out of the half batch of dough. To achieve that, roll the dough out to a touch over 6” wide and about 15” long

For each pastry rectangle you want enough length of 4.5 to 5” to form a decent log. Place one baton piece across one end, just in a bit from the edge. Roll that edge over the baton then place the second baton (or pieces placed together) tucked up against the dough/first baton. Get it? Then roll it up into a snug log.

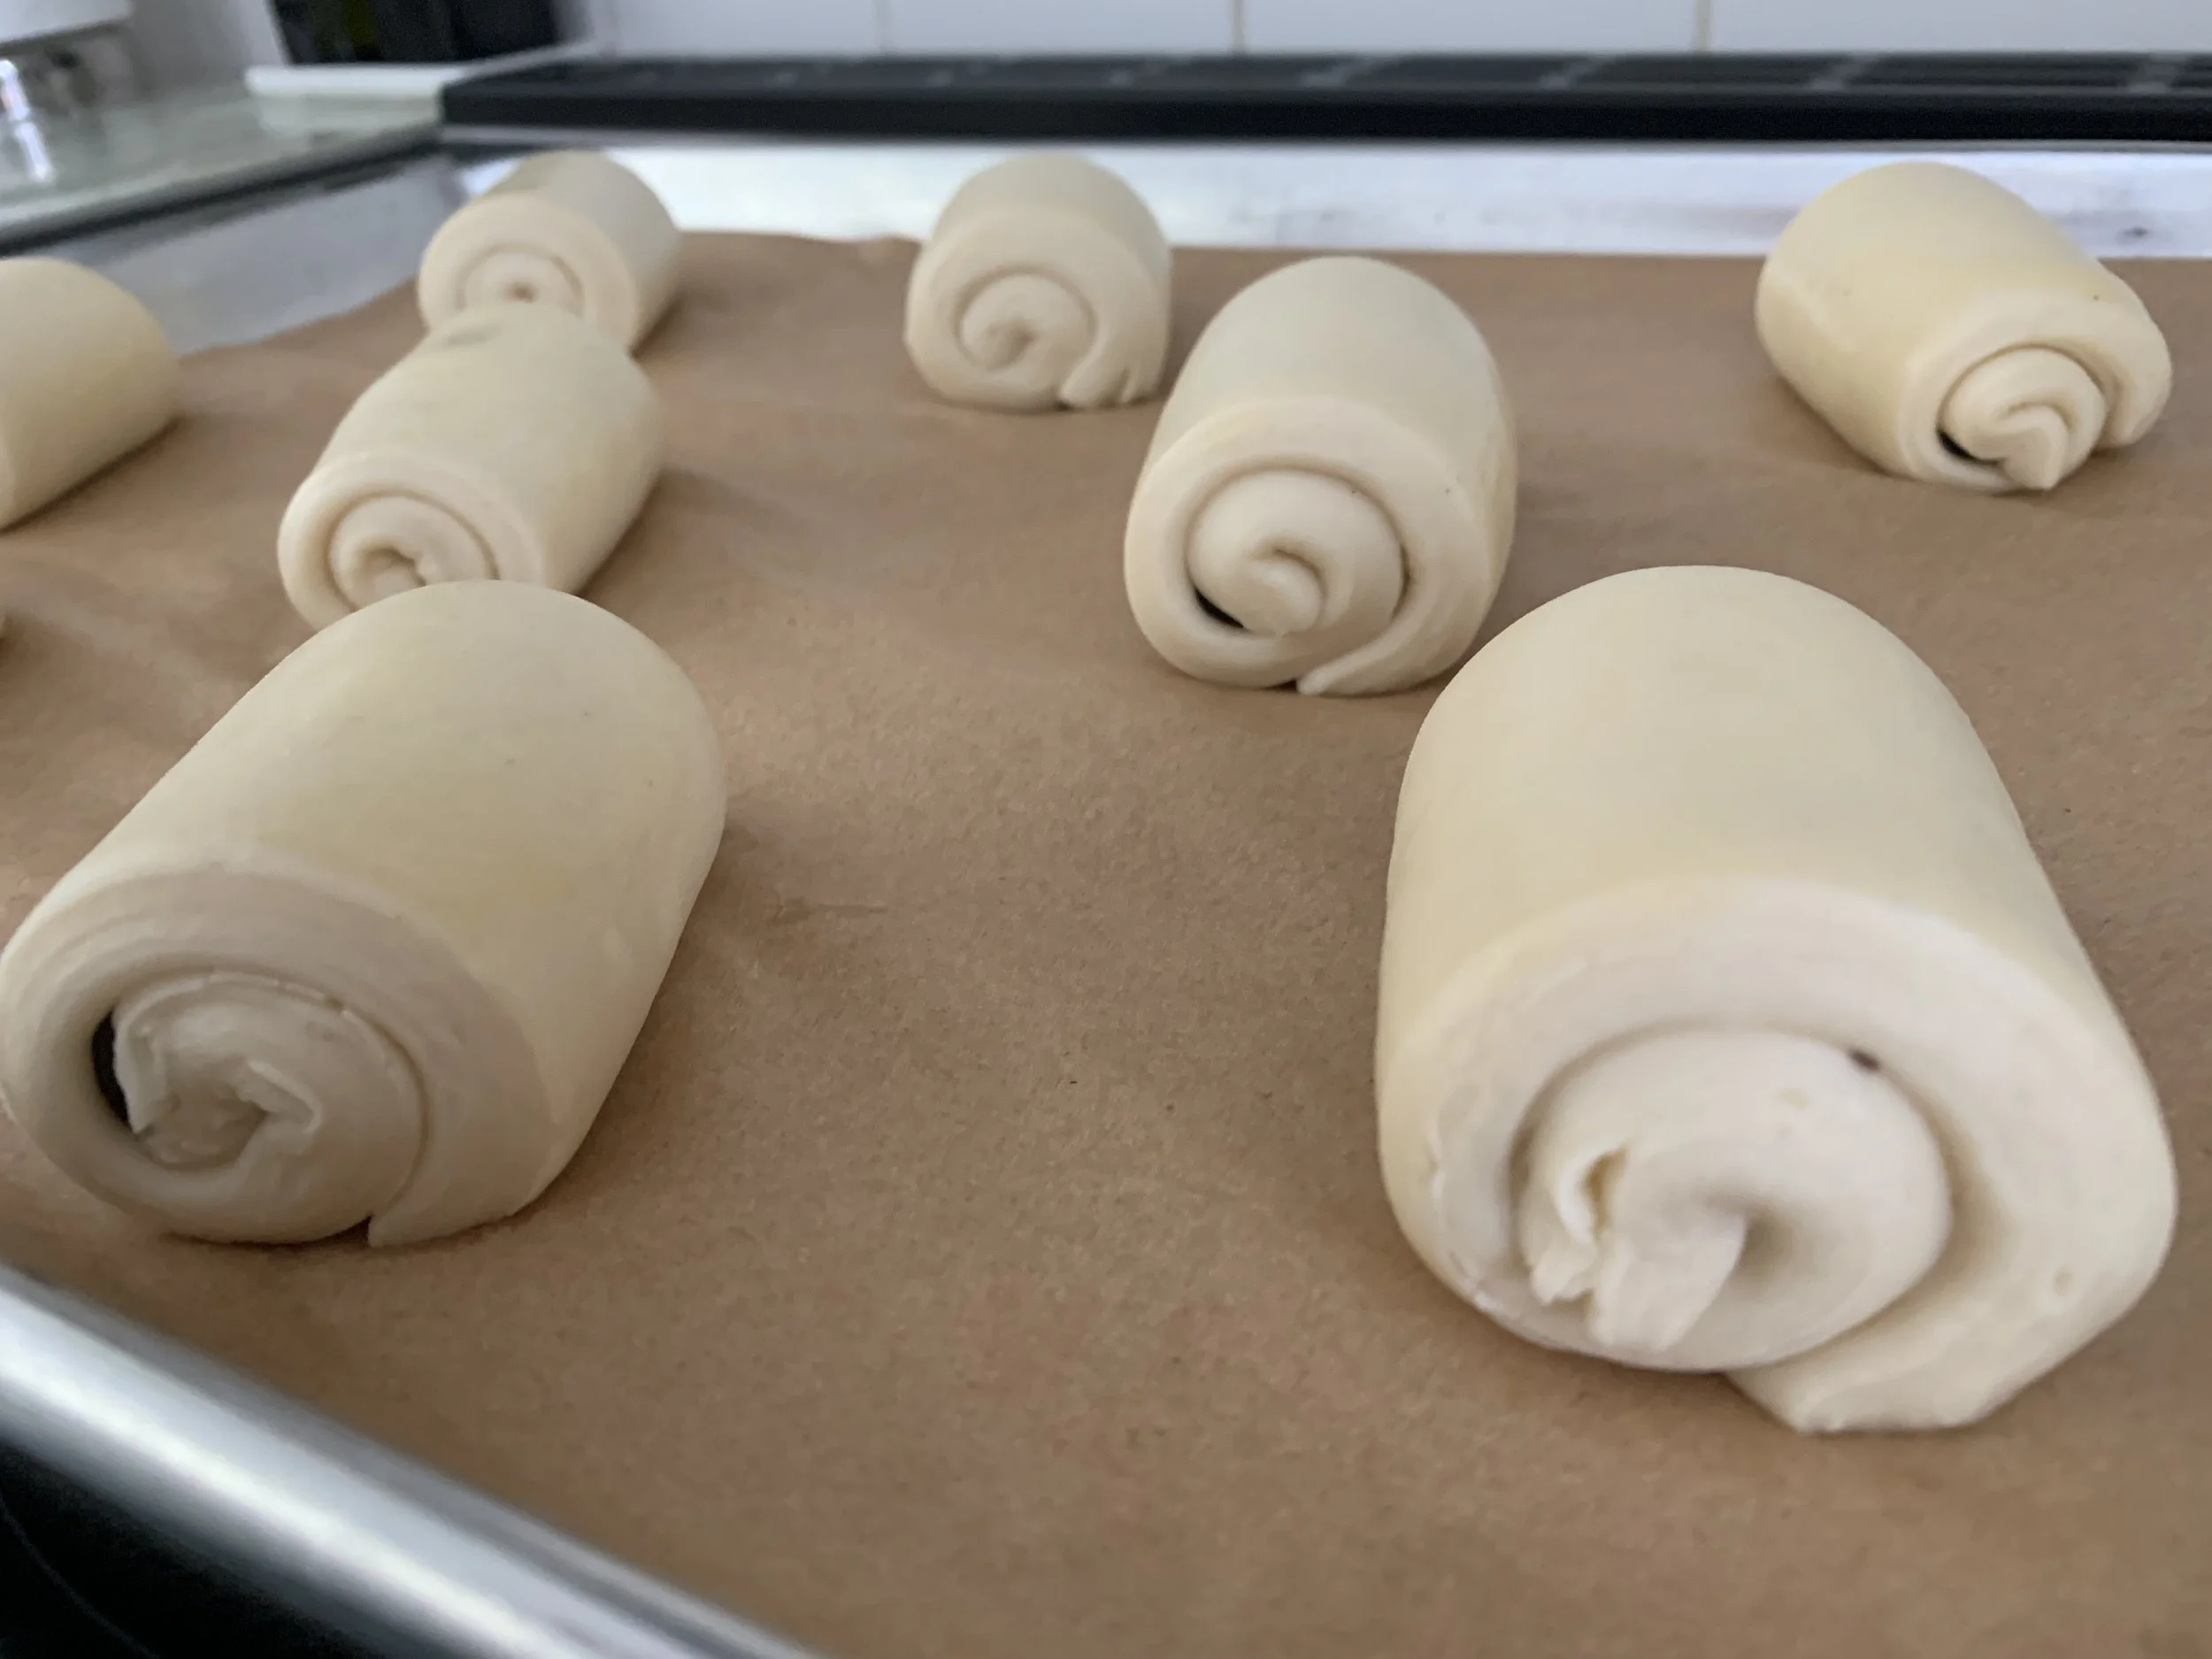
It’s important that the visible cut end of the formed roll be face down on the sheet pan - enough to keep the pastry from rolling open during baking. Don’t worry - it does happen, but they still taste good!


Below is the side view of the finished shaped logs - you can see how the end edge is just underneath. If you roll it back too much, the whole thing will unfurl during rising/baking; roll it more forward and that cut end will open right up.


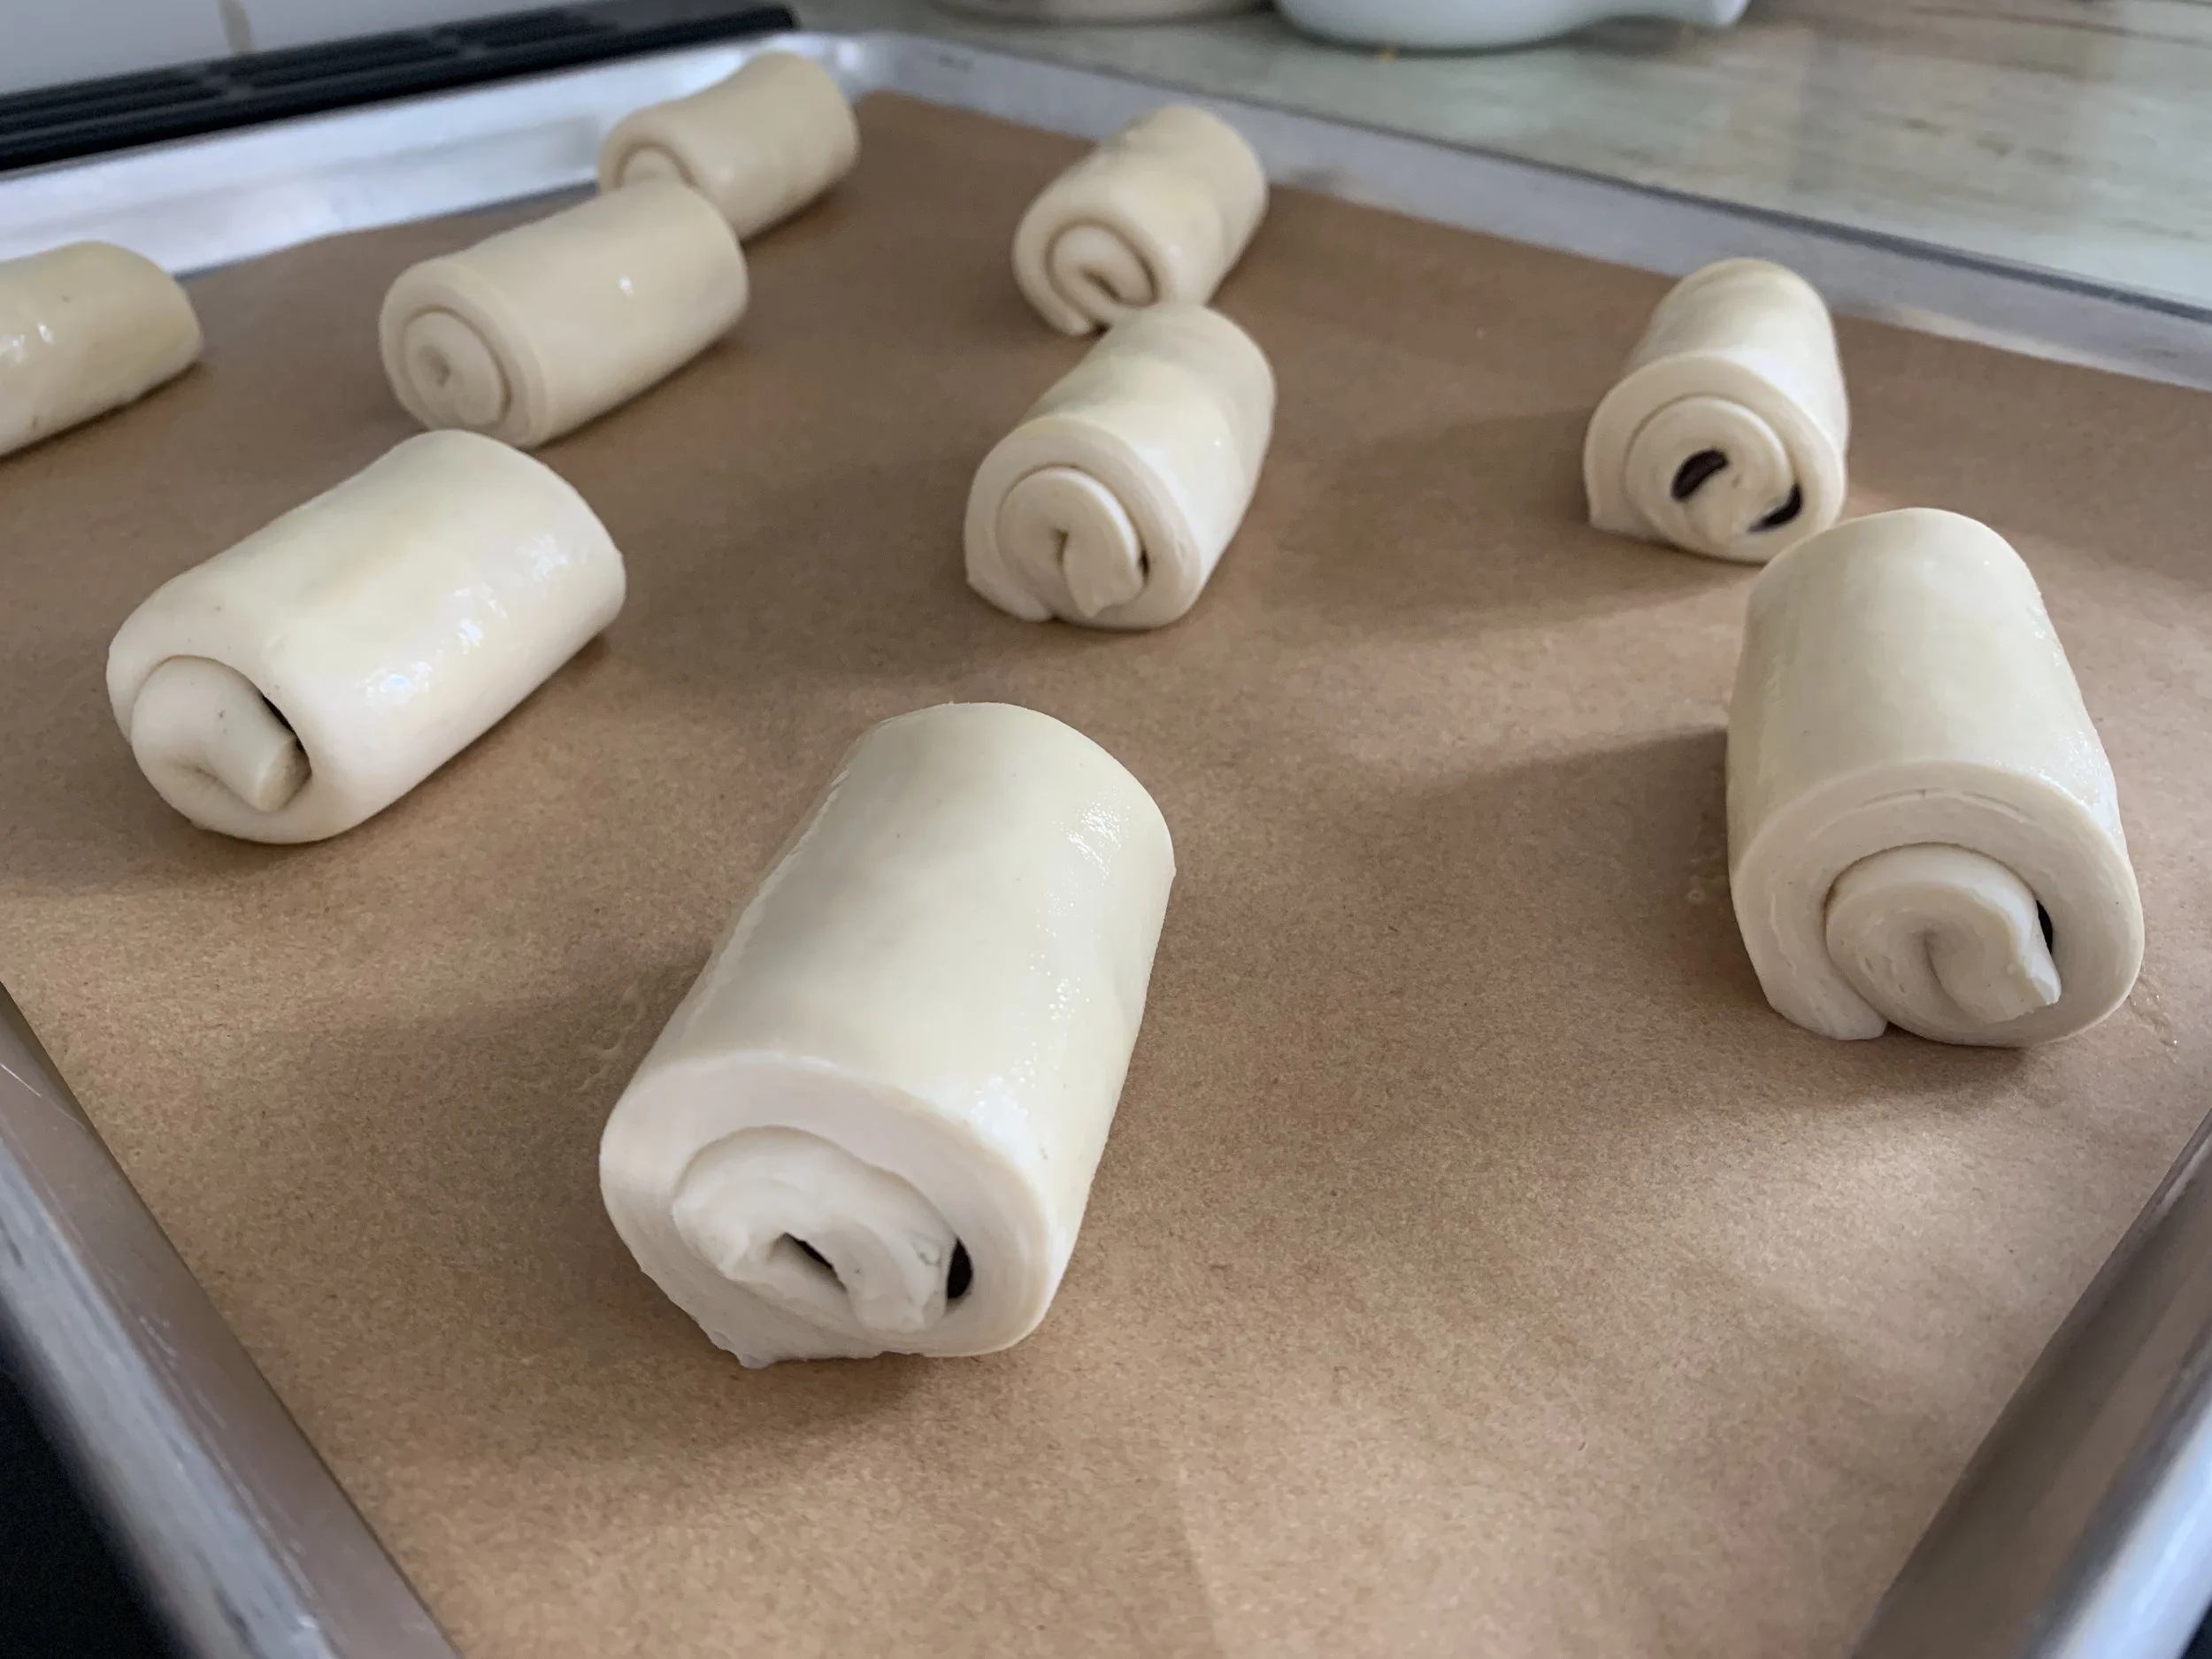
Here they are after a 2.5 hour rise. More pudgy and the laminations more visible. The dough takes on a softer more supple look and when you jiggle the tray a bit, the pastries also jiggle. It takes practice - eventually you just know.


Bake at 400º about 20 minutes. A bit of unfurling but not bad at all. You want the visible edges to be lightly browned (not pale). A sign of a well baked pain au chocolat or croissant is it’s lightness when picked up. If it feels heavy, it’s not done inside.


Okay! So much for that project. It’s pretty wintery here in west Michigan.

Like fluffy cotton balls

Recent snow and more to come

A bit of holiday cheer for you. Until next time - happy baking!

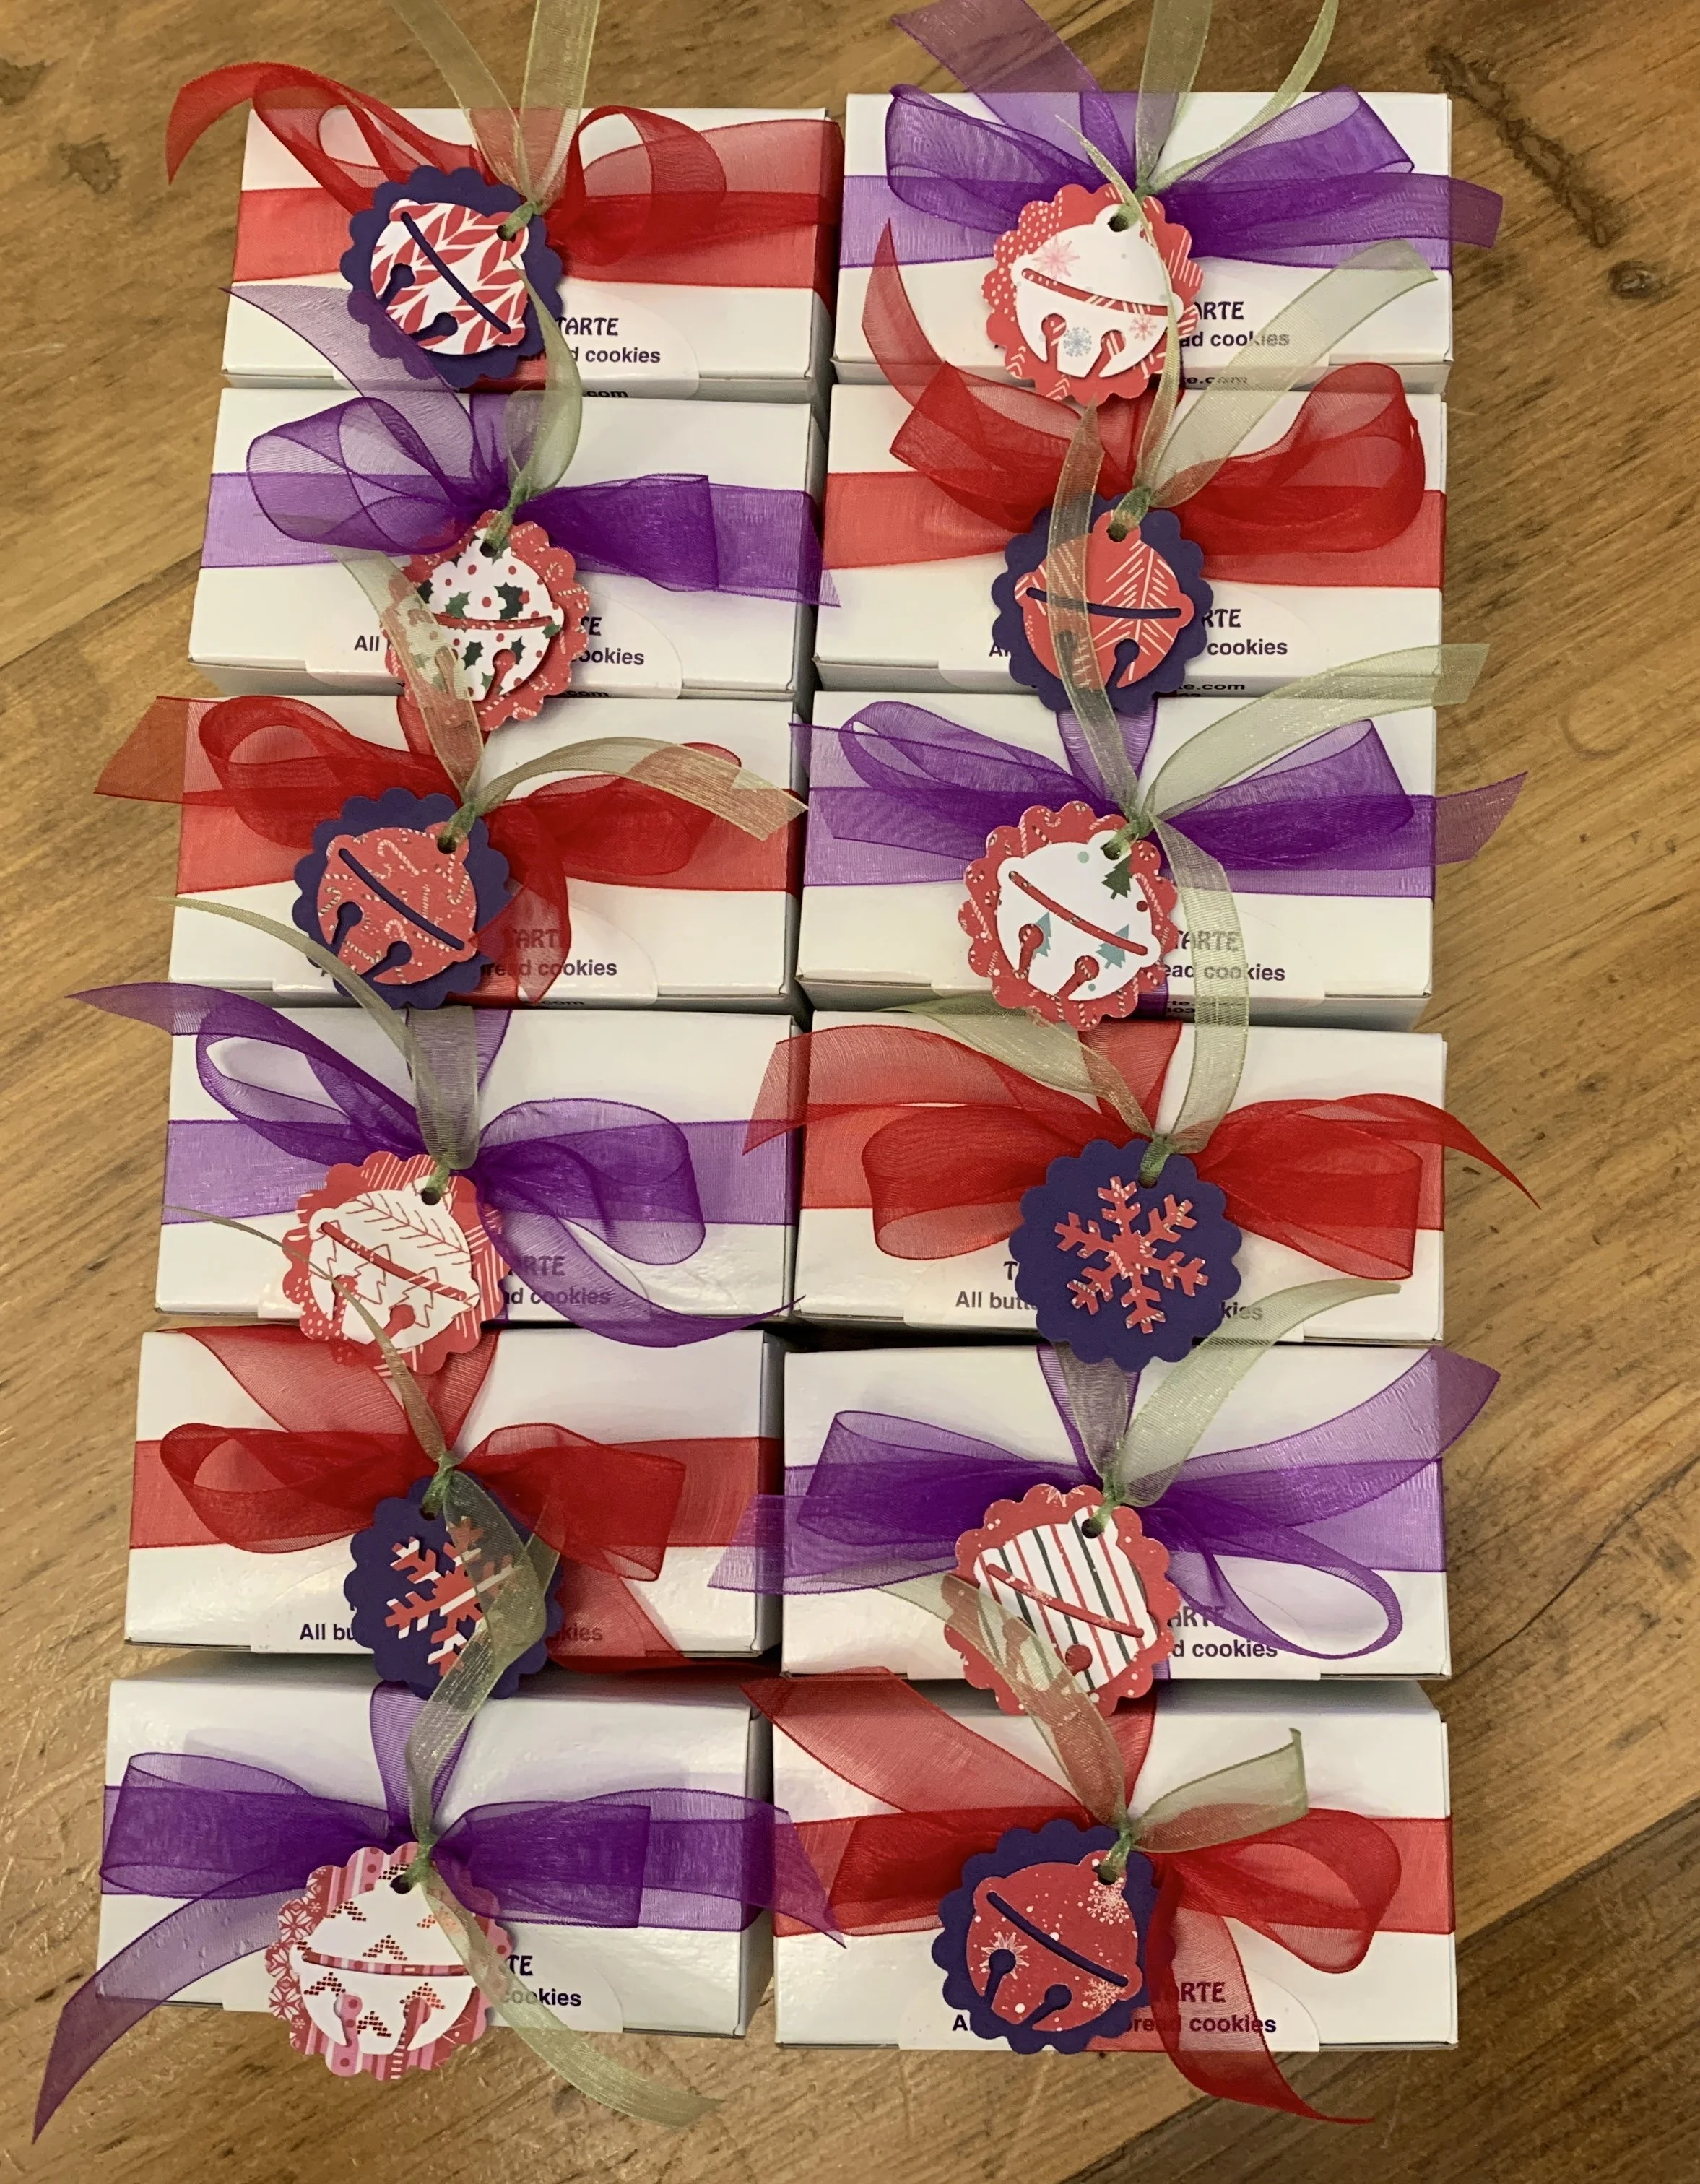
Shortbread gift boxes

Chocolate pistachio swirls

IMG_0342.jpg

Time for more fun with croissant dough! Thinking along the lines of pain au chocolat , how about using the classic chocolate batons in smaller pieces to create a chocolate pistachio swirl? Sure thing!

IMG_0318.jpg

I’ve been using Callebaut’s chocolate baking sticks ever since my Paris internship days at Pascal Pinaud’s pâtisserie on rue Monge in the 5th arr. The box in the shop looked EXACTLY like this and here I am 13 years later still buying the same brand. They’re delicious and hold up well during baking - the only problem is that Steve likes to snitch a couple every day for that oh so needed chocolate fix.

IMG_0319.JPG

I love making petite pain au chocolat with my basic croissant dough. Just the right size for a treat along side one’s morning coffee.

IMG_0132.JPG

For this project I took a slightly different approach. I had a full batch of dough on hand but, since I wanted to bake some straight-up all butter croissants for the freezer (croissant aux amandes here we come!), I used a half batch for those and the other for my choco-pistachio swirls.

I made a pistachio version of crème d’amandes by replacing the almond flour with toasted and ground pistachios. Blend butter and sugar, add in the ground pistachios, blend in egg and a bit of flour and you’re ready.

I prepped my muffin tins by buttering and coating with raw sugar.

IMG_0323.JPG

I spent a few minutes plotting the size to which I wanted to roll the dough out as well as the width of each spiral. Turns out I used 1/3 portions (~1 inch wide pieces) of the chocolate batons to create my spirals.

I planned 9 swirls from a half batch of dough. Roll the dough out to ~ 9 inches wide and ~ 12 inches high. Spread a layer of pistachio cream over the dough and place 4 rows of the 1” baton pieces across the dough, spacing the rows about 3 inches apart as seen below.

IMG_0324.JPG

Cut one inch strips, roll them up and tuck them cut side up in the prepared muffin tins.

IMG_0325.jpg
IMG_0327.jpg
IMG_0328.JPG

Cover the pan lightly with plastic wrap and let the spirals rise about 45 minutes. You should appreciate some poof and greater prominence of the laminations.

About 20-30 minutes before baking heat the oven to 375ºF.

IMG_0330.jpg

Bake approximately 20-25 minutes until golden brown and the pistachio cream is set. I typically bake 10 minutes, rotate my pan and, depending on the degree of browning, I may reduce my oven temp to 350ºF to finish the process.

I find that when baking these in a muffin tin, even when the visible portions of the swirls look nicely browned, once I pop them out of the pan there can still be paleness to the sides and bottoms. If so, I transfer the swirls (OUT of the tin) onto a parchment lined sheet pan and put them back in the oven at 325ºF for another 5-10 minutes to finish off the baking and have a nicely golden end result. It’s a bit more fuss but it does the trick.

Another way to approach this is to use buttered 80 mm open rings instead of a muffin tin or simply space the pastries an inch and a half or so apart on a parchment lined sheet pan and bake them unfettered by any type of form. They’ll probably unfurl a bit as they expand but will be “held” by their neighbors.

IMG_0333.JPG

Once cooled (or even when still a bit warm!) enjoy with a fresh cup of coffee or your favorite tea. No fancy plated shot here - just go for it!

Flaky, buttery, pistachio-y with just the right balance of chocolate. Good and good for ya as Steve loves to say!

Stay home and happy baking! We’ll get through this yet folks.

IMG_0339.JPG

Pâte feuilletée inversée and galette des rois

IMG_1089.jpg

Happy New Year everyone! I’m re-sharing this post I published FIVE years ago to celebrate Epiphany, galette des rois and a look at making reverse puff pastry, one of my favorite versions of pâte feuilletée.

Galette des rois or king's cake, is that very popular, scrumptious, almond-and-pastry-cream-filled puff pastry treat.  During the month of January in France most pâtisserie windows are laden with these "cakes" in various sizes, from the individual to the more traditional 9-10" size.  And they even sell them with a lovely golden paper crown!

Back in early 2007 I began my stage  in Paris two days before Epiphany, and the crew at Pascal Pinaud's had already assembled and frozen many unbaked galettes (ahhhhh the beauty of the freezer).  I don't recall how many were baked every day, but, suffice it to say, those babies were flying out the door - and it didn't stop for weeks to come.

Traditionally the galette is baked with a fève (literal translation: broad bean) inside, and the person who gets the slice which holds this "treat" is crowned king for the day.  Over the years the whole fève thing has evolved into a mini industry of small porcelain or ceramic figures that have become collector's items.

On one of my Parisian sojourns to Mora (a wonderful pastry supply shop with plenty of cool stuff to get your baking juices flowing) I purchased a set of 12 or so of these ceramic figures - mine were little marionettes.  I still had a couple of them left (along with a miniature olive oil bottle that I had saved from my own galette eating experience) and was looking forward to choosing one for my current project.  Imagine my disappointment when I found them in their storage spot (which I thought was safe!) all broken.  What a bummer.  But, thankfully, I had an intact sphinx that would just have to do.

2020 update note: I have since purchased additional sets of fèves at Mora and still have a number on hand just waiting to be popped into their own galettes.

Since my freezer stash of puff pastry was gone, I was inspired to make a batch of pâte feuilletée inversée or what I call reverse puff pastry.  When I was first introduced to this version in pastry school, I found it non user friendly and wondered why anyone would make it.  Buuuutttt. . . . now I have a completely different view.

Some time ago I tried the recipe from Dorie Greenspan's book "Paris Sweets" (one of my top all time fave pastry books!) and, while I found the process a bit frustrating, I loved the result!  It puffs beautifully and has a lovely texture to boot.  I've fined tuned my process to make it easier and have become a true convert to this method for pâte feuilletée.  

So here we go . . .

As is true for classic puff pastry there are two components - the butter part and the dough part - but here the butter portion is on the outside, rather than being enveloped by the dough portion.

The ingredients are simple.  What I'll call dough #1 is 400 gm of butter blended with 175 gm of flour.

The butter should be room temp - beat it with the paddle and then add the flour . . . .

Mix it until clumps form . . . .

Turn it out onto plastic film wrap . . . .

and form a block about 6" in diameter.  I use the plastic to help me form the dough into a square.

What I'll call dough #2 consists of 113 gm butter (melted first, then cooled slightly), 180 ml water,  2 teaspoons salt, 1/4 teaspoon vinegar and 390 gm flour.

Just a side note about the vinegar - I've seen puff recipes with and without it, so I did a little online review and found that it helps to tenderize the dough and also keeps it from oxidizing or turning gray. It is said to strengthen the gluten, making the dough stretchier and less likely to tear during rolling.

Mix the water, salt and vinegar and set aside.  Blend the melted, cooled butter with the flour to moisten it . . . .

Slowly pour in the water mixture, blending with the paddle on low . . . .

until the dough comes together and cleans the sides of the bowl.

Turn it out onto plastic wrap . . .

and form a square about 4-5" in diameter.

Both doughs should be chilled for a couple of hours or even over night if you need that time in your schedule.

Now the two doughs have to be formed into a package, and this is where the process gets a bit sticky (and I mean literally!).

I pull the doughs out of the fridge a good 20-30 minutes ahead so they will be somewhat malleable and easier to roll.  Since dough #1 is primarily butter it's important to work efficiently and with enough flour on your surface to avoid sticking.  I really struggled with this step for awhile, but I finally figured out that if I kept the dough between 2 sheets of film wrap, periodically lifting the film and flouring the dough surface a bit, I could roll to my heart's content.

Once I've rolled dough #1 into a rectangle I place dough #2 on one end to check for sizing.

Then I simply lift the still-plastic-wrapped #1 and fold it over to see if I have enough length to properly encase dough #2.  No butter sticking to the rolling board!

If needed I'll roll #1 a little longer and then unwrap #2, rolling it so it will fit nicely on one half of the outside dough.

 The outer dough is folded over the inner, edges pinched together, and the whole thing is wrapped and chilled for an hour or so before beginning the folds.

The dough is rough around the edges and not at all pretty at this stage, but just wait for the transformation!

After a 30-60 minute chill I roll the dough, still between plastic wrap since the outer butter is still a bit sticky, to a rectangle that is about 3 times long as it is wide. No precise measurements are necessary - just eyeball it.  Remove the top plastic . . . .

and do a "double turn", which I prefer to call a "four fold" or “book fold”, since I'm folding the dough ends into the center and then onto themselves like a book, thus creating four layers.

The completed fold . . .

Now chill the dough for another 30-60 minutes.  At this stage I see the beginning transformation from a somewhat marbled, rough, irregularly edged slab into a more uniform, smooth, supple dough. I ditch the plastic wrap for the next step, since the buttery stickiness has decreased considerably. Don’t forget to turn the dough 90 degrees to get ready for the next fold.

Now do another four fold just like the one above . . . .

and wrap and chill the dough for another 30-60 minutes.

Roll the dough into a rectangle. . . .

and now do a "single turn" or what I refer to as a "three fold" or “letter fold” since I'm folding the dough into thirds.

By this point the dough has achieved a beautiful light color, an oh-so-smooth feel, is easy to work and is simply lovely!  Oh how I love the feel of cool, smooth dough.

The dough should be chilled again before rolling it out for its final use, or it can be frozen at this point as well.  Many sources suggest that, if you plan to freeze your dough, you complete the two "double turns" or "four folds" but do the final "single turn" or "three fold" once you've thawed the dough and are ready to use it.  I tend to do all the steps and then freeze - works for me!

Whew - now that the dough is finished, let's make a galette des rois!

The rest is pretty simple: two rounds of puff pastry (I use about 175 gm of puff for the bottom and about 250 gm for the top) filled with frangipane and a fève of course and baked to golden perfection.

The filling for a 9"galette is a combination of about 250 gm of crème d'amandes (63 gm soft butter; blend in 63 gm sugar; blend in 63 gm almond flour; blend in 1 egg and a splash of vanilla; blend in 10 gm flour) and about 50 gm of pastry cream (just choose a basic recipe and go for it - use leftovers to fill eclairs or make a fresh fruit tart!).  An option is to add a tablespoon or so of rum or orange liqueur, although I prefer an almond or hazelnut liqueur if I'm going to add one.

You can make your filling a day or so ahead if you wish, then you'll be at the ready when you want to assemble and bake.

I roll out both top and bottom puff using a 9" fluted tart form to gauge the size. I hold the top layer covered in the fridge until I'm ready for it.  Don't cut the dough round yet - that happens AFTER its assembled.

Still using my fluted tart pan as a guide I pipe my almond cream in a nice coil, mounding it in the center and leaving an inch or so around the periphery.

Remove the tart pan, position the fève . . .

and now egg wash the periphery.  Gently place the top layer of puff over the cream and press firmly around the edges to seal.  Then I use my tart pan to cut the scalloped round - push down firmly and gently pull away the edges.  All right - scraps!

Lift off the tart pan, make a nice flat edge around the dome of cream and poke a little steam hole in the center.

Brush some egg wash over the surface and score decorative lines, kind of like a pinwheel, on the domed part.  Then do some linear slashes in the opposite direction along the flat edge.  I also add a little button of puff on the steam vent.

Whenever I bake anything with puff pastry, I pop the assembled goods in the freezer for 10 minutes or so before baking to stabilize the butter/dough layers.  The contrast between the cold galette and the hot oven increases the steam produced by the moisture in the butter, thereby causing the puff to puff.  Yeah!

I heat my convection oven to 450º, give the galette 5 minutes at that temp and then reduce to 425º.  After another 10-15 minutes, as I observe the baking process, I often slowly ratchet down the oven temp toward 350º over the total 30-40 minute baking time to achieve a nicely browned and fully baked end result.

Galette des rois is lovely for dessert, and to cap off the flaky, buttery, almond-creamy goodness, I garnish with lightly sweetened whipped cream, Cara-cara orange segments (love that pinkish-orange color), a drizzle of caramel and some toasted, sliced almonds.  Yes indeed!

Here’s to a fantastic baking year ahead! Happy New Year to all.

Pâte feuilletée inversée and galette des rois

Happy New Year everyone!

Epiphany is upon us, and it's time to make a galette des rois or king's cake, that very popular, scrumptious, almond-and-pastry-cream-filled puff pastry treat.  During the month of January in France most pâtisserie windows are laden with these "cakes" in various sizes, from the individual to the more traditional 9-10" size.  And they even sell them with a lovely golden paper crown!

Some years ago I began my stage in Paris two days before Epiphany, and the crew at Pascal Pinaud's had already assembled and frozen many unbaked galettes (ahhhhh the beauty of the freezer).  I don't recall how many were baked every day, but, suffice it to say, those babies were flying out the door - and it didn't stop for weeks to come.

Traditionally the galette is baked with a fève (literal translation:  broad bean) inside, and the person who gets the slice which holds this "treat" is crowned king for the day.  Over the years the whole fève thing has evolved into a mini industry of small porcelain or ceramic figures that have become collector's items.

A few years back on a Parisian sojourn to Mora (a wonderful pastry supply shop with plenty of cool stuff to get your baking juices flowing) I purchased a set of 12 or so of these ceramic figures - mine were little marionettes.  I still had a couple of them left (along with a miniature olive oil bottle that I had saved from my own galette eating experience) and was looking forward to choosing one for my current project.  Imagine my disappointment when I found them in their storage spot (which I thought was safe!) all broken.  What a bummer.  But, thankfully, I had an intact sphinx that would just have to do.

Since my freezer stash of puff pastry was gone, I was inspired to make a batch of pâte feuilletée inversée or what I call reverse puff pastry.  When I was first introduced to this version in pastry school, I found it non user friendly and wondered why anyone would make it.  Buuuutttt. . . . now I have a completely different view.

A few years ago I tried the recipe from Dorie Greenspan's book "Paris Sweets" and, while I found the process a bit frustrating, I loved the result!  It puffs beautifully and has a lovely texture to boot.  I've fined tuned my process to make it easier and have become a true convert to this method for pâte feuilletée.  

So here we go . . .

As is true for classic puff pastry there are two components in this method - the butter part and the dough part - but here the butter portion is on the outside, rather than being enveloped by the dough portion.

The ingredients are simple.  What I'll call dough #1 is 400 gm of butter blended with 175 gm of flour.

The butter should be room temp - beat it with the paddle and then add the flour . . . .

Mix it until clumps form . . . .

Turn it out onto plastic film wrap . . . .

and form a block about 6" in diameter.  I use the plastic to help me form the dough into a square.

What I'll call dough #2 consists of 113 gm butter (melted first, then cooled slightly), 180 ml water,  2 teaspoons salt, 1/4 teaspoon vinegar and 390 gm flour.

Just a side note about the vinegar - I've seen puff recipes with and without it, so I did a little online review and found that it helps to tenderize the dough and also keeps it from oxidizing or turning gray. It is said to strengthen the gluten, making the dough stretchier and less likely to tear during rolling.

Mix the water, salt and vinegar and set aside.  Blend the melted, cooled butter with the flour to moisten it . . . .

Slowly pour in the water mixture, blending with the paddle on low . . . .

until the dough comes together and cleans the sides of the bowl.

Turn it out onto plastic wrap . . .

and form a square about 4-5" in diameter.

Both doughs should be chilled for a couple of hours or even over night if you need that time in your schedule.

Now the two doughs have to be formed into a package, and this is where the process gets a bit sticky (and I mean literally!).

I pull the doughs out of the fridge a good 20-30 minutes ahead so they will be somewhat malleable and easier to roll.  Since dough #1 is primarily butter it's important to work efficiently and with enough flour on your surface to avoid sticking.  I really struggled with this step for awhile, but I finally figured out that if I kept the dough between 2 sheets of film wrap, periodically lifting the film and flouring the dough surface a bit, I could roll to my heart's content.

Once I've rolled dough #1 into a rectangle I place dough #2 on one end to check for sizing.

Then I simply lift the still-plastic-wrapped #1 and fold it over to see if I have enough length to properly encase dough #2.  No butter sticking to the rolling board!

If needed I'll roll #1 a little longer and then unwrap #2, rolling it so it will fit nicely on one half of the outside dough.

 The outer dough is folded over the inner, edges pinched together, and the whole thing is wrapped and chilled for an hour or so before beginning the folds.

The dough is rough around the edges and not at all pretty at this stage, but just wait for the transformation!

After a 30-60 minute chill I roll the dough, still between plastic wrap since the outer butter is still a bit sticky, to a rectangle that is about 3 times long as it is wide. No precise measurements are necessary - just eyeball it.  Remove the top plastic . . . .

and do a "double turn", which I prefer to call a "four fold", since I'm folding the dough ends into the center and then onto themselves, thus creating four layers.

The completed fold . . .

Now chill the dough for another 30-60 minutes.  At this stage I see the beginning transformation from a somewhat marbled, rough, irregularly edged slab into a more uniform, smooth, supple dough.  I ditch the plastic wrap for the next step, since the buttery stickiness has decreased considerably.

Now do another four fold just like the one above . . . .

and wrap and chill the dough for another 30-60 minutes.

Roll the dough into a rectangle. . . .

and now do a "single turn" or what I refer to as a "three fold" since I'm folding the dough into thirds.

By this point the dough has achieved a beautiful light color, an oh-so-smooth feel, is easy to work and is simply lovely!  Oh how I love the feel of cool, smooth dough.

The dough should be chilled again before rolling it out for its final use, or it can be frozen at this point as well.  Many sources suggest that, if you plan to freeze your dough, you complete the two "double turns" or "four folds" but do the final "single turn" or "three fold" once you've thawed the dough and are ready to use it.  I tend to do all the steps and then freeze - works for me!

Whew - now that the dough is finished, let's make a galette des rois!

The rest is pretty simple: two rounds of puff pastry (I use about 175 gm of puff for the bottom and about 250 gm for the top) filled with an almond cream (and a fève of course) and baked to golden perfection.

The filling for a 9"galette is a combination of about 250 gm of crème d'amandes (63 gm soft butter; blend in 63 gm sugar; blend in 63 gm almond flour; blend in 1 egg and a splash of vanilla; blend in 10 gm flour) and about 50 gm of pastry cream (just choose a basic recipe and go for it!).  An option is to add a tablespoon or so of rum or orange liqueur, although I prefer an almond or hazelnut liqueur if I'm going to add one.

You can make your filling a day or so ahead if you wish, then you'll be at the ready when you want to assemble and bake.

I roll out both top and bottom puff using a 9" fluted tart form to gauge the size. I hold the top layer covered in the fridge until I'm ready for it.  Don't cut the dough round yet - that happens AFTER its assembled.

Still using my fluted tart pan as a guide I pipe my almond cream in a nice coil, mounding it in the center and leaving an inch or so around the periphery.

Remove the tart pan, position the fève . . .

and now egg wash the periphery.  Gently place the top layer of puff over the cream and press firmly around the edges to seal.  Then I use my tart pan to cut the scalloped round - push down firmly and gently pull away the edges.  All right - scraps!

Lift off the tart pan, make a nice flat edge around the dome of cream and poke a little steam hole in the center.

Brush some egg wash over the surface and score decorative lines, kind of like a pinwheel, on the domed part.  Then do some linear slashes in the opposite direction along the flat edge.  I also add a little button of puff on the steam vent.

Whenever I bake anything with puff pastry, I pop the assembled goods in the freezer for 10 minutes or so before baking to stabilize the butter/dough layers.  The contrast between the cold galette and the hot oven increases the steam produced by the moisture in the butter, thereby causing the puff to puff.  Yeah!

I heat my convection oven to 450º, give the galette 5 minutes at that temp and then reduce to 425º.  After another 10-15 minutes, as I observe the baking process, I often slowly ratchet down the oven temp toward 350º over the total 30-40 minute baking time to achieve a nicely browned and fully baked end result.

We were heading to brother Dick and sister-in-law Dorothy's for supper, also joined by brother-in-law Carl.  The galette was destined for dessert so to cap off the flaky, buttery, almond-creamy goodness, I added some lightly sweetened whipped cream, Cara-cara orange segments (love that pinkish-orange color), a drizzle of caramel and some toasted, sliced almonds.  Yes indeed!

None of the five of us had the honor of being king for the day since the fève was still hidden, but the leftovers were destined for breakfast the next morning. Who was the lucky one - Dick, Dor or Carl??

Until next year!