Sesame brioche rolls

Hmmmm . . . more sesame you say? This time let’s talk tahini brioche. While I don’t always have tahini on hand, once purchased and used for its intended project, it sits in the cupboard waiting. I think Steve and I bought a jar some weeks back to make a dressing or marinade for something. Fortunately the shelf life is good, but I don’t like to let it linger too long before figuring out ways to use it up.

Always up for trying a new brioche recipe, I thought I’d give this one a try. As was true of the sesame cumin crackers of which I wrote recently, the recipe comes from Sofra, the popular middle Eastern bakery/cafe in Cambridge MA. It was presented in the holiday 2018 issue of King Arthur Flour’s erstwhile magazine “SIFT”, a beautiful, glossy presentation of all things baking and pastry. Please note - all credit goes to Sofra and King Arthur - I’m simply here to share my experience as I went through the steps.

i love a buttery brioche and have tried and tweaked many a recipe. My current go to recipe involves the usual long mixing time for this enriched dough, followed by an overnight rest in the fridge before dividing, shaping and baking the intended rolls or buns or whatever. The primary difference with Sofra’s is the first step of making a sponge before mixing the final dough. A sponge belongs to the family of pre-ferments like poolish, biga, pâte fermentée and levain and is intended to give the dough a chance to develop more flavor as well as give it a longer shelf life.

After a quick review of pre-ferments in Rose Levy Beranbaum’s “The Bread Bible”, as well as a few recipes that utilize the sponge approach, I realized that the sponge in this brioche sits for a short 30 minutes. It seems that 1-4 hours at room temperature or even overnight refrigeration are more typical, buuuuuut . . . . . I opted to follow the recipe - you gotta try, right!

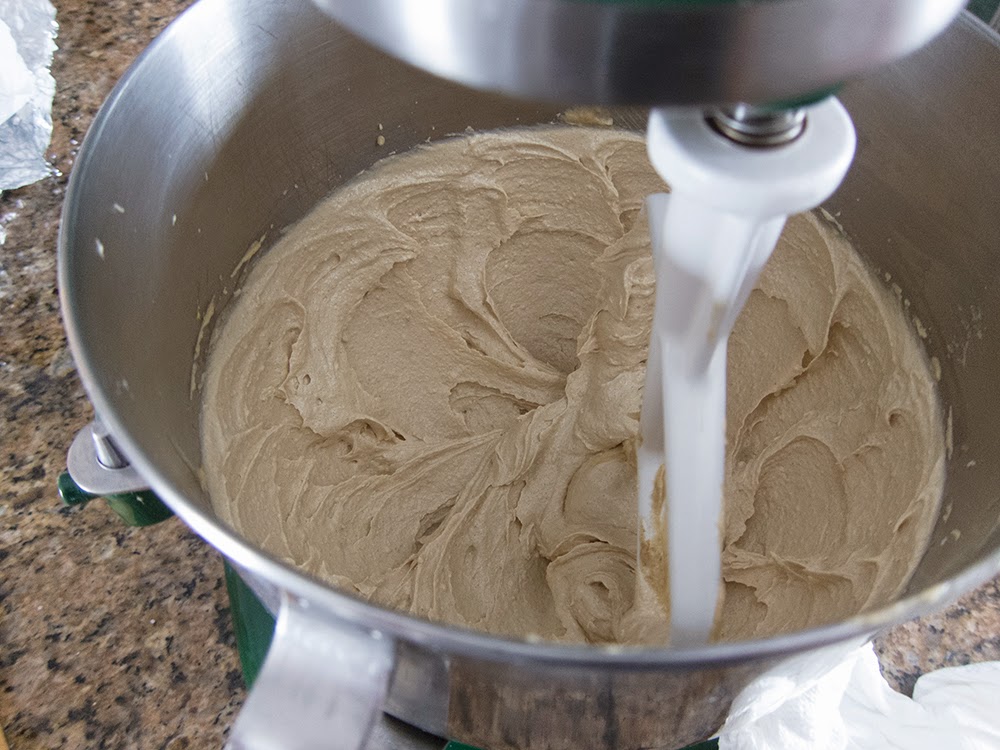
The image below shows my mise with the sponge not quite at the 30 minute stage (as you see above).

OK - let’s go through the steps. For the sponge blend together 60 ml / 1/4 cup tepid whole milk, 7 g / 2.25 teaspoons instant yeast, 1/2 teaspoon sugar in the bowl of a stand mixer; once the yeast has dissolved, whisk in 2 large eggs and stir in 130 g / 1 cup all purpose flour.

Sprinkle another 65 g / 1/2 cup all purpose flour over the top of the mixture.

Cover and set aside for 30 minutes until the top flour layer is cracked, a sign that the yeast has started its work.

Now add to the sponge: 227 g / 1.75 cups all purpose flour, 50 g / 1/4 cup sugar, 10 g / 2 teaspoons salt, 3 large eggs, 1 large yolk and 110 g /~1/3 cup well stirred tahini. Mix on low speed with the dough hook to bring everything together. Then increase to medium for 8-10 minutes until the dough starts forming around the hook.

Scrape down the sides and give it a high speed mix for a minute more.

On medium speed add half (100 g) of the cold, cubed butter; mix until incorporated; add the remaining 100 g butter and mix about 10-15 minutes more until silky smooth. Give it one more minute on medium high - you want the dough pulling away from the sides of the bowl.

Oooooooh - love that sheen!

Lightly butter a 3 or 4 quart bowl or container, place the dough in and press into a rectangle. Fold the edges in, turn the dough over and press again into a rectangle. Cover or tightly wrap and refrigerate 6 hours or overnight. Being such an enriched dough, it doesn’t tend to rise too aggressively.

Here it is the next morning. Rise and shine!!

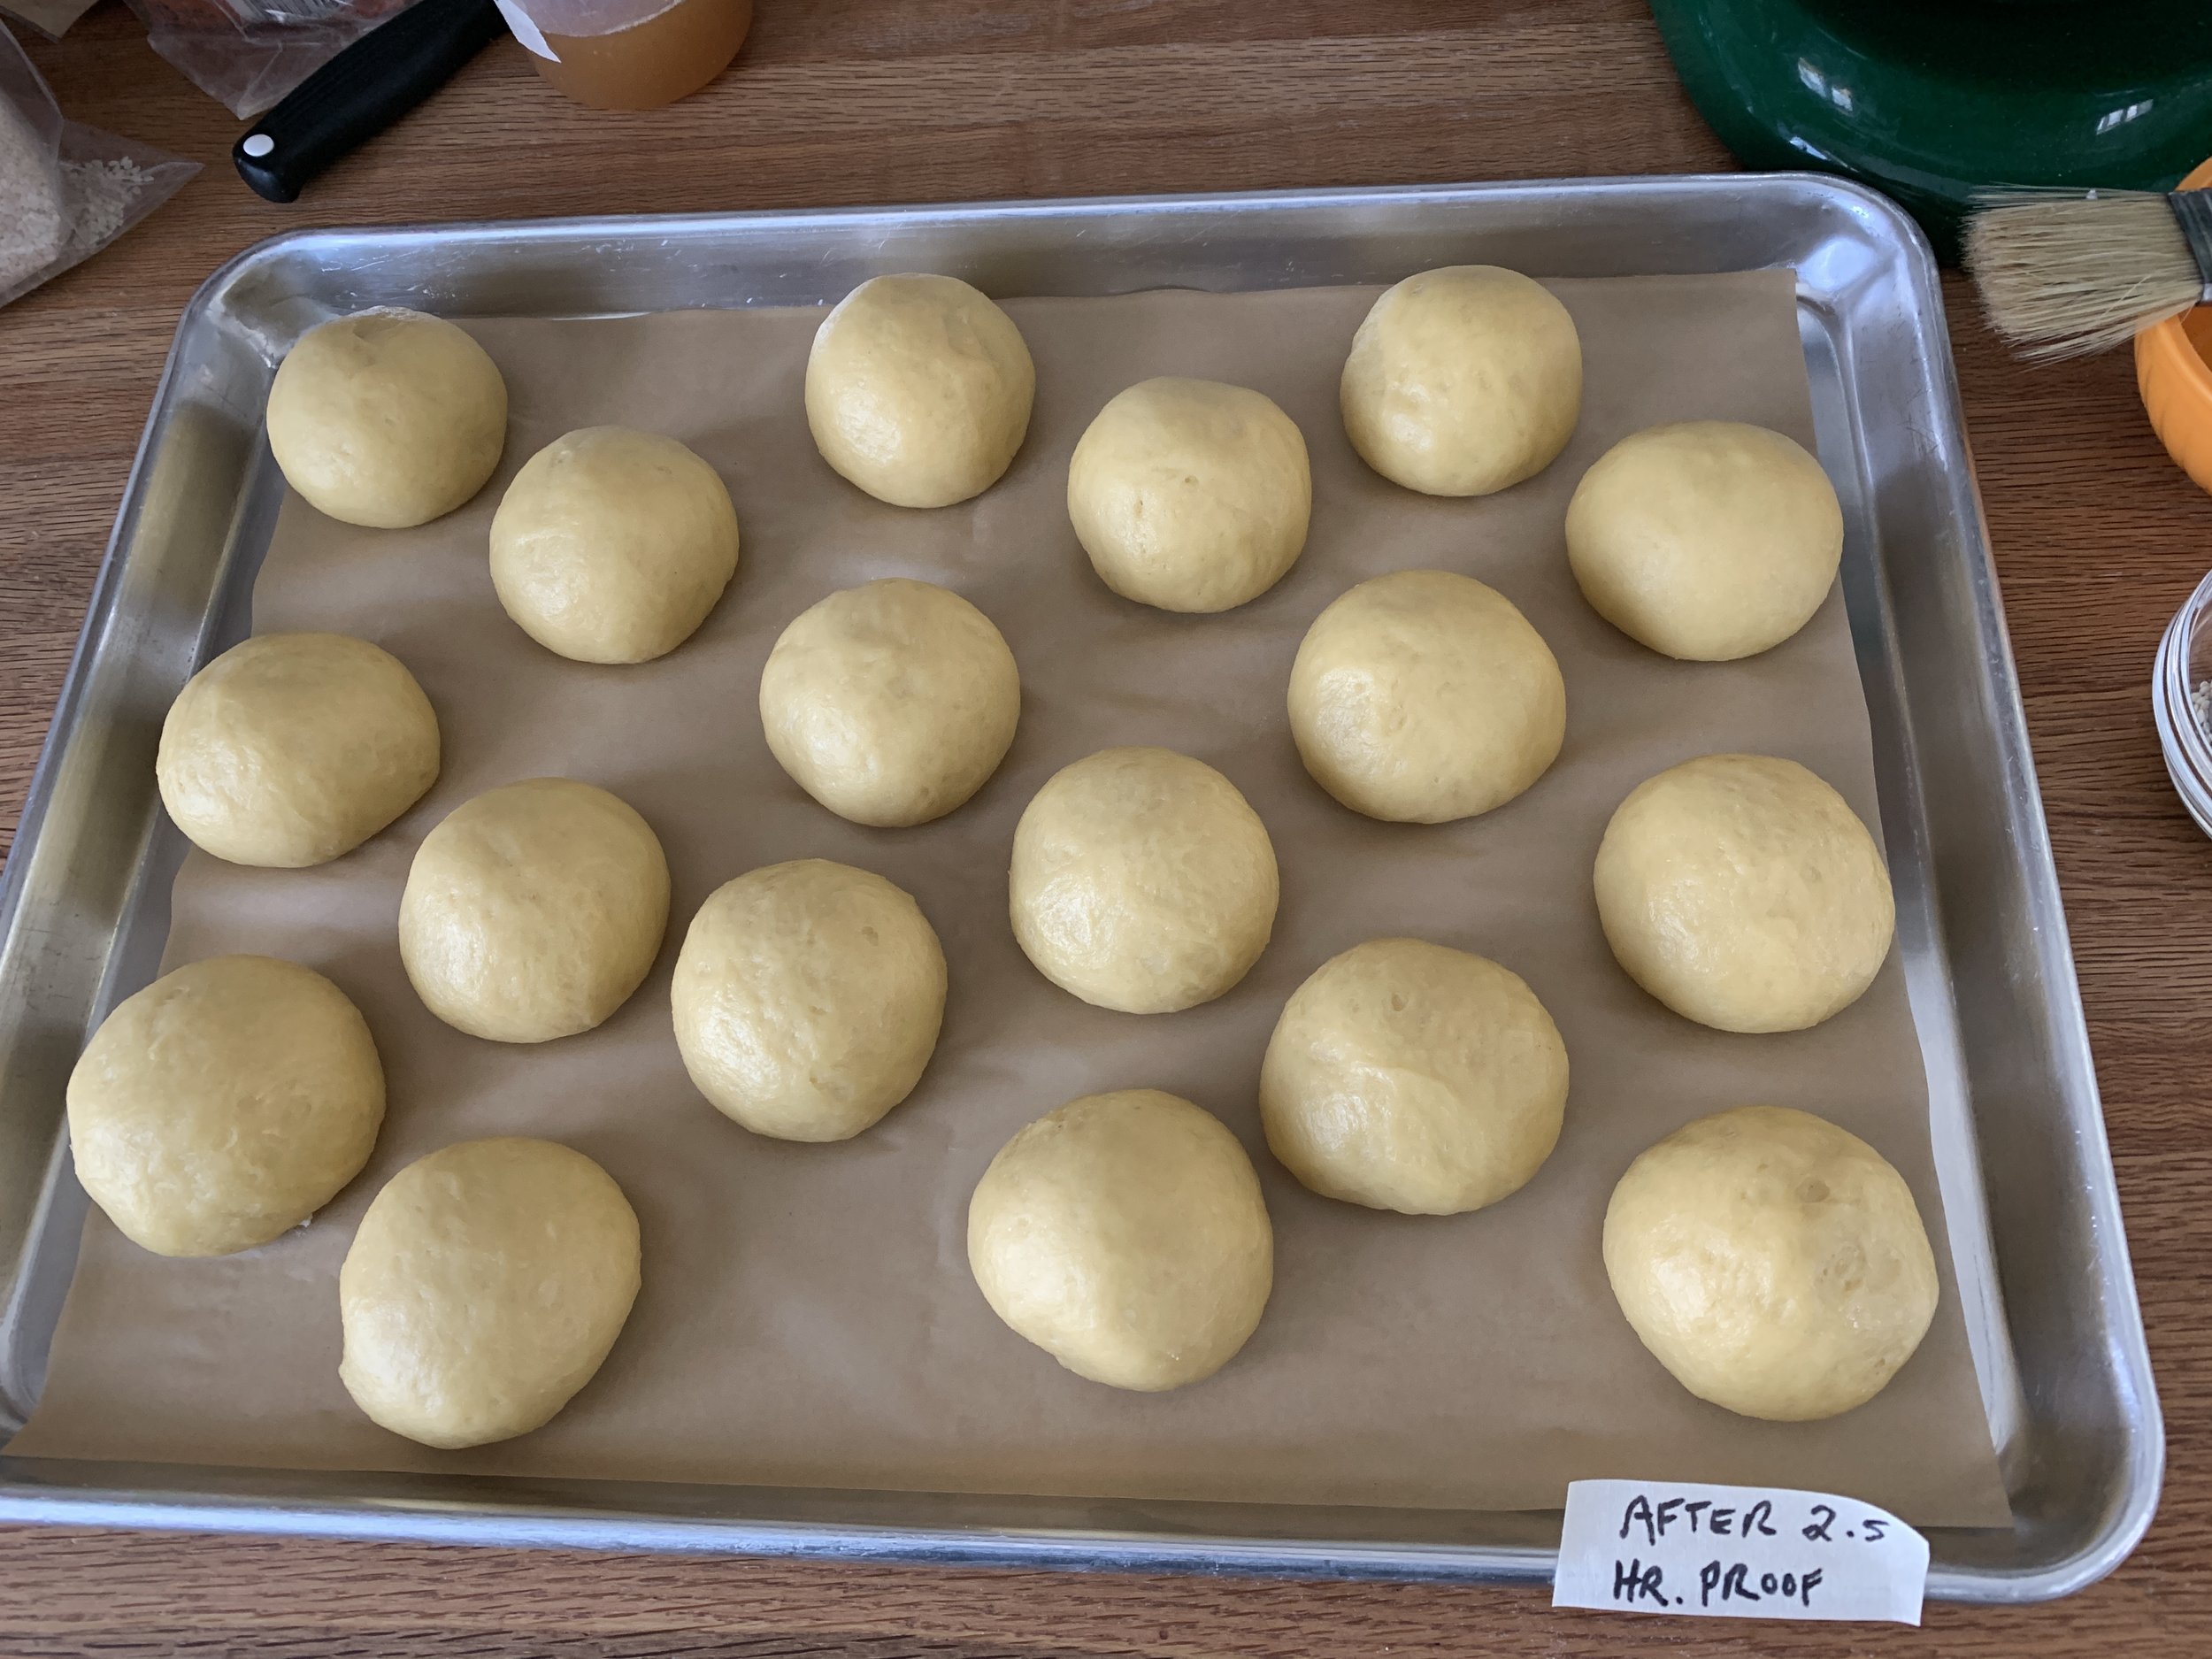
In general when shaping brioche dough it’s best to keep it cold, so leave it in the fridge until you’re ready to go. I envisioned a smallish roll so I figured about 60 g / 2 ounces for each piece (Sofra’s yield is a dozen rolls, making each a generous 90-ish g each). My total dough came to 1100 g; divide that by 60 g which yields 18 rolls. Sounds good to me.

Divide the dough and shape each piece into snug balls.

Place rolls on a parchment lined sheet pan. NOTE: Sofra’s recipe directs use of a buttered 9 or 10” springform pan, tucking the rolls in and ending up with pull-apart rolls.

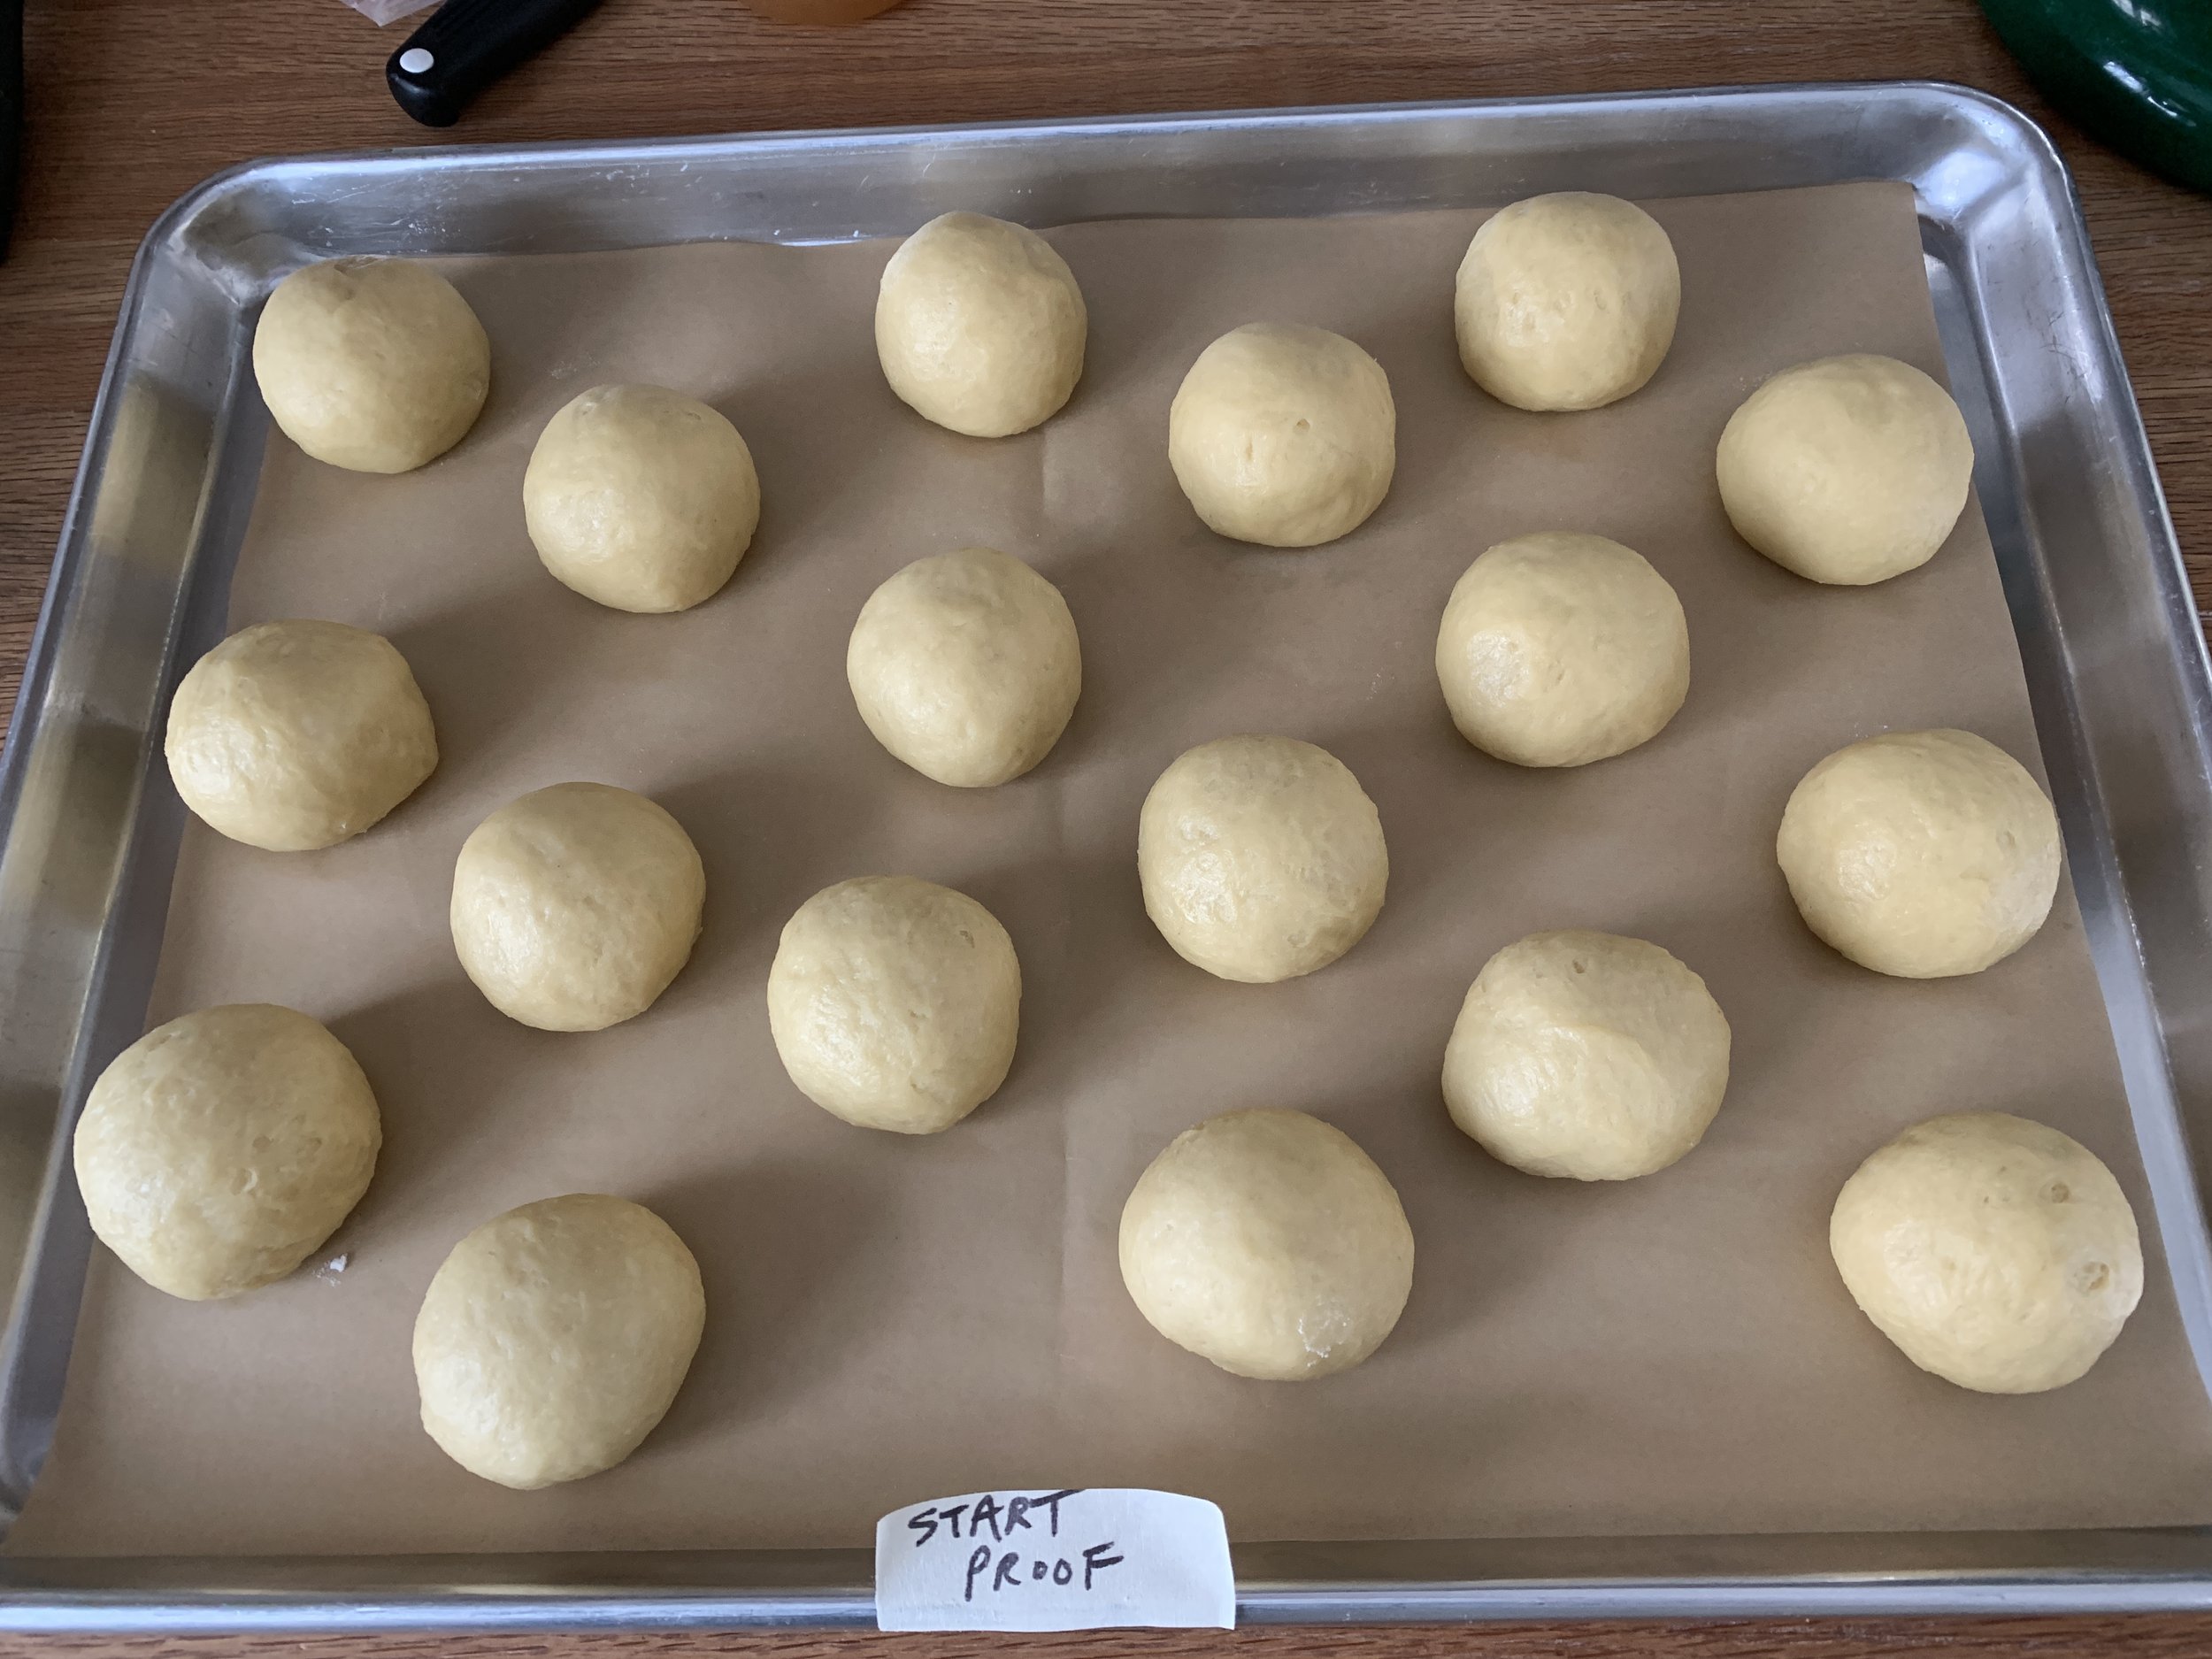
Cover with lightly buttered plastic wrap and let rise 2 to 2.5 hours. On a cold winter day and in my kitchen at 69ºF, I give them the longer rise. Since brioche is so enriched, it needs plenty of time and won’t appear to rise as robustly as lean yeasted doughs. Toward the end of the rise, heat your oven to 350ºF.

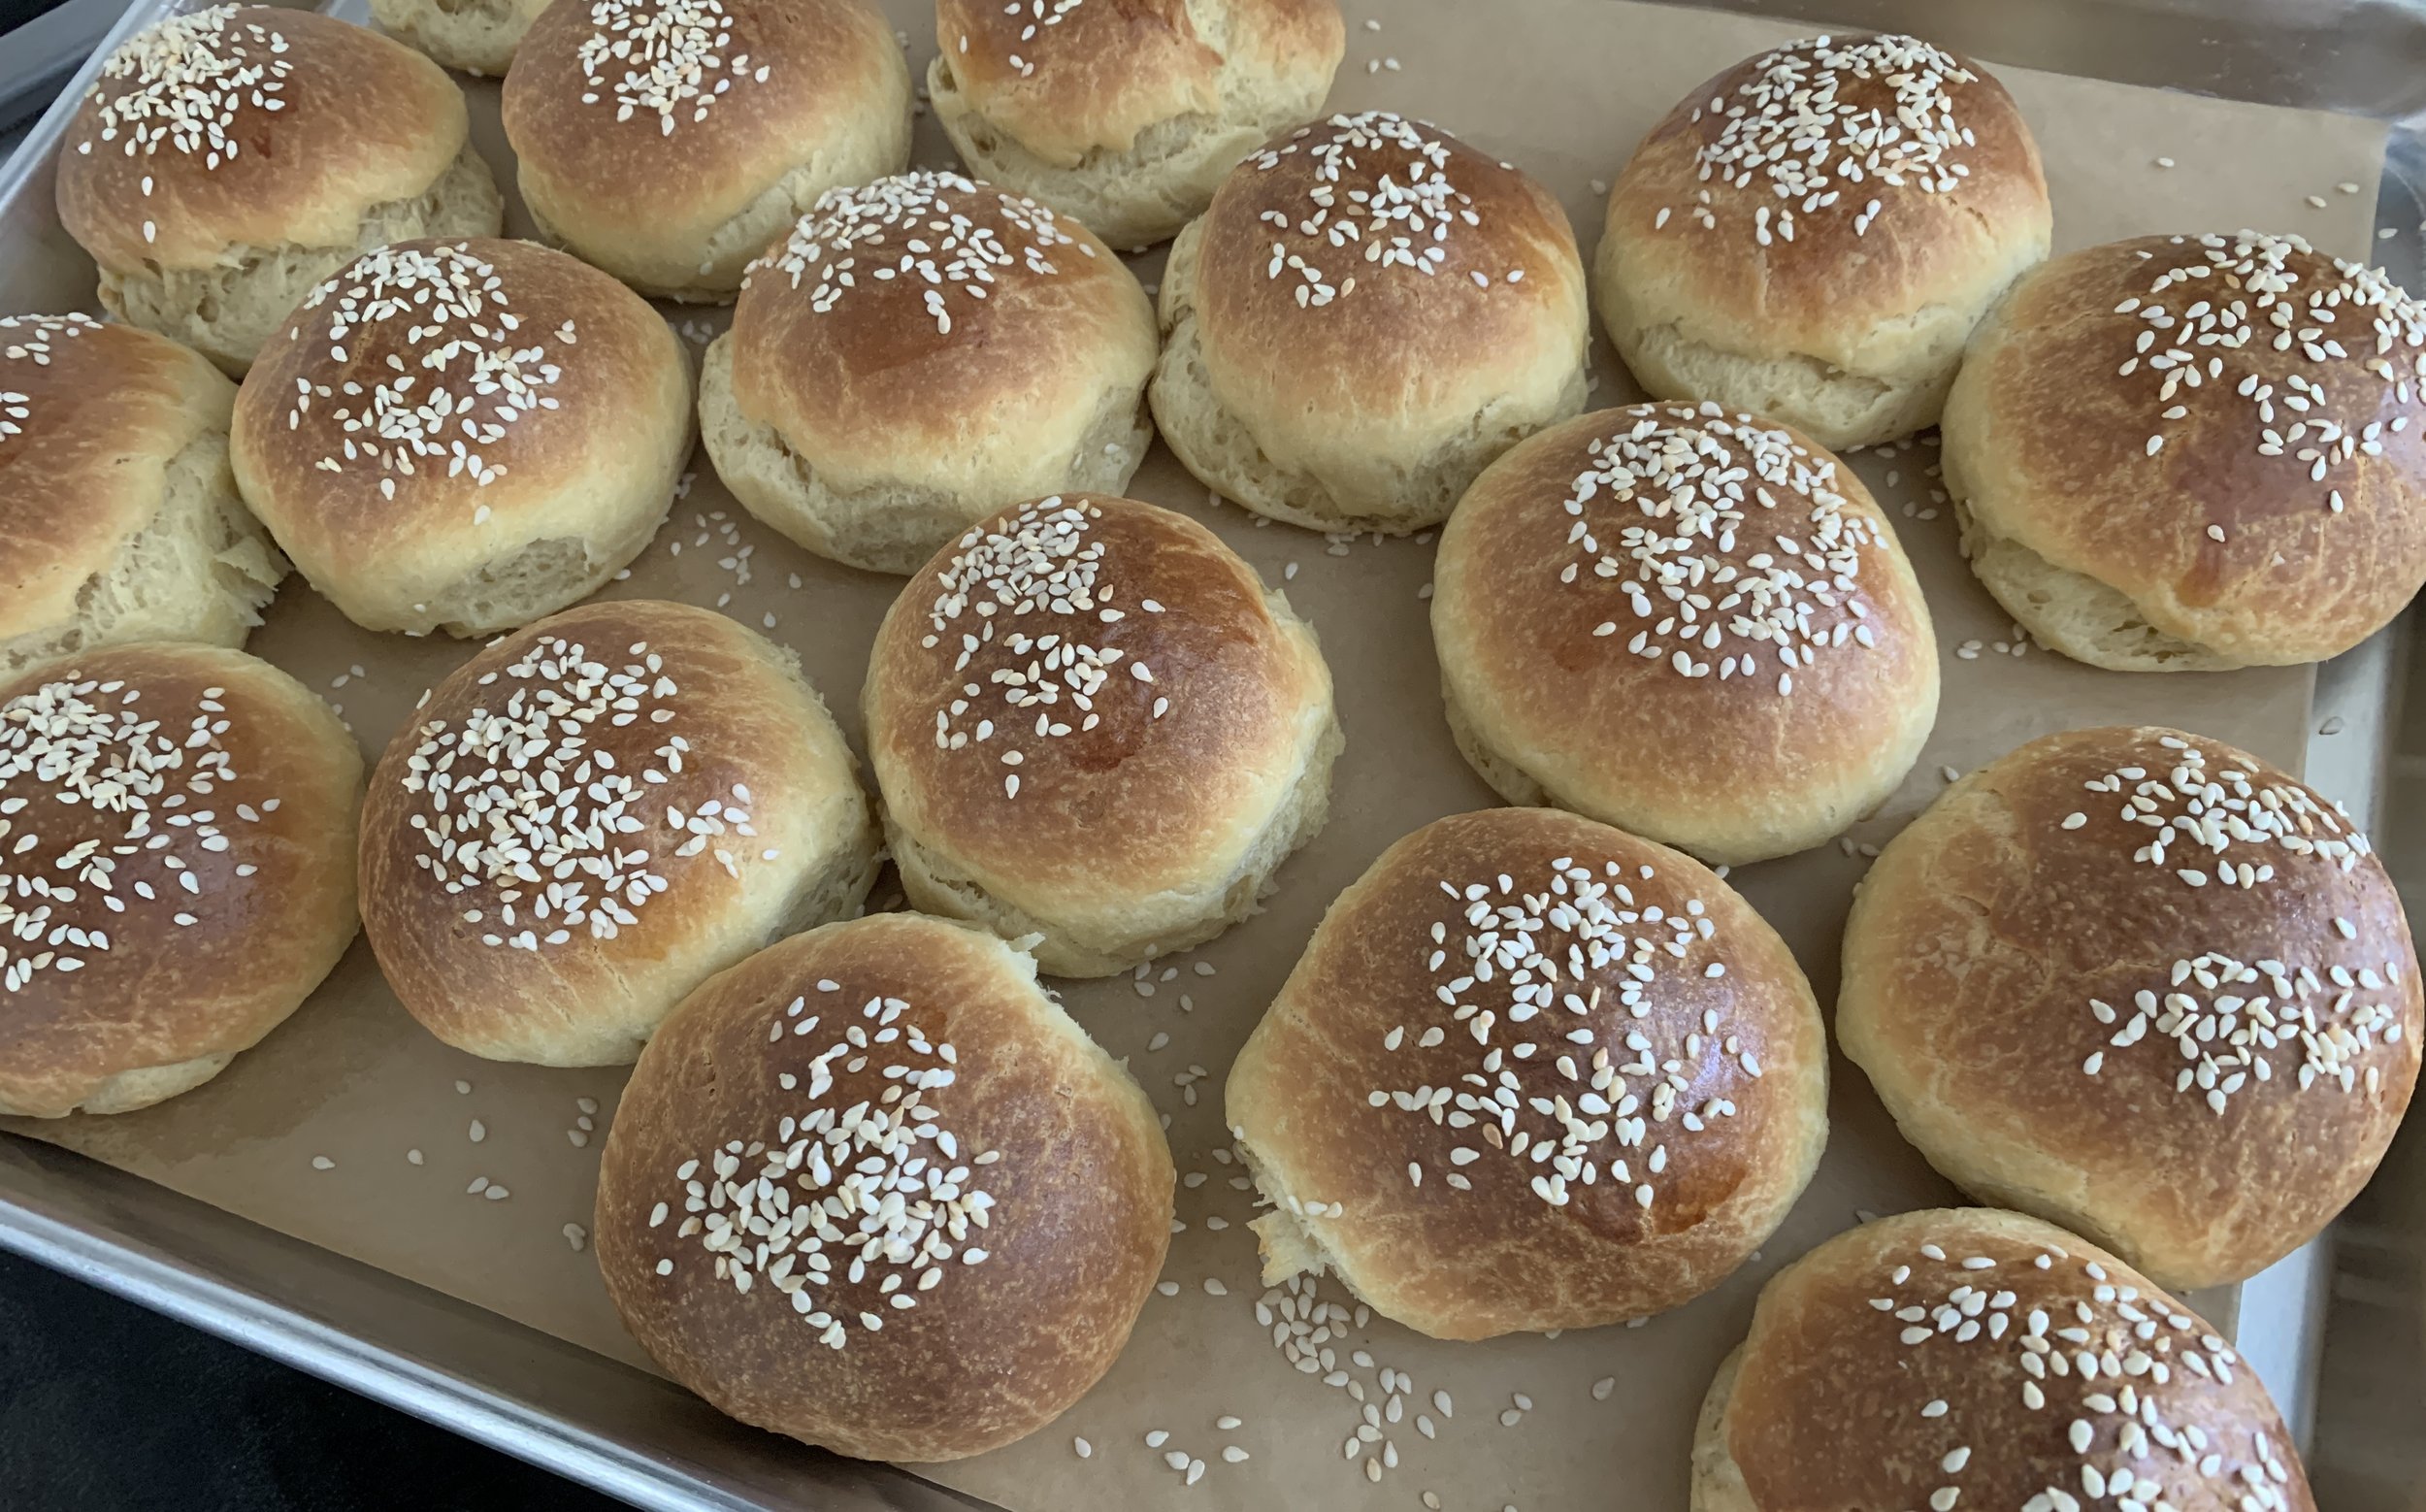
Brush the tops with a bit of egg white (or water or milk) and sprinkle with sesame seeds.

Bake about 30-35 minutes until nicely browned (internal temp 190ºF). Cool and enjoy!

Of course Steve and I had to taste test a warm roll with a drizzle of honey (good!) and followed that the next day with sliced/lighted toasted versions served along side (or sandwiched with!) Sunday morning scrambled eggs. Yummy.

These will keep for several days well wrapped but I chose to freeze the majority of my batch (dinner rolls coming up?). I’m imagining a tasty chicken salad sandwich or sliced/cheesed up and broiled to go along with some of the great soups Steve has been making lately. Yes indeed.

Meanwhile , in spite of winter’s attempts to hold on, we’re getting little whiffs of spring - red wing blackbirds, the sandhill cranes who hung around all last summer have returned, pussy willows are starting to open and there’s a different feel in the air. You just know it.

Take care until next time!

Sesame cumin crackers

Nothing fancy here folks but these babies are delicious! My first foray into baking with chickpea flour, I came across this recipe when browsing back through some old issues of SIFT magazine (Holiday 2018, No. 12) from King Arthur Baking Company (King Arthur Flour back then). The company published this beautiful magazine over 5 years, 3 issues per year, but, alas, they stopped with the holiday issue at the end of 2019. I have all of them except the very first and they tell me it’s not available. I did find an old press release with a PDF of the first 5 pages and also this link to what’s in that first issue if you’d like to check it out.

This cracker recipe comes from Sofra, the popular middle Eastern bakery/cafe in Cambridge MA. Steve and I have experienced some of their goods in past years, since it’s not far down the road from Mt. Auburn cemetery. During our Providence days, we would occasionally take a drive to stroll the beautiful grounds, enjoy the arboretum and pay our respects to the likes of Henry Wadsworth Longfellow, Dorothea Dix, Winslow Homer and Isabella Stewart Gardner. There’s a great view of Boston from the higher elevations, and birding is popular too. A calming place!

The dough is simple to put together but plan ahead since you roll out quarters of the dough, stack them between parchment and chill them for at least 4 hours or overnight before cutting and baking.

Here’s the recipe: In a small bowl blend 3/4 cup buttermilk with 2 tablespoons tahini (be sure and stir it up well first!). In the bowl of a stand mixer with the paddle combine 227 g / 1.75 cups all purpose flour, 50 g / 1/2 cup chickpea flour (I use Bob’s Redmill), 1 tablespoon sugar, 1 teaspoon kosher salt, 1 tablespoon ground cumin, 1/4 teaspoon ground allspice and 113 g / 4 ounces cold unsalted butter cut in 1/4” cubes. Blend on low until butter is in small pieces then add the buttermilk mixture and mix to a wet dough.

The dough is pretty easy to handle when the work surface is properly floured. Divide the dough in 4, keeping the waiting quarters in the fridge as you roll out one at a time. Roll each quarter to a 12”x13” (ish) rectangle - mine was pretty loose-y goose-y since I envisioned my crackers would end up in a variety of shapes and sizes, and I didn’t mind some rough edges. The main thing is rolling the dough nice and thin (1/16”) for better crisping up during the bake.

Line a half sheet pan with parchment, sprinkle with cornmeal (or semolina) and place the first rolled out dough quarter on it. Place a second piece of parchment on the dough, sprinkle again with cornmeal and place the rolled out second quarter on it. Repeat with the other two portions. Cover with plastic and refrigerate 4 hours or overnight. I chose overnight.

When ready to bake, heat the oven to 350ºF. Have a teaspoon of kosher salt and 2 tablespoons sesame seeds on hand. Lift one of the dough portions on its parchment onto an empty sheet pan. Fork prick it all over, brush lightly with water and sprinkle 1/4 teaspoon kosher salt and 1/2 tablespoon sesame seeds over the top. Cut into squares or rectangles (or whatever shape and size you’d like) with a pizza cutter.

Repeat the above with the next batch of dough on a second empty sheet pan. NOTE - I baked two pans in one go but if you prefer to bake one at a time, go for it.

If you only have one or two half sheet pans and need to rotate batches, pull the baked sheets off onto cooling grids and let the pans cool completely before you continue the above steps with the remaining dough quarters.

Bake about 15 minutes, rotating your pans half way through. I baked mine a bit longer since they weren’t deeply browned and crispy at the 15 minute mark. Remember - all ovens are different! Let cool then recut or break apart and enjoy.

Steve and I found them very tasty with a schmear of hummus or a nice slice of Cotswald cheese. Yum. One note - the medium grind cornmeal that I used for “dusting” the parchment sheets had too much coarse crunch for our tastes. I’d suggest using either fine-grind cornmeal or semolina to 86 that problem.

They keep well in a closed container for a good week. Try ‘em, you’ll like ‘em.

Have a wonderful week!

Playing in the kitchen on a snowy day

A few days ago, during a bout of scattered snow showers, I was in the mood to play a bit in the kitchen.  First I wanted to try my hand at using puff pastry scraps from my freezer as though they were pristine pâte feuilletée (i.e. never been used), and, second, I had some unopened tahini that was dying to be put to use!

First up - the puff pastry project was to test how well puff scraps might actually puff on their second go around.  Up until now, when working with puff pastry or teaching classes on the topic, I've always followed (and given) the advice that one should use the scraps only for things in which you don't desire or need much of a puff factor.  Some good examples are cheese straws, palmiers, tart, flan or quiche crusts and even millefeuille, in which pâte feuilletée is one of the main components.

Chausson aux pommes is one of my favorite apple pastries to make, and since I had a couple of Granny Smith apples in the fridge, chausson was my choice for this test.  I love how the tartness of the apples marries so well with the buttery pastry.


I peel, core and dice the apples and sauté them in butter and vanilla sugar.  This time I also added some of my homemade caramel sauce, hoping to have a richer end product.


sauté under way

pretty nicely caramelized

I divided up my puff scraps and rolled each out into a rough circle.  After a short rest I cut rounds


which were then rolled out into ovals and topped with apples and an extra drizzle of caramel.


After egg washing the lower edge I close them up, press the edges to seal, egg wash and score the surface and sprinkle 'em with vanilla sugar.  Heat the oven to 450 and, meanwhile, pop the unbaked chaussons in the freezer to firm them up and stabilize the dough before they go into the hot oven.


ready to bake
I usually bake these for about 20-25 minutes, watching what's going on in the oven and ratcheting the temp down as I go to achieve a nicely browned surface and a fully baked interior.

And YES, they puffed!!


Now I will admit that some of my edge seals left a bit to be desired and some of the innards leaked out, but these guys were mighty tasty.  Just ask Steve.

The moral of the story - yes, puff scraps will rise again!

Next came the tahini challenge.  I had shortbread on the brain as a follow up to a tahini shortbread recipe I had tried several years ago.  That one was from Maura Kilpatrick, the pastry chef at Sofra Bakery in Cambridge.  I enjoyed the taste but wasn't quite sure how I felt about the texture - kind of like a PB cookie, but more of a stick-to-the-roof-of-your-mouth yet crumbly number.  It definitely had possibilities, and I wanted to give tahini another go.

After some online research I decided on "Chocolate Tahini Sablés", a recipe I found on the site "one hundred eggs".  I've developed a taste for coriander and wondered how that might fit into the flavor profile.

Off I went to my trusty "Flavor Bible", a book that was strongly recommended to me by my former chef at Gracie's, Joe Hafner.  One can find almost any ingredient accompanied by a list of all of the things that might go well with it.  I was surprised that "tahini paste", as such, was not included in the book, but, upon checking out sesame seeds, I found that coriander was indeed one of the possibilities.  Hmmmm, now there's an idea.


the sesame seed (white) list

Interestingly, this recipe calls for a hard boiled egg yolk, which brought back memories of making Italian canestrelli cookies while in school in Florence.  It seems that the "hard boiled egg" type of cookie is common in Germany, Poland, Slovenia and Italy (and probably many others).  The yolk contributes to the light, crumbly nature of this class of sablés.

First I boiled a couple of eggs (so I would have plenty to make myself an egg salad sandwich for lunch!), cooled them down in ice water and extracted one of the yolks for the recipe.

I assembled my ingredients, replacing a teaspoon of instant espresso powder with ground espresso, adding 1/2 teaspoon of coriander to the mix, and planning a mini-chocolate-chip stir-in at the end.


Here goes:  In a separate bowl whisk together 195 gm flour, 28 gm cocoa powder (I prefer Dutch process), 1 teaspoon of ground espresso and about 1/2 teaspoon ground coriander.

dry ingredients

Push the egg yolk through a fine strainer, then add 140 gm room temperature butter, 140 gm well stirred tahini (see side note below), 42 gm granulated sugar, 42 gm brown sugar (I used dark) and 1 teaspoon of salt.


pouring the tahini in

Blend all these in a mixer and cream for about 4 minutes till lightened and smooth.


nicely creamed

Side note - the online recipe calls for one cup/5 oz of tahini; I found that when weighing the 5 oz or 140 gm, it was actually closer to 2/3 cup.

Add the flour/cocoa mixture and blend just until combined.


Stir in 100 gm mini chocolate chips  . . .

ready to shape
and divide dough into 4.

Another side note:  I prefer to work with smaller amounts of dough when shaping logs, so, whereas the online recipe suggests dividing the dough in two, I divided it in 4.


logs ready for the fridge
I shaped 2 square, 1 triangle and 1 round.

This dough is soft, so it's important that it has a proper chill after forming the logs, before slicing and baking.

I like to bake my shortbread "low and slow" so I heated the oven to 300º, coated my shortbread log in raw sugar, sliced 1/4 inch slices and popped them in the freezer before baking.

ready for the oven
I baked them approximately 20-25 minutes until set and looking dry.


Boy oh boy, are these crumbly with a lovely, melt-in-your-mouth texture.  And the espresso and saltiness comes through very nicely.  Whether the presence of coriander is detectable is unclear, but the overall flavor is definitely a thumbs up!

Since I'm known to crave shortbread with my morning cappuccino or my afternoon tea, I popped these chocolate tahini sablés into the fridge with some salted caramel that I had baked the other day.

I'm set.


yes sirree!