Hazel-chocolate spirals plus croissant squiggles

Back on our stage once again - it’s time for more fun with croissant dough! Some weeks back I came across an article about the various ways that many baking and pastry folks are shaping their laminated dough - eye opening to say the least. I wanted to give one of those shapes a try in addition to making some spirals for a group event.

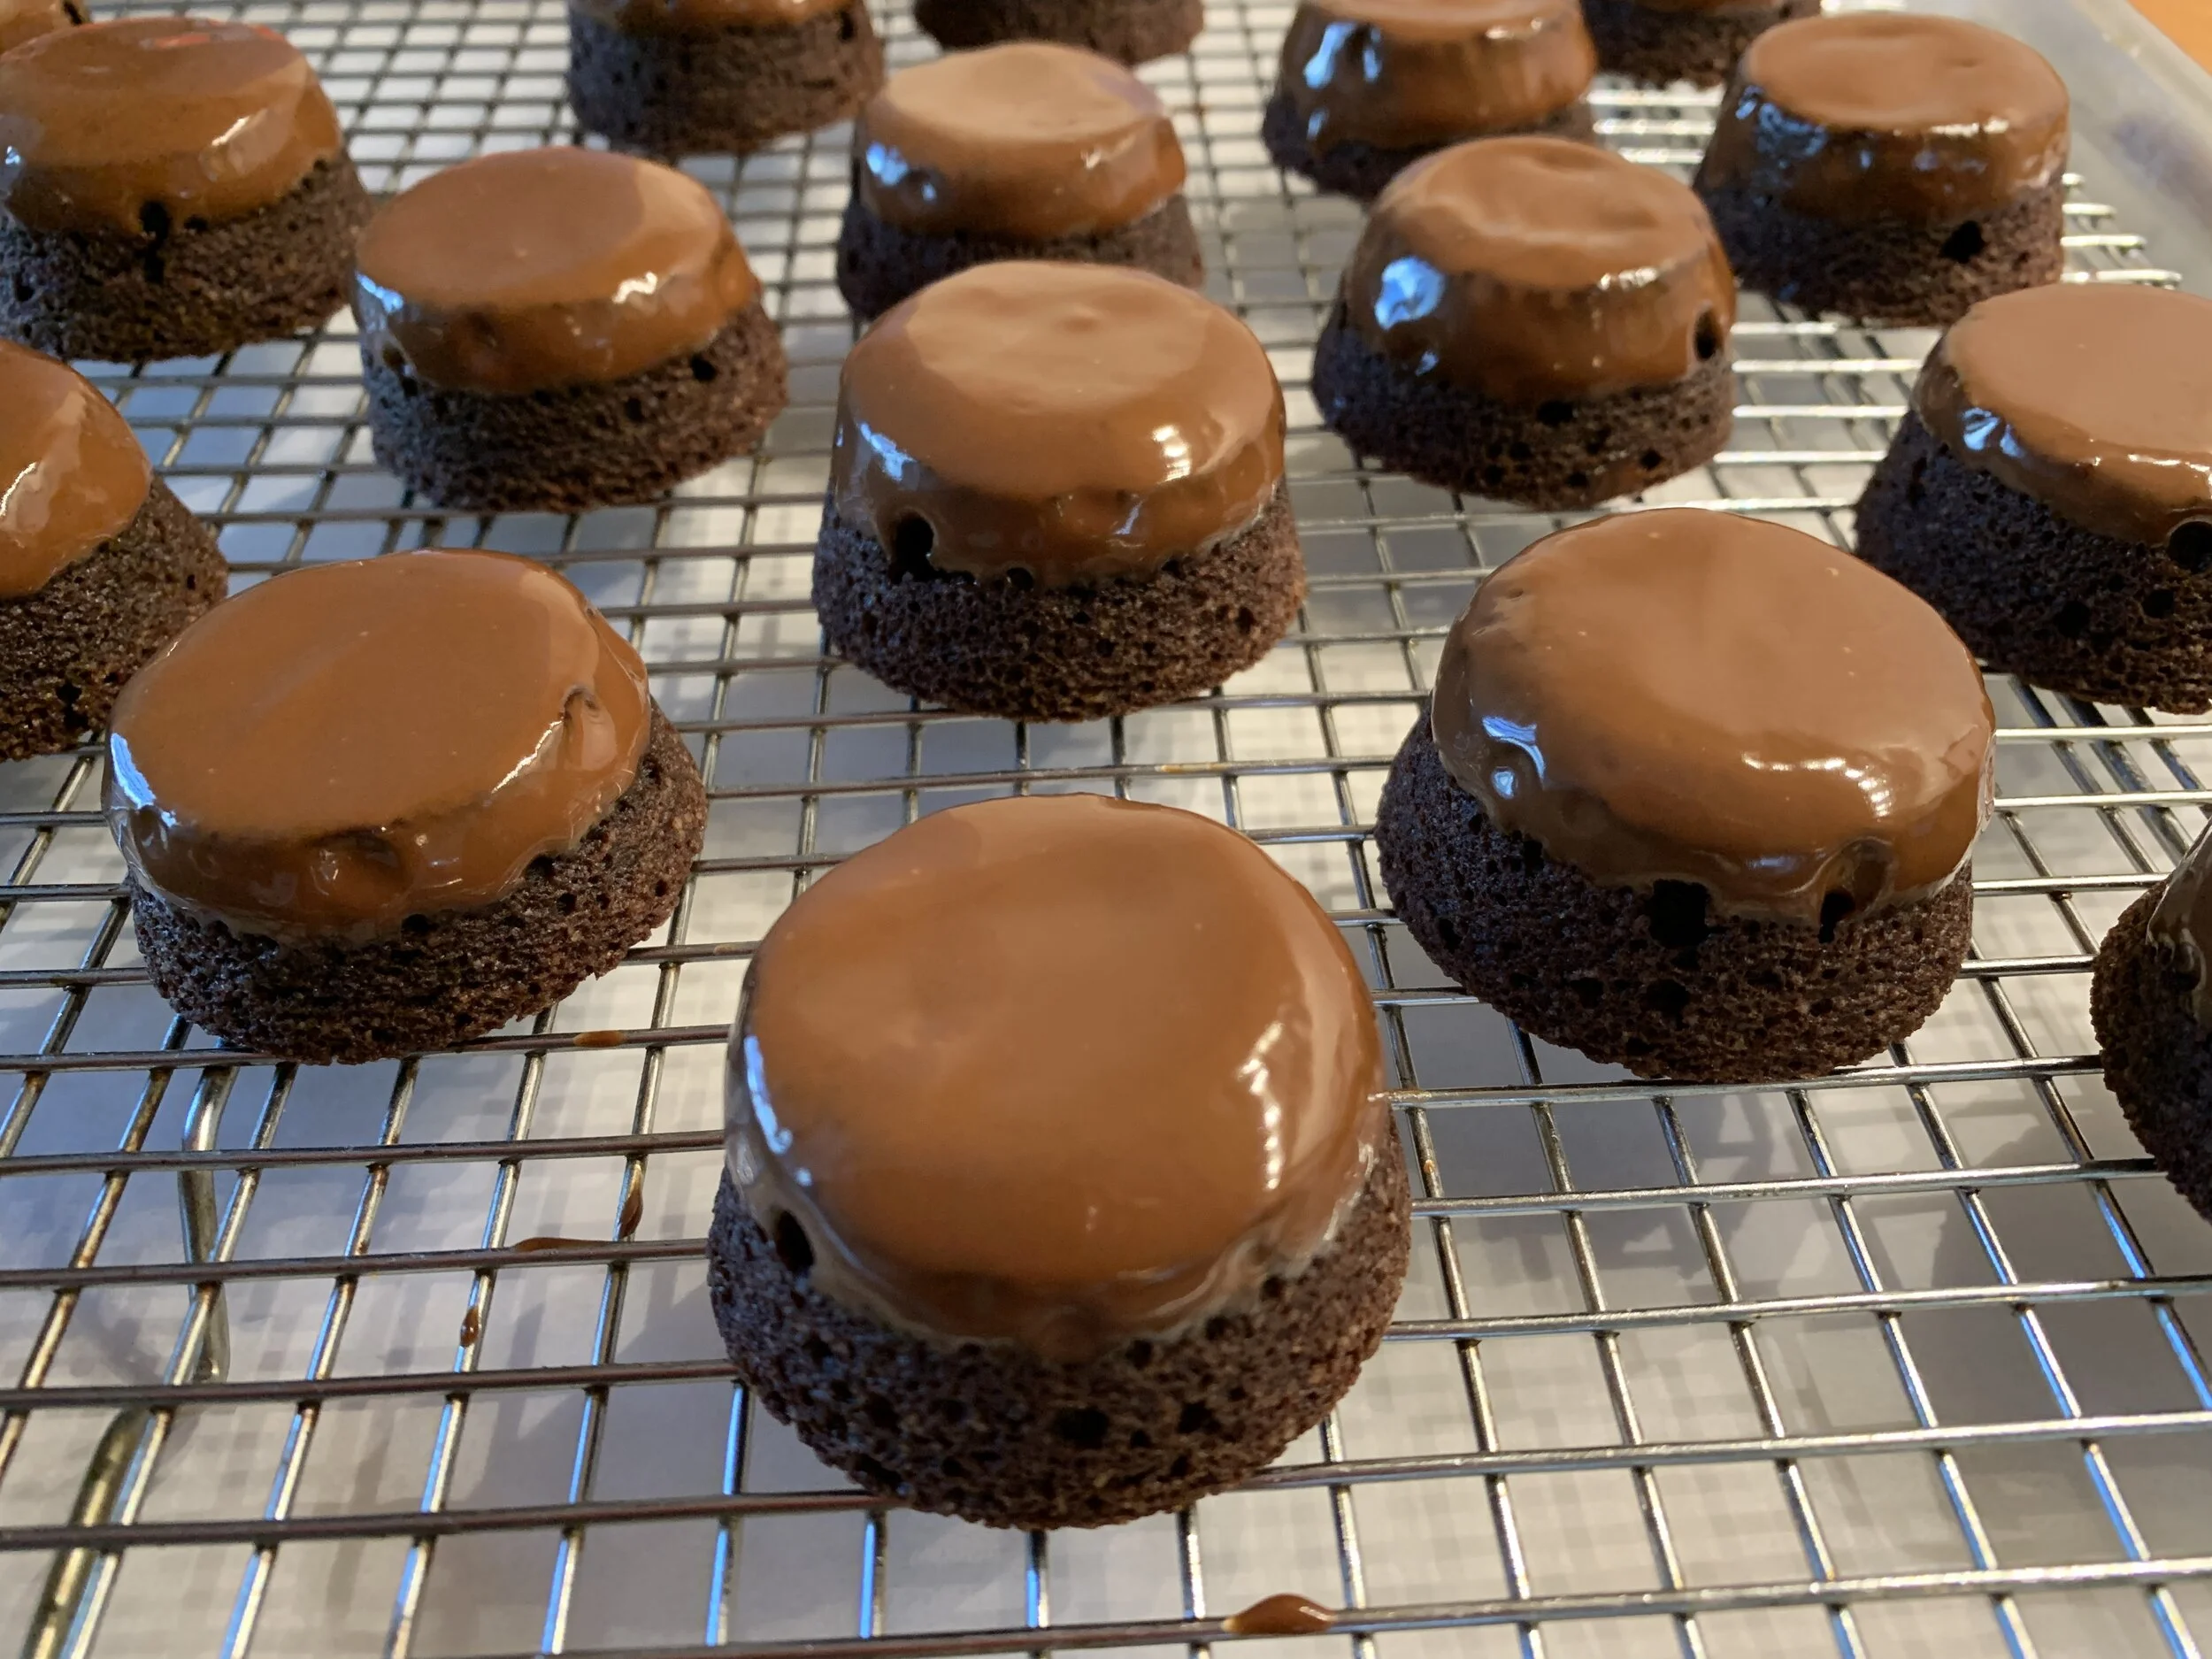
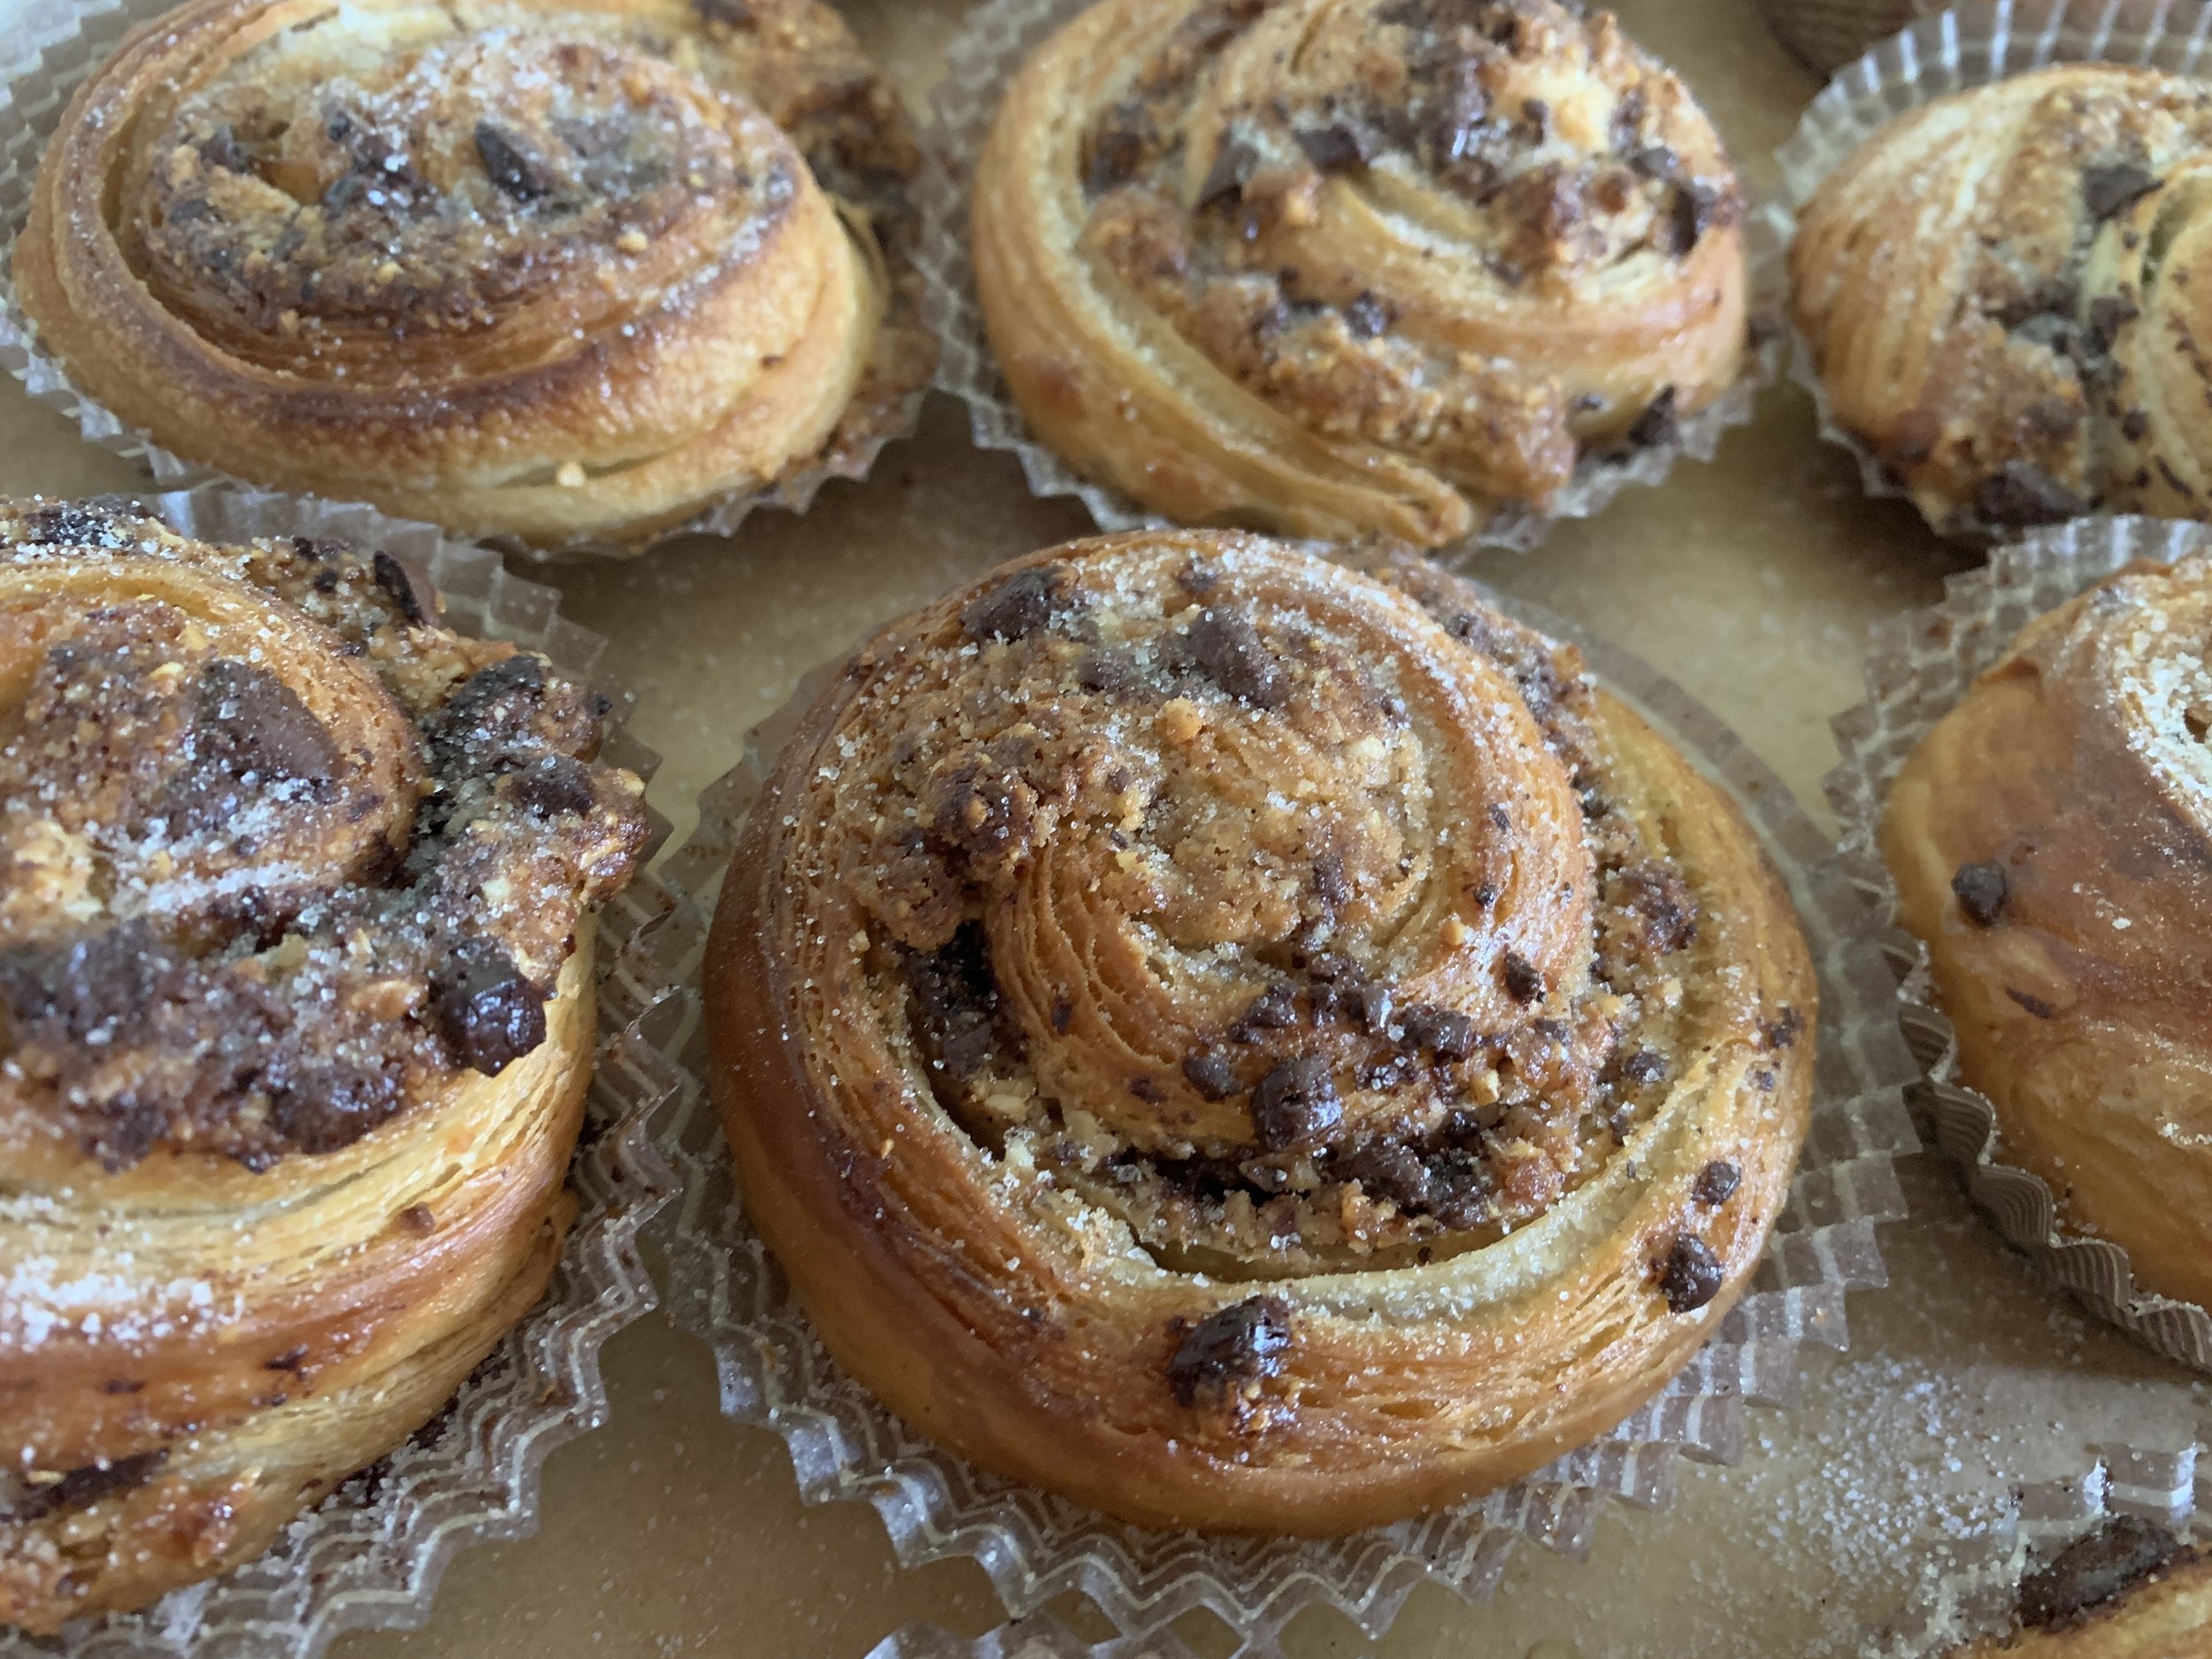
First let’s review the classic spiral process (here’s one version), using one of my favorite fillings - hazelnut remonce topped with chopped chocolate for a match made in heaven.

A quick sidebar: I first made remonce about 3 years ago based on Brontë Aurell’s recipe - 100 g each of almond paste (preferably 50% almond/50% sugar), sugar and butter. As I thought about that mix, I realized it’s essentially 50 g almond, 150 g sugar and 100 g butter. After my lovely class experience in Copenhagen in May of 2022 where we made remonce with 100 g each almond flour, sugar and butter - essentially créme d’amande without any egg or flour - I tweaked the almond paste version to 100 g almond paste, 50 g almond flour, 50 g sugar and 100 g butter for a more almond, less sweet version than Aurell’s. Add 300 g of toasted, ground hazelnuts to the mix for the hazel version. Did you follow that?? It’s all in the details.

As many of you know, the spiral is what we all use for cinnamon rolls - roll out a rectangle of dough, spread or sprinkle your filling on, roll it up into a log, slice, pan up, proof, bake and enjoy! There are tons of filling options, either sweet or savory, so use your imagination and go for it.

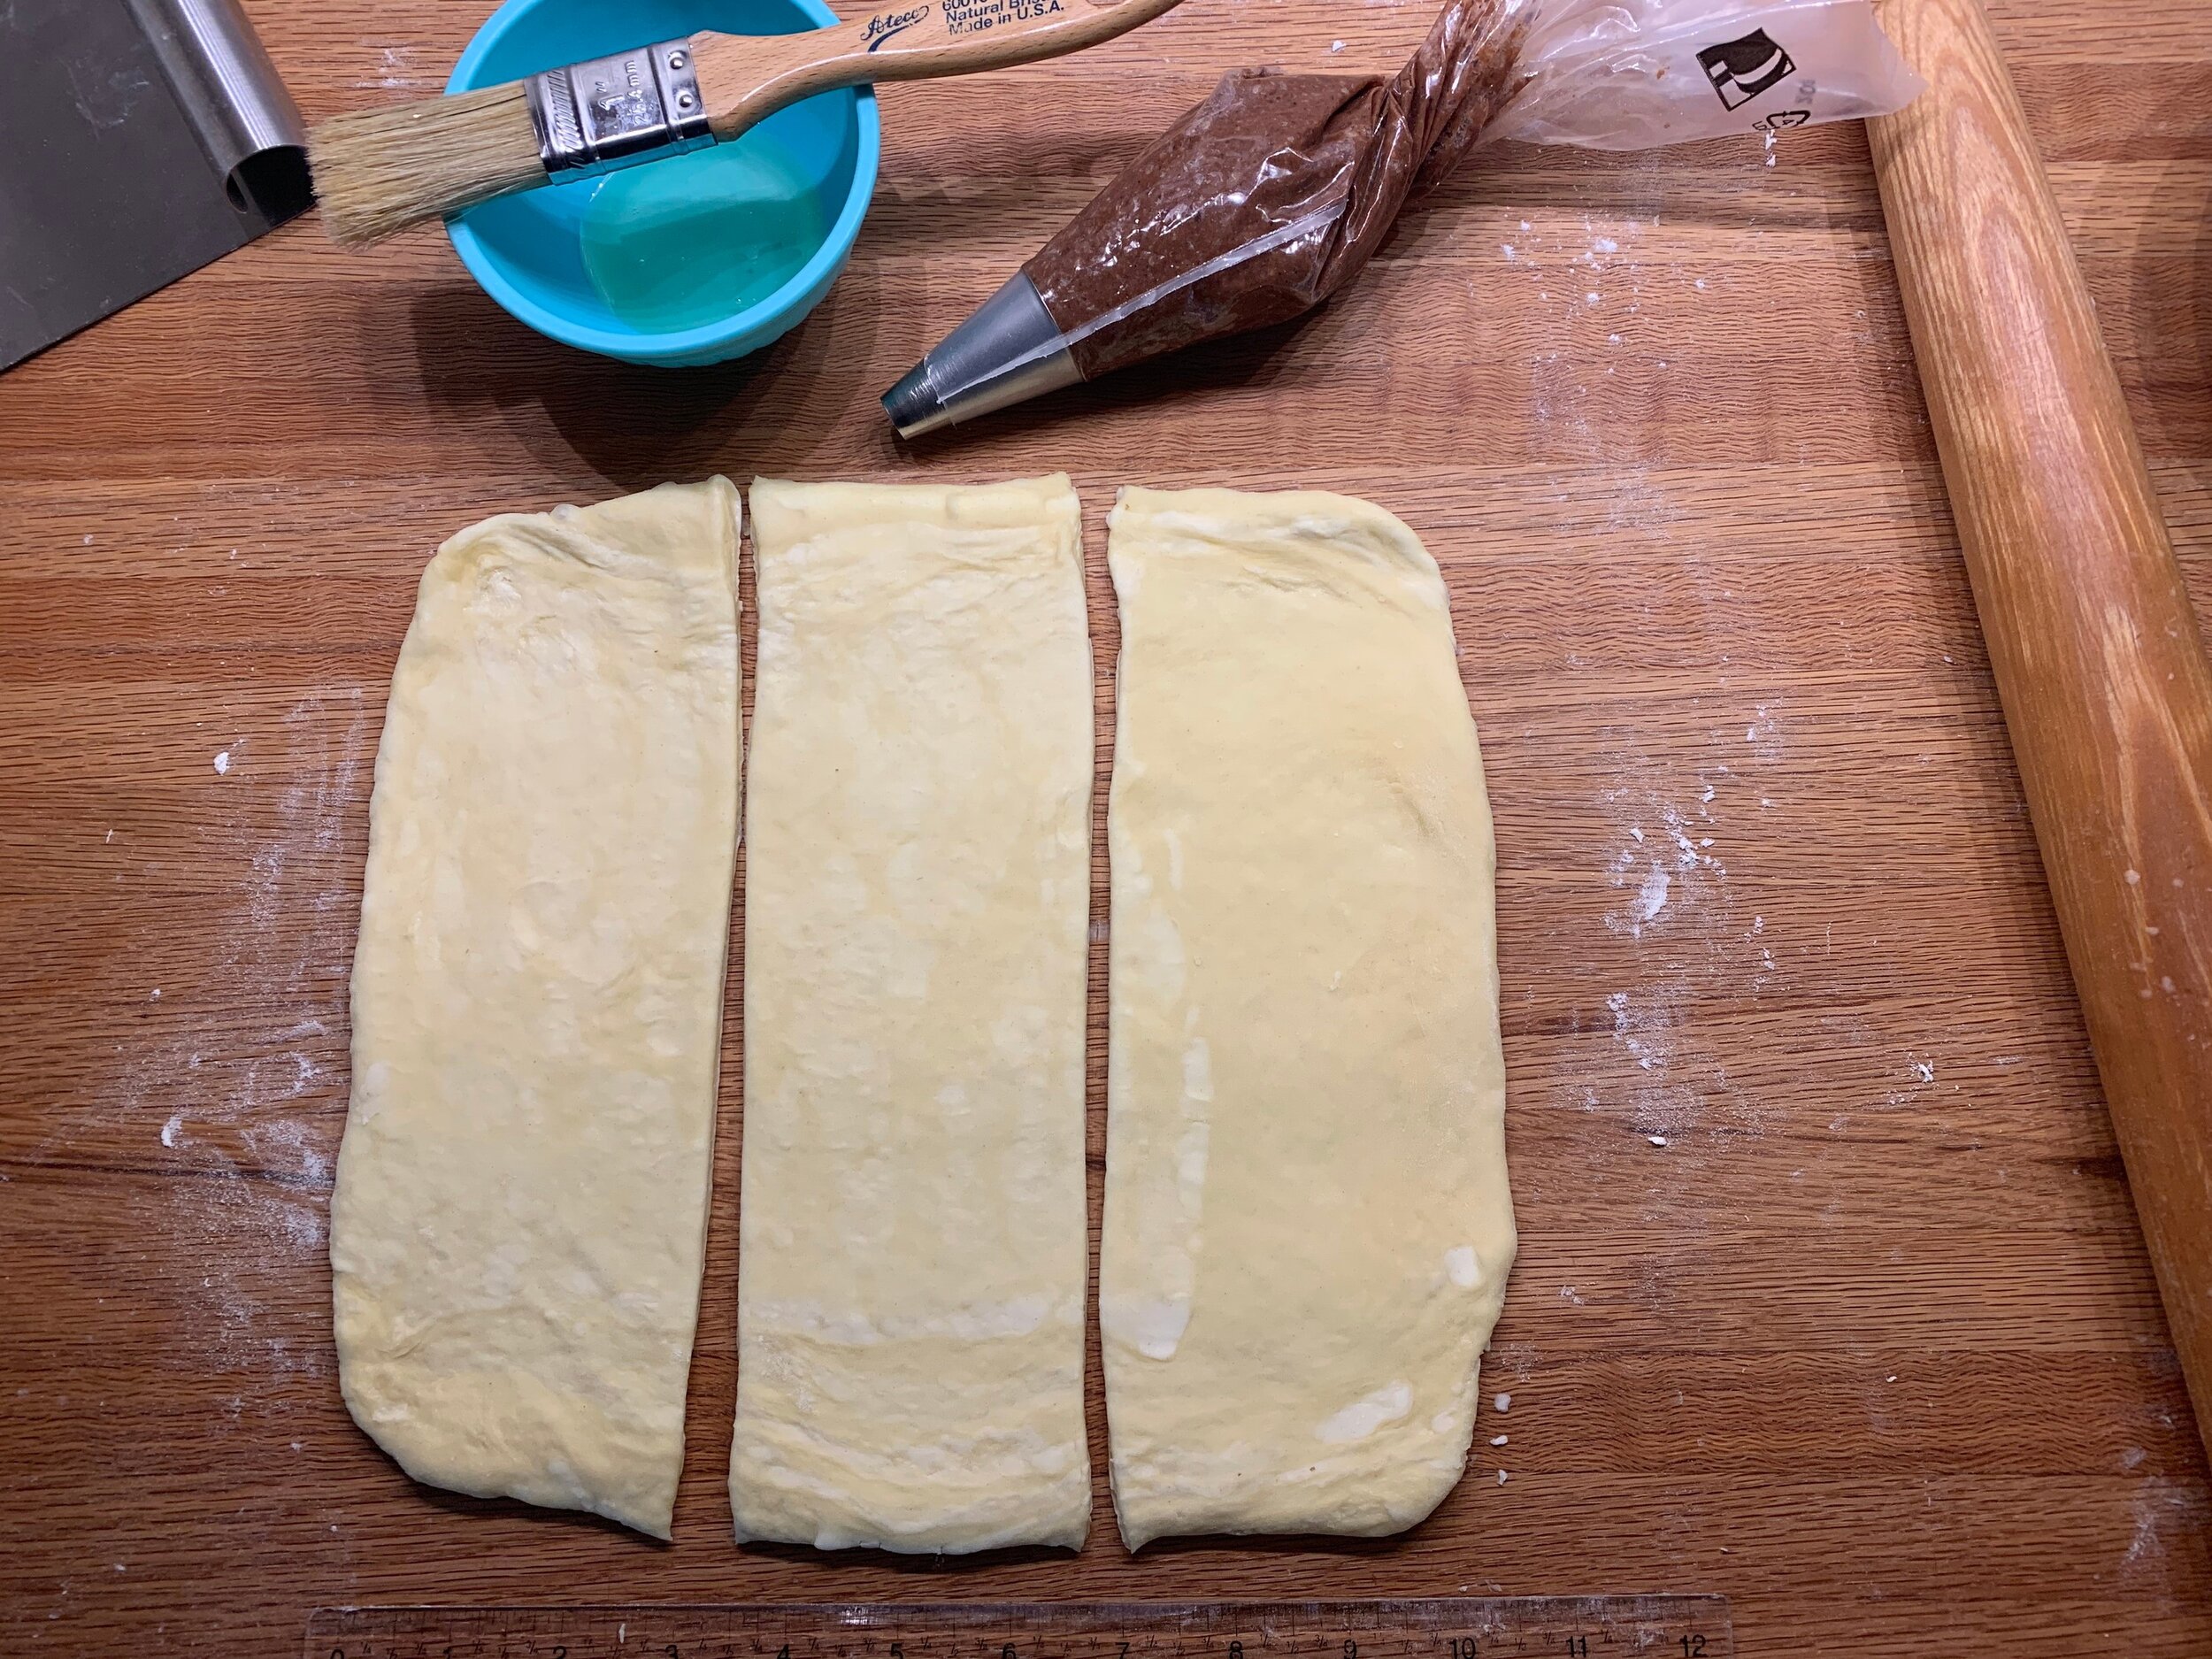
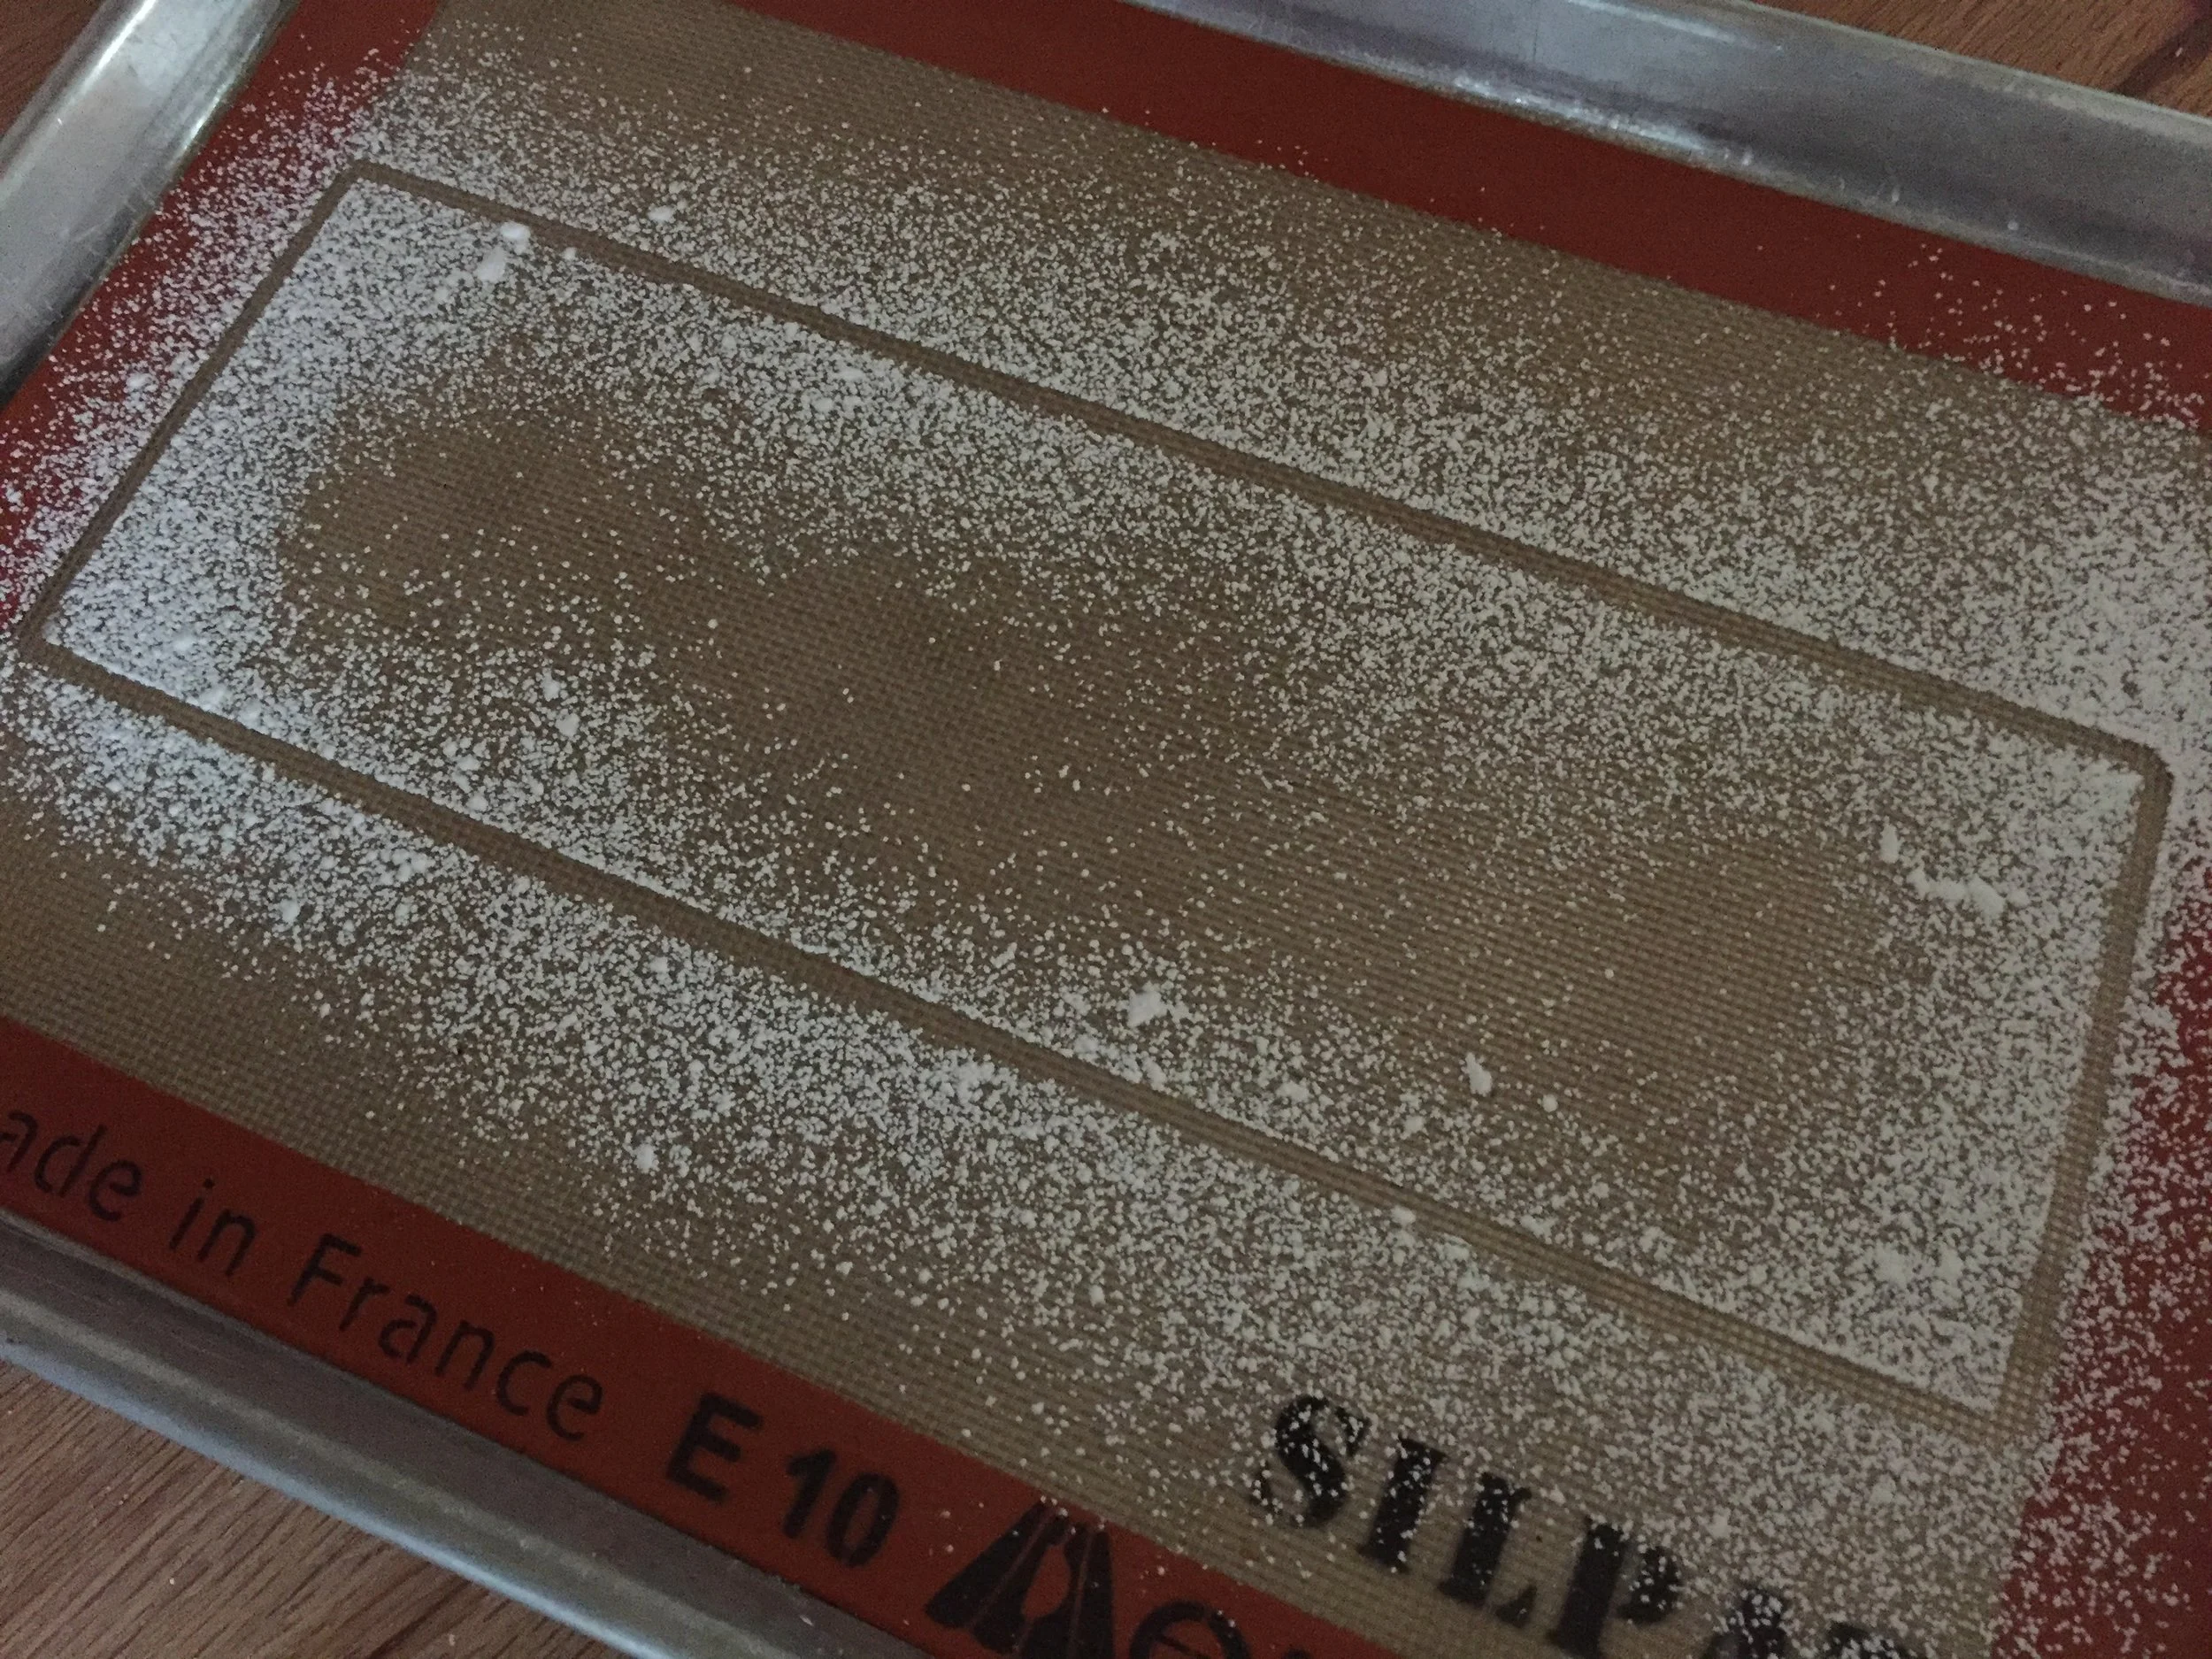
I’m using a half batch of croissant dough here - roll to about an 8” x 12” rectangle (20 cm x 30 cm).

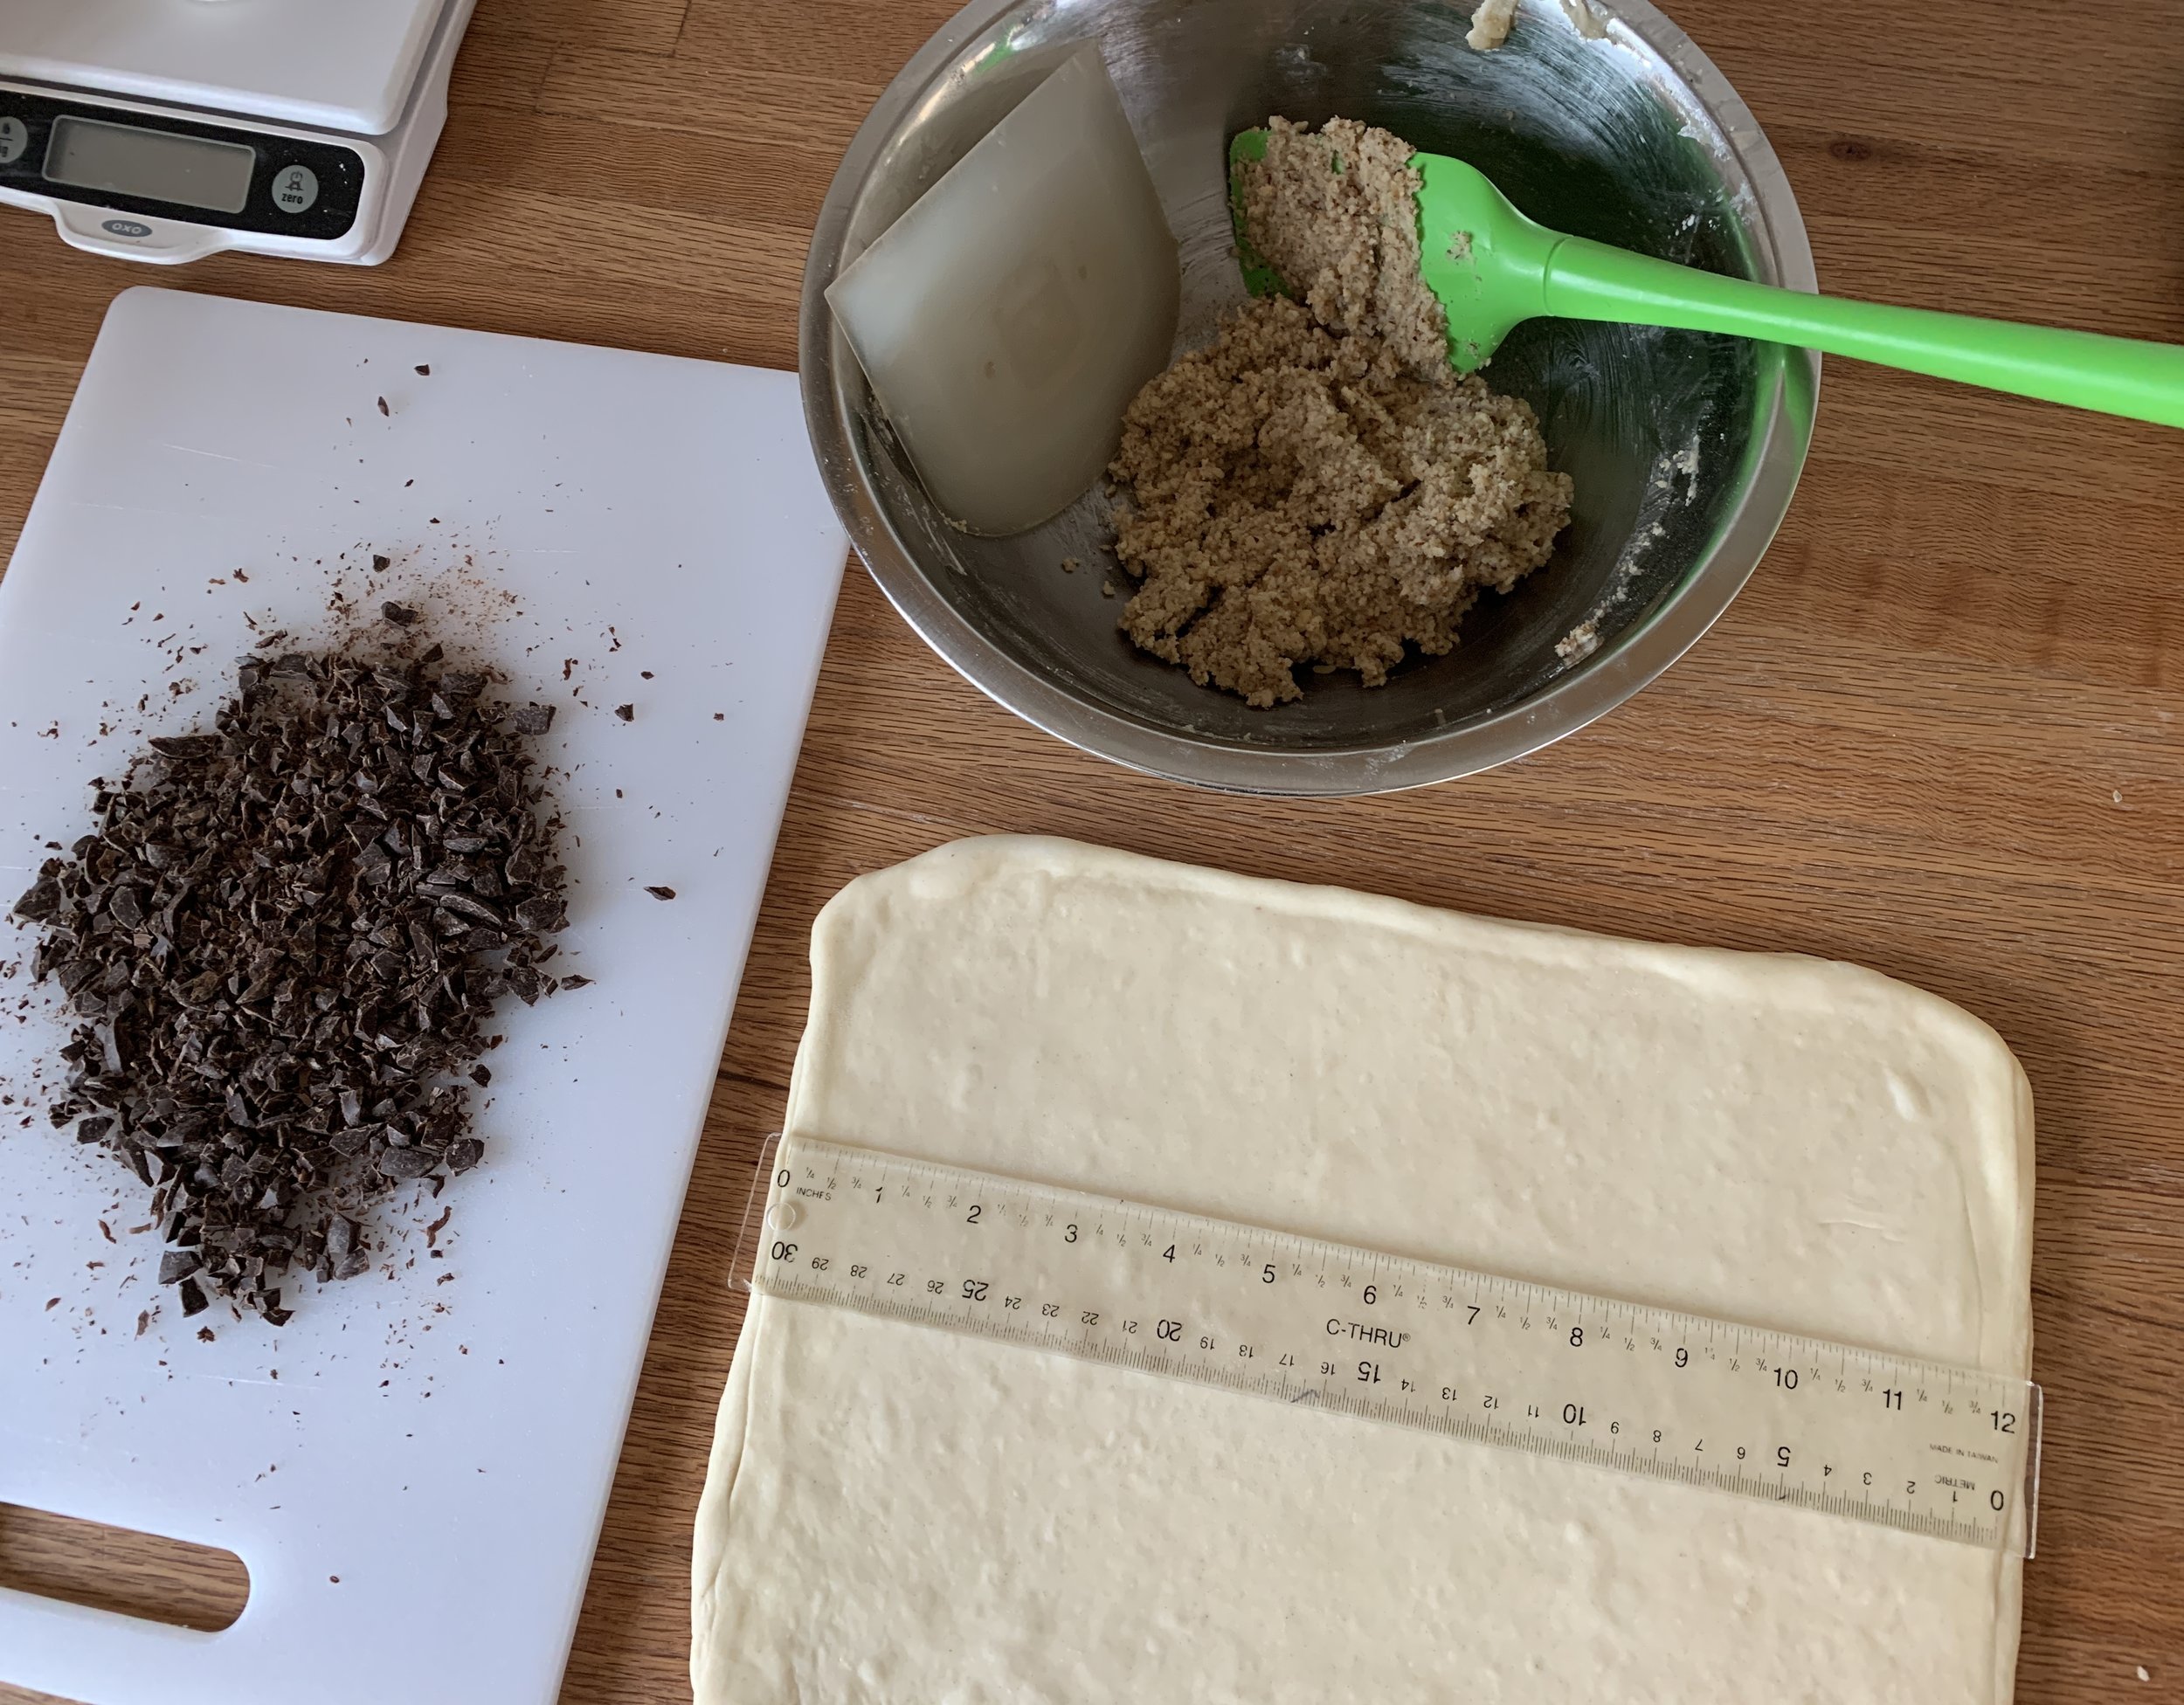
Ready for the filling

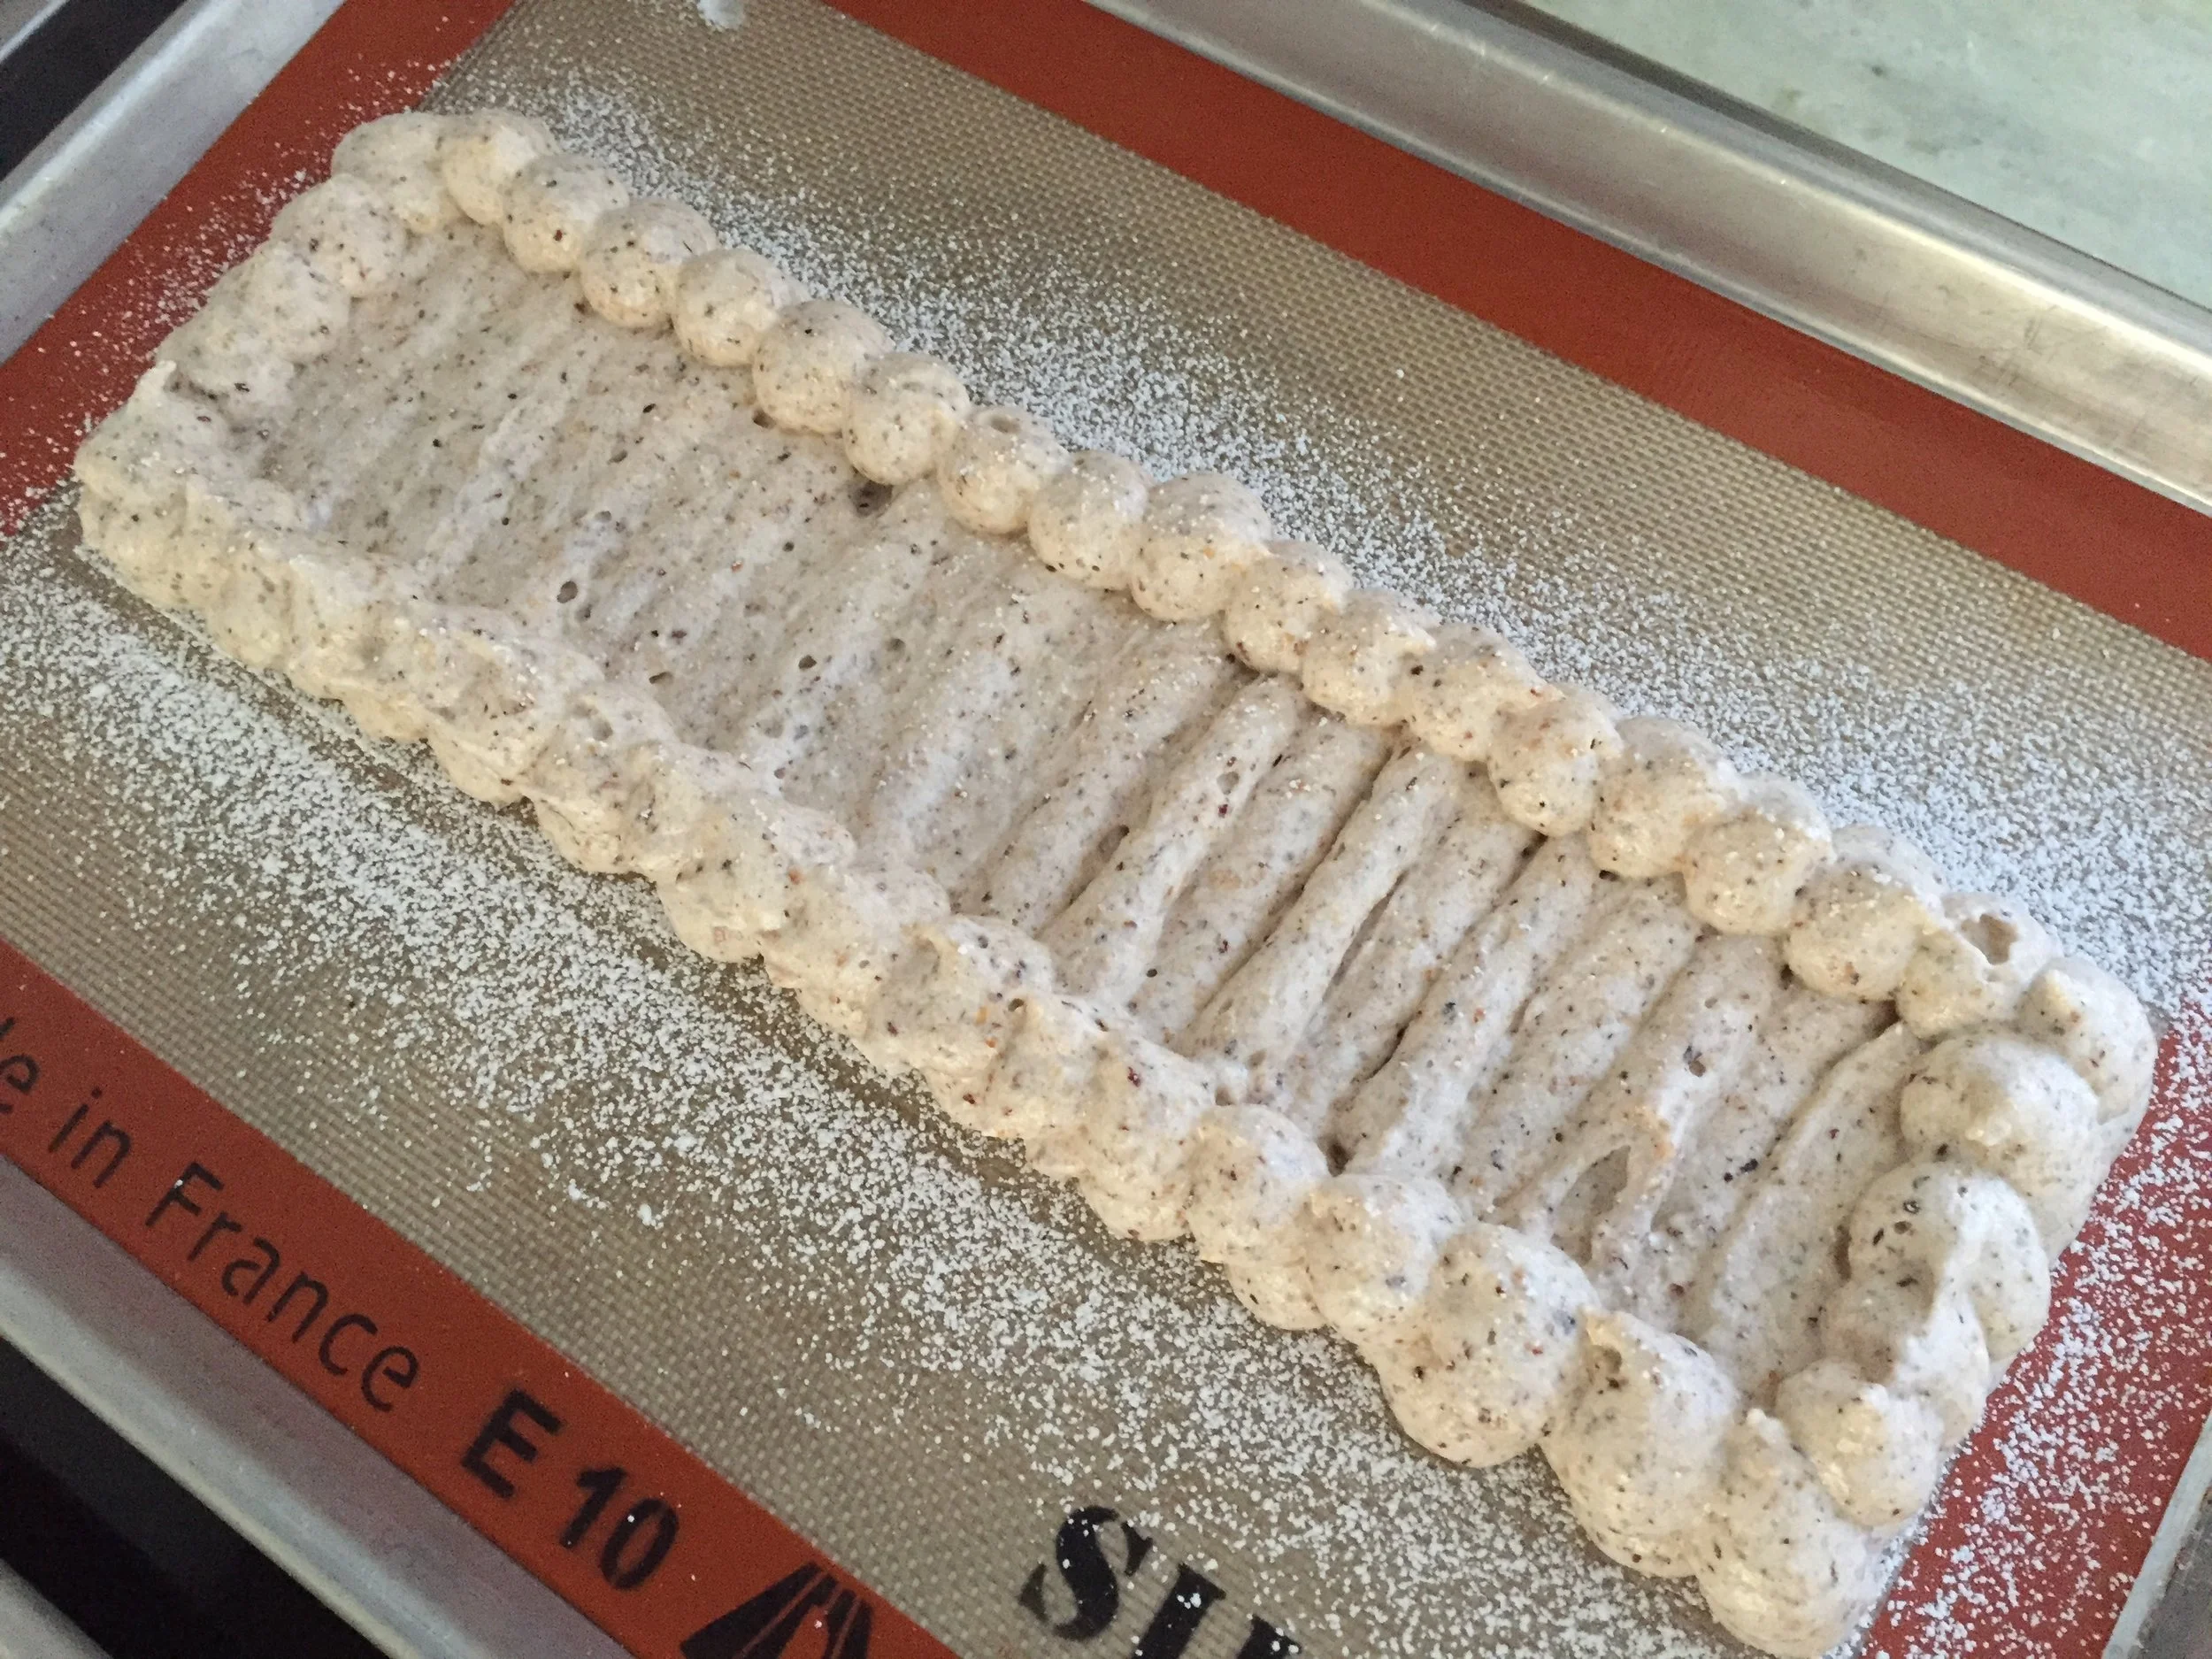
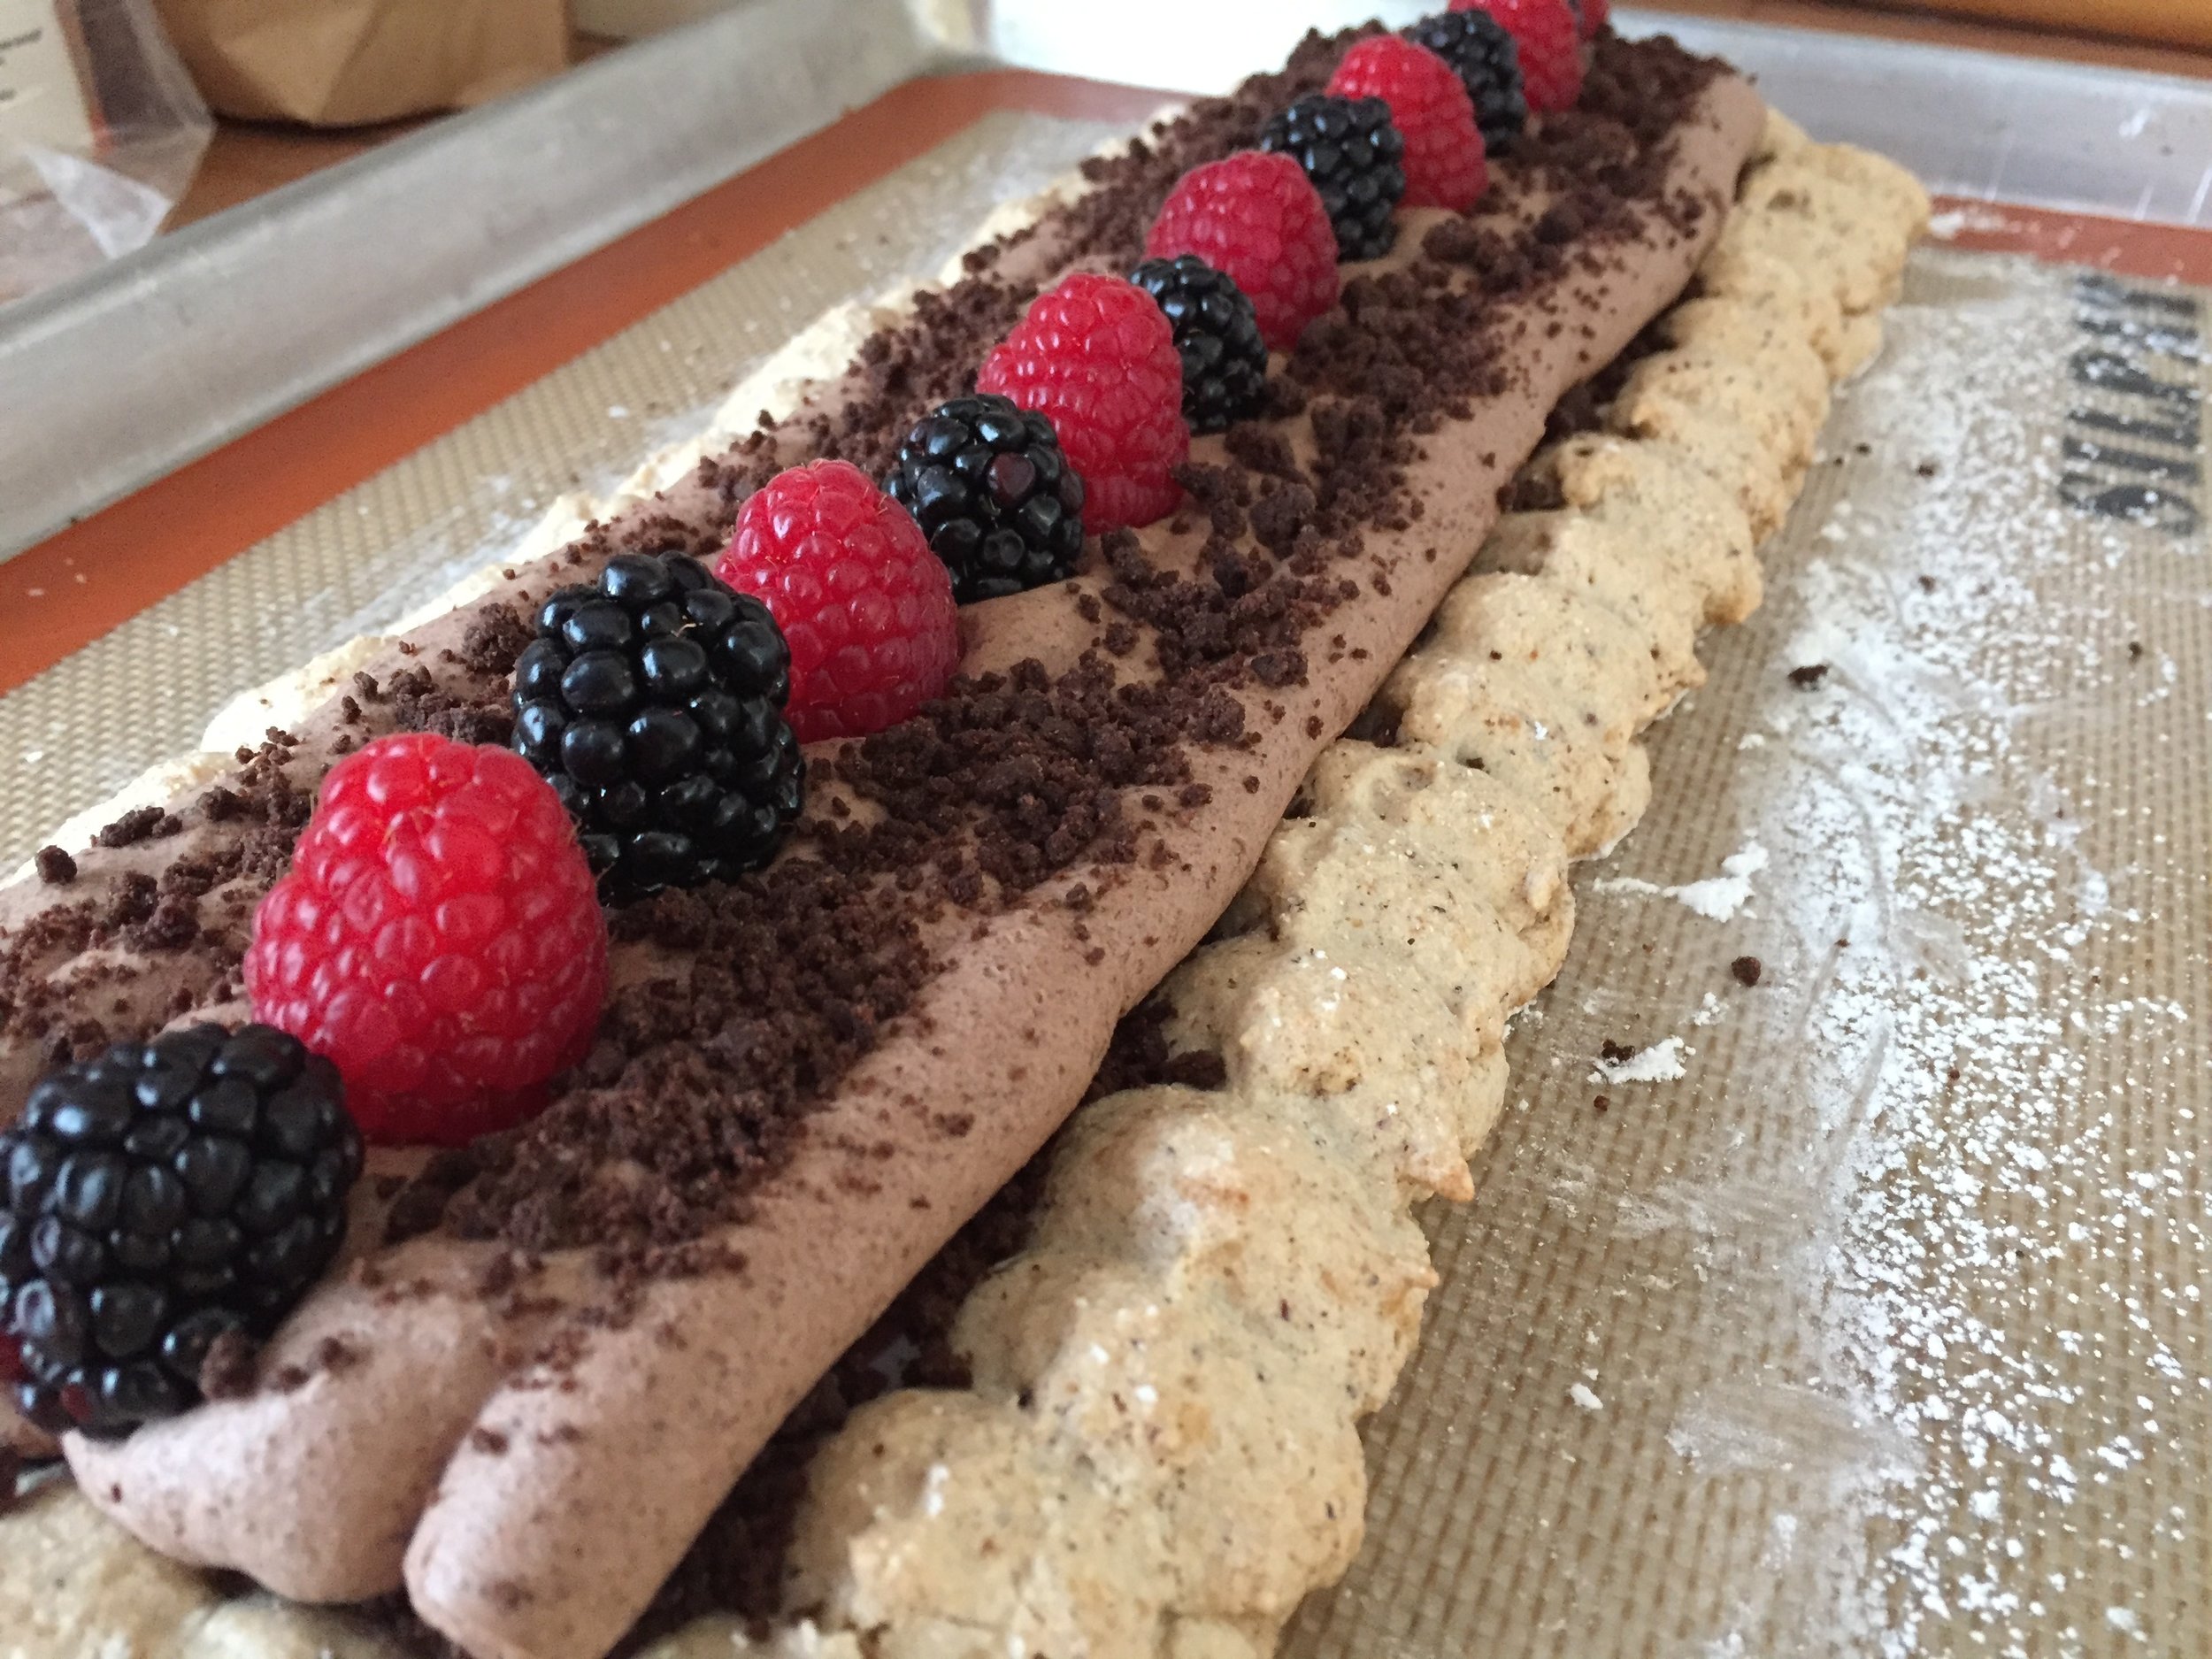
Spread 227 g / 8 ounces hazelnut remonce filling over the dough and sprinkle with 50 g chopped chocolate. I use Guittard 61%.
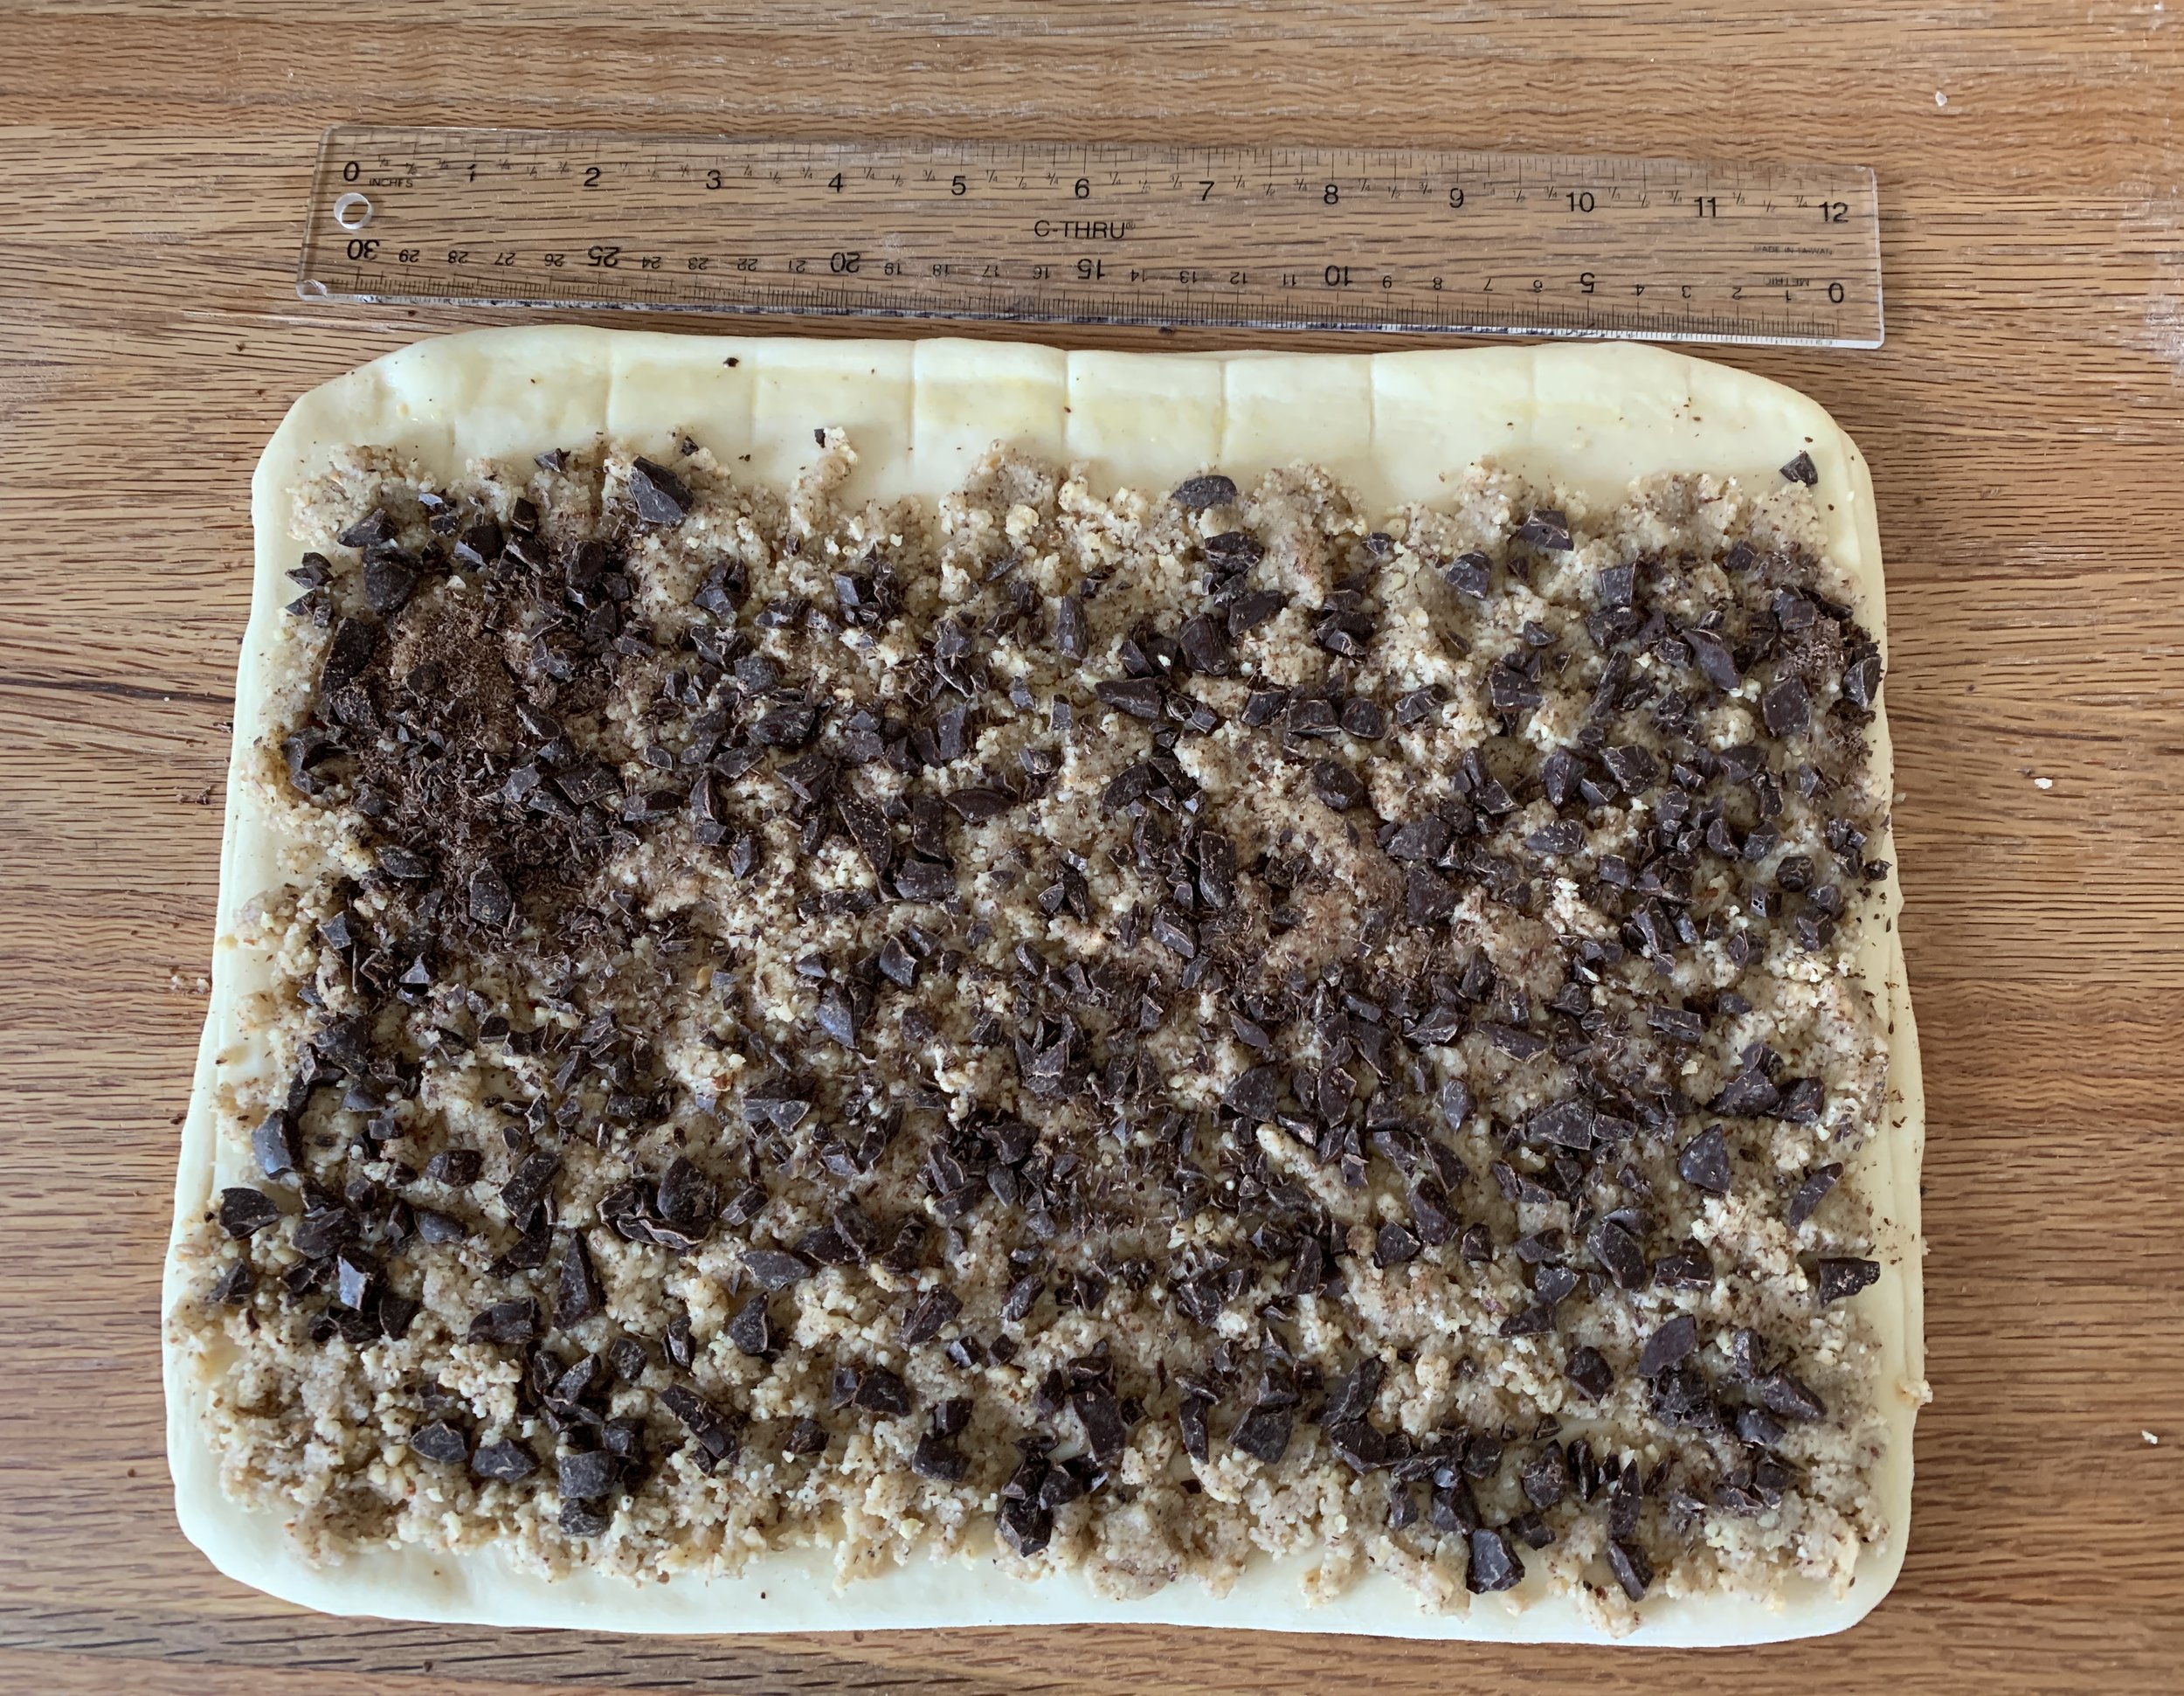
Ready to cut

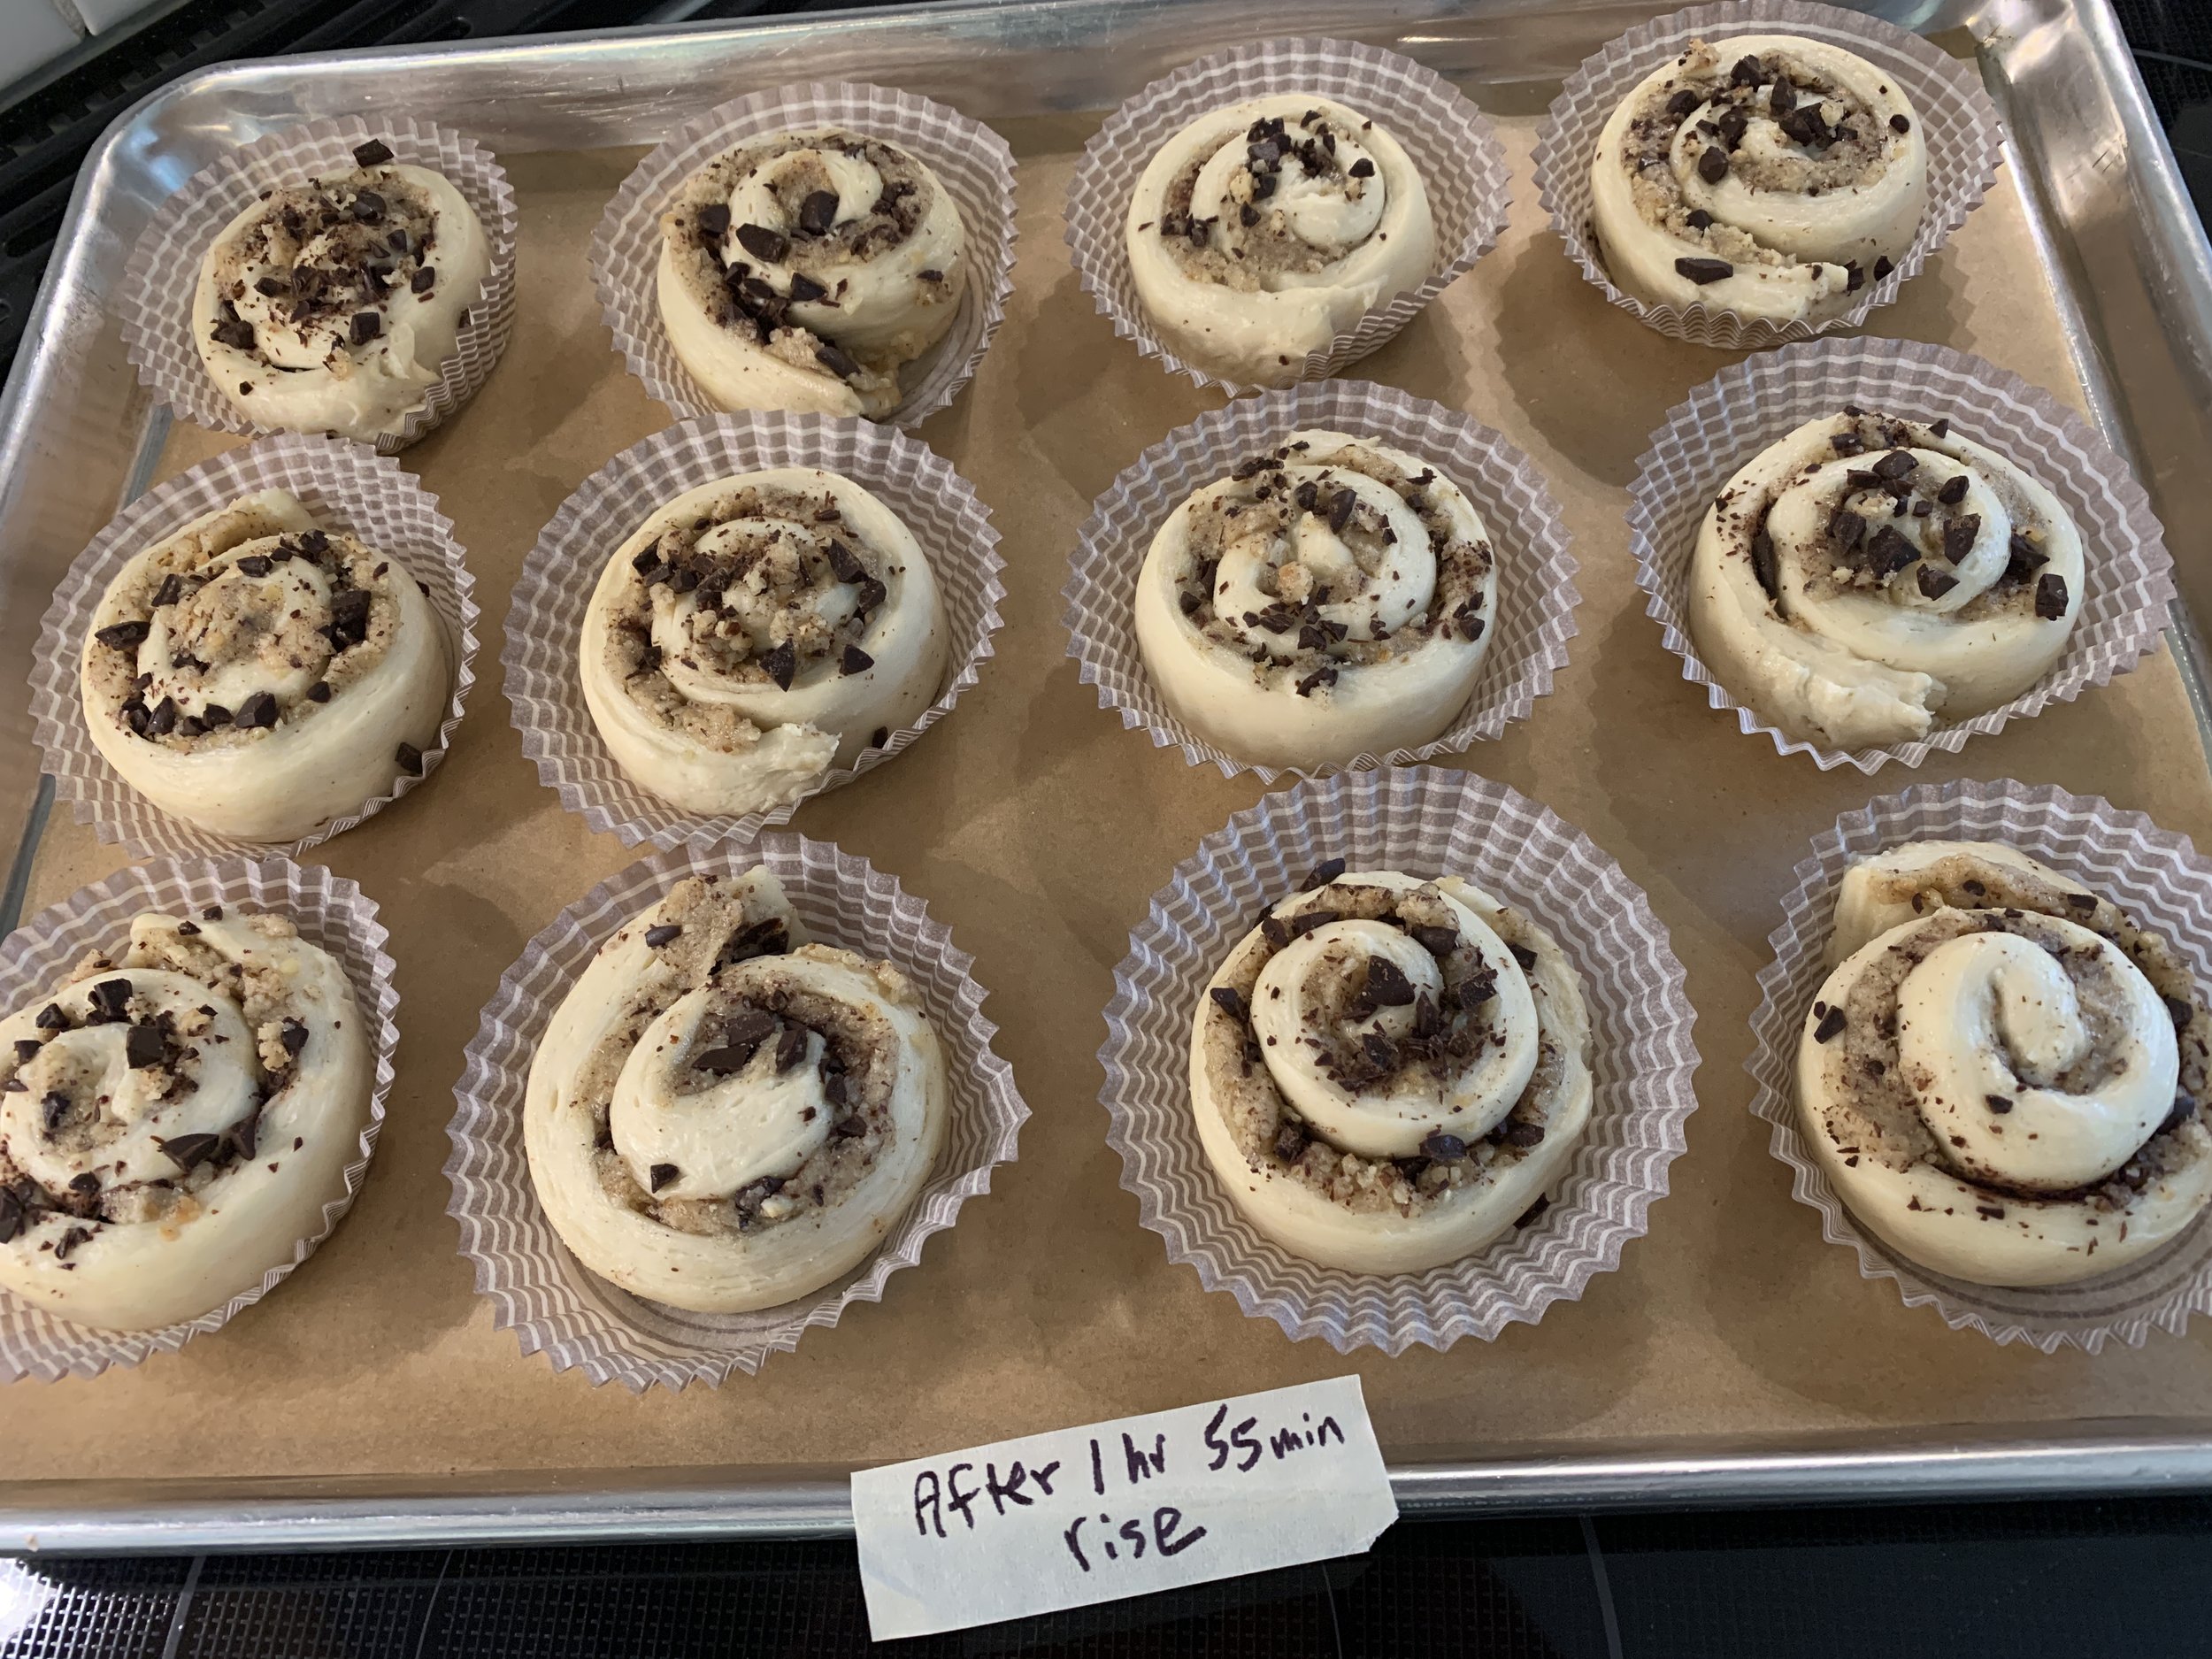
Cut ten 3 cm wide strips, roll ‘em up and place each in a standard sized baking paper. PSST - this is a new approach for me. Rather than tucking them in a pan cheek-by-jowl or setting them openly onto a sheet pan without any ring or form, the papers give them just enough of a boundary to allow for rising/spreading and baking very nicely. Yes!

Rolling, rolling, rolling


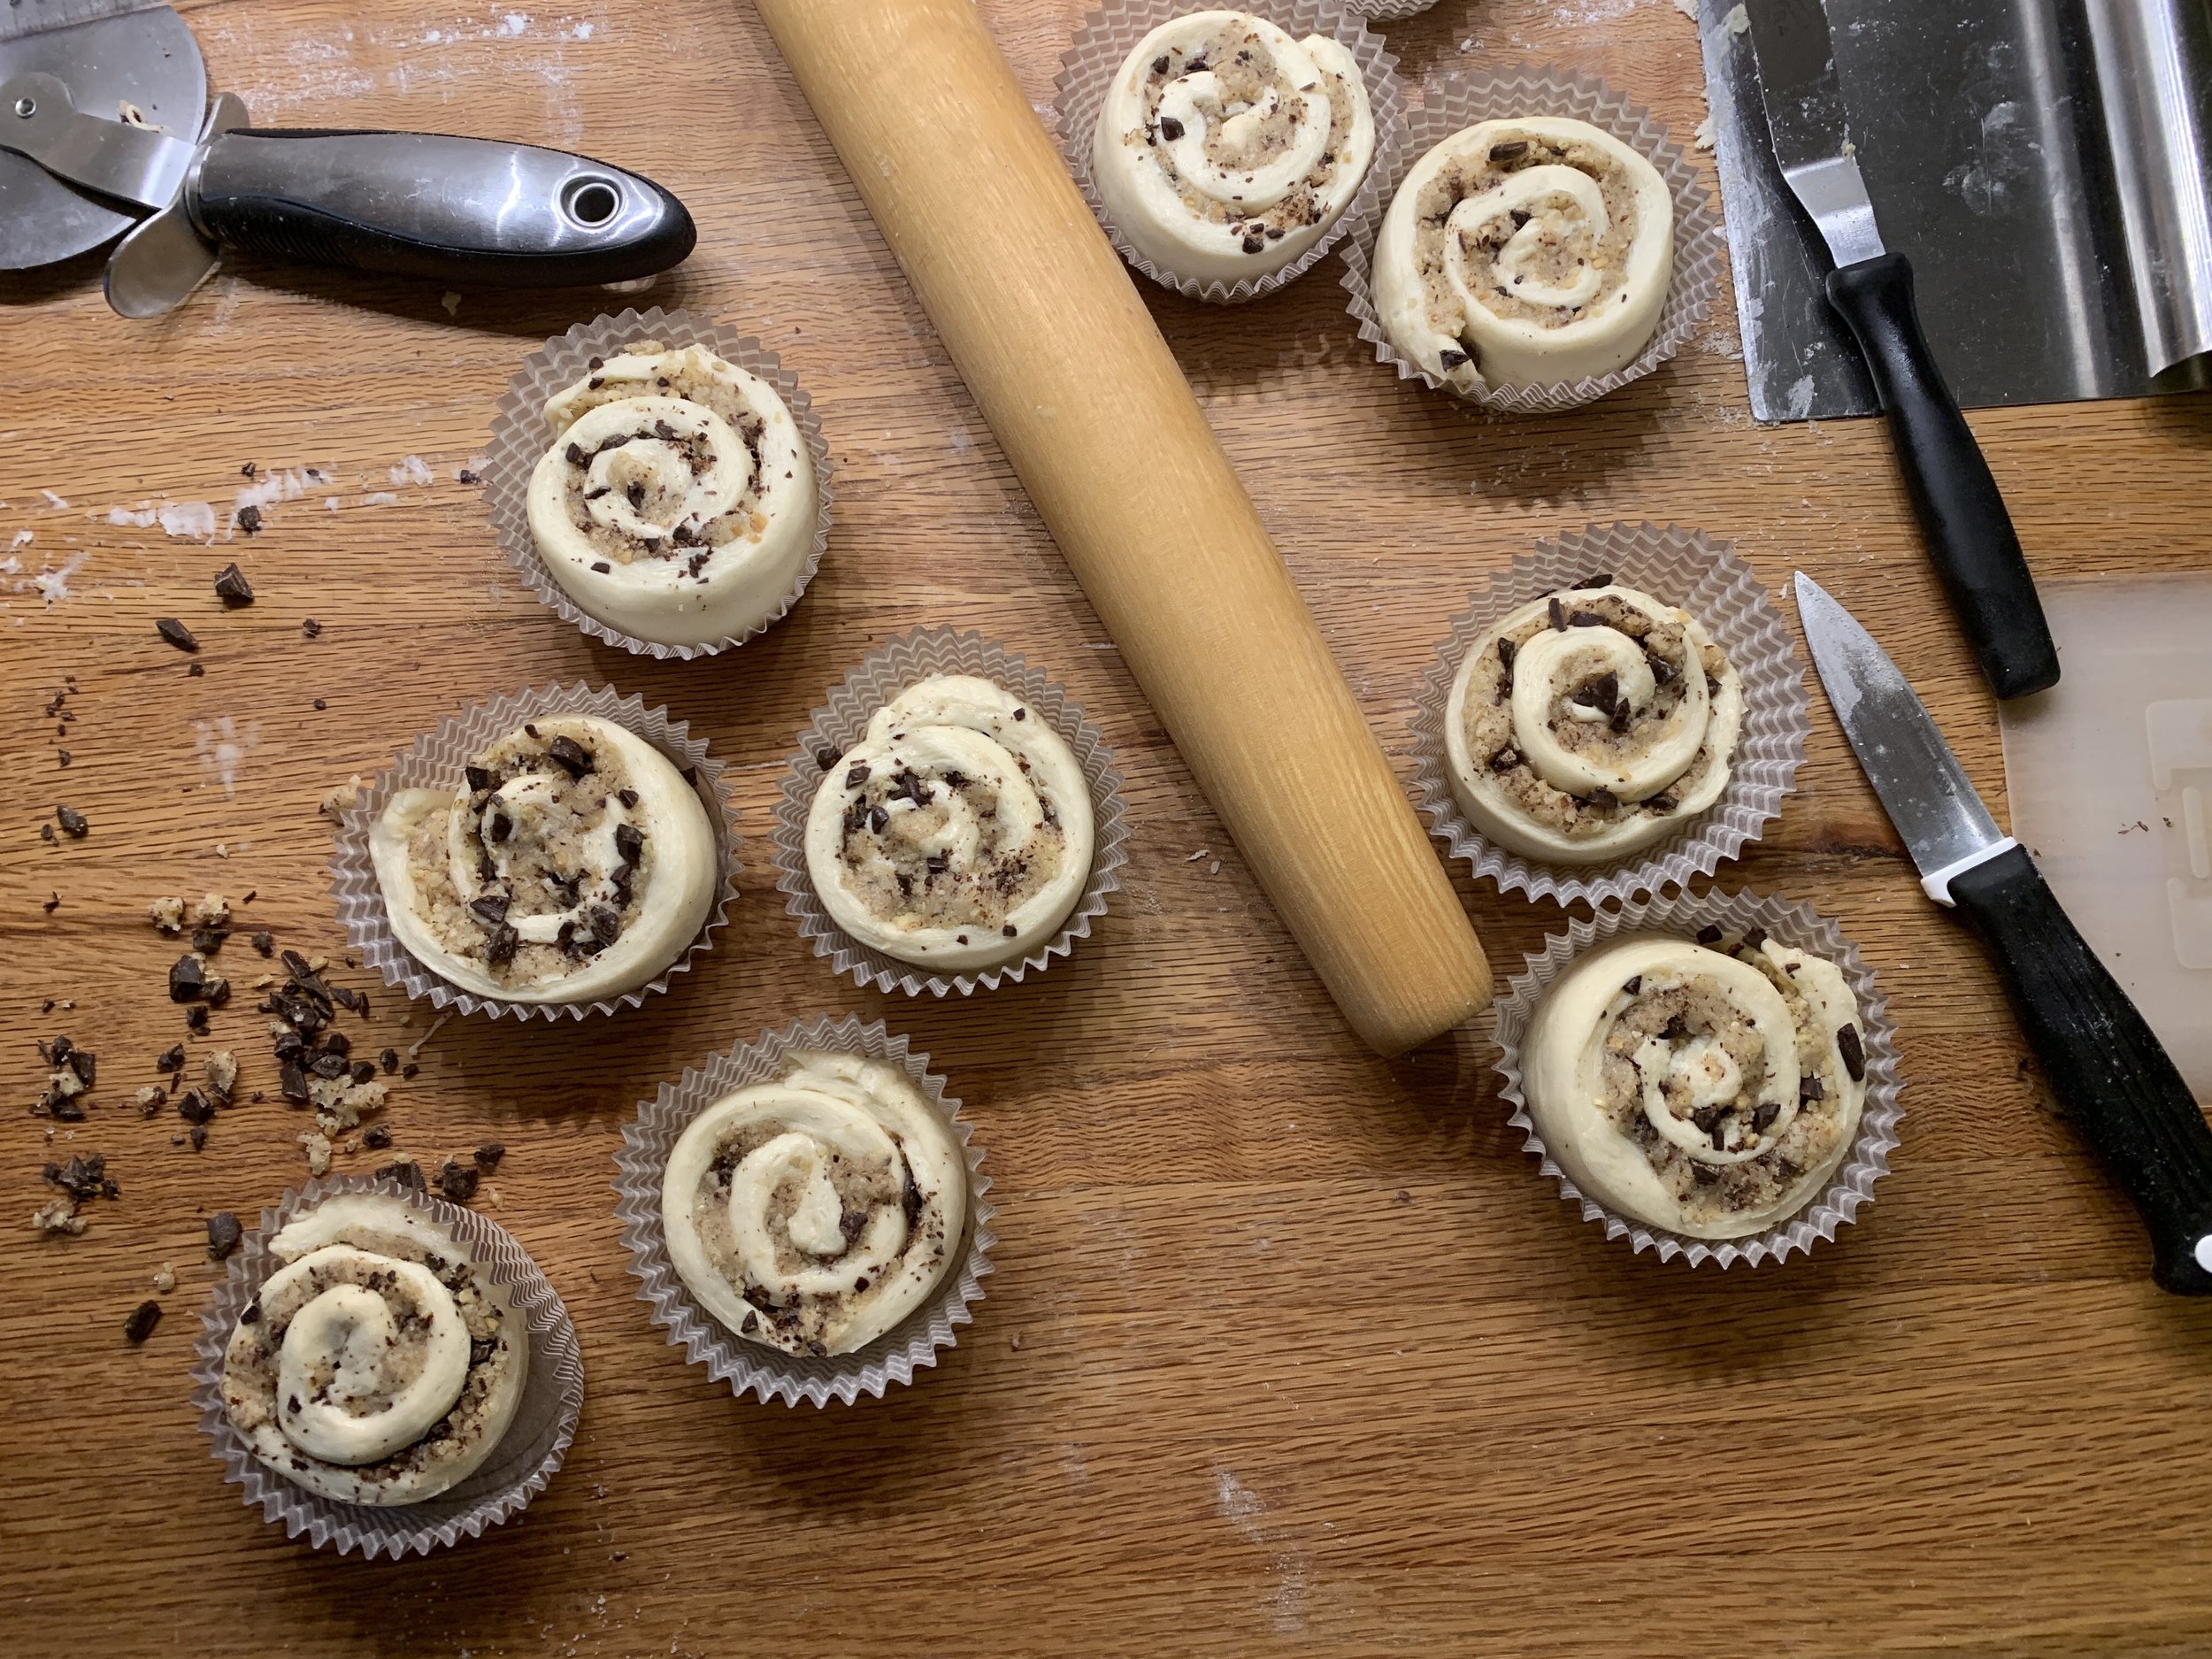
Cover lightly with buttered plastic wrap and let rise 1.5 to 2 hours. Not to confuse you, but I cut two additional strips from the half batch of dough I was using for the squiggle test (coming up) to give me an even dozen as you see below.


Toward the end of the rise heat the oven to 400ºF. Bake 10 minutes, rotate the pan and check the browning. If browning too quickly, reduce temp to 375ºF and bake an additional 10-15 minutes until nicely browned.


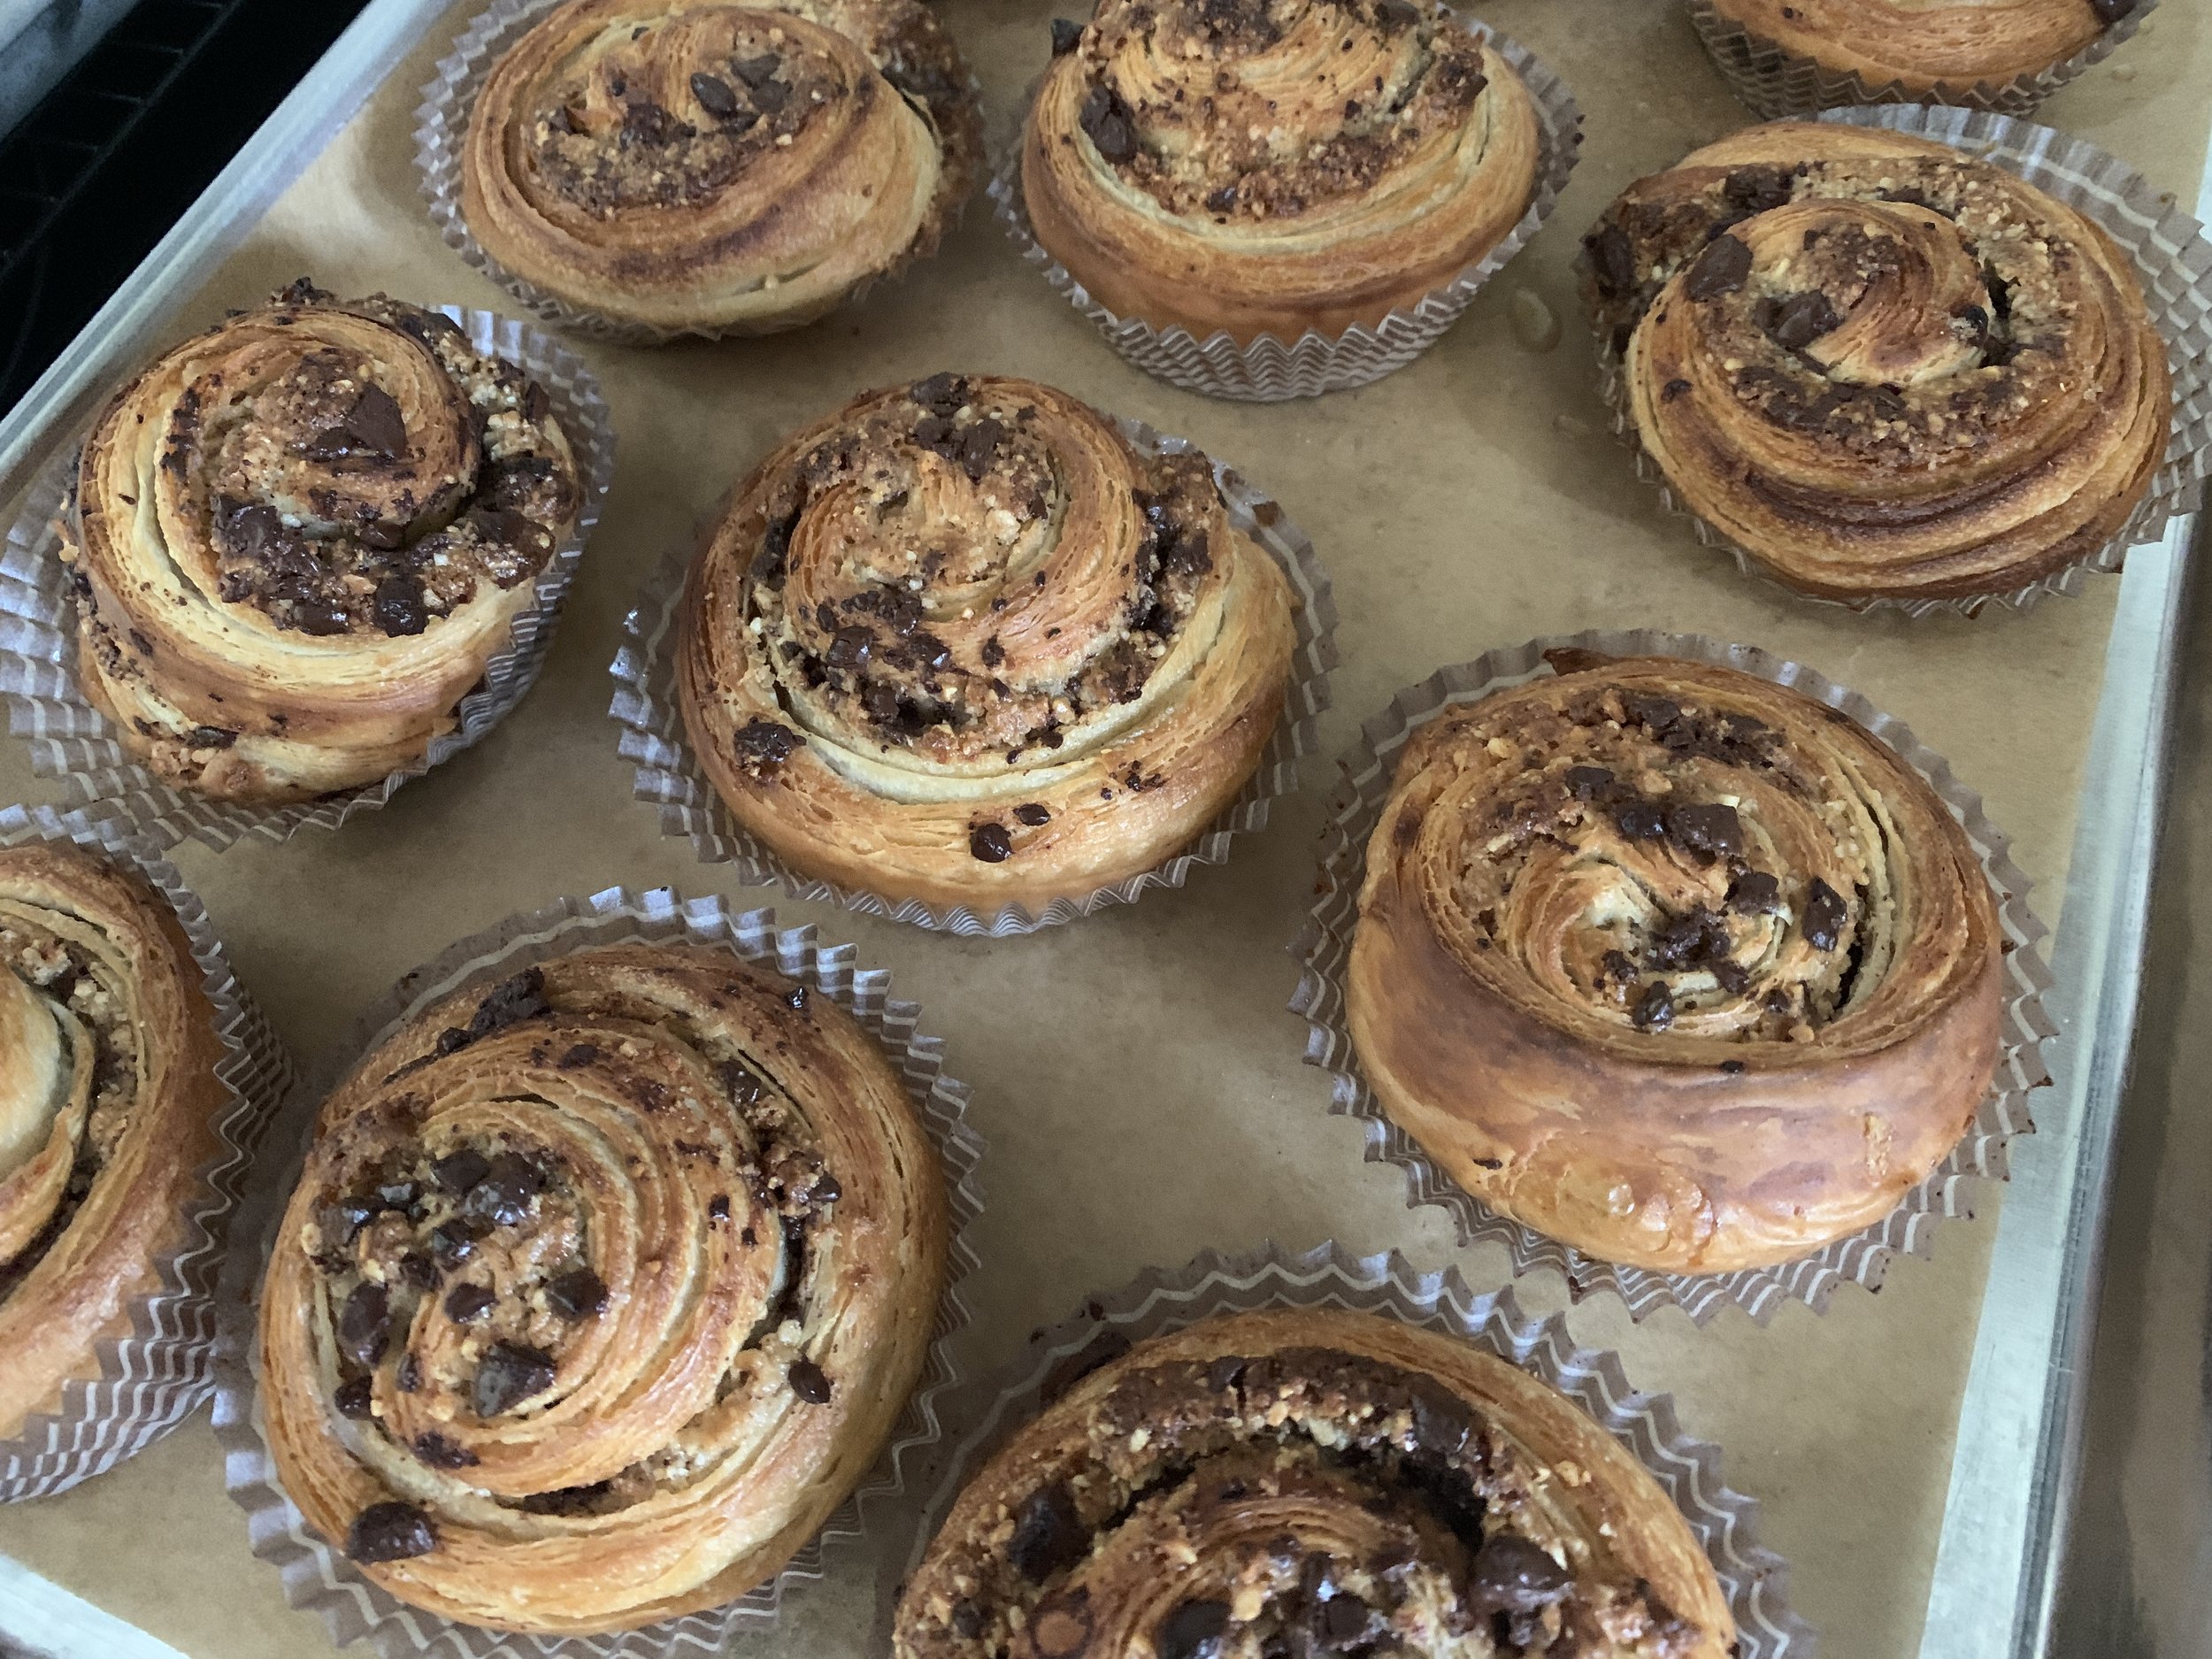
For a little shine I brush them with some simple syrup and then give ‘em a sprinkle of coriander sugar. Yum.


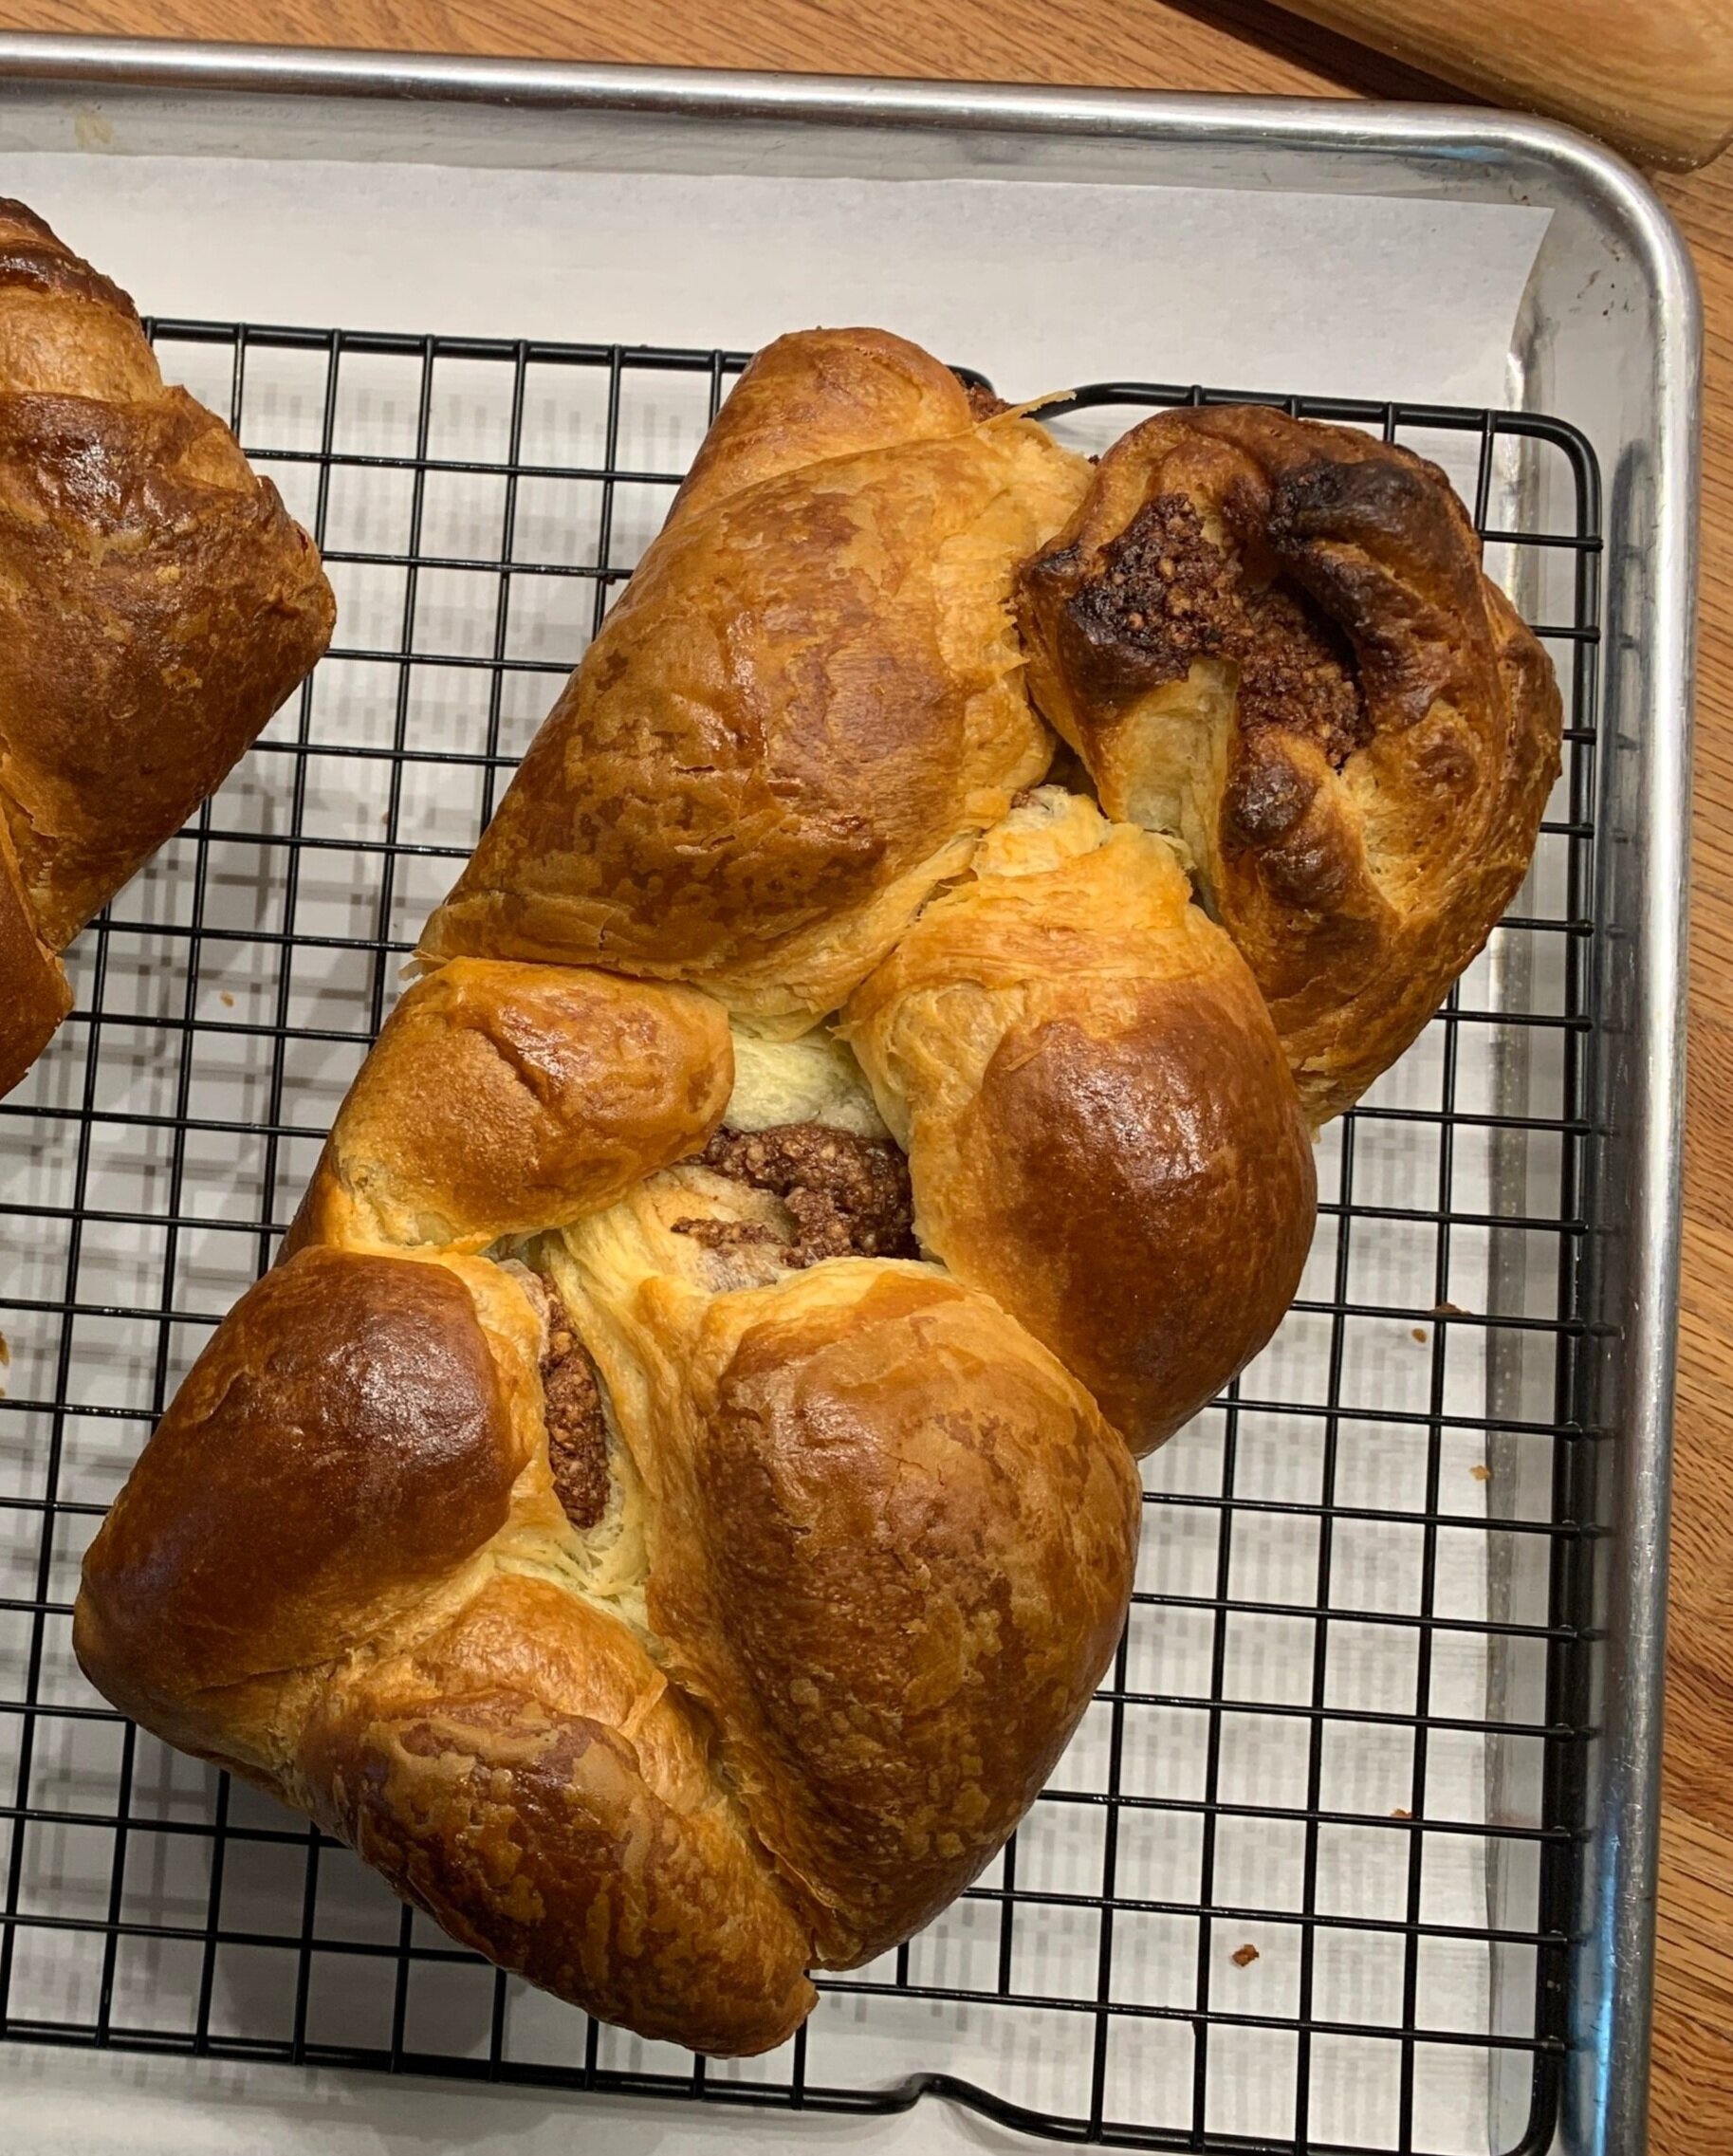
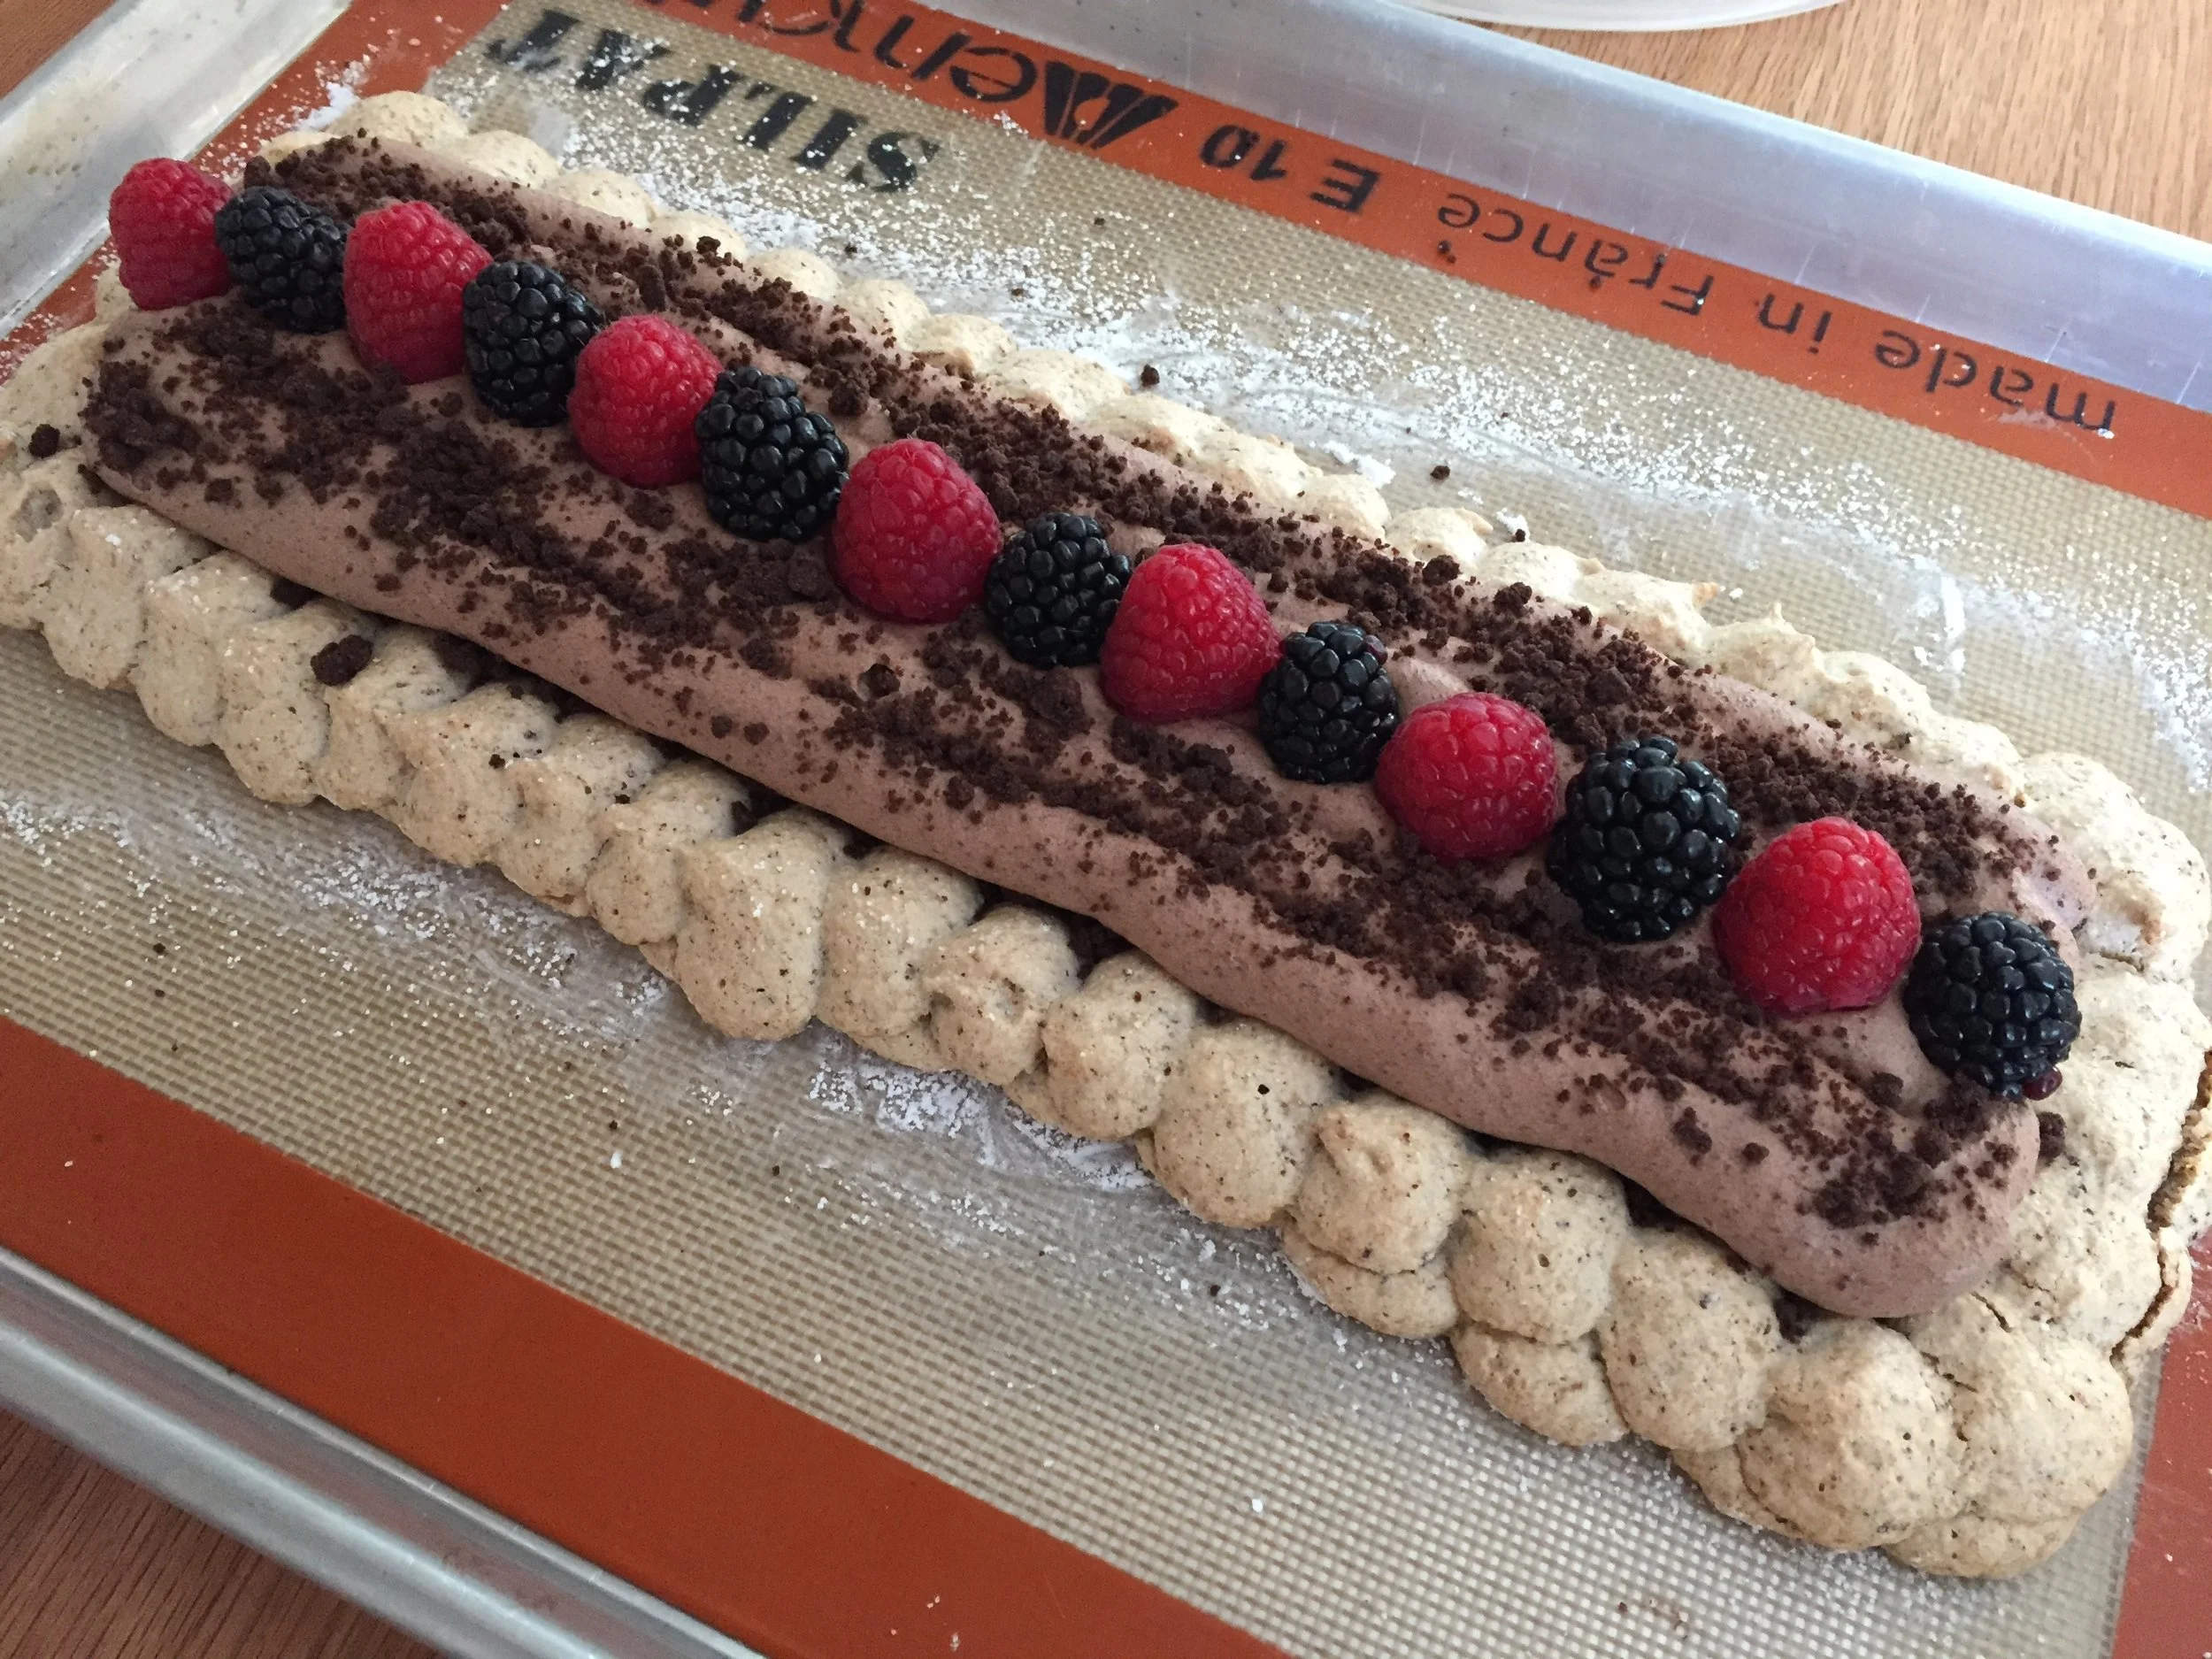
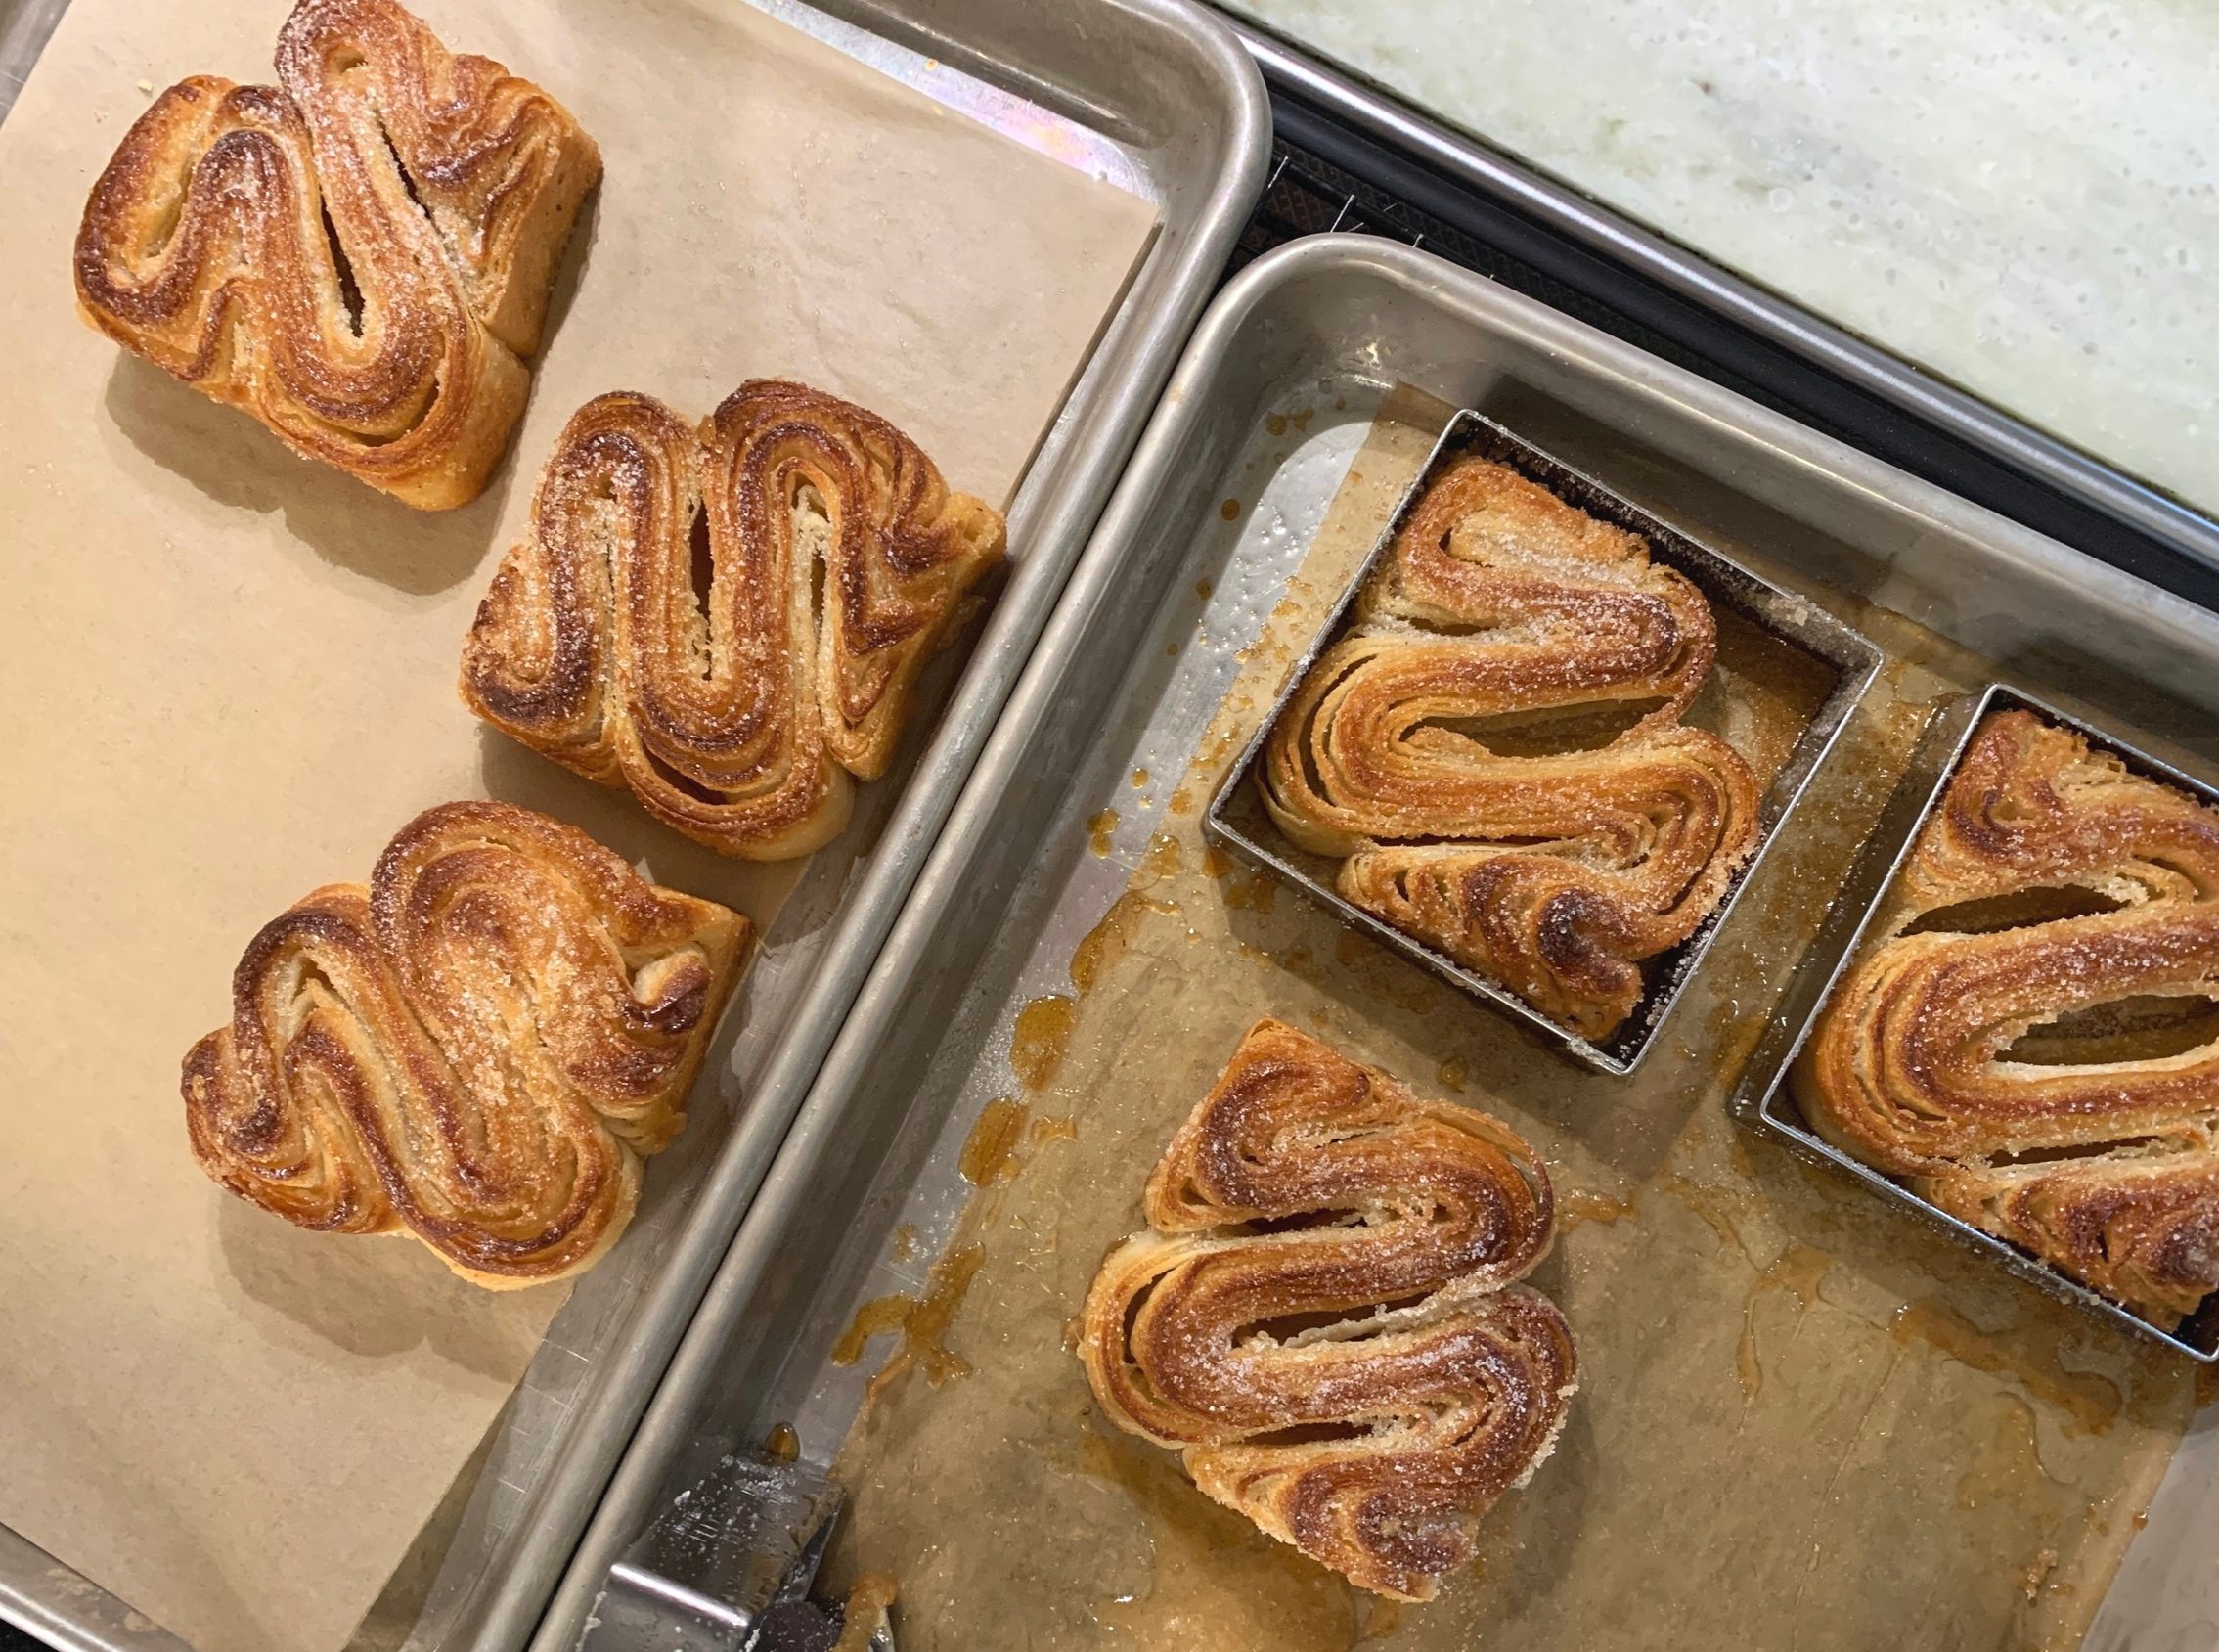
Time for the new shape! Squiggles. They remind me of fleur-de-lis.


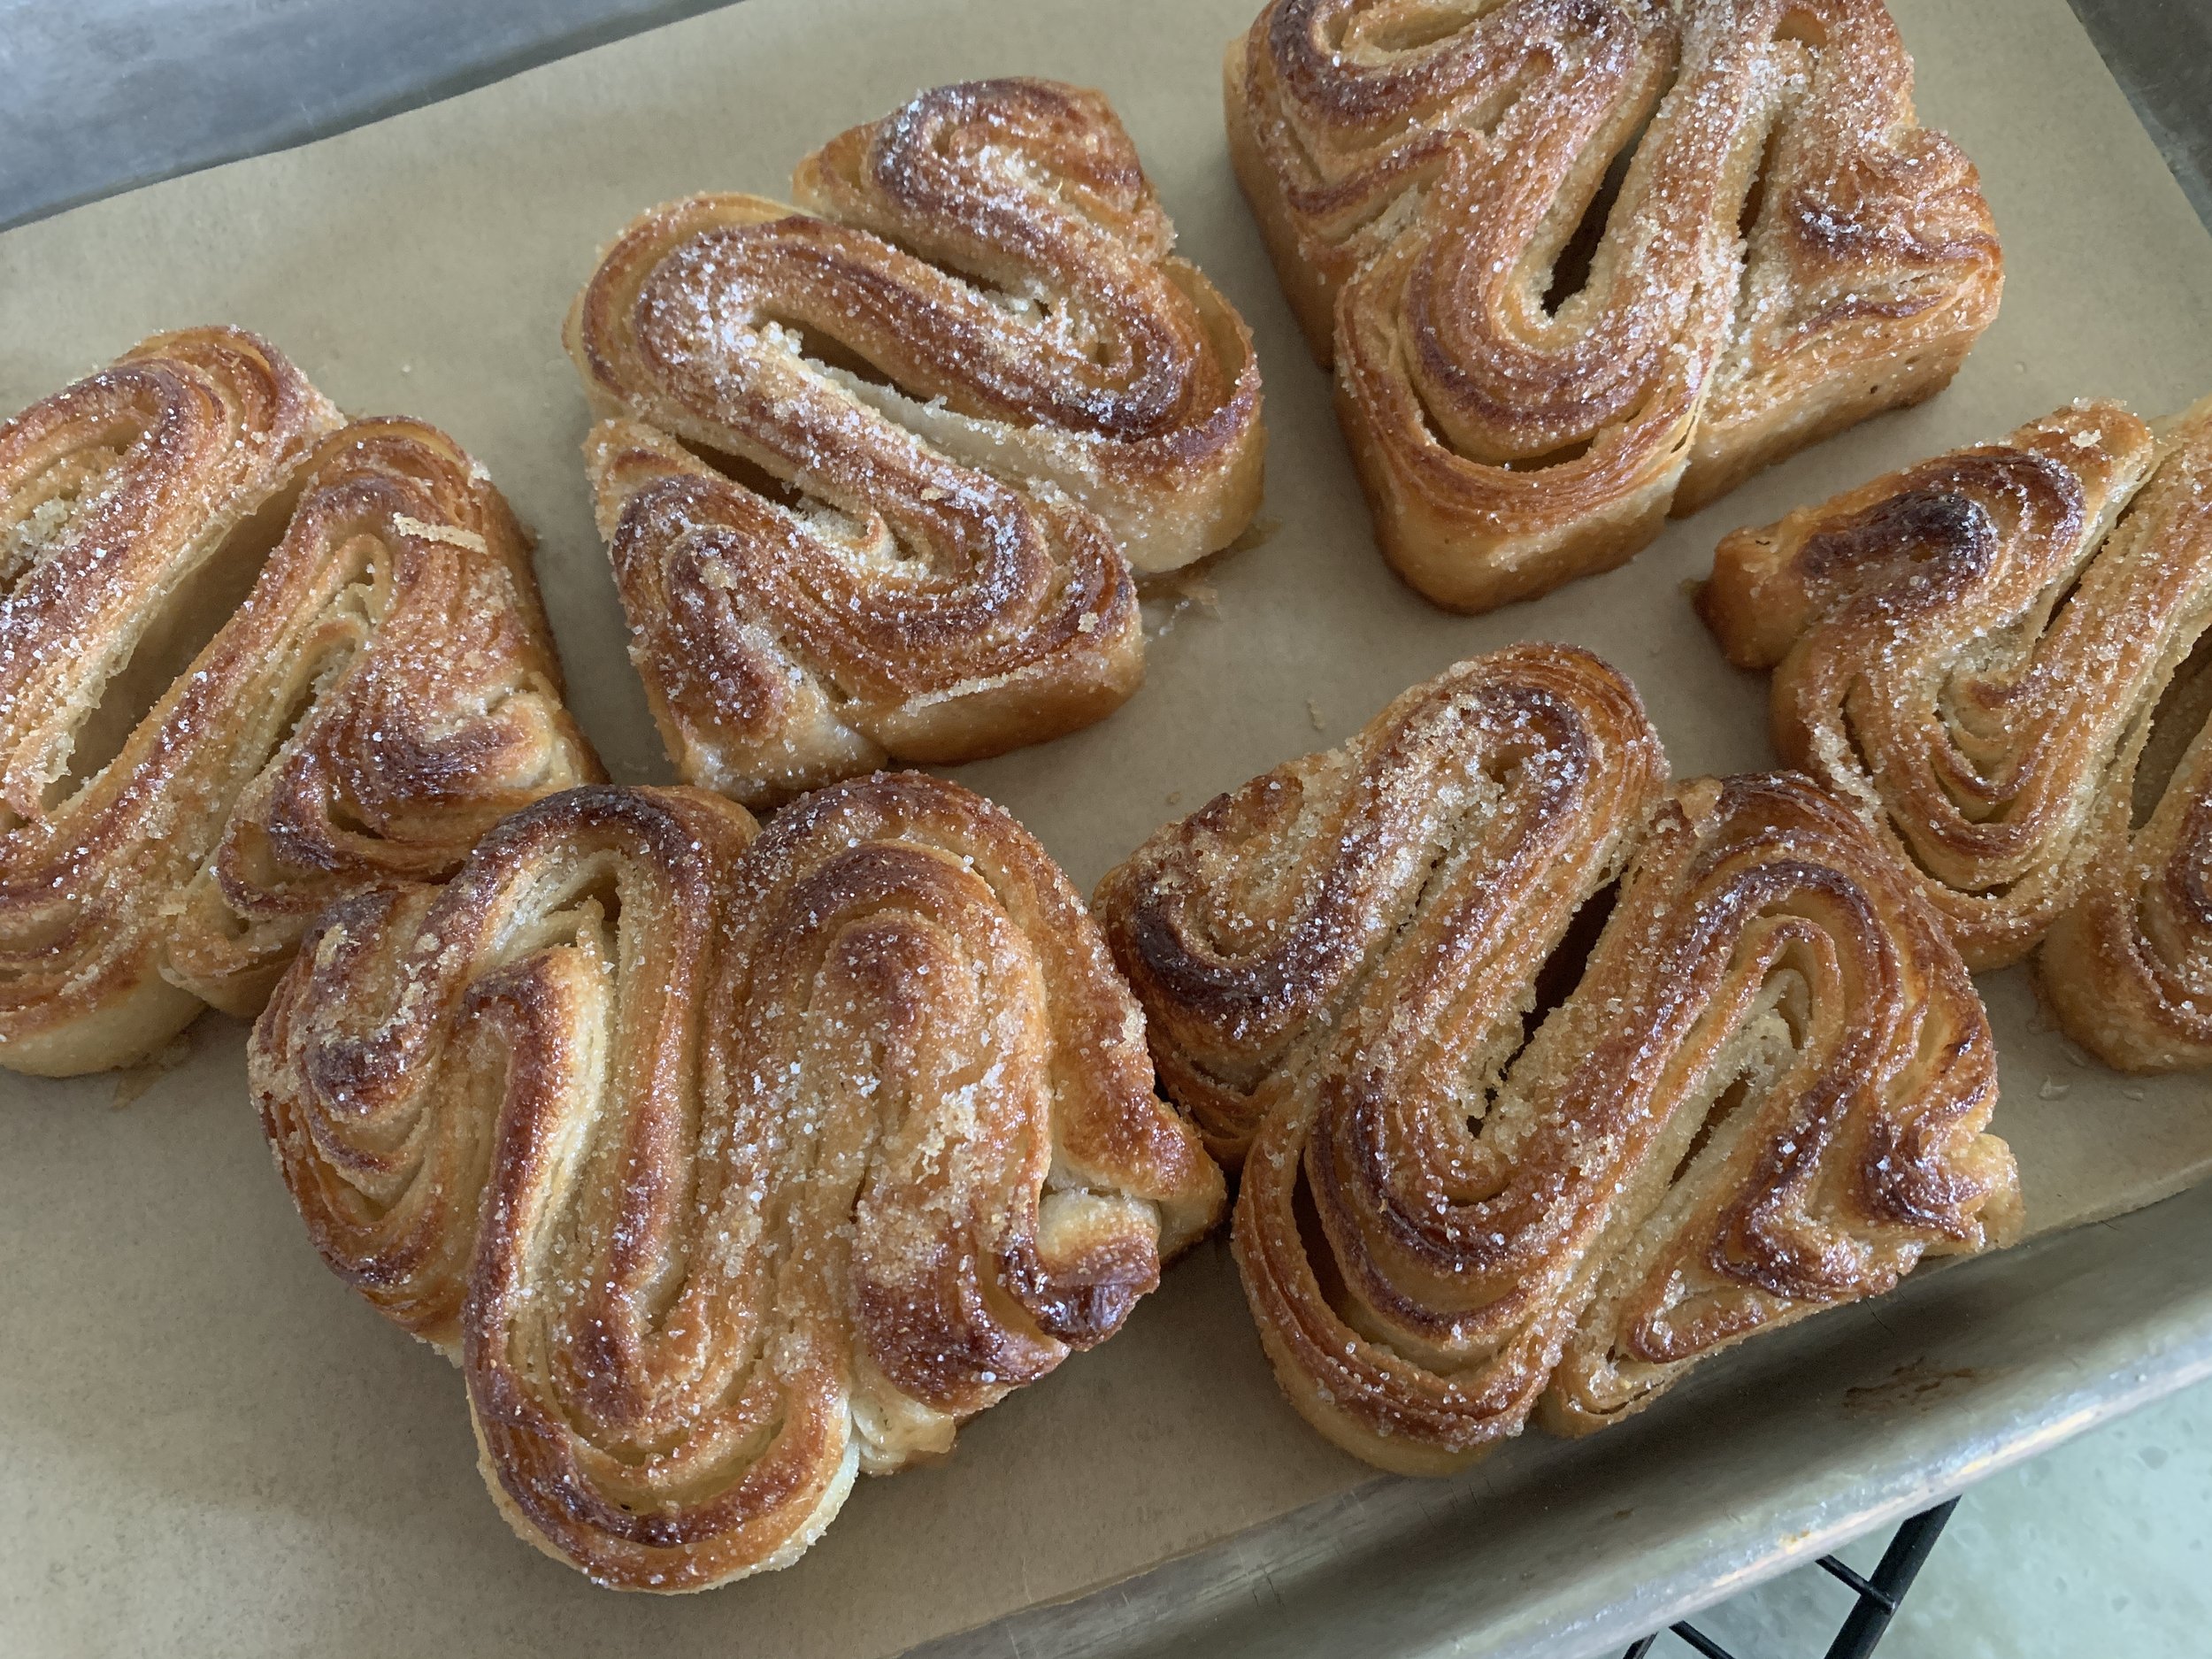
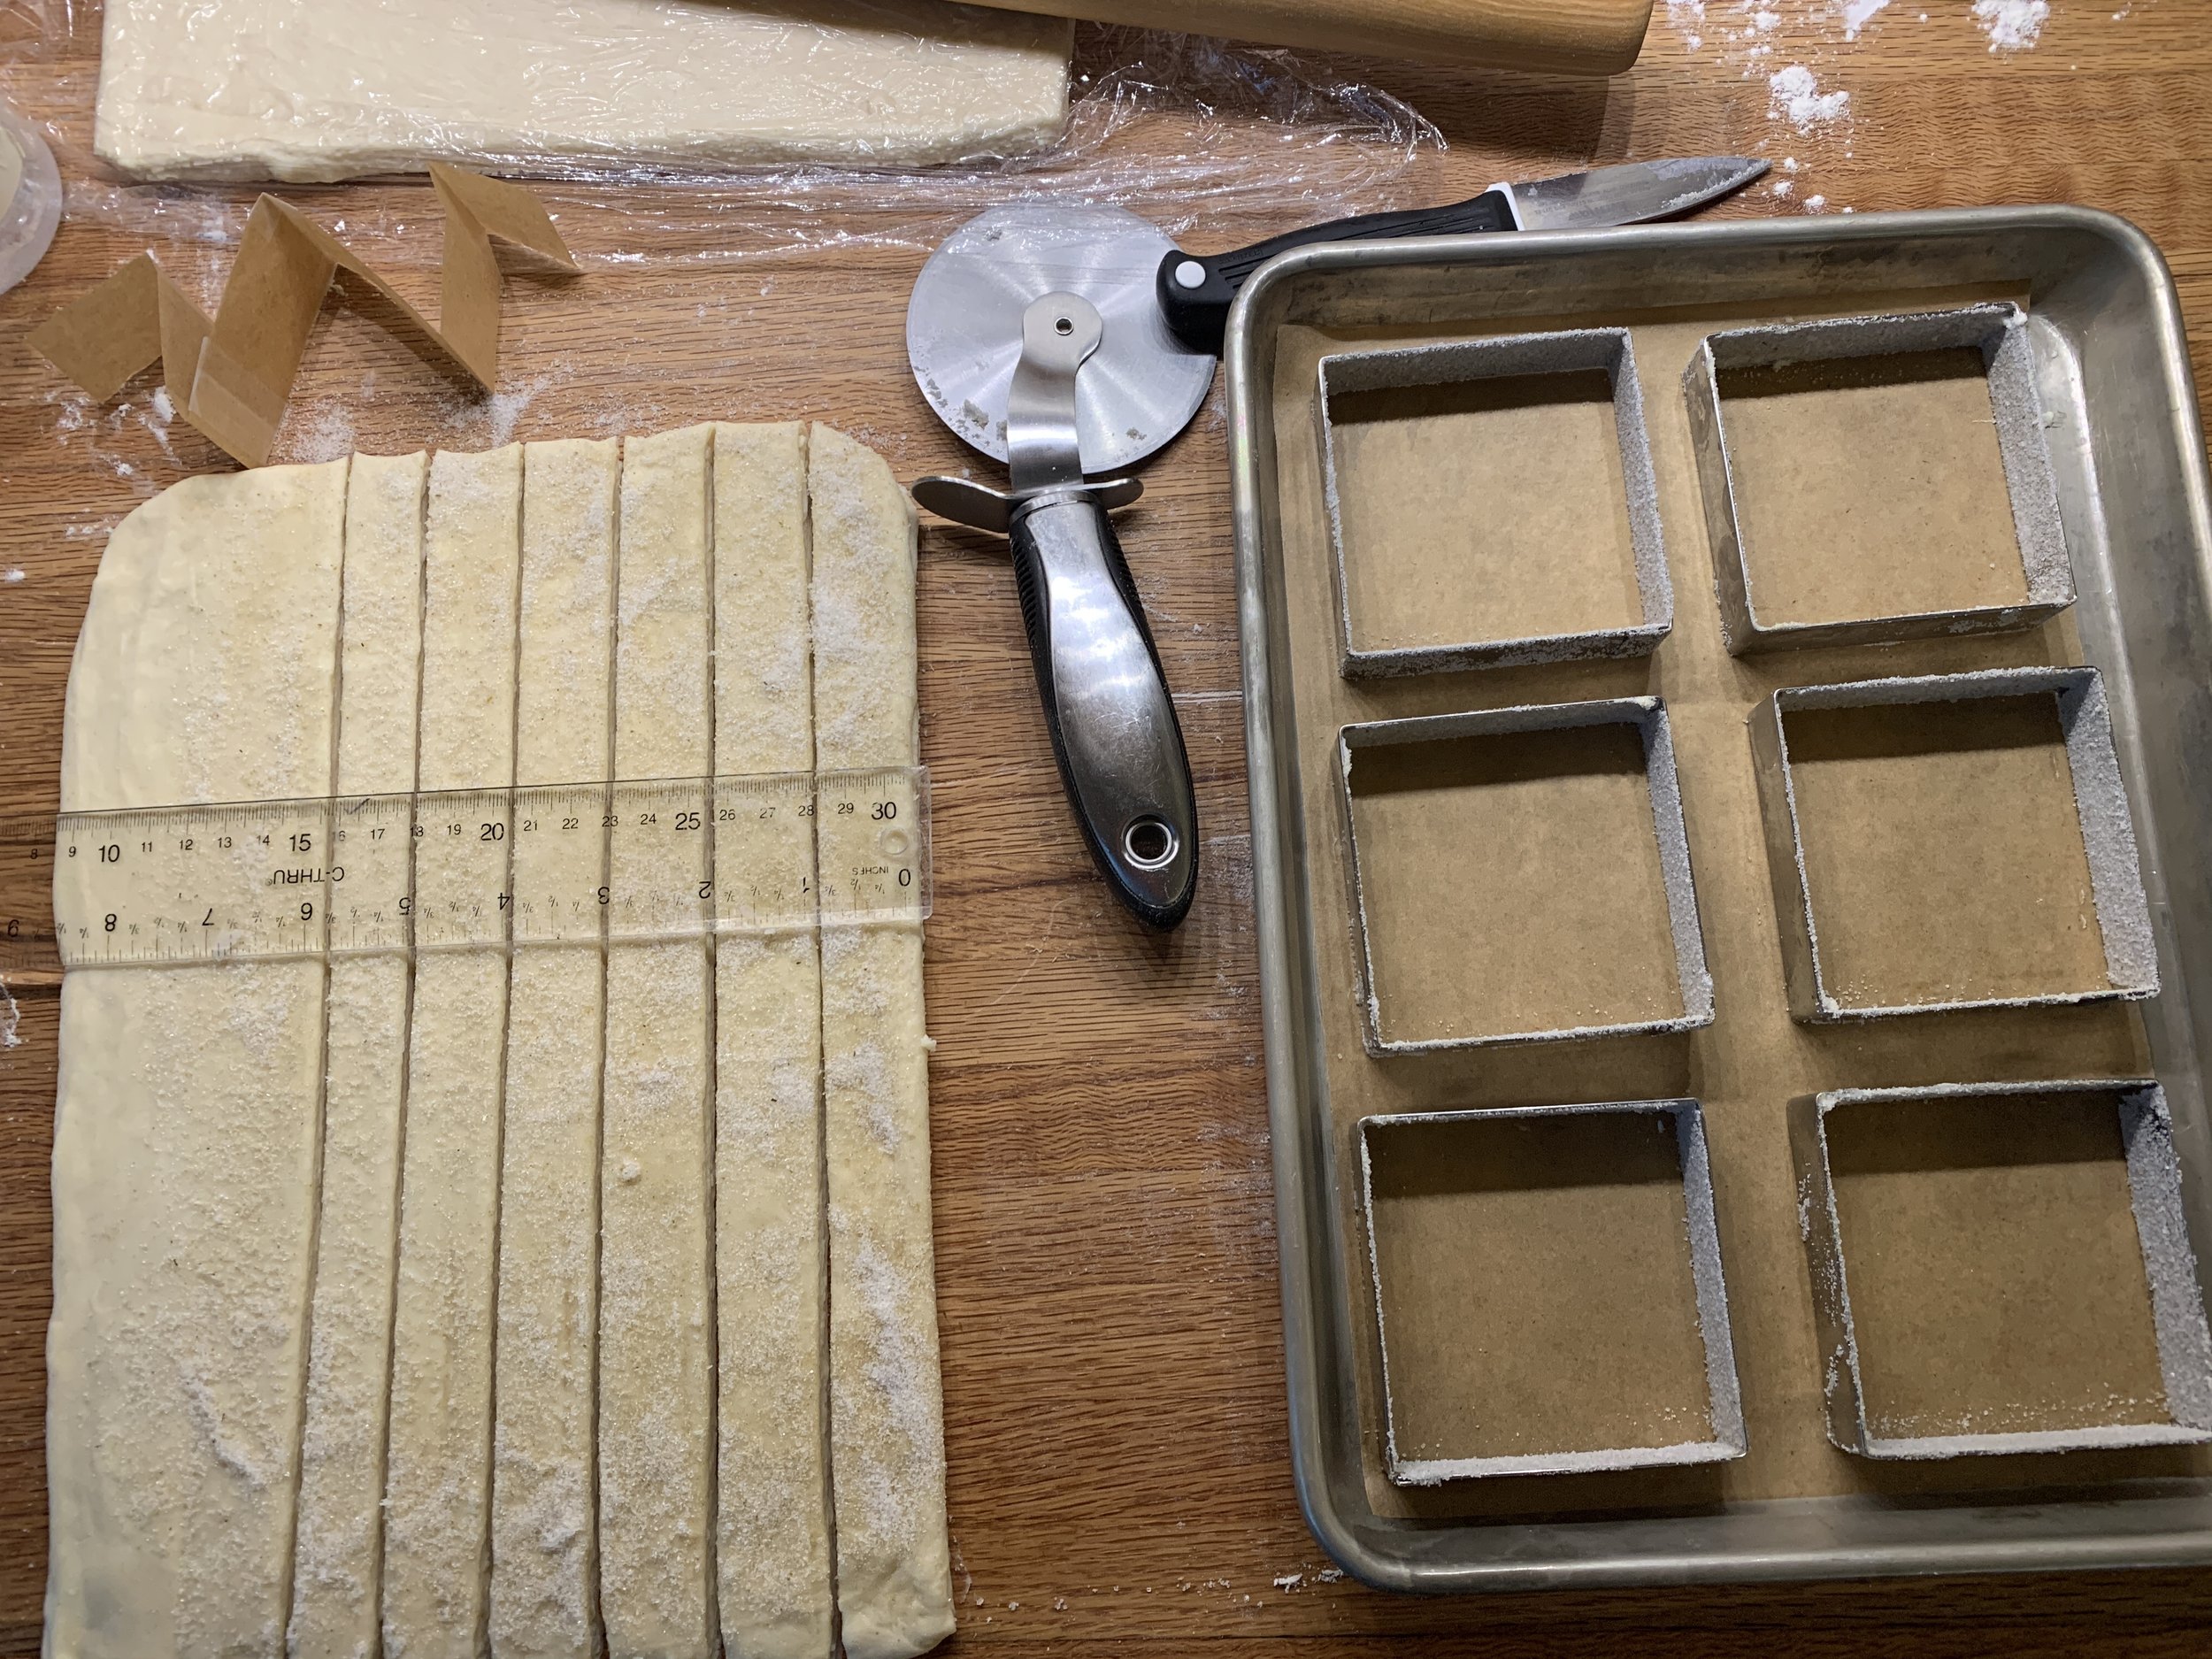
Using a half batch of dough, I rolled it out to an 8” x 12” rectangle, this time with the short side parallel to the edge of the counter. I have only six 80-mm square tart forms so six pastries resulted from this experiment.

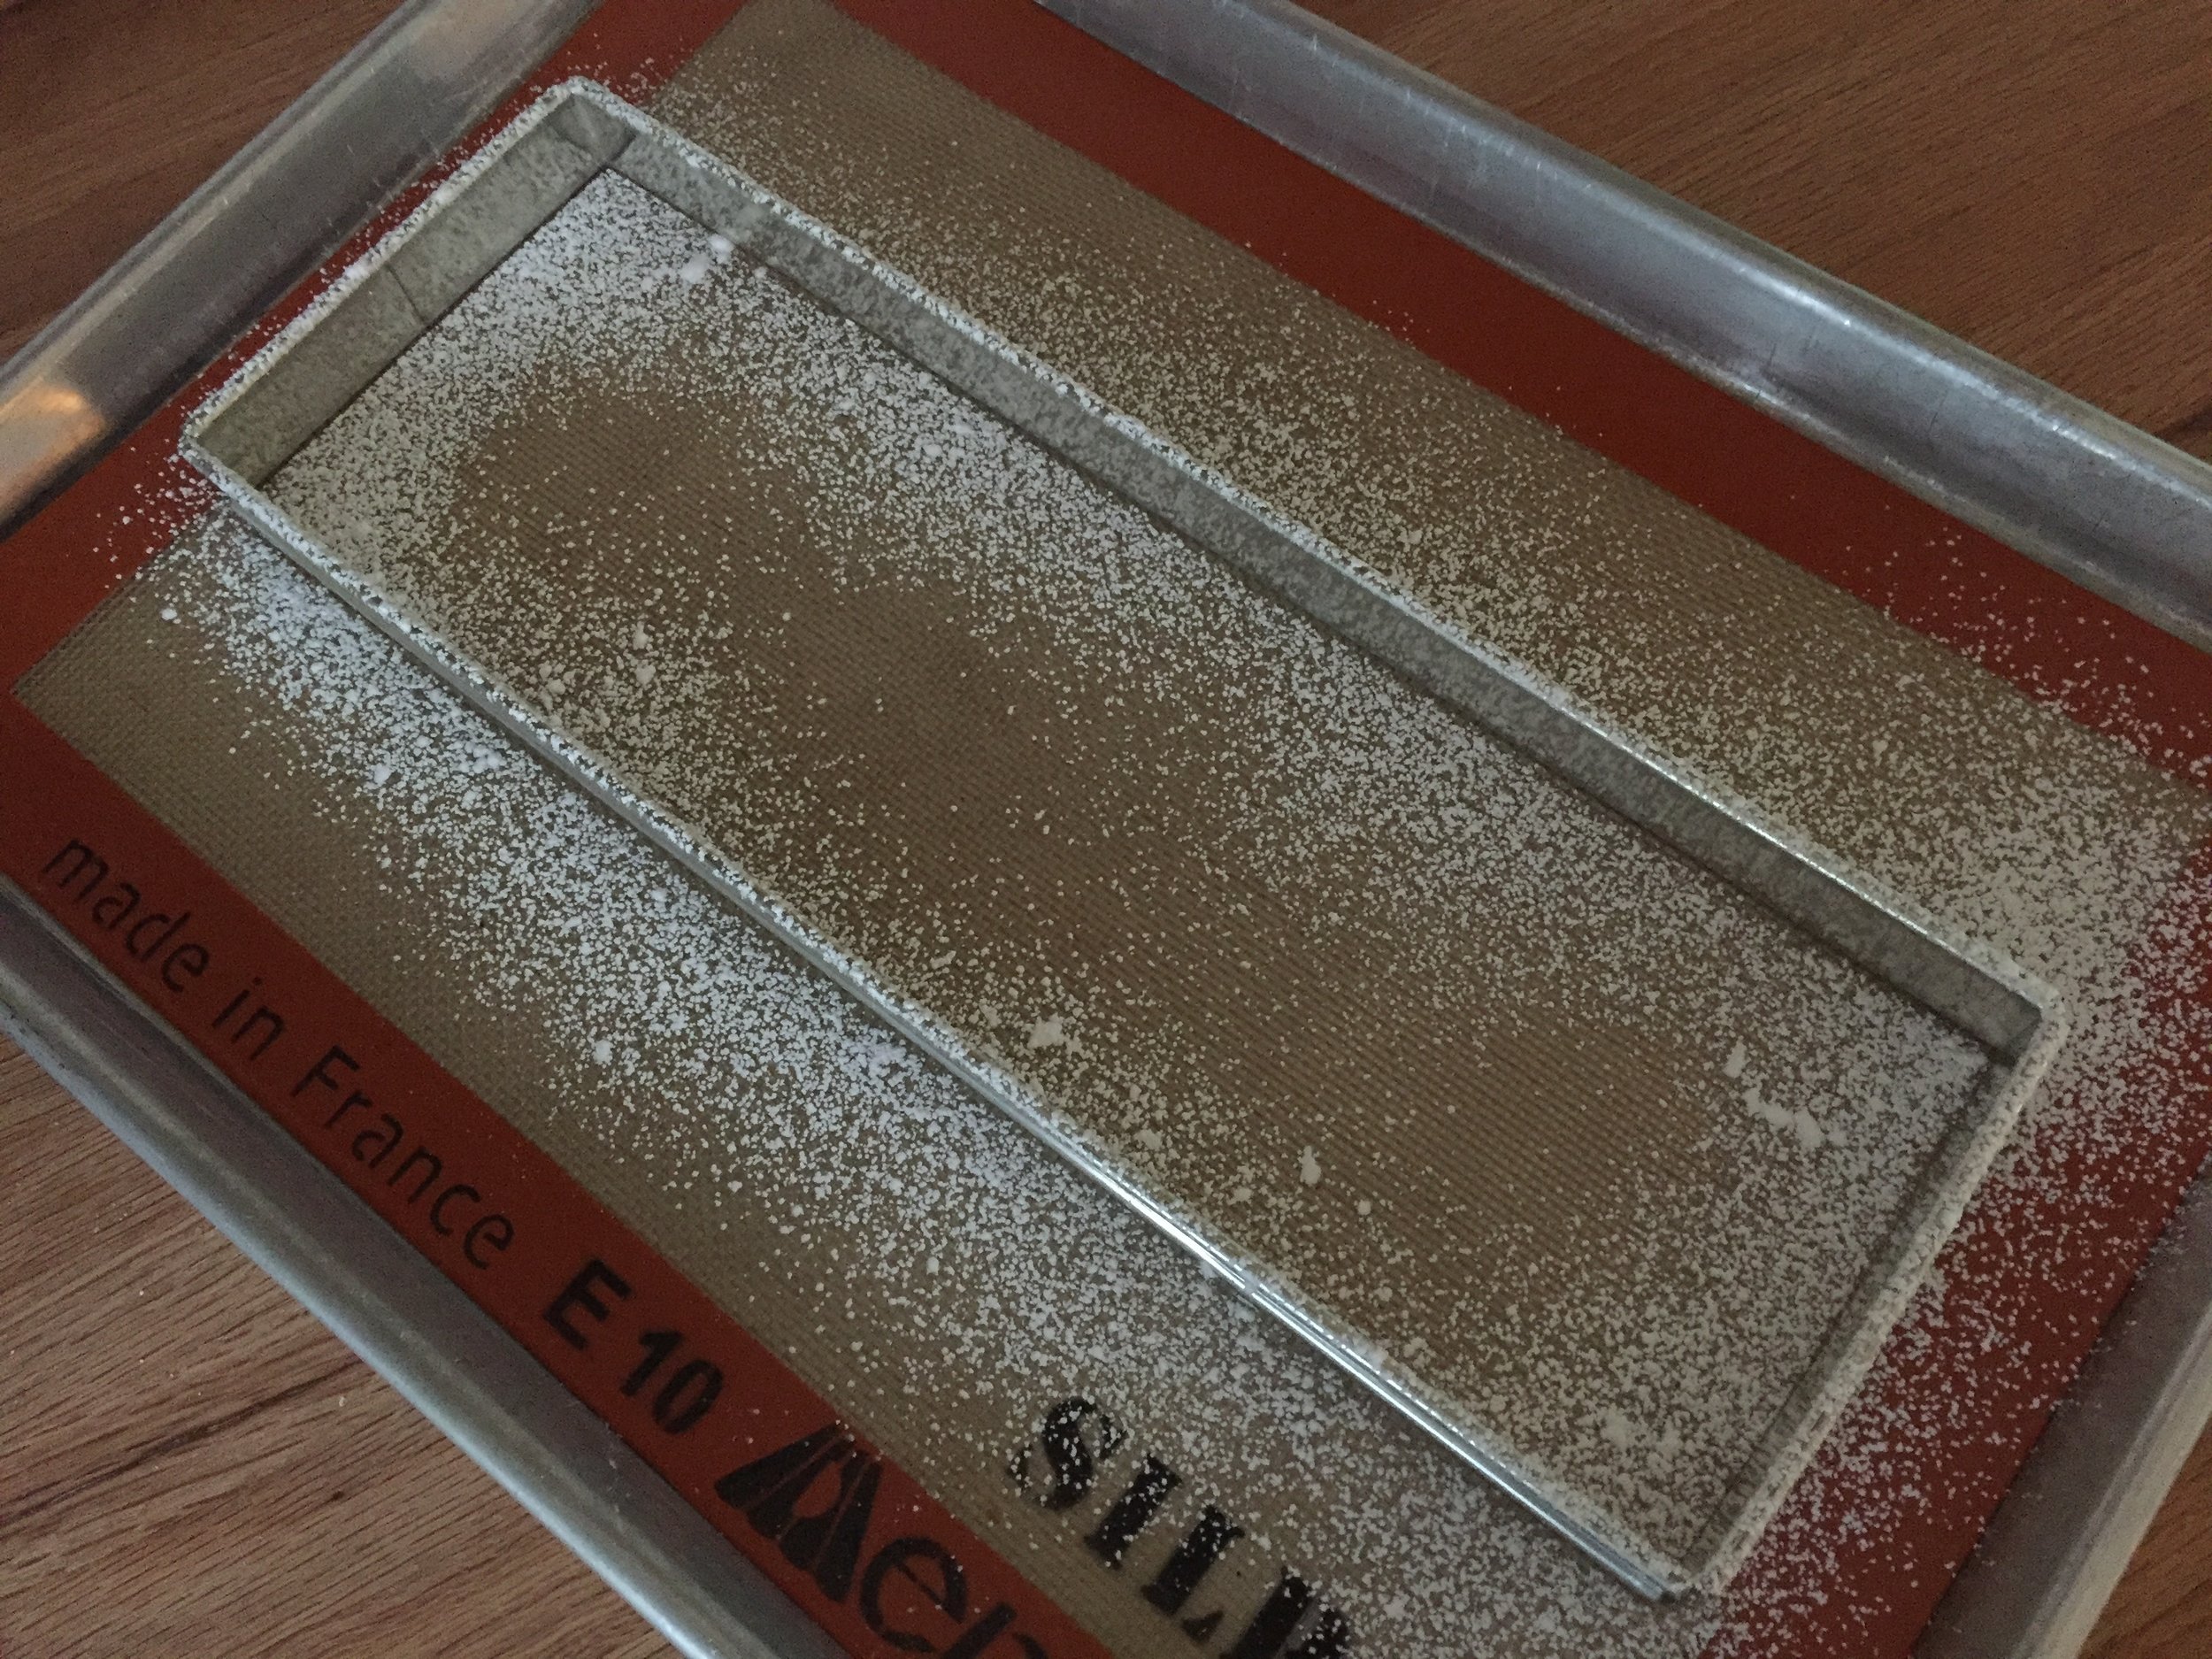
Butter and sugar the tart forms which serve as the boundary for the dough to keep it in check, so to speak, as it proofs and bakes. Cut six 30 cm (12”) long and ~ 2.5 cm (1”) wide strips. My cutting eye was a bit off and a couple came out a bit narrower - going forward I’d cut them all a tad wider, ~3 cm each.


Shape each strip into a squiggle (I had practiced with a strip of paper first and figured out the curves I was going for), tuck each into a prepped form at an angle as seen below and sprinkle with some coriander sugar.


Cover lightly with buttered plastic wrap and let rise about 1.5 hours.


Bake at 375ºF about 20 minutes until nicely browned. I also gave these the simple syrup, coriander sugar treatment.


All in all, a fun time in the baking kitchen! I hope you’re having fun too!!

Summer marches on.

Favorite garnishes, the end: crumbles

Banana rye cakes with hazelnut crumble (and a bit of chocolate tucked underneath)

Ready to bake mixed berry crisp with pistachio crumble

Time for the garnish finale in what has become a 4 parter on some favorite ways to dress up and enhance your baked goods.

Crumbles are easy, ever so adaptable, perfect for layering or topping and they keep either unbaked or baked in the freezer for many weeks. What a great way to be ready for any garnish occasion. Yes!

If you plan to make some crumble, feel free to double, triple or quadruple the recipe for future projects. Simply mix equal weights of flour and sugar in a medium bowl then sand in the same weight of cool, diced butter with your fingertips, work it to smallish coarse crumbs and voilà, that’s it!

A basic starter quantity is 60 g each of flour, sugar and butter which easily tops a dozen muffin size teacakes, a 9” fruit tart or a 9”x9” pan of fruit crisp.

Ready for sanding

If you’re not using it right away, either spread it out on a sheet pan to bake ahead (350ºF for 15 to 20 minutes, stirring occasionally until golden brown), cool and bag up for the freezer OR store unbaked in a zip-top bag until ready to use.

Tray ready to bake/bag going into the freezer

All baked up

You can change up your crumble by subbing in spelt, whole wheat pastry or rye flour for all purpose (or do a mix) and swap out granulated sugar for raw or dark brown. Make it more nutty by adding an equal weight of nut flour or finely ground toasted nuts. Or simply add in chopped nuts (use anywhere from half to equal the weight of the other ingredients) for more texture and crunch. Add in your favorite spice(s) and/or some citrus zest. Create!

For an alternate crumble approach I use my favorite chocolate shortbread dough (recipe compliments of Thomas Keller’s “Bouchon Bakery”) and rather than bake it as cookies I just crumble up the dough in a single layer on a sheet pan and bake it up. There’s always a bag of the stuff in my freezer. Steve and I love it on ice cream, and I use it to top teacakes garnished with Swiss meringue buttercream or my favorite chocolate ganache tart.

Black gold!

Dark chocolate ganache and caramel apple teacakes

Chocolate ganache tart

You can do the same with your favorite crispy gingersnap dough or basic shortbread dough. I love making my own graham crackers too, both for crumb crusts as well as crushing them up for a garnish.

There’s nothing like the crispy crunch of crumble married with juicy, baked fruit, layered with luscious cream or as a topping for citrus curd or ganache - the list goes on. Just go for it and have fun.

Cheers until next time.

Hazelnut ricotta berry entremet layered and topped with almond/hazelnut crumble

Favorite garnishes part 1: candied nuts

Lightly candied sliced almonds

Lightly candied sliced almonds

Wow! It seems like this one’s been awhile in the making. Let’s just say that life has a way of taking us on a variety of paths and unknowns.

Now let’s talk about garnishes! It’s time to take your pastries and desserts to the next level with . . . . . . . Crunchies!!

Whether you choose cookie crumbs, candied citrus, nutty crumbles, brittles or candied nuts, they’ll all add that extra splash your creations deserve. Use as garnishes on top of ice cream, teacakes, baked fruit and custard desserts or tuck them into creamy layers between your favorite cake slices and you’ll be the happier for it. It’s the little things that make all the difference.

I’ve touched on many of these when writing about different projects over the years, but now I’ve attempted to organize some of my favorites in separate posts so as not to overwhelm with too much info.

Let’s talk nuts. I’ll explain three approaches to candied nuts. Generally you’ll need the stove top and in some cases the oven. I find silicone mats perfect for these projects - no sticking plus easy cleanup.

Start with a clean slate, as it were - use raw, non-salted, non-roasted nuts. I typically have almonds, pecans, walnuts, pistachios and hazelnuts in my larder and, unless I know I’m going to use them within a few weeks, I keep them in the freezer up to six months to preserve freshness.

Here we go. The first approach calls for making a syrup on the stovetop, stirring in your choice of nuts (whole or sliced) and then baking in the oven to crisp things up. Sounds good.

Heat your oven to 350ºF. In a small saucepan stir together 1/4 cup (50 g) sugar, 2 tablespoons water, 1 tablespoon corn syrup and a large pinch of kosher salt. Bring it to a boil over medium heat then remove from the heat and stir in 1.5 cups (~ 200g) of nuts until coated. Then spread the mix out on a parchment or silicone lined 1/2 sheet pan and bake for 5 minutes. Stir them up and bake another 8-10 minutes until golden brown. Let cool and store in an airtight container at room temp. They should last several weeks and are great for garnishing ice cream, custards, crisps, tarts or whatever your little heart desires. Even your morning oatmeal. And they’re not bad all by themselves!!

Cherry almond Breton tartelettes with almond crunchies

The next approach (which I refer to as the egg white method) uses a bowl, whisk, rubber or silicone (my preferred) spatula and the oven (no stovetop). I particularly love making pistachios this way, coarsely chopped and blended into my favorite Breton shortbread dough for just the right touch of crunch. Yum.

Halve or double the recipe to suit your needs. Prep note - you’ll be toasting and cooling the nuts first before blending them into the egg white mixture and then back into the oven. You can do the toasting a few days ahead of time and store the nuts at room temperature in a covered container.

Heat the oven to 300 - 325ºF depending on the nuts you’re using (325º for whole almonds, walnuts and hazelnuts; 300º for pecans and pistachios which tend to burn more easily). Spread 2 cups (about 227 g / 8 ounces) of nuts in a single layer on a sheet pan and toast them about 8-10 minutes to bring out the fragrance. Let cool. Keep the oven on at the same temperature at which you toasted the nuts.

If you’re like me and save your egg whites for various purposes, this is just one way to use ‘em. In a medium bowl whisk 1/2 or ~ 16 g (give or take) of a large egg white with about 75 g of granulated sugar and a pinch of salt until the mixture has thickened and looks like a loose meringue. Don’t fret about the egg white - using one large white will simply give you a frothier coating.

NOTE: change things up by using brown sugar instead of white and adding spices like ginger, cardamom, cinnamon or coriander (or a mix!) for a tasty option.

Blend the nuts into the mix and spread out on a parchment lined pan.

Bake 20-30 minutes, stirring every 10 minutes or so until the egg white mixture appears dry and crunchy, coating the nuts. Let cool and store in a covered container at room temperature for a couple of weeks.

Use whole as a teacake topper; coarsely crush/chop as a garnish for your favorite ice cream; pulse them up in a food processor and blend into buttercream for your favorite layered cake or dessert creation.

Cocoa hazelnut teacakes with white chocolate-mascarpone cream

Buttercream anyone?

The last method also involves toasting the nuts first so have your oven ready. The nuts should be warm when blending them into the caramel for which you’ll need a medium-large saucepan. Have a silicone-mat-lined or buttered baking sheet on which to spread the caramelized nuts. This is akin to making brittle (coming up in a future garnishes post) but no baking soda here.

During my schooling at Le Cordon Bleu in Paris and internship at Pâtisserie Pascal Pinaud, we referred to this concoction as nougatine - caramelized nuts, spread out and cooled, then ground up into crunchy goodness for layering the many entremets that the French love to make and eat. Here’s just one entremet example.

I’m making a pistachio nougatine here. I’ve toasted 170 g / 6 oz pistachios and have them waiting warmly on the side. Have a silicon spatula lightly oiled at the ready.

Place 300 g / 1.5 cups granulated sugar and 60 ml / 1/4 cup water in your saucepan on low to dissolve the sugar.

Once the sugar is dissolved turn the heat up to medium high and bring to a boil.

Cook the sugar to a lovely medium amber. The image below is almost there. When I get close, I give it another 30 seconds or so to reach my desired color. Don’t wait too long - you don’t want burned sugar. After you’ve done it a bunch of times, you just know when to snatch it off the heat.

Remove the caramel from the heat and stir in the nuts with the oiled spatula. Scrape out onto the silpat lined sheet pan and spread into a single layer. Don’t hesitate - just do it.

Let cool. Your options now are to break it up into smaller pieces (a mallet is great for this!) as a topping for ice cream or process it to medium fine crumbs and use it as a garnish or layer for your chosen dessert.

Pistachio nougatine

WARNING! Please be careful when breaking this up since edges of caramel can be extremely sharp. Believe me, I’ve been there.

That’s it for now. You have a number of things in your dessert armamentarium that will add just that special touch. Go for it.

Next time - candied citrus . . . . . and more to follow that. All in due time.

On a final note, as noted at the beginning of this post, it’s taken me awhile to get this one finished. Life events tend to trap our attention when we least expect it. The main thing is to stay positive, stay safe and have a wonderful holiday season.

See you next time around!

A last gasp of bittersweet

Blueberry hazelnut tarte Bretonne

Petite version

Petite version

I’ve extolled the virtues of sablé Breton on a number of occasions over the years and simply must return to it now and again. The dough is versatile and one that I can make ahead and keep handy in the freezer for a couple of months. As we ease into the late spring and summer seasons, a Breton dough base is perfect either baked with fruit or jam or baked au naturel and topped with fresh fruits and luscious creams. Mmmmm . . . I can just taste them now. Fulton Farmers Market here I come!

Just one of the beauties of this dough is it’s made with egg yolks so . . . . . . When I need to amass egg whites for some of my faves like financier, dacquoise or Swiss meringue buttercream, Breton dough comes to the rescue. Separate the eggs, yolks go into the dough and whites (which can sit in the fridge for a week or so and can also be frozen) are on hand for whatever. I love that.

As an aside, a few other basics that offer me the same egg white saving opportunities are the classic custard sauce/ice cream base crème anglaise or the familiar crème pâtissiére, crème brulée and pots de crème. Of course it’s generally best to make these egg and dairy based goodies within a couple of days of enjoying them, so some planning ahead is important. But they’ll all give you plenty of whites to add to your stash.

I do digress. On to la tarte Bretonne!

The dough comes together easily - one plan ahead note is the butter should be soft. Let it sit out an hour or so, mise out the rest of the ingredients and you’re ready to go. Once mixed you can either wrap in plastic and chill for later or you can shape a rough circle and simply press it into a buttered ring or mold. NOTE: I love baking this dough in silicone flexi-molds which don’t have to be buttered. Yay - one less step!

Here I sub in hazelnut flour for the almond but you can do the same with pretty much any ground nut. Using a buttered 220 mm / 9” tart ring, I guestimated about 360 g of dough to press in the bottom and build up the sides. It’s up to you to experiment a bit, depending on how thin or thick you want your finished dough to be. Thicker than a typical tarte crust is my preference here. You can use even more dough (up it to 400 or 425 g) for a base that’s a delicious, buttery cross between tarte and cake. Yum.

Just for comparison sake, if I’m making a standard tarte with let’s say pâte sucrée, a good rule of thumb is to take the diameter of your ring (e.g. 220 mm), add 30 g to that number and that gives you a decent estimate for the amount of dough for that size ring - 250 g. It works pretty well with inches/ounces too - 9” tart uses about 9 ounces of dough.

998021B8-862D-4609-A6A0-E076FDB324CD.jpeg

Once the dough is pressed into the ring, you can cover and refrigerate it for a few hours or overnight if you’re not quite ready to proceed.

I made a quick hazelnut crumble with 50 g sugar and 75 g whole wheat pastry flour (all purpose is fine too) mixed in a medium bowl; sand in 60 g of cool, cubed butter to coarse crumbs and add 30 g of toasted and chopped hazelnuts. It yields plenty for this type of project and you can freeze any leftover for next time.

My store bought blueberry jam is Bonne Maman, but I also like St. Dalfour, both of which have some great flavor options.

Heat the oven to 350ºF.

Create a layer of fresh blueberries mixed with a few spoonfuls of jam (eyeball it) over the dough. No fancy fillings here folks!

AD5ACA4A-199B-4E0B-A84D-7EC84214C368.jpg

Top it with a decent layer of crumble.

68D8D8D9-ACD6-491E-917F-F435171D62D9.jpg

Bake about 25-30 minutes until the edges and crumble are nicely browned and the jam/berries look bubbly and set. Reduce oven to 325ºF if you feel your edges are browning too quickly. It’s up to you to keep on eye on things!

478CDEBC-5EE7-49F1-8120-45C11B67F05F.jpg

I made this baby for Easter dessert, served with homemade raspberry ice cream. The end result was a nutty, chewy, buttery, jammy, fruity and delicious treat which paired so beautifully with the creamy raspberry.

Truth be told, I prefer small individual desserts to larger, sliceable versions. I made a petite version ahead of time as a test, and it worked so well with a rustic scoop of ice cream right on top. Steve and I enjoyed our taste test while the tartelette was fresh and still a tad warm. Oh my.

E02D9501-C815-468A-97EB-DD1CBA277249.jpg
E5E79400-8188-4574-82DC-AB4326796713.jpeg

There are so many ways to create your own tarte Bretonne. Trust me, you won’t regret it!

Meanwhile spring keeps springing with flowers popping, sightings of turtles on logs, herons flying overhead, red wing blackbirds with their shrill call, garter snakes on the path and spring peepers singing to us all.

Enjoy the season and stay safe.

80881E5D-722B-4B7A-AD7B-25E567586C19.jpeg
7A8FA5C7-2D42-457A-8EBE-FFFF9C231D14.jpeg


Baking with Dutch process cocoa powder

Ganache dipped, Swiss meringue swirled cocoa cakes

Ganache dipped, Swiss meringue swirled cocoa cakes

Dutch process cocoa powder is one of my standby ingredients, always on hand and at the ready. I’ve been using it for years, not only for my standard brownies that are perennially available for the Steve-meister for his regular evening treat, but for MOST recipes calling for unsweetened cocoa powder. Such wonderful flavor.

NOTE: I say “most” because there are some guidelines for using natural vs Dutch processed that have to do with acid/alkali and using chemical leaveners (baking soda, baking powder). Here’s a great summary for you from Serious Eats (a great resource by the way!).

Dutch process you ask? It’s all thanks to Dutch chemist and chocolatier Conrad van Houten (1801-1887) who figured out how to alkalize the acids in cocoa powder to create a more mellow taste experience. I’ve been using Bensdorf high fat Dutch process cocoa powder for some years now (I am of Dutch heritage after all!) and find the end results so tasty. It’s available through a variety of sources which you can easily find online.

Many say that the decision to use natural cocoa powder vs Dutch process is purely personal and indeed a matter of taste. While the natural version may offer a more enhanced and complex chocolate flavor, the “dutched” version is smoother and, in my estimation, more delicious.

French Tarte “O”s

French Tarte “O”s

As I review the things I generally bake with cocoa powder (brownies, financier, shortbread, meringues, fudge cookies, flourless sponge and more), I realize that, at least in my current armamentarium, the only one that contains a chemical leavener is Bouchon’s version of that popular chocolate sandwich cookie lining grocery store shelves. I did a bit of research to try and figure out why one would add baking soda to a shortbread cookie since they don’t typically rise like, let’s say, a classic chocolate chip cookie. From the scientific standpoint, the alkaline baking soda seems to contribute to a more even bake, tenderness and even enhances color and flavor.

OK - enough science. Let’s look at some more ways to use Dutch process cocoa powder. along with a couple of straight forward recipes for you.

Cocoa cakes

Cocoa cakes

This tasty babies are from Yotam Ottolenghi and Helen Goh’s book “Sweet”. Not unlike financier, the batter is made with similar ingredients but doesn’t involve browning the butter which one would normally do for financier. They are a dream to put together and bake so nicely in individual silicone molds from very mini to larger “muffin” sizes, depending on your mood.

This Silikomart mold (SF022) is one of my favorite ones for simple small cakes - just the right size to enjoy a few bites without feeling you’ve overdone it. Remember - everything in moderations folks!

The wells each hold about 48 g/1.7 ounces (if full) - I get about 15 cakes out of the recipe below. You can easily double the recipe for more!

3FD69FD3-253A-4E5B-99BD-9274B99024E7.jpg

Heat the oven to 375ºF. If not using silicone molds, buttered mini or regular muffin tins work well. Yield will vary depending on the mold/pan you use.

Melt 140 g/5 ounces unsalted butter (I use a pyrex glass cup on medium power in the micro) and have it at the ready.

In a separate bowl, sift together 40 g all purpose flour, 40 g almond flour and 50 g Dutch process cocoa powder.

Place 120 g (4 large) egg whites in the bowl of a stand mixer fitted with the whisk attachment along with 160 g granulated cane sugar and beat on medium-high for a couple of minutes until thickened and glossy.

Continue on the same speed and drizzle the melted butter down the side of the bowl, beating until combined. Scrape down the sides.

On low speed blend in the dry ingredients. I usually take the bowl off the mixer and finish the blending by hand - you want to make sure none of the dry stuff is sitting on the bottom.

Fill molds about 3/4 full (you can scoop but I prefer piping for more equal portions and less muss) and bake about 15 minutes or until center looks set and springs back when touched. Baking time varies depending on mold size.

Let cool in molds about 10 minutes then turn out onto wire rack to finish cooling.

Once cooled I dipped the tops in ganache (seen above), popped them in the fridge to set the ganache, then gave them a nice swirl of dark chocolate Swiss meringue buttercream. Yum. Steve loves these!

2FB91D89-DB9C-4230-881F-948D02AD6A07.jpg

Next up - flourless walnut fudge cookies, a François Payard recipe from FOOD52’s “Genius Desserts”. This is an eye opener folks. Plus you can change up the nut choice as you wish - pistachio, pecan, macadamia and more. Nuts and chocolate are a marriage made in heaven if you ask me.

FBD11C1C-0A02-47B6-BF33-0DD79A7E4C0D.jpeg

Heat your oven to 350ºF. Line two 1/2 sheet pans with parchment or silicone mats. Place 4 large egg whites in a bowl and allow to come to room temperature (place the bowl in a slightly larger bowl of warm water to speed it up).

Toast 275 g / ~2.75 cups walnuts or nuts of choice on a parchment lined sheet pan for about 10 minutes. You’ll smell the aroma and you’ll know. Let them cool, then chop ‘em up.

Mix together 350 g confectioners sugar, 70 g Dutch process cocoa powder, 1/4 teaspoon salt and the chopped nuts in the bowl of a stand mixer with the paddle. Give a quick low speed mix to combine then add the egg whites and a tablespoon vanilla extract with the mixer running. Mix on medium about 3 minutes to thicken.

I prefer smaller cookies so I used my tablespoon scoop to portion the dough out. Place pans into the oven then reduce the temp to 325ºF and bake about 15 minutes until tops lightly crack. Rotate your pans half way through the bake.

Slide cookies with the parchment onto cooling racks. Remove from parchment once cooled (tip - if sticking, lift parchment up and gently peel it off cookies from the bottom OR brush a little water on the undersurface of the parchment and the moisture makes for easier release.)

B01478A5-C16E-4379-A9E3-C88F73F88F86.jpg

Mmmmmm - what a delightful chew, wonderful nutty flavor and all around tasty experience. Thanks to François Payard and FOOD52!

To wrap it up, I want to share one more way I’ve used Dutch process cocoa in recent weeks. I often speak of twice baked croissant aux amandes, one of Steve’s and my favorite treats (and a lot of other people too, let me tell you).

I made a chocolate hazelnut version by replacing the almond flour in my basic crème d’amandes with hazelnut flour, left the all purpose flour out and added a hefty tablespoon of Dutch process you-know-what.

It goes like this: take croissants a day or two old; slice them as though you’re going to make a sandwich; dip the whole thing in vanilla simple syrup to moisten and give it a squeeze (don’t worry, it’s great fun!) to get rid of excess.

Now open the croissant, pipe a line of hazelnut-cocoa cream, throw a few chunks of chopped chocolate (something in the 60-ish % ballpark) on the cream, then close the sandwich and pipe another line of cream on top. You can add a sprinkling of chopped hazelnuts too.

I usually assemble my twice baked croissants and hold them in the freezer until baking. Heat the oven to 325ºF (I use convection) and put them in right outta the freezer. Bake about 20-25 minutes - you want the cream nicely golden and set. Cool and enjoy. A nice dusting of confectioners sugar gives them that certain je ne sais quoi.

A0397812-0A1D-4DE1-BAB4-CF31411DD0DA.jpg

Our taste test was so enjoyable! The inside had just the right amount of chocolate to accompany the hazelnut cream. Of course we tried one while still slightly warm which only enhanced the experience. Yum. Yum. Yum. And just as good the next day. Yes!

294398A8-0ADC-4030-8F16-A50BF53D9750.jpeg

Have fun creating your own chocolate goodies. Until next time - stay safe, stay healthy and get vaccinated when you can!

Brioche feuilletée revisited - chocolate hazelnut braid

IMG_0825.jpg

I would never have imagined that the most viewed post on this blog would be Brioche feuilletée, written back in November, 2016. I launched that project by tweaking the brioche recipe from a Le Notre Paris class I attended in September of that year. Reducing the butter in the base dough, adding a butter block and putting it through three 3-folds yielded a lovely laminated result.

Since then, as is my wont, I’ve reviewed a number of additional brioche recipes and techniques from the likes of Dorie Greenspan and Jeffrey Hamelman (of King Arthur Flour fame) and developed a new version of the base dough in November, 2018. The dough can be used for any brioche option you wish - Nanterre, brioche à tête, coffee cake, cinnamon buns or brioche rolls topped with pastry cream/jam/fruit. Lots of choices.

In this recipe PDF I go into more details about brioche, adjusting the recipe to yield either a leaner or an even richer dough plus some options for laminating the dough. So many possibilities.

It helps me to assess a brioche recipe by looking at the butter to flour ratio. A medium brioche dough typically contains butter that is about 50% the weight of the flour. Brioche can run from lean (where the butter may be as low as 25% of the flour) or rich where the butter can be all the way up to 100% of the flour.

The full batch of the base brioche dough (before adding any butter block/laminations) yields about 1300 g (2.8 lbs) of dough. So you can make the full batch and then separate out the 600 g for this braided two loaf project. Wrap and freeze the remaining dough for later or use it for other projects you might have up your sleeve.

Using Hamelman’s guidelines for these braided delights, I laminated 600 g of the base dough with an additional 120 g/4.25 ounces of butter which, by my calculations gave the final result a butter to flour ratio of 1:1. Now THAT’S a rich brioche! Remember - this makes TWO braids.

IMG_0829.jpg

Let’s do a quick review on laminating the dough - it never hurts, since the more you do it, the more it becomes second nature.

Roll the dough out to a 6”x12” rectangle. Have a 6” butter block ready - it should be cool and malleable.

IMG_0796.jpg

Place the butter on half of the dough . . . . . .

IMG_0797.jpg

then fold the dough over the butter, pinching the edges closed to fully envelope the dough. This is the beurrage.

IMG_0798.jpg

If your kitchen is pretty warm or your dough and butter seem warm and starting to squish, wrap it up and refrigerate for 30 minutes before proceeding. Now roll the dough out to about 18” long and 6” wide, always with the short side parallel to the work surface and rolling to and from yourself (not sideways) to achieve the length. Do a 4-fold (book fold) by bringing each short end into the middle with edges meeting . . . . . .

IMG_0799.jpg

then fold it on itself.

IMG_0800.jpg

Wrap and chill the dough for 30 minutes to allow it to relax then proceed with a 3-fold (business letter fold). Before rolling remember to turn the dough 90 degrees so the “spine” or fold is on your left then roll out to approximately 18”x6” again, rolling to/from yourself. Don’t get hung up on exact measurements - you’re going for about three times length to width.

IMG_0807.jpg

Visualizing the dough in thirds, fold one end up . . . . . .

IMG_0808.jpg

and the other down over it. Congrats! Your laminated dough is complete.

IMG_0809.jpg

Now wrap it snugly and refrigerate for a good 1-2 hours to let it relax and firm up before rolling it out for your intended purpose.

For this braid project I divided the dough in half - look at those buttery layers!

IMG_0814.JPG

Each half of the laminated version weighs about 360 g (before filling) and is good for a medium loaf pan size braid.

I created a chocolate hazelnut filling by taking 200 g of a hazelnut remonce mixture I had left from this hazelnut/almond couronne project and adding 50 g / ~2 ounces of Nocciola crema and a bit of egg white and simple syrup to loosen it a bit for piping.

IMG_0803.JPG
IMG_0802.JPG

Butter two medium (8”x4”) loaf pans and have the filling ready in a piping bag.

On a lightly floured surface roll one half of the dough into a 10”x10” square and divide it in three strips.

IMG_0815.jpg

Egg wash (I used egg white since I had some on hand) along one long edge of each strip then pipe a line of filling along the opposite edge.

IMG_0816.jpg

Roll each strip up into a log and press the edge to seal.

IMG_0817.jpg

With seam sides down do a classic three strand braid.

IMG_0818.jpg

As you come to the end of the braid, just tuck the ends under then pop it into a buttered loaf pan.

IMG_0819.jpg

Repeat the steps with the second half of the dough.

Cover the pans with buttered plastic wrap and let rise for a good 1.5 hours. Toward the end of that proofing time heat the oven to 375ºF.

IMG_0821.JPG

Brush the loaves with egg wash and bake about 35 minutes until nicely golden.

IMG_0823.jpg

Remove them from the pans and, if you’d like to gussy them up a bit, brush with either some simple syrup or apricot glaze for a bit of shine and even go another step and drizzle on a confectioner’s sugar/milk/vanilla glaze. I left mine au naturel.

IMG_0825.jpg

Once cooled, I sliced into one of these babies. Oooooh - buttery with just the right swirl of choco-hazelnut and pretty darn delicious to boot. Nothing like a good brioche, eh?

IMG_0831.JPG

I love the feel of dough, the shaping, the proofing, the baking, the aromas and, of course, the tasting! Dough reigns!!

Mid-July update

IMG_1149.jpg

Seeing Queen Anne’s lace in bloom is a sure sign of summer’s march into August and beyond. Still plenty of time for outdoor enjoyment, fresh air and sunny skies.

As we come to grips with the fact that (whoa!) it’s already mid-July, would any of us have foreseen all that’s happened in the past four months?! No sir.

Lately we’ve had quite a string of hot days, punctuated over this past weekend with pleasant days, cool nights and clear, low humidity skies. Baking is happening in waves, and now seems as good a time as any to share a few of the things I’ve been making in recent months.

Cinnamon oat crunch scones

Cinnamon oat crunch scones

A number of projects were done with an eye toward becoming blog posts and are currently in their draft phases. I’m working on them bit by bit, often side tracked by various other at-home activities that seem to take precedence. Time has taken on a much different sense, don’t you think?

Some of these goodies go into the freezer for future enjoyment, some are shared with neighbors and family and some go into the occasional pastry order that pops up every now and then.

Chocolate hazelnut swirl brioche loaf

Chocolate hazelnut swirl brioche loaf

Gateau renversé aux cerises (cherry upside down cake)

Gateau renversé aux cerises (cherry upside down cake)

Mixed berry mascarpone trifle

Mixed berry mascarpone trifle

Swedish cardamom buns

Swedish cardamom buns

Baguette

Baguette

Croissant

Croissant

Stay tuned! Baguette! Brioche! Swedish buns! Yippee!!

Meanwhile enjoy summer, be kind and helpful. It works.

Chocolate hazelnut marjolaine

IMG_3809.JPG

For Steve’s one-week-early birthday meal at my mom’s I decided to make a marjolaine for our dessert. He’s a sucker for anything with dacquoise or choux paste so of course I wanted to include at least one of those components in his celebration dessert. Since we won’t be in GR on his actual birthday, Mom hosted us, along with cousin Clark, for a repast of her famous Swiss steak, cheesy potatoes, green beans and crunchy cole slaw. What a great way to launch a birthday week, eh Stevie?

Happy Birthday to Steve!

Happy Birthday to Steve!

A classic marjolaine is a layered, flourless dessert consisting of rectangles of nutty meringue (dacquoise) layered with ganache and pastry cream or buttercream. Once assembled it’s finished off with a coating of ganache or buttercream along with sliced almonds pressed onto the sides for garnish. Some flavors that are popular with the dark chocolate ganache are hazelnut, coconut, coffee or pistachio.

In my case chocolate and hazelnut were the choices, particularly since I had some of my homemade praliné in the fridge. The plan: three layers of toasted hazelnut-topped dacquoise sandwiched with whipped dark chocolate-praliné ganache and garnished with Chantilly, dacquoise kisses and more ganache. I opted for the rustic approach without the finish coat.

A quick note: my marjolaine became “floured” due to the addition of chocolate shortbread crumbs as one of my layers - omit that component and it is indeed flourless!

In preparation for dacquoise baking I used my 4” x 11” tart form to outline my rectangles - just place the form on the Silpat, dust powdered sugar over, lift off the form and voilà - the shapes are there as simple templates for the dacquoise. Cool.

IMG_3794.jpg

I had enough batter for the three rectangles plus some leftover for petite kisses. Awwwww.

All piped out

All piped out

Before baking I sprinkled chopped hazelnuts on top along with a generous dusting of powdered sugar.

IMG_3796.JPG

Dacquoise bakes at 350ºF for about 20 minutes. My version is a soft meringue - I look for lightly browned and set rectangles.

IMG_3797.JPG

For the ganache I put 100 g dark chocolate pastilles in a heatproof bowl, brought 250 ml heavy cream to a boil, poured it over the chocolate, blended until smooth and then added 50 g (about 15% by weight of the ganache) of praliné (caramelized hazelnuts processed to a paste). Pop it into the fridge to chill before whipping it up for the layering portion of the program. I had plenty of ganache for this purpose - good for perhaps some petite tartelettes or profiteroles.

IMG_3801.jpg

One rectangle of dacquoise down, ganache spread over it, then my chocolate crunchy crumbs (my favorite chocolate shortbread dough baked into crumbs) sprinkled over that.

IMG_3802.JPG

Another layer of dacquoise then ganache then crumbs and so on.

IMG_3804.JPG

To top it off I piped some Chantilly cream “pearls” along the length with swirls of ganache down the center and popped some of the dacquoise kisses right down the middle.

All set!

All set!

IMG_3815.JPG

We enjoyed simple slices for the birthday dessert. Light, airy, delicious!

IMG_3814.JPG

Enjoy spring and here’s to lots of May flowers coming soon!

And as always - happy baking!

IMG_3832.JPG

Hazelnut dacquoise tarte

hazelmeringue

This little project came about as a way of creating a dessert for another recent family dinner at cousin Jen's house. Steve, as usual, requested something with chocolate, and since I wanted to keep it on the lighter side, I decided on a nutty meringue base (known as dacquoise) as the launch for what was to come. Cue in chocolate ganache, chocolate crunchy crumbs and fresh berries. Not a bad way to go.

I used my rectangular tart form to outline the shape in which I wanted to pipe my meringue. The pics below give you a nifty technique with which to create the area you'd like to fill.

Place your desired form/shape on your lined sheet pan (I'm using silpat here since it's my fave for baking meringues), dust around the edges with powdered sugar . . . 

tartform

then simply lift off the form and your outline is staring you right in the face. How cool is that?!

tartform

Now pipe away!! The powdered sugar won't hurt a thing since the meringue receives a dusting anyway before going in the oven.

All piped out

All piped out

The meringue bakes at 350ºF for about 20 minutes until nicely browned.

dacq

The beauty of meringue is its make-ahead-ability. Do it several days ahead and freeze it or, if doing it the day before, just lightly wrap it at room temperature until you're ready for the next step.

Time to assemble. For this one I poured a thin layer of a standard 1:1 ganache made with 61% Guittard chocolate over the base, inside the raised edge. I let it set a bit.

dacq

Then a light layer of chocolate shortbread crunchy crumbs . . .

dacq

and to finish off a whipped chocolate ganache made with the same Guittard chocolate in a 3:1 cream to chocolate ratio, more crunchies and some lovely fresh berries.

hazelmeringue

And just to show you another version, here's a small round base I made with the same hazelnut meringue. This one got a sprinkle of chopped hazelnuts too. Create your own and top it with whatever your little heart desires!

dacq

Here's the PDF of the recipe for the hazelnut meringue, also listed below. It makes just the right amount to create both the 11"x4" rectangle and the 6"-ish/16 cm round forms you see here. Play around with your own shapes and sizes.

  • 198 g egg whites (about 6 large) at room temperature

  • 50 g cane sugar (many use superfine sugar for meringues - sometimes I do, sometimes I don't)

  • 198 g hazelnut flour or meal

  • 150 g powdered sugar

  1. Heat the oven to 350ºF (or 325º convection)

  2. Whisk the hazelnut flour and powdered sugar together in a medium bowl.

  3. Place the egg whites in the bowl of a stand mixer fitted with the whisk attachment. Whisk on low for several minutes until a nice foam starts developing, then shower in the granulated sugar on medium-low speed until it's all added.

  4. Up the speed to high and whisk to medium stiff peaks.

  5. Fold in half of the hazelnut mixture, then add the second half and fold until nicely combined.

  6. Pipe or spread your meringue in the shape of your choice.

  7. Bake about 20 minutes until nicely browned. Pay attention to what's going on in that oven!!

Once your base is cool proceed with your choice of filling. The sky's the limit. And remember you can sub in pretty much any nut flour for the hazelnut in the meringue recipe. Even do half-and-half of two different nuts. Yes!

Here are just a few filling ideas: a simple lightly sweetened Chantilly cream topped with fresh berries; a tangy citrus curd lightened with whipped cream and topped with tropical fruits and maybe even a little toasted coconut; any whipped ganache using white, milk or dark chocolate topped with your own version of shortbread crumbs - how about chai or ginger - and your favorite nut, seed or sesame brittle; a standard pastry cream topped with lightly poached pear slices, some candied nuts and a drizzle of caramel.

It's up to you!

Chausson Napolitain

The third recipe in Philippe Conticini’s La Pâtisserie des Reves is an interesting mix of several classic pastry bases.

While I had been aware of this particular pastry, I had never researched it and had certainly never made it. In a nutshell it’s a pâte feuilletée (puff pastry) turnover filled with a combo of crème pâtissière and pâte à choux. Interesting, eh?

The recipe also calls for rum soaked raisins (a favorite of the French), but I opted for an hazelnut/cherry version instead. I developed my plan and struck out on a new adventure.

Most of the components can be prepared the day before, each one requiring minimal time, leaving you with the pâte à choux prep, final assembly and baking for the day of. It's all about timing and planning. Three cheers for mise en place!

I should point out that there are a couple of serious errors in this recipe, requiring you to pay close attention and adjust accordingly. The 200 gm of puff pastry called for is woefully inadequate, and should be about 600 gm. It was clear that 200 gm was not enough to create a 30x60 cm piece with a 1.5-2 mm thickness.

And when slicing the rouleau, the slices should be 1.0 -1.5 cm thick NOT 1/2 cm as the printed recipe states.  Philippe, where are your recipe testers and copy editors??

As I alluded to above, I admit that I’m not a big fan of rum or raisins. During the pastry program at Le Cordon Bleu, as well as my during my stage at Pâtisserie Pascal Pinaud on rue Monge in the 5th, I was amazed at how often rum (and a lot of it) was used by the Parisians.

When a recipe calls for alcohol, I tend to replace rum with either an almond or hazelnut liqueur, or I leave it out altogether and stick with good old vanilla extract.  It's so much easier on the budget, and I don't find the liqueur to be that much of a flavor enhancer.

For this particular project I replaced any rum in the recipe with Fratello, a delicious hazelnut liqueur that Steve discovered recently, used tart dried cherries instead of raisins and replaced macadamias with hazelnuts.

So let's get going!

I soaked 50 gm of cherries in Fratello/brown sugar and my softened butter/brown sugar mixture is ready to go. I weighed out 50 gm of blanched hazelnuts and coarsely chopped them before final assembly.

I have a batch of crème pâtissière chilled in the fridge.

I roll my puff out to about a 2 mm thickness and a length of 60 cm. (Note: I typically have puff pastry in my freezer so I let it thaw overnight in the fridge before rolling it out.)

I spread on the softened butter/brown sugar mixture and rolled it up snugly (the rouleau). Note: images below

The rouleau can be wrapped and refrigerated until you are ready to assemble the chausson.  Alternatively you can form the rouleau the same day, freeze it for 40 minutes or so, and it will be ready to slice.

Wrap and chill the rouleau and on the day you plan to assemble and bake your chausson make your pâte à choux. 

Once the choux is ready, blend in the crème pâtissière, add the zests of one lemon and one orange, a splash of vanilla extract, the marinated cherries and the chopped hazelnuts.  Your filling is ready to go! 

Remove your puff roll from the fridge (or freezer) and cut cleanly into 1.0-1.5 cm thick slices.

Cool layers, don't ya think?

Now comes a bit of fussiness.

The slices are rolled out into a flat, ~2 mm thick oval, and it is very helpful if you keep the slices cool. Work with 3 or 4 at a time while keeping the others handy in the fridge.  Work quickly on a nicely floured surface to minimize the potential sticking of the butter layer. I keep a bench scraper close by to lift up the dough and re-flour the surface as I go.

Scoop a grosse noix of filling just low of center on your oval and fold it over.  Don't worry about sealing the edges - just gently place them together, since you want the chausson to be open.

Yessirree!

Now give them a coat of egg wash and chill. Philippe recommends a one hour refrigeration before baking.  I put mine in the freezer for about 30 minutes.  My practice with all things puff pastry is to freeze before baking, whether it's chausson aux pomme, palmier or simply blind baking a puff crust for a quiche or flan.  The freezing firms up the dough and re-stabilizes the butter layers before it goes into the hot oven.

Bake at ~350ºF convection for about 30-40 minutes.

Remember: every oven is different, and it is sooooo key to pay attention to what's going on in there!  Even convection ovens don't always bake uniformly, so rotate and change shelf positions of your sheet pans half way through. It works!

Et voila - c'est fini! These babies were tasty indeed. Who would’a thunk it to put puff pastry, pastry cream, choux paste all together in one pastry. Oh boy, oh boy!