Chausson aux pommes - a classic

You know when you’ve made something so many times using the method you were taught because, well duh, that’s how we did it? That’s what chaussons aux pommes have been for me. Ever since my Paris pastry schooling and internships in 2006-2007 I’ve done the preparation/assembly the same way, the process unchanged throughout the years. Roll out the dough, cut circles of your desired size, let them rest a few minutes then roll out a bit more to an oval. Egg wash the lower edge, scoop prepped apples on the bottom half, fold the top over and seal the edges. ONE. BY. ONE.

Well low and behold, as I was planning to teach a recent puff pastry class here in Grand Rapids and reviewing one of my favorite books “Pastry, Savory and Sweet” by Michel Roux, I realized that through all these years I had NEVER noticed his method of creating chausson. Eureka!

Hint- think ravioli.

Let’s start at the beginning and work through the steps. I’ll assume you have your puff pastry already made or purchased. The next thing is to prep the apples. I love Granny Smith for this since the caramel-y tart apples go so well with the buttery, flaky puff. Yum.

If you’re wondering how many apples to prep, I find that a good sized Granny Smith will yield me three to four chaussons of medium-ish size (I tend to lean smaller in my pastries - just sayin’). I peel, core and small dice the apples and sauté them in butter and sugar until softened. My “rule” is to use about 10 g sugar and 10 g butter per medium apple soooooo . . . . . if I’m prepping 5 apples, I use 50 g (about 1/4 cup) sugar and 50 g (about 1/2 stick) unsalted butter. You can play around with the proportions to suit your taste.

Have some water on the side so when the apples start browning and sticking a bit and their liquid evaporates, you can splash a bit more water in to deglaze. Toward the end of sautéing I also add a big splash of boiled apple cider and a couple of big squirts of my home made caramel sauce, always at the ready in my fridge.

The apples should become golden brown and caramel-y and start sticking to the pan. Once they’re fork prick tender (but NOT mushy), I scrape them onto a paper towel lined sheet pan to cool and soak up any remaining moisture.

A side note: when sautéing the apples, I figure I might as well go for the “more is better” approach since they keep well in the fridge for several days. Plus you can assemble a bunch of chaussons and freeze them unbaked until you’re ready. Have some house guests coming soon? Pop a few onto a sheet pan and into the oven (no thawing needed) for some freshly baked morning treats.

Ready for assembly? Let’s go!

I usually get about 12 chaussons from a half batch (~600 g) of my puff. Save the scraps to roll out for palmiers or as the lining crust for quiche or flan Parisien or for blind baked mini tart shells that you can fill with lemon curd or ganache or coconut cream or . . . . . you decide.

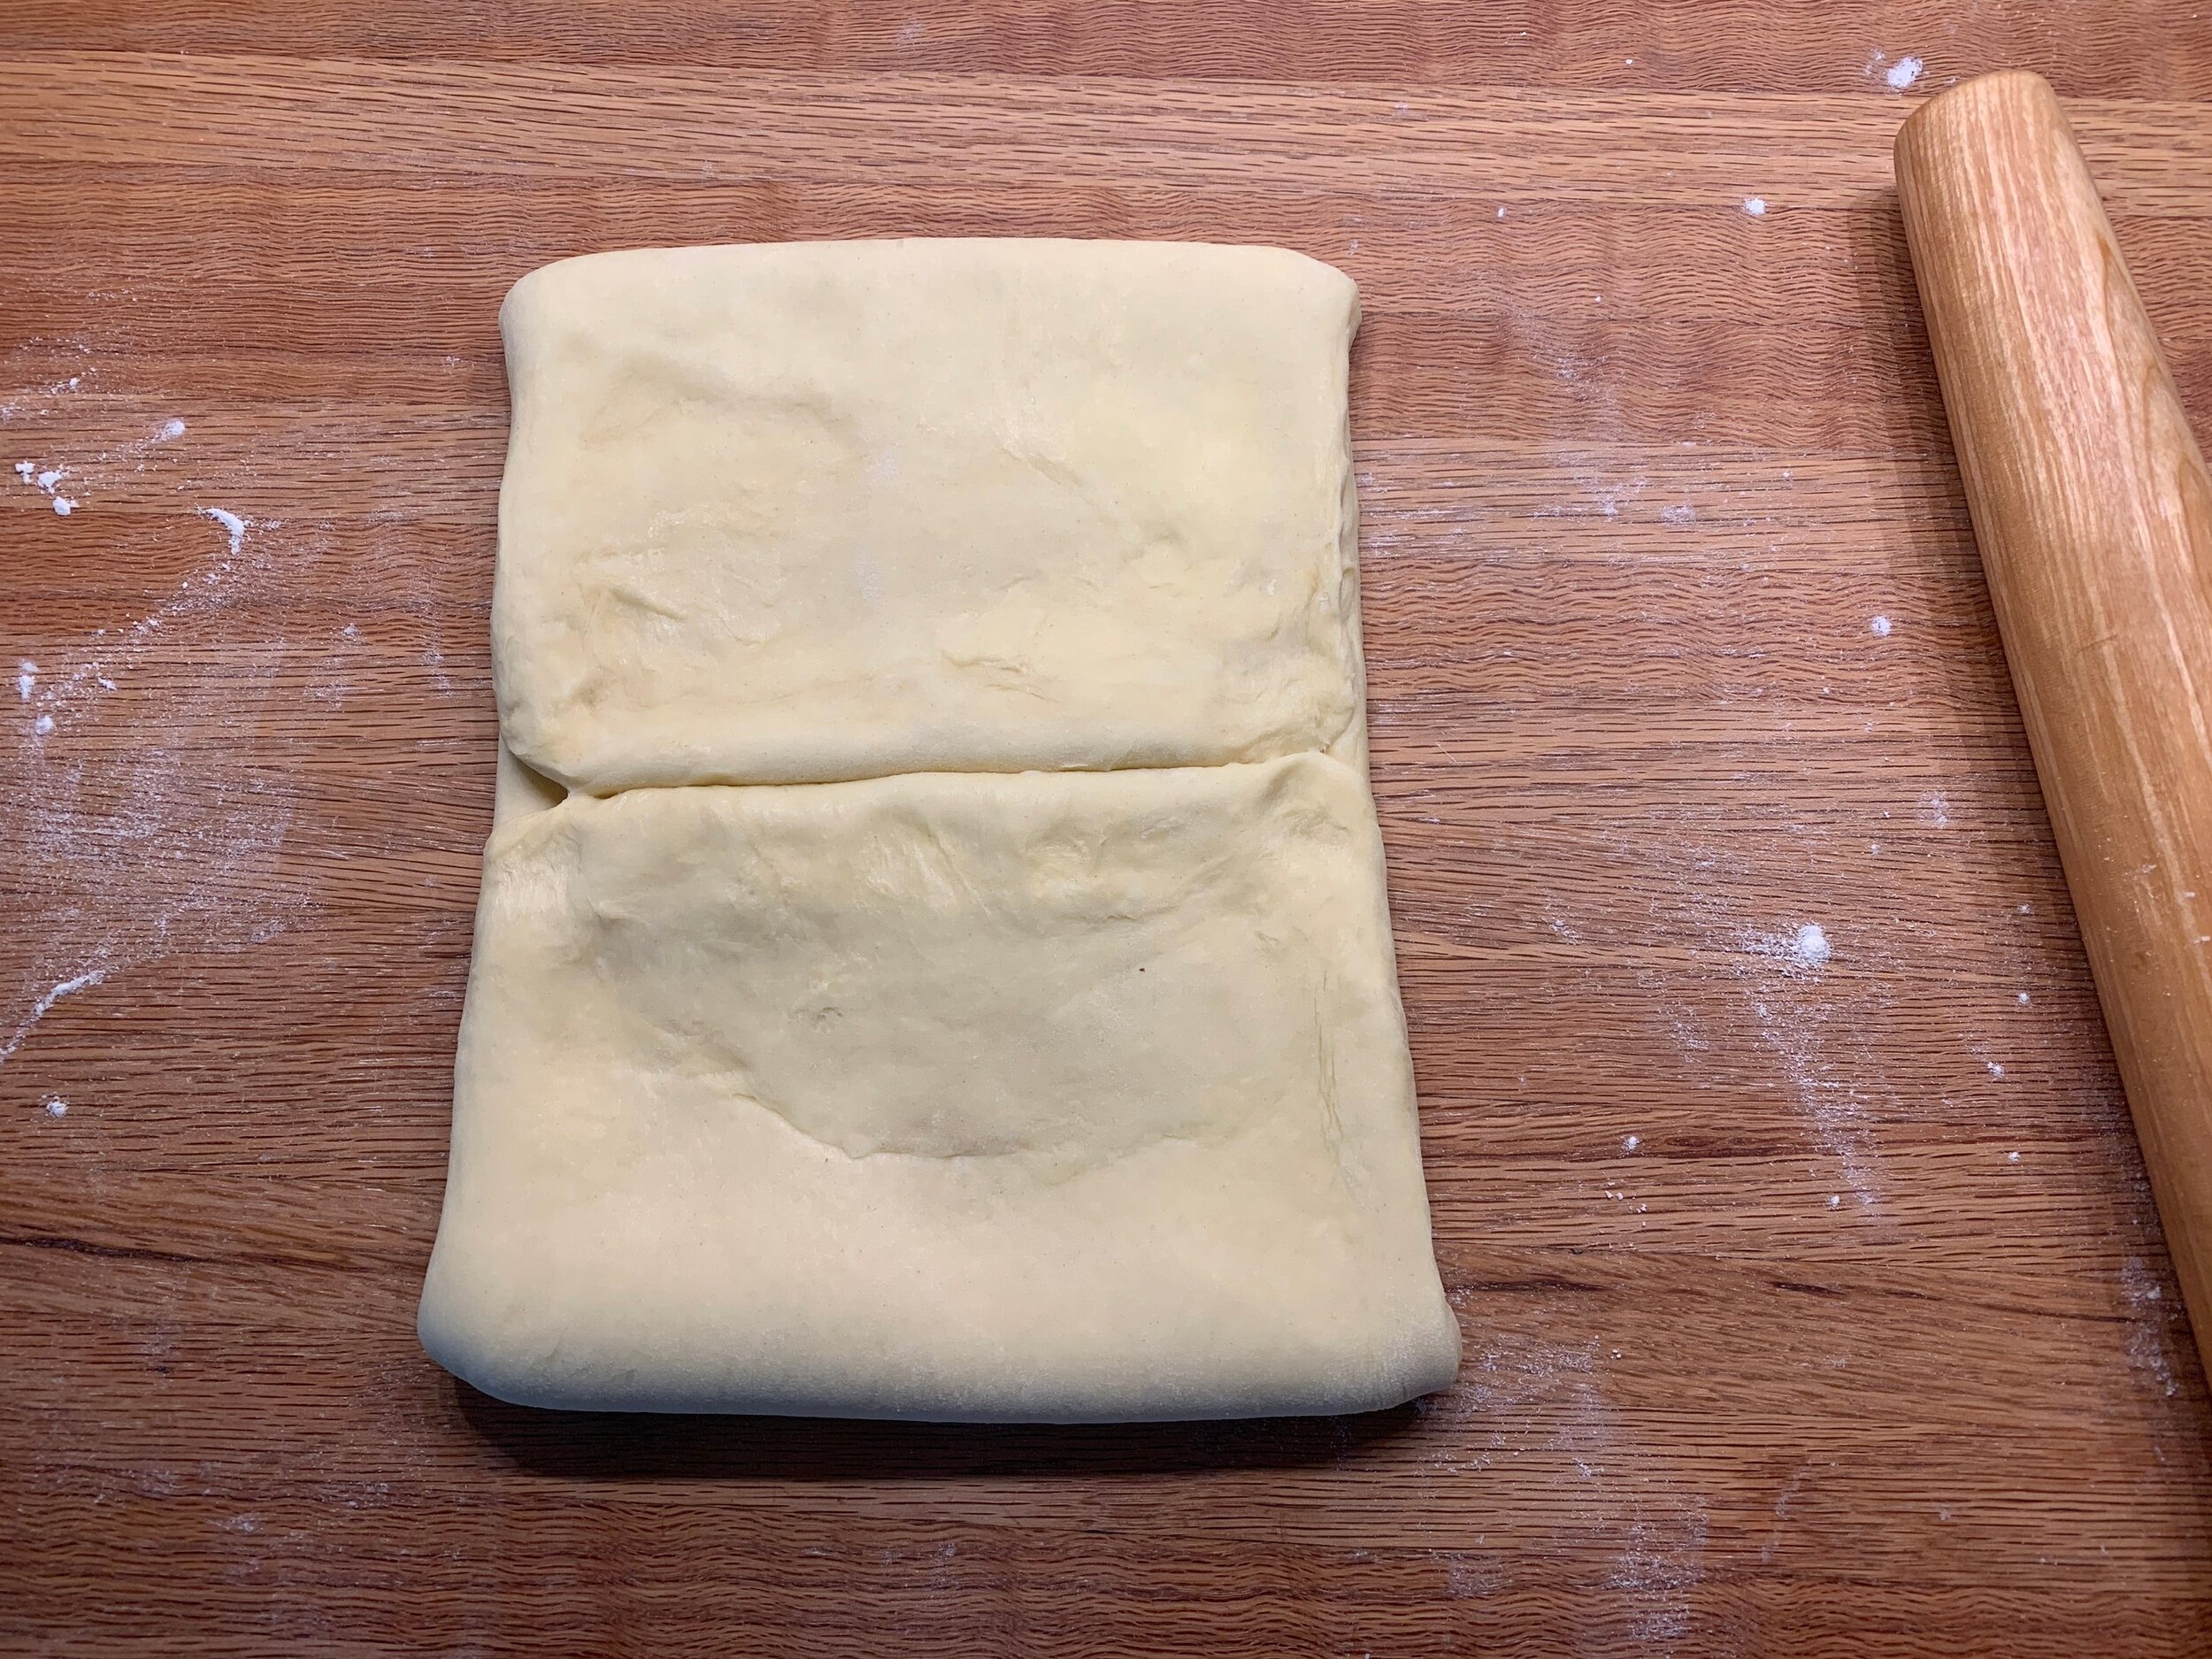
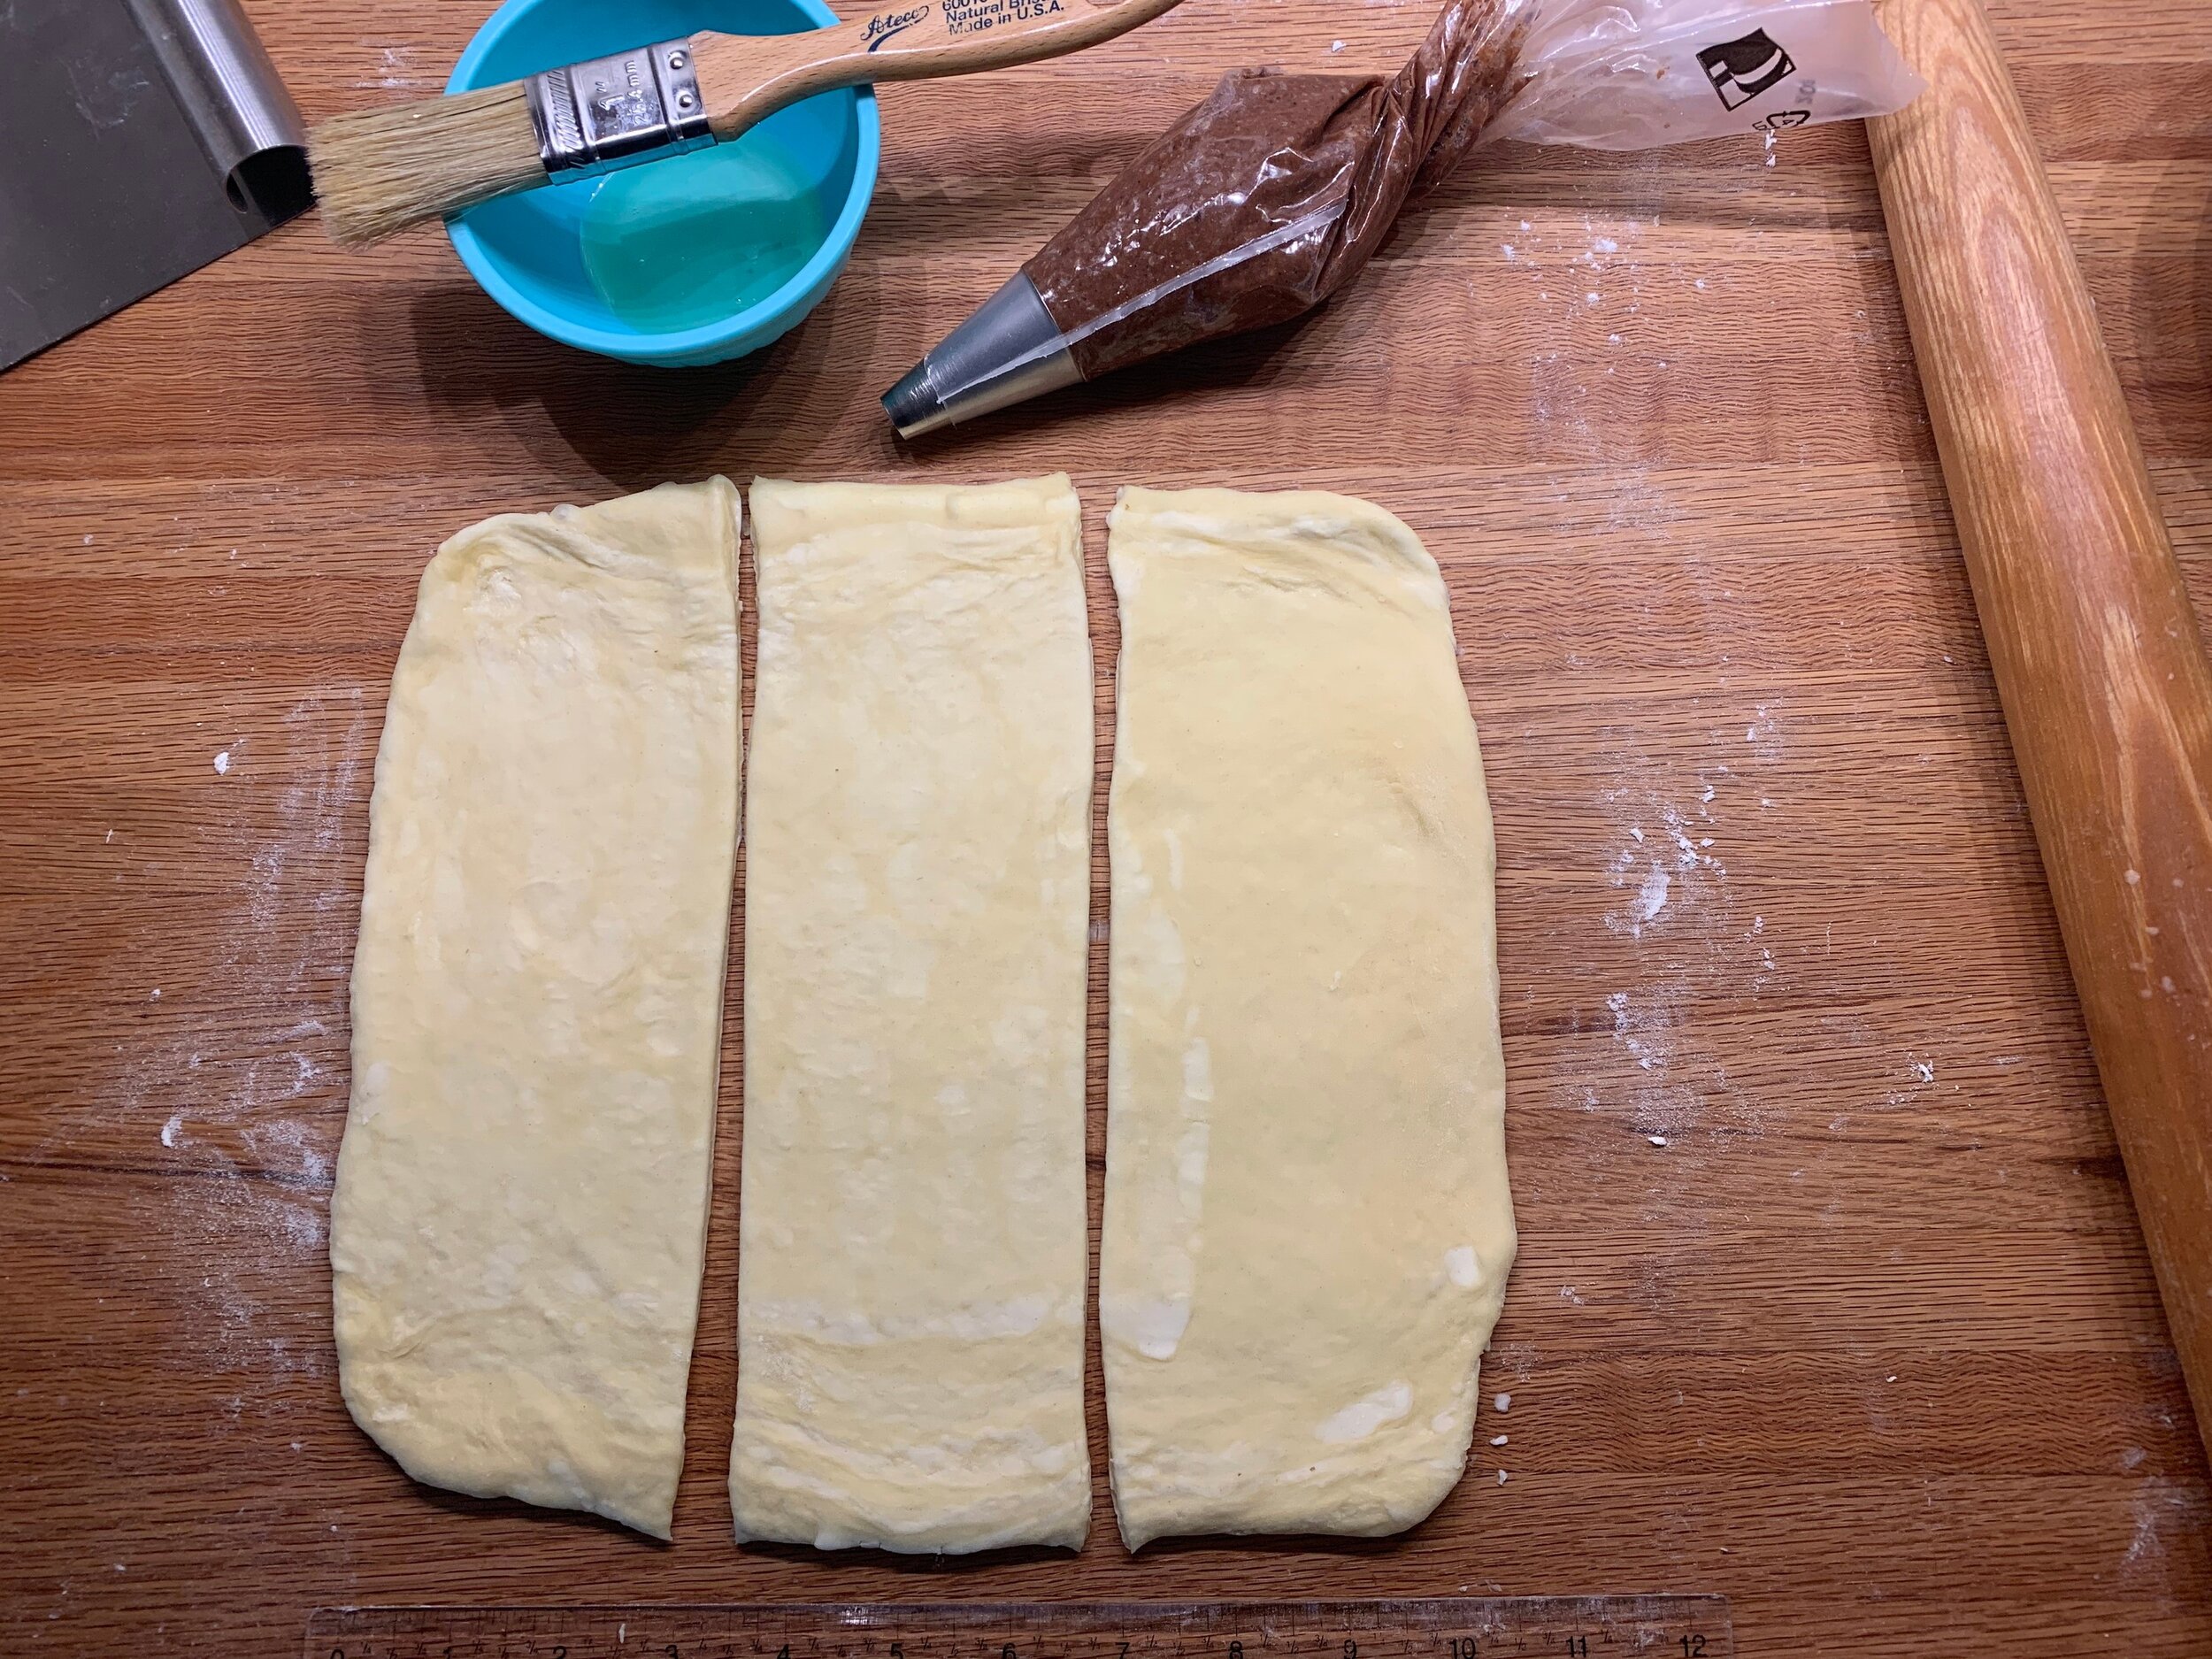
On a lightly floured surface roll the dough out to a 16” across and 18” top to bottom rectangle, about 1/8” thick. Divide the dough into three strips of 6” by 16”. A pizza cutter works great here! You’ll create 4 chaussons from each strip.

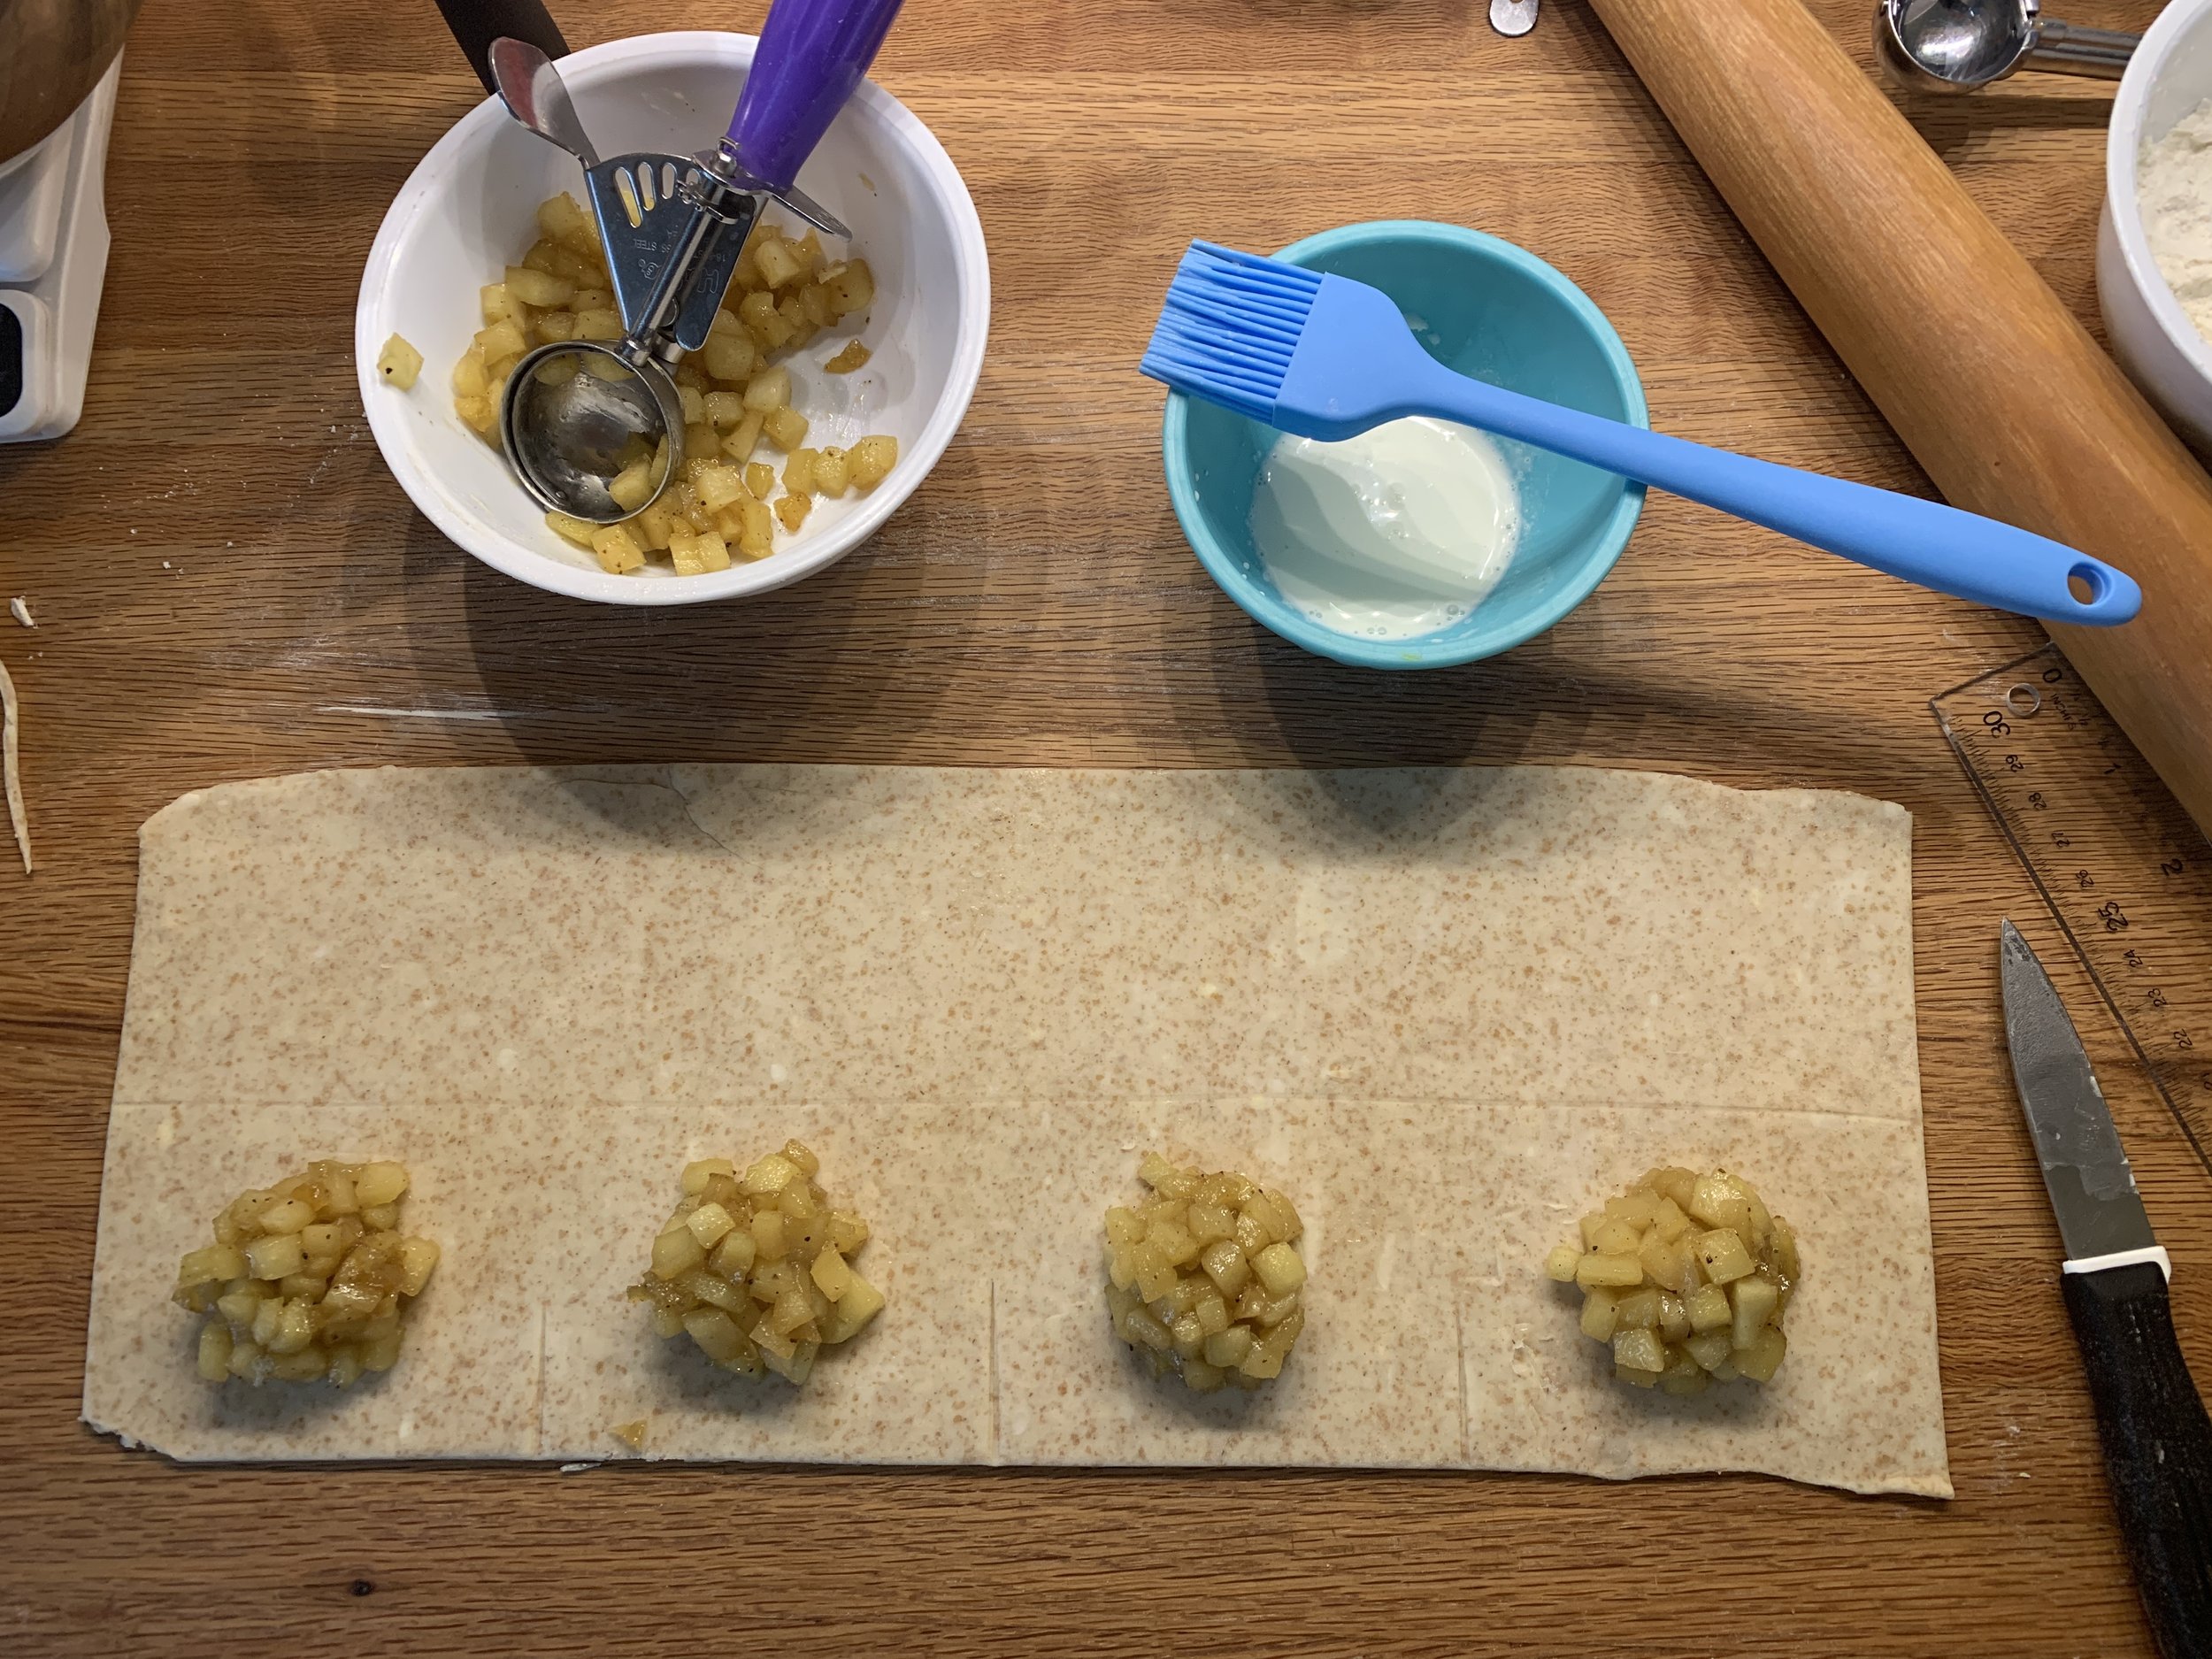
In the image below I did a practice run using my spelt rough puff (had some in the freezer, don’t ya know). Without cutting the dough, mark it into four 4” sections.

Also mark (don’t cut!) the midline across the length of the piece. Now put a nice scoop of apples on each of the sections.

You can use water or milk or egg white or egg wash - just something wet to brush around the apples. Now fold the dough from top down, covering the apples, pushing out any air pockets and pressing down around the mounds to seal.

I tried two different forms to cut the dough - a 3.5” fluted tart pan and a 3.25” fluted cutter. The tart pan didn’t cut sharply enough but the fluted cutter did the trick.

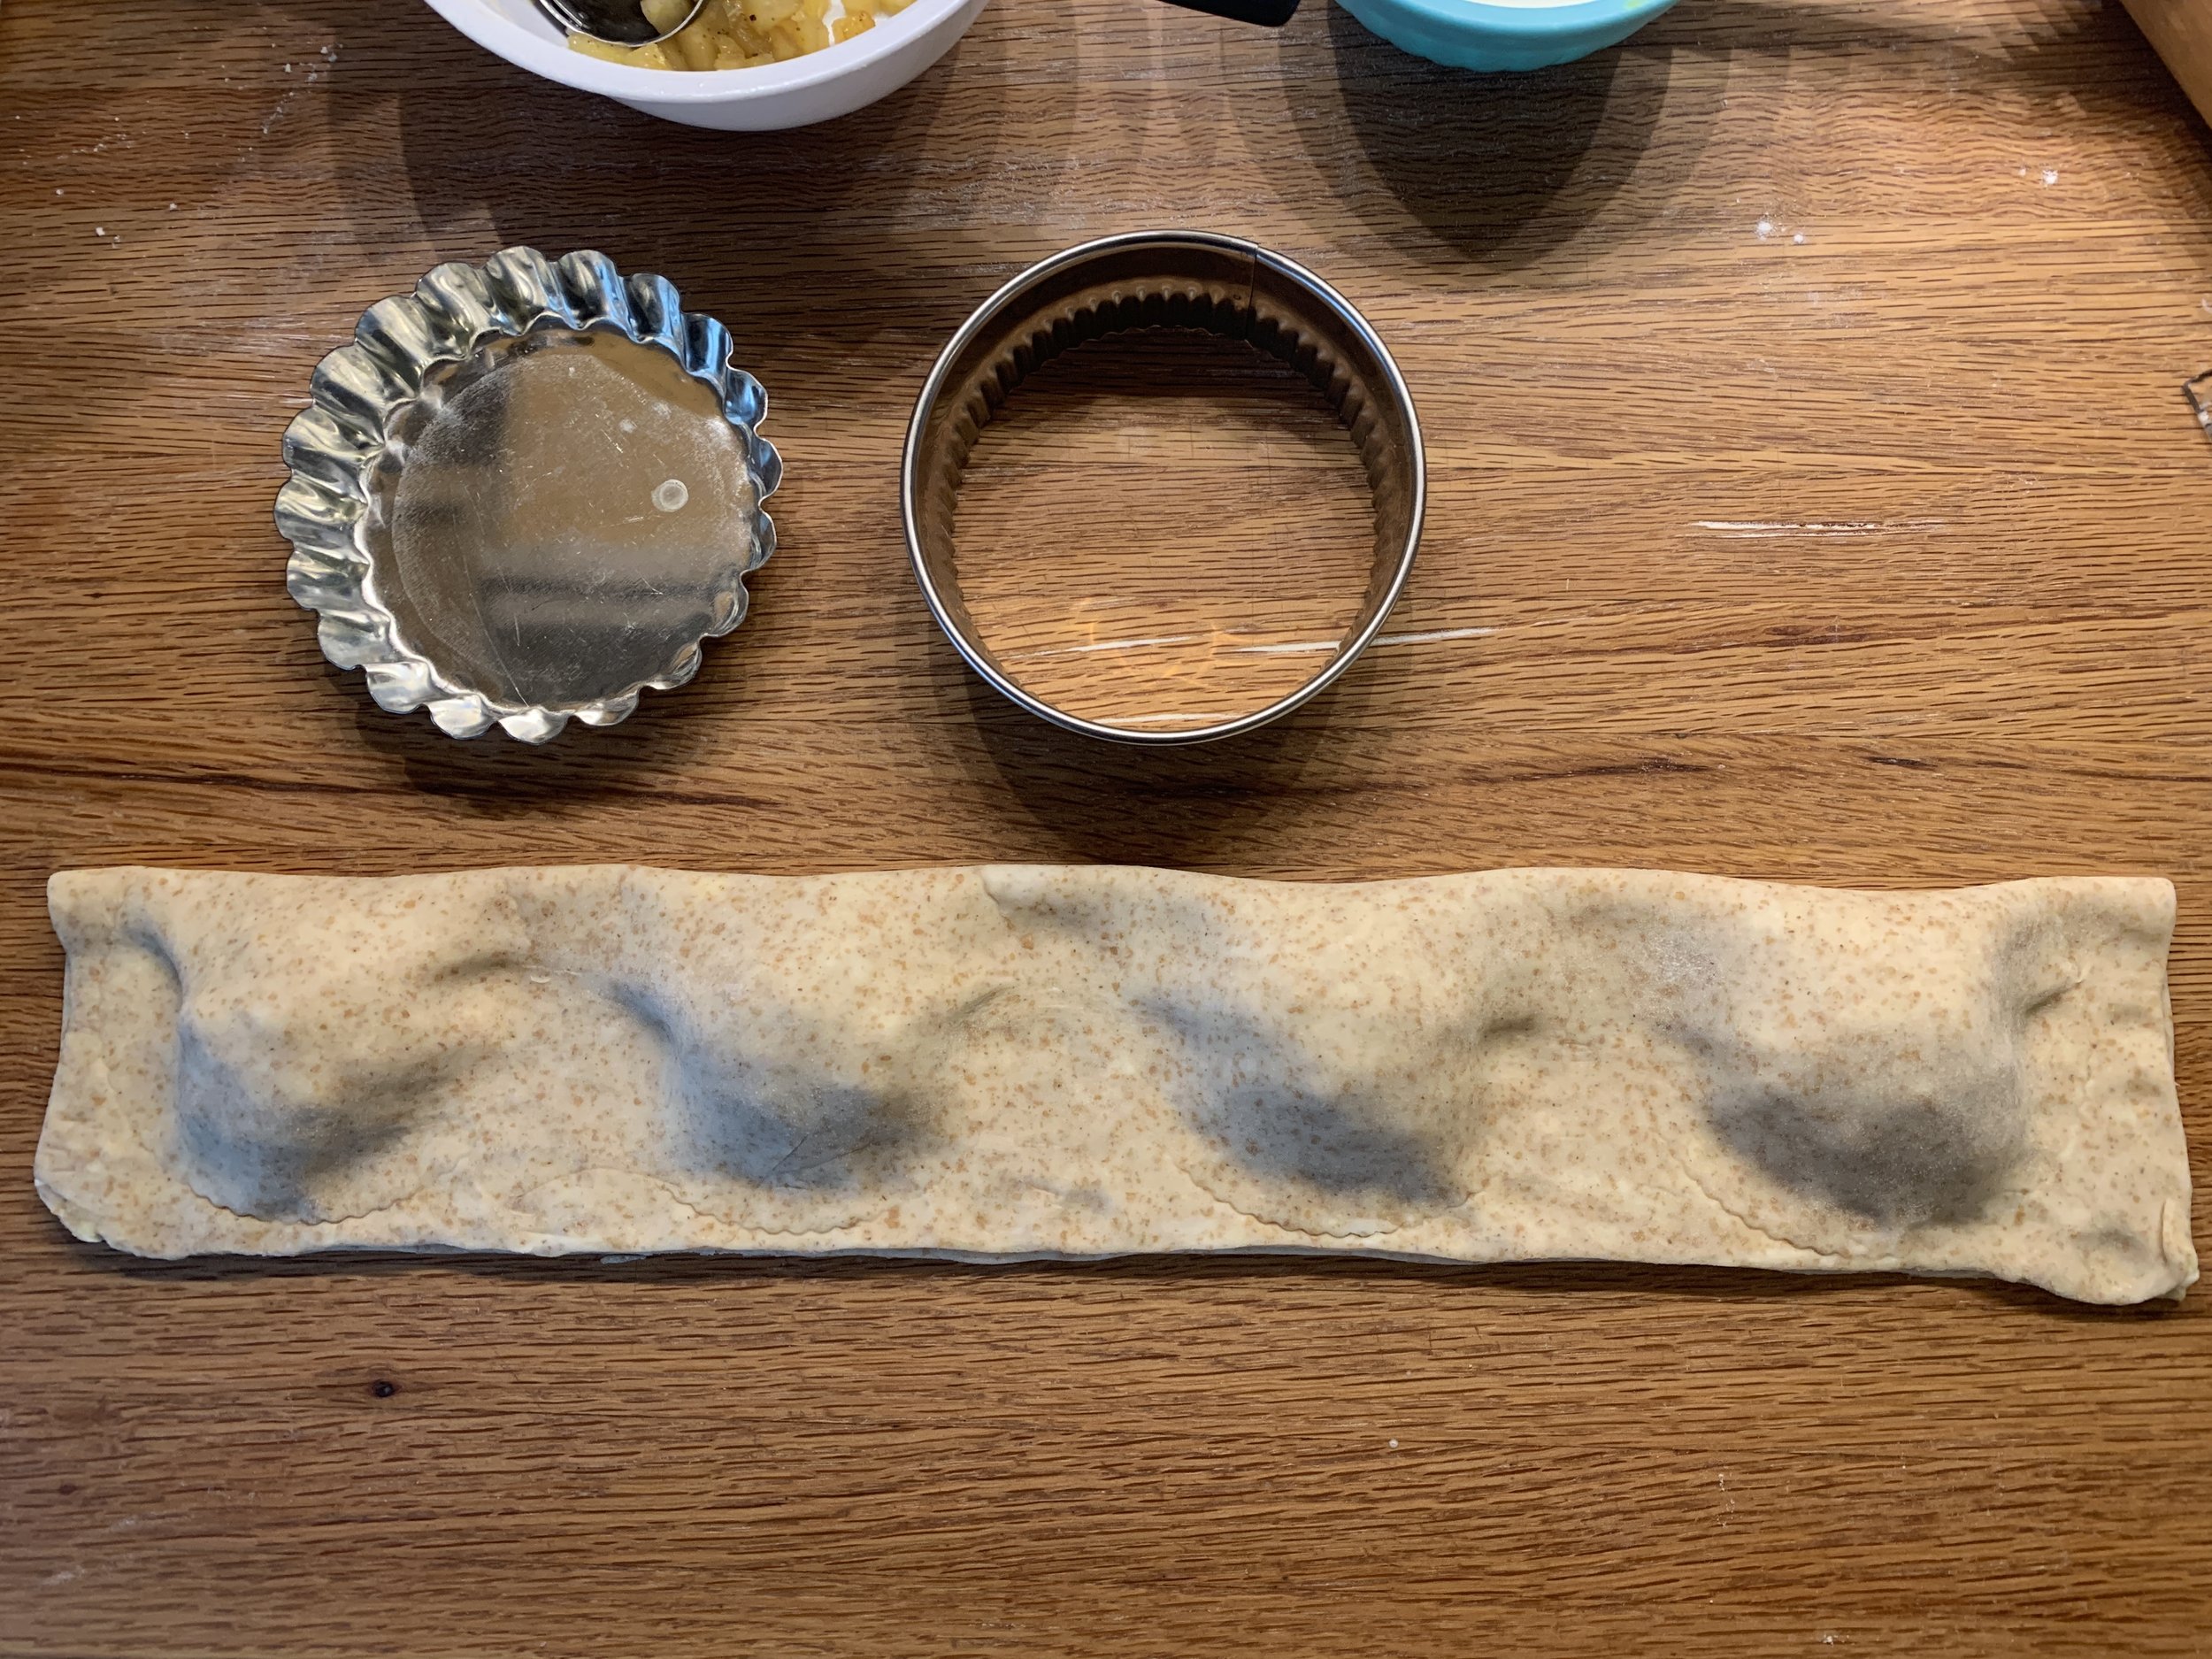
Shoot! I didn’t get a pic of the cutter placement - set it so that a little over half of the cutter is over the dough and a little less than half is over the counter, straddling the folded edge.

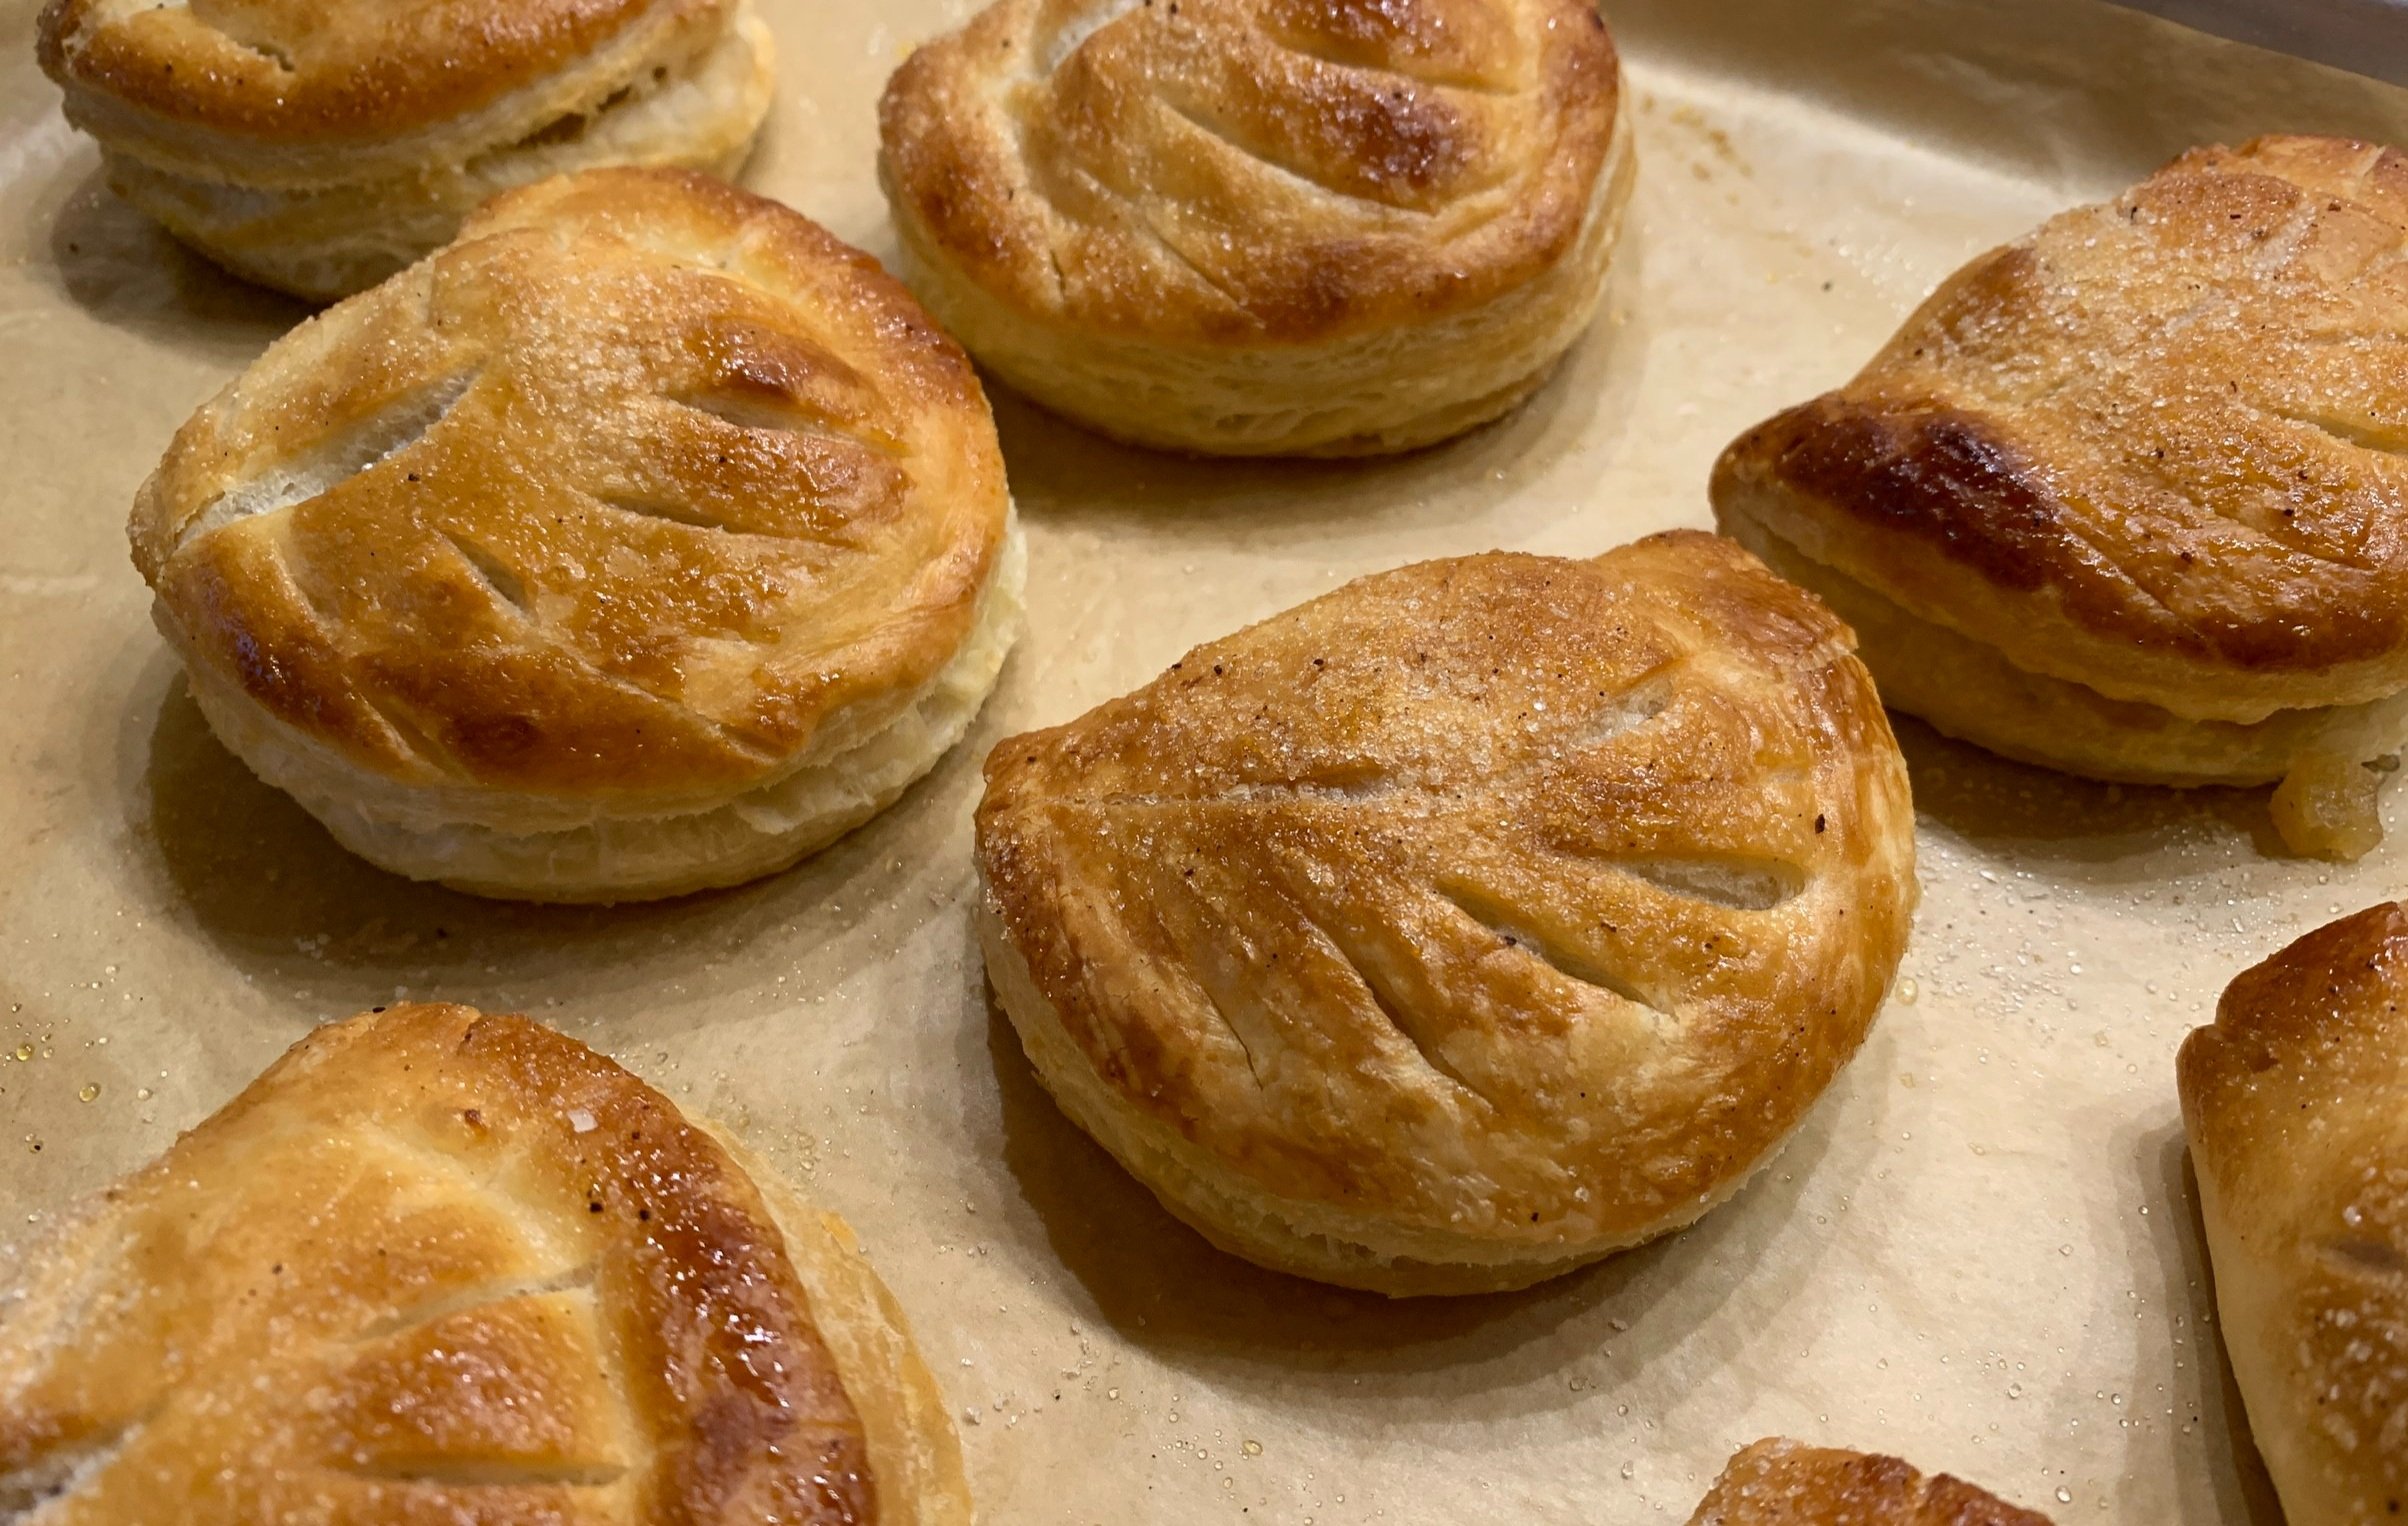
Make slashes to create a leaf like pattern. Pssst . . . I’m using some regular puff below, having done my assembly in a couple of different sessions.

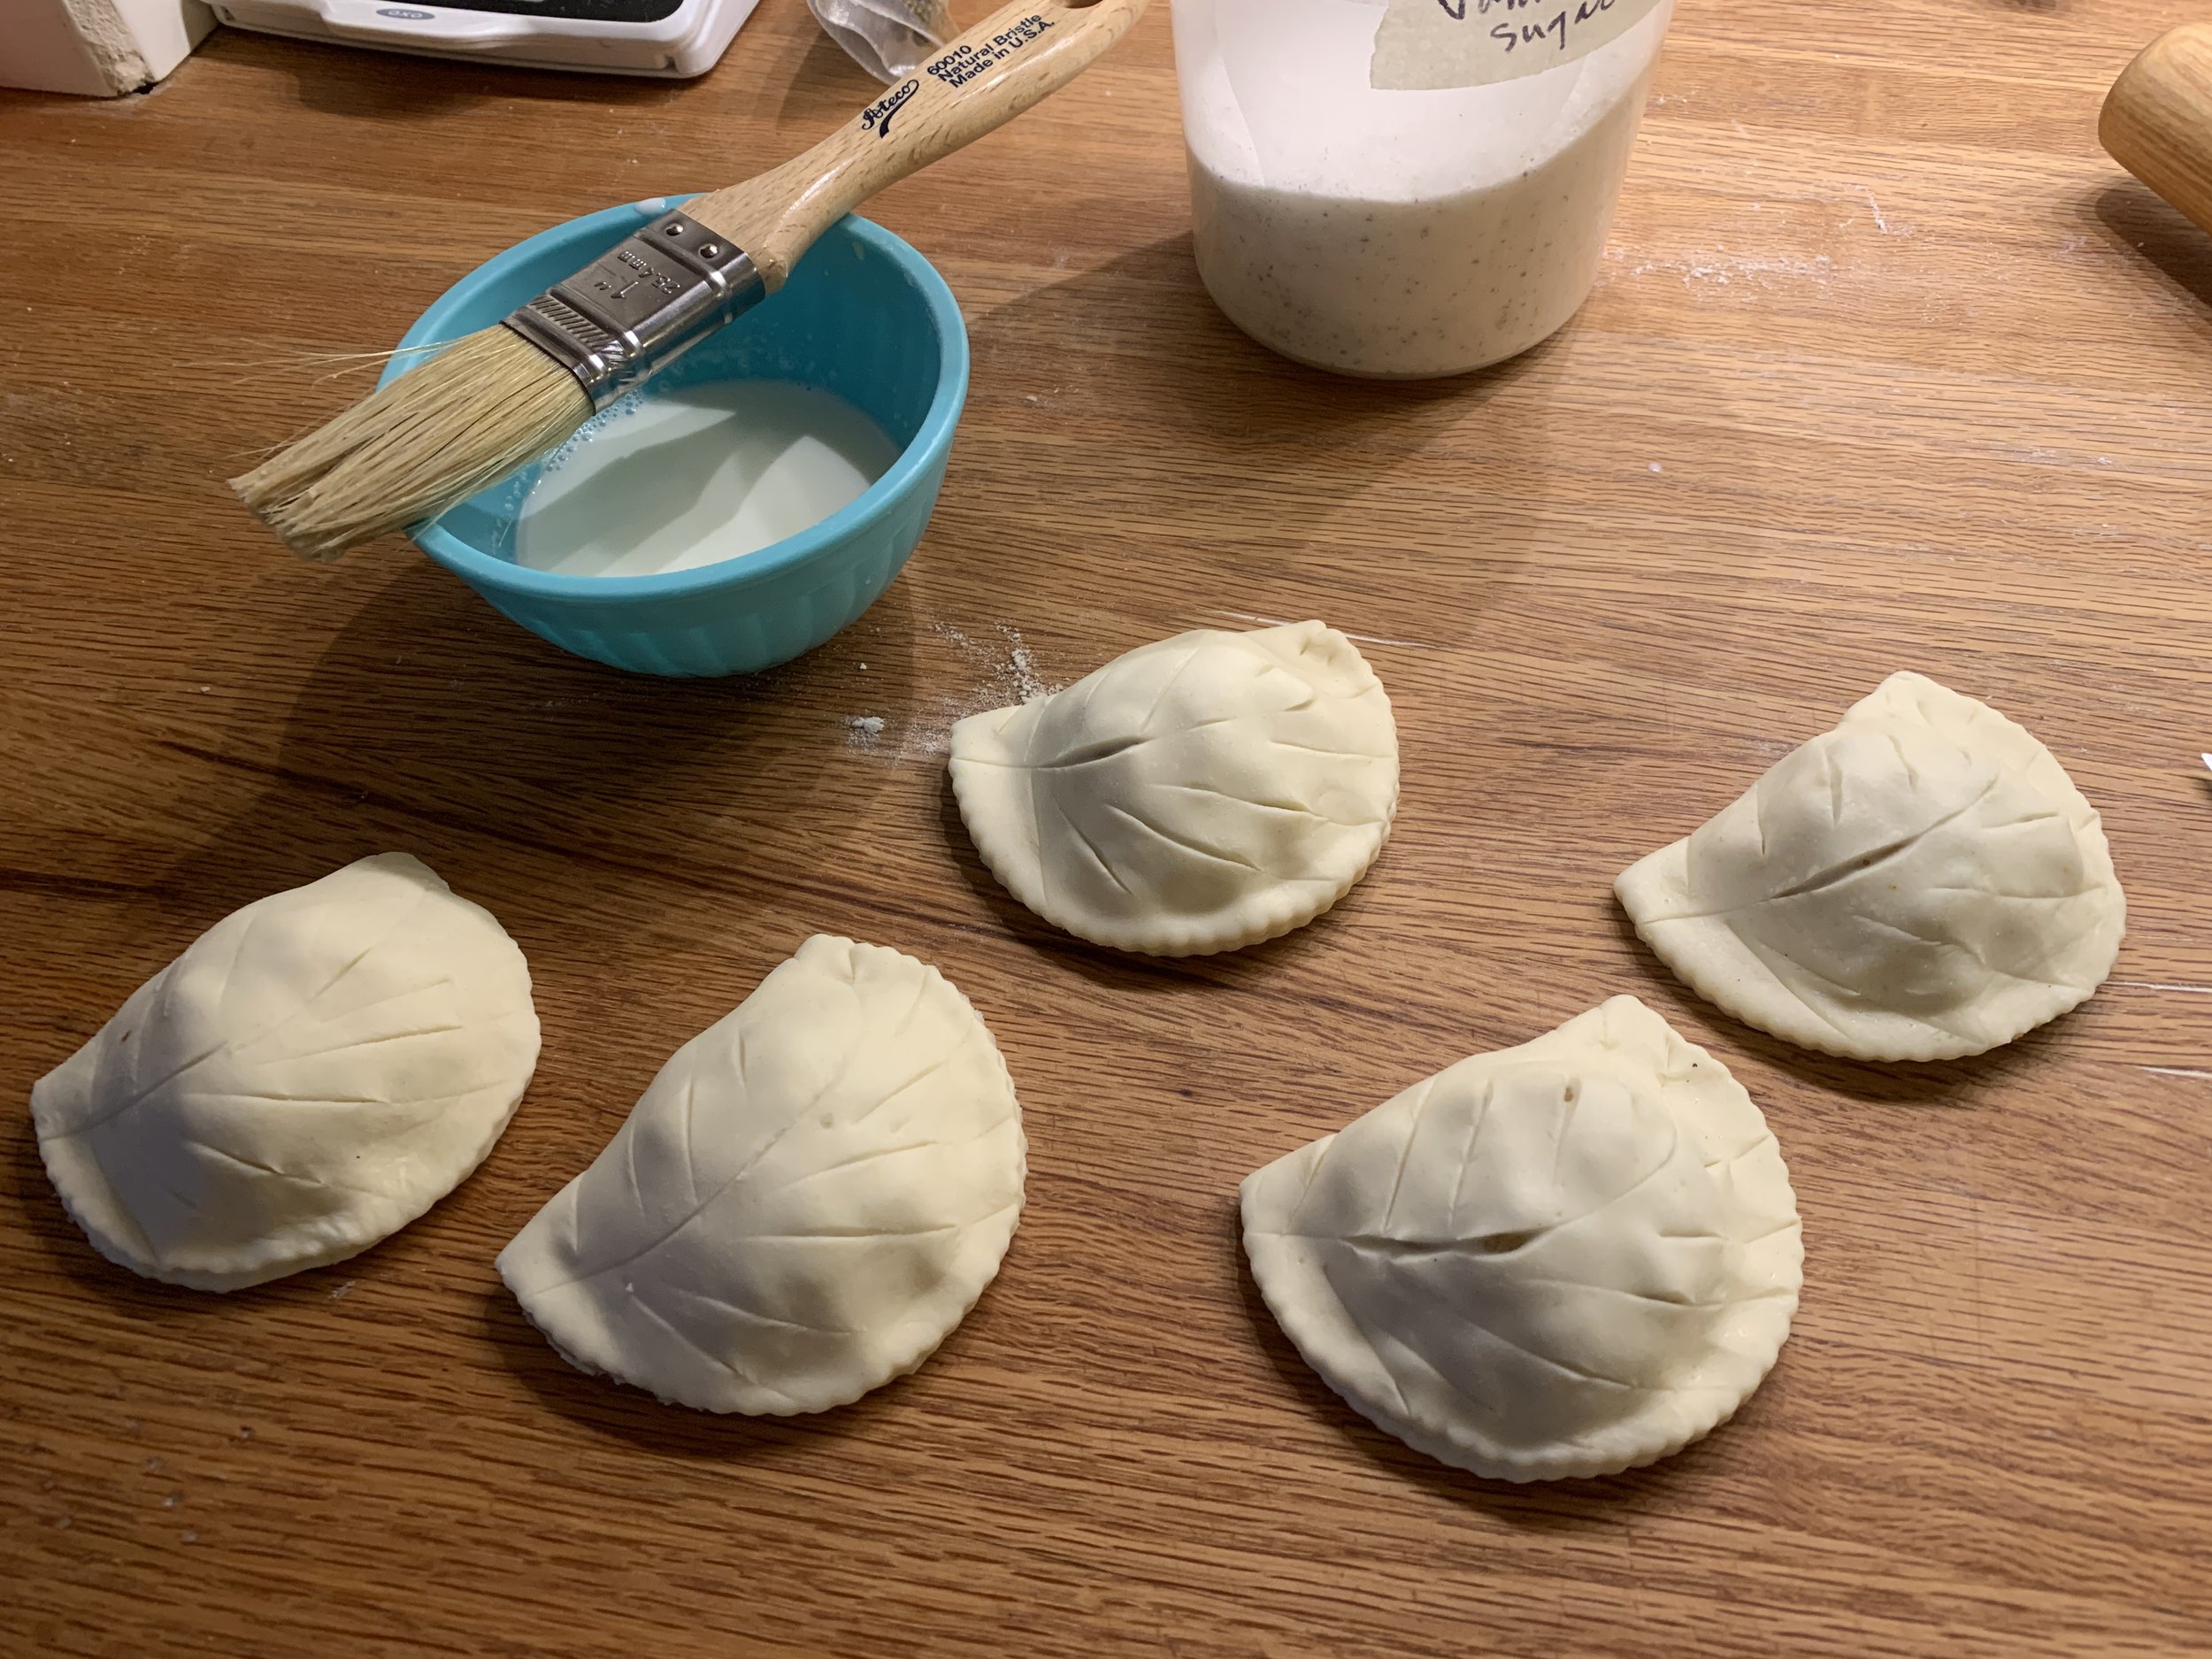
Brush them with egg wash or milk, sprinkle with vanilla sugar or coarse raw sugar and place them on a parchment lined sheet pan. Pop ‘em into the freezer to firm things up and stabilize the butter while you heat the oven to 425ºF.

Bake 10 minutes, rotate your pan and check on the browning. If browning too quickly, reduce temp to 400ºF and bake an additional 10-15 minutes until golden brown.


Mmmmmm . . . . these are tasty indeed!

Not only that, but spring is finally springing. Enjoy!

Bacon cheddar corn scones

So much sweet corn this year - gotta try something a little different. Why not savory scones!

Steve’s been buying up batches of ears, cutting the kernels off and freezing a lot of it, but he’s also grilled some ears and cut off the grilled kernels for adding to stir fries, frittatas, fried rice, corn chowder - you name it!

I went with a slight variant of my cheddar scone recipe and added grilled corn kernels and bacon bits to the mix. A small pinch of cayenne gives it the right hint of heat without being overwhelming (you can always add more if you’re into the heat factor). If you’d like to make these, here’s a PDF of the recipe fully written for this particular project.

Remember - cold butter and cold cream/egg, work quickly and efficiently to bring it all together.

Place dry ingredients into a large enough mixing bowl to accommodate your hands; work cold butter into the mix by flattening the butter between your fingertips and “flaking” the butter into the flour mixture. Leave visible pieces of butter which will help achieve a light and tender crumb.

Place grated cheese (I like a combo of gruyère and cheddar), corn kernels and bacon on top of the dry ingredients. Pour the cold cream/egg mixture into the center and toss it all with a fork to moisten. Bring everything together quickly with a bowl scraper then turn out onto a lightly floured work surface to gently knead a few times to incorporate any dry bits.

This recipe yields about 900 g of dough. I divide it in two, form each half into a 5”-ish round about 3/4 inch thick and cut into 8 wedges for a yield of 16. I happen to prefer the petite sizes, but if you’d like larger scones, cut each round into 6 wedges (yield 12) or even 4 (yield 8) for a pretty generous sized serving. It’s all up to you.

Once the scones are placed on a parchment lined sheet pan, brush with a little milk and sprinkle more cheese on top.


I pop the tray into the freezer and place a second sheet pan in the oven while heating to 400ºF.

Place the scone pan onto the heated sheet pan, bake 10 minutes, rotate trays and bake another 10 minutes until nicely browned. Reduce oven temp to 375ºF half way through if browning too quickly. If I’ve said it once, I’ve said it a thousand times - all ovens are different!

Enjoy slightly warm or cool fully before serving. Hint - a drizzle of honey adds a nice touch.

Crispy outside, moist and studded with goodness inside. You bet.

Work your own wonders with fresh sweet corn. Time’s a wasting!

Happy autumn!!

Crème fraiche pound cake à la Melissa Clark

Rum crème fraiche version

Rum crème fraiche version

After my last post on baguette this one was a piece of cake. Hah! Get it?

Here’s another great contribution to the baking world from NYT food writer Melissa Clark. This one caught my eye partly because of the rum (which I’m starting to appreciate more and more) and crème fraiche (which I’m finally making myself!) in the ingredient list, but also because I’ve made my share of tasty pound cakes over the years and am always up for a new one. If you love pound cake, you MUST try this one.

Pound cake is typically butter, sugar, egg and flour in fairly equal weights, sometimes with cream cheese or sour cream added in. As Melissa notes, pound cake recipes don’t often contain any leavening like baking powder, but it’s the creaming of the butter and sugar to aerate and the eggs to add substance and binding to create the signature texture of these traditional cakes.

I made this recipe twice, the second time swapping the rum for a smooth Kentucky peach bourbon that we recently received from cousin Harve. Just had to try it don’t ya know. I added some orange zest to the batter and used a bourbon butter variant of the crème fraiche glaze, topping it with chopped toasted pecans. Mmmm good.

Bourbon glazed orange pecan version

Bourbon glazed orange pecan version

I’ve become very attached to my mom’s old Mirro brand loaf pan that is a bit longer and narrower than a standard loaf. I love the way the cake comes out in a sleek and less stodgy sort of way. Prep the pan, including the edges, by buttering and sugaring it.

IMG_1457.jpg

Bake at 350ºF for about an hour until golden and a tester comes out clean.

Mmmmm . . . .  doesn’t that look delicious!

Mmmmm . . . . doesn’t that look delicious!

The main take home point that Melissa makes is the fact that if you vary the amount of baking powder you add to the batter, you’ll achieve either a lighter (more baking powder) or more dense and creamy texture (less baking powder).

For my first go I used the higher amount of baking powder (1 teaspoon) as well as the rum, crème fraiche (she gives sour cream as an option) and vanilla called for in the recipe. Check out the sliced image - looks like a lovely pound cake to these eyes! And it was deeeeeelicious! Light yet dense if that makes any sense at all. I also loved the slight crunch in the crème fraiche rum glaze - and our neighbors enjoyed it too.

88D6D819-A006-4D45-952E-26CCBF9C74FB.jpeg

For my second go I used the lower amount of baking powder (1/2 teaspoon) and swapped Kentucky peach bourbon for the rum. I zipped some orange zest into the batter while I was at it. Another lovely crumb experience to be sure.

For the bourbon butter glaze: heat 60 ml/1/4 cup bourbon and 49 g/3.5 tablespoons unsalted butter to melt the butter, then add in 100 g/1/2 cup granulated sugar, stir to dissolve and boil one minute. When the cake comes out of the oven, poke holes in the top with a toothpick, brush on about 1/4 of the glaze, wait 5 minutes then brush on another 1/4 of the glaze. Reserve the remaining glaze.

Once the cake has cooled, run a small offset spatula around the edges and pop it out of the pan. Blend the reserved bourbon butter glaze with 50 g/1/2 cup confectioner’s sugar and two tablespoons crème fraiche and pour it over the top and sides of the cake. In my case I added the pecans as the pièce de resistance but you can leave them off if you prefer.

IMG_1470.jpg

Both of these cakes are buttery, luscious and dense as pound cake should be. Could I tell a lot of difference between the two? Not really, but both were superb in flavor and texture. Go either way with the baking powder and you’ll be happy no matter which one you choose. Thanks Melissa!

Remain calm and stay safe. We’re already deep into the first week of November and even though many of the leaves are now off the trees, here’s a mini photo album of what I’ve been enjoying during my walks this past month. I love autumn.


Brioche feuilletée revisited - chocolate hazelnut braid

IMG_0825.jpg

I would never have imagined that the most viewed post on this blog would be Brioche feuilletée, written back in November, 2016. I launched that project by tweaking the brioche recipe from a Le Notre Paris class I attended in September of that year. Reducing the butter in the base dough, adding a butter block and putting it through three 3-folds yielded a lovely laminated result.

Since then, as is my wont, I’ve reviewed a number of additional brioche recipes and techniques from the likes of Dorie Greenspan and Jeffrey Hamelman (of King Arthur Flour fame) and developed a new version of the base dough in November, 2018. The dough can be used for any brioche option you wish - Nanterre, brioche à tête, coffee cake, cinnamon buns or brioche rolls topped with pastry cream/jam/fruit. Lots of choices.

In this recipe PDF I go into more details about brioche, adjusting the recipe to yield either a leaner or an even richer dough plus some options for laminating the dough. So many possibilities.

It helps me to assess a brioche recipe by looking at the butter to flour ratio. A medium brioche dough typically contains butter that is about 50% the weight of the flour. Brioche can run from lean (where the butter may be as low as 25% of the flour) or rich where the butter can be all the way up to 100% of the flour.

The full batch of the base brioche dough (before adding any butter block/laminations) yields about 1300 g (2.8 lbs) of dough. So you can make the full batch and then separate out the 600 g for this braided two loaf project. Wrap and freeze the remaining dough for later or use it for other projects you might have up your sleeve.

Using Hamelman’s guidelines for these braided delights, I laminated 600 g of the base dough with an additional 120 g/4.25 ounces of butter which, by my calculations gave the final result a butter to flour ratio of 1:1. Now THAT’S a rich brioche! Remember - this makes TWO braids.

IMG_0829.jpg

Let’s do a quick review on laminating the dough - it never hurts, since the more you do it, the more it becomes second nature.

Roll the dough out to a 6”x12” rectangle. Have a 6” butter block ready - it should be cool and malleable.

IMG_0796.jpg

Place the butter on half of the dough . . . . . .

IMG_0797.jpg

then fold the dough over the butter, pinching the edges closed to fully envelope the dough. This is the beurrage.

IMG_0798.jpg

If your kitchen is pretty warm or your dough and butter seem warm and starting to squish, wrap it up and refrigerate for 30 minutes before proceeding. Now roll the dough out to about 18” long and 6” wide, always with the short side parallel to the work surface and rolling to and from yourself (not sideways) to achieve the length. Do a 4-fold (book fold) by bringing each short end into the middle with edges meeting . . . . . .

IMG_0799.jpg

then fold it on itself.

IMG_0800.jpg

Wrap and chill the dough for 30 minutes to allow it to relax then proceed with a 3-fold (business letter fold). Before rolling remember to turn the dough 90 degrees so the “spine” or fold is on your left then roll out to approximately 18”x6” again, rolling to/from yourself. Don’t get hung up on exact measurements - you’re going for about three times length to width.

IMG_0807.jpg

Visualizing the dough in thirds, fold one end up . . . . . .

IMG_0808.jpg

and the other down over it. Congrats! Your laminated dough is complete.

IMG_0809.jpg

Now wrap it snugly and refrigerate for a good 1-2 hours to let it relax and firm up before rolling it out for your intended purpose.

For this braid project I divided the dough in half - look at those buttery layers!

IMG_0814.JPG

Each half of the laminated version weighs about 360 g (before filling) and is good for a medium loaf pan size braid.

I created a chocolate hazelnut filling by taking 200 g of a hazelnut remonce mixture I had left from this hazelnut/almond couronne project and adding 50 g / ~2 ounces of Nocciola crema and a bit of egg white and simple syrup to loosen it a bit for piping.

IMG_0803.JPG
IMG_0802.JPG

Butter two medium (8”x4”) loaf pans and have the filling ready in a piping bag.

On a lightly floured surface roll one half of the dough into a 10”x10” square and divide it in three strips.

IMG_0815.jpg

Egg wash (I used egg white since I had some on hand) along one long edge of each strip then pipe a line of filling along the opposite edge.

IMG_0816.jpg

Roll each strip up into a log and press the edge to seal.

IMG_0817.jpg

With seam sides down do a classic three strand braid.

IMG_0818.jpg

As you come to the end of the braid, just tuck the ends under then pop it into a buttered loaf pan.

IMG_0819.jpg

Repeat the steps with the second half of the dough.

Cover the pans with buttered plastic wrap and let rise for a good 1.5 hours. Toward the end of that proofing time heat the oven to 375ºF.

IMG_0821.JPG

Brush the loaves with egg wash and bake about 35 minutes until nicely golden.

IMG_0823.jpg

Remove them from the pans and, if you’d like to gussy them up a bit, brush with either some simple syrup or apricot glaze for a bit of shine and even go another step and drizzle on a confectioner’s sugar/milk/vanilla glaze. I left mine au naturel.

IMG_0825.jpg

Once cooled, I sliced into one of these babies. Oooooh - buttery with just the right swirl of choco-hazelnut and pretty darn delicious to boot. Nothing like a good brioche, eh?

IMG_0831.JPG

I love the feel of dough, the shaping, the proofing, the baking, the aromas and, of course, the tasting! Dough reigns!!