Banana rye walnut chocolate chunk cakes

I learned something about bananas some years back. Once they’re ripe and you’re not ready to eat them right then and there, peel ’em, chunk them up and freeze them! You can then use them in smoothies, cakes or quick breads where they lend a special creaminess to the batter. Yum.

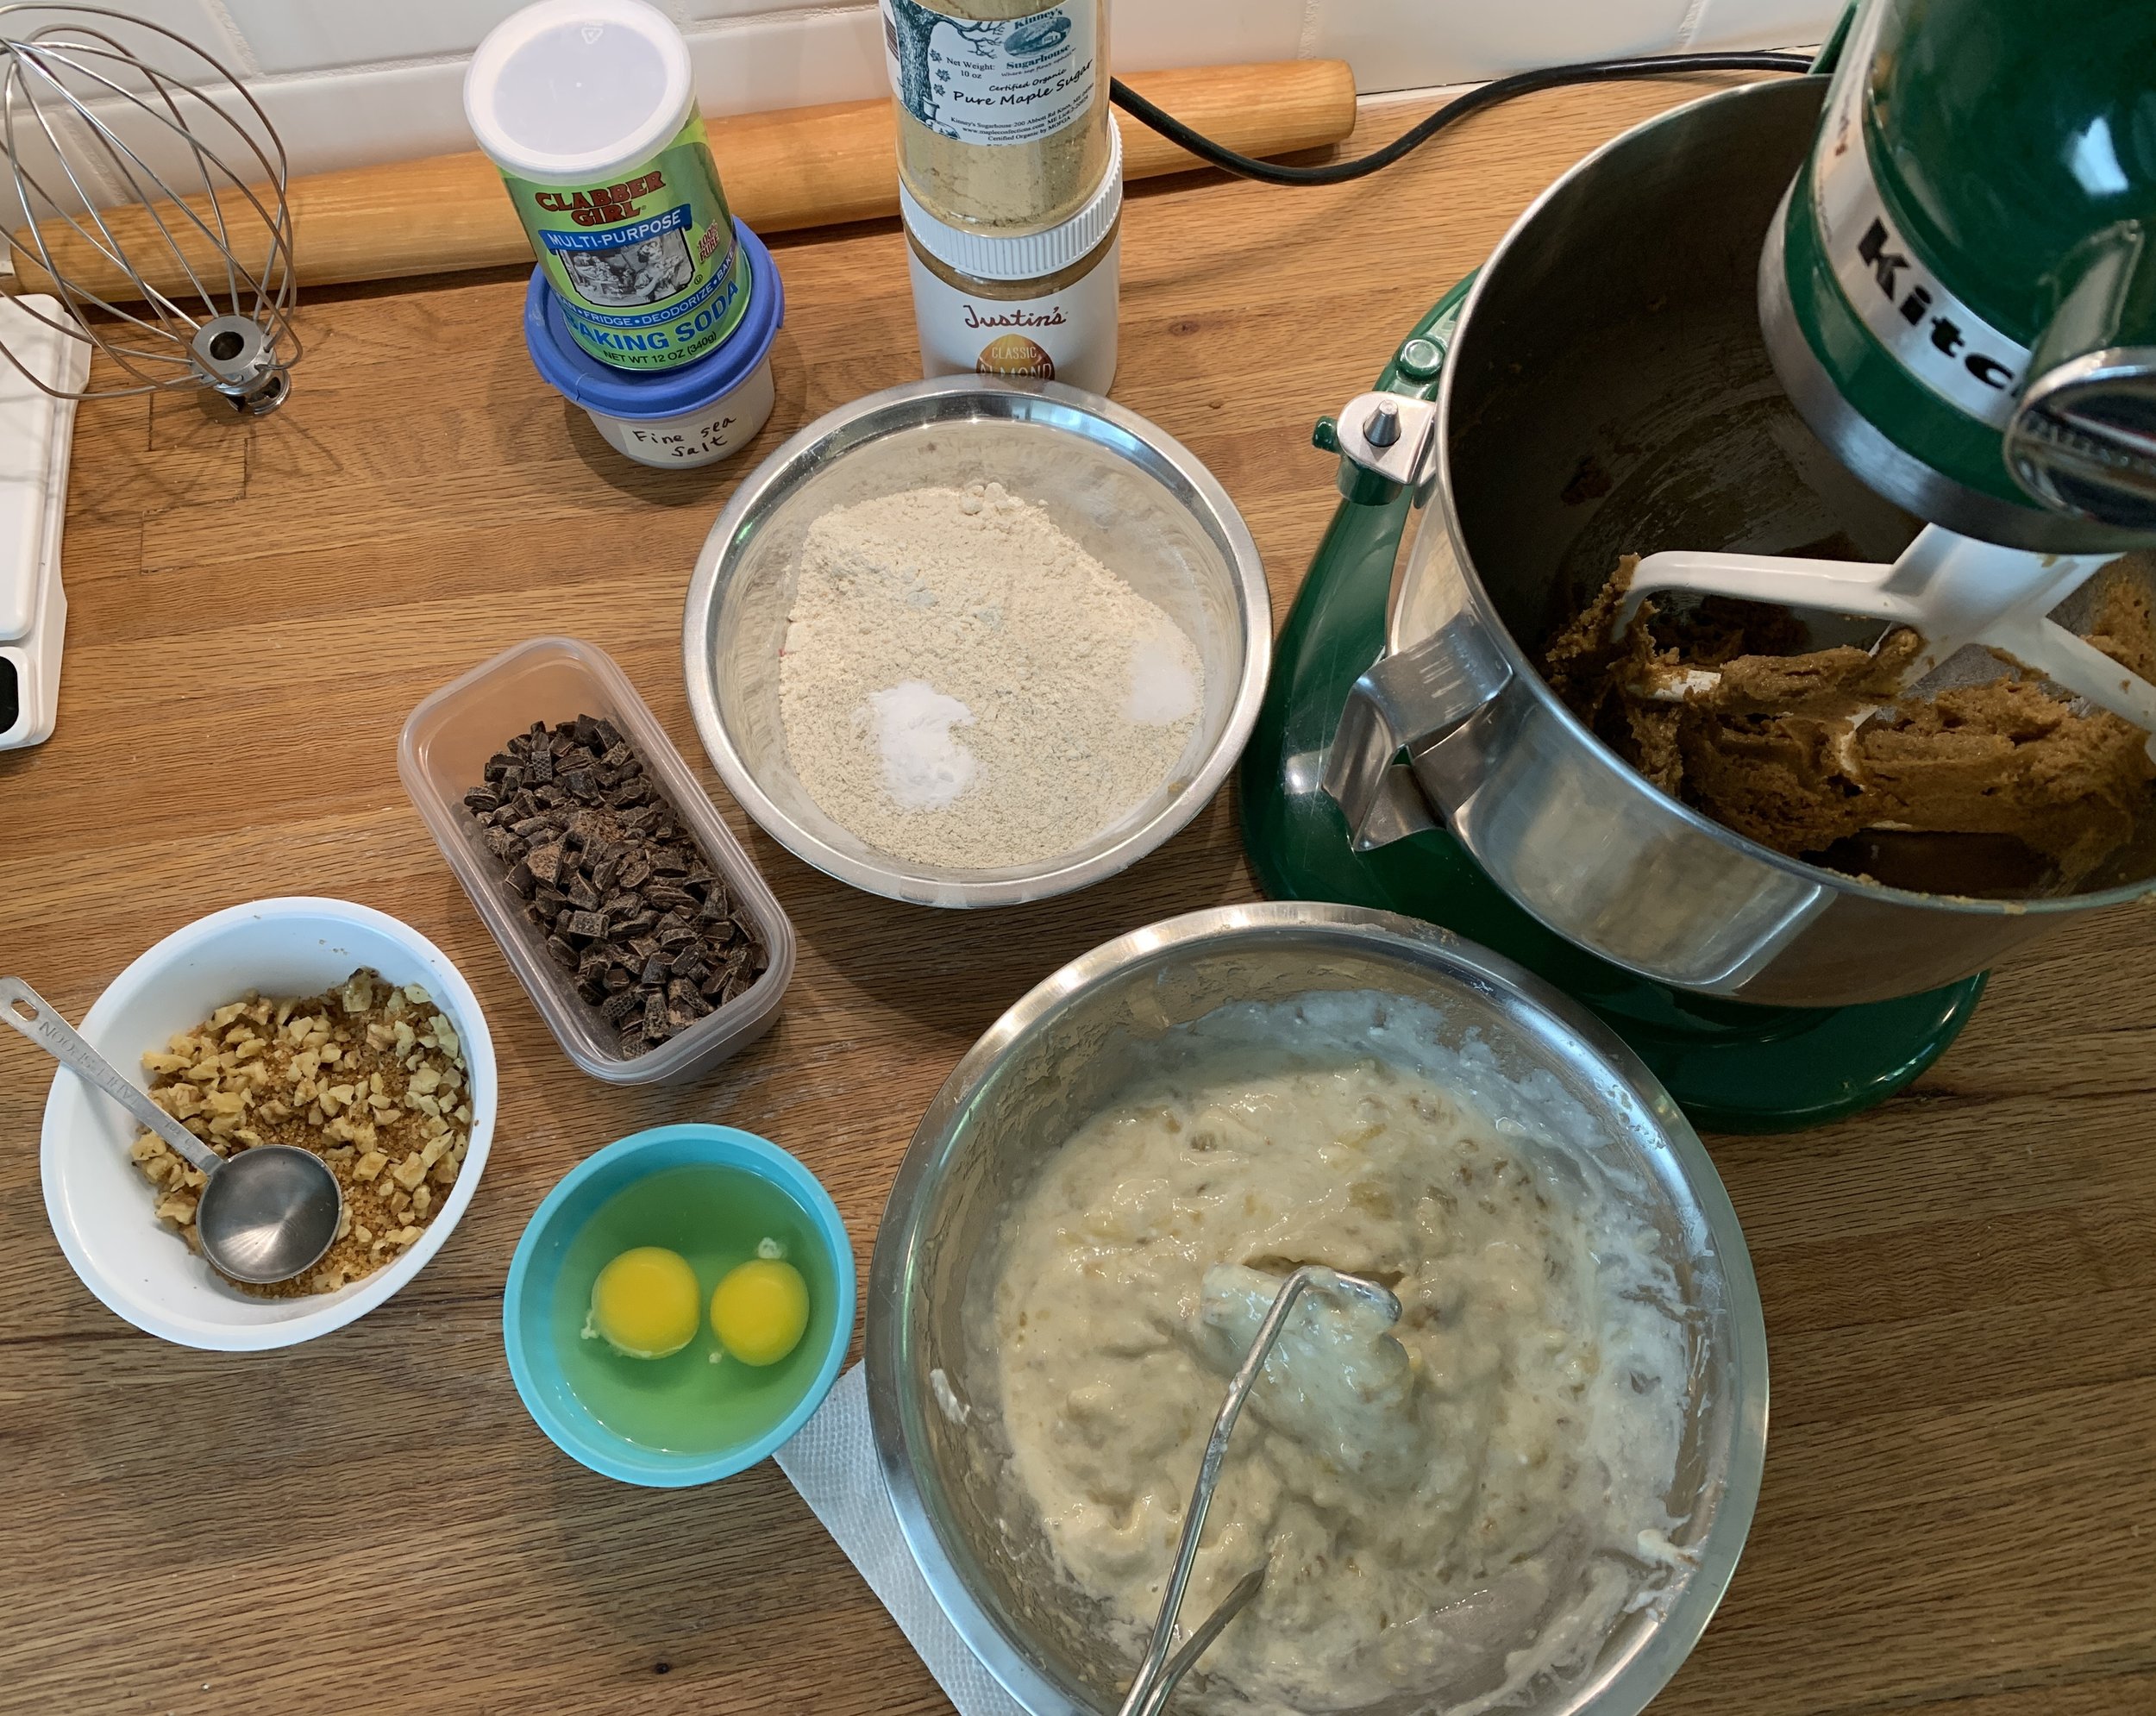
This recipe calls for 4 medium bananas which I figured came to about 480 g of banana mash (~120 g per banana). I’m sure you can give or take the amount without negatively affecting the final result so don’t fuss too much as to the exact quantity of said banana.

This is my take on banana rye bread from Brontë Aurell’s book “Brontë at Home - baking from the Scandi Kitchen”. I’ve made these babies a bunch of times and realized that I’ve never written about them. I’ve done variations subbing maple sugar (thanks sister Joyce!) for some of the brown sugar, subbing ground oats and/or whole wheat pastry flour for some of the all purpose flour, adding in chopped toasted nuts like hazelnuts or walnuts, adding chocolate chunks and topping with a nutty streusel. So moist. All good.

Here’s the recipe (including some of the variations I’ve made) and my mise for this version in the image below. It’s a pretty straight forward cake batter - mashed banana, yogurt, lemon juice and vanilla in a separate bowl; dry ingredients in another bowl; cream butter/sugar, add egg then add wet/dry alternating. Basic right?

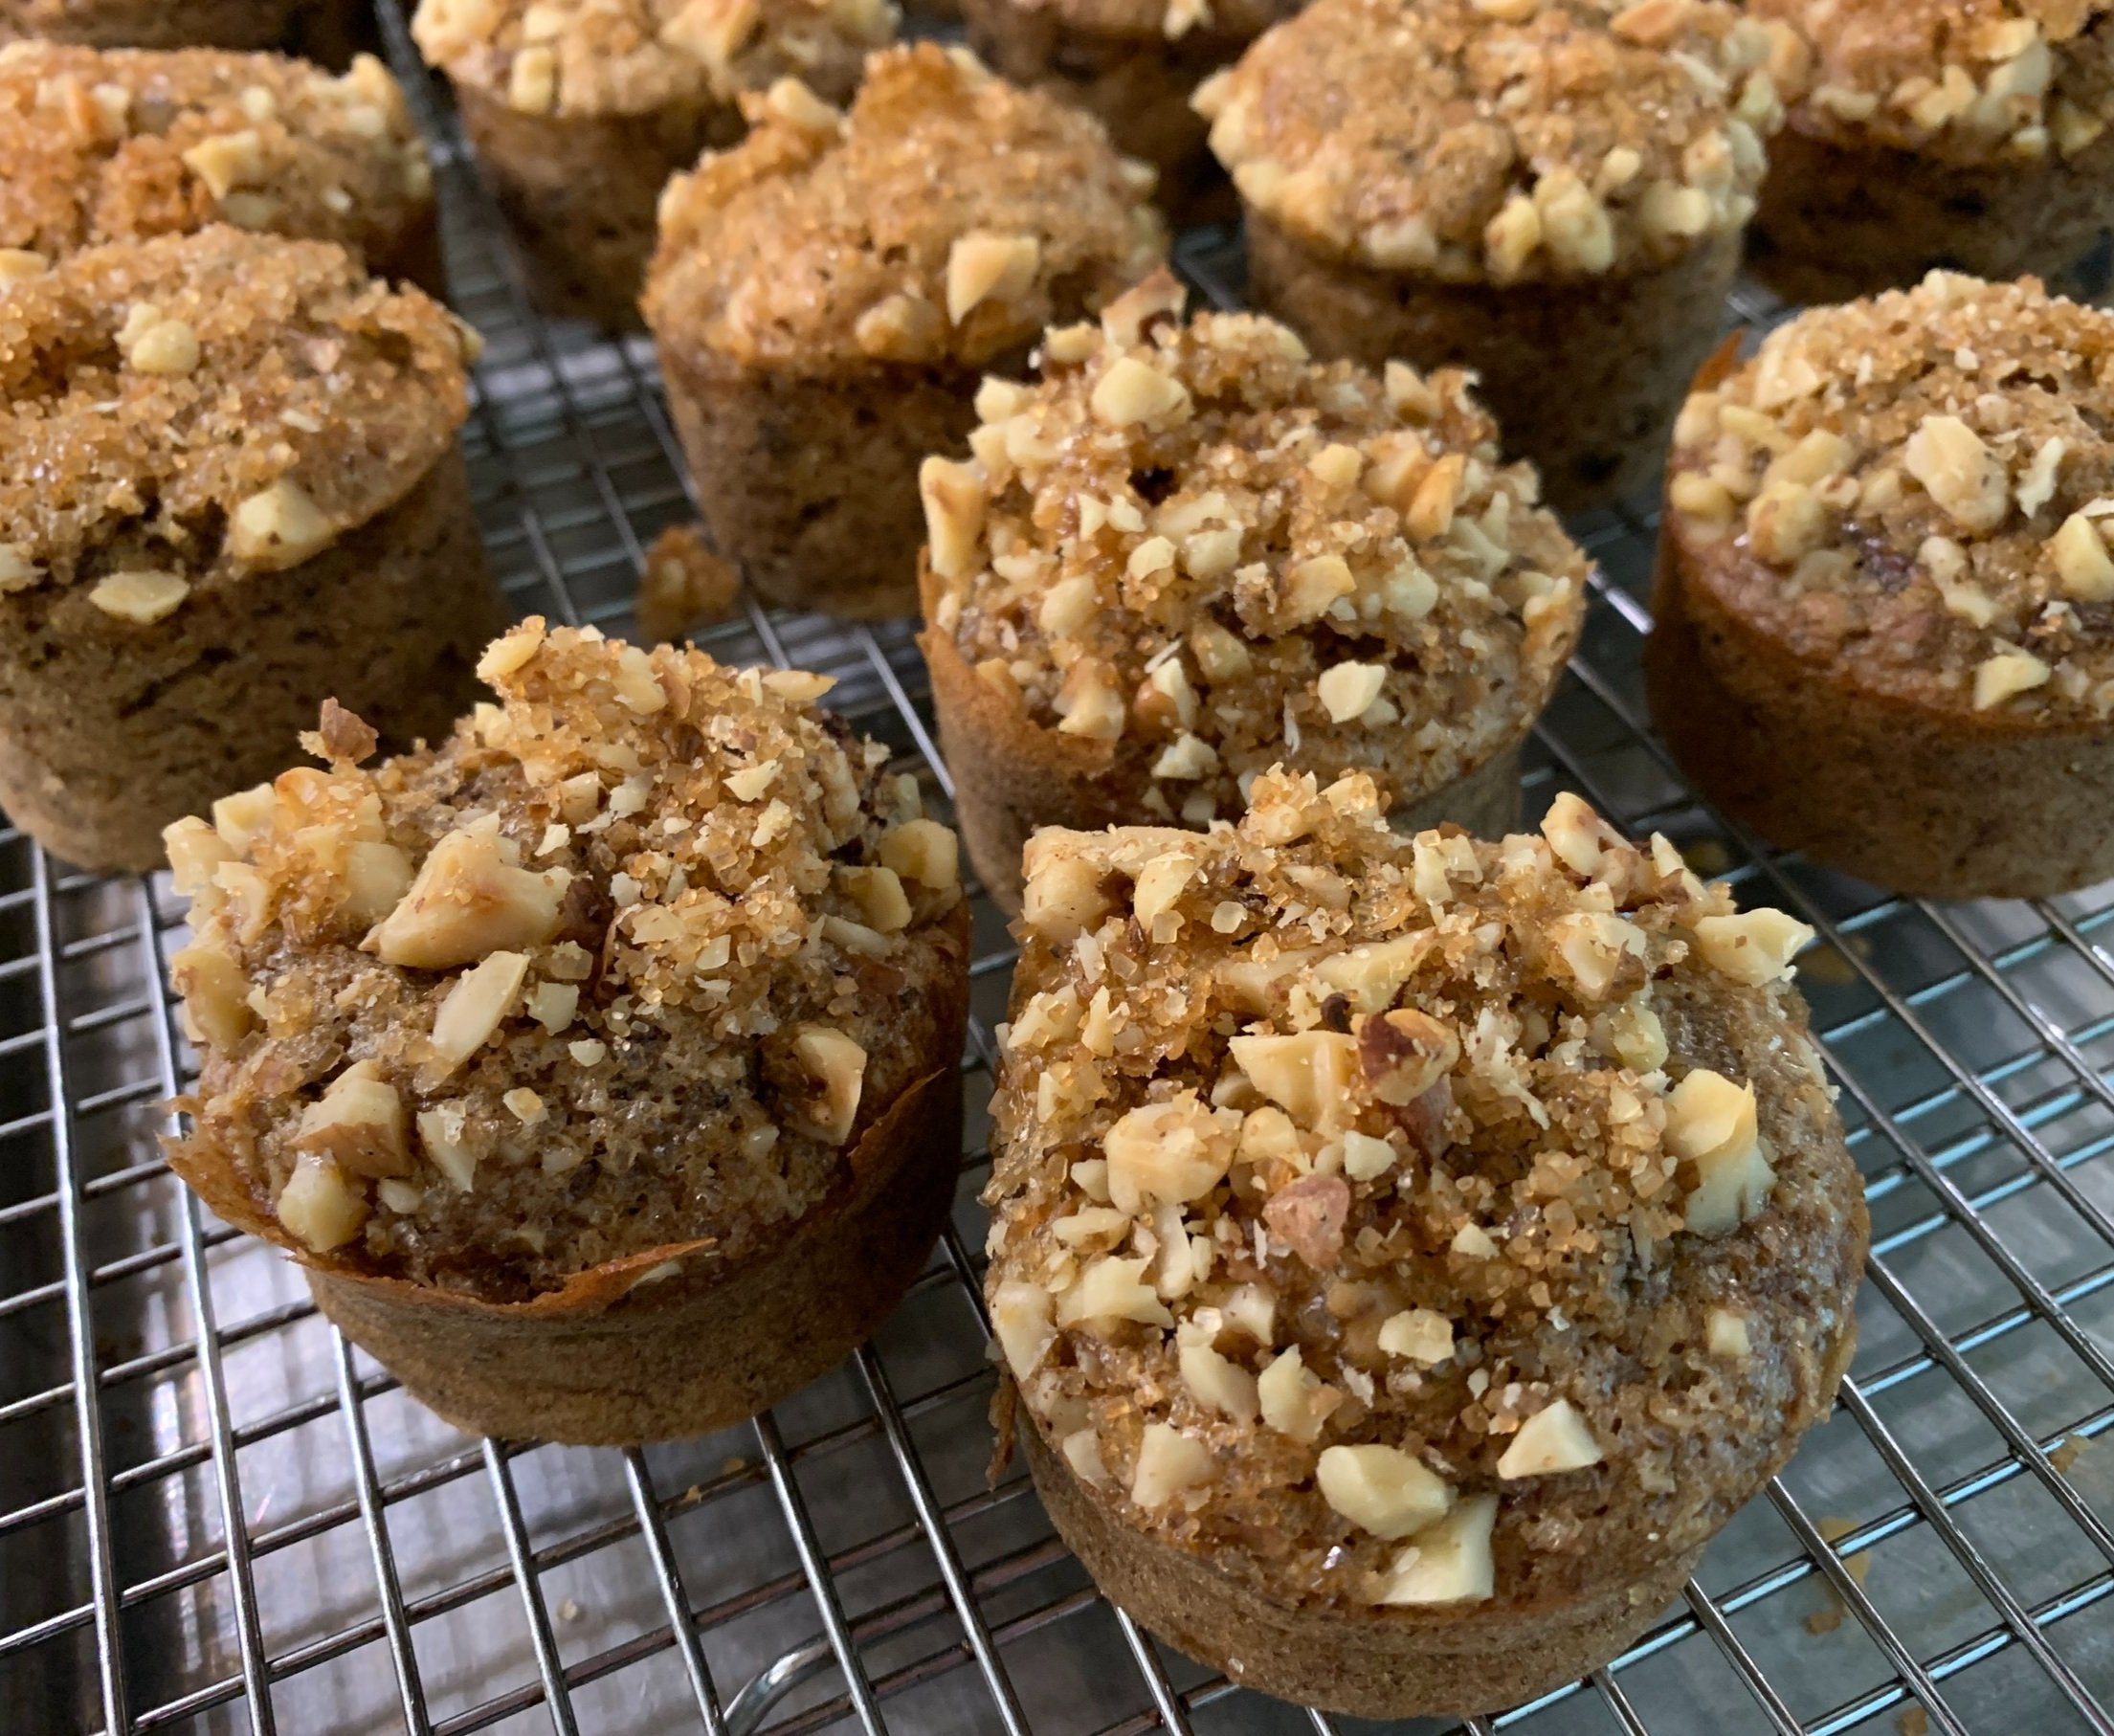
In this case I’m also adding 170 g / 6 ounces chopped chocolate to the batter and topping with chopped walnuts and raw sugar for a bit of crunch.

You can bake these cakes in buttered/floured muffin tins but I prefer (and love) my Silikomart silicone flexi-molds - so many different shapes and sizes. This time I’m using the 8-well SF028, rather like a standard muffin size. The recipe yield is about 20 cakes using that particular mold. I also often use the 11-well SF022 which is a tad larger than a standard mini-muffin pan - I get about 33 cakes with that mold. NOTE - I have several of each mold.

I place the molds on a wire grid on a half sheet pan - that allows for better air circulation and more even baking.

You can find a large selection of Silikomart molds at bakedeco.com. By the way - I have no affiliate links with any companies - I simply like sharing the things I find useful and fun in the baking kitchen!

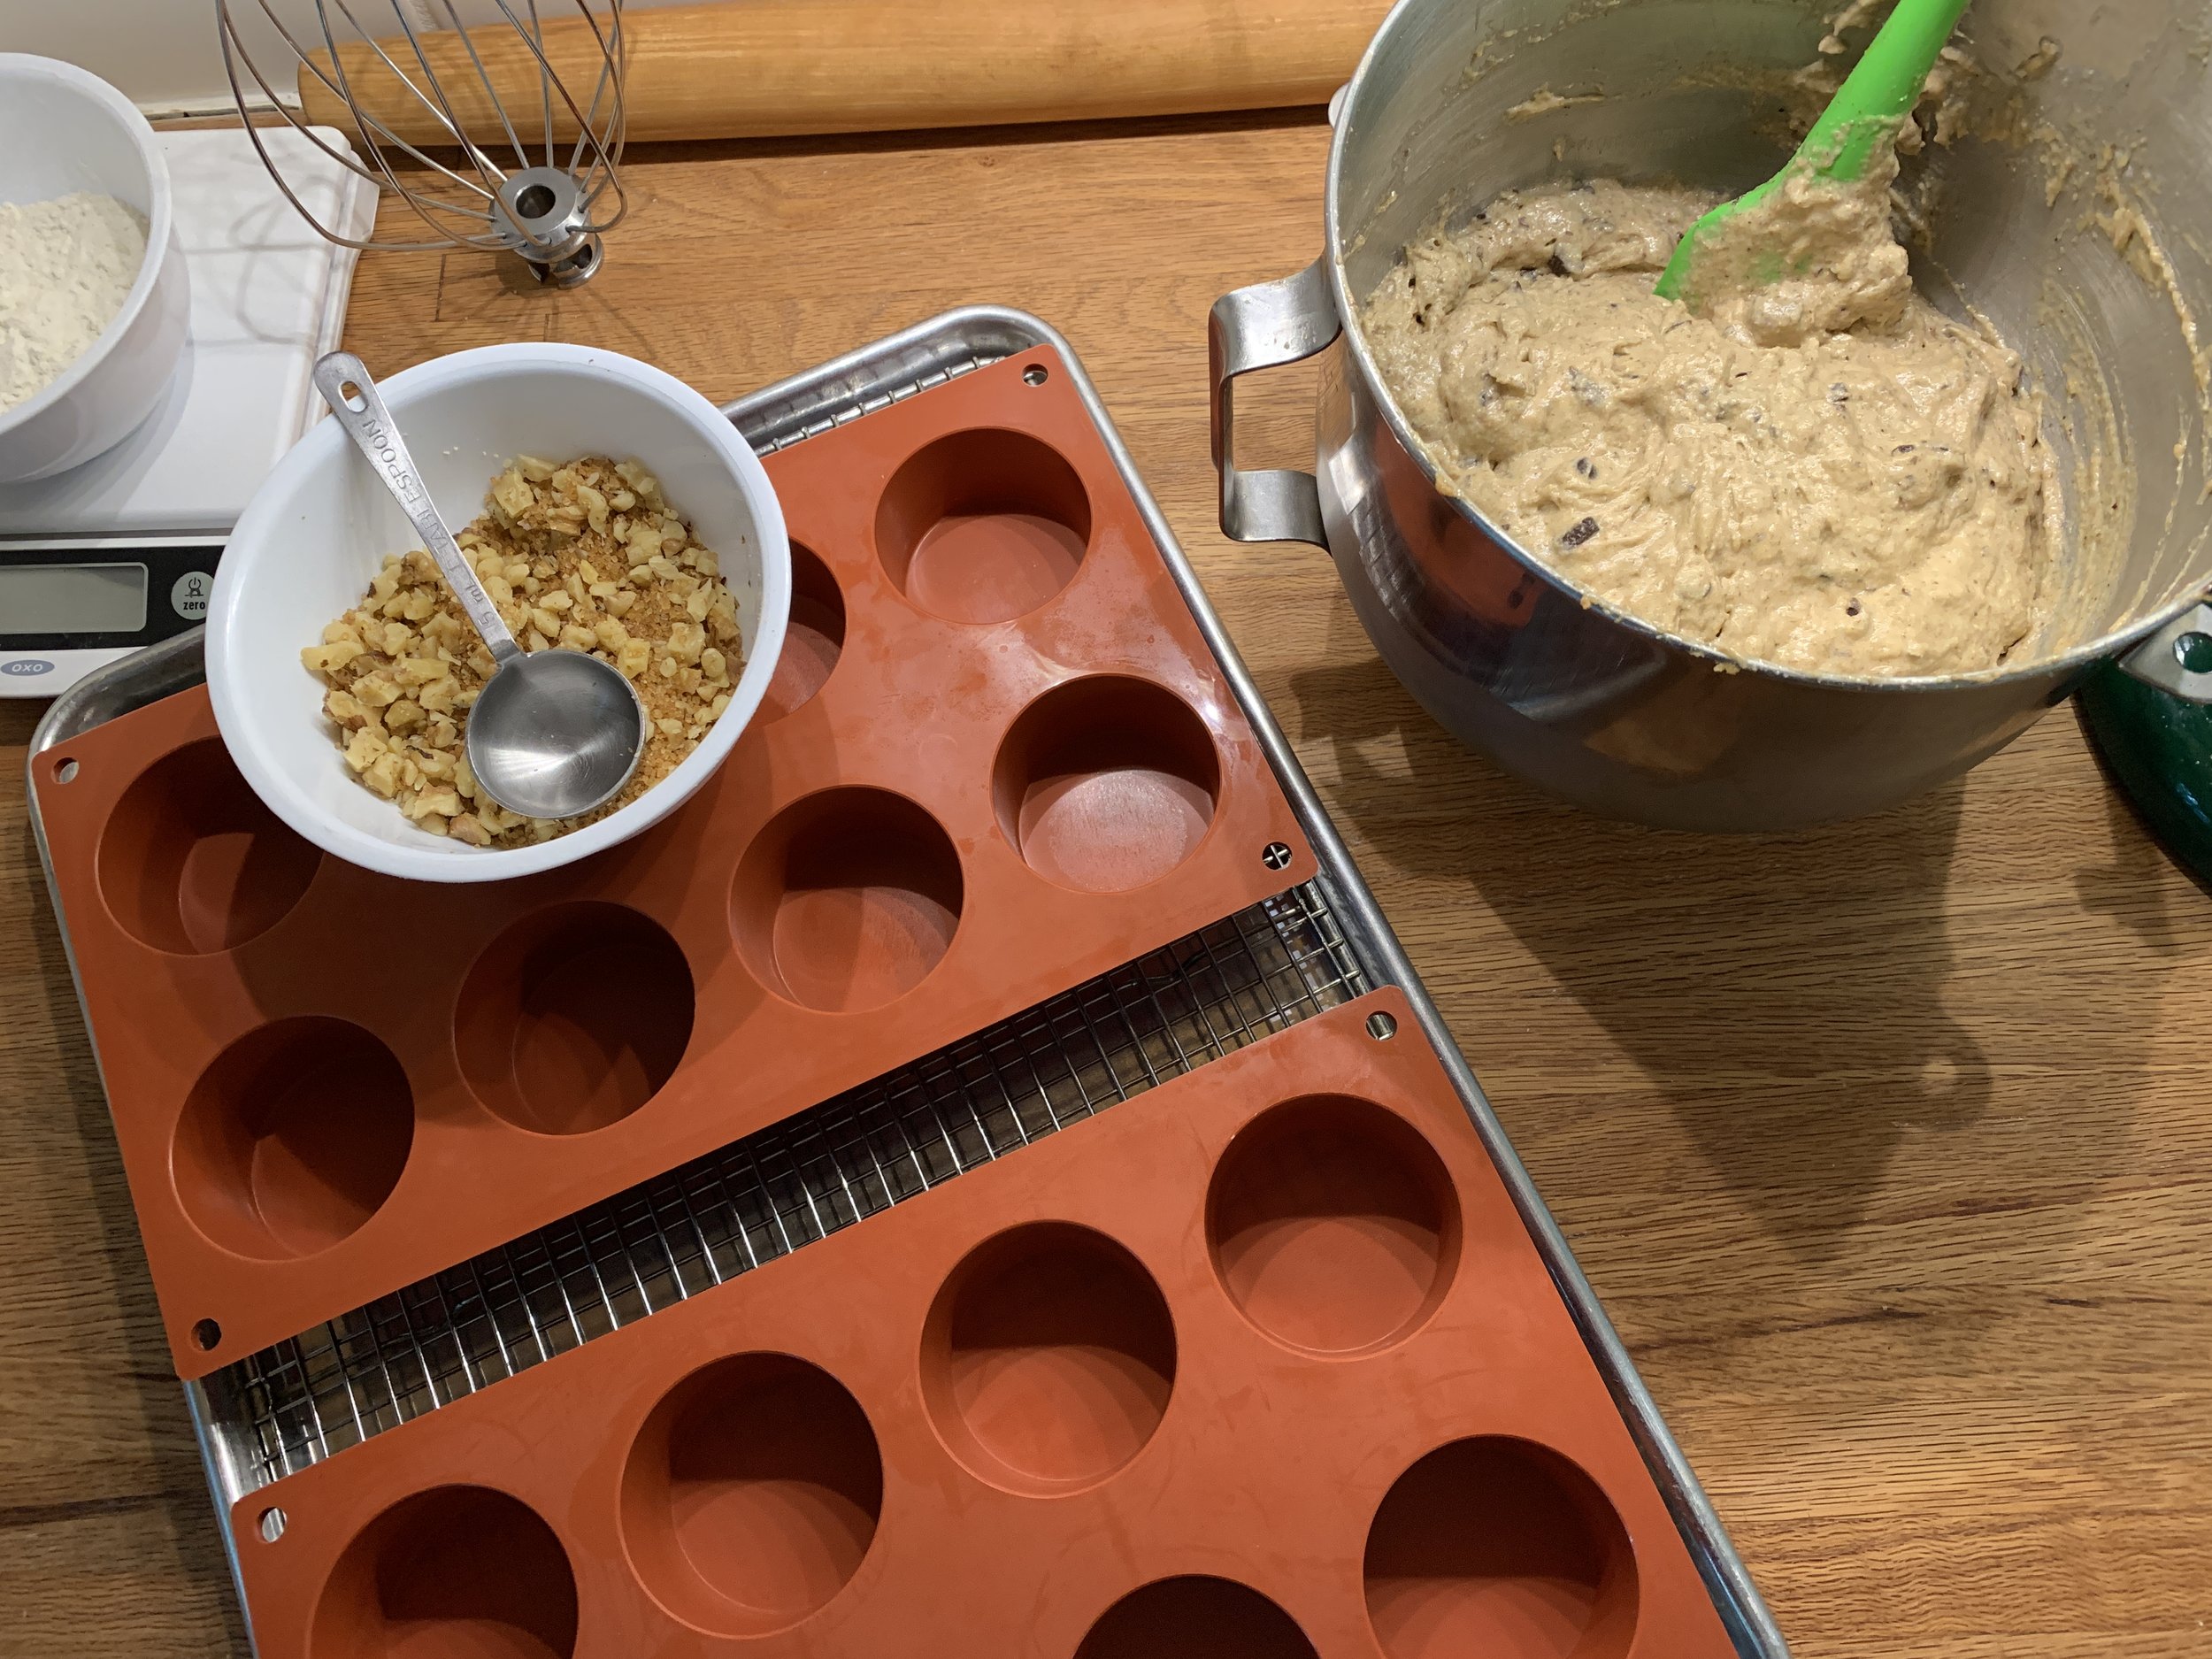
Heat the oven to 350ºF. Fill molds about 3/4 full. Sprinkle chopped walnuts and raw sugar on top.

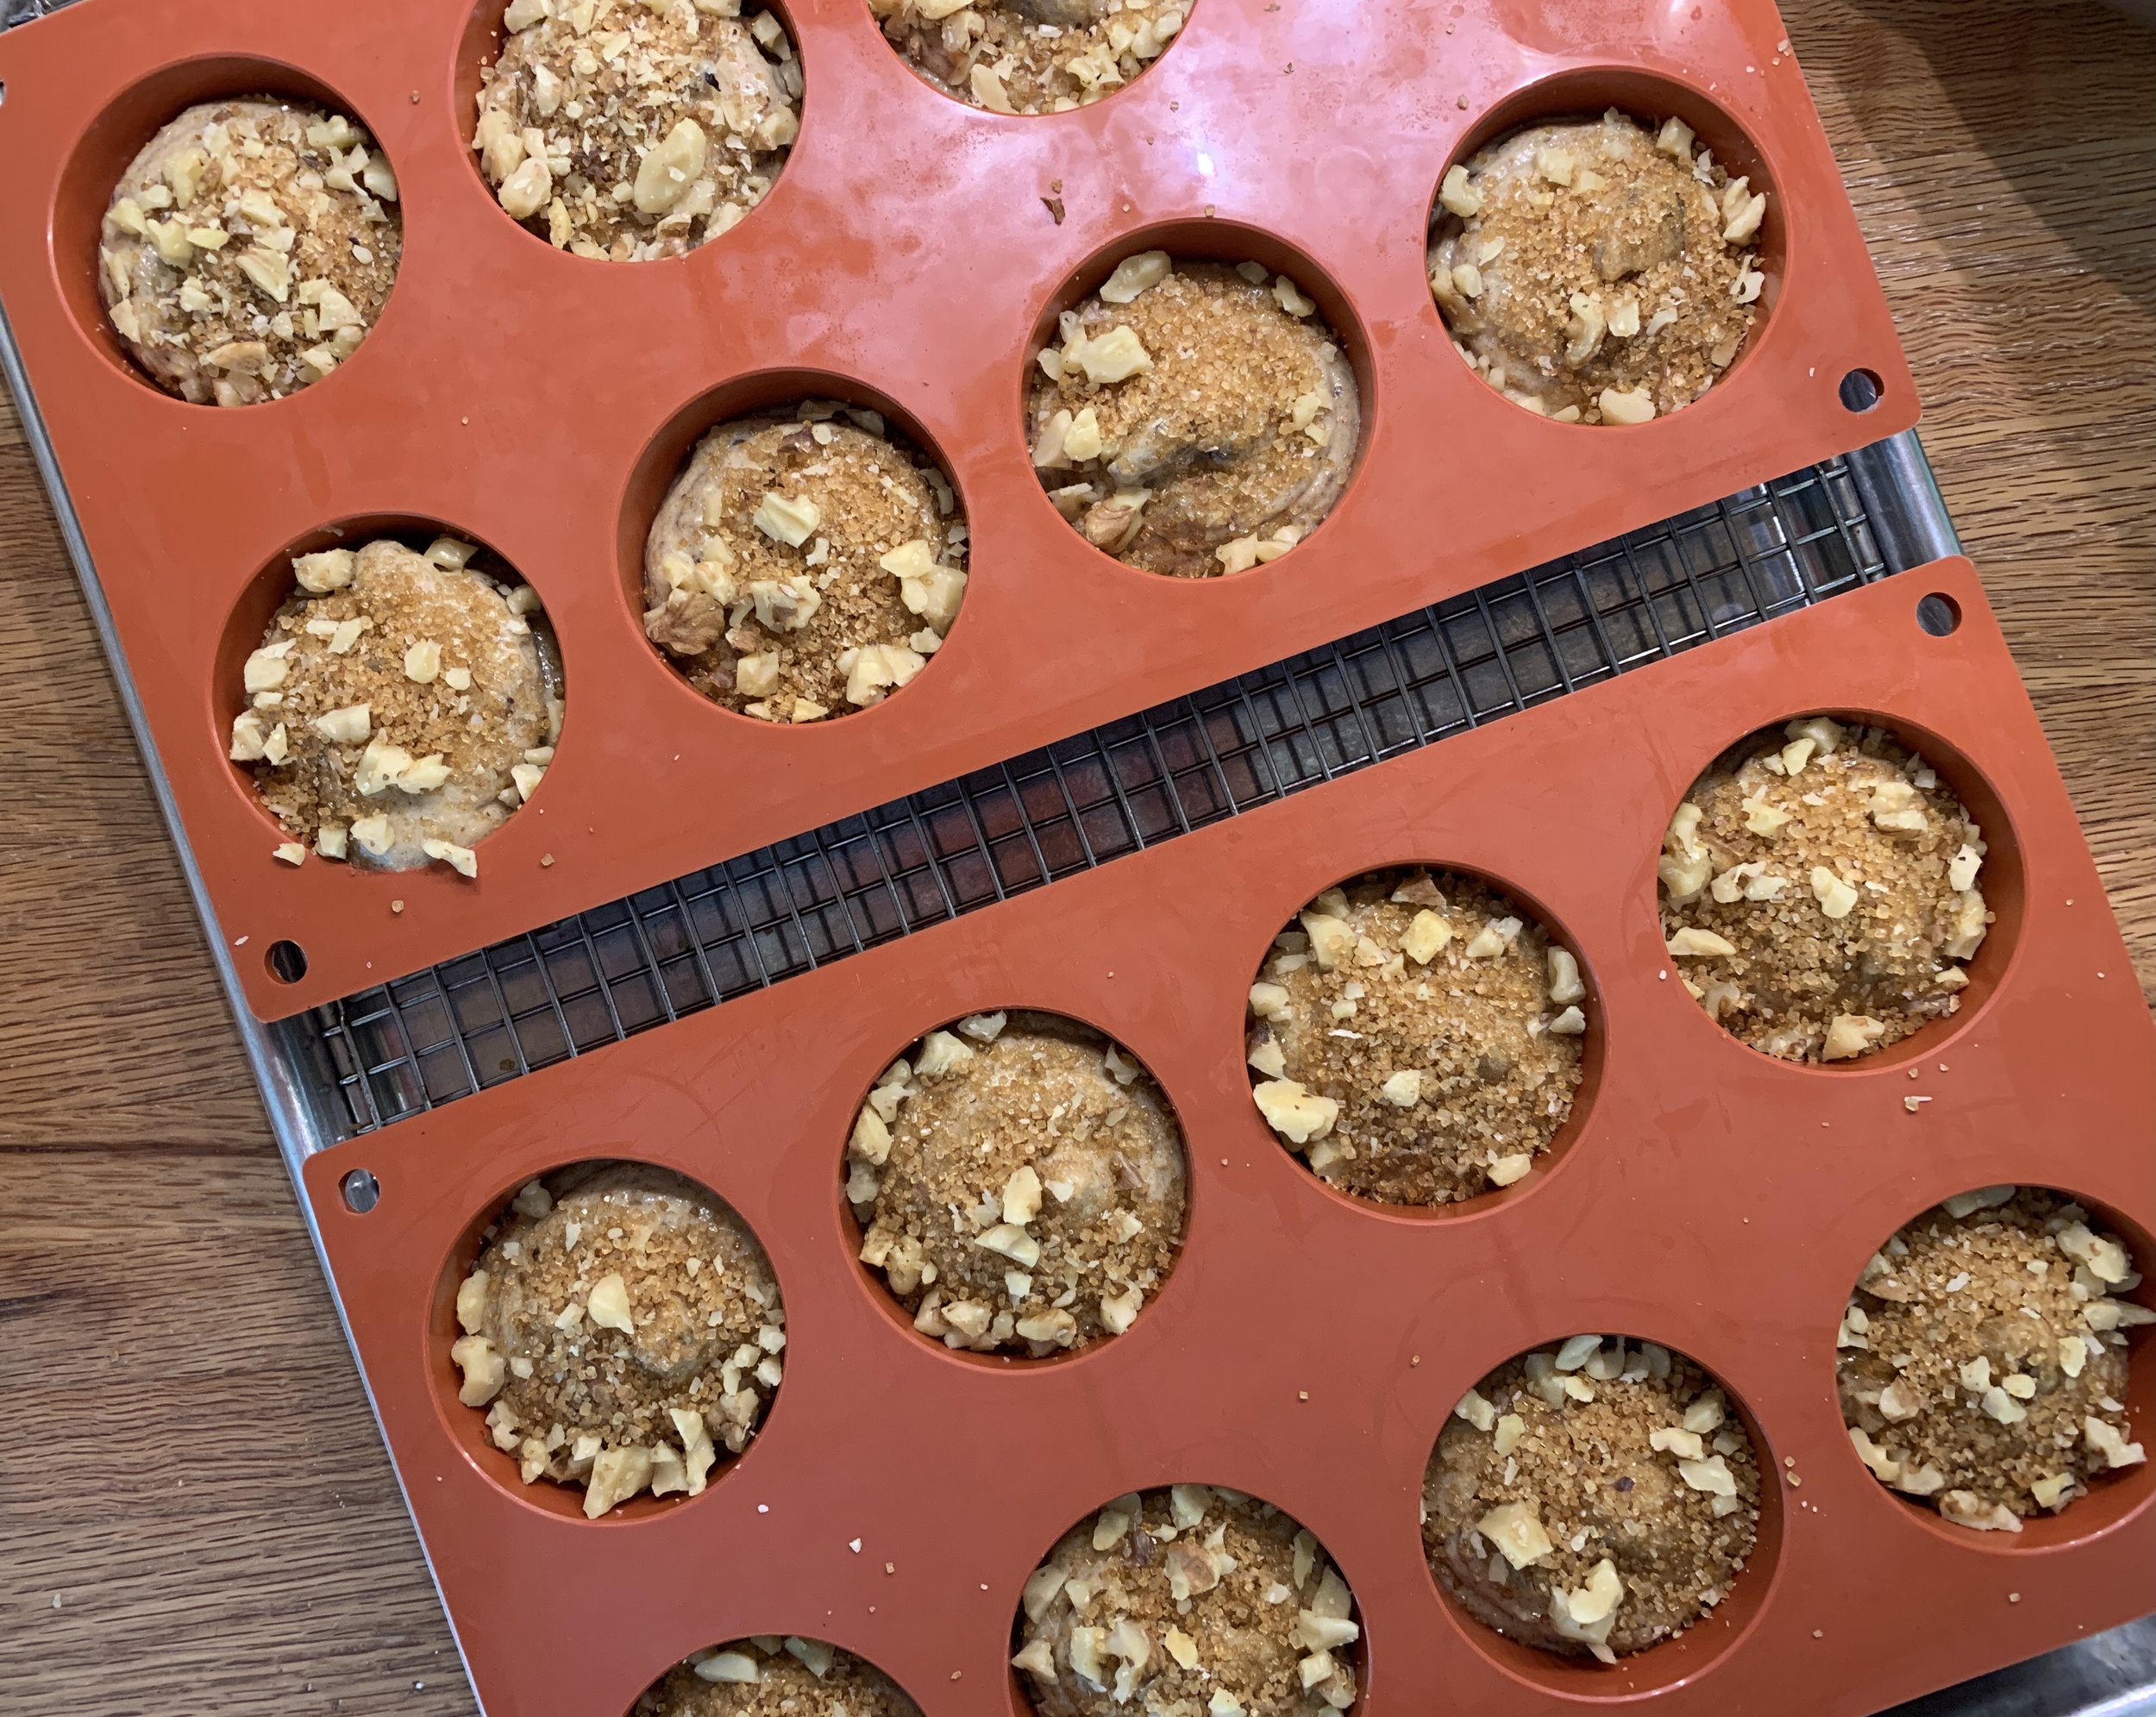
Bake 20 minutes or so - always check about half way through. Your oven may take longer than mine. You want the center to feel set and just the barest hint of a moist crumb on a tester.

Let them rest about 10 minutes then gently turn them out onto a wire cooling rack. If you can’t wait, try one a bit warm when the chocolate will still be gooey, otherwise cool to room temp and enjoy.

These freeze well too. Even better!

Let me add my official Happy New Year to all of you. Time for new projects and, as always, staying active and keeping our collective chins up. OK.

Baking with Dutch process cocoa powder

Ganache dipped, Swiss meringue swirled cocoa cakes

Ganache dipped, Swiss meringue swirled cocoa cakes

Dutch process cocoa powder is one of my standby ingredients, always on hand and at the ready. I’ve been using it for years, not only for my standard brownies that are perennially available for the Steve-meister for his regular evening treat, but for MOST recipes calling for unsweetened cocoa powder. Such wonderful flavor.

NOTE: I say “most” because there are some guidelines for using natural vs Dutch processed that have to do with acid/alkali and using chemical leaveners (baking soda, baking powder). Here’s a great summary for you from Serious Eats (a great resource by the way!).

Dutch process you ask? It’s all thanks to Dutch chemist and chocolatier Conrad van Houten (1801-1887) who figured out how to alkalize the acids in cocoa powder to create a more mellow taste experience. I’ve been using Bensdorf high fat Dutch process cocoa powder for some years now (I am of Dutch heritage after all!) and find the end results so tasty. It’s available through a variety of sources which you can easily find online.

Many say that the decision to use natural cocoa powder vs Dutch process is purely personal and indeed a matter of taste. While the natural version may offer a more enhanced and complex chocolate flavor, the “dutched” version is smoother and, in my estimation, more delicious.

French Tarte “O”s

French Tarte “O”s

As I review the things I generally bake with cocoa powder (brownies, financier, shortbread, meringues, fudge cookies, flourless sponge and more), I realize that, at least in my current armamentarium, the only one that contains a chemical leavener is Bouchon’s version of that popular chocolate sandwich cookie lining grocery store shelves. I did a bit of research to try and figure out why one would add baking soda to a shortbread cookie since they don’t typically rise like, let’s say, a classic chocolate chip cookie. From the scientific standpoint, the alkaline baking soda seems to contribute to a more even bake, tenderness and even enhances color and flavor.

OK - enough science. Let’s look at some more ways to use Dutch process cocoa powder. along with a couple of straight forward recipes for you.

Cocoa cakes

Cocoa cakes

This tasty babies are from Yotam Ottolenghi and Helen Goh’s book “Sweet”. Not unlike financier, the batter is made with similar ingredients but doesn’t involve browning the butter which one would normally do for financier. They are a dream to put together and bake so nicely in individual silicone molds from very mini to larger “muffin” sizes, depending on your mood.

This Silikomart mold (SF022) is one of my favorite ones for simple small cakes - just the right size to enjoy a few bites without feeling you’ve overdone it. Remember - everything in moderations folks!

The wells each hold about 48 g/1.7 ounces (if full) - I get about 15 cakes out of the recipe below. You can easily double the recipe for more!

3FD69FD3-253A-4E5B-99BD-9274B99024E7.jpg

Heat the oven to 375ºF. If not using silicone molds, buttered mini or regular muffin tins work well. Yield will vary depending on the mold/pan you use.

Melt 140 g/5 ounces unsalted butter (I use a pyrex glass cup on medium power in the micro) and have it at the ready.

In a separate bowl, sift together 40 g all purpose flour, 40 g almond flour and 50 g Dutch process cocoa powder.

Place 120 g (4 large) egg whites in the bowl of a stand mixer fitted with the whisk attachment along with 160 g granulated cane sugar and beat on medium-high for a couple of minutes until thickened and glossy.

Continue on the same speed and drizzle the melted butter down the side of the bowl, beating until combined. Scrape down the sides.

On low speed blend in the dry ingredients. I usually take the bowl off the mixer and finish the blending by hand - you want to make sure none of the dry stuff is sitting on the bottom.

Fill molds about 3/4 full (you can scoop but I prefer piping for more equal portions and less muss) and bake about 15 minutes or until center looks set and springs back when touched. Baking time varies depending on mold size.

Let cool in molds about 10 minutes then turn out onto wire rack to finish cooling.

Once cooled I dipped the tops in ganache (seen above), popped them in the fridge to set the ganache, then gave them a nice swirl of dark chocolate Swiss meringue buttercream. Yum. Steve loves these!

2FB91D89-DB9C-4230-881F-948D02AD6A07.jpg

Next up - flourless walnut fudge cookies, a François Payard recipe from FOOD52’s “Genius Desserts”. This is an eye opener folks. Plus you can change up the nut choice as you wish - pistachio, pecan, macadamia and more. Nuts and chocolate are a marriage made in heaven if you ask me.

FBD11C1C-0A02-47B6-BF33-0DD79A7E4C0D.jpeg

Heat your oven to 350ºF. Line two 1/2 sheet pans with parchment or silicone mats. Place 4 large egg whites in a bowl and allow to come to room temperature (place the bowl in a slightly larger bowl of warm water to speed it up).

Toast 275 g / ~2.75 cups walnuts or nuts of choice on a parchment lined sheet pan for about 10 minutes. You’ll smell the aroma and you’ll know. Let them cool, then chop ‘em up.

Mix together 350 g confectioners sugar, 70 g Dutch process cocoa powder, 1/4 teaspoon salt and the chopped nuts in the bowl of a stand mixer with the paddle. Give a quick low speed mix to combine then add the egg whites and a tablespoon vanilla extract with the mixer running. Mix on medium about 3 minutes to thicken.

I prefer smaller cookies so I used my tablespoon scoop to portion the dough out. Place pans into the oven then reduce the temp to 325ºF and bake about 15 minutes until tops lightly crack. Rotate your pans half way through the bake.

Slide cookies with the parchment onto cooling racks. Remove from parchment once cooled (tip - if sticking, lift parchment up and gently peel it off cookies from the bottom OR brush a little water on the undersurface of the parchment and the moisture makes for easier release.)

B01478A5-C16E-4379-A9E3-C88F73F88F86.jpg

Mmmmmm - what a delightful chew, wonderful nutty flavor and all around tasty experience. Thanks to François Payard and FOOD52!

To wrap it up, I want to share one more way I’ve used Dutch process cocoa in recent weeks. I often speak of twice baked croissant aux amandes, one of Steve’s and my favorite treats (and a lot of other people too, let me tell you).

I made a chocolate hazelnut version by replacing the almond flour in my basic crème d’amandes with hazelnut flour, left the all purpose flour out and added a hefty tablespoon of Dutch process you-know-what.

It goes like this: take croissants a day or two old; slice them as though you’re going to make a sandwich; dip the whole thing in vanilla simple syrup to moisten and give it a squeeze (don’t worry, it’s great fun!) to get rid of excess.

Now open the croissant, pipe a line of hazelnut-cocoa cream, throw a few chunks of chopped chocolate (something in the 60-ish % ballpark) on the cream, then close the sandwich and pipe another line of cream on top. You can add a sprinkling of chopped hazelnuts too.

I usually assemble my twice baked croissants and hold them in the freezer until baking. Heat the oven to 325ºF (I use convection) and put them in right outta the freezer. Bake about 20-25 minutes - you want the cream nicely golden and set. Cool and enjoy. A nice dusting of confectioners sugar gives them that certain je ne sais quoi.

A0397812-0A1D-4DE1-BAB4-CF31411DD0DA.jpg

Our taste test was so enjoyable! The inside had just the right amount of chocolate to accompany the hazelnut cream. Of course we tried one while still slightly warm which only enhanced the experience. Yum. Yum. Yum. And just as good the next day. Yes!

294398A8-0ADC-4030-8F16-A50BF53D9750.jpeg

Have fun creating your own chocolate goodies. Until next time - stay safe, stay healthy and get vaccinated when you can!

Ahhhhh croissants - old favorites and a chocolate trial

I held a croissant class recently, and, in preparation for that event, I baked a couple of croissants and pains au chocolat for class tasting purposes.

Just imagine that flaky, crisp exterior and lovely airy, not-quite-bready interior.  So good.


And for a special treat I had to do croissant aux amandes, bien sûr.  A big hit with the group.


In addition to the classics, I'm periodically on a path of discovering different things to do with croissant dough.  On one of my morning walks I started thinking chocolate, and, since I had recently finished a batch of chocolate pâte feuilletée, it seemed only natural to try croissant dough with a chocolate twist.

I made a half batch of my usual recipe, adding in some Dutch process cocoa powder (10% by weight of my flour amount) with the dry ingredients.  I increased the milk just a bit, since I find that cocoa powder tends to have a drying effect on dough.

the détrempe

In addition I worked some hazelnut flour into my butter block hoping to give it a nutty flair.  Yup!  Definitely wingin' it!!


hazelnut butter block


Ready for the beurrage . . . .


Finished dough after the three turns . . . .


Not long ago I added a new flexi-mold to my Silikomart collection and was itching to use it.  I had visions of dough spirals dancing in my head.  Even though these silicone molds are non-stick, I brushed them with soft butter so I could coat them with vanilla sugar before placing the spirals in to rise.


I rolled the finished dough out to allow for shaping a couple of typical croissants . . . .


plus a block of dough topped with vanilla sugar and mini chocolate chips . . . .


that I cut into 3/4" strips, rolled up into spirals and popped into my buttered/sugared molds.


I gave them a 1.5 hour rise . . .


after the rise

after the rise

and then on to the bake!  One thing's for sure - the chocolate makes it much more difficult to assess whether they've baked long enough, but I could appreciate some browning and the croissants had the "feel" of being fully baked (once you've felt it, you just know).


rather interesting, eh?


 I wanted to give the spirals a bit longer in the oven to make sure the interior layers were done.  I took them out of the molds, drizzled them with caramel, baked 'em another 5-10 minutes and called it a day.


Taste test time!!

Cutting into the croissant resulted in the hoped for shower of crispy exterior shards.  The inner laminations looked OK and the texture was good, but the taste wasn't much different from a regular butter croissant (although Steve thought it on the dry side).  And this is the key for me - minimal (if any!) chocolate flavor and no hint of hazelnut.  So much for that.


The spirals, however, offered a pleasant, crispy caramelized texture and flavor, and the mini chips added just the right touch of chocolate.


.


In the end, this attempt at chocolate croissant dough was not worth the effort.

Perhaps an increase in the amount of cocoa powder, or adding the chocolate to the butter block rather than the détrempe might make a difference, but at this point I'll stick with the classic dough from here on out.

Chocolate bread pudding here I come!