One great bread a few different ways

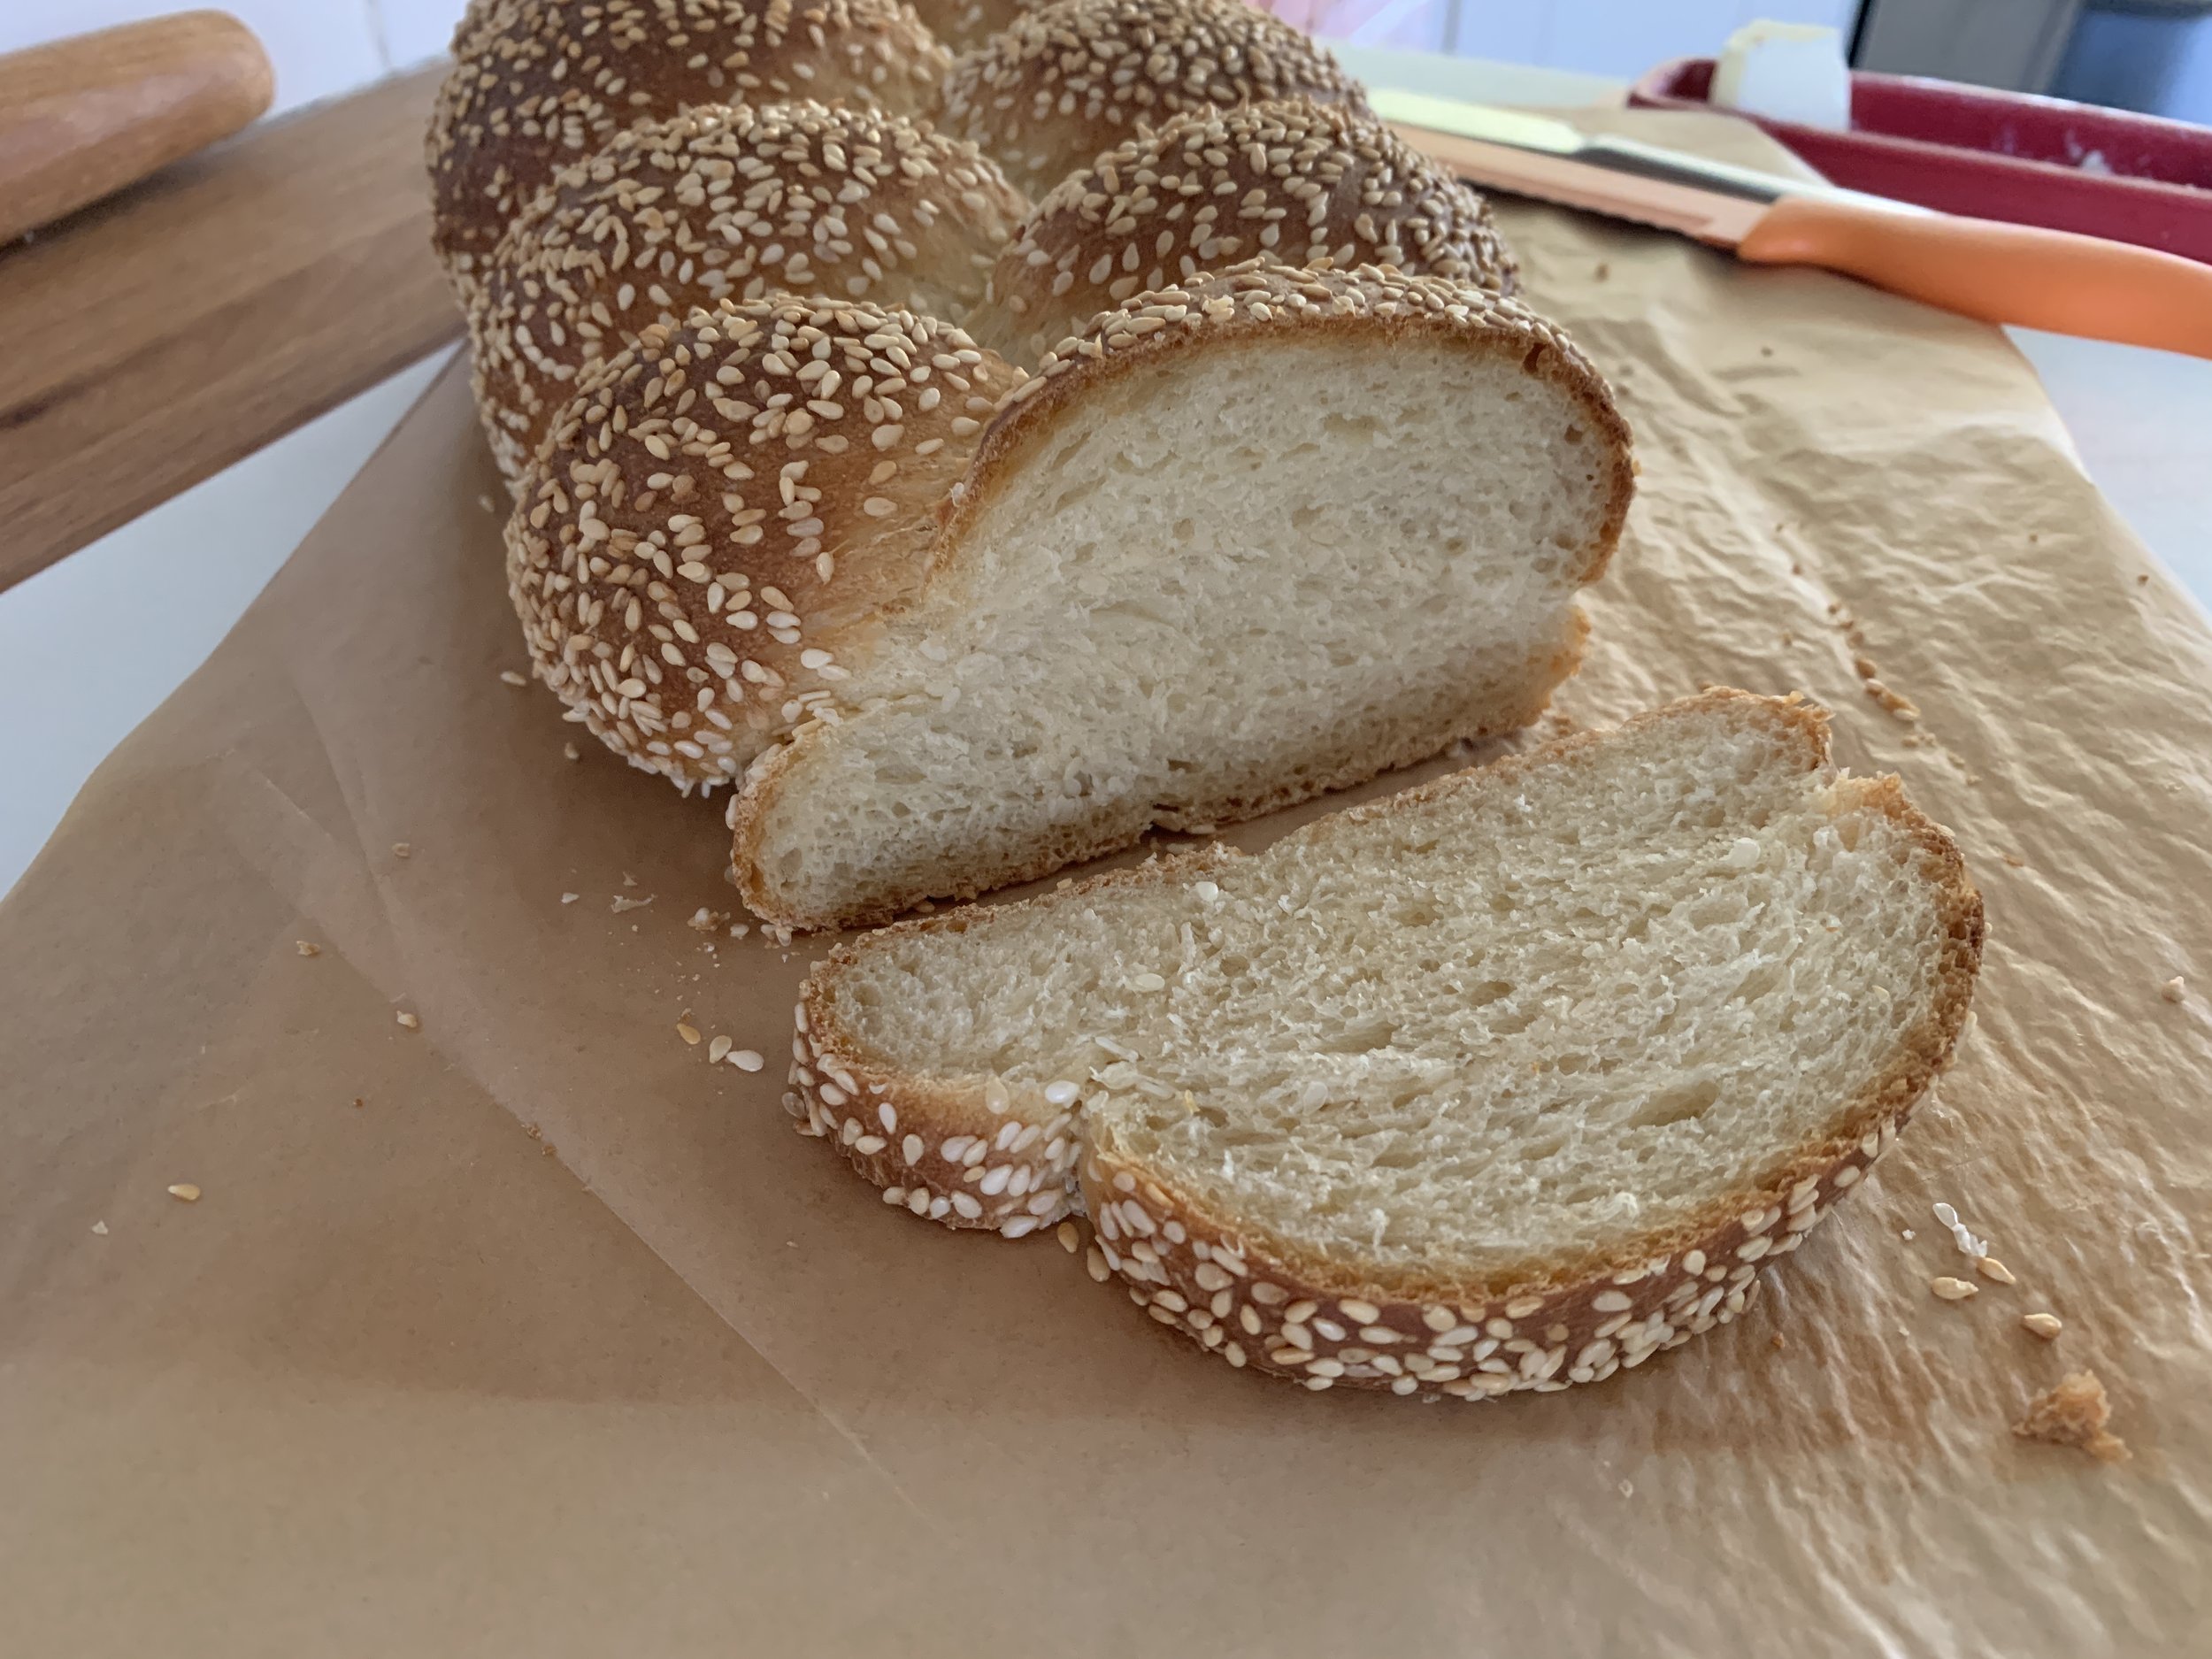
Sesame braid

Hi all. I gave you a sneak peek at this one awhile ago. My how time flies - seems like eons! I packed a lot into this post so get ready.

I LOVE this dough! It calls for an overnight preferment, a process that not only lends itself to planning ahead but also to a stellar end result.

This is my adaptation of scali bread from King Arthur Baking Company. I first came across it in the spring 2017 issue of SIFT magazine (now defunct -awwww!) and made it for the first time back in April of 2022. It’s said to be a staple in Boston’s North End, and, as is the case with the internet, I found a bunch of references/posts about it on line. Meatball sandwiches anyone?


Classically made as a three strand braid coated in sesame seeds, I started with KA’s base recipe for one braid but then doubled it and created my own recipe, subbing in some rye and white whole wheat flour. I’ve tried several different approaches - braid it, twist it, torpedo it, loaf it, herb it, cheese it, seed it - they’re all good!

Let’s take a look at the steps. Make the preferment the evening before. Please note - the dough/proofing images are for my recipe which would make TWO braids. I’m showing the shaping steps for ONE braid.

Give it 13-15 hours at room temperature after which it should be actively fermenting. It’s more stiff than let’s say a typical poolish which is equal weights flour and water.

Mix the preferment with the other dough ingredients and knead to a nice smooth end result.

Give it a 90 minute rise until nice and pouf-y.

That’s what I call a rise folks!

Proceed with your desired shaping. Here are the steps for one sesame coated braid using HALF of the above dough.

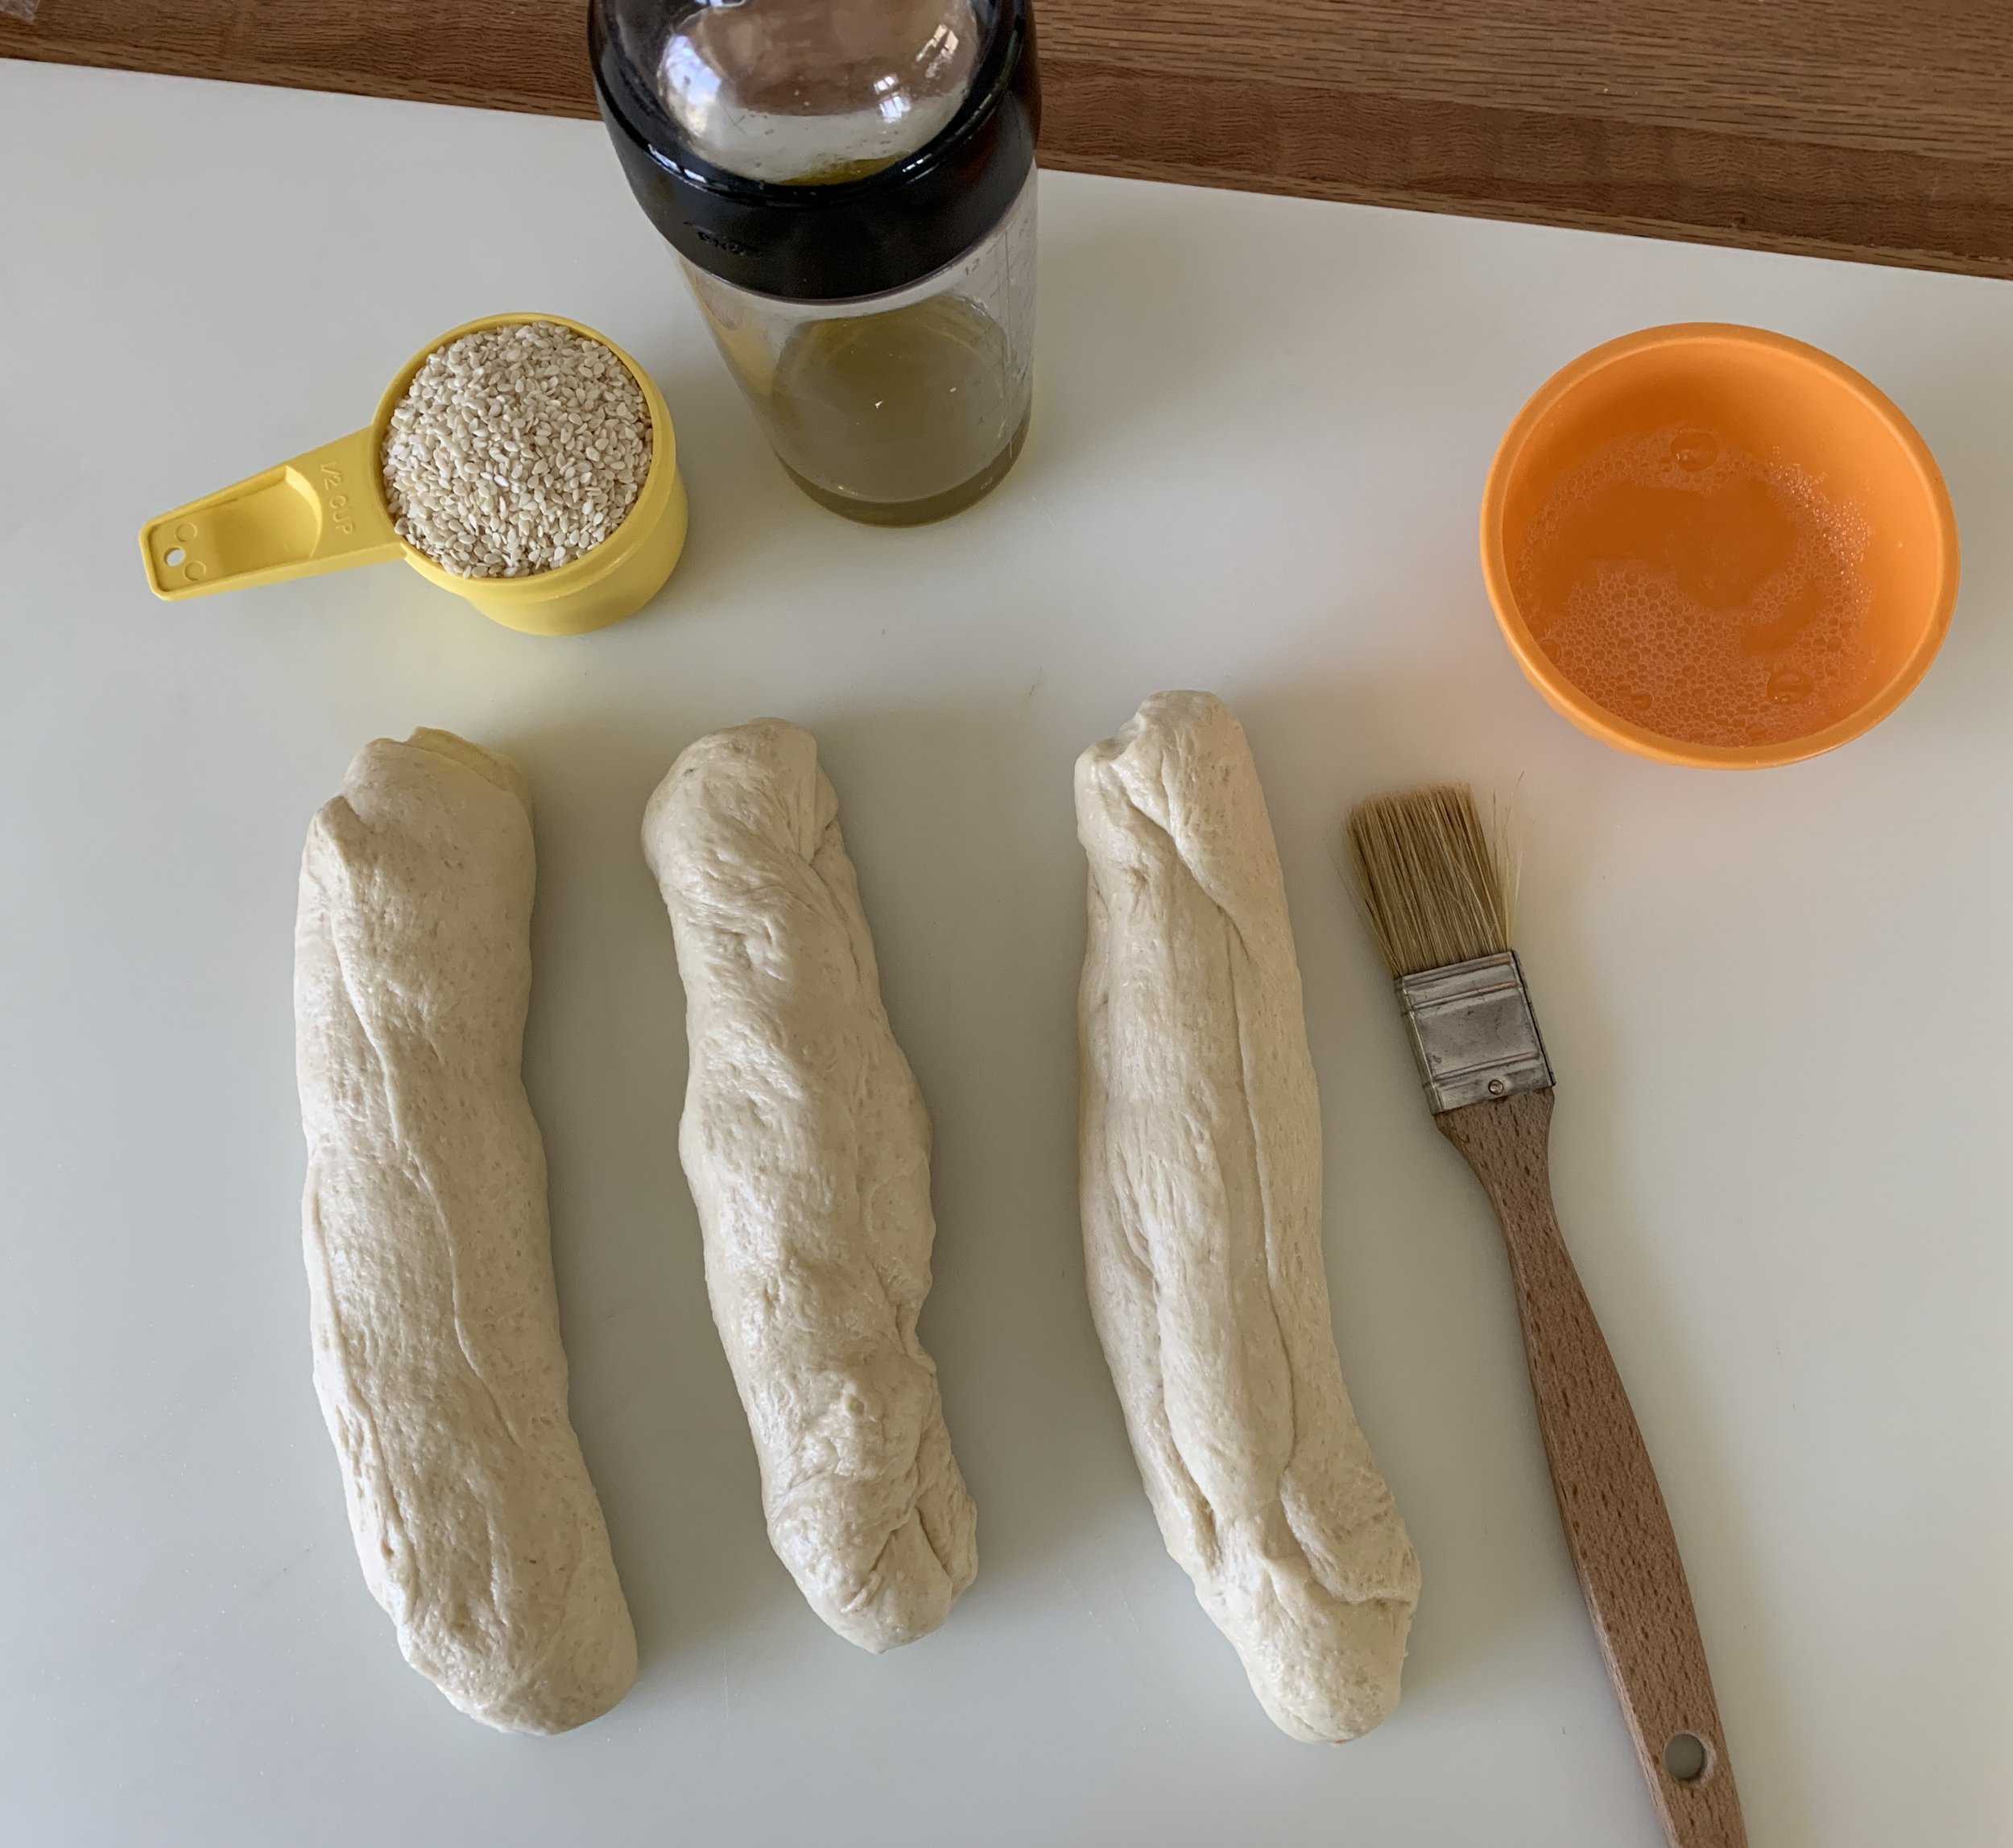
Deflate the dough gently, divide in three equal pieces (each should be about 230 g or so). On a lightly oiled surface roll each piece into a rough log and let rest 10-15 minutes.

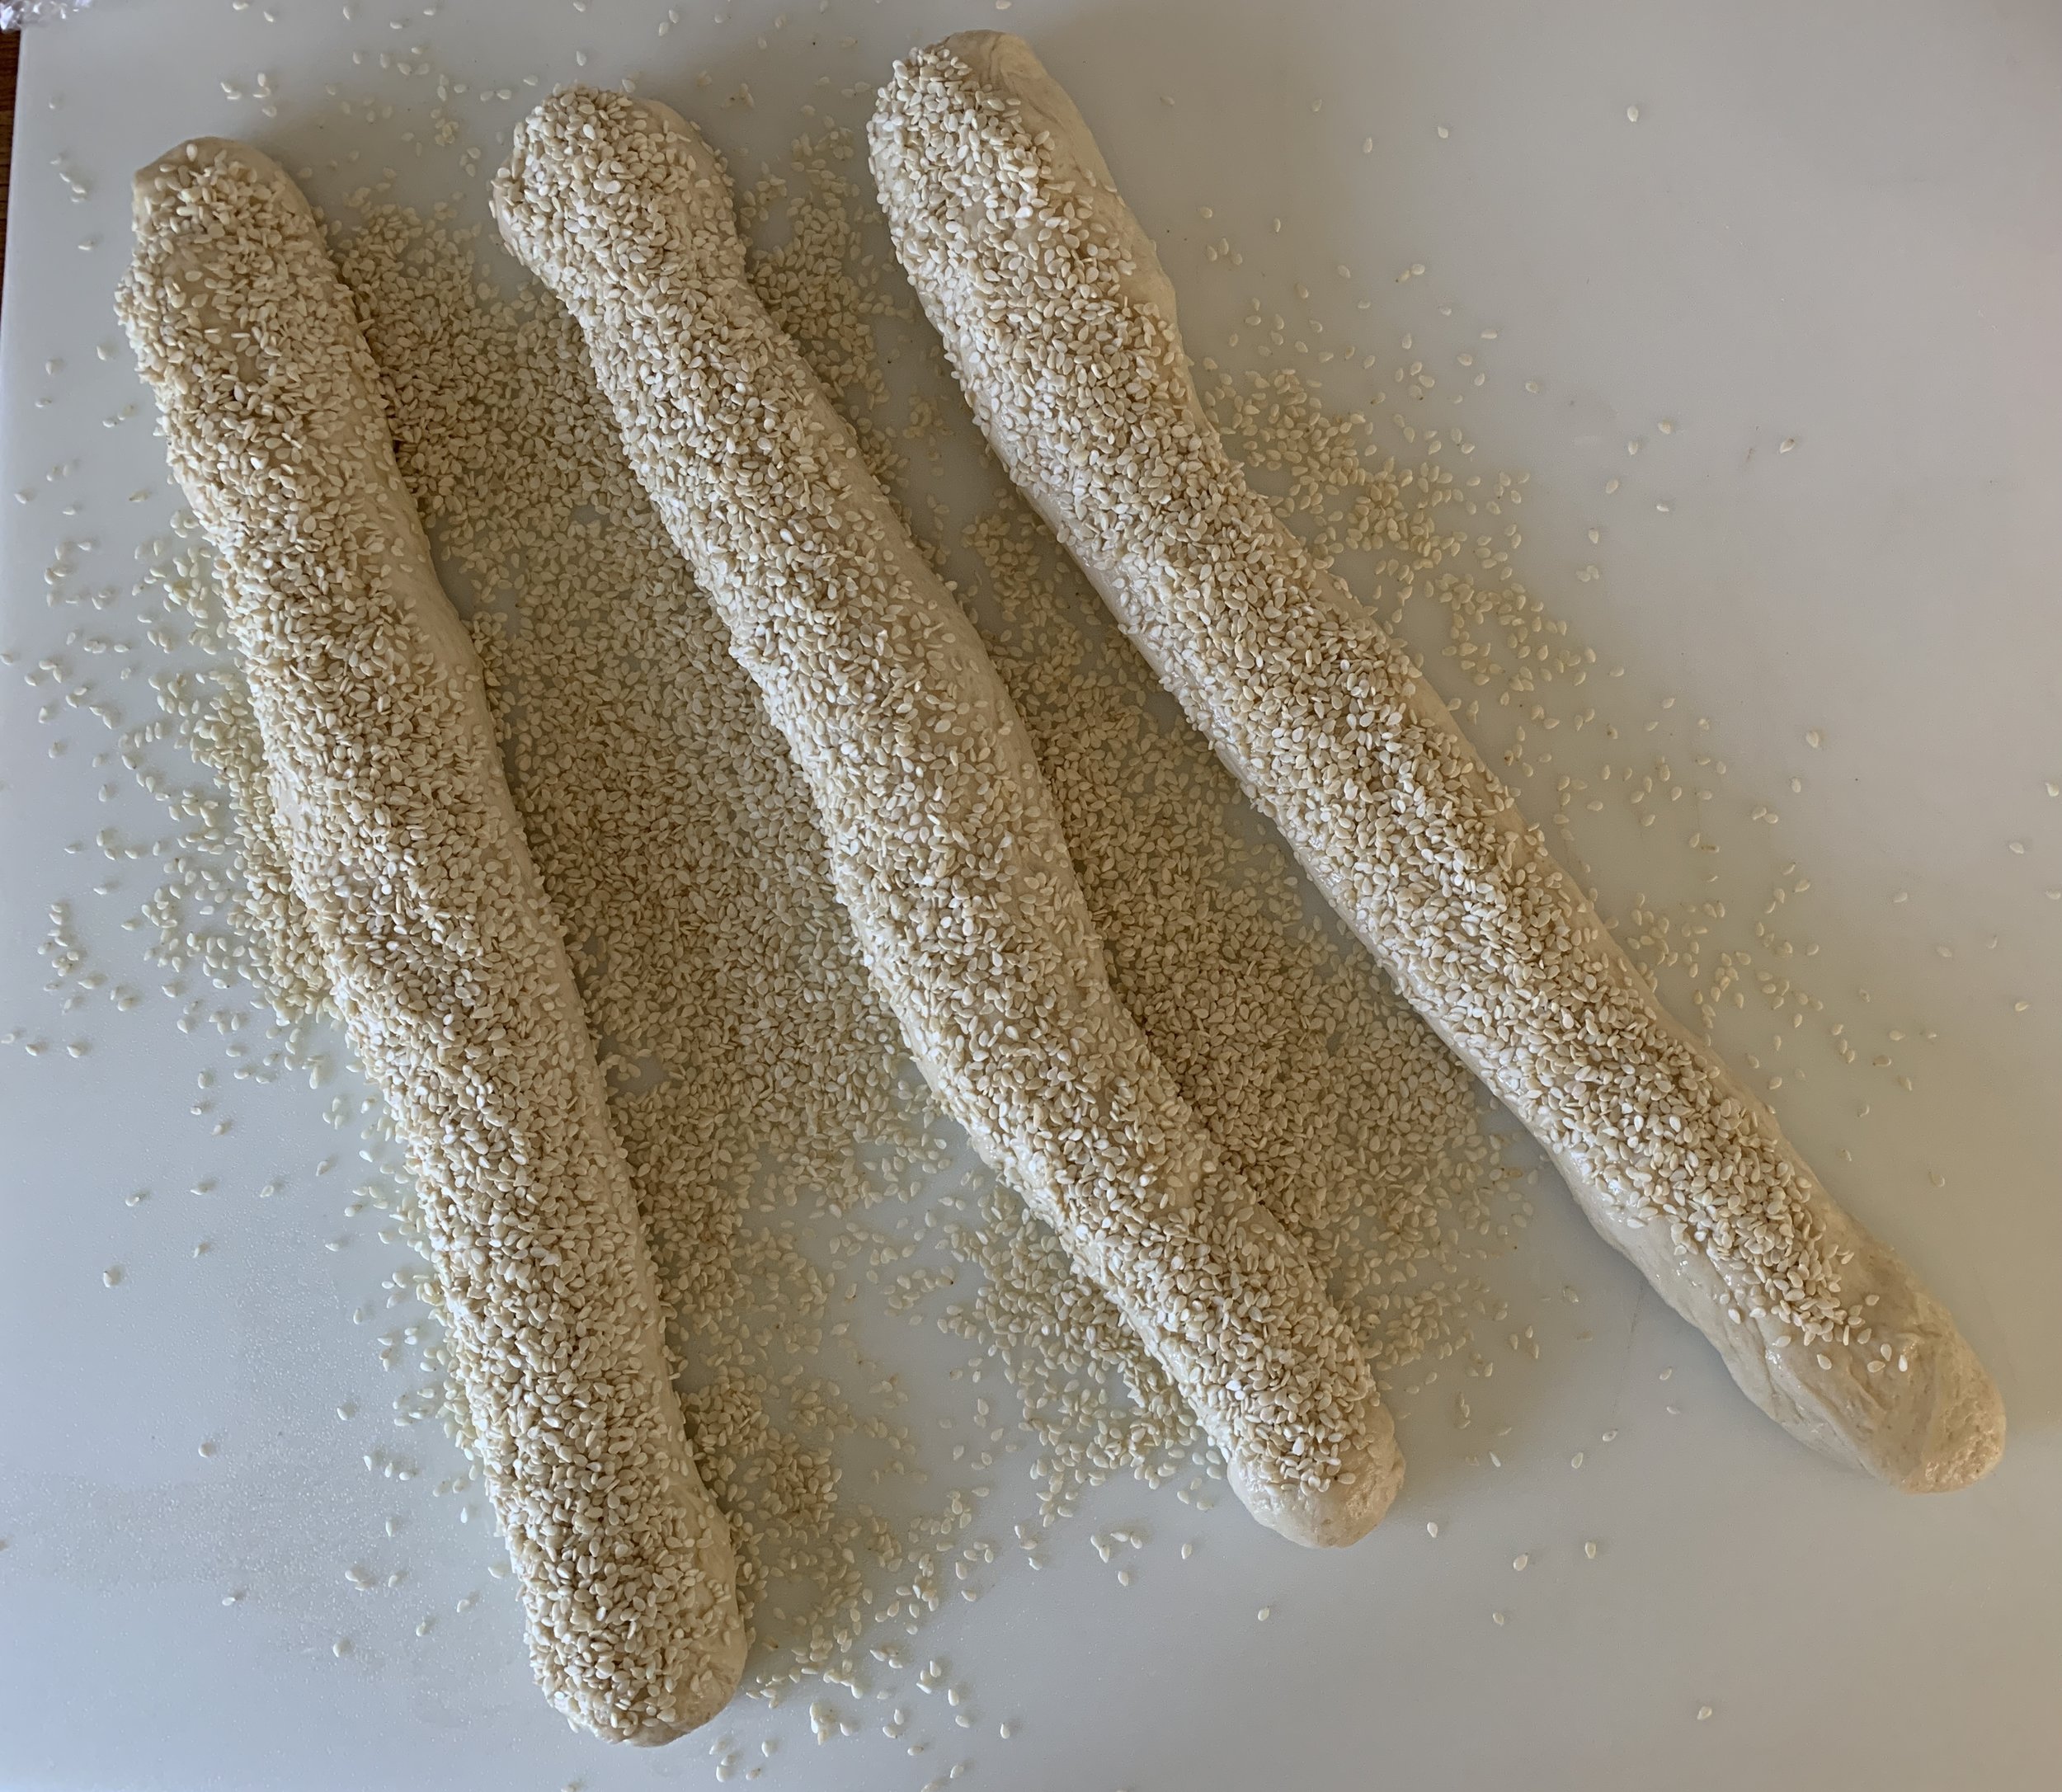
Now roll each log out to a 10-12” length then brush each with egg white and coat thoroughly in sesame seeds.

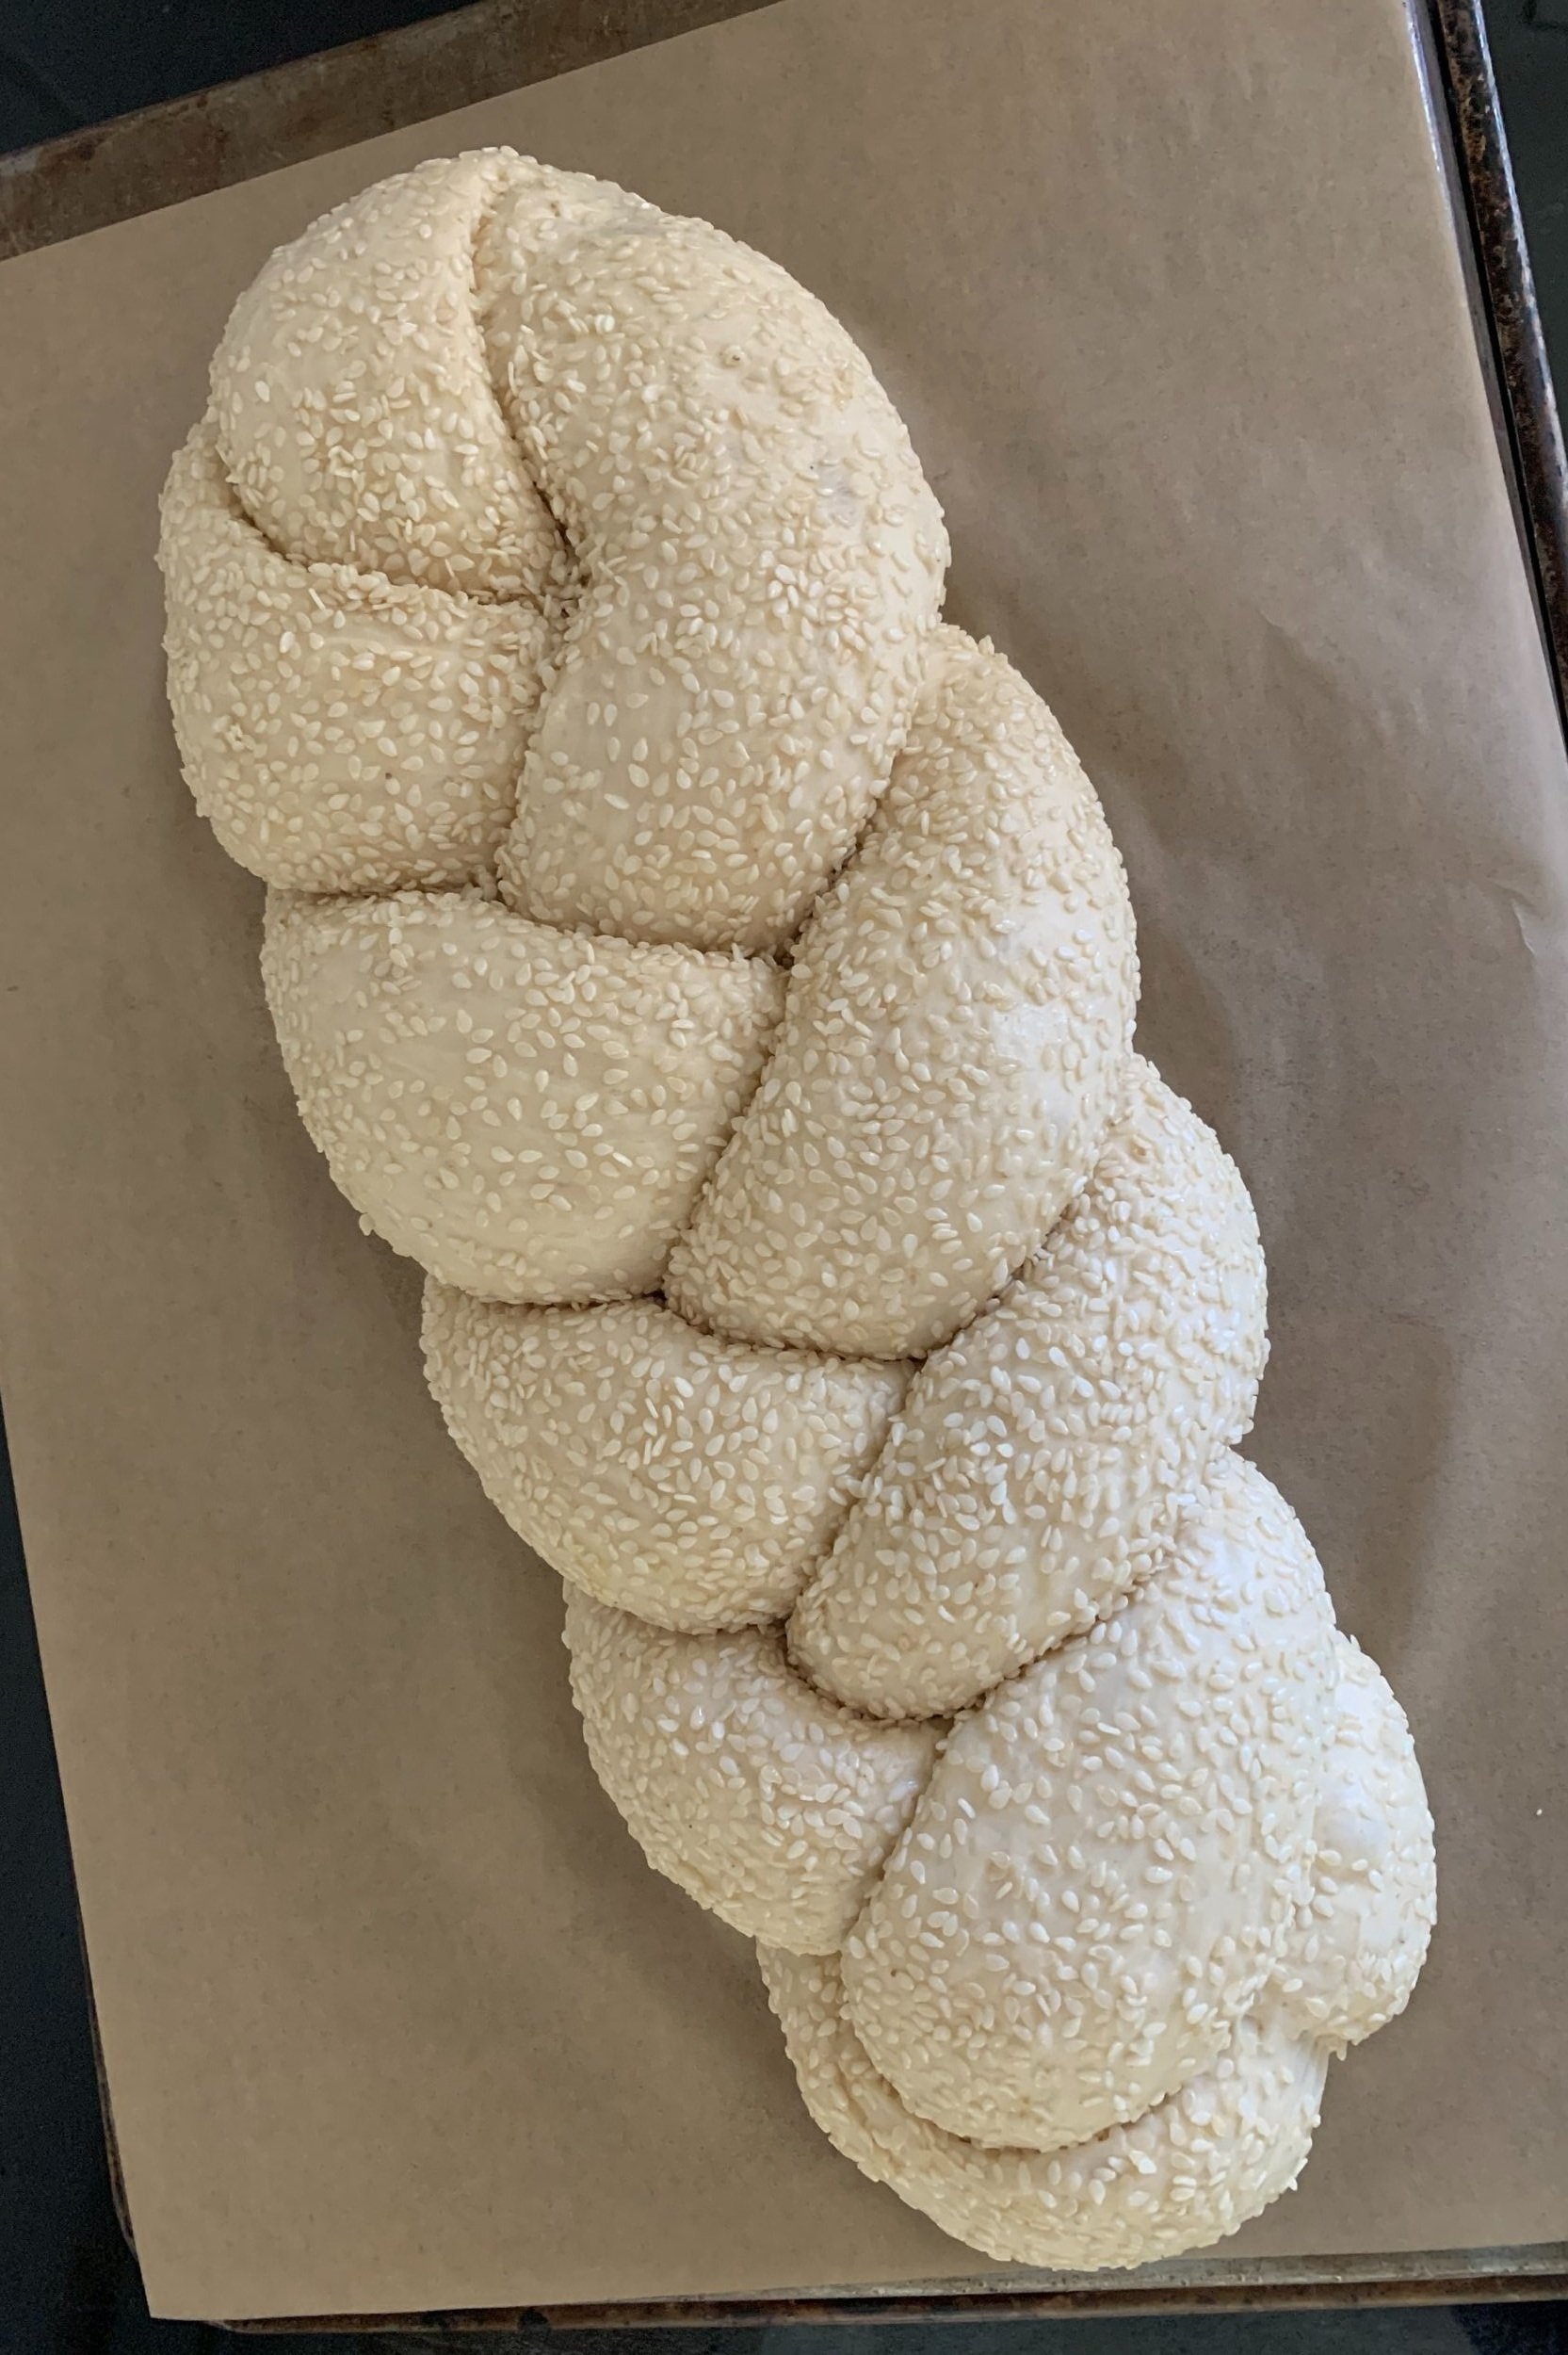
Pinch top ends together and do a typical three strand braid. Tuck the ends under to neaten things up. I placed mine on parchment on an overturned sheet pan in preparation for sliding it onto my heated baking stone.

Cover with lightly oiled film wrap and let rise about 90 minutes until pouf-y.

Toward the end of the rise, heat the oven to 425ºF (400º convection) with your baking stone if using.

Bake 25-35 minutes until golden brown.

Cooled, sliced, buttered - oh so good!

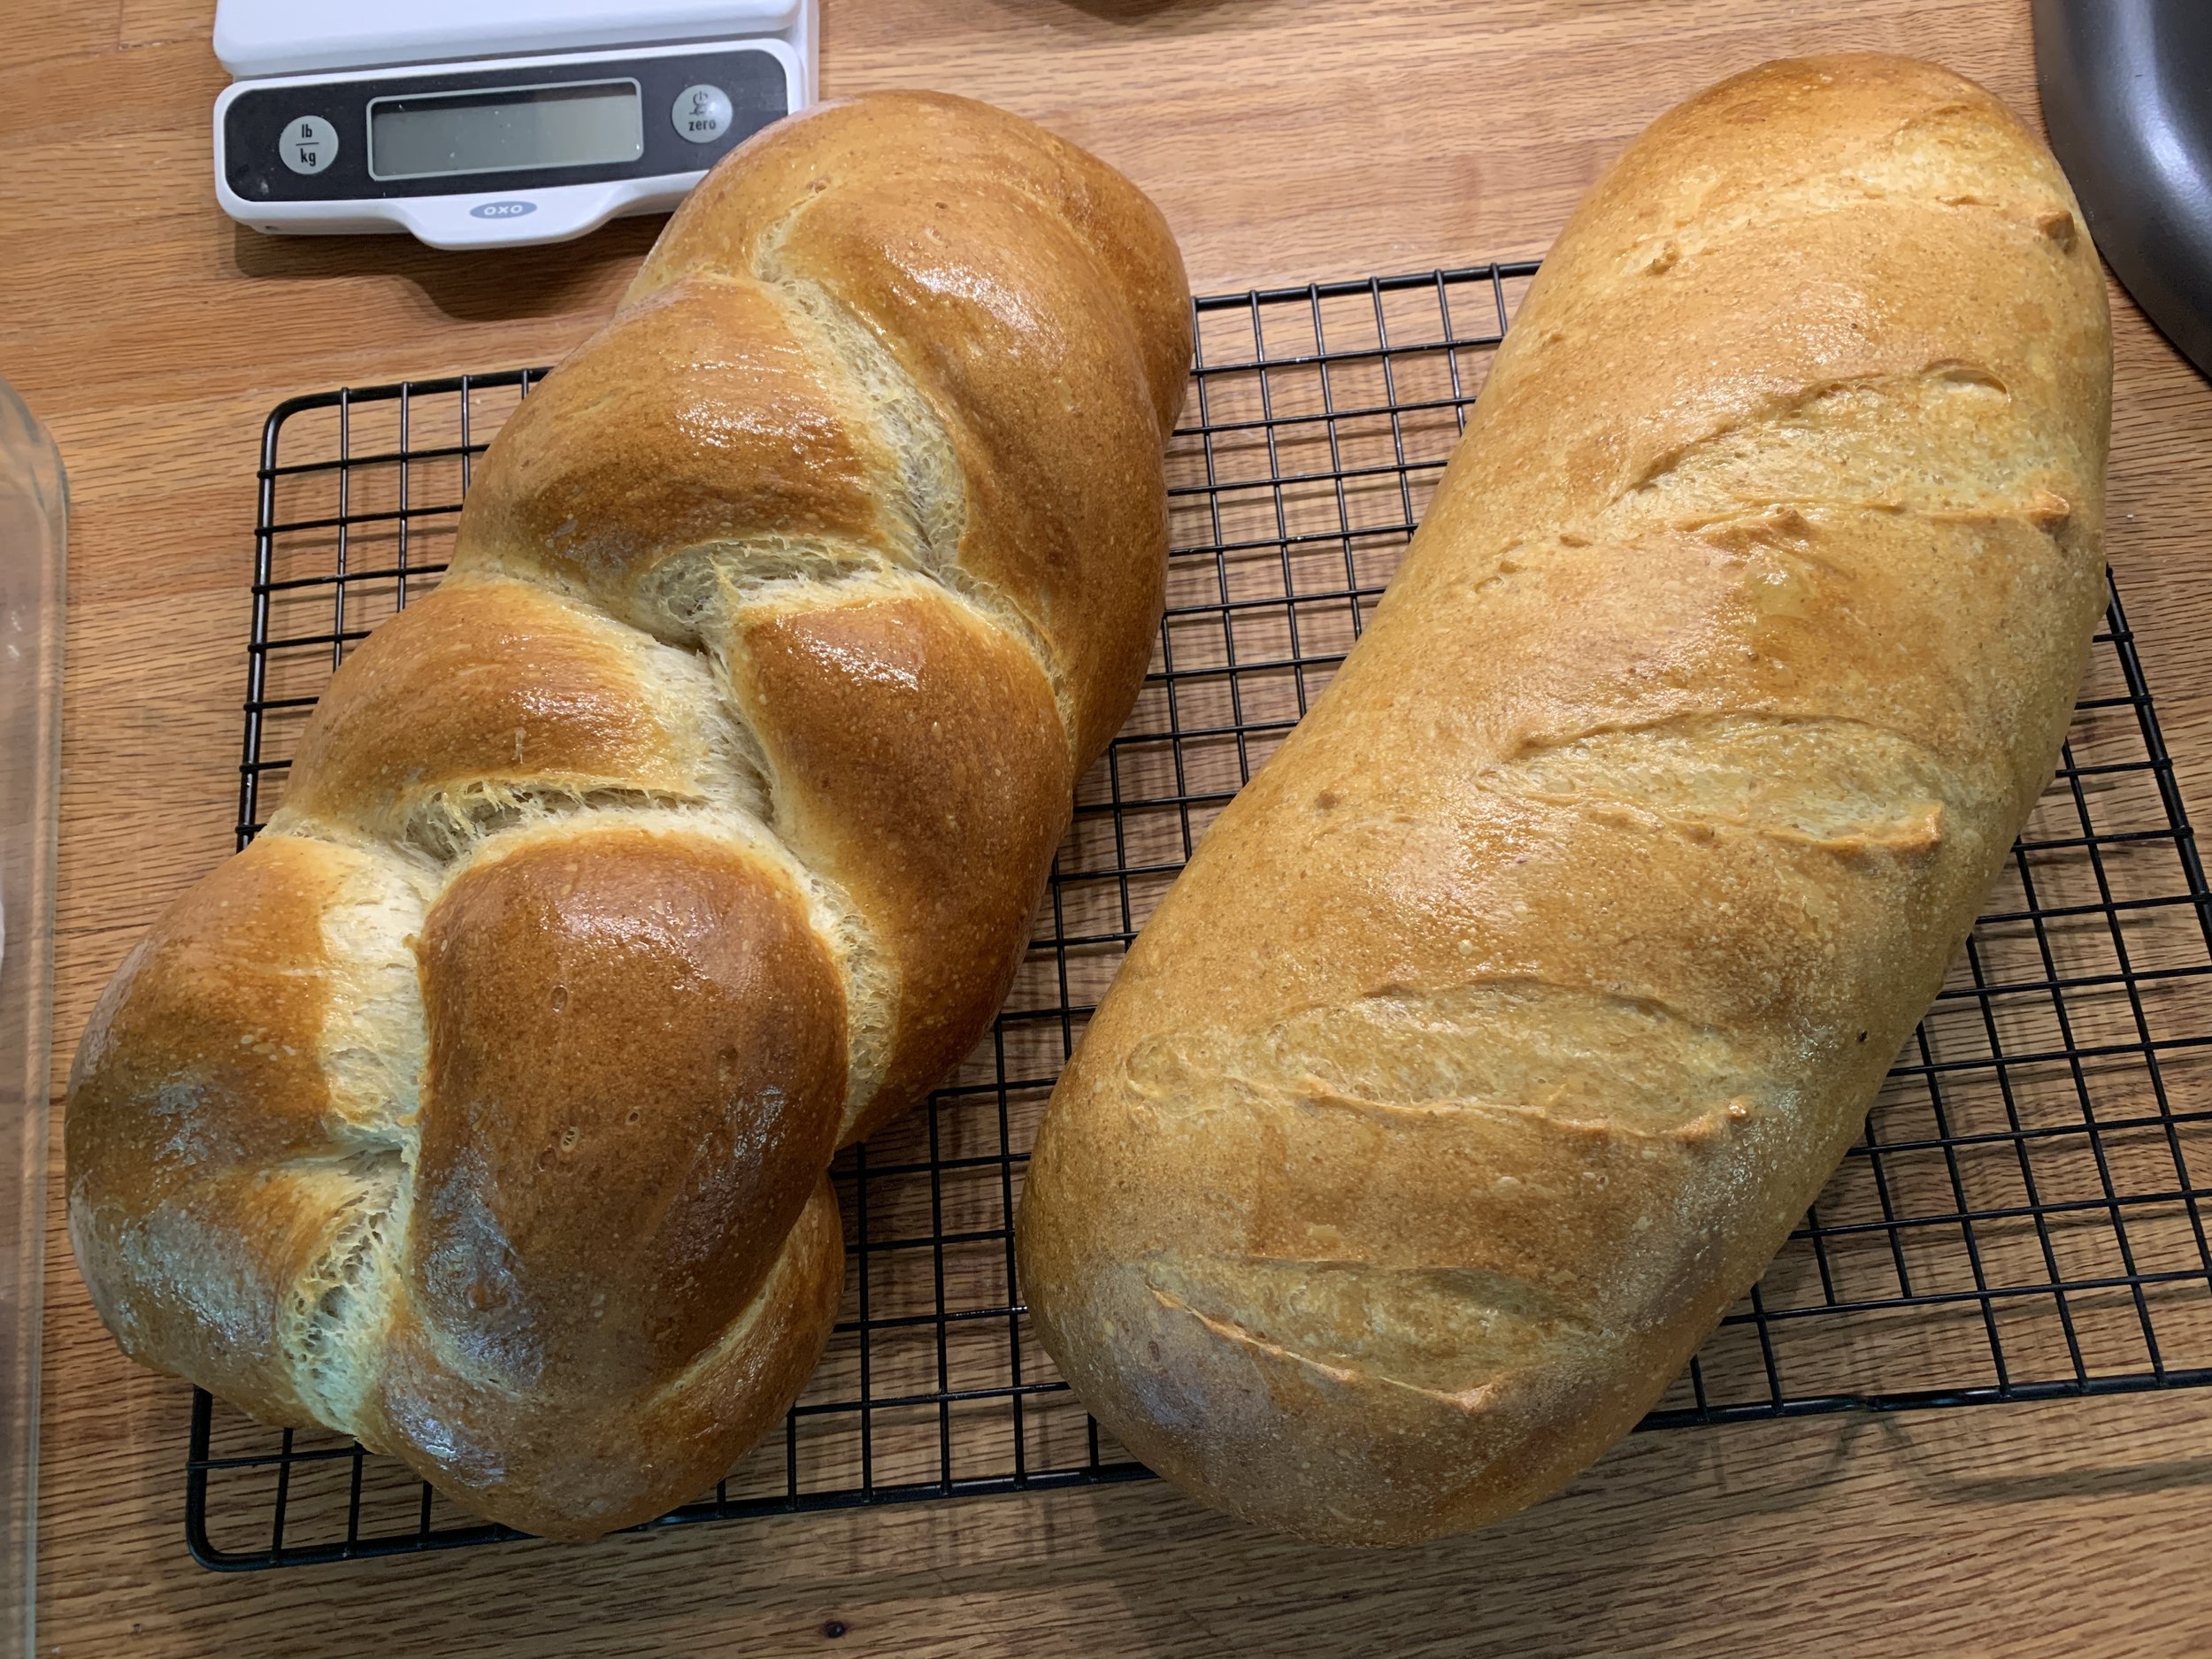
Here are a few other things I made with my full batch recipe. Two basic loaves, one braided and one slashed before baking.

Butter basted braid and a simple loaf

Another full recipe went into making a couple versions of rolls and a cheesy braid.

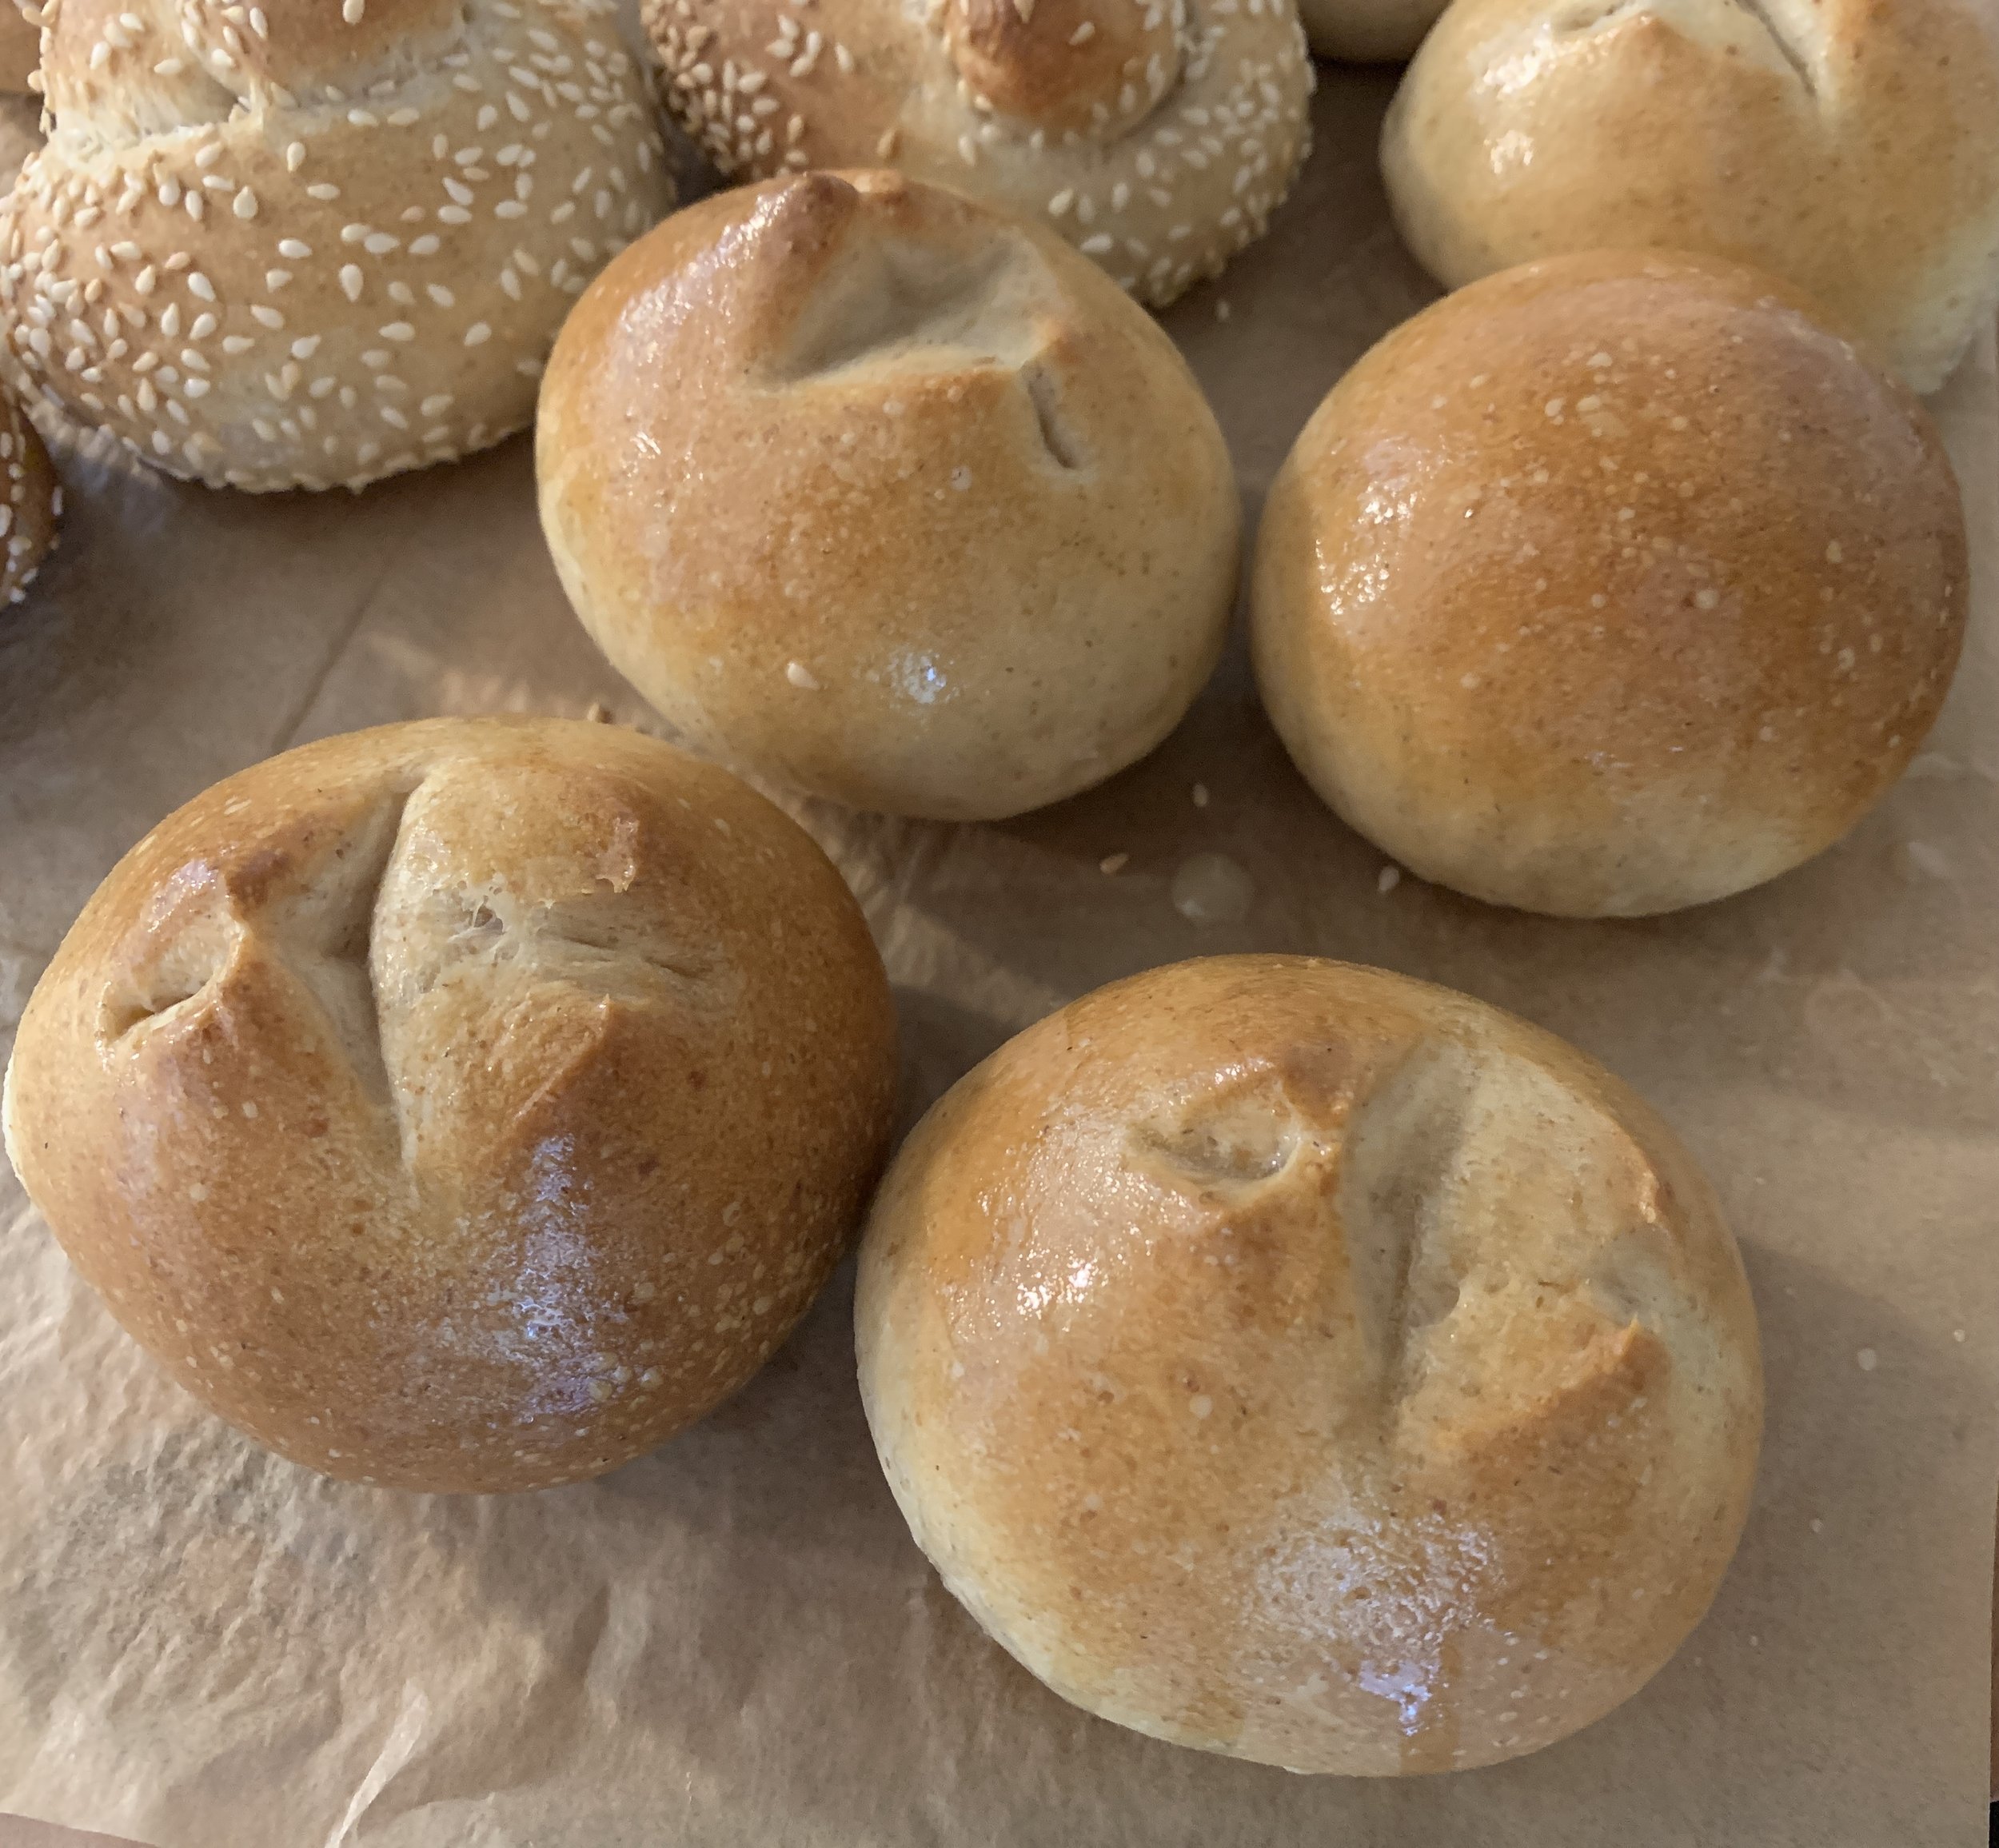
For the rolls I used a tad less than half the recipe to make fifteen 45 g rolls - 8 as sesame knots and 7 as butter basted. The rest became the cheese loaf.

I formed eight “logs” that I rolled in sesame and knotted up and left the other seven as standard round rolls (with a top snip before baking).

shape, shape, shaping!

The rolls enjoyed a nice long rise of ~100 minutes.

REady to bake, Before the snip!

Oops! Forgot one snip!!

Sesame knots and butter basted dinner rolls

This cheesy braid is just like the sesame approach except I coated the ropes in grated cheese the quantity of which I eye-balled. I used sharp Cheddar but gruyère, emmental (or a mix of your faves can all work) and topped with more cheese. I’d use more next time. You could add herbs if you wish. Mmmm good.

Cheesy braid

Had enough yet?? Almost there, I promise.

I wanted to try a filled wreath, using half a recipe (~700 g) for that and dividing the rest into two for a couple of simple boules.

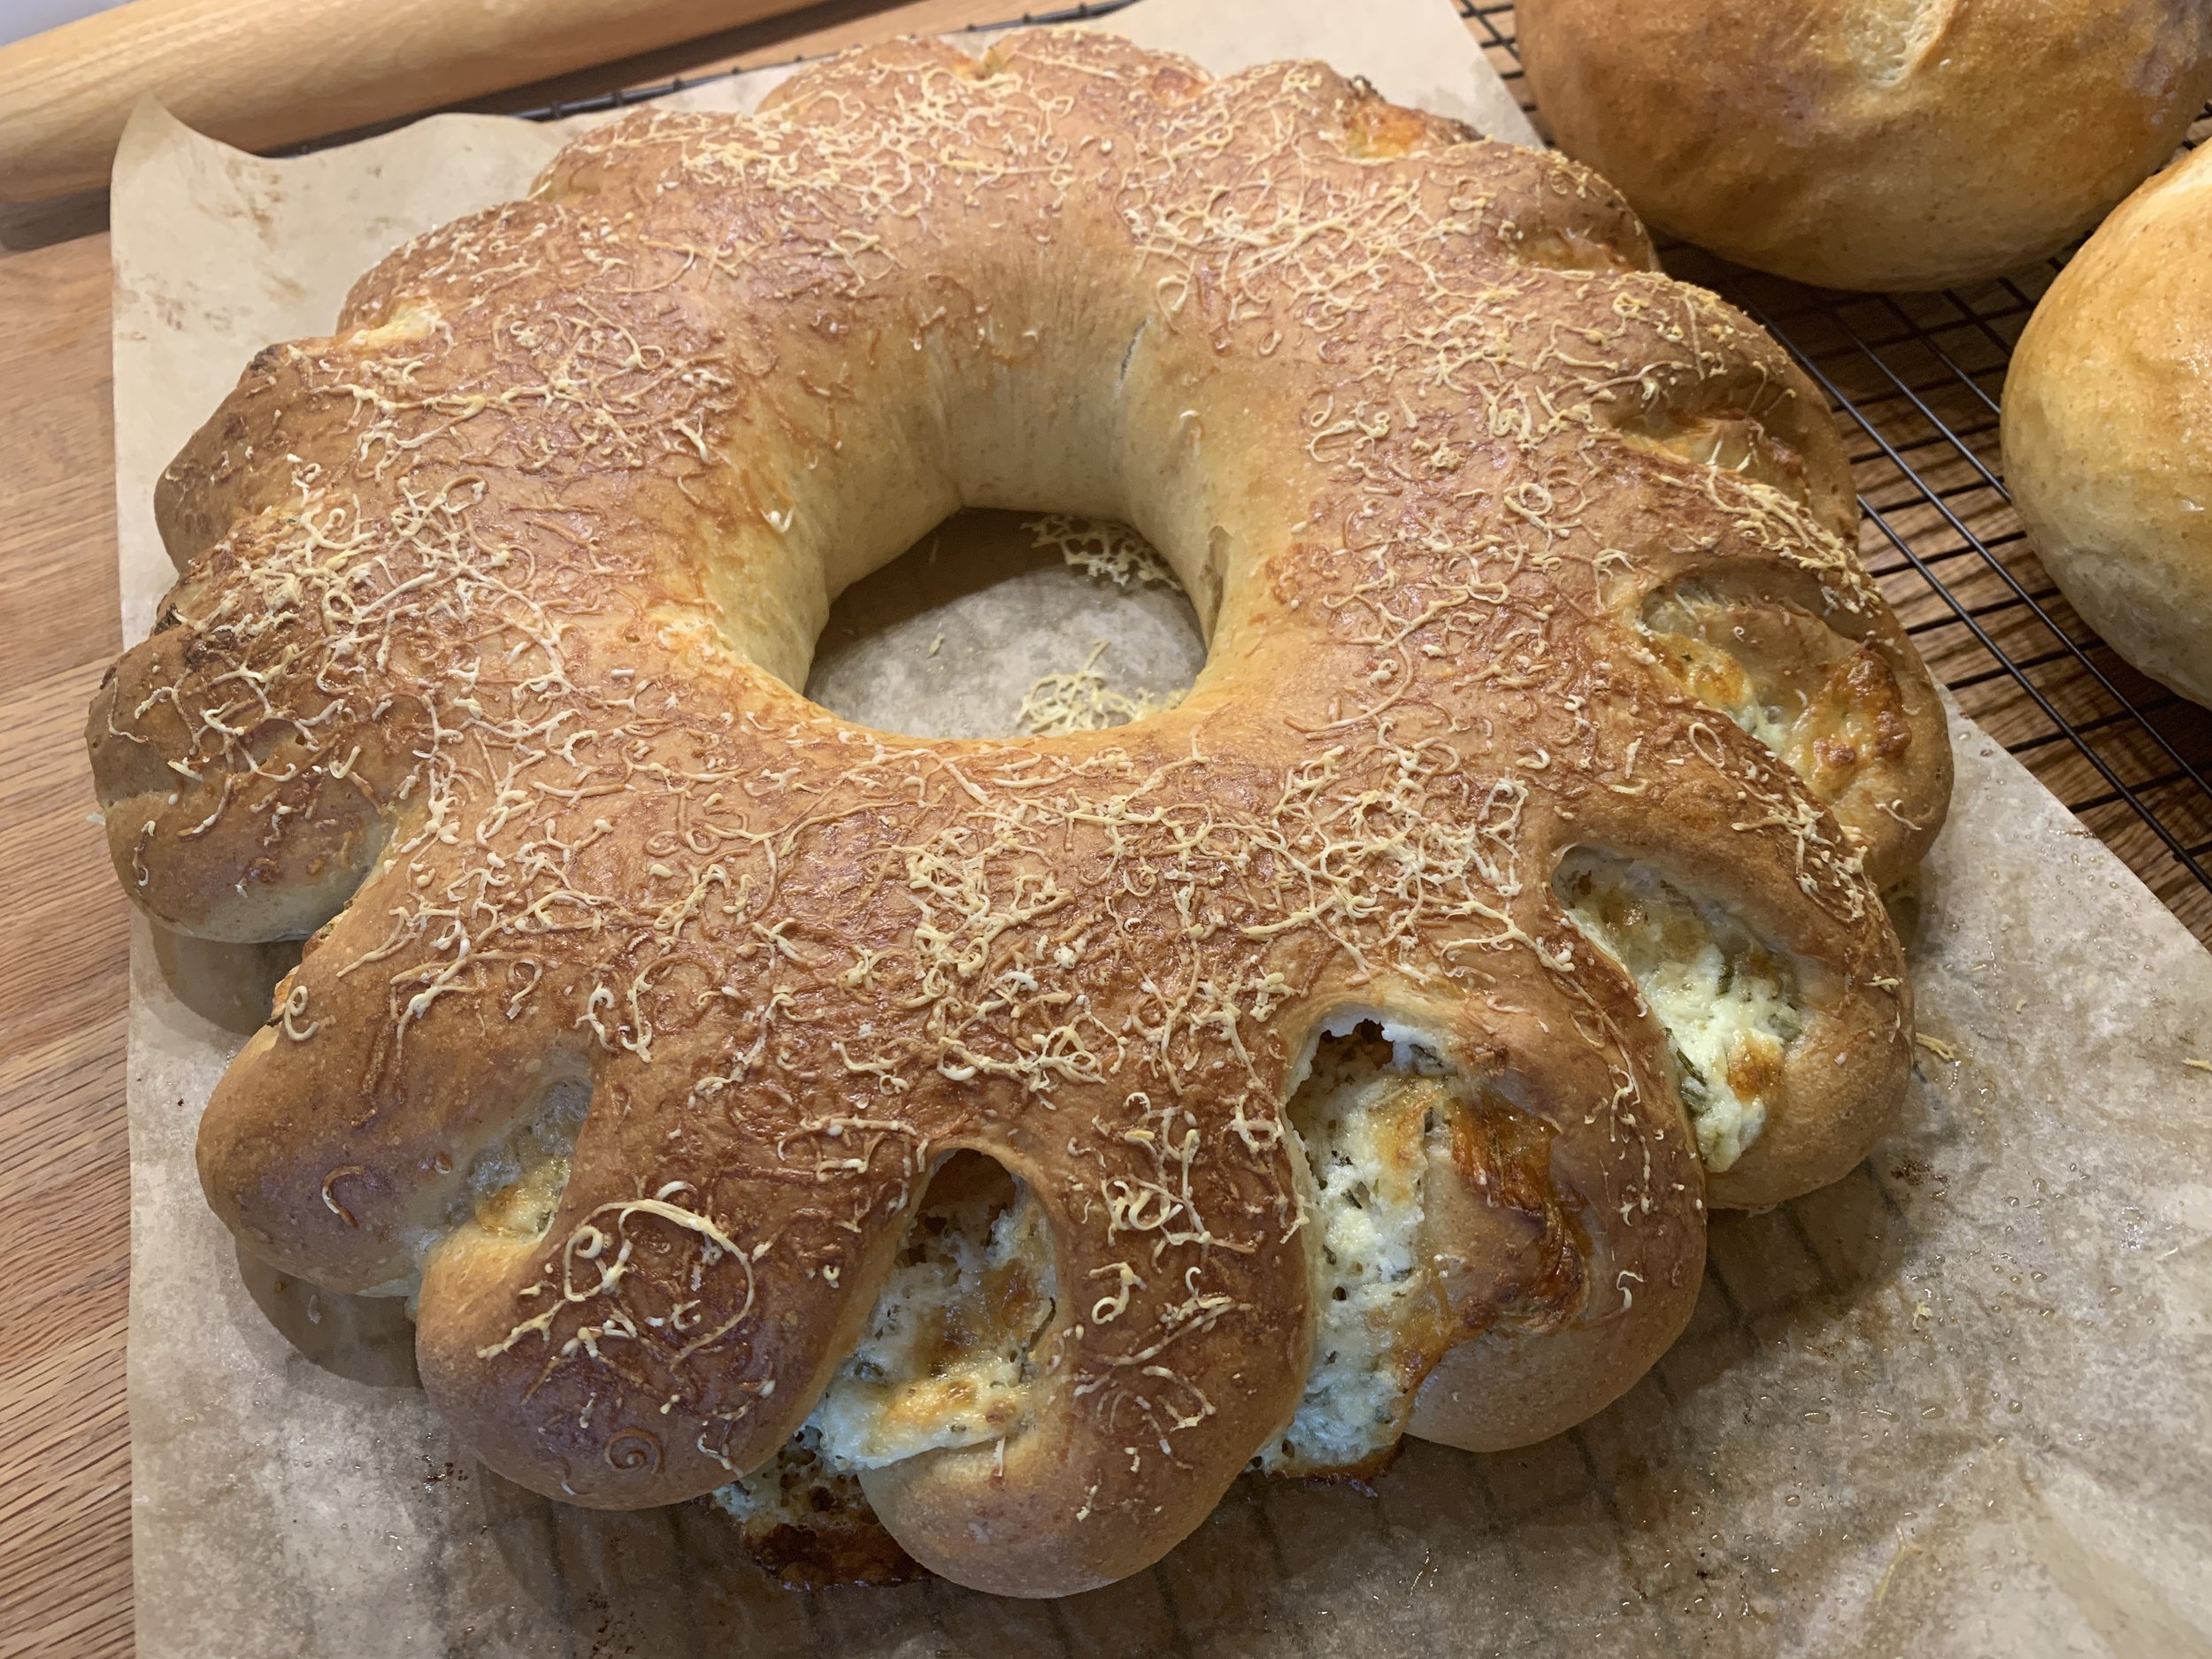
Ricotta herb wreath and two small boules

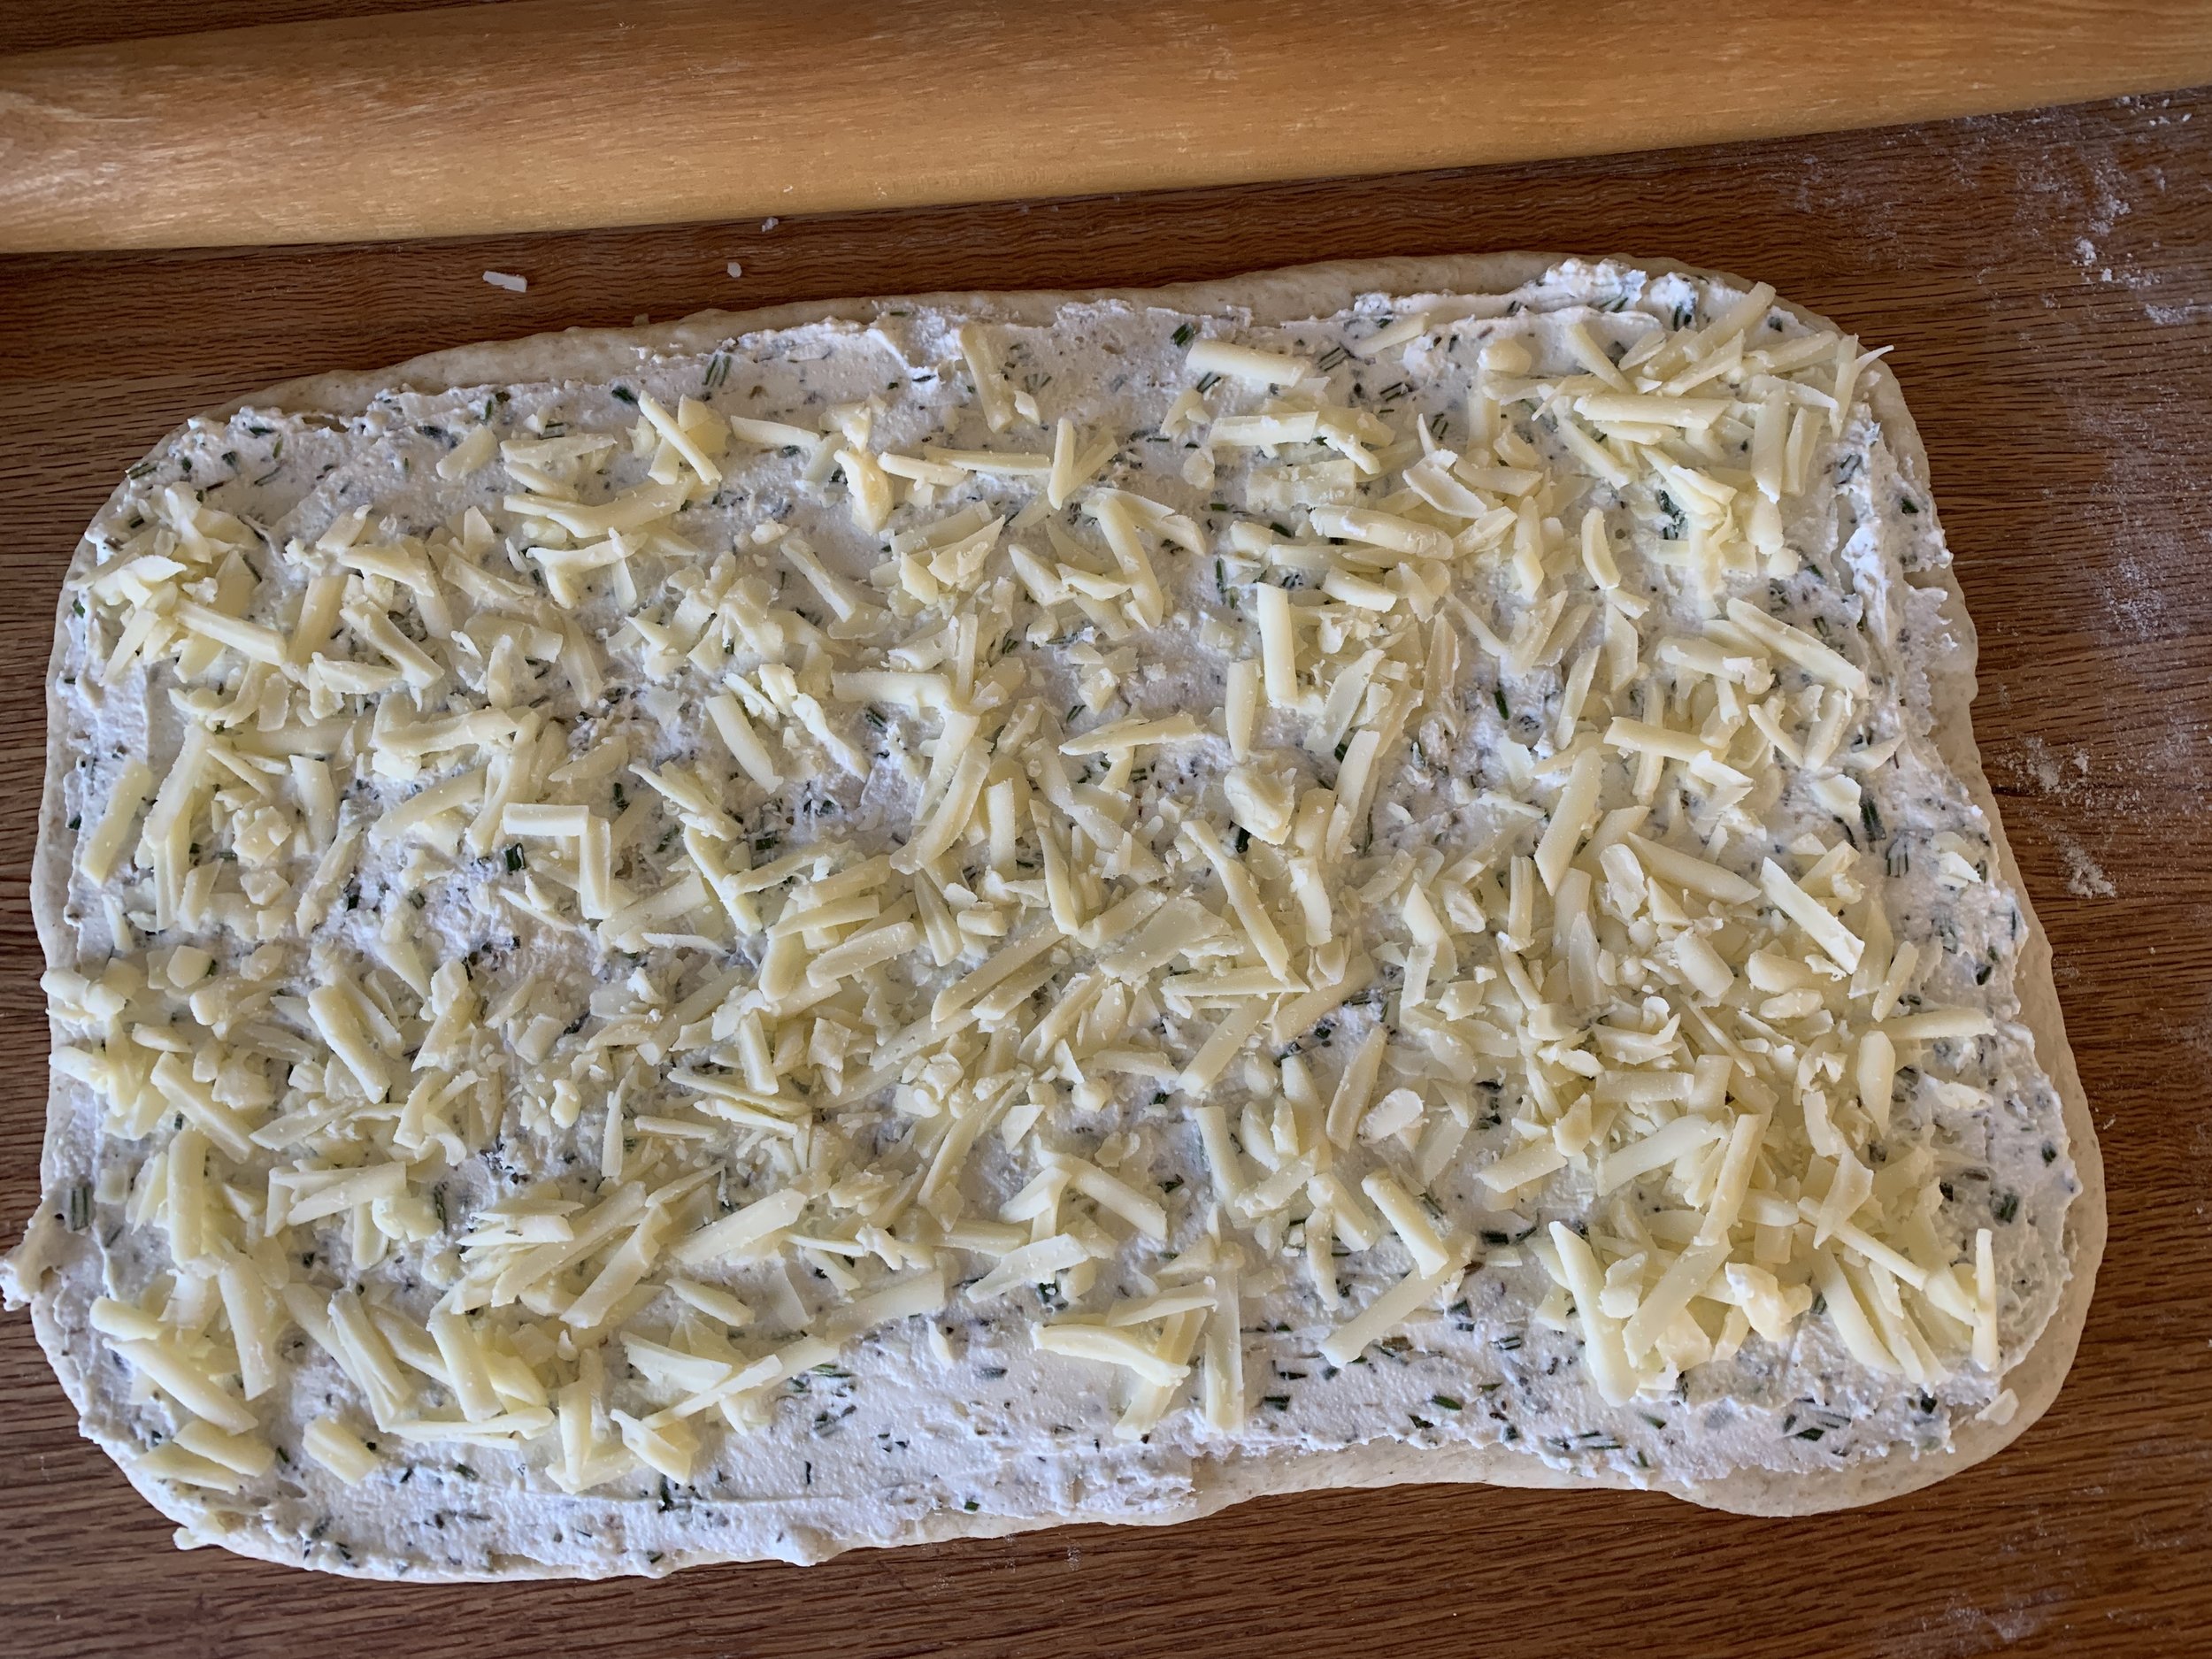
For the filling I mixed 3/4 cup whole milk ricotta, 1/4 cup cream cheese, a few pinches of dried oregano and herbes de provence plus ~2 tablespoons chopped fresh rosemary, one grated clove garlic and 4 ounces of grated sharp provolone which I ultimately thought too over powering - too much!. Live and learn, eh? Next time . . . . .

Roll the dough out to a rectangle of 8-ish by 16-ish inches.

Spread the ricotta filling over the dough and top it with the grated cheese. Press it down lightly.

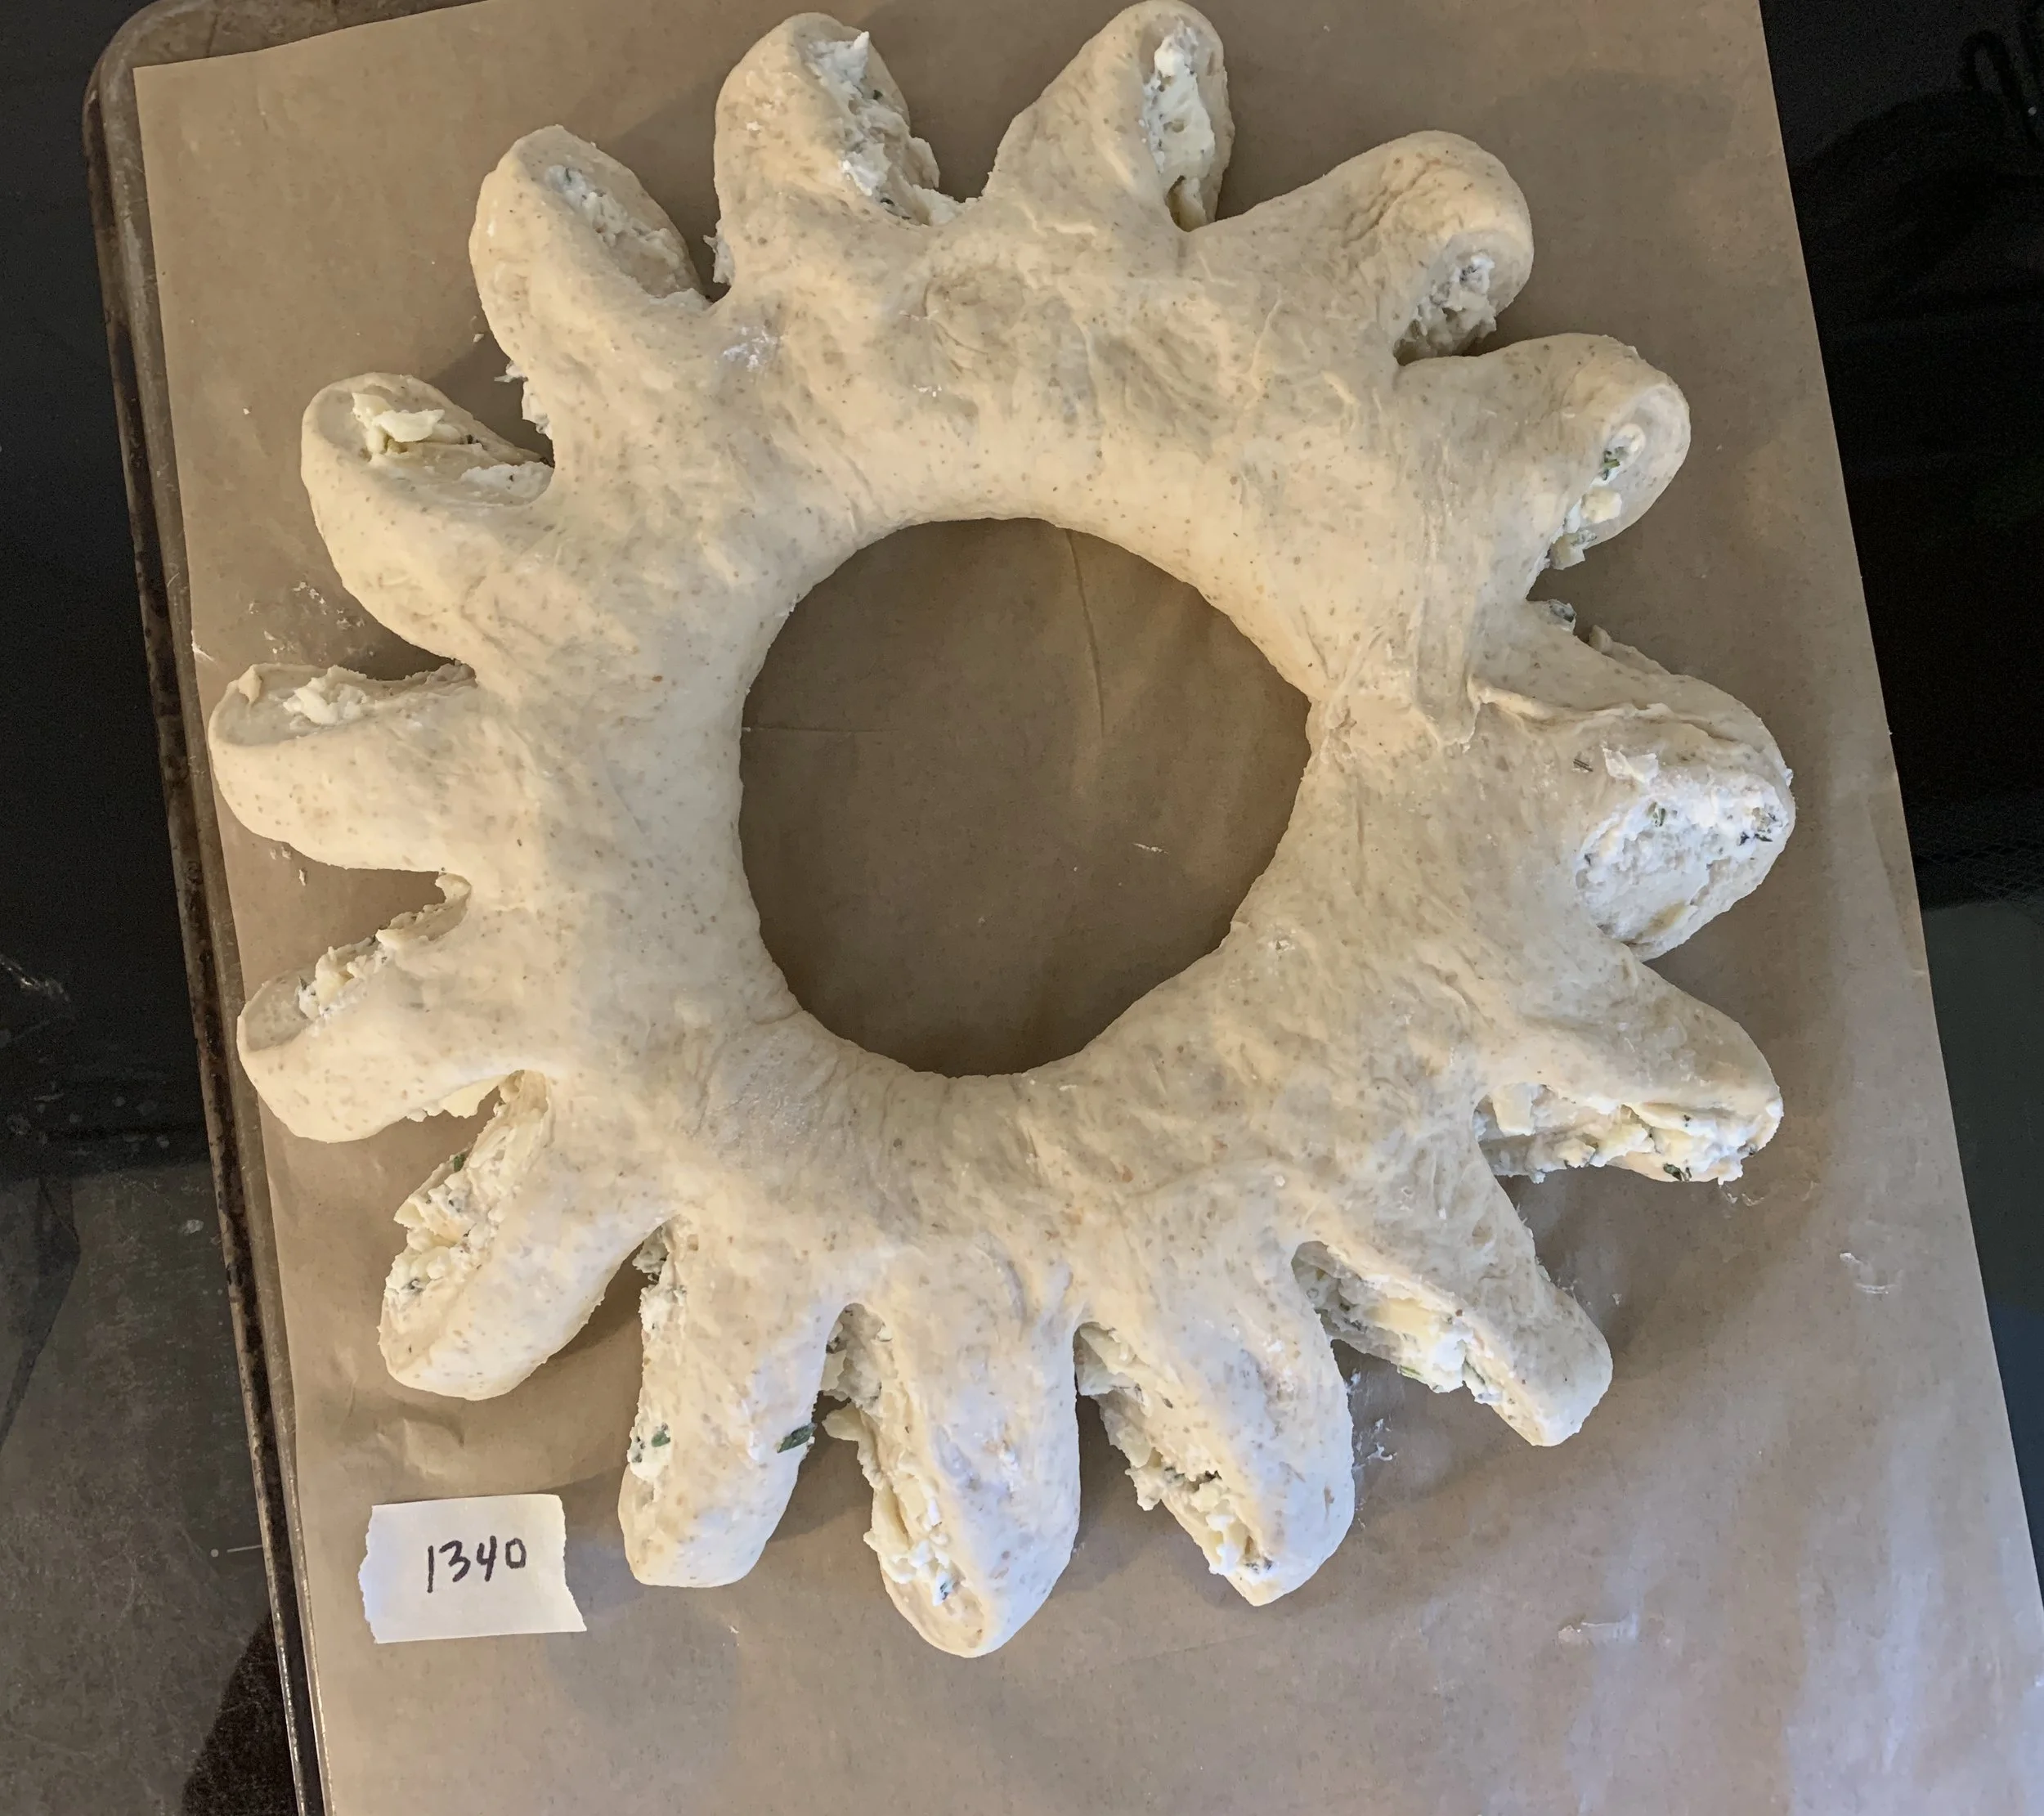
Log roll it up and cut slits along one side every inch of so, half way through.

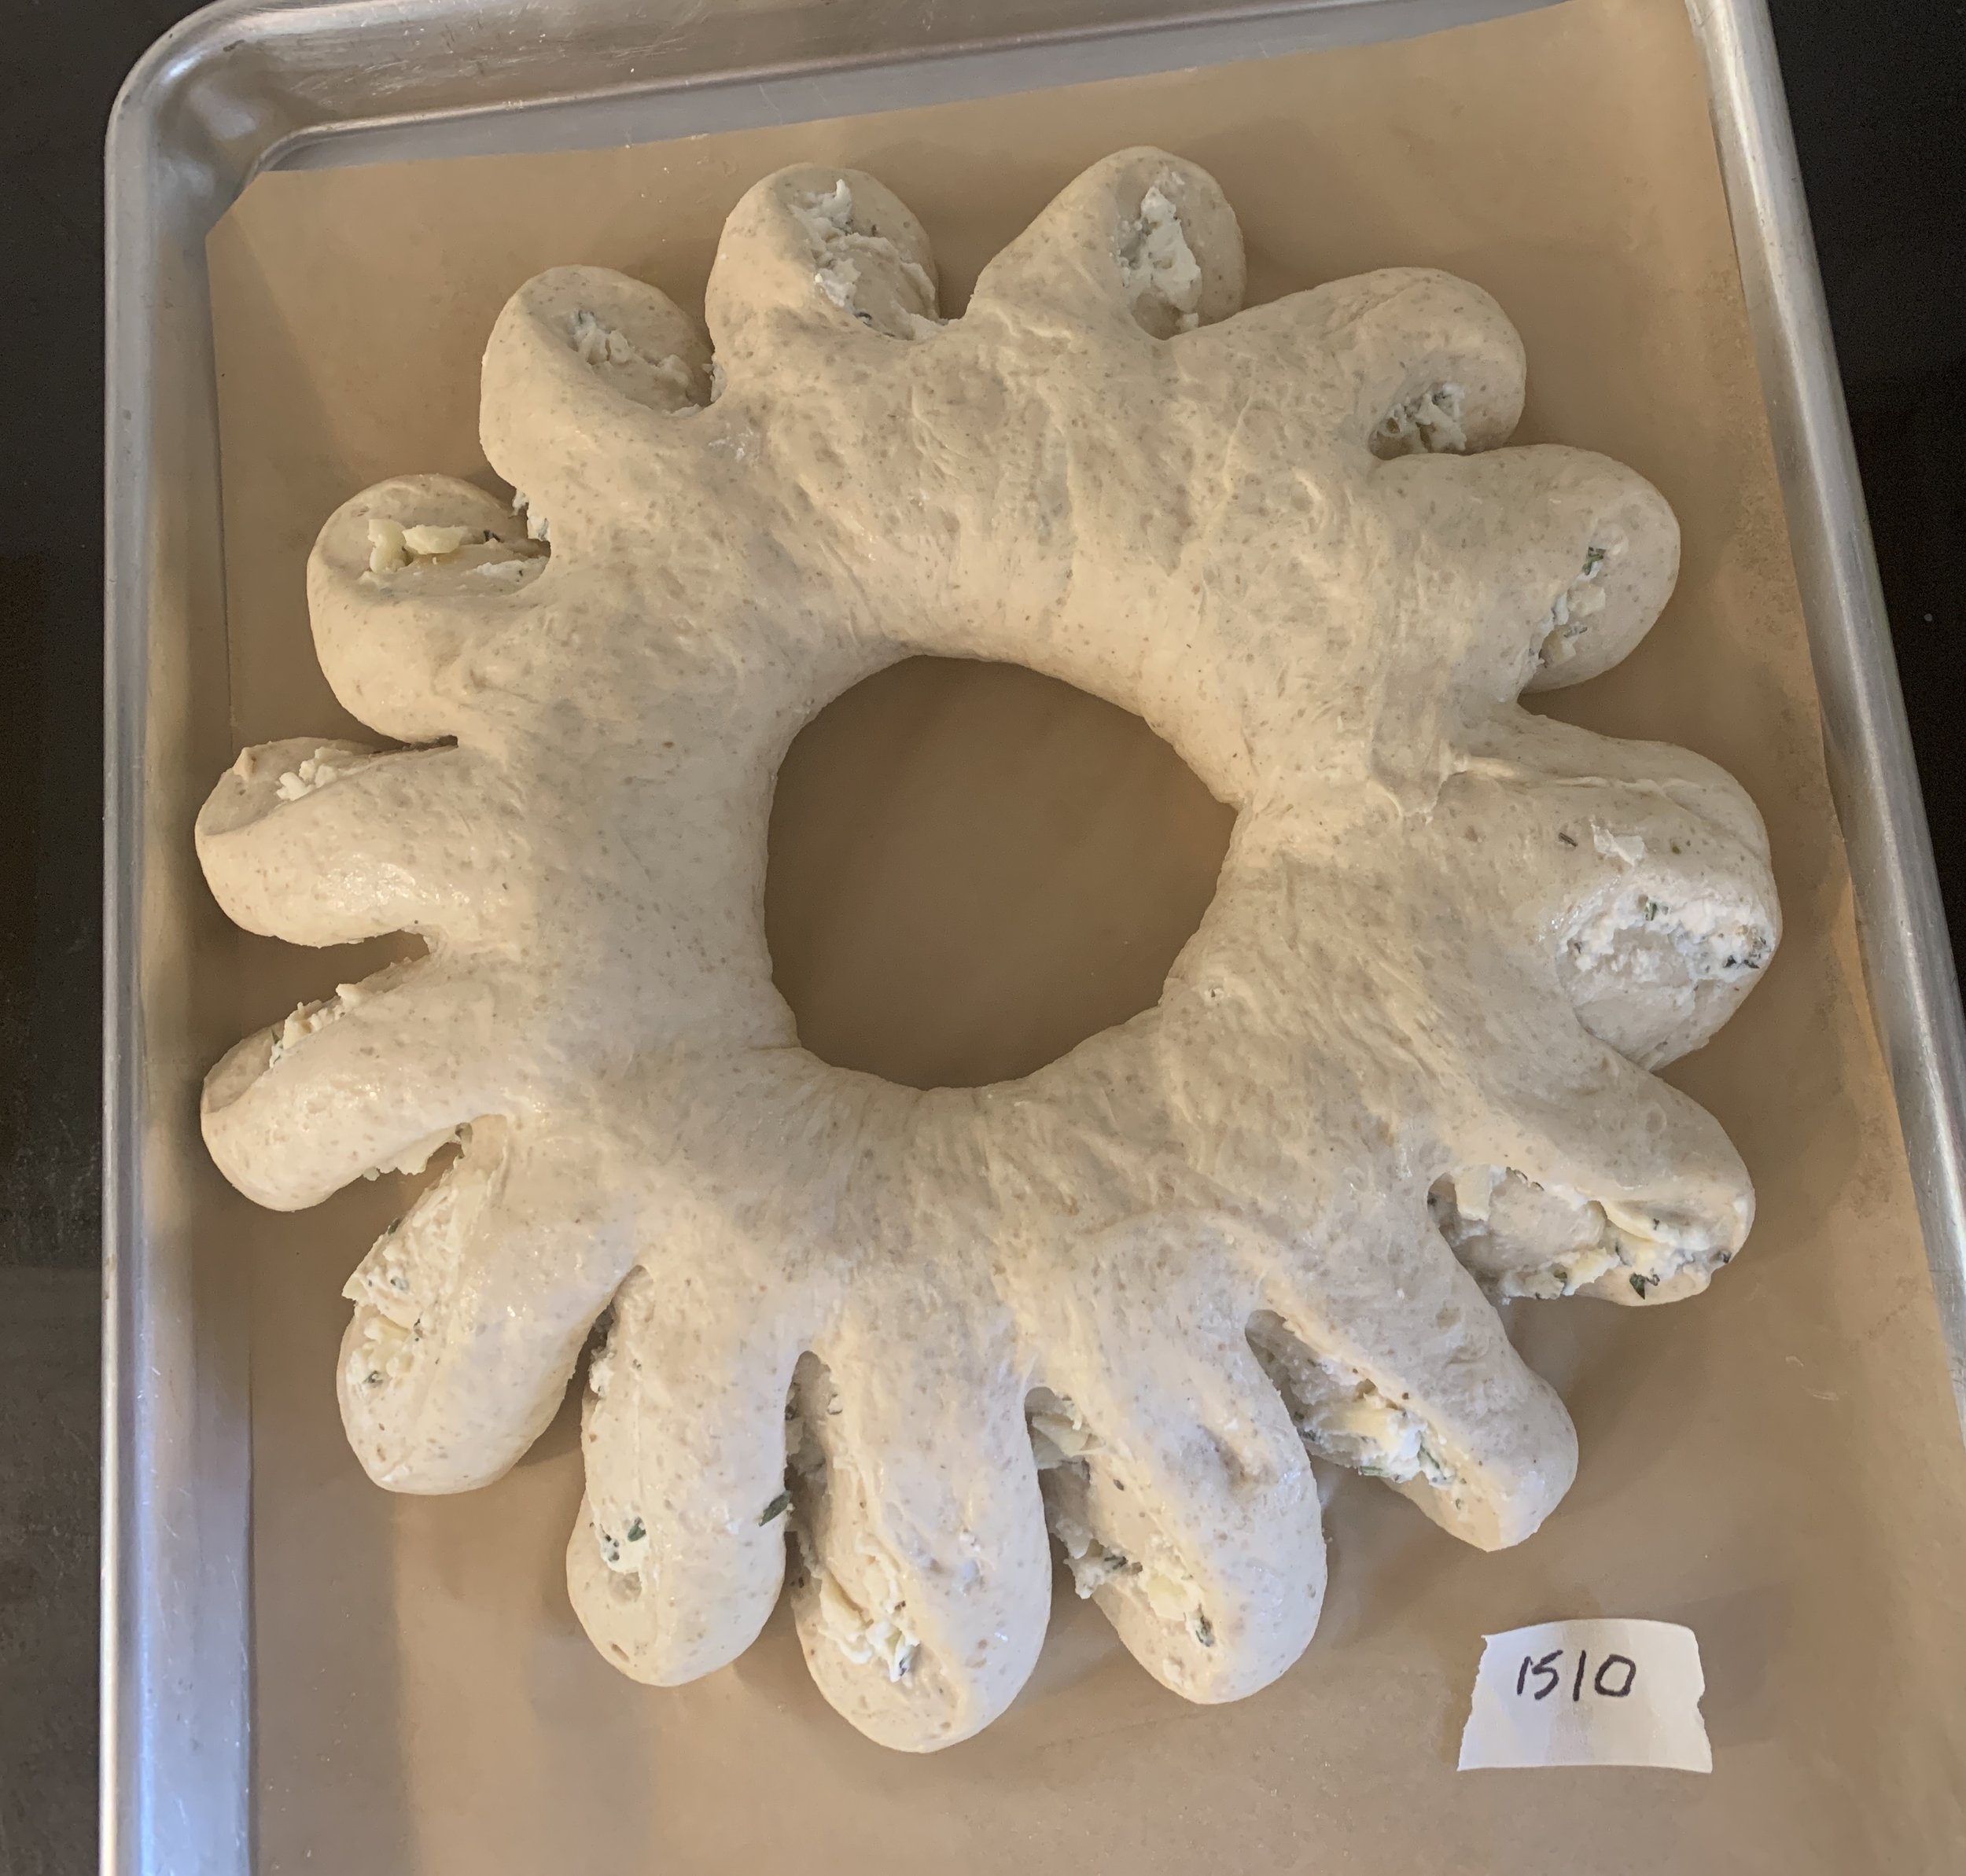
Form it into a wreath and pinch the ends together. Separate and twist the sections out a bit. Hmmm . . . looks like some sort of sea creature.

Cover lightly with oiled plastic wrap and let rise about 90 minutes.

Lightly brush top with egg white or water and grate more cheese on top - parmesan or locatelli work well.

Bake 25-30 minutes, let cool and enjoy.

Whew! The end. It’s a good dough to work with and so tasty no matter how you choose to bake it. Have fun!

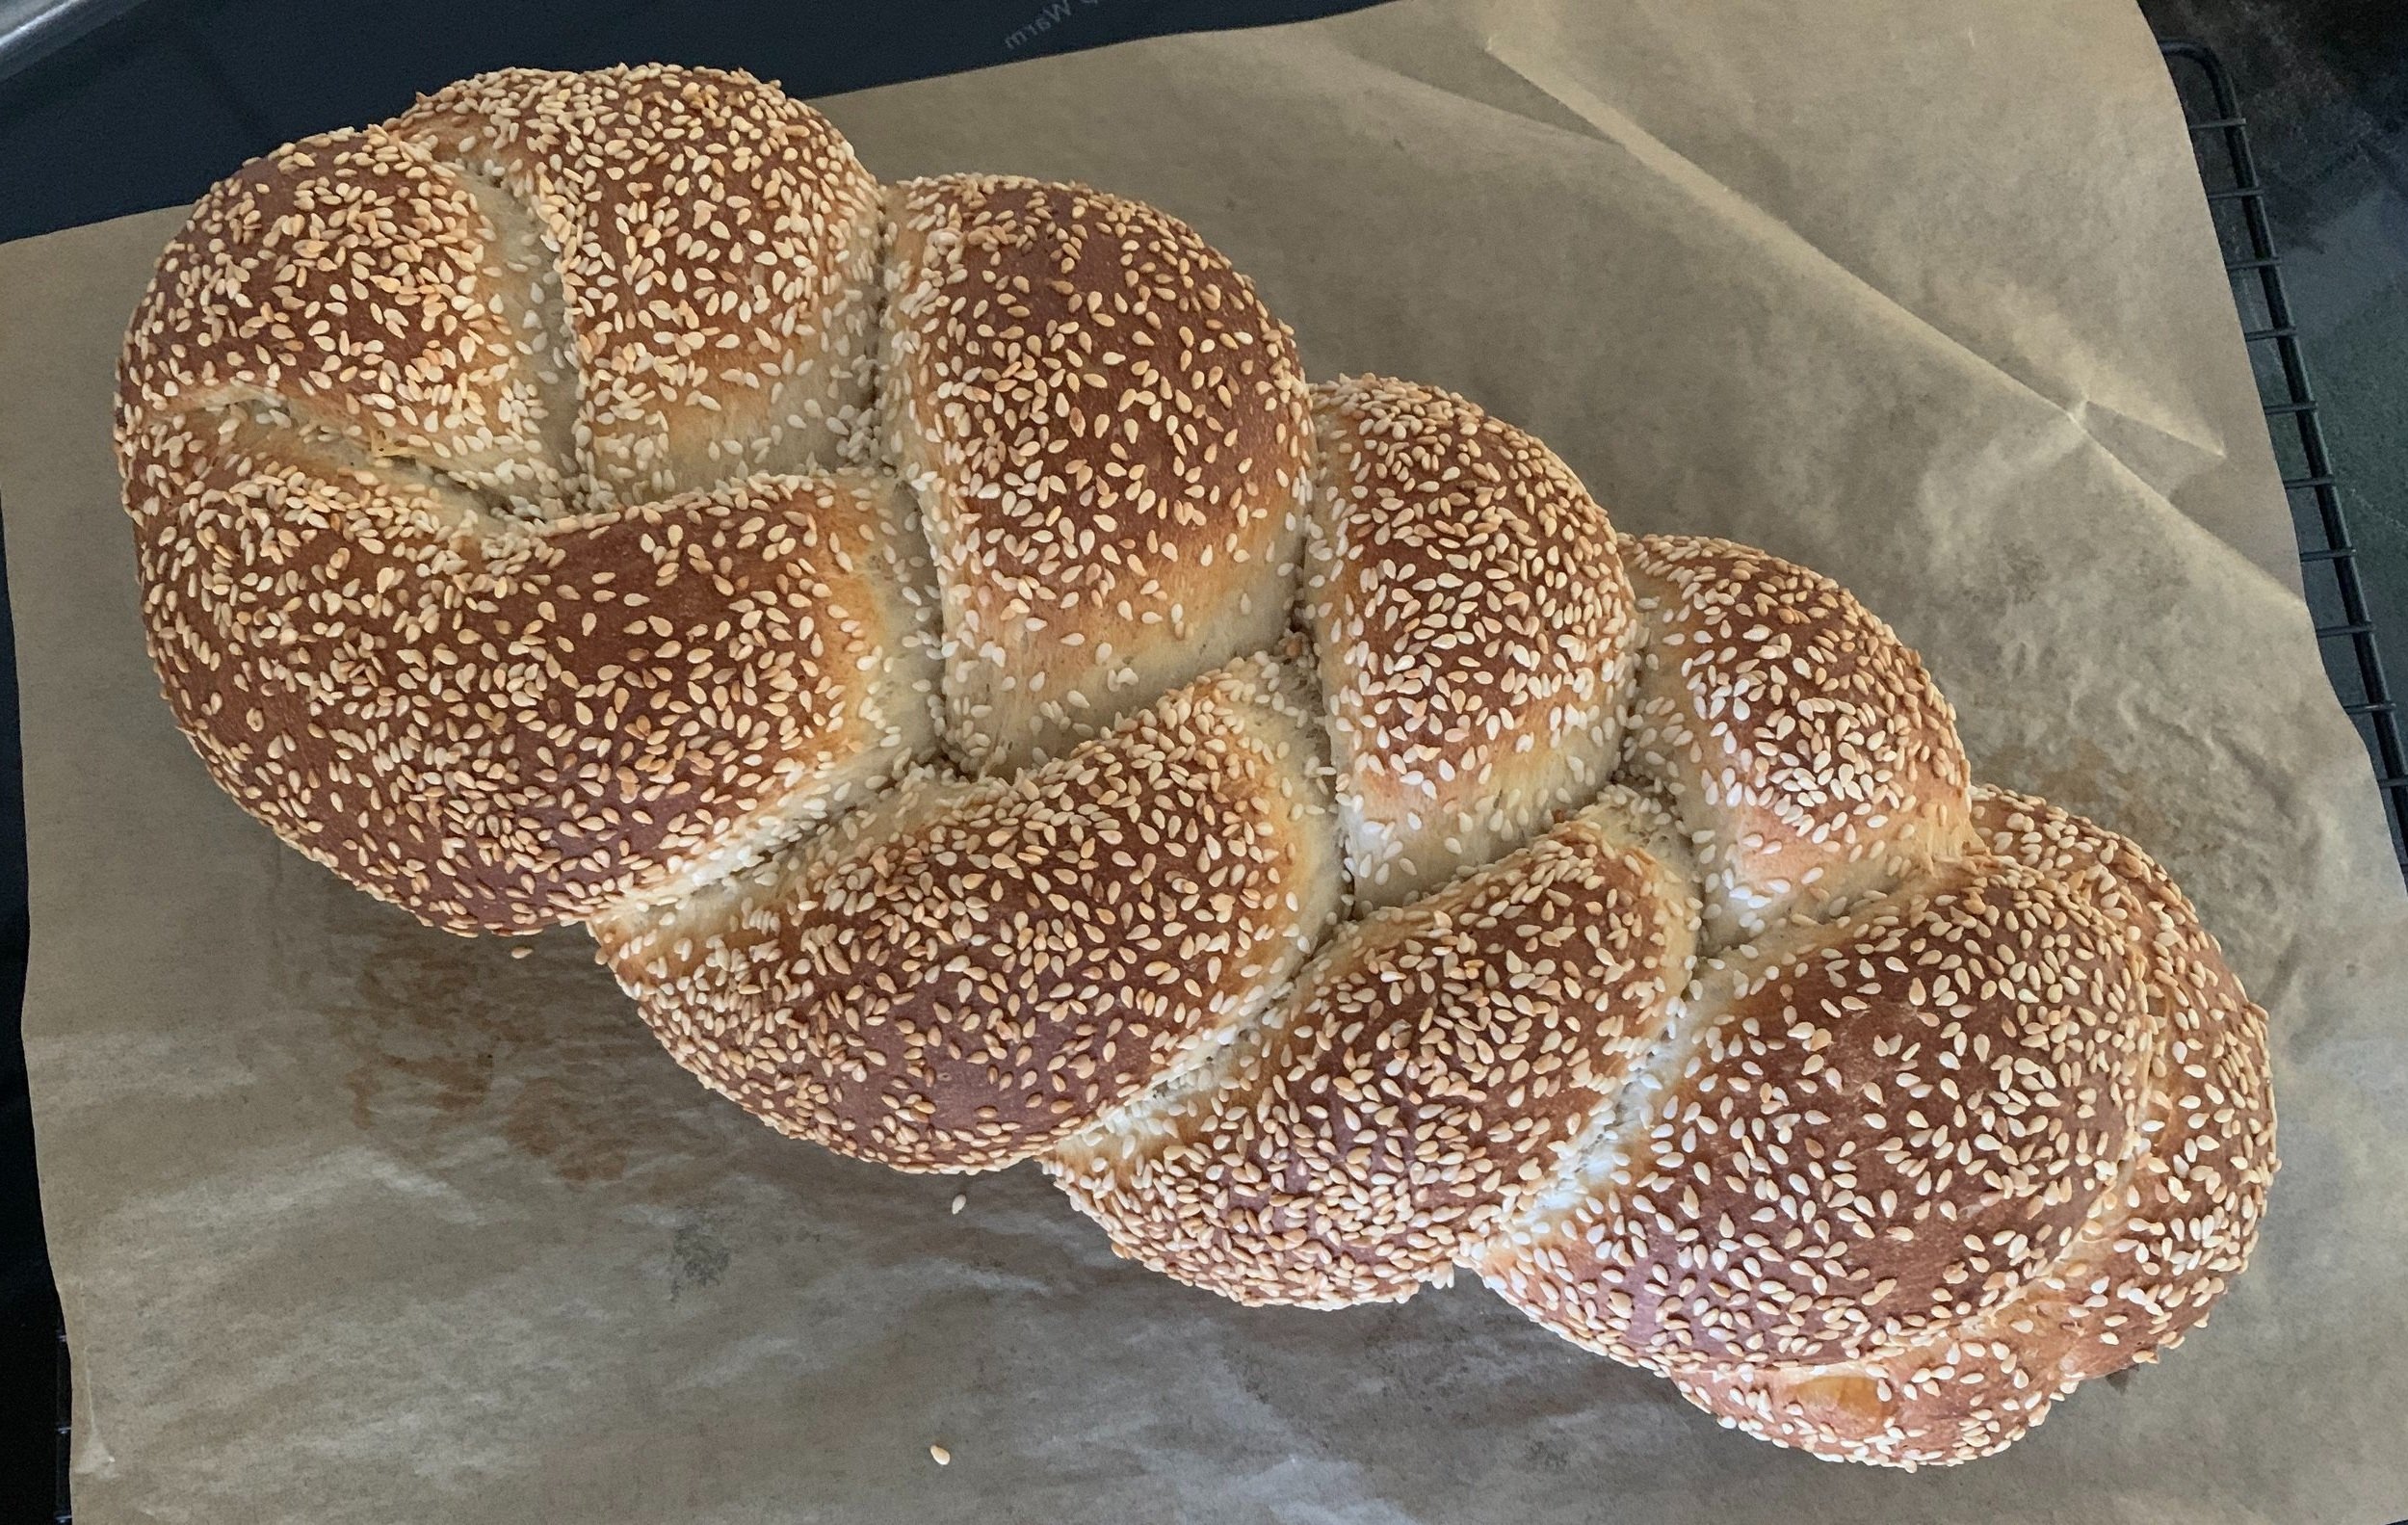
Sneak peek - sesame braid and more!

This is one delicious dough folks! First time around I did the sesame braid. Second time around I doubled the recipe and made two standard loaves - great for sandwiches and morning toast.

I have a couple additional versions up my sleeve and look forward to sharing them and the recipe with you in upcoming weeks. We’ve had some lovely Michigan summer days interspersed with heat and humidity so I’m planning my baking projects around the weather. Ahhh - summer.

Here’s a bit of nature for you - the light, the shadows - Steve says I could be an impressionist!

Summer whites - landscaped

Summer whites - natural

Teasel - intriguing to be sure!

Sesame brioche rolls

Hmmmm . . . more sesame you say? This time let’s talk tahini brioche. While I don’t always have tahini on hand, once purchased and used for its intended project, it sits in the cupboard waiting. I think Steve and I bought a jar some weeks back to make a dressing or marinade for something. Fortunately the shelf life is good, but I don’t like to let it linger too long before figuring out ways to use it up.

Always up for trying a new brioche recipe, I thought I’d give this one a try. As was true of the sesame cumin crackers of which I wrote recently, the recipe comes from Sofra, the popular middle Eastern bakery/cafe in Cambridge MA. It was presented in the holiday 2018 issue of King Arthur Flour’s erstwhile magazine “SIFT”, a beautiful, glossy presentation of all things baking and pastry. Please note - all credit goes to Sofra and King Arthur - I’m simply here to share my experience as I went through the steps.

i love a buttery brioche and have tried and tweaked many a recipe. My current go to recipe involves the usual long mixing time for this enriched dough, followed by an overnight rest in the fridge before dividing, shaping and baking the intended rolls or buns or whatever. The primary difference with Sofra’s is the first step of making a sponge before mixing the final dough. A sponge belongs to the family of pre-ferments like poolish, biga, pâte fermentée and levain and is intended to give the dough a chance to develop more flavor as well as give it a longer shelf life.

After a quick review of pre-ferments in Rose Levy Beranbaum’s “The Bread Bible”, as well as a few recipes that utilize the sponge approach, I realized that the sponge in this brioche sits for a short 30 minutes. It seems that 1-4 hours at room temperature or even overnight refrigeration are more typical, buuuuuut . . . . . I opted to follow the recipe - you gotta try, right!

The image below shows my mise with the sponge not quite at the 30 minute stage (as you see above).

OK - let’s go through the steps. For the sponge blend together 60 ml / 1/4 cup tepid whole milk, 7 g / 2.25 teaspoons instant yeast, 1/2 teaspoon sugar in the bowl of a stand mixer; once the yeast has dissolved, whisk in 2 large eggs and stir in 130 g / 1 cup all purpose flour.

Sprinkle another 65 g / 1/2 cup all purpose flour over the top of the mixture.

Cover and set aside for 30 minutes until the top flour layer is cracked, a sign that the yeast has started its work.

Now add to the sponge: 227 g / 1.75 cups all purpose flour, 50 g / 1/4 cup sugar, 10 g / 2 teaspoons salt, 3 large eggs, 1 large yolk and 110 g /~1/3 cup well stirred tahini. Mix on low speed with the dough hook to bring everything together. Then increase to medium for 8-10 minutes until the dough starts forming around the hook.

Scrape down the sides and give it a high speed mix for a minute more.

On medium speed add half (100 g) of the cold, cubed butter; mix until incorporated; add the remaining 100 g butter and mix about 10-15 minutes more until silky smooth. Give it one more minute on medium high - you want the dough pulling away from the sides of the bowl.

Oooooooh - love that sheen!

Lightly butter a 3 or 4 quart bowl or container, place the dough in and press into a rectangle. Fold the edges in, turn the dough over and press again into a rectangle. Cover or tightly wrap and refrigerate 6 hours or overnight. Being such an enriched dough, it doesn’t tend to rise too aggressively.

Here it is the next morning. Rise and shine!!

In general when shaping brioche dough it’s best to keep it cold, so leave it in the fridge until you’re ready to go. I envisioned a smallish roll so I figured about 60 g / 2 ounces for each piece (Sofra’s yield is a dozen rolls, making each a generous 90-ish g each). My total dough came to 1100 g; divide that by 60 g which yields 18 rolls. Sounds good to me.

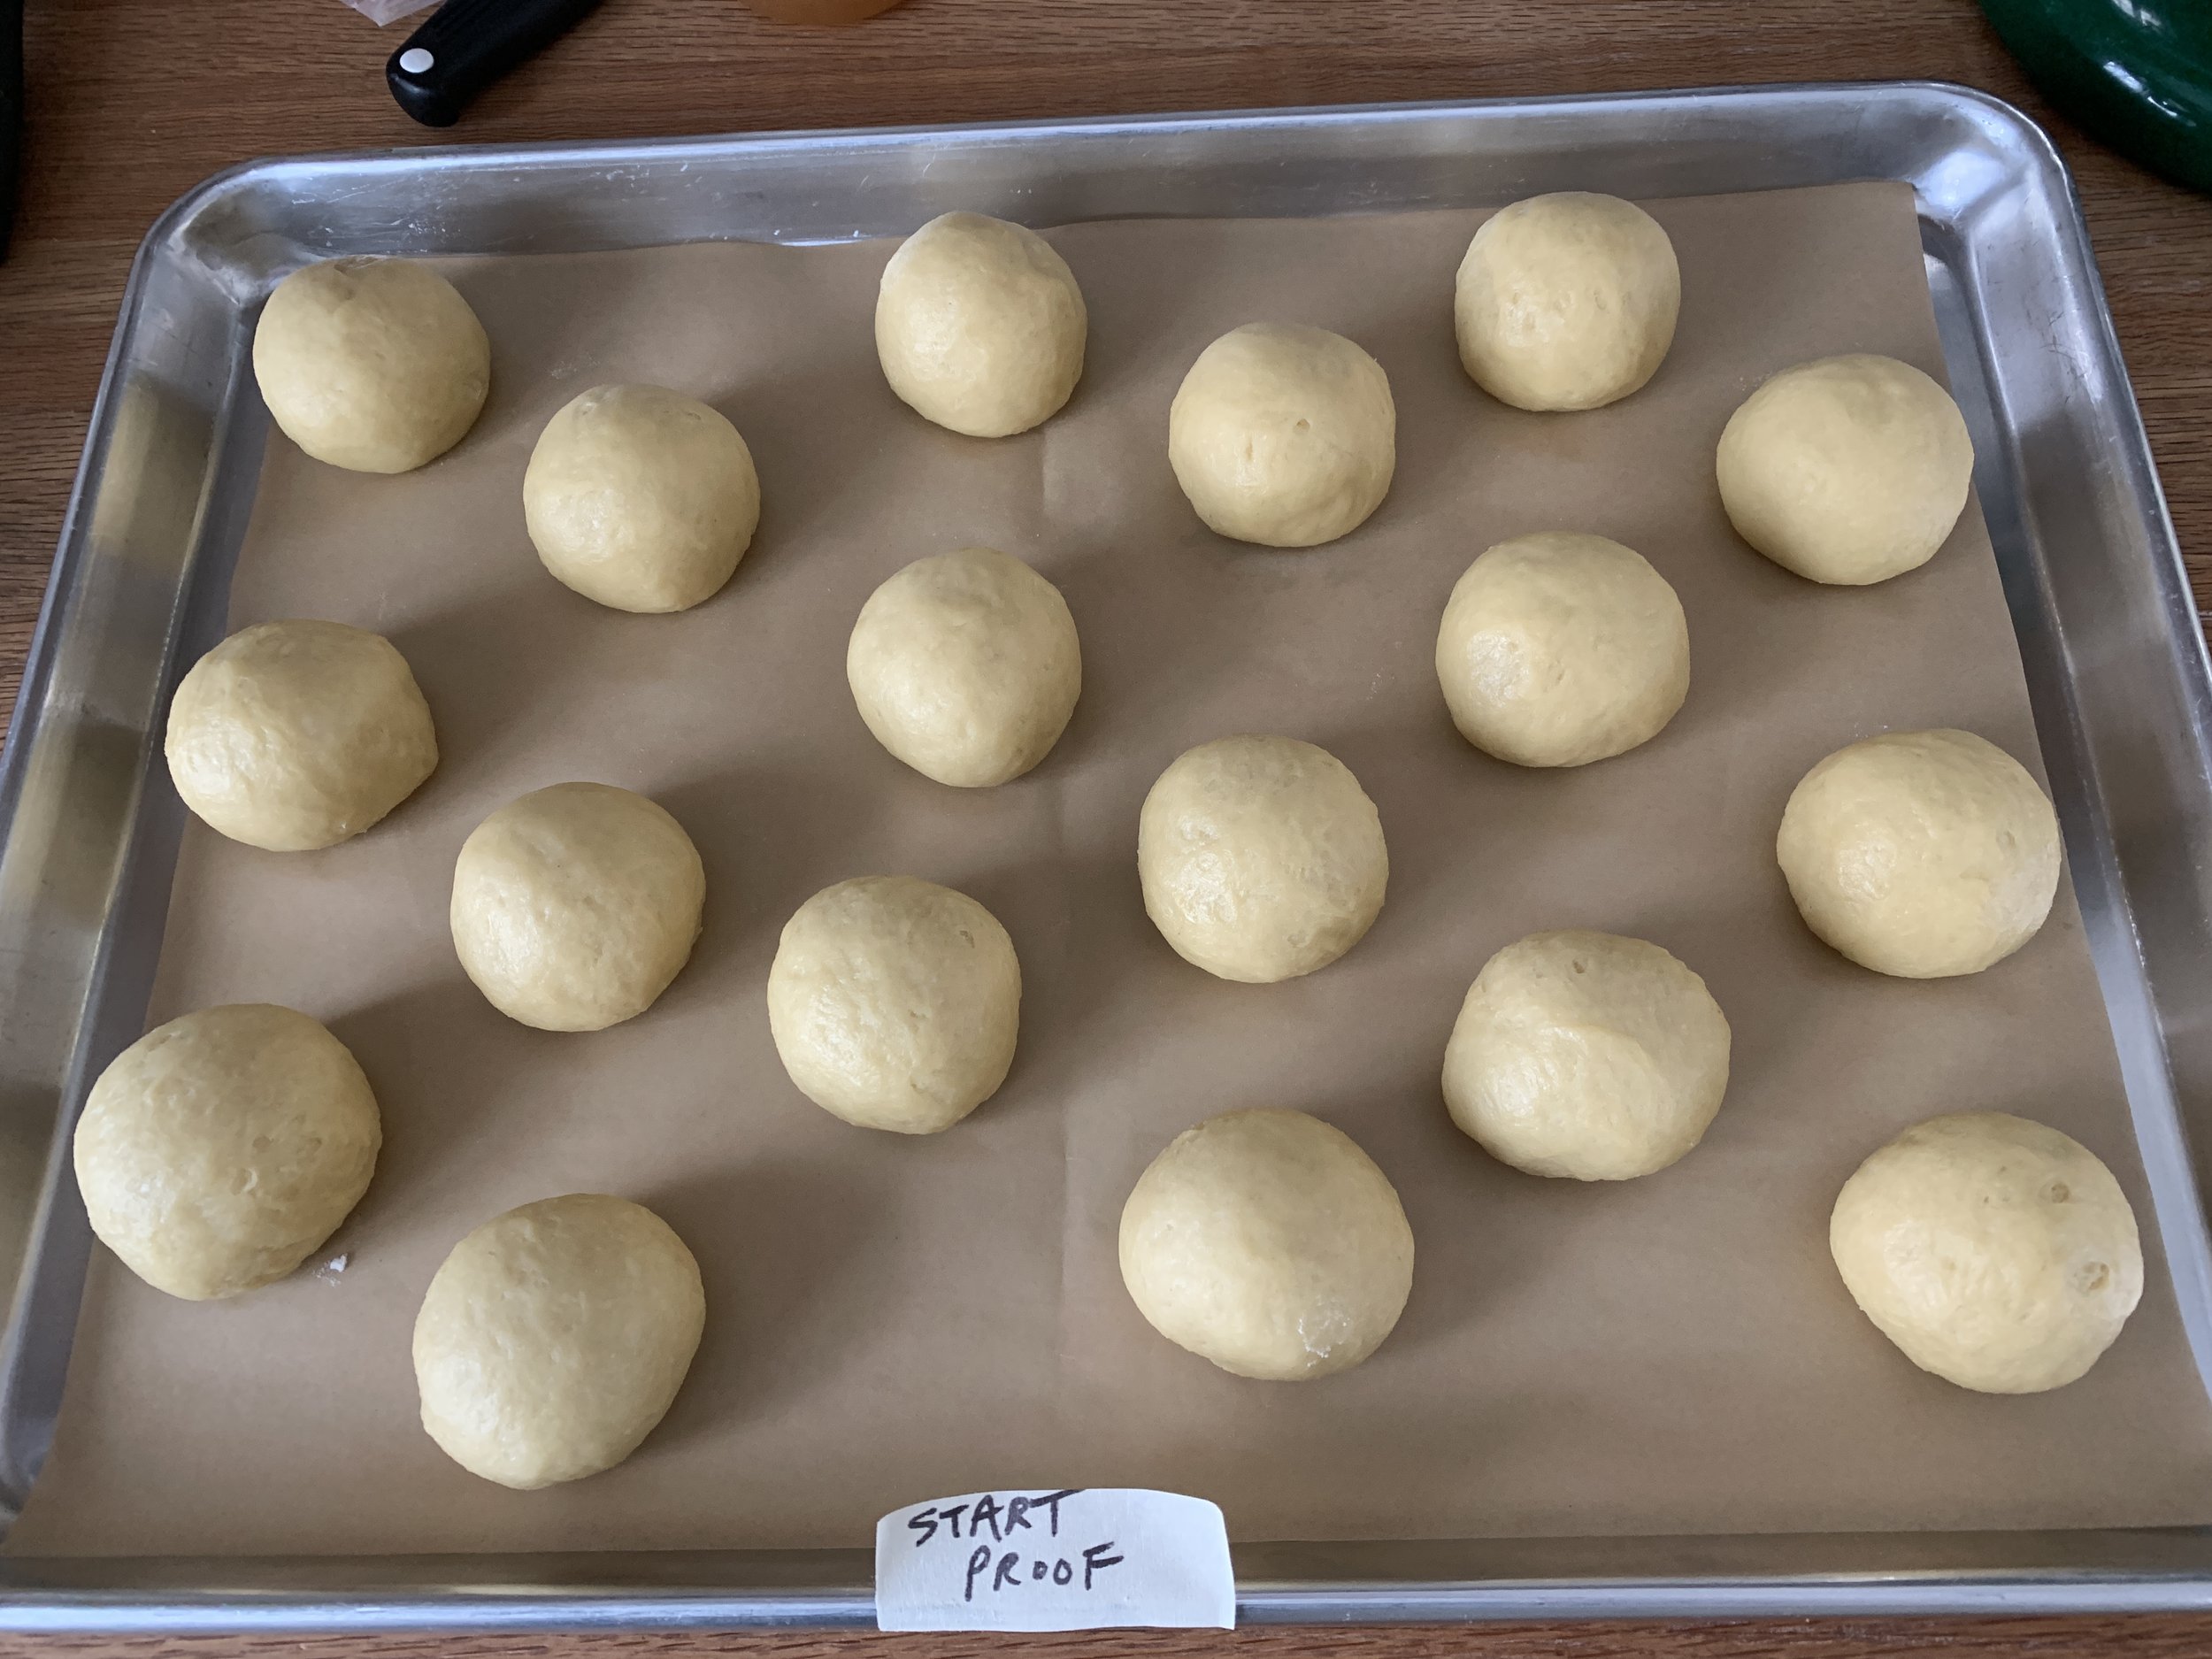
Divide the dough and shape each piece into snug balls.

Place rolls on a parchment lined sheet pan. NOTE: Sofra’s recipe directs use of a buttered 9 or 10” springform pan, tucking the rolls in and ending up with pull-apart rolls.

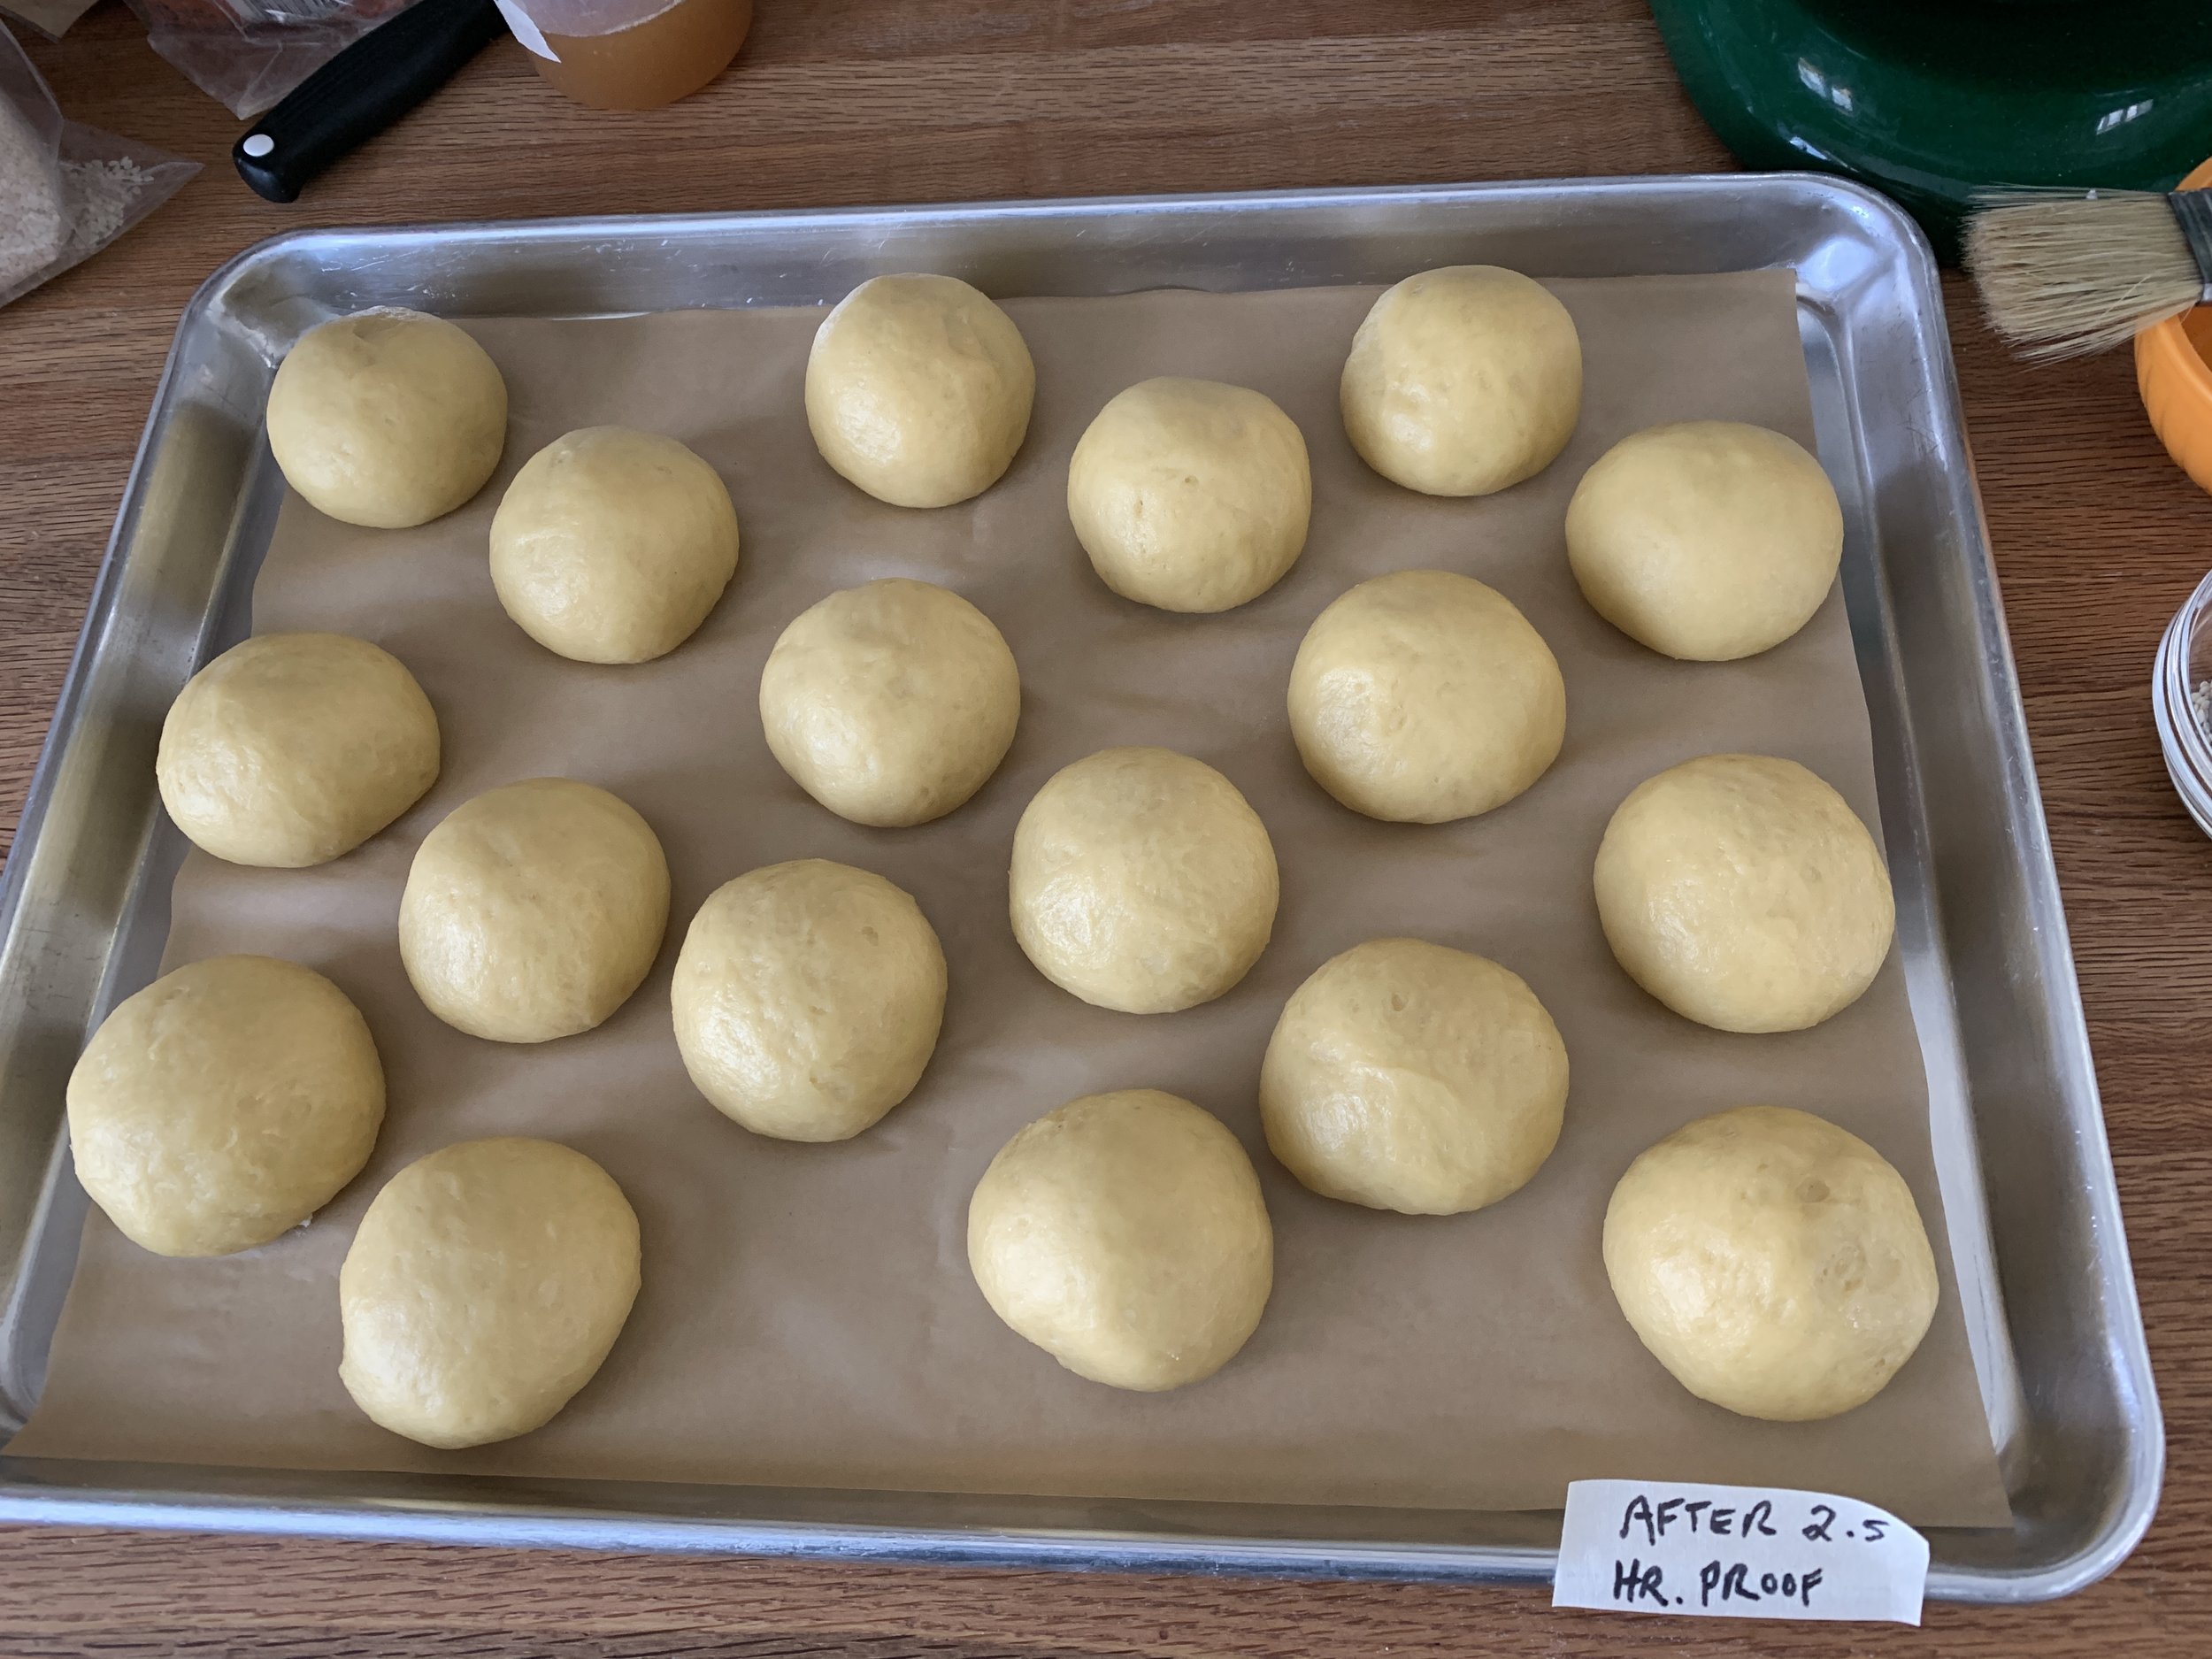
Cover with lightly buttered plastic wrap and let rise 2 to 2.5 hours. On a cold winter day and in my kitchen at 69ºF, I give them the longer rise. Since brioche is so enriched, it needs plenty of time and won’t appear to rise as robustly as lean yeasted doughs. Toward the end of the rise, heat your oven to 350ºF.

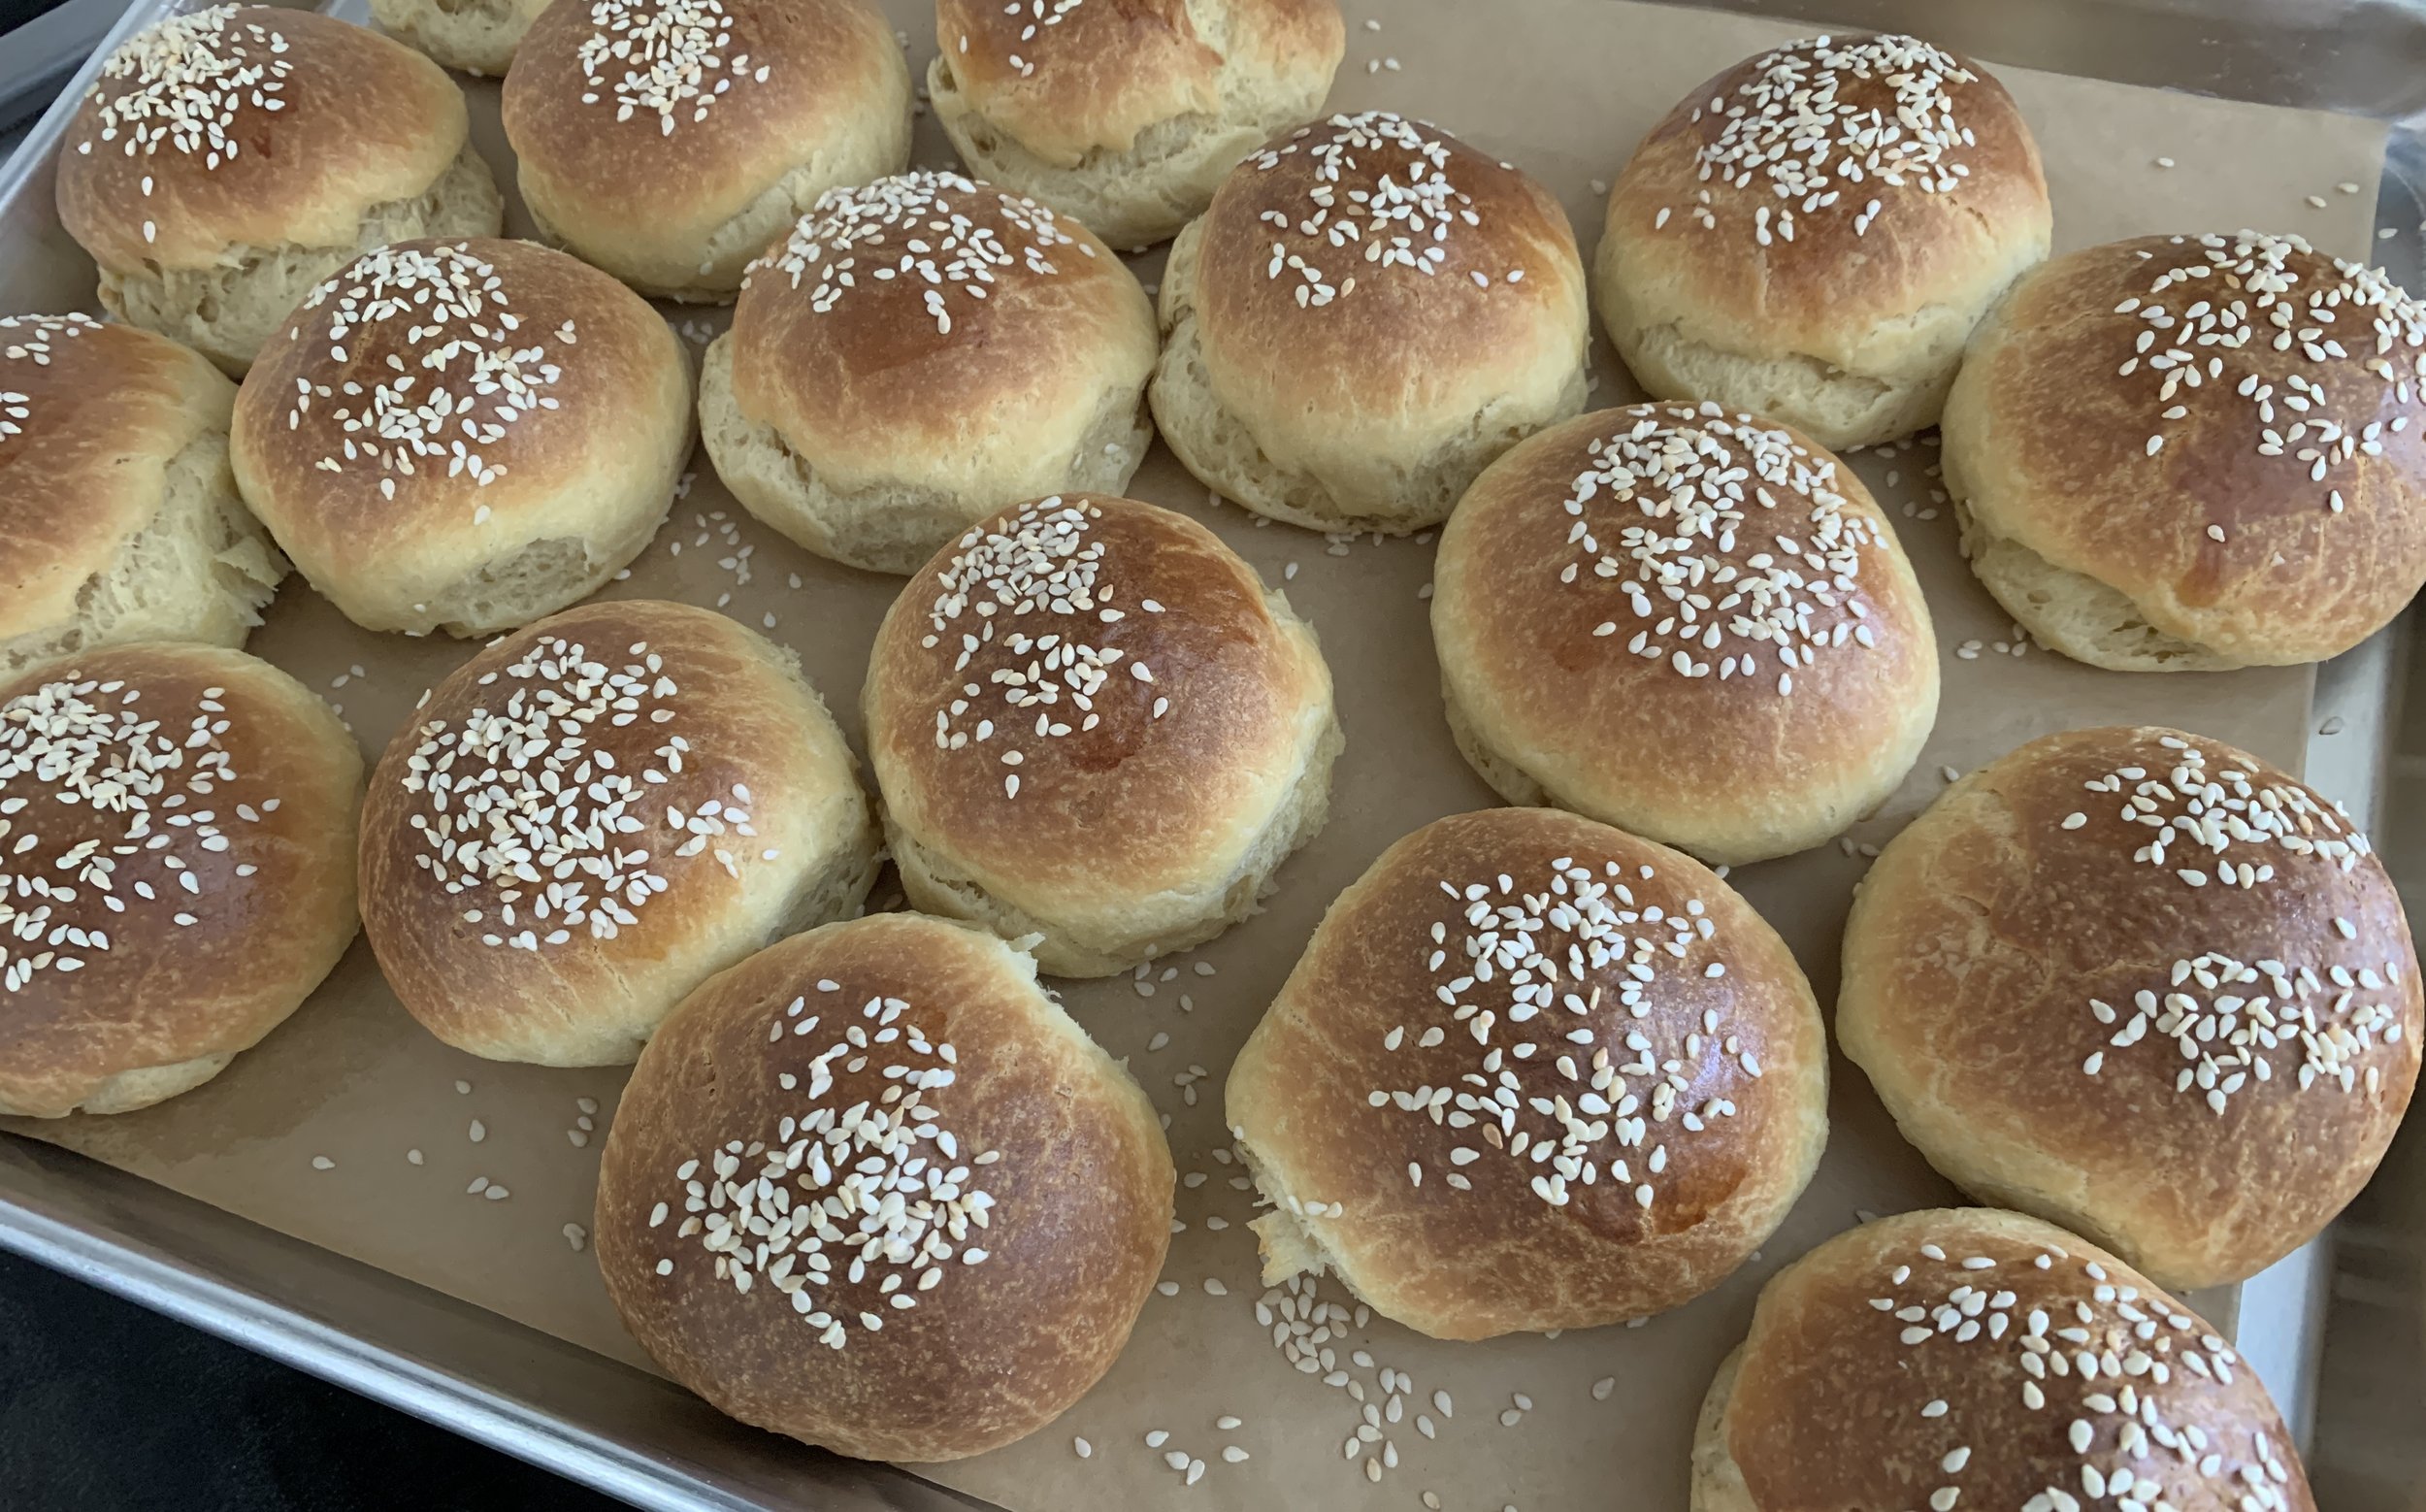
Brush the tops with a bit of egg white (or water or milk) and sprinkle with sesame seeds.

Bake about 30-35 minutes until nicely browned (internal temp 190ºF). Cool and enjoy!

Of course Steve and I had to taste test a warm roll with a drizzle of honey (good!) and followed that the next day with sliced/lighted toasted versions served along side (or sandwiched with!) Sunday morning scrambled eggs. Yummy.

These will keep for several days well wrapped but I chose to freeze the majority of my batch (dinner rolls coming up?). I’m imagining a tasty chicken salad sandwich or sliced/cheesed up and broiled to go along with some of the great soups Steve has been making lately. Yes indeed.

Meanwhile , in spite of winter’s attempts to hold on, we’re getting little whiffs of spring - red wing blackbirds, the sandhill cranes who hung around all last summer have returned, pussy willows are starting to open and there’s a different feel in the air. You just know it.

Take care until next time!

Petits gâteaux part one - sesame crunch gâteau de Pâques

IMG_2641.JPG

For our recent Easter dinner at cousin Jennifer's lovely home in the woods on Clear Bottom Lake, I created a couple of bite size gâteaux for the occasion. I've been on a sesame kick lately, having discovered a terrific way to create sesame brittle, compliments of Yotam Ottolenghi and Helen Goh. More about that in a bit.

IMG_2614.JPG

Rather than cramming a lot of recipe info into one post, I'm doing a two-parter, one part for each little cake.

First up is gateau de Pâques, a classic chocolate biscuit for Easter that I've made a number of times and have never found wanting.

The French word biscuit generally refers to a cake in the sponge family that's made with eggs that are first separated, then the yolks and whites are beaten separately before combining various components at the end to make a light and tasty cake.  On the other hand, biscuit sec usually refers to a cookie.

In English the word biscuit has a completely different connotation. While the Brits call cookies biscuits (as the French do biscuit sec), we Americans think of shortcake à la buttermilk biscuits or biscuits and gravy. Language is so cool and fun to figure out, don't you think?!

IMG_2626.JPG

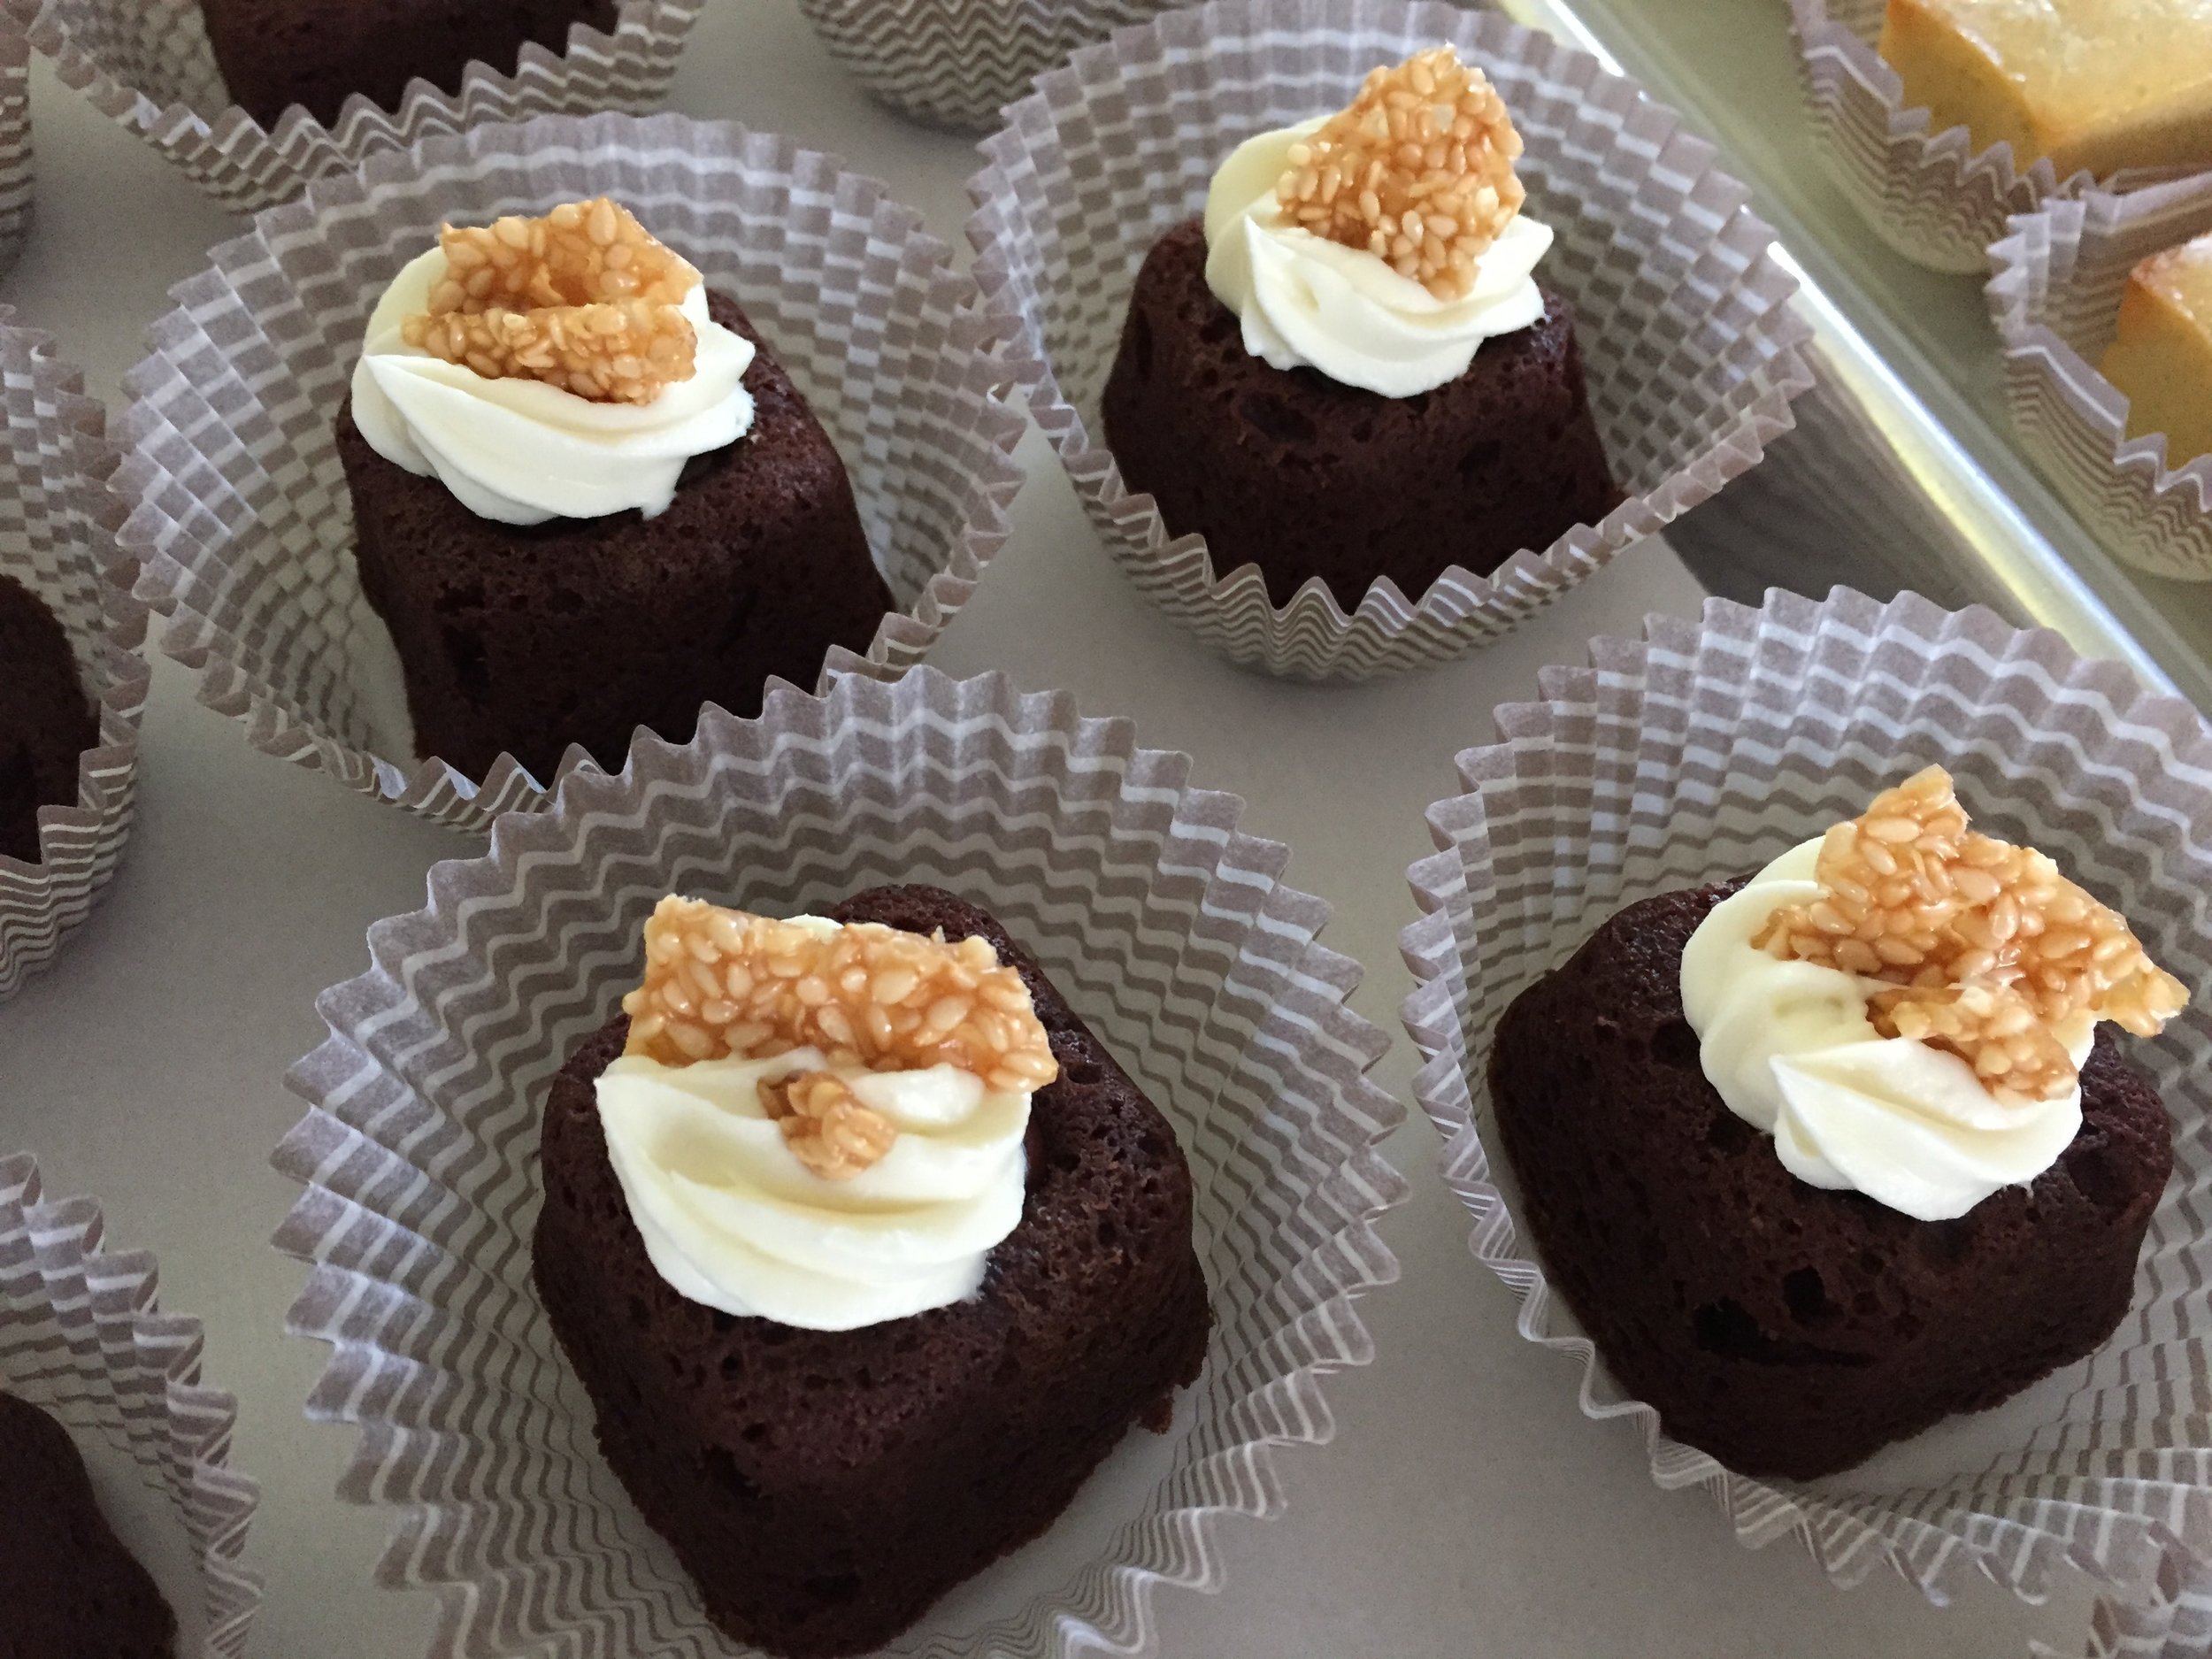
For this fun little cake I used one of my favorite square savarin fleximolds from Silikomart, which allows me to fill the "dent" with something good before garnishing with a swirl of another something good.

IMG_2633.JPG

And then adding another something even better!

IMG_2635.JPG

That sesame brittle is oh-so addicting - just ask Steve.

Let's do the recipes!

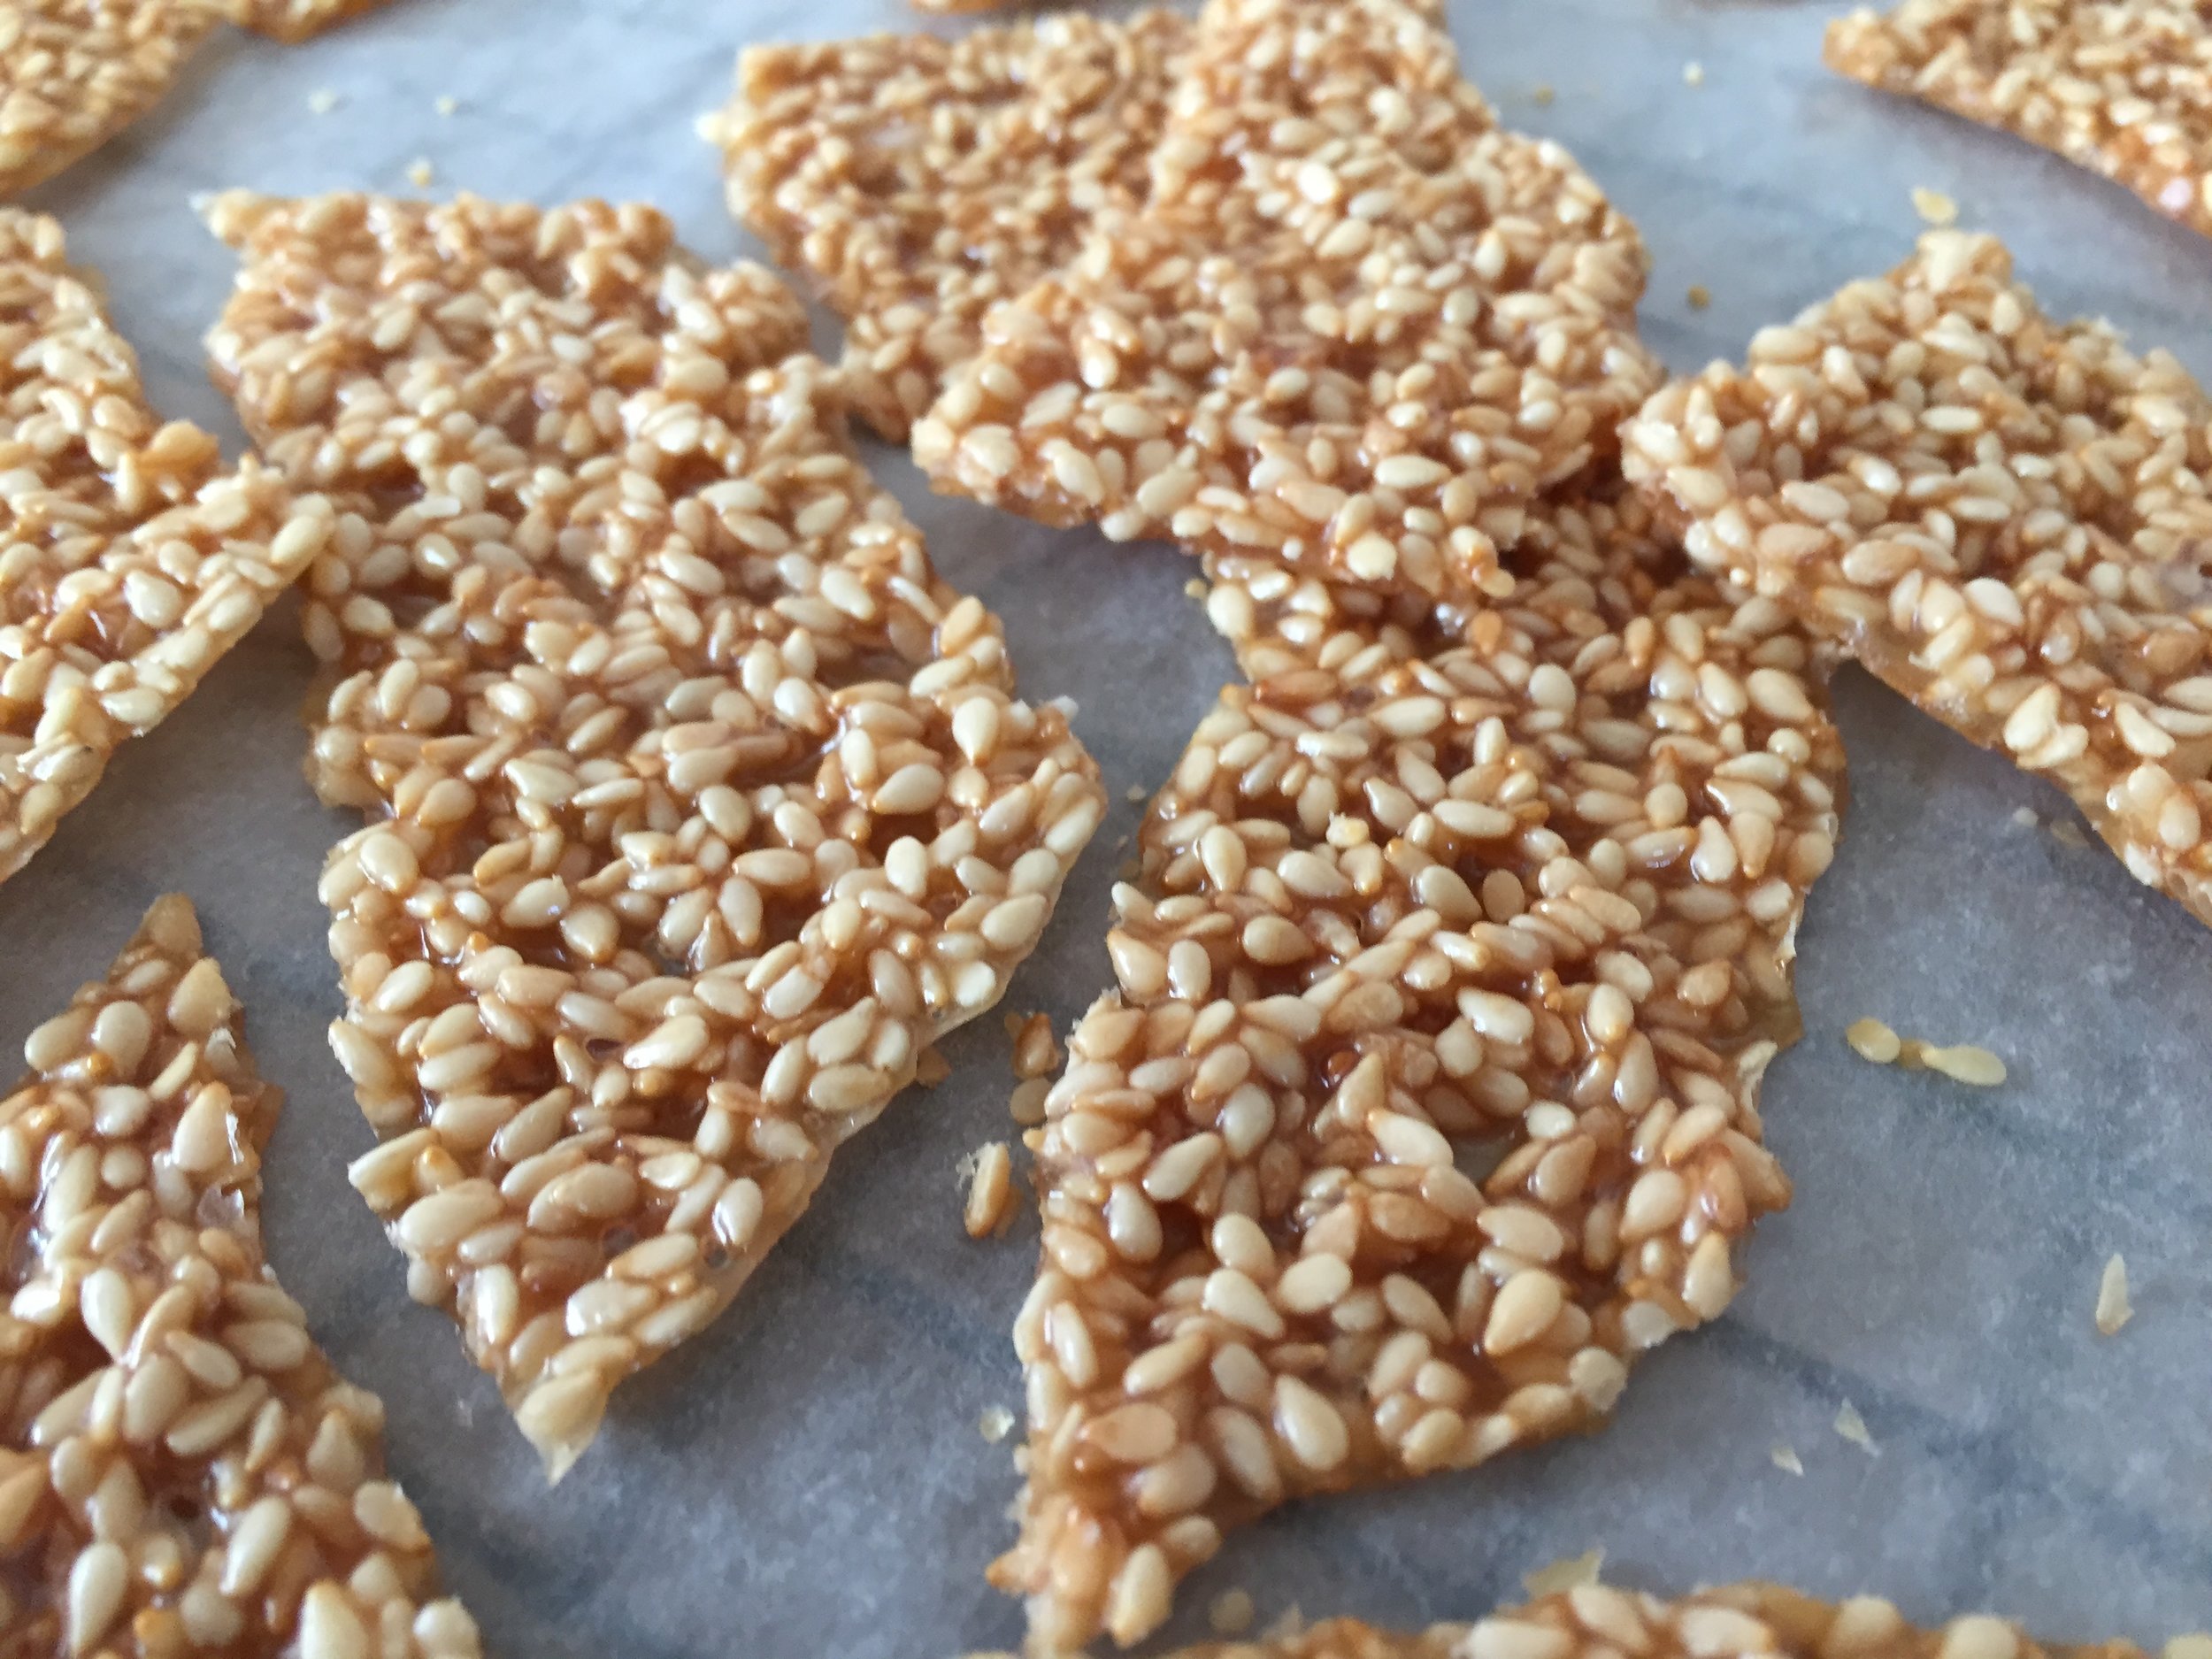
First the sesame brittle, so you'll have it ready to go for the garnish. And it keeps for a number of days.

IMG_2356.JPG

Sesame brittle (makes plenty!)

The beauty of this brittle method is you don't have to use a candy thermometer or worry about reaching a certain temperature. I LOVE that!

  1.  Toast 125 g sesame seeds (mix of 1/3 black and 2/3 white or all white like I did) either in the oven at 325ºF for about 10 minutes until nicely brown, stirring occasionally, or in a skillet on medium-low on the stove top. Do what you're most comfortable with. Set aside. Increase the oven temp to 350ºF.

  2. Have two half sheet pans and four pieces of parchment at the ready. 

  3. In a medium saucepan put 100 g granulated sugar, 100 g light corn syrup, 50 g unsalted butter and 1/8 teaspoon salt. Stirring constantly on high heat, blend the mixture and bring to a boil. Remove from the heat and stir in the toasted sesame seeds.

  4. Put two pieces of parchment (or Silpat!) on a heat proof surface (I used two overturned half sheet pans) and pour half of the sesame mixture on each. Cover with the other parchment pieces and roll with a rolling pin until about 1/8 inch thick. 

  5. Slide the paper with the sesame caramel onto half sheet pans and remove the top layer of parchment. Peel it back gently and push down any caramel that might stick. Bake for about 20 minutes until nicely browned. Remove from oven, cool and break into shards.

  6. Stores nicely in single layers between pieces of parchment or waxed paper in a well sealed container. The first batch I made lasted a couple of weeks and served as garnish for a number of goodies!

IMG_2616.JPG

Gateau de Pâques (for one 8-9" cake or multiple small cakes) - find recipe PDF here

  1. Heat your oven to 350ºF and have your molds of choice at the ready. Butter and flour a 8-9" cake or springform pan OR you can use any shape multi-well silicone flexi-mold (no butter/flour needed) or mini-muffin tins lined with decorative papers. You decide.

  2. Melt 200 g dark chocolate (I used 61%) and 200 g unsalted butter gently over a bain marie. I like to do this over very low heat and once the melting has begun, I turn the heat off and let the residual warmth finish the melting process. Stir the mixture every once in awhile as it melts.

  3. Once you have that going, separate 4 cold eggs. NOTE: Eggs separate best when cold so do that at the beginning of your prep. The whites will be beaten separately and whip best when warm so it's all part of planning ahead!!

  4. In a large bowl whisk the 4 yolks with 150 g sugar until thickened and more pale. Blend in the melted chocolate/butter mixture.

  5. Blend in 100 g all purpose flour.

  6. In a clean bowl beat the 4 egg whites with a pinch of salt to soft peaks. Gently fold the whites into the the above mixture.

  7.  Pipe or scoop the mixture into your chosen molds and bake. Your baking time will vary depending on the size of your molds. An 8" cake may take about 30 minutes, whereas mini cakes may take about 10. Look for a more dry appearance to the surface of the batter without gooey centers. 

  8. Let cool and unmold. Garnish with ganache or whatever you'd like! I made a basic 1:1 dark chocolate ganache to fill the wells, then piped a swirl of whipped white chocolate ganache (1:1 cream to chocolate, chilled then whipped) on top and added some shards of sesame brittle. Whew!

IMG_2634.JPG

The texture of these cakes is light and oh so smooth. And the whipped white chocolate ganache and sesame brittle finished 'em off so deliciously. You gotta try these, I'm telling you now.

Stay tuned for Part 2: toasted coconut lime cakes!

Nutty rosemary and lemon/pistachio/sesame shortbread

IMG_2610.JPG

I LOVE shortbread! I think back to those childhood days of eating Lorna Doone cookies and how much I enjoyed their crumbly butteriness (was there really butter in those babies??). I've come a long way down the shortbread trail since then. Yes, I know I've gone on about this topic in the past, but good things deserve a little review every now and then, right?

Depending on what part of the world you hang out in, these cookies can be referred to as biscuits (thanks to the Brits), shortbread (more Scottish - think Walkers) or sablés (thanks to the French).

My approach follows the traditional Scottish method - a simple combo of sugar/butter/flour, and you're good to go. Typically along the lines of 1-2-3 dough, you weigh out 1 part sugar to 2 parts butter to 3 parts flour and mix 'em up. You can play around with the ratios (decrease the sugar and increase the butter a bit) to yield an even more buttery cookie.

I have two base recipes that I use regularly. One uses granulated cane sugar and one confectioner's sugar (gives 'em a slightly more tender texture?). You can play around with different sugars on your own and decide which gives you the texture you most enjoy.

And why do I use two different bases you might ask? Because I can and so can you!

Add in your favorite citrus zest, spices, chopped nuts, chopped chocolate, dried fruit - the possibilities go on and on.

There are two mixing methods: sanding and what I like to call blending (I think of this one as just short of creaming - you're not trying to aerate the dough, just blending everything together).

The first involves weighing your sugar and flour into a mixing bowl, dicing cold butter and sanding it into the dry ingredients to coarse crumbs. At that point you just press into a pan and bake it. You can take the mixing a step further, going past the coarse crumbs until the dough holds together, then wrap, chill and roll out later, cutting into any shape that suits your fancy.

Both methods result in a lovely crumbly/crispy/buttery cookie, although, with the sanding and press in method, the texture is a bit more crumbly and melt-in-your-mouth. I make mine both ways and enjoy them equally.

If you look at LOTS of shortbread cookies recipes, you may notice that many of the French sablés add egg (whole or yolk) to the dough as a binder. They're delicious too! 

Periodically I enjoy changing up my flavor offerings. This time I had pecans in the freezer and sesame seeds in the cupboard.

First up - rosemary pecan.

IMG_2492.JPG

Over the years I occasionally make rosemary roasted nuts, usually walnuts or pecans, that are absolutely delicious as an appetizer along with a cheese or two. For a savory cookie, I chop some of the already rosemary-ied nuts and add them into my dough. Yum. So delicious.

IMG_2609.JPG

Next - lemon pistachio sesame.

IMG_2545.JPG

This one adds in some toasted sesame seeds, lemon zest/juice and chopped unsalted raw pistachios. Once baked, I brush them with honey and pop them back into the oven for a few minutes to set the honey. Oh man are they good!

IMG_2538.JPG
IMG_2611.JPG

On to the base recipes (plus additions!)

Rosemary pecan:

  1. In a stand mixer with the paddle attachment blend 75 g granulated cane sugar with 200 g diced, room temperature unsalted butter. 
  2. Add 250 g all purpose flour and blend in just until the dough comes together. Note/tip: I've started replacing about 1/5 of my all purpose flour with white whole wheat for some added whole grain goodness. 
  3. For the rosemary pecan version, chop 75 g rosemary roasted pecans (recipe below) and add them into the dough. Wrap, chill for at least an hour before rolling out and cutting desired shapes.

How easy is that??!

Lemon pistachio sesame:

  1. In a stand mixer with the paddle attachment blend 75 g confectioner's sugar with 227 g diced, room temperature, unsalted butter (notice a slight bump in the butter content here).
  2. Add 1 teaspoon vanilla extract, the zest of two lemons plus 2 teaspoons freshly squeezed lemon juice and blend in.
  3. Add 260 g all purpose flour (or sub 1/5 of that as white whole wheat flour) and 1/2 teaspoon salt and mix just until it comes together.

Blend in 50 g toasted sesame seeds and 50 g chopped raw pistachios. Wrap and chill for an hour or so before rolling out and cutting desired shapes.

I bake my shortbread at 325ºF (convection) for about 15 minutes or until gently browned (watch what's happening in there!!). Don't forget - it's your job to learn your own oven. 

Now how about those roasted rosemary pecans, you might ask? Here's the recipe (you'll have PLENTY of nuts for your shortbread dough - feel free to halve the recipe OR, even better, make the full batch and have plenty for apps and snacks):

  1.  Heat oven to 325º F.
  2. In a microwave safe bowl melt 2 tablespoons unsalted butter. Add 2 tablespoons olive oil, 1/3 cup chopped fresh rosemary (or 2 tablespoons crumbled dried), 2 teaspoons kosher salt, 1 teaspoon paprika and 1/8 teaspoon cayenne.
  3. Place 4 cups nuts (walnuts, pecans or a mixture of the two) in a bowl and toss with the above mixture, coating the nuts evenly.
  4. Spread onto a 1/2 sheet pan and bake 15-20 minutes, stirring every 5 minutes or so, until browned and fragrant.
  5. Drain on paper towels, cool and serve at room temperature (or chop some up for your shortbread - yay!!).
  6. Store leftovers in an airtight container and enjoy for many days.
IMG_2493.JPG

Now get in that kitchen of yours and create your own version of delicious, crumbly, buttery shortbread. You can do it!