Kouign-amann: Part 2


OK. Here we are in part 2 of my Kouign-amann review. Part 1 covered shaping two versions of individual pastries. This time it’s the full sized cake version, more traditional in Brittany for slicing and enjoying at breakfast or afternoon tea. Inspired by one of King Arthur Baking Company’s “Bake of the Week” recipes back in January, 2022, I’ve had it in my “I’m-going-to-try-this” pile ever since. My how time flies!

I ended up making two versions of this cake: the first (thanks to Andrew Janjigian and the above mentioned KA Baking Co) utilized a unique approach to the sugar/butter incorporation. I thought it rather messy and the end result not as flaky, lofty or tasty as that made with my usual recipe. If you’d like to give it a try, just click the link on Andrew’s name and you can learn about his approach/recipe. There are always different ways to do things!

my result with andrew janjigian’s version

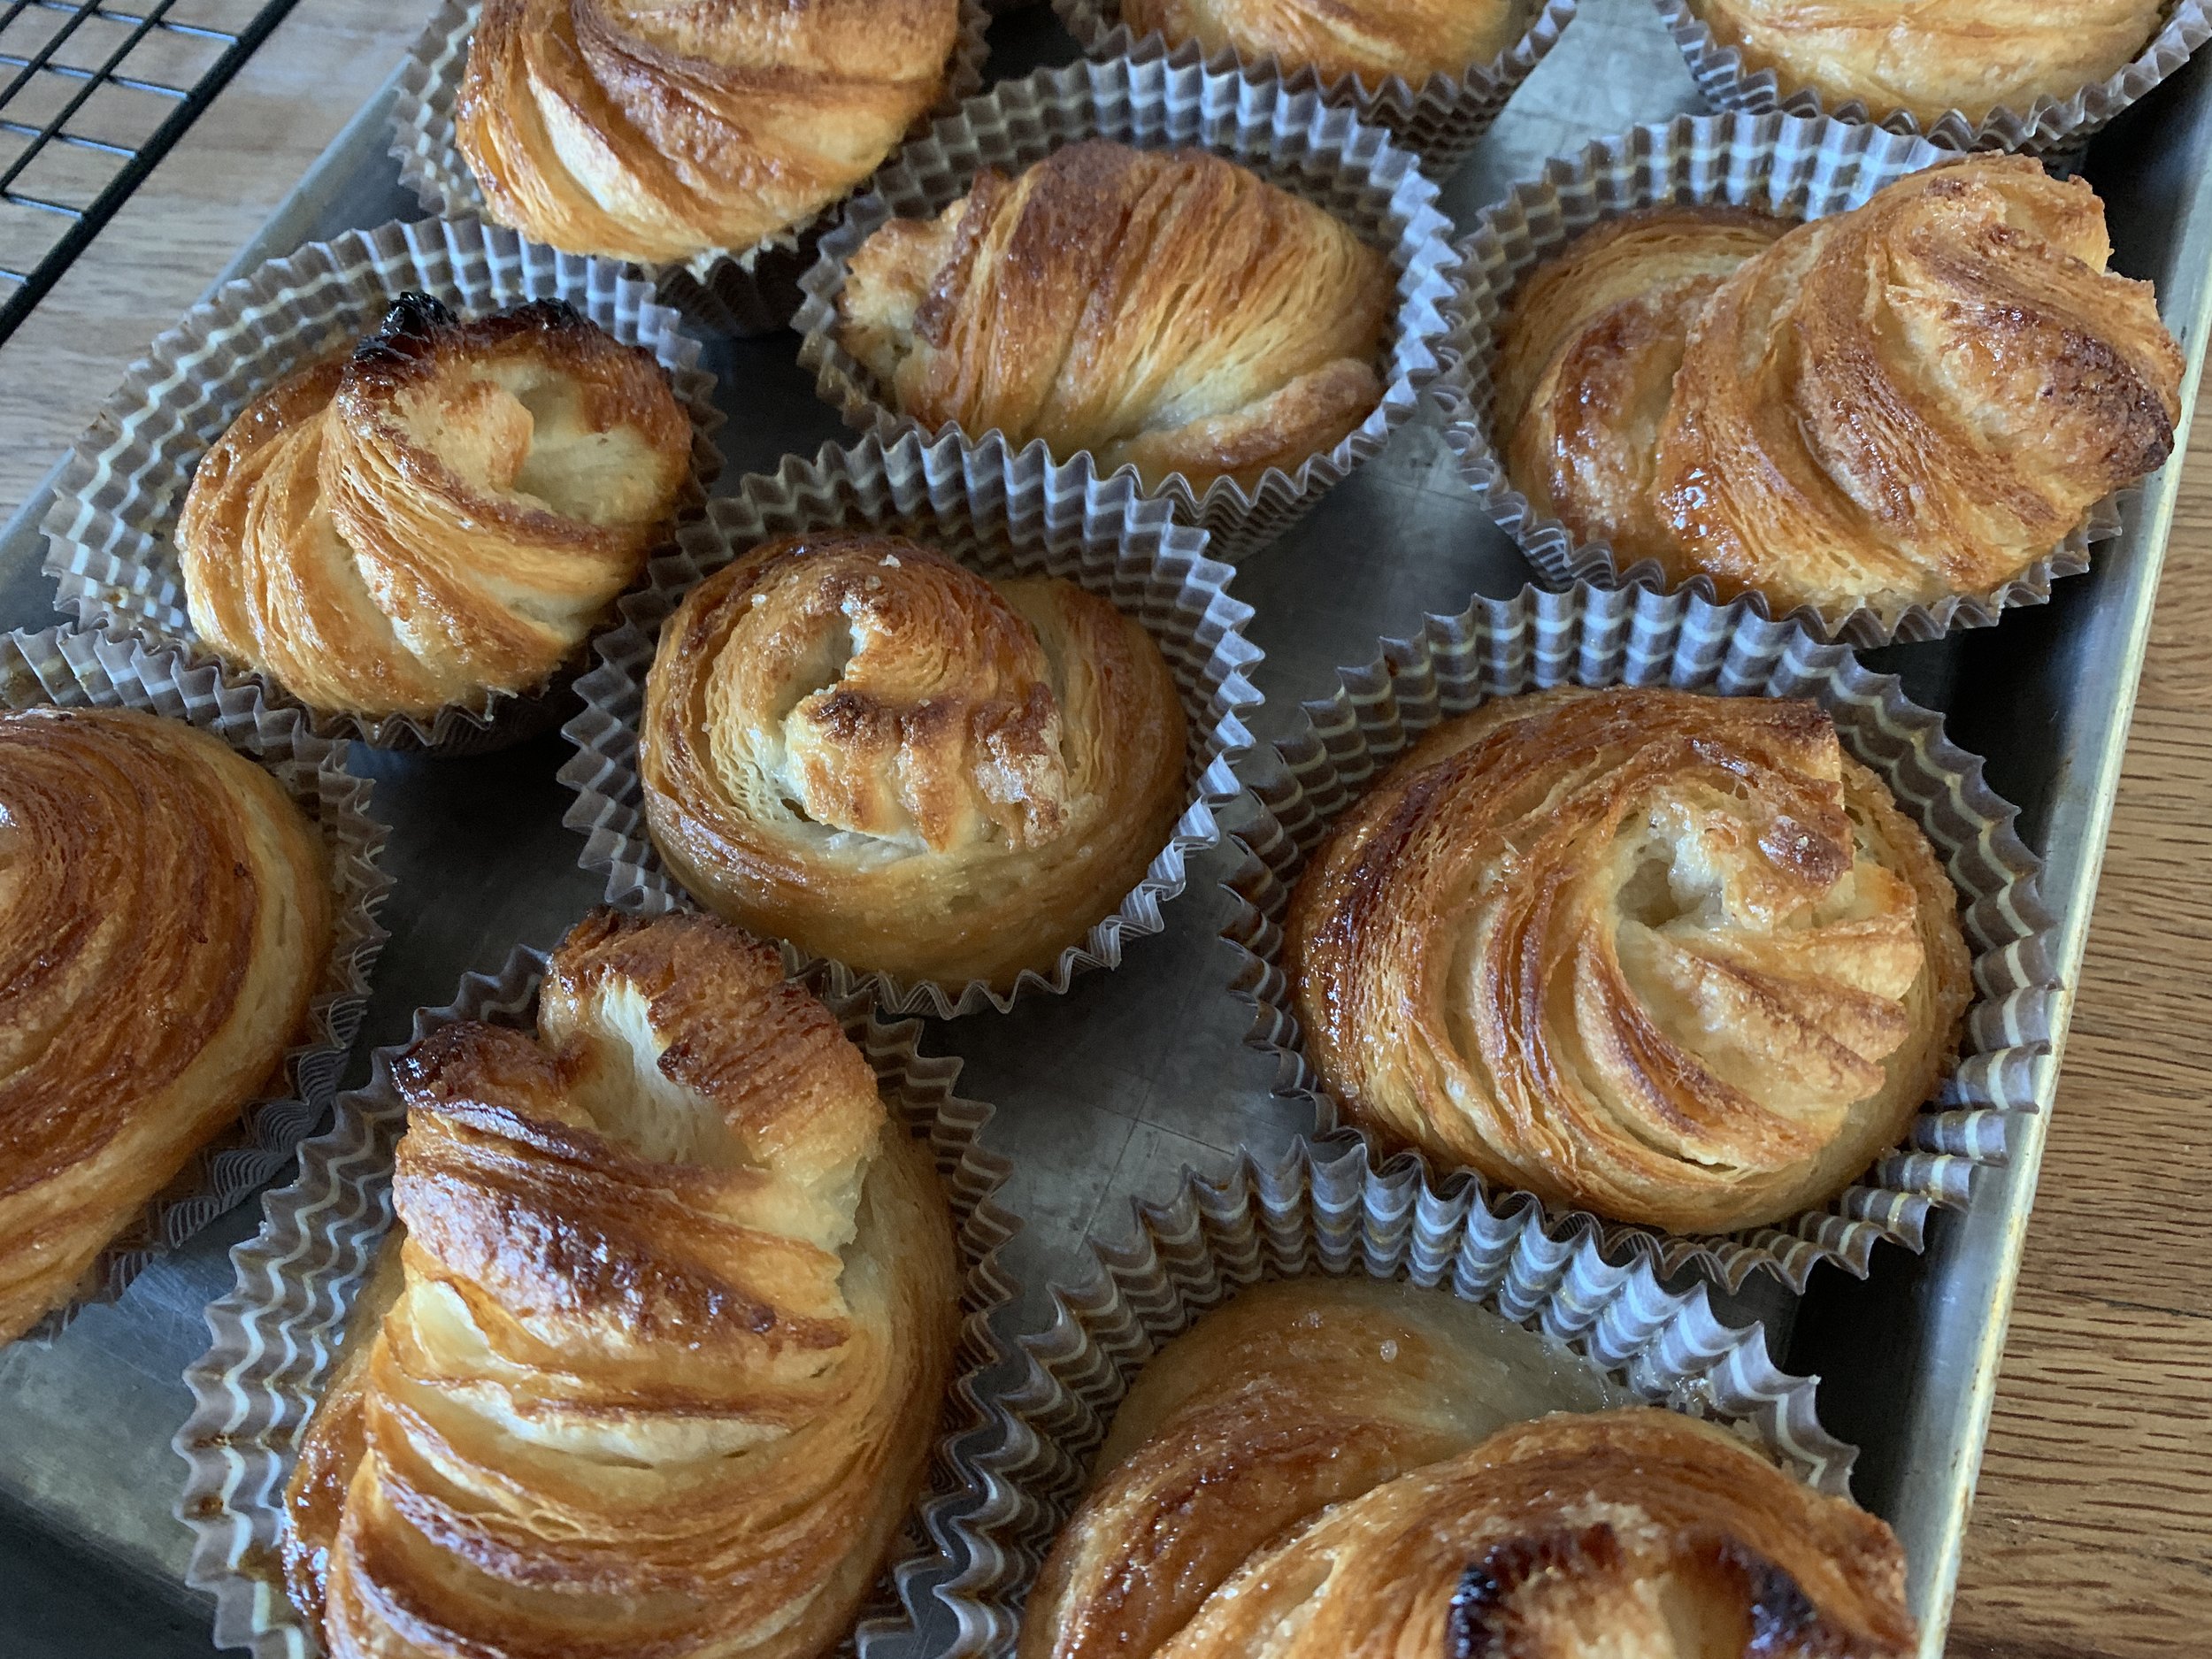
For the second using my base recipe (enough for two full sized cakes), I used half of the dough for a single cake and the rest went toward cute small spirals that are absolutely delicious!! I simply couldn’t help it. They’re stashed in my freezer as we speak.

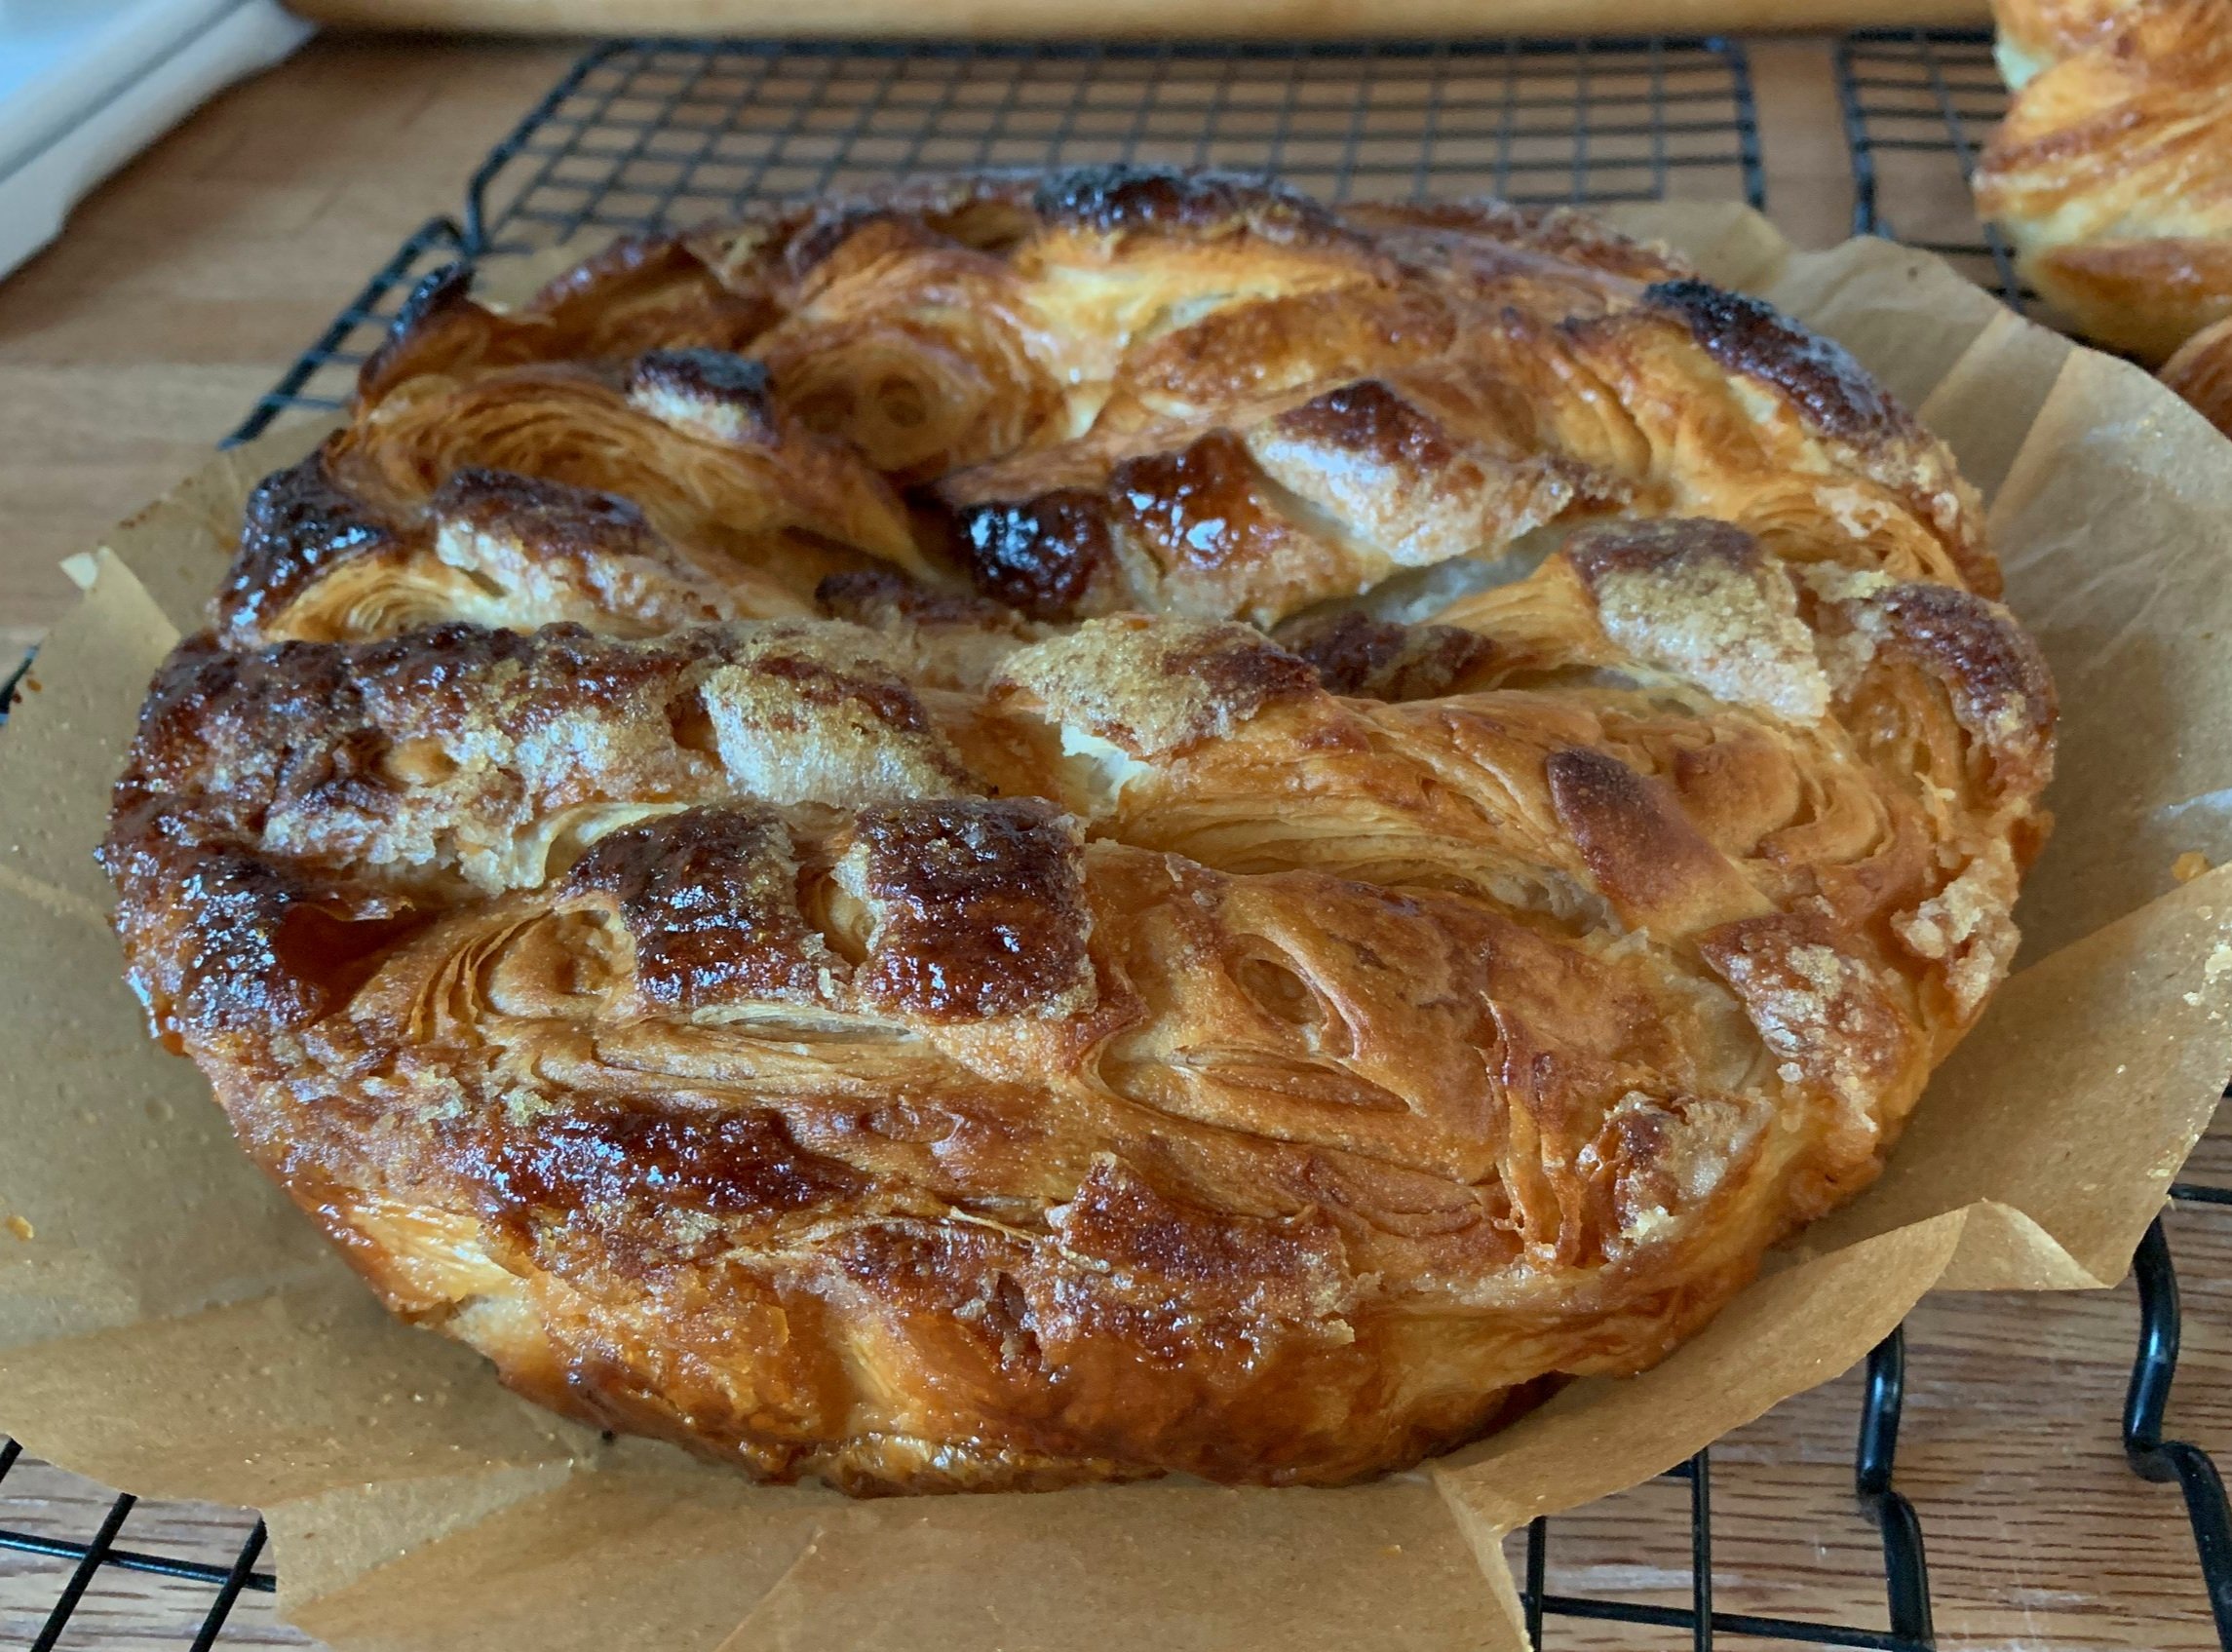
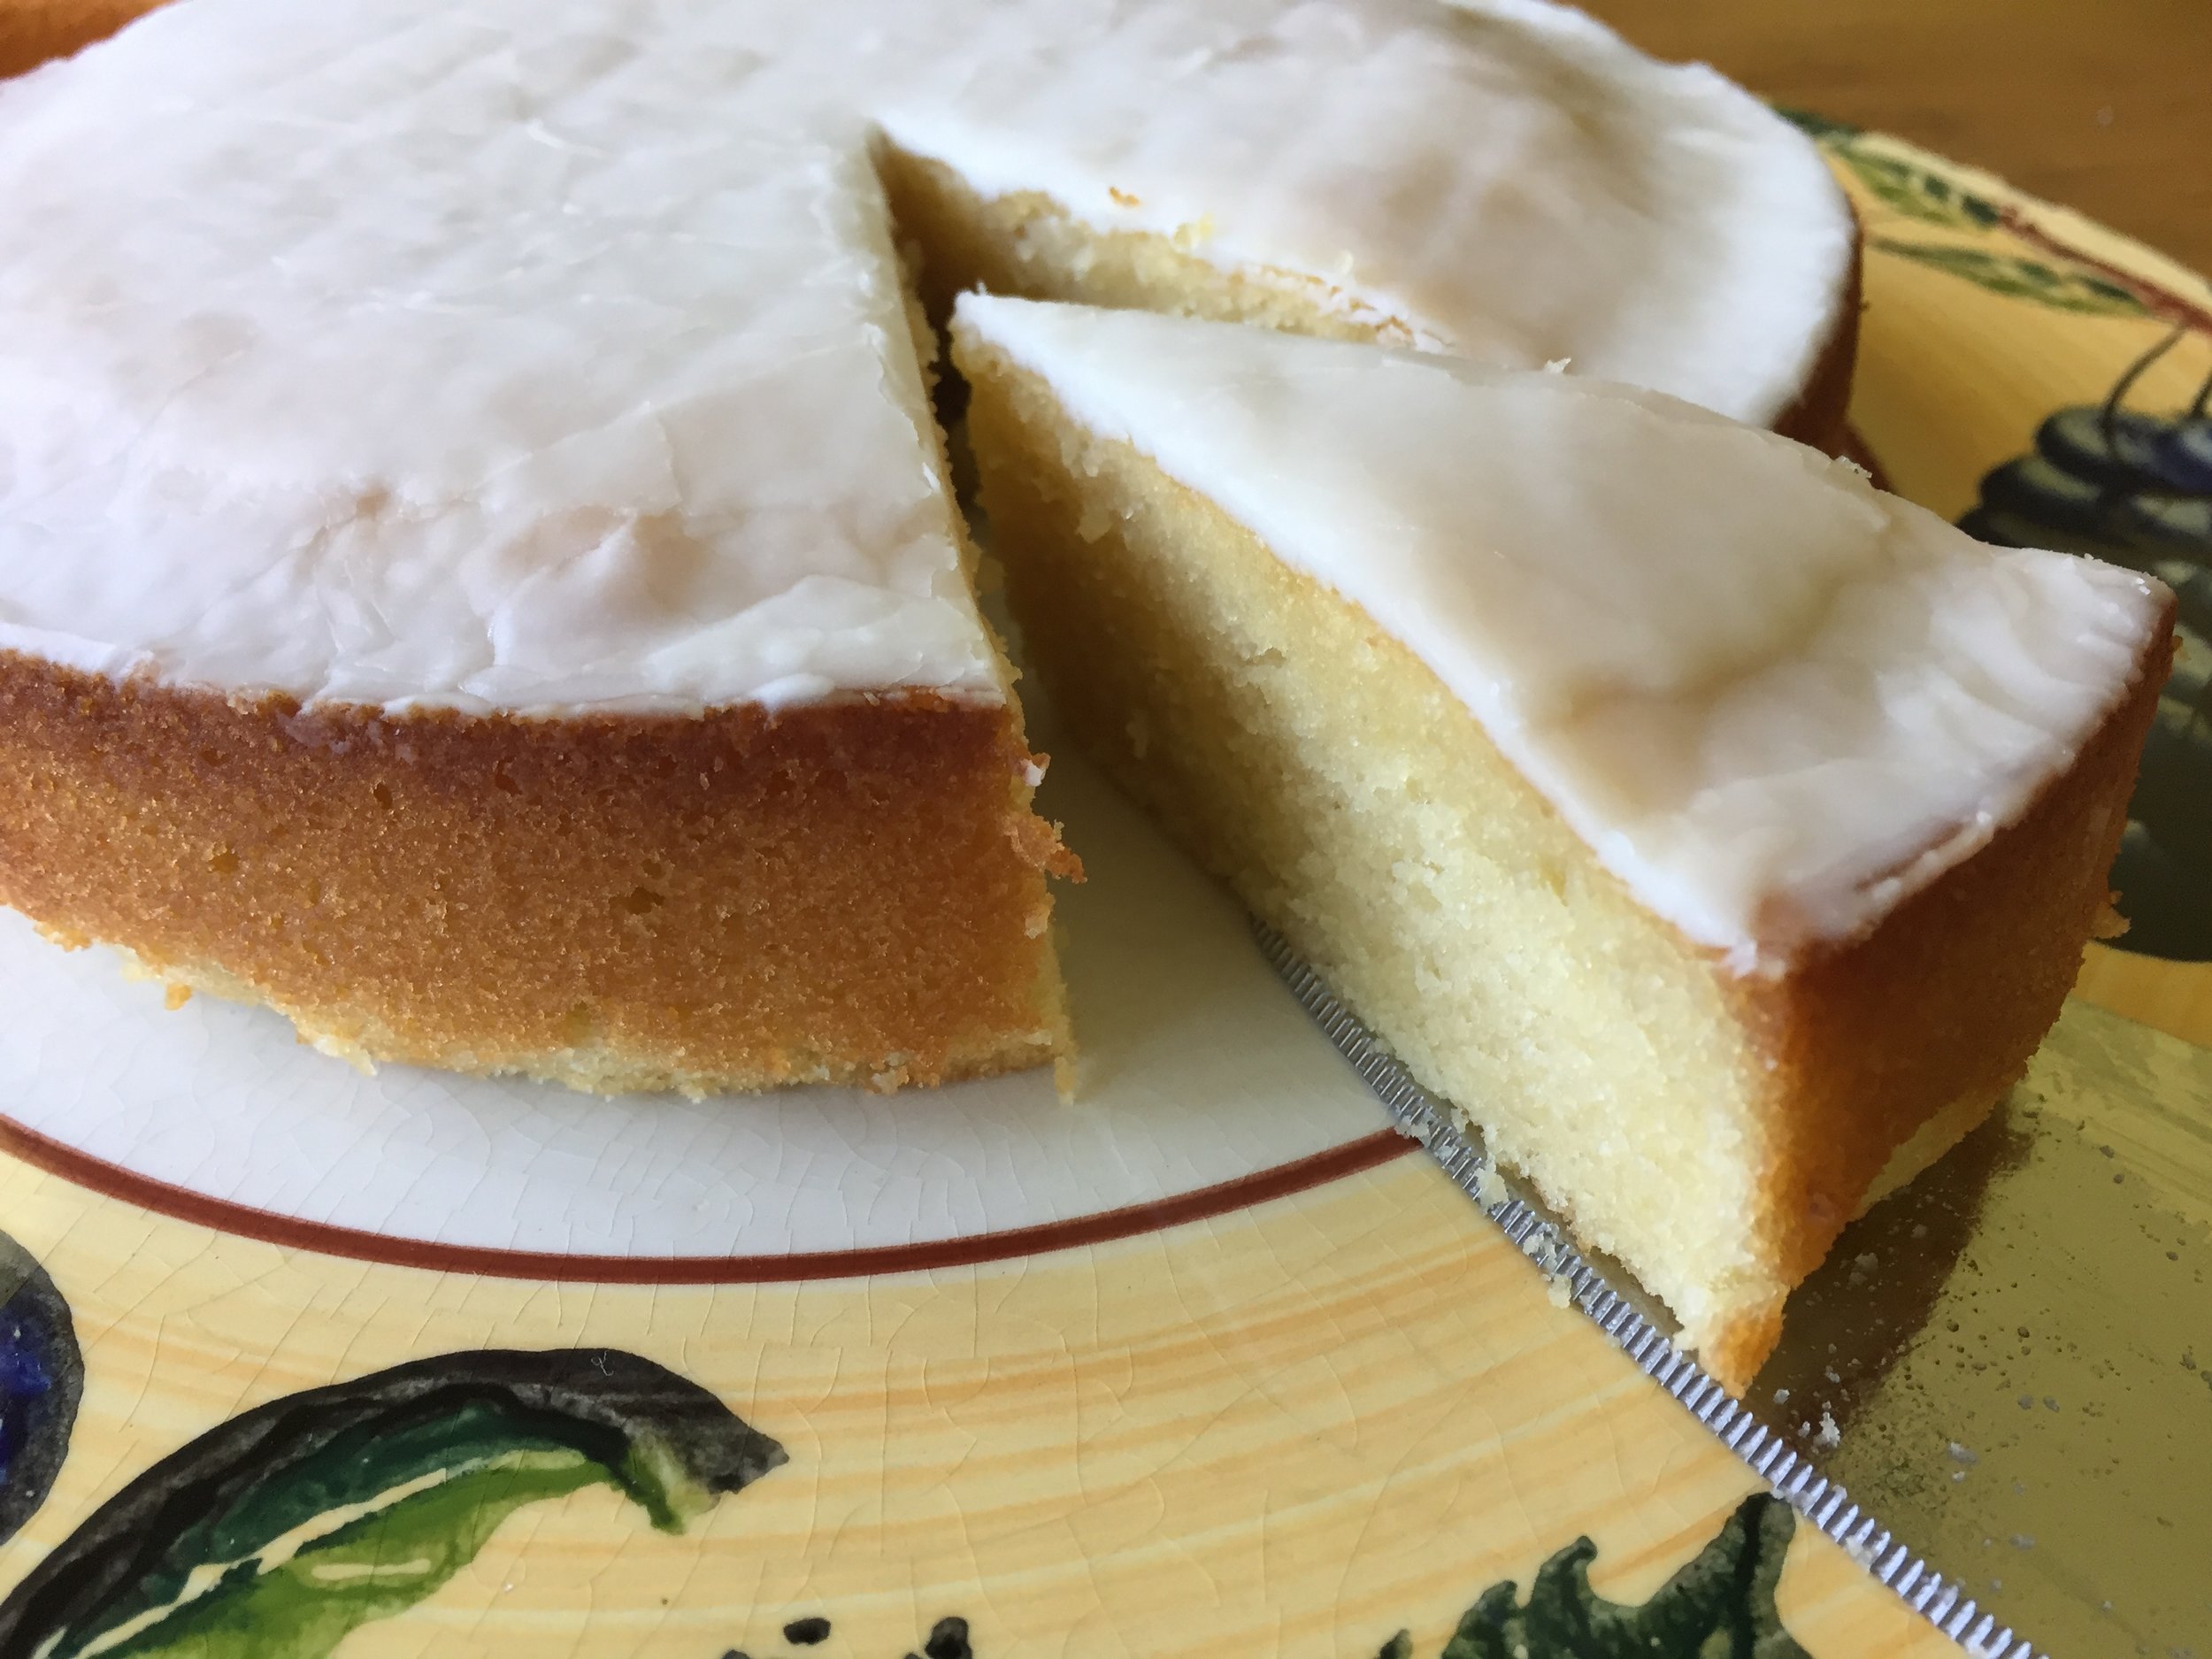
my result with my recipe


yummy spirals

Let’s create a full sized kouign-amann! We’re proceeding with the nearly completed dough, already put through three 3-folds rolling with flour. Now it’s ready for the last sugar-rolled 3-fold.

First prep an 8” cake pan by buttering the bottom and sides then lining with a round of parchment large enough to leave an edge above the pan’s rim. This makes it easier to lift out after baking. Then butter and sugar the parchment. You can do this ahead and set it aside.

pan all prepped

Roll the dough out length wise using sugar on the rolling surface as well as on top.

ready for last three fold with sugar

Once you complete the last fold, let the dough rest at room temperature (NOT in the fridge) lightly wrapped in parchment for 20-30 minutes and then proceed with shaping/proofing/baking.

Remember I’ve made a full recipe so I divide the dough in half, using one half for one cake. You can make two cakes if you want, but I took a different route.

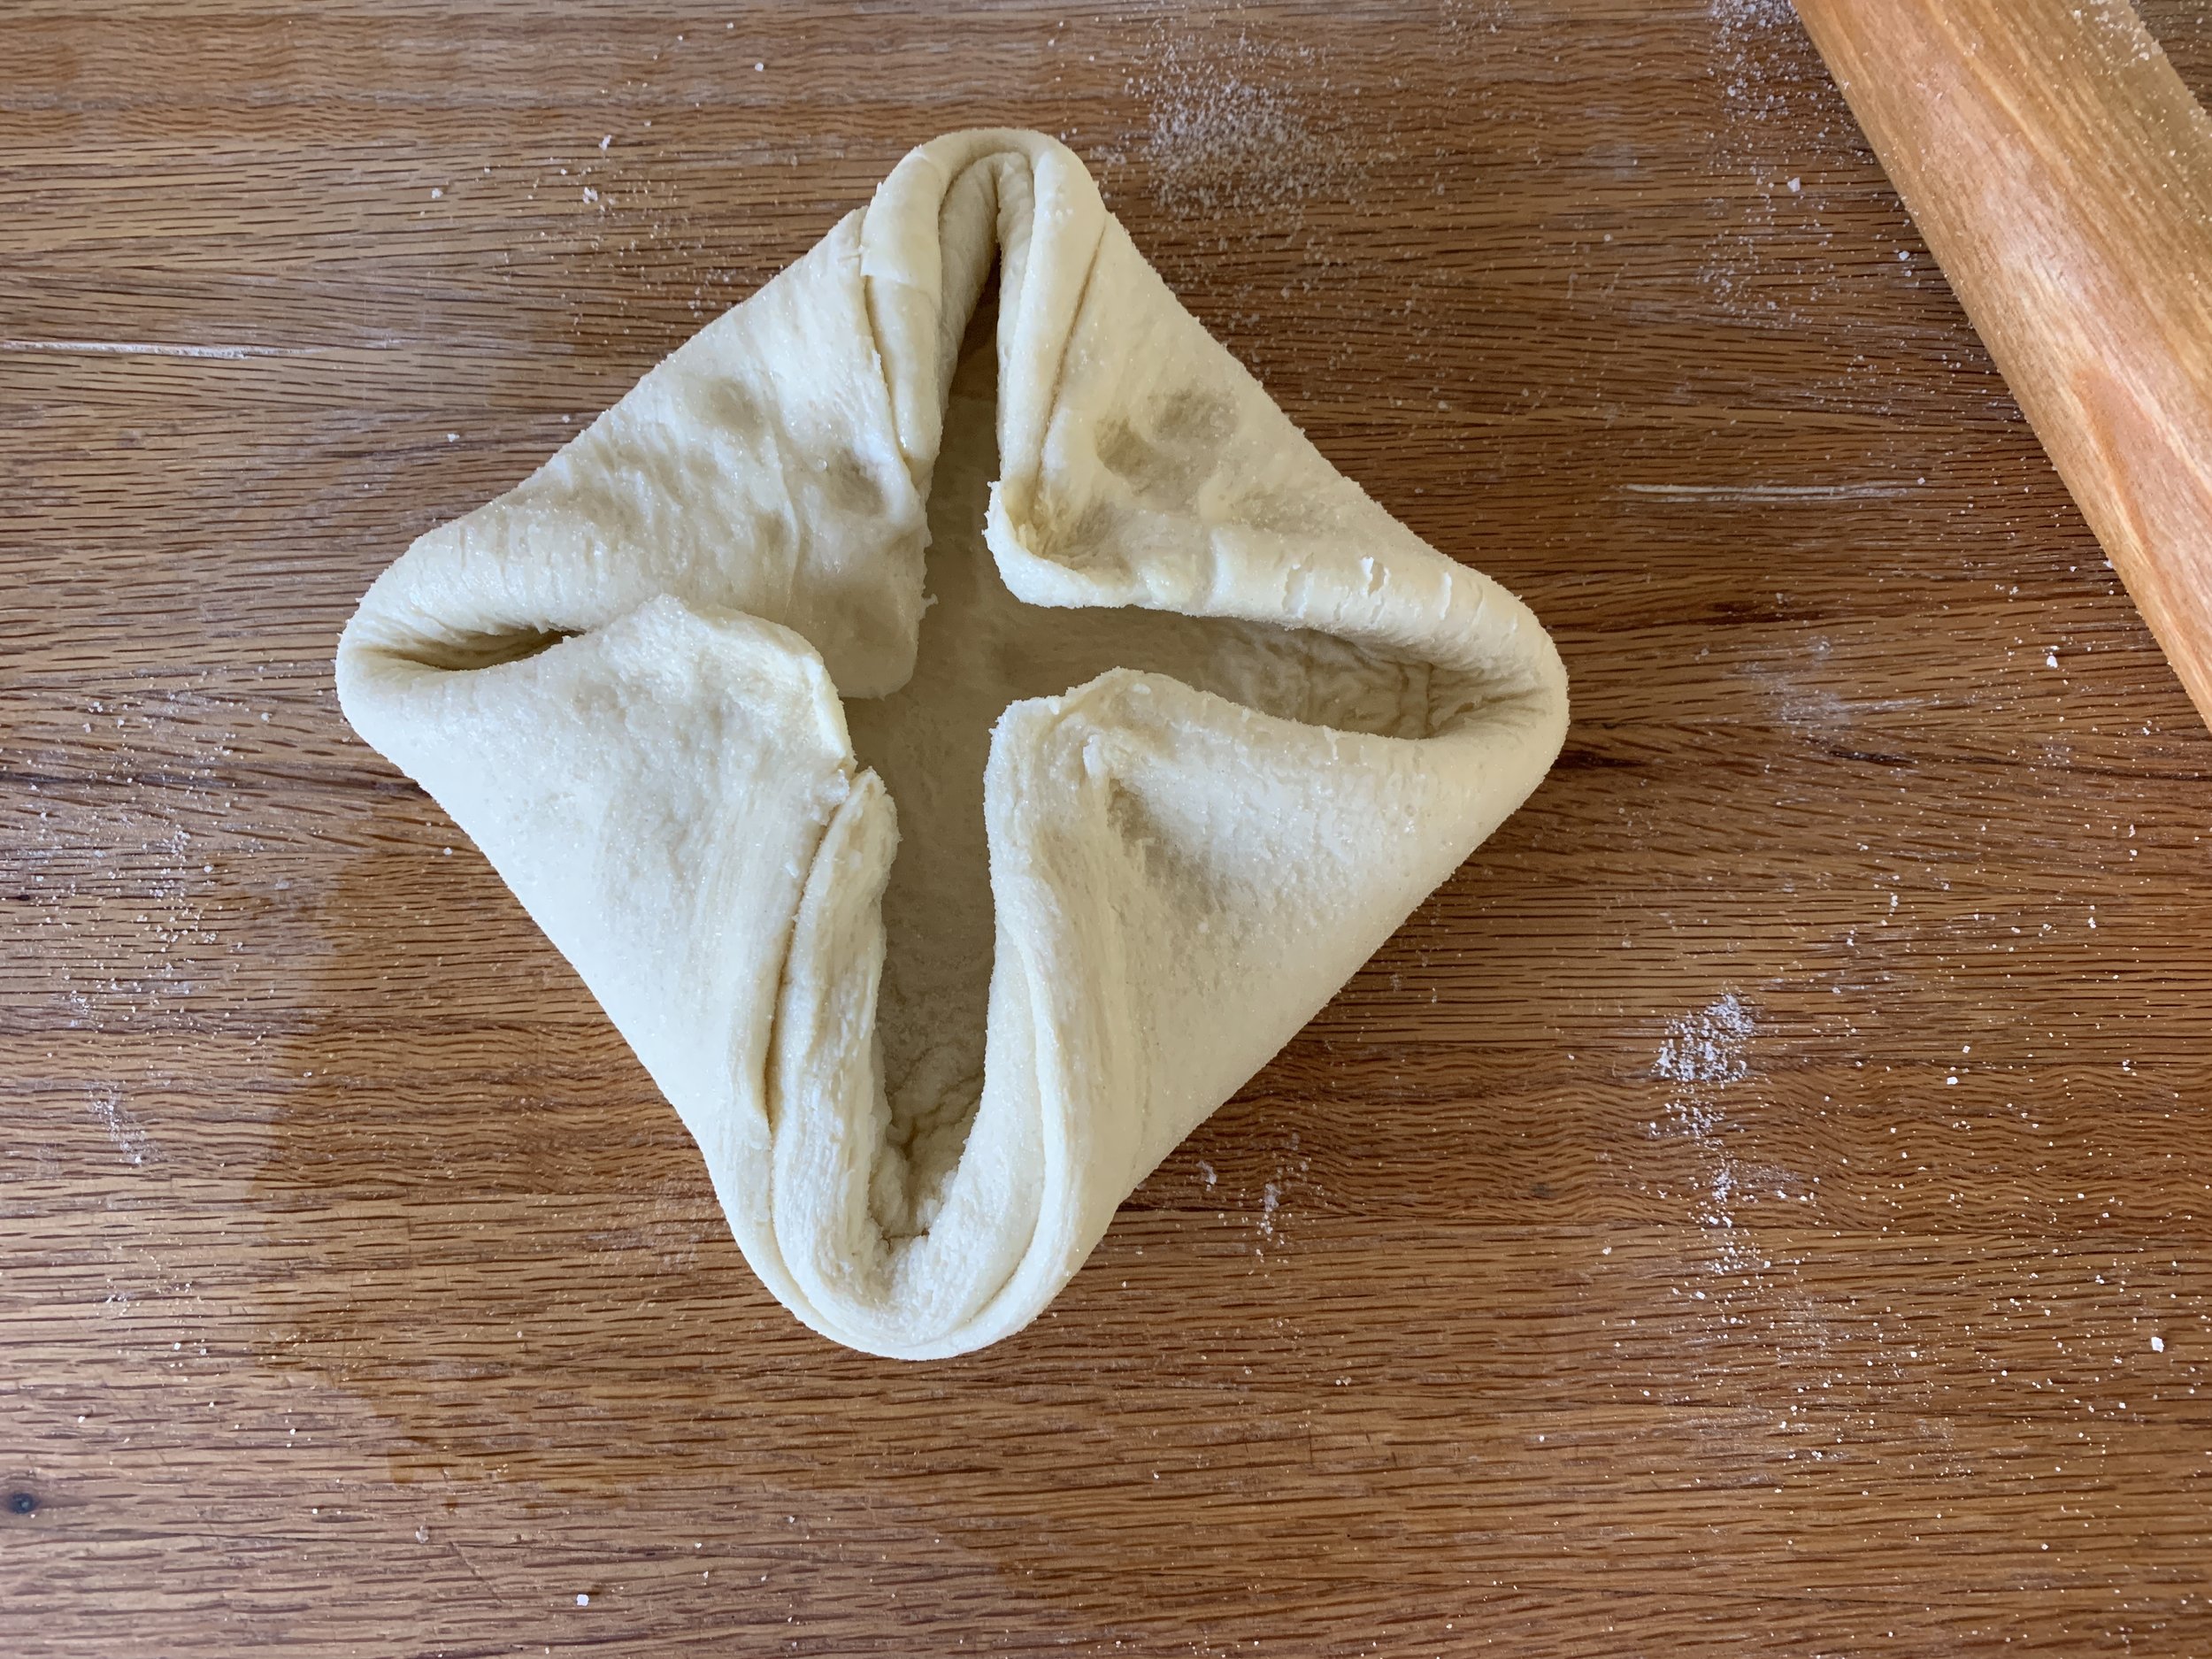
Roll a half portion into a rough-ish 8-9” square (still rolling in sugar) and fold the corners into the center.

corners in, ready to flip over

Turn the dough over onto the sugar dusted work surface so the corners/seams are down and roll out again (using sugar) to an approximately 8” squarish round. Don’t be too fussy about the shape - I figured it would spread out and bake into the confines of the pan, so I just went with it.


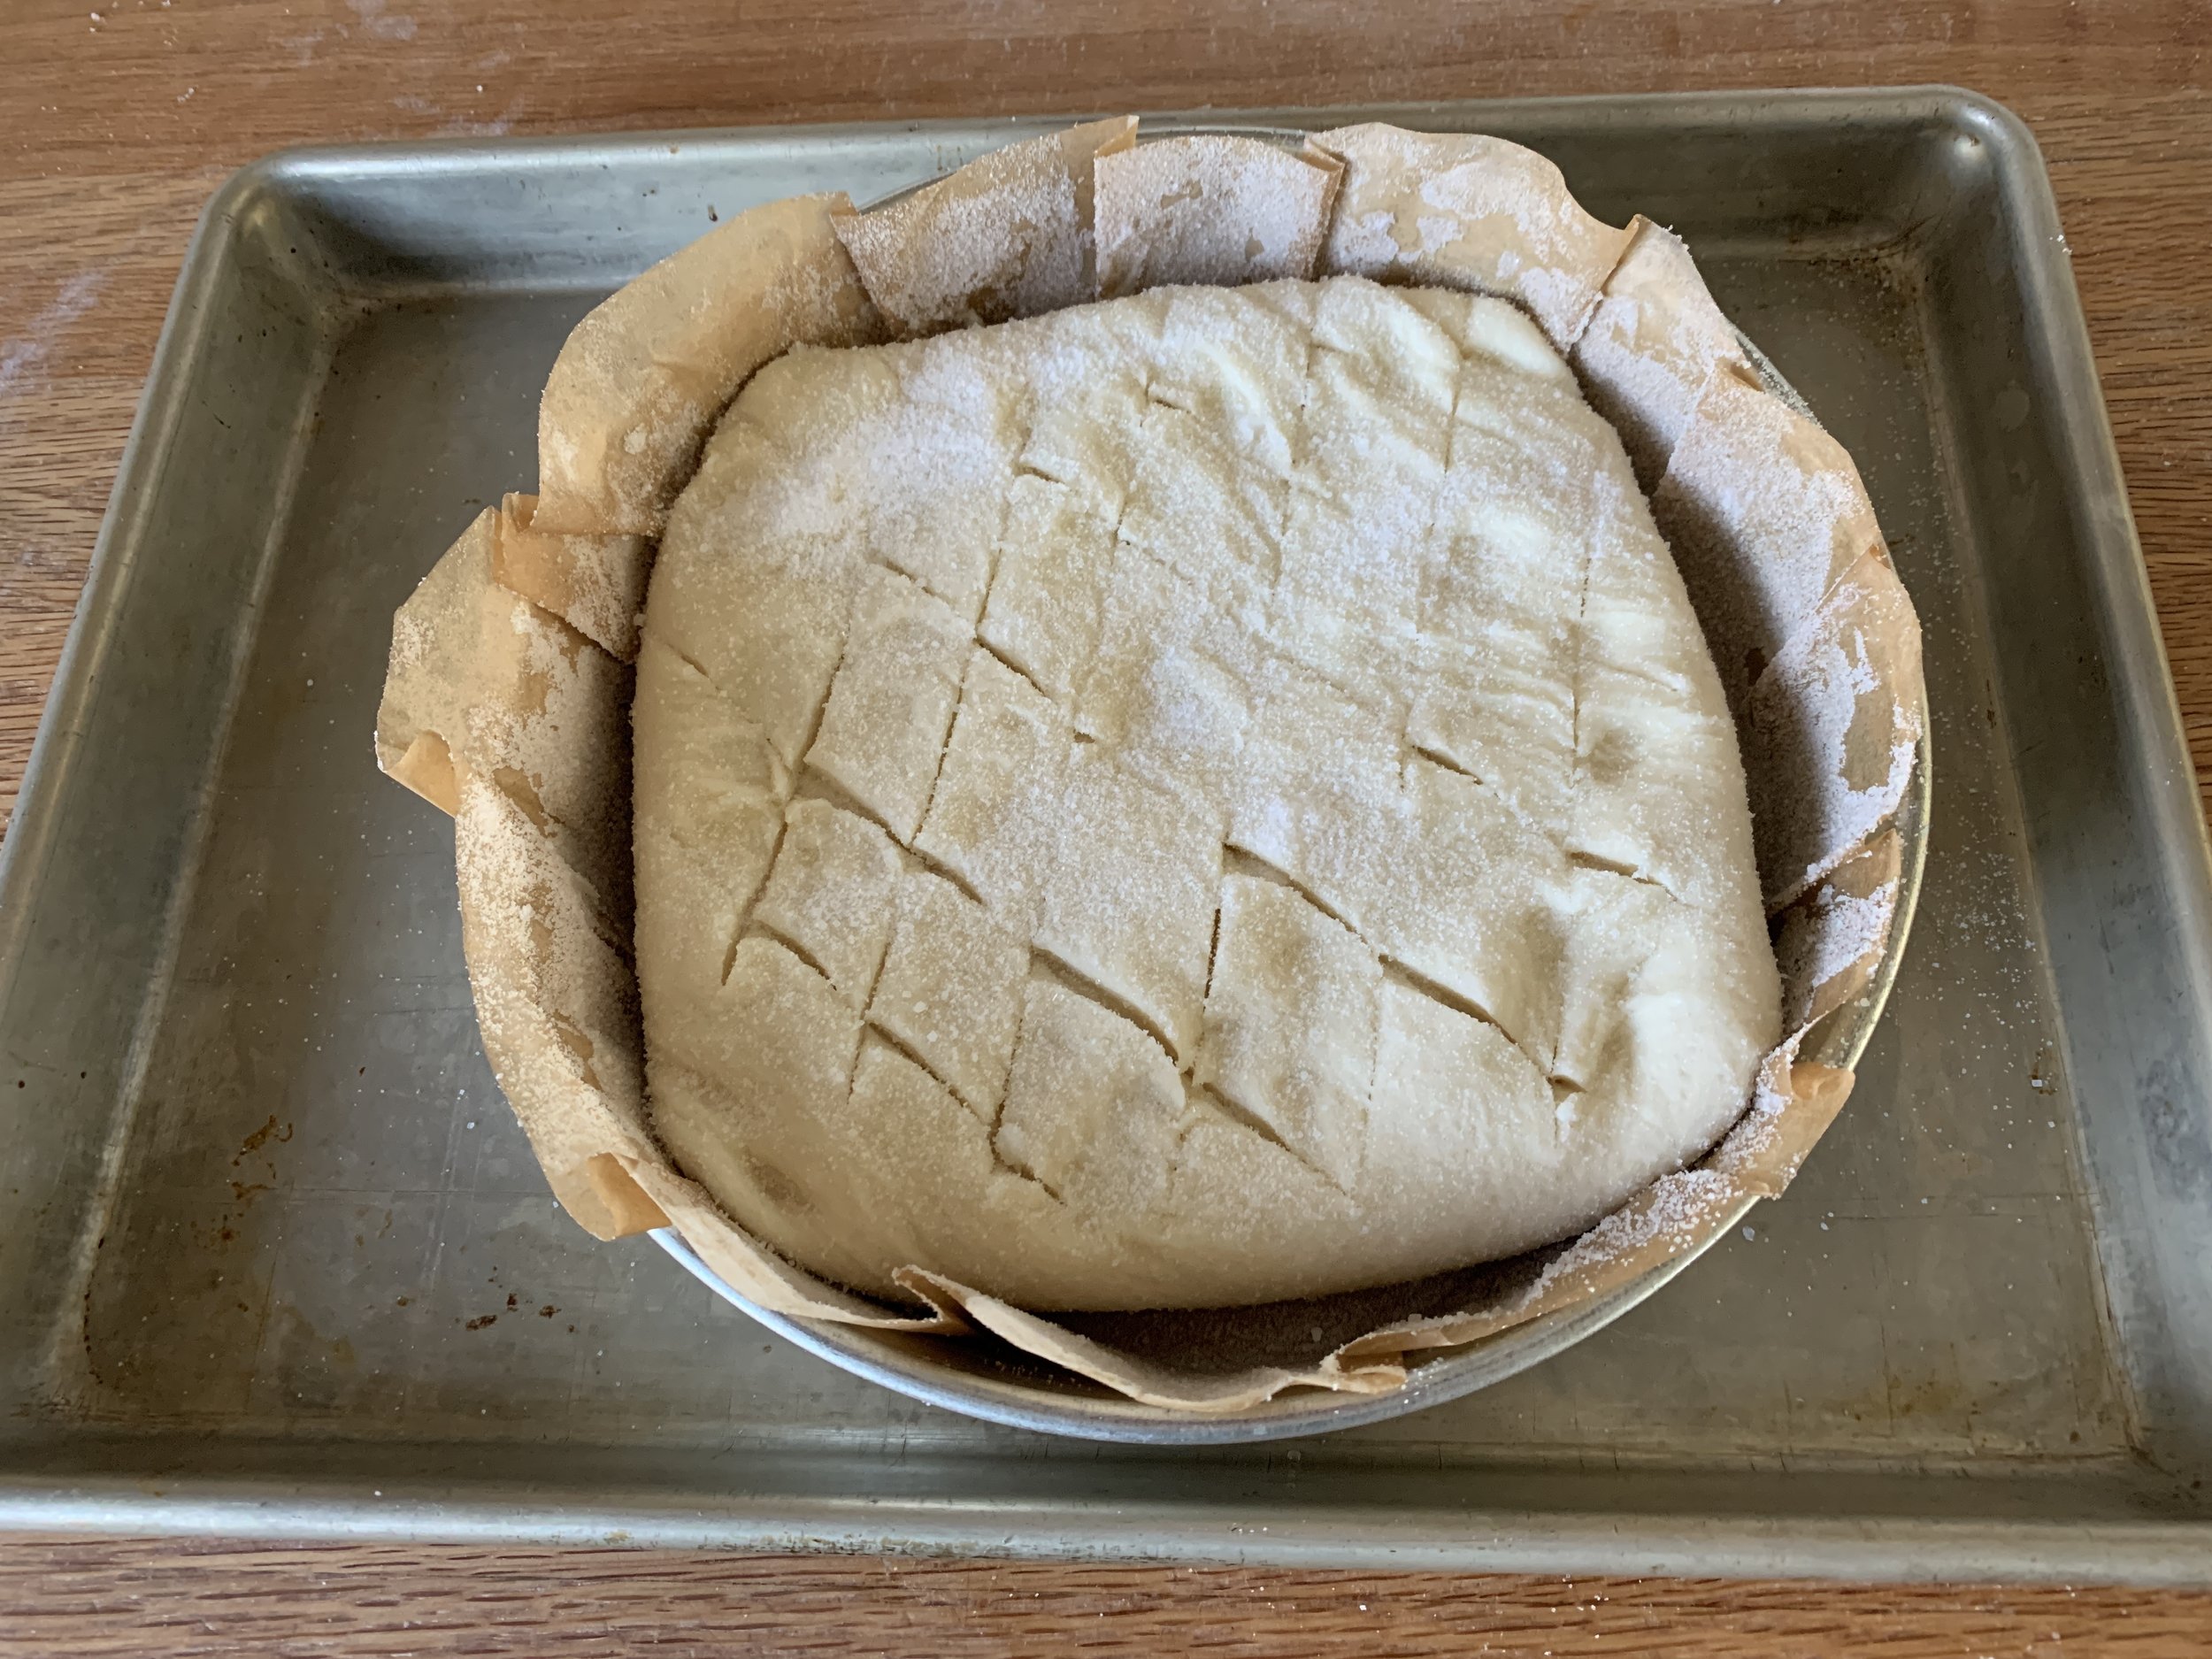
Lift the dough into the pan and tuck it in as best you can. Cut straight lines diagonally across the surface to create a diamond pattern and sprinkle with sugar.

ready to rise

Cover with lightly oiled plastic wrap or a damp towel and let proof 45-60 minutes. Meanwhile heat the oven to 400ºF (convection).

I used the other half of my dough to create a dozen spirals, rolling the dough out to about 10”x10”, cutting one-ish inch wide strips, rolling ‘em up and tucking into doubled paper baking cups rather than muffin tins. The paper cups give each a boundary so they don’t bake up against each other. My hope was they would bake more uniformly golden this way (I was right!).


just formed, ready to rise

My rise ended up at about 50 minutes. Time to bake!


I gave them 20 minutes, turned the temp down to 375ºF and rotated the trays. The spirals were well baked in another 3-4 minutes so out they came. I gave the cake an additional 10 minutes and then covered it with foil for another 10 minutes to avoid over browning. There were still some paler dough sections in the center that I wanted a bit more done.

If I’ve said it once, I’ve said it a thousand times: all ovens are different and it’s up to you to check on how things are going in there. You can do it. Let your recipe be your guide but your eyes, nose and touch be part of it too.

Oooh! Swirls and whirls of caramelized goodness. Reminds me of some of the rocks we saw in the southwest’s national parks last autumn.


Lift the cake out of the pan by grasping the paper edges and set it on a wire cooling grid.


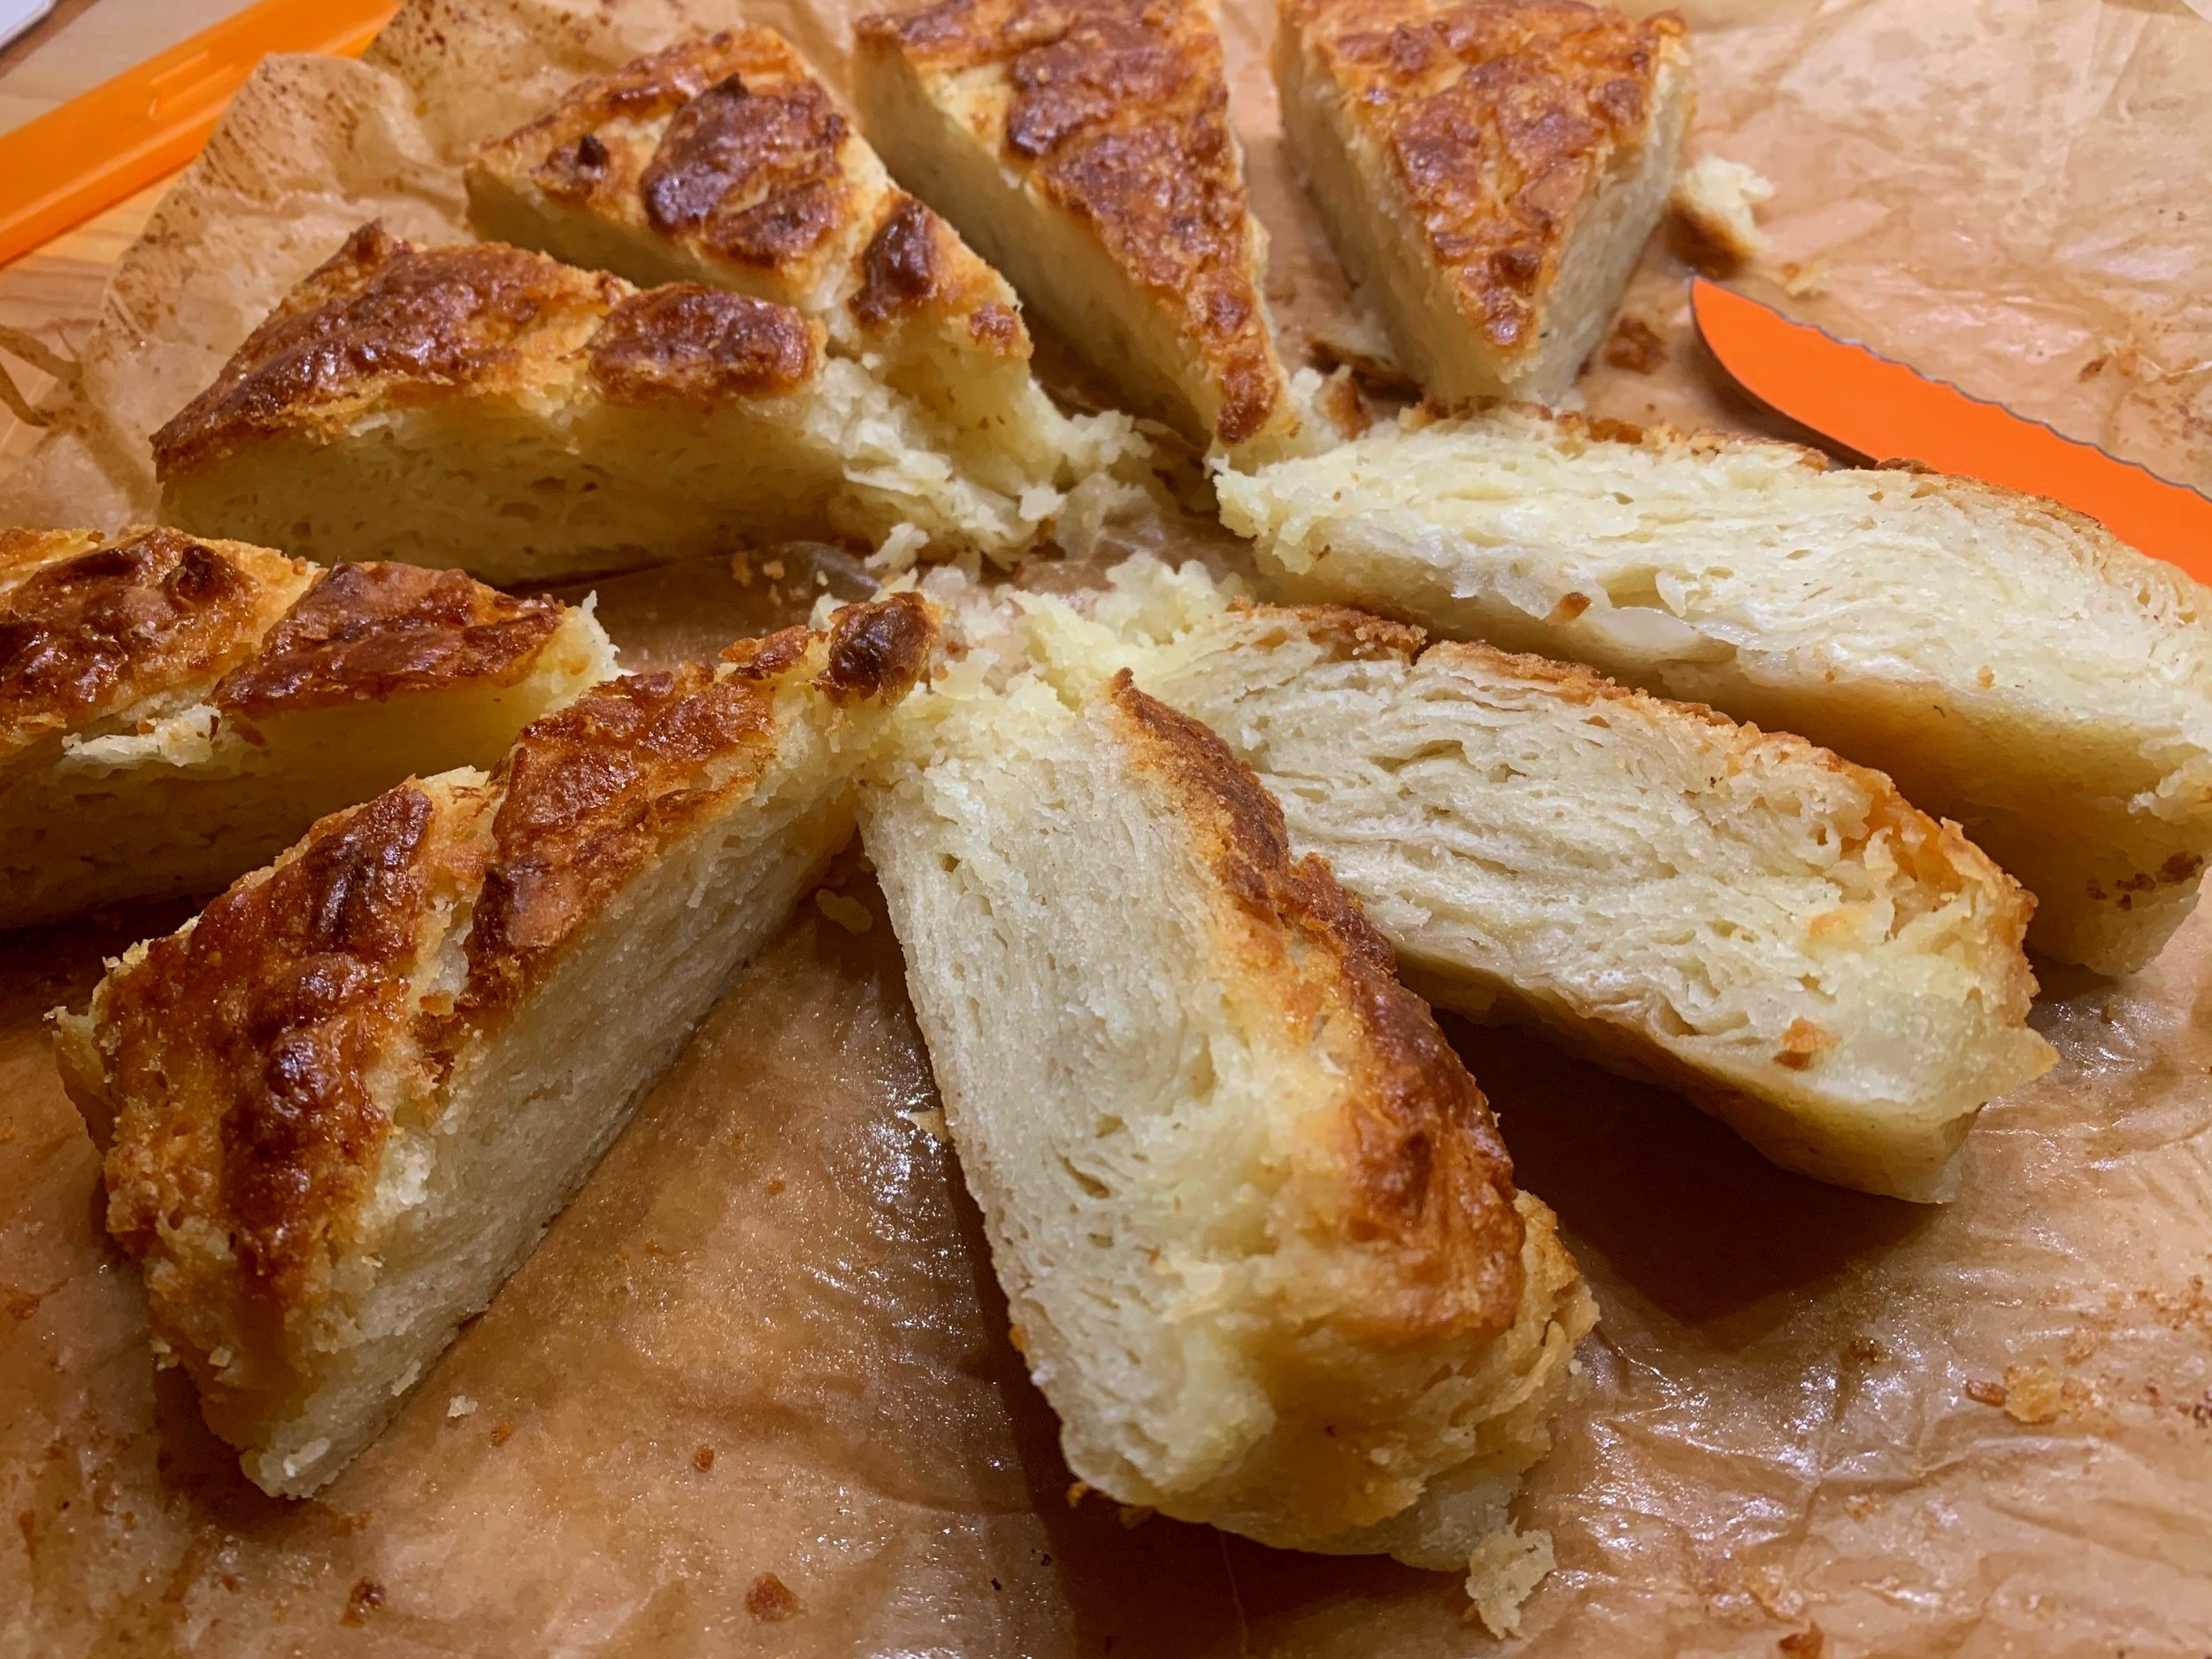
Let it cool a bit and then . . . . . the key for me when testing out any baked laminated pastry is the initial slice to check out the layers. Fingers crossed!


While my initial concern at first inspection was for a doughy under-bake, these layers came out with a certain creaminess that compliments the caramelized exterior - flaky, light and oh so delicious.

Of course, Steve and I had to have our requisite taste test, a decadent pairing of a slightly warm slice with homemade vanilla ice cream. Swoon!

The spirals baked nicely too and turned out just the right size for a delightful morning treat. I peeled them out of the papers pretty soon after baking so as to avoid caramel-y sticking.


love these - like a petite seashell!

Always itching to test out the staying power of baked goods, a few days later I pulled a few of the spirals out of the freezer for a morning oven warm up for family guests. Delicious. There were two left which we wrapped in parchment and dared to leave out at room temp until the next morning. Another short warm up and they were still great. Good deal!

I had some of my first Janjigian test slices in the freezer along with some of the K-amann slices made with my recipe so Steve and I did another test a couple of weeks later. After a thaw/warm up of about 15 minutes in a 325º oven, we found the first version (seen on the right below) greasy, tough and not very tasty. The second was flaky with a nice texture and all around better flavor.

Mine on left

On a final note, here’s a bit about cleaning the work surface after the sugar rolling. It gets pretty messy. I prefer butcher block (my fave for all things dough) but other surfaces like Corian, granite, stainless are all much easier to clean. I do have a large polycarbonate type cutting board that I can use too, but I opted for the wood this time.

ready for cleaning

NOTE: This is about the only situation in which I rinse my rolling pin quickly under warm water to get the gooey sugar off. Pat it dry and let it sit out on a counter to dry fully. Otherwise after usual dough rolling in flour I simple rub any dough particles and flour off the pin until the next time.

For the sugary surface I use my bench or bowl scraper to push off all the loose debris into a waste basket. Then rub the surface with pieces of lemon, sprinkle with kosher salt and even a little flour to help soak up the moisture and let sit for awhile.


Rub it around to give the surface a gentle scouring, then scrape all the stuff off with a bowl scraper, wipe with a damp cloth and let air dry. The butcher block likes a mineral-oiling once in awhile too, which I might do every few months.

Lemon TIP: when I’ve zested lemons for whatever purpose, I then juice them, pour the juice into ice cube trays and freeze. The cubes are great when you need a tablespoon or two of juice for a cooking or baking project.

I then chop up the zested lemons into chunks and bag them up for the freezer. Throw a few into the garbage disposal every once in awhile to freshen things up or use a few chunks for the above cleaning process.

I think I’ve said enough folks! Happy spring and happy baking!!

just one bluebird of happiness!

Gâteau Nantais

IMG_4100.JPG

Always on the look out for regional French baked goods, this one came to my attention some months ago thanks to a link to a Washington Post piece (from which the recipe comes) sent by my friend MBT. I’ve had it on my to do list ever since and finally got around to purchasing a bottle of rum, an ingredient that typically doesn’t grab my attention nor my taste buds!. Buuuuutt - desirous of keeping to the classic recipe I simply had to include the rum n’est-ce pas?

The preparation is oh-so straight forward but give yourself a day or two ahead of serving since it’s recommended that you let this rum soaked/glazed cake sit for a day for the flavors to infuse. And be sure you have SALTED butter on hand, an absolute when baking anything even remotely associated with Brittany. While present day Nantes is located in the Pays de la Loire region, it was once the capital of Brittany and home to les Ducs de Bretagne. Those Bretons do love their butter.

There are three components: rum simple syrup, almond sponge cake and confectioner’s sugar glaze.

Make the syrup: Heat 75 g granulated sugar with 155 ml water over low-medium heat in a small saucepan. Stir occasionally to dissolve the sugar then increase to high and bring to a boil. Remove from the heat, cool then add 3 tablespoons dark rum. This can be made several days ahead and held in the fridge. The recipe makes plenty for one cake and any leftover will keep in the fridge for weeks as any simple syrup will.

Make the cake: Heat the oven to 350ºF. Butter an 8” springform pan, line the bottom with a round of parchment then butter the parchment.
Place 125 g salted butter and 150 g granulated sugar in the bowl of a stand mixer (or use an electric handheld mixer) and beat with the paddle on medium low until creamy. Add 125 g almond flour and beat to incorporate. In a separate bowl lightly beat 3 large eggs and add them to the batter in three or four additions, blending well after each addition. Add 40 g all purpose flour and 3 tablespoons of rum and beat on medium to create a smooth batter.
Spread the batter evenly in the prepared pan.

IMG_4088.JPG

Bake 40-45 minutes until set in the center and beginning to pull away from the sides of the pan.

IMG_4090.JPG

Once out of the oven, loosen the pan, turn the cake out onto a cooling rack, remove the bottom parchment than flip right side up onto another cooling rack set over a sheet pan. Brush the warm cake generously with about half of the rum syrup.

IMG_4091.jpg

Once the cake has cooled completely give it another decent brushing of rum syrup.

For the glaze: mix 100 g confectioner’s sugar with 1 tablespoon rum and add small amounts of water until you have a glaze that will drizzle and spread smoothly. You can spread it on top only, as I did, or let it drip down the sides - it’s up to you.

IMG_4095.JPG

Now it’s ready to cover and let sit for a day. Steve and I behaved ourselves and waited the requisite time frame before diving in for a taste.

IMG_4099.JPG
IMG_4100.JPG
IMG_4101.JPG

To our delight, the rum essence was not at all overpowering and the cake offered a pleasing density, moistness and all around lovely taste. My one regret is that I didn’t avoid the top-of-the-cake grid marks from the cooling rack but that certainly didn’t detract from the overall enjoyment. One small slice is all it takes to comprehend le gâteau Nantais. Now we just have to visit Nantes and enjoy a slice! Maybe we’ll see you there?

IMG_4103.JPG

Gateau Breton

Perhaps I've mentioned this wonderful goodie in previous posts, if only to speak of its ease of preparation and its delightful taste and texture.  In the wake of making a walnut version recently, I thought it time to focus on Breton dough a bit more.  

Absolument!

Gateau Breton au noix

In Brittany a simple gateau Breton is a common offering for petit déjeuner.  It's hard to describe its texture - kind of a cross between cake and shortbread.  When you first take a bite, there is a crispiness to the exterior, but then you reach a dense, almost cake-like interior full of buttery goodness. So deelish.

Breton dough is in the sablé category of dough, but differs from some pâte sablés by changing up the sugar, butter and flour ratios, adding more egg yolks plus baking powder, not a typical ingredient in shortbread and tart doughs.

There are many Breton dough recipes out there.  Most of them utilize equal weights (or close) of sugar and butter in addition to a number of egg yolks, and an amount of flour that is usually about 2 times by weight of that of the sugar or butter.  You can replace some of the flour with a ground nut flour of choice, e.g. almond, pistachio or walnut. Tons of variations exist!

The beauty of Breton dough is its ease of mixing and shaping.  Plus, depending on how thick you bake it, you'll end up with a crispy shortbread (baked thin) or a classic gateau Breton (baked thick).  How can you go wrong with those choices?!

For my walnut version I used Christophe Felder's sablé Breton recipe from his book Les Folles Tartes, replacing the almond flour with toasted, then ground walnuts (toasting nuts before using brings out their flavor!).

I'm a pastry chef who takes lots of notes.  In Felder's book the dough is described thus:  "sablé aéré et léger", and my notation of 2/11/11 was "c'est vrai!" On that date I baked this Breton dough in 60 mm rings and served it with ricotta custard, almond nougatine and a blackberry/raspberry sorbet.  Wow! 

How can something be dense yet airy and light at the same time?  You just have to taste it to understand.

I've since created versions of Breton tarts by topping the dough with almond or pistachio cream and berries or cherries before baking.  You can also add a layer of raspberry or apricot jam (or any flavor you want!) between two layers of dough before baking.  Or bake it plain and top with citrus curd and fresh fruit or coconut cream, candied lime zest and chopped crystallized ginger.  Just use your imagination!

On to the recipe.

les ingredients

There are different methods of mixing the dough - I use the one I learned at LCB in Paris in which one puts all the ingredients except the yolks in the mixing bowl, brings it to the crumbly stage, then adds the yolks and mixes just until the dough comes together.  So easy.

Here goes.  Place 140 g sugar, 150 g diced/cool butter, 200 g all purpose flour, 70 g ground toasted walnuts (almonds if you're following Felder's recipe), 1 teaspoon baking powder and 1/2 teaspoon salt in the mixing bowl.

NOTE:  Felder calls for 20 g baking powder which is about 2 tablespoons.  I opted to cut it back so as to avoid too heavy of a baking powder taste.

Mix with the paddle on low until coarse crumbs.  Have 3 egg yolks standing by.

ready to start mixing

coarse crumbs

Now add the 3 yolks and blend just until the dough comes together.

c'est fini!

I baked my gateaux Bretons in 80 mm (~3") wide, 2.5 cm (1") tall open rings.  Butter them first and place them on a parchment lined sheet pan.  Heat the oven to 325ºF (I use convection).

Here's the beauty of Breton dough.  When baking it this way, you don't have to chill it or let it rest first.  You can simply press it into place.  I divided the dough up among 6 rings ( ~105 g per ring) and pressed it down evenly.

all divided up

all pressed down evenly

On a side note, if you're baking this dough as a thin cookie, you should wrap and chill it for a couple of hours first.  Then you can roll it out on a lightly floured surface and cut shapes of choice.

Bake these gateaux for about 20-25 minutes and REMEMBER - always watch what's going on in your oven. You're looking for golden brown deliciousness, and the dough should have risen up along the edges of the rings.

golden brown

looks yummy

Let cool for about 10-15 minutes before gently removing from the rings.

I served the gateaux with warm, sautéed plums prepared as follows.

Thinly slice 4 plums, toss them with a bit of lemon zest,  about 1/4 cup of vanilla sugar and  a couple of teaspoons of cornstarch . . . .

all mixed up

then sauté them over med-low heat until the juices are released and start to thicken, 5-10 minutes.

thickened up and ready to go

And the piéce de resistance . . . .

Gateau Breton with sautéed plums, chantilly cream and nut crumble

Très, très délicieux!

Happy autumn tout le monde!!