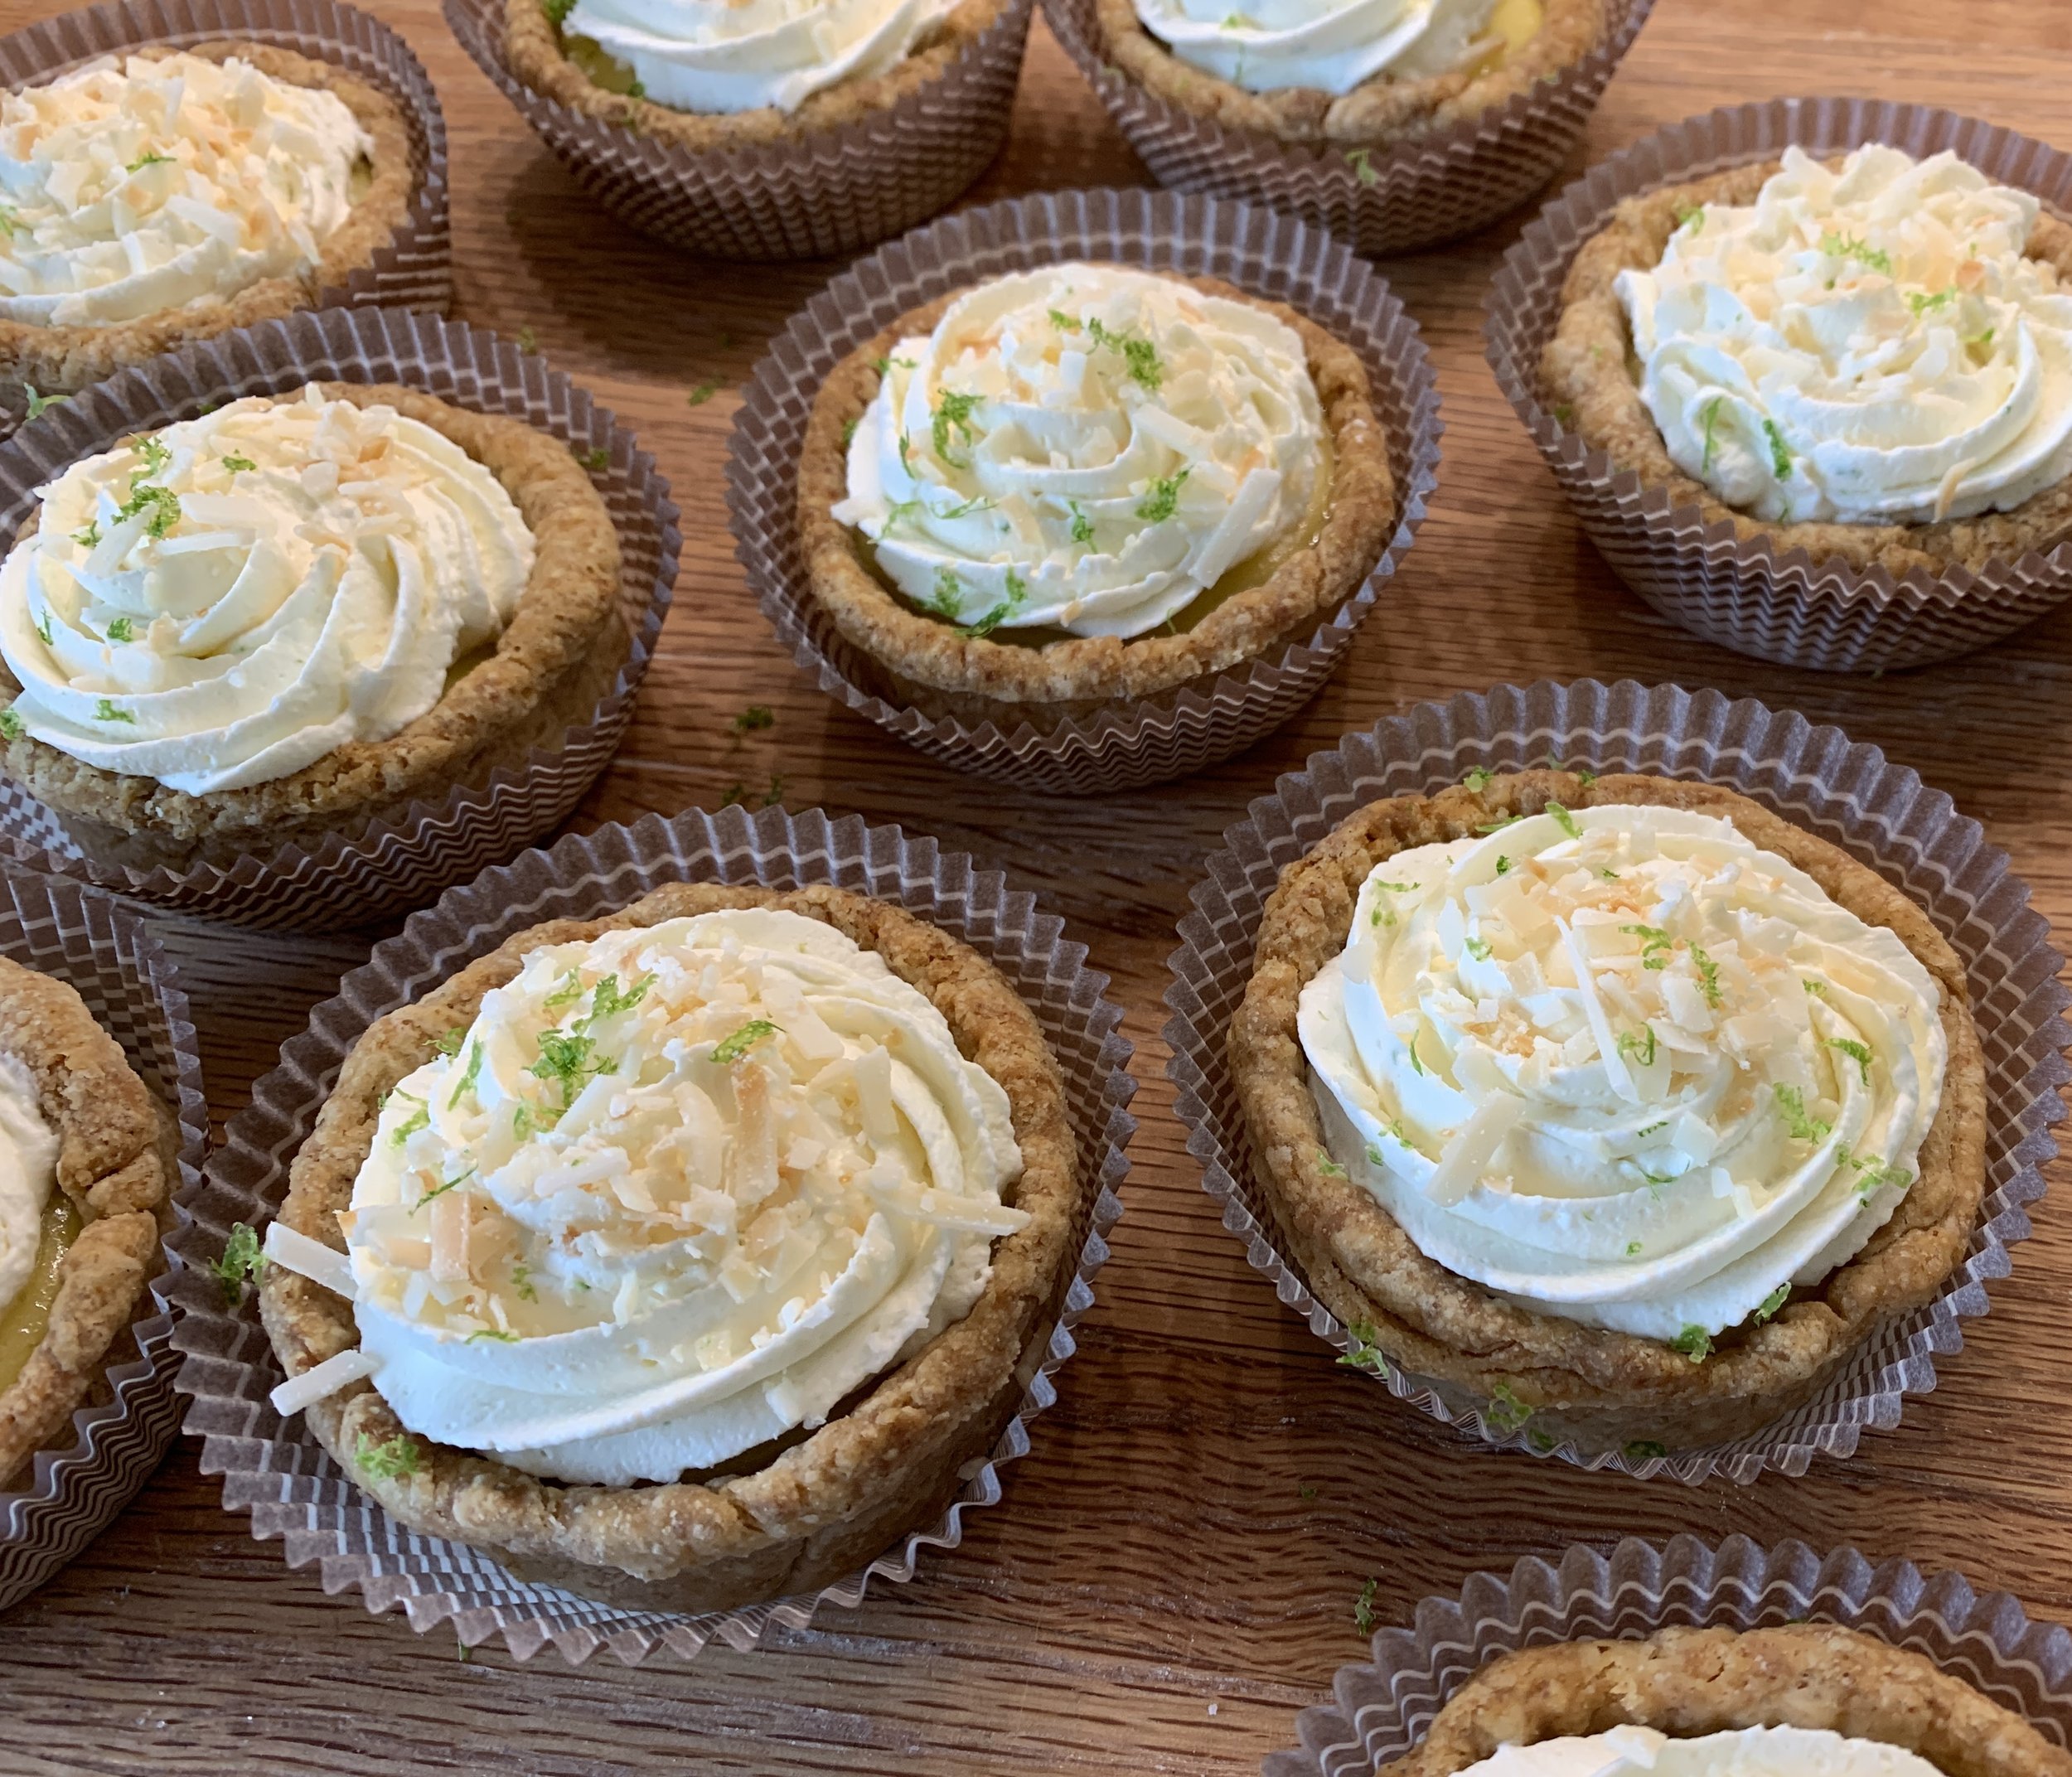
Lemon lime toasted coconut tartelettes

Spring’s celebrations always bring out a wave of lemon, lime and coconut themed recipes, and I’m certainly one who hops on the band wagon tout de suite. I made these for Easter as well as for a spring pastry event right down the road - a big hit.

After our return from a late spring trip to New England and Nova Scotia, I was determined to write at least a bit about these, since, even with summer upon us, there’s always room for citrus.

So delicious!! Plan ahead friendly! Tart lemon lime filling baked in an already blind baked pâte brisée shell then garnished with whipped lemon mascarpone cream and toasted coconut. Yum. Yum. Yum.

I know I go on (and on and on) about the classic bases of pastry and these babies fit the bill big time. Using three of the top components on my A list, the result is a match made in heaven. I like to think of tart preparation as a build-your-own process in which you can change up your chosen dough, filling and garnishes to suit your tastes and occasion.

If you already have pâte brisée in your freezer, you’re one step ahead. If not, make the dough and chill it a few hours or overnight before rolling it out, lining your chosen rings/molds then blind baking the shells. TIP: wrap and freeze the dough up to a couple of months for even more plan ahead fun.

Check out this post for so much more on pâte brisée.

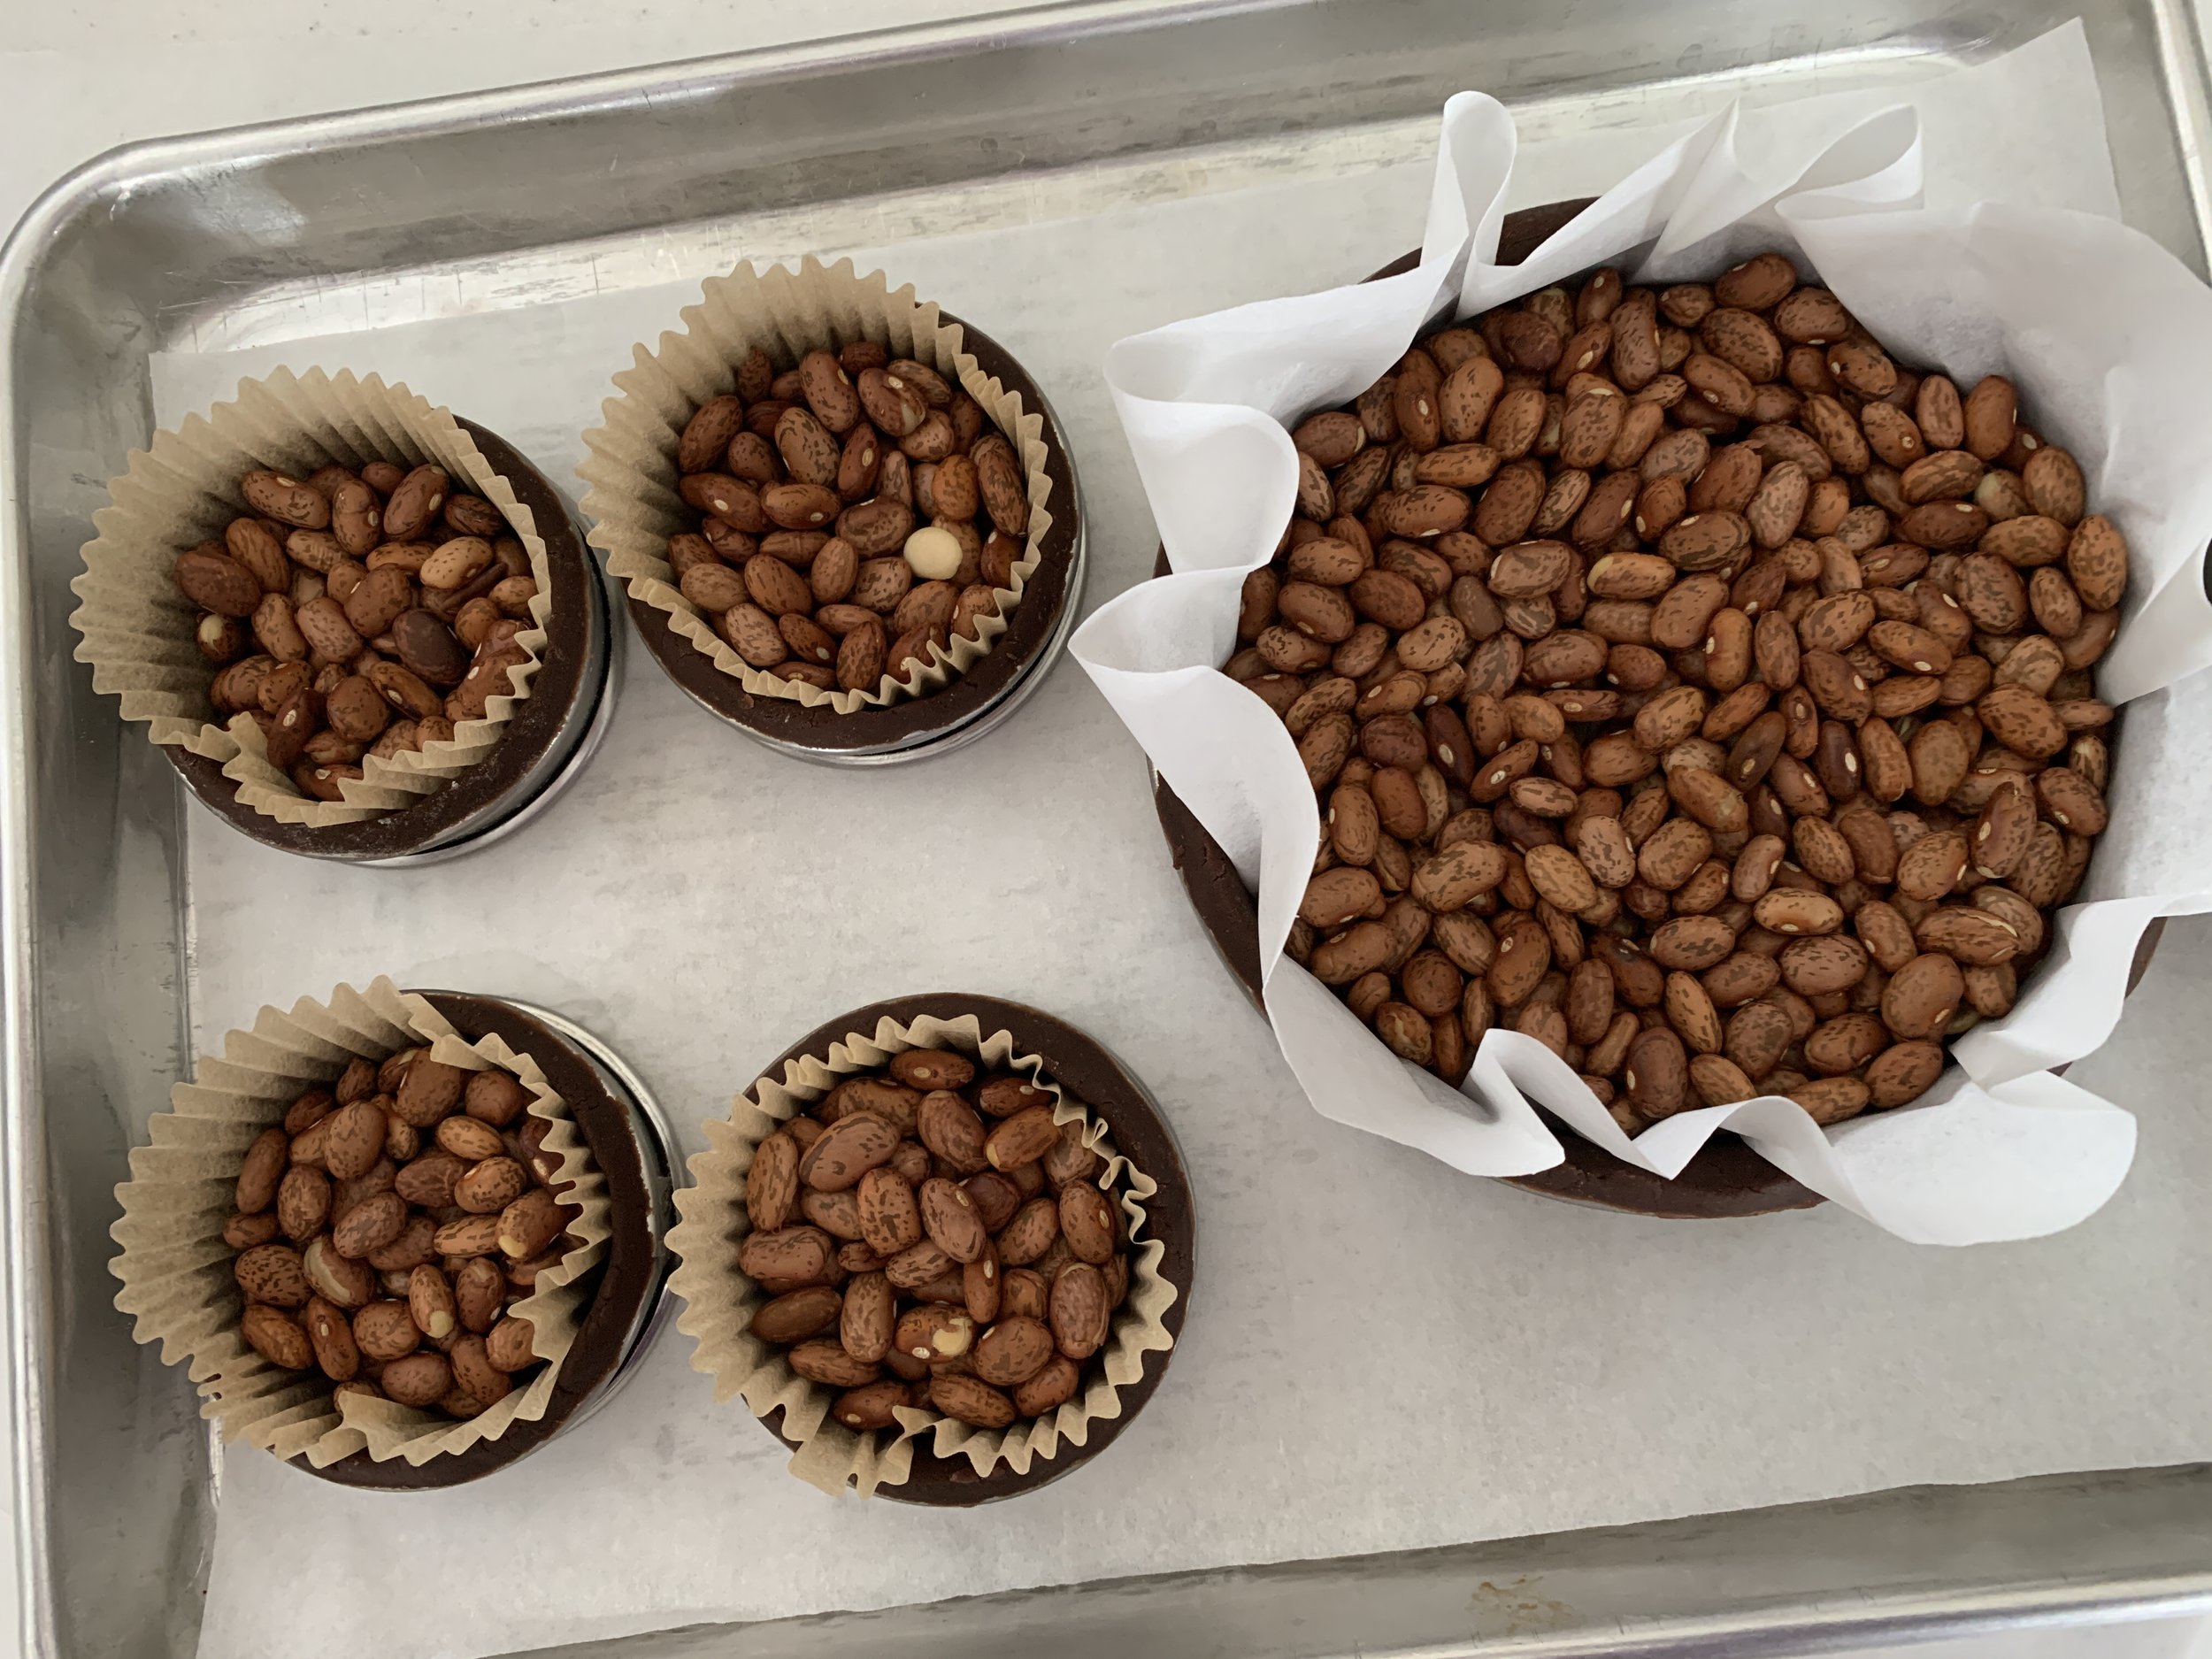
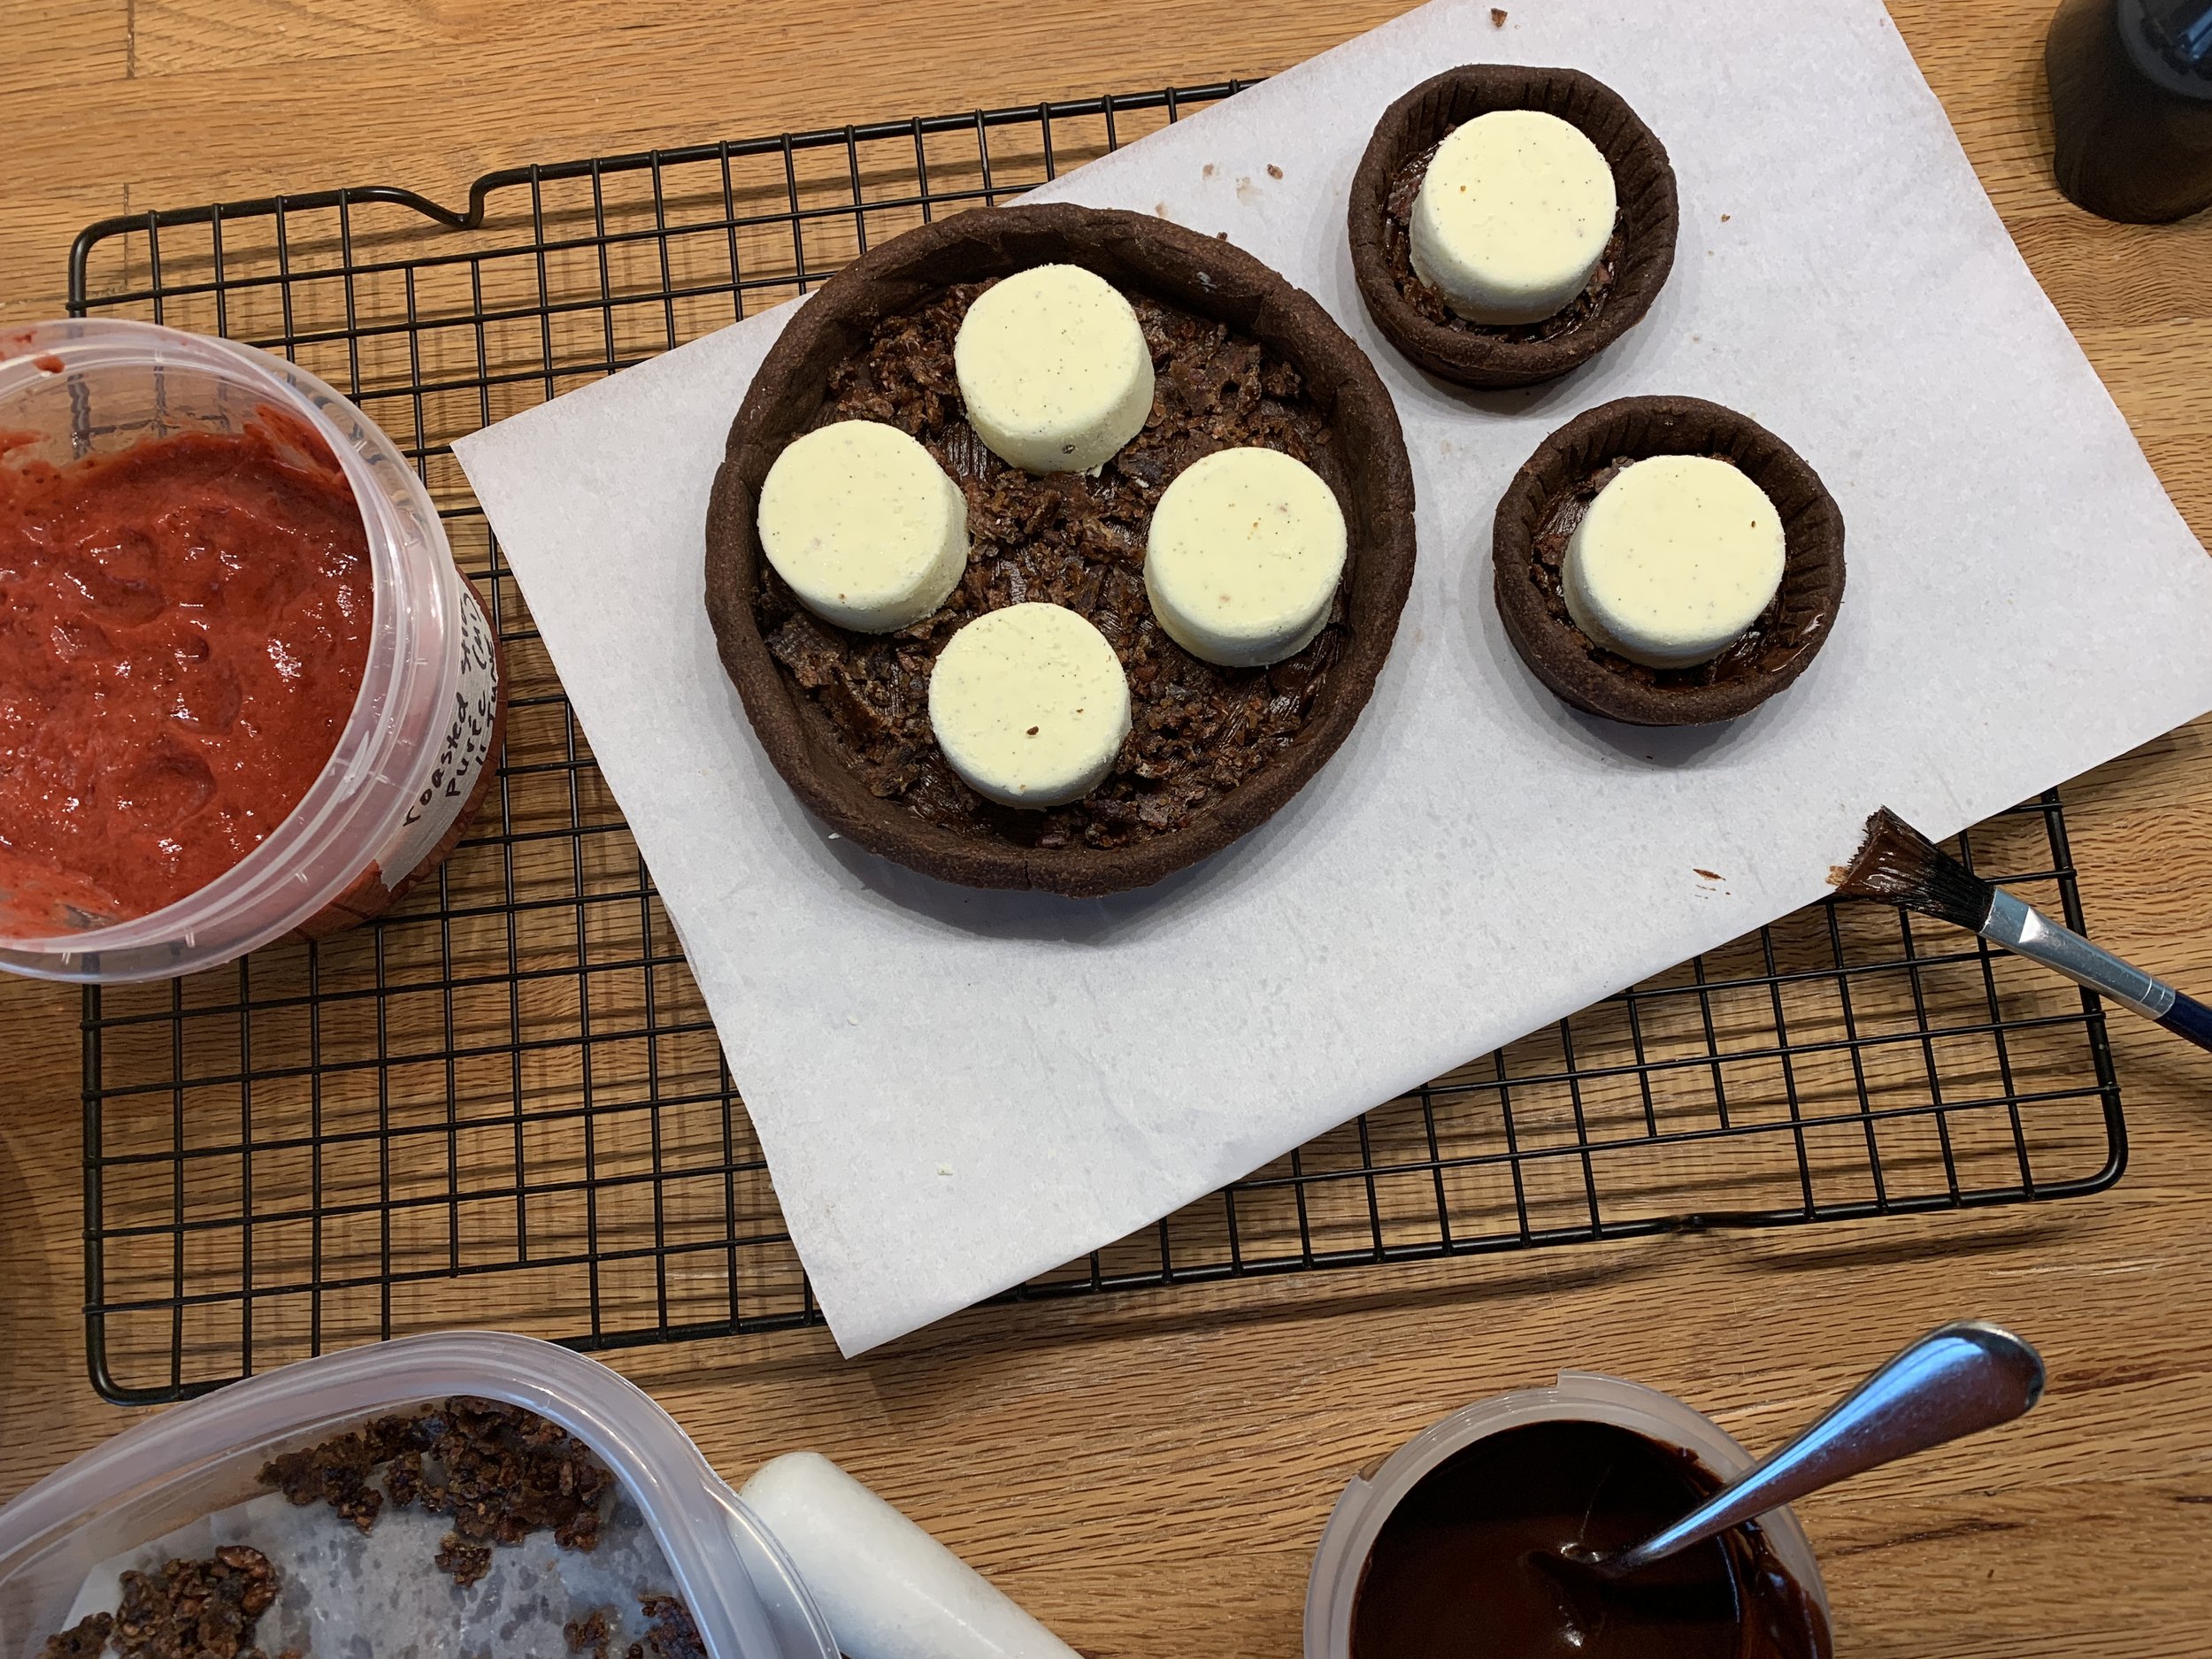
example of rings lined for blind baking

The lemon-lime curd is a favorite based on Yotam Ottolenghi’s recipe in “Sweet”, a book I highly recommend. It can be made several days ahead and holds well in the fridge - another win-win for planning. If I have leftover curd, I’ll add it to whipped mascarpone as I’ve done here. It’s also great added to Swiss meringue buttercream, ice cream base during processing or blended into crème pâtissiére to fill choux puffs.

If you prefer, you can make the filling while the shells are baking. I then typically fill the blind baked shells immediately with the warm curd then pop them into a 325ºF oven for about 10-15 minutes to set with a hint of a jiggle left. Cool at room temperature about 30 minutes then chill completely before adding your chosen garnish.

Some may wonder why I bake the filling since it’s already cooked. While not absolutely necessary, I find it makes for a more luscious, creamy mouth experience by taking that extra step.

Option - chill the curd separately then fill the baked/cooled shells, garnish and enjoy .

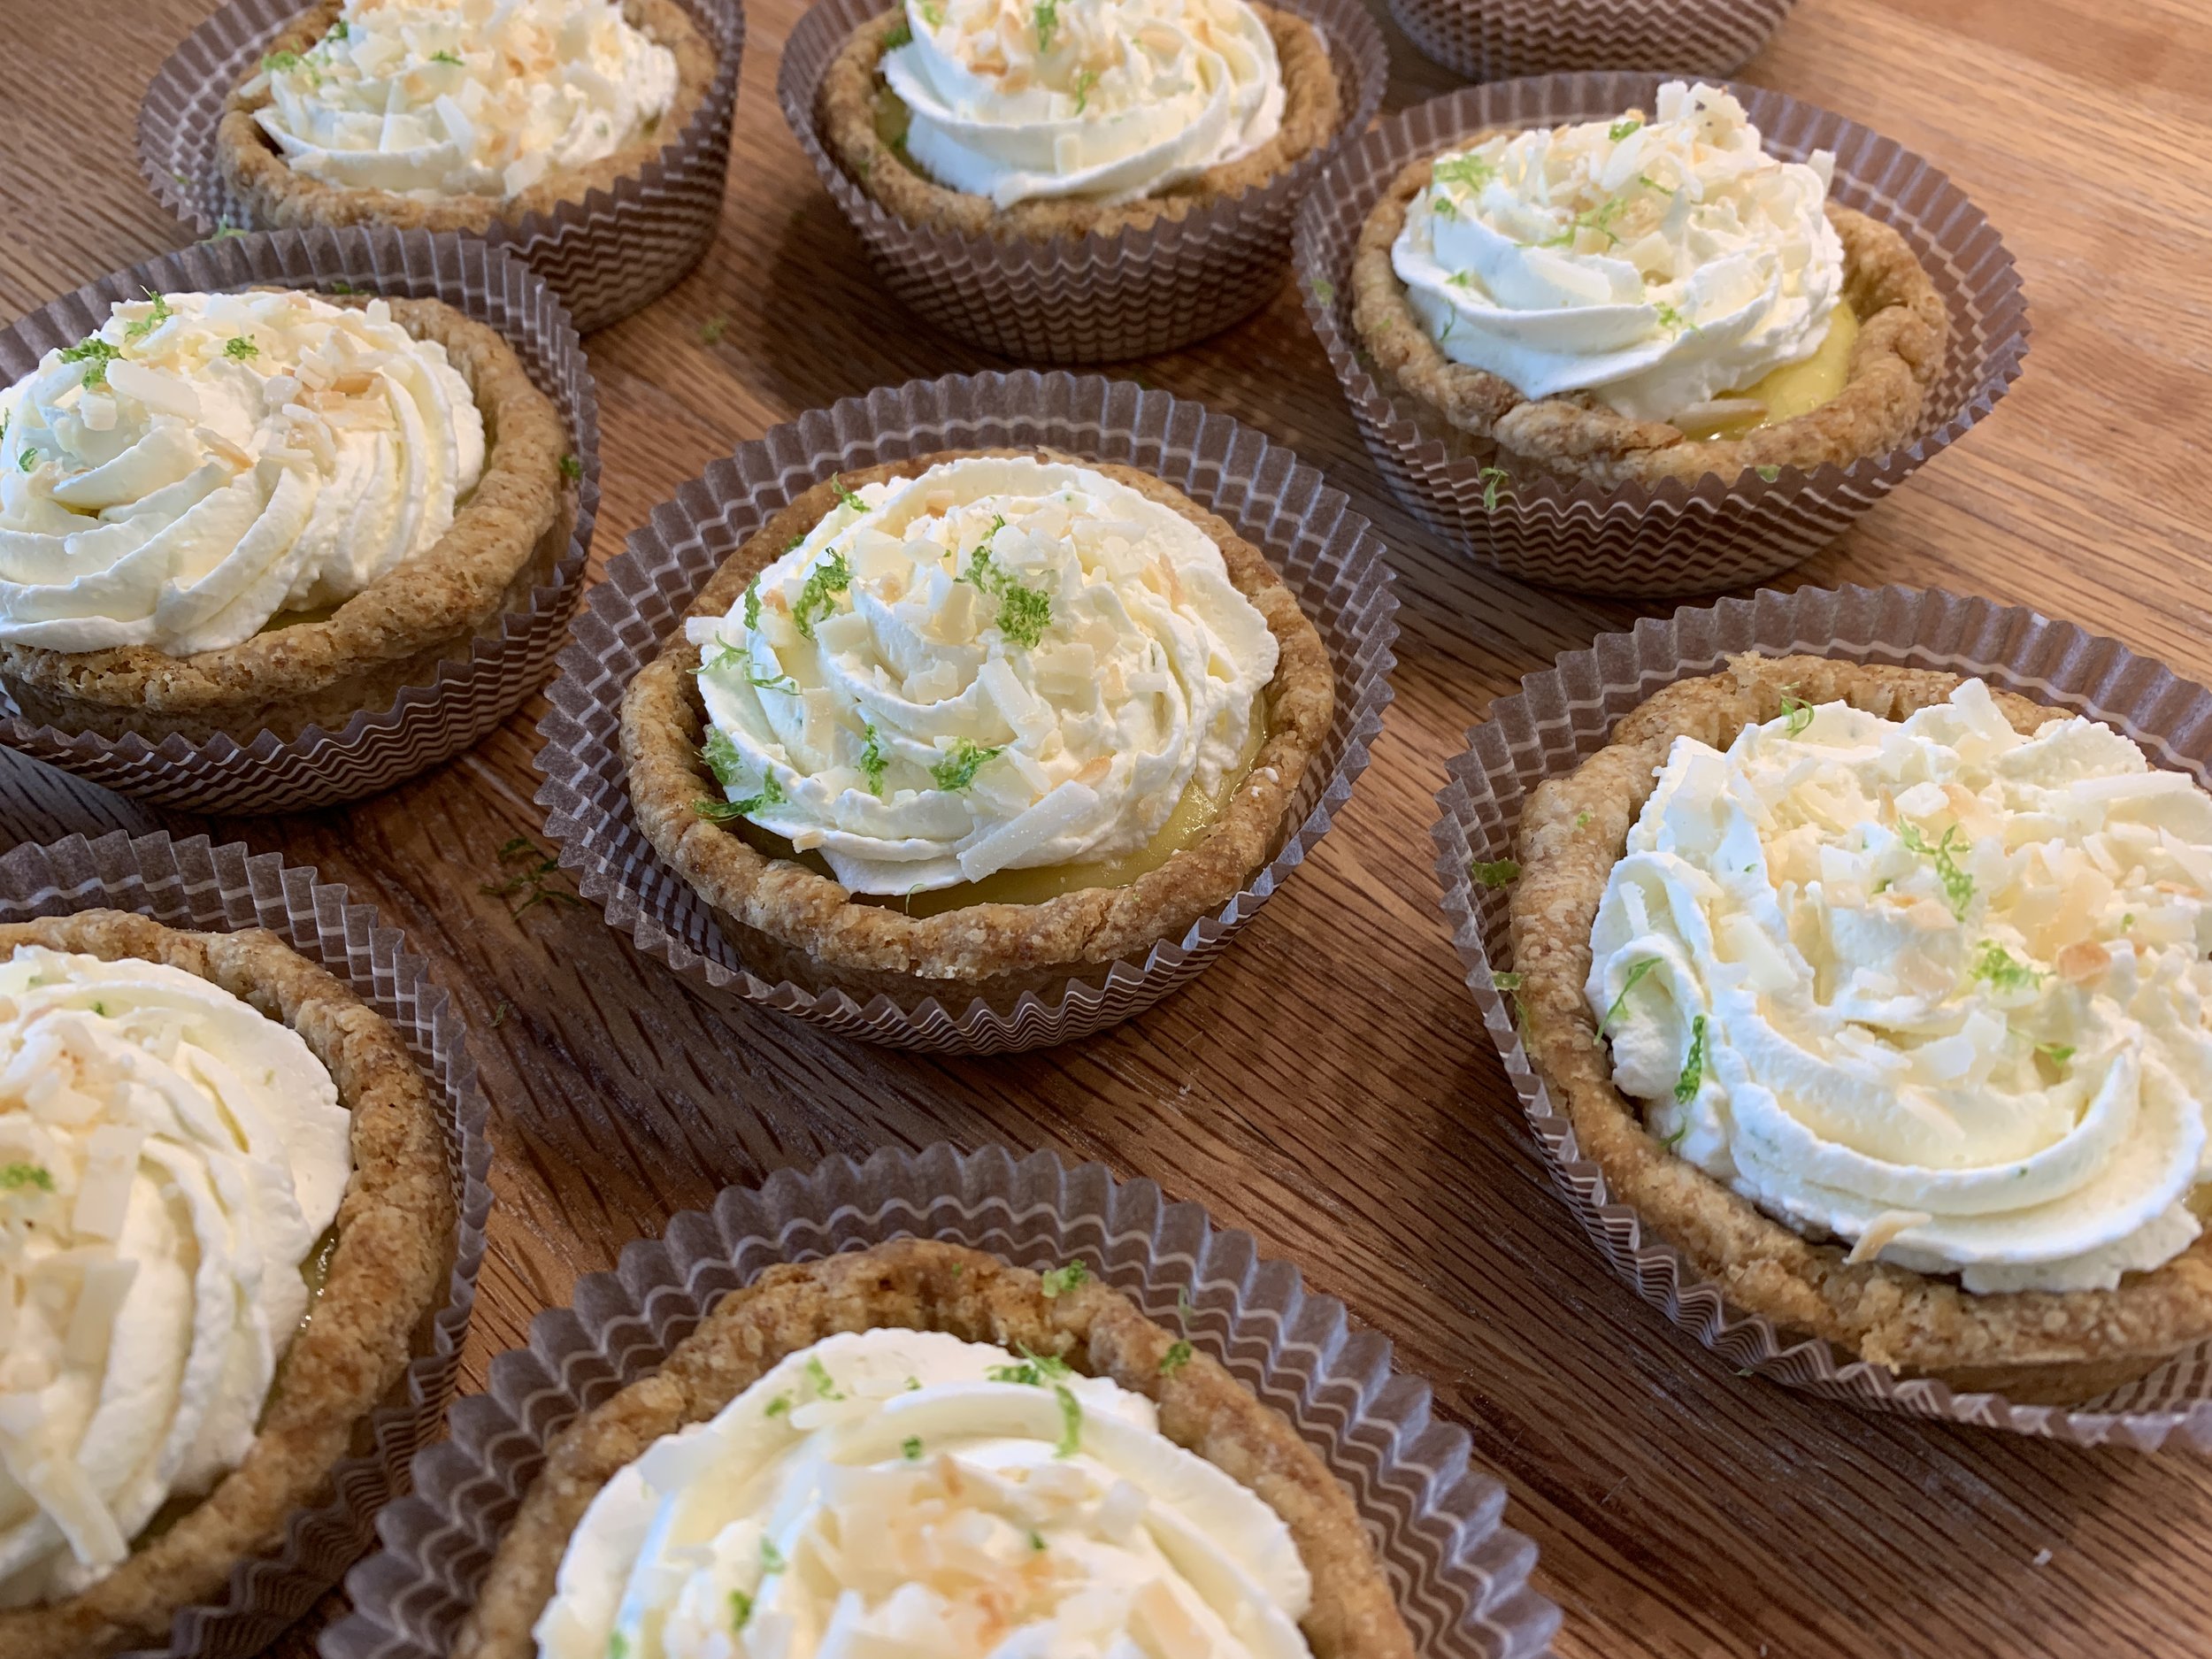
In the image below the two tartelettes at bottom left and right are examples of the option just mentioned. You can appreciate a looser texture than the others that have been baked which have a certain sheen and appear more set.

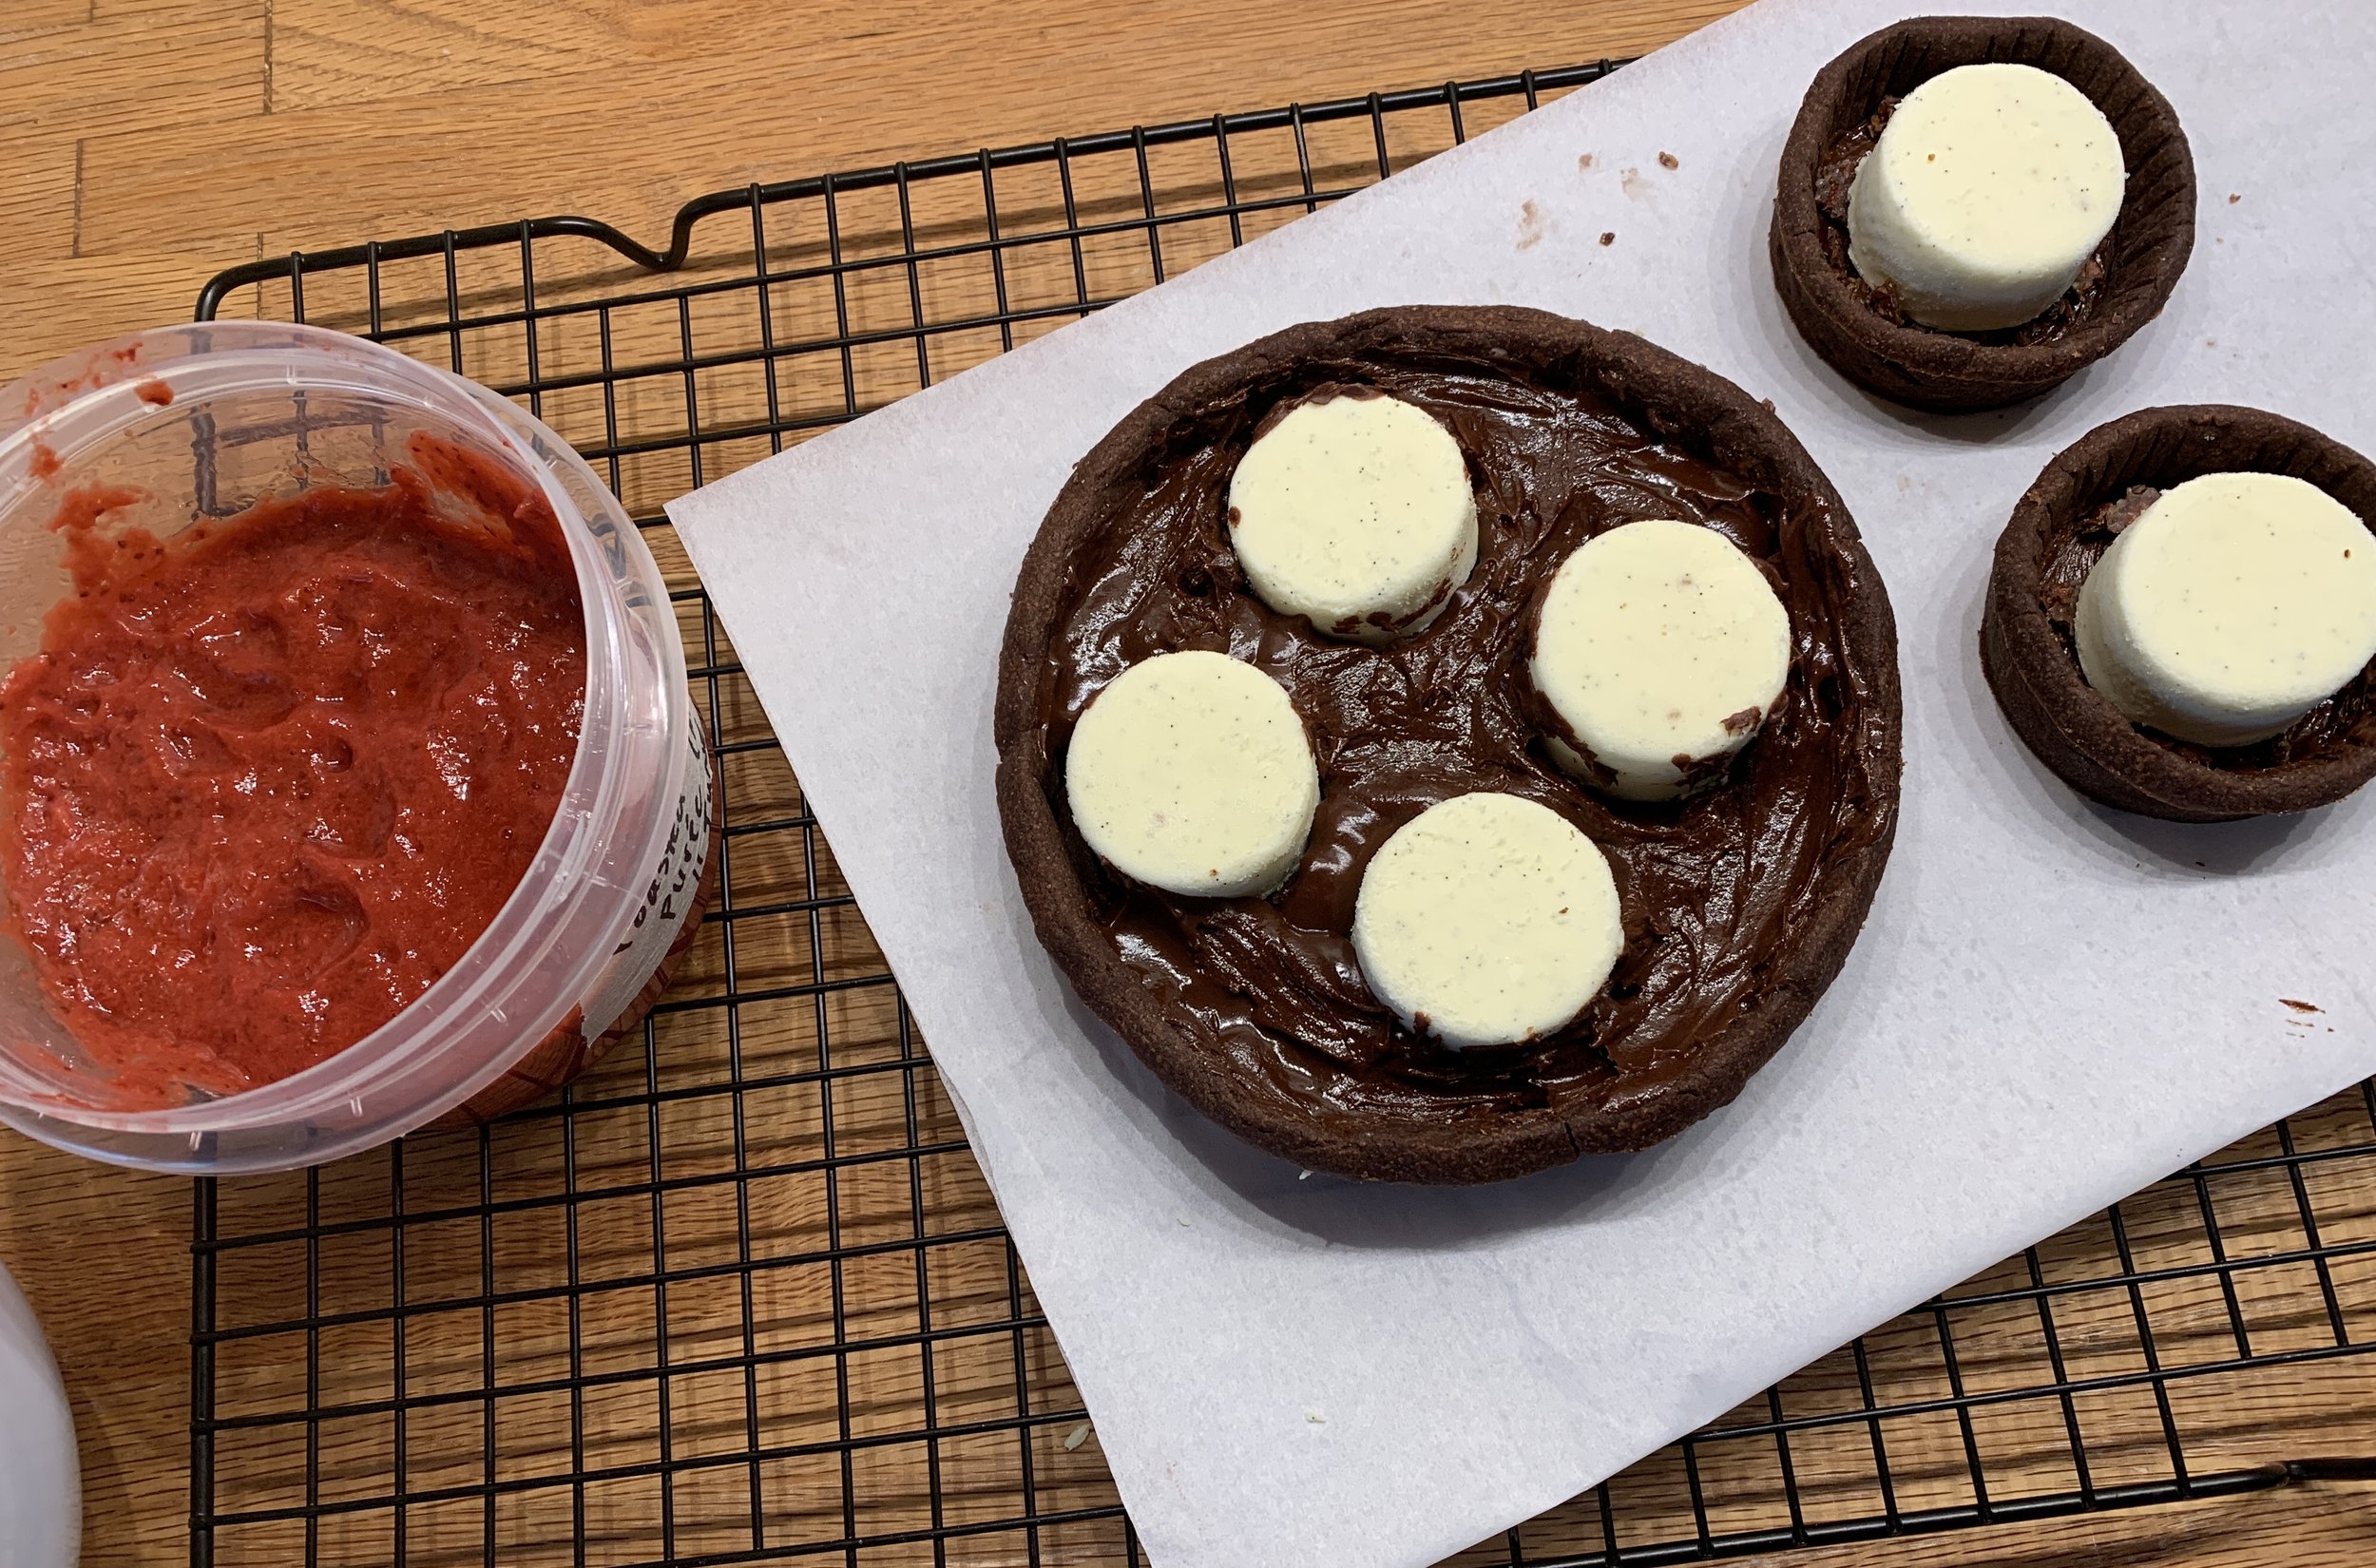
Before the final garnish

Whichever way you do it, the final task is the garnish - whipped mascarpone cream which I prep just ahead of use. In this case I used half of the base recipe, adding lime zest and 3-4 tablespoons (or to taste) of lemon-lime curd to the cream as I whipped.

Decorate the tarts with your favorite swirl pattern and top with a bit of lime zest and toasted coconut. You’ll be so happy.

One more thing - Steve and I can attest to the staying power of these lovelies in the fridge for 4-5 days. Whoopee!!

Enjoy and have fun with it!

Cherry chocolate ganache teacakes

Hi all! It’s been a bit busy lately with some family birthday and anniversary celebrations which means any new baking projects and blogging have taken a back seat. Not to mention some pretty hot days here and there which haven’t inspired much kitchen activity.

I recently wrote about my cherry lime Breton version of a Gateau Basque in which I described roasting sweet cherries and puréeing some of them for cherry chocolate ganache (AND cherry Swiss meringue buttercream!). First let me just say - ganache is one of the best things ever!!

As I’m sure most of you know, ganache is a combo of heavy cream and chocolate, created using different ratios of those two ingredients depending on the final consistency you’d like. Place chopped chocolate (or feves, discs or wafers) in a heat proof bowl; bring the cream to a boil either on the stovetop or in the microwave; pour the cream over the chocolate and gently blend until smooth. I’ve been using Guittard’s Lever du Soleil 61% wafers as my house chocolate - love it for ganache, almond bark and whatever else might come along.

Here are a few ganache examples: a medium or 1:1 ganache is made with equal weights of cream and chocolate. Use it while it’s still warm to glaze a cake; let it set up a bit and pipe it into your French macarons; chill to firm and scoop it into truffles. So many possibilities.

Change up the ratio by using more cream, let’s say 2.5 cream to 1 chocolate by weight, for a softer ganache. Chill it and then whip it up just like whipped cream. What a great way to layer/garnish a delicate chocolate cake or top a layer of chopped toasted nuts and caramel on the bottom of a blind baked tart shell. Yum.

Go the other direction using more chocolate than cream for a firmer ganache. Get the picture?

Let’s get on to the project at hand.

I’ve made raspberry chocolate ganache in the past as a financier garnish and found it quite delightful. But frankly I don’t often think about making fruit ganache as a rule. This time I had in mind a tart cherry, brown sugar version of a favorite cake based on the recipe in Yotam Ottolenghi’s book “Sweet” and thought what the heck; why don’t I put a of dollop of ganache in the center before baking and see what happens!

When making fruit ganache, simply replace some of the cream with your chosen fruit purée (I used half cream/half purée). I wanted my ganache to be on the slightly firmer side of medium and came up with 180 g chocolate (in this case a third milk, cuz I wanted to use up what I had, and two thirds dark), 70 g heavy cream and 70 g roasted sweet cherry purée. This turned out to be plenty for the 16 cakes I baked, and the rest went into the fridge for another time. Hmmm . . . . maybe to sandwich macarons or my favorite chocolate shortbread cookies!

BTW - ganache keeps very well in the fridge for at least a couple of weeks and can also be frozen.

I approached it two ways. First: layer of batter/blob of ganache/topped with additional batter to cover the ganache. Second: batter/blob of ganache on top.

Bake at 375ºF for about 20 minutes until set and golden.

Here they are out of the oven.

Let them cool about 5-10 minutes in the molds then turn out onto a cooling rack. You can place them top or bottom side up - whichever speaks to you. I did some of each. You can see the batter/ganache/batter version below in the background, bottom side up, the ganache having settled on the bottom (which is now the top!)

The ganache on batter version is in the foreground, top side up - the chocolate behaved nicely and nestled right into the batter.

Once cooled I gave most a nice swirl of roasted sweet cherry Swiss meringue buttercream, handed a bunch out to neighbors and of course sampled a few ourselves over several days. I also froze some ungarnished to enjoy at a later date.

Steve has always been a bit leery of fruit and chocolate combos so these weren’t his fave, BUT I found them delightful with the ganache nestled in the tart cherry cake and the wonderful creaminess of the buttercream. So tasty!

Mmmm - creamy goodness

Take good care until next time.

Here’s a little trip memory - in the botanical garden in Copenhagen.

Favorite garnishes part 3: easy brittles (and Happy New Year!)

Moelleux chocolat/mascarpone cream/sesame brittle

I freely and proudly admit that I’m a dough loving gal in the pastry kitchen. Give me tart dough, puff pastry, croissant and Danish dough, yeast breads (lean and enriched) and shortbread and I’m a happy camper.

Other than the occasional chocolate nut bark or cluster, soft caramel or chocolate truffle, candy making isn’t something I do often. But, particularly when it comes to a tasty garnish, there’s nothing like a snappy brittle to brighten up one’s day. Not only great for a small snack when you’re craving a hint of sweet crunch, they’re a wonderful way to dress up small cakes, custards, ice cream, tarts . . . . . . . . I think you know where I’m going with this.

Here I’ll focus on what has become my go-to-perfect-for-garnsh brittle recipe, compliments of Yotam Ottolenghi”s book “Sweet”. So straight forward with nary any muss nor fuss with candy thermometers or sugar cooking stages. Let’s keep it easy!.

Ottolenghi’s sesame brittle

Here’s a previous post with the recipe and one of the ways I’ve used it. And here’s the recipe again.

  1. Toast 125 g sesame seeds (mix of 1/3 black and 2/3 white or all white like I did) either in the oven at 325ºF for about 10 minutes until nicely brown, stirring occasionally, or in a skillet on medium-low on the stove top. Do what you're most comfortable with. Set aside. Increase the oven temp to 350ºF.

  2. Have two half sheet pans and four pieces of parchment (or two parchment and two silicone mats) at the ready.

  3. In a medium saucepan put 100 g granulated sugar, 100 g light corn syrup, 50 g unsalted butter and 1/8 teaspoon salt. Stirring constantly on high heat, blend the mixture and bring to a boil. Remove from the heat and stir in the toasted sesame seeds.

  4. Put two pieces of parchment (or Silpat!) on a heat proof surface (I used two overturned half sheet pans) and pour half of the sesame mixture on each. Cover with the other parchment pieces and roll with a rolling pin until about 1/8 inch thick.

  5. Slide the paper with the sesame caramel onto half sheet pans and remove the top layer of parchment. Peel it back gently, using an oiled silicone spatula to push down any caramel that might stick. Bake for about 20 minutes until nicely browned. Remove from oven, cool and break into shards.

Oiled spatula to hold the brittle down while removing the parchment

Bubbling away in the oven

Out of the oven

Pumpkin custard tart with sesame brittle from a Thanksgiving past

I also made a HALF recipe of a cocoa/cacao nib version by subbing cacao nibs (60 g in this case) for the sesame seeds and adding 10 g sifted Dutch process cocoa powder into the sugar/butter mixture along with the nibs. It’s another great addition to teacakes and ice cream as well as a garnish or crunchy layer for desserts, particularly when you need a bit of chocolate-ness.

Note: the cacao nibs I use are pretty chunky so I put them in a zip-top bag and pound them with the smooth side of a meat mallet to crush them up. It works!

Cacao nib version

These brittles come out thin and crispy without fear of any tooth-sticking pull. They store nicely in single layers between pieces of parchment or waxed paper in a well sealed container (ideally in a cool/non-humid environment) and can also be frozen for several weeks.

Get creative with your own version. I’ve done one with puffed rice. Finely chopped nuts of choice are always an option and crushed pumpkin seeds aren’t bad either.

Before I go, here’s a quick tart project I did to use up some leftover components in my fridge and freezer. I had enough dough for a few small tarts; some dark chocolate ganache (3 parts cream to 2 parts chocolate); a handful of petite, frozen ricotta custard rounds from an earlier project; some thawed roasted Michigan strawberry purée that I had used for our Christmas Eve dessert (more on that later); a little bit of white chocolate to make a loose ganache for whipping; plenty of cacao nib brittle.

I blind baked some chocolate tart shells with my favorite chocolate tart dough - one 140 mm “sharing” size and four 65 mm individual sizes. TIP: this is a good plan ahead step since you can freeze blind baked tart shells for days.

Two of the smaller tarts served as a quick dessert after the Christmas holiday, filled with ganache, topped with whipped cream and crushed nibs. So tasty.

For the remaining tarts I brushed some dark chocolate ganache on the bottoms . . . . . .

then sprinkled crushed cacao nib brittle over the chocolate and popped in the frozen ricotta rounds (they thaw pretty fast but hold their shape).

I spooned the ganache around as best I could. It’s a tad messy but will be covered up so no one’s the wiser. You could pipe it in too but I wasn’t in the mood.

I added a generous soup spoon full of strawberry purée to the chilled white chocolate ganache (used 120g heavy cream to 40 g white chocolate) and whipped it up to soft peaks. For the sharing size tart I piped the cream around and over the ricotta discs then topped with fresh raspberries and more crushed nib brittle.

Et voilà - our New Year’s Eve dessert!

Triple chocolate tart with berry cream

Psst . . . . the smaller tarts were used as taste tests. I was able to spread the softened ricotta flush into the tartelettes then top with a bit of berry cream and nib brittle for a midday snack that Steve and I so enjoyed. Yum - the chocolate crust and ganache with the smooth ricotta custard, hint of berry cream and crunchy nibs is just divine.

Happy New Year everyone and may 2022 bring us new adventures and peaceful, happy days!

I’ll leave you with just a hint of the lovely holiday displays at nearby Meijer Gardens